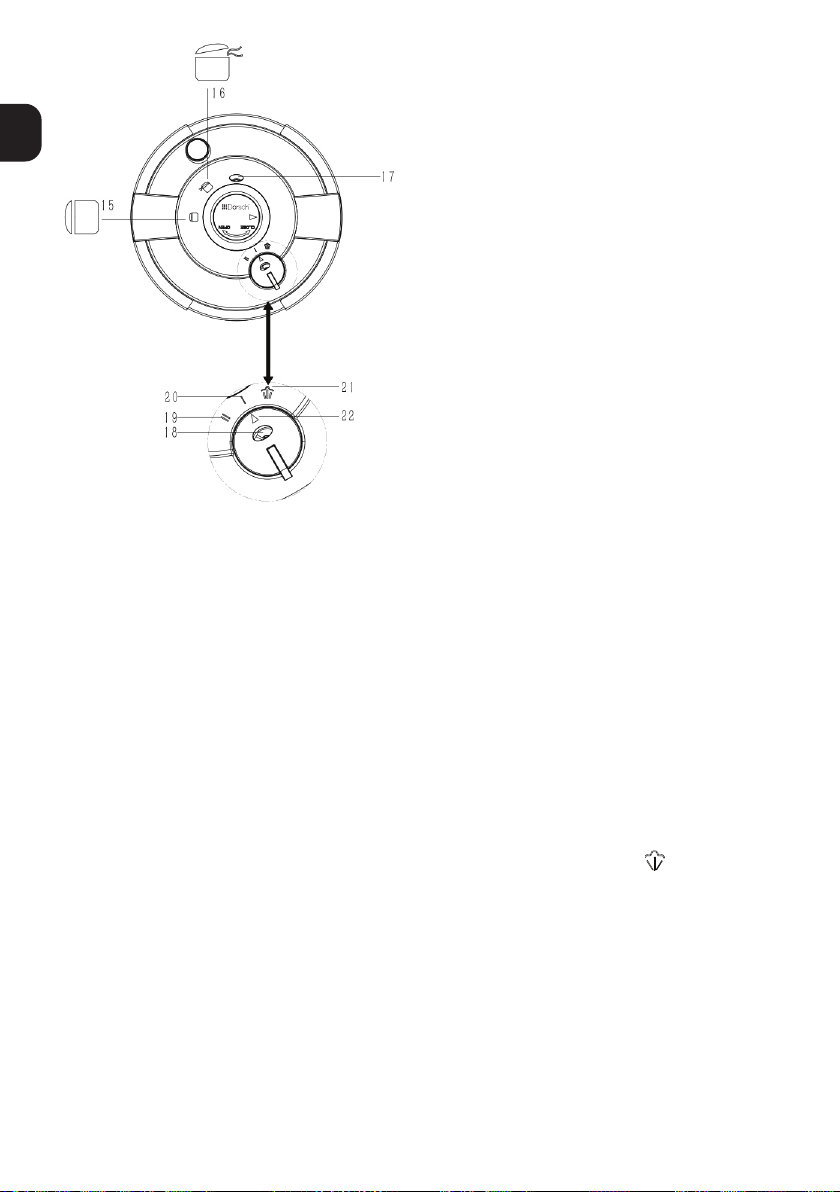
Dorsch GOPRESS User manual

PRESSURE COOKER

PRESSURE COOKER
STRUCTURE
1. Lid
2. Knob
3. Pressure regulator
4. Clamp
5. Safety window
6. Indicator valve
8. Safety valve
9. Anti-block lter
10.Indicator valve nut
11. Handle
12. Body
13. Steamer
14. Tripod
7. Silicon gasket
1
English

SAFETY SYSTEM
SAFETY PRECAUTIONS
If one of the safety devices is activated
The pressure cooker is equipped with two safety devices for over pressure:
1. The safety valve releases the pressure and the steam escapes from the safety valve outlet.
2. The steam flows through the safety window.
• turn off the heat source immediately and let the pressure cooker cool down;
• open the pressure cooker;
• check and clean the pressure regulator, steam outlet, safety valve and gasket.
1. As with all cooking appliances, make sure that you properly supervise the cooking area if children or
handicapped people are close-by.
2. Before each use, always check visually in daylight that the steam outlet is not blocked. If it is blocked,
clean it by using a clip to pierce into the hole, and then rinse it under water.
3. Before each use, always check the mobility of the pressure regulator to positions .
4. Never disassemble the lid of the pressure cooker!
5. The minimal quantity of liquid in the pot is 1/3 of the total capacity of the pressure cooker.
The total amount of the food should not exceed 2/3 of its total capacity. For food that expands
considerably during cooking, such as rice, dehydrated vegetables or stewed fruits, do not fill the
pressure cooker with contents more than half of the pot.
6. Don’t forget to turn down the heat once there is continuous release of steam from the steam outlet.
7. Be careful as the steam, which is released, is very hot.
8. To move or lift the pressure cooker, use the side handles on the pot. Never use the revolving knob to
move or lift it.
9. Never use the bleach or chlorine based products to clean your pressure cooker as these damage
the quality of stainless steel.
10. Do not use any sharp or pointed object to carry out operating and safety checks.
11. When re-fitting the gasket, to ensure a perfect seal, make sure the gasket slips fully under each tab
by pressing and pushing it with your finger towards the edge of the lid.
15. Locking symbol
16. Unlocking symbol
17. Safety valve
18. Steam outlet
19. High pressure position (II)
20. Low pressure position (I)
21. Pressure release position
22. Selector point
2

OPENING
CLOSING
HOW TO USE
1. Press down the knob lightly and turn the knob towards the unlocking symbol . Release the clamps
as shown in Figure 1.
2. Lift the lid off.
1. Place the lid over the pressure cooker body, ensuring that it is sitting correctly on the pot.
2. Press down the knob turning it towards the locking symbol as shown in Figure 2. It is normal
for the lid to be able to twist round when it is locked.
3. After locking the lid, fit the clamps into the rim of the lid as shown in Figure 3.
1. BEFORE THE FIRST USE fill the pressure cooker up to 2/3 with water, turn the pressure regulator to
the high pressure position (II), and set the highest temperature at the heat source. When steam
starts to release from the steam outlet, turn down the heat source. After 15 minutes, turn off the heat.
Gradually turn the pressure regulator towards the pressure release position .
When no more steam escapes from the steam outlet and the safety valve is down, open the
pressure cooker. Rinse it out and dry it.
2. Put the food inside the pressure cooker. The minimal quantity of liquid in the pot is 1/3 of the total
capacity of the pressure cooker. The total amount of the food should not exceed 2/3 of its total capacity.
For food that expands considerably during cooking, such as rice, dehydrated vegetables or stewed fruits,
do not fill the pressure cooker with contents more than half of the pot.
3

Indicator Valve
2/3 of its total capacity. For food that expands considerably during cooking, such as rice, dehydrated
vegetables or stewed fruits, do not fill the pressure cooker with contents more than half of the pot.
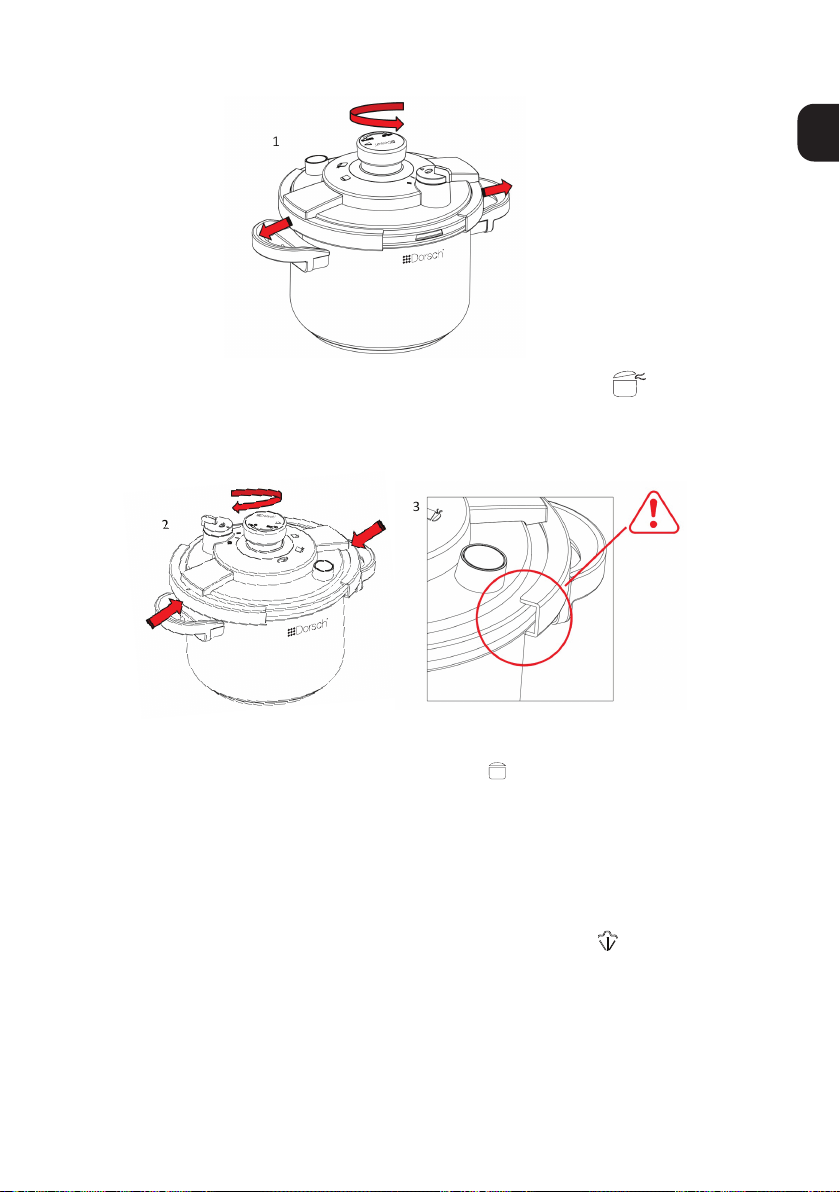
3. Close the lid. Check that it is correctly fastened, i.e. the clamps are tightened.
4. Check that the pressure regulator, the safety valve, or safety valve inside the lid, can move freely.
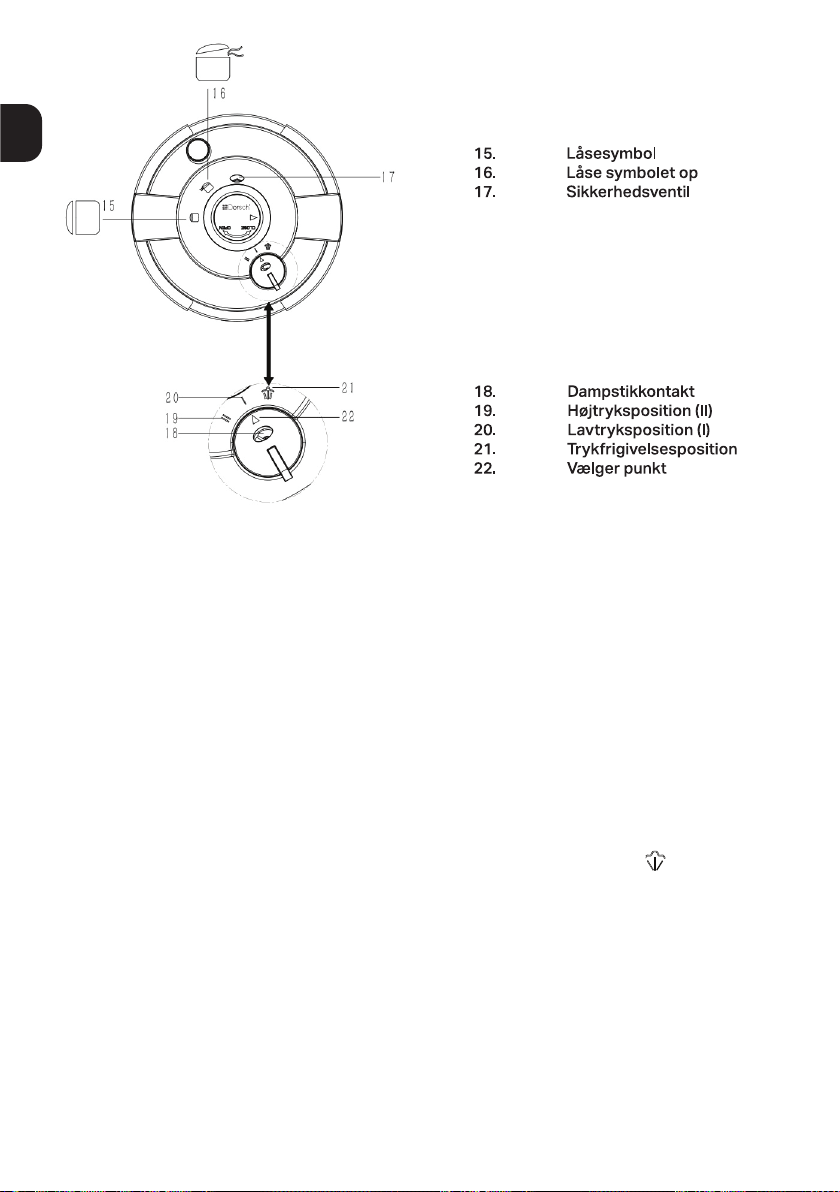
5. Set the pressure regulator to low pressure position (I) or to high pressure position (II).
6. Cooking starts when the steam escapes in steady flow from the steam outlet with a regular hissing
sound, turn down the heat. It is normal to see the steam release from the safety valve before it is
released from the steam outlet. Condensation may appear in this area as well.
7. As soon as the safety valve has risen, you cannot open the pressure cooker, because the inside
pressure has exceeded 5 KPA.
8. After the cooking is done and the heat has been turned off, you have two alternatives:
A. SLOW PRESSURE RELEASE: Gradually turn the regulator towards the pressure release position .
If you notice unusual release of the pressure during decompression, turn the regulator towards the
low pressure position (I) or high pressure position (II). Then repeat the decompression procedure slowly,
ensuring that the pressure has been released normally.
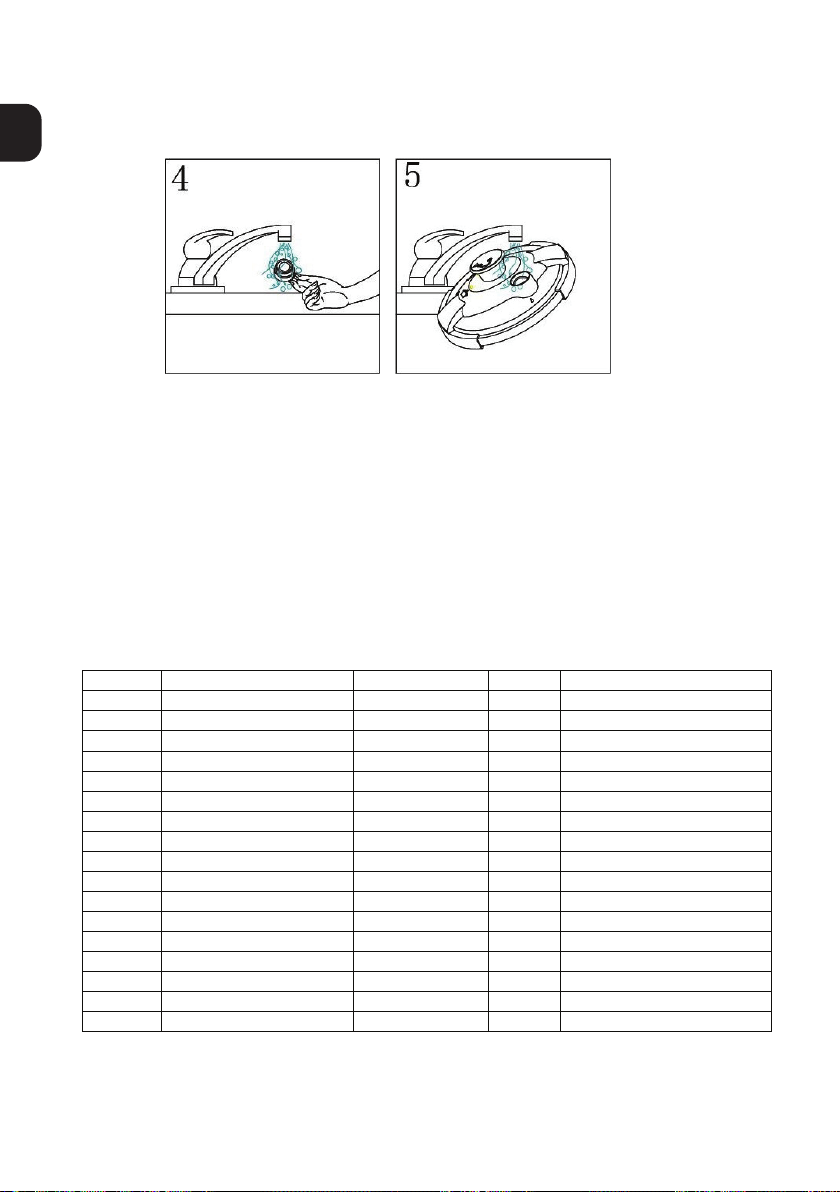
B. FAST PRESSURE RELEASE – ONLY IN CASE OF EMERGENCY: Place the pressure cooker under a
cold running tap, directing the flow onto the metal part of the lid.
Only when the safety valve is down in its normal position, which means all the pressure has been
released from the pot, you can open the pressure cooker.
9. When no more steam escapes from the steam outlet and the safety valve is down,
open the pressure cooker.
C. Begin Cooking
When the safety valve tops up, it indicates that the pressure in the pot has built up and cooking starts.
After pressure builds up, the indicator valve shows corresponding yellow line,
and the steam escapes in steady flow from vent-pipe and a regular hissing sound,
turn down the heat.
Position(1)
Turn down the heat when first yellow line
come out. Cooking Starts
Warning
Do not leave the pressure cooker unattended during cooking. Always observe the normal working
condition of the pressure cooker. May cause danger.
Do not touch the hot surface of the pressure cooker with your hands or other exposed parts of the body,
otherwise it may cause burns.
Use the handle and knob when cooking and use it according to the correct method of use.
When cooking porridge, soup and other foods, if there is any overflow of the soup, you should immediately
reduce the heat source, otherwise it will cause splashing.
Note
Before the pressure is applied, it is normal that gas escapes from the exhaust port, which is normal.
It’s normal that the exhaust port makes a slight noise after adjusting the heat.
If the noise keep harsh, please turn down or turn off the heat.
Check the pressure cooker fault according to “Frequently Asked Questions and Solutions”
If the red line appears on the pressure indicating valve, it means the pressure cooker is in an abnormal state.
Position(2)
Turn down the heat when second yellow lines
come out. Cooking Starts
4

USING THE STEAMER
TROUBLE SHOOTING
1. Place the steamer onto the tripod.
2. Pour suitable water into the pot: the water must not reach the bottom of the steamer.
3. You can simultaneously cook food at the bottom of the cooker with at least 1/3 of liquid.
The foodstuffs placed in the steamer must not touch the lid.
Please turn off the heat source immediately.
Troubleshoot the pressure cooker according to “Frequently Asked Questions and Solutions.
After the safety valve has risen, do not try to open the lid. You can only open the lid when the pressure
valve is completely dropped.
Cannot close the lid
-Make sure the clamps are fully open before fitting the lid onto the pot.
-Check good condition and correct position of the gasket.
The safety valve does not rise
-It is normal for the first few minutes.
-If the phenomenon continues, check that
• There is enough liquid inside the pan.
• The source of heat is high enough; if not, increase the heat.
• The pressure regulator is turned to .
• The pressure cooker is closed properly.
• The clamps must be in contact with the edge of the lid.
• The gasket for the lid is positioned correctly.
• The gasket is clean and in good condition; change it, if necessary.
• Check the cleanness and the mobility of the safety valve.
The safety valve has lifted up and no steam escapes from the steam outlet during cooking
-Put your pressure cooker under cold water to release the steam.
-It means that the pressure level has not been reached yet, so set the selector back to the initial position.
Steam is leaking around the lid
Check that
-The lid is closed correctly.
-The gasket is correctly fitted onto the lid.
-The lid, safety valve and pressure regulator are clean.
-The edge of the pot is not damaged.
Cannot open the lid
Check that the safety valve is in the low position; if not, release the steam from the pressure cooker by
cooling it under running water, if necessary.
The food is burnt or under cooked
Check
-The cooking time.
-The heat source.
-The correct setting of the pressure regulator.
-The quantity of liquid.
If the food in the pot has been burned, leave the pot to soak before cleaning it. Never use bleach or chlorine
based products to clean the pressure cooker.
5

CLEANING AND MAINTENANCE
Wash your cooker after each use. When storing your pressure cooker, turn the lid over on the pot,
so that it is in stable position.
Cleaning by hand
Wash the pot in warm water with a little washing-up liquid. You can use a scouring pad to wash the
inside of the pot.
To clean the lid, take off the pressure regulator from the valve seating at any position for cleaning and
maintenance as shown in Figure 4 and 5. Clean the lid under water with a sponge and washing-up
liquid. Let the lid drip dry after cleaning. To assemble, put the pressure regulator back into the valve
seating at any position.
Dishwasher cleaning
You can wash the pot in the dishwasher.
You cannot put the lid into the dishwasher!
COOKING TIME
6
№
Food
Working pressure
Volume
Cooking Time
1.
Chicken
II
1/2
8-15 minutes
2.
Beef
II
1/2
17-25 minutes
3.
Pork
II
1/2
15-25 minutes
4.
Mutton
II
1/2
10-15 minutes
5.
Veal
II
1/2
16-20 minutes
6.
Lamb
II
1/2
12-15 minutes
7.
Duck
II
1/2
18-20 minutes
8.
Liver
II
2/3
8-10 minutes
9.
Rice
II
1/3
3 minutes
10.
Jacket potatoes
II
2/3
8 minutes
11.
Peeled potatoes
II
2/3
6 minutes
12.
Carrots
II
2/3
4 minutes
13.
Beetroot
II
2/3
10 minutes
14.
Fresh fish
I
1/3
5-8 minutes
15.
Frozen fish
I
1/3
8-10 minutes
16.
Cabbage
I
2/3
6 minutes
17.
Cauliflower
I
2/3
3 minutes

TRYKKOGER
STRUKTUR
7. Silikone pakning
7
Dansk

SAFETY SYSTEM
SAFETY PRECAUTIONS
If one of the safety devices is activated
The pressure cooker is equipped with two safety devices for over pressure:
1. The safety valve releases the pressure and the steam escapes from the safety valve outlet.
2. The steam flows through the safety window.
• turn off the heat source immediately and let the pressure cooker cool down;
• open the pressure cooker;
• check and clean the pressure regulator, steam outlet, safety valve and gasket.
1. As with all cooking appliances, make sure that you properly supervise the cooking area if children or
handicapped people are close-by.
2. Before each use, always check visually in daylight that the steam outlet is not blocked. If it is blocked,
clean it by using a clip to pierce into the hole, and then rinse it under water.
3. Before each use, always check the mobility of the pressure regulator to positions .
4. Never disassemble the lid of the pressure cooker!
5. The minimal quantity of liquid in the pot is 1/3 of the total capacity of the pressure cooker.
The total amount of the food should not exceed 2/3 of its total capacity. For food that expands
considerably during cooking, such as rice, dehydrated vegetables or stewed fruits, do not fill the
pressure cooker with contents more than half of the pot.
6. Don’t forget to turn down the heat once there is continuous release of steam from the steam outlet.
7. Be careful as the steam, which is released, is very hot.
8. To move or lift the pressure cooker, use the side handles on the pot. Never use the revolving knob to
move or lift it.
9. Never use the bleach or chlorine based products to clean your pressure cooker as these damage
the quality of stainless steel.
10. Do not use any sharp or pointed object to carry out operating and safety checks.
11. When re-fitting the gasket, to ensure a perfect seal, make sure the gasket slips fully under each tab
by pressing and pushing it with your finger towards the edge of the lid.
8

SIKKERHEDSSYSTEM
Trykkogeren er udstyret med to sikkerhedsordninger til overtryk:
1. Sikkerhedsventilen frigiver trykket, og dampen kommer ud af sikkerhedsventilens udløb.
2. Dampen strømmer gennem sikkerhedsvinduet.
• Sluk for varmekilden straks og lad nedkøleren afkøles
• Åbn trykbeholderen
• Kontroller og rengør trykregulatoren, dampudløbet, sikkerhedsventilen og pakningen.
1. Som alle madlavningsapparater, skal du sørge for at overvåge madlavningen korrekt, hvis børn eller
handicappede er tæt på.
2. Inden hver brug skal du altid kontrollere i dagslys, at dampudgangen ikke er blokeret. Hvis det er blokeret,
skal du rengøre det ved at bruge et clips for at gennembore hullet og derefter skylle det under vand.
3. Inden hver brug skal du altid kontrollere bevægelsen af trykregulatoren til stillinger.
4. Afmonter aldrig låget på trykbeholderen!
5. Den minimale mængde væske i gryden er 1/3 af trykbeholderens samlede kapacitet. Den samlede
mængde af maden må ikke overstige 2/3 af den samlede kapacitet. For mad, der udvides betydeligt under
madlavning, såsom ris, dehydreret grøntsager eller stuvet frugt, må du ikke fylde trykbeholderen med indhold
mere end halvdelen af gryden.
6. Glem ikke at skrue ned for varmen, når der er vedvarende frigivelse af damp fra dampudløbet.
7. Pas på, da dampen, som frigives, er meget varm.
8. For at flytte eller løfte trykkogeren, skal du bruge sidegrebet på potten. Brug aldrig den drejende knap til
flytte eller løfte det.
9. Brug aldrig blegemiddel eller klorbaserede produkter til at rengøre din trykkoger, da disse skader kvaliteten
af rustfrit stål.
10. Brug ikke skarpe eller spidse genstande til at udføre drifts- og sikkerhedskontrol.
11. Når pakningen sættes på igen, skal du sørge for, at pakningen glider helt under hver fane for at sikre en
perfekt forsegling, ved at trykke på og skubbe den med fingeren mod kanten af låget.
Hvis en af sikkerhedsordningerne er aktiveret/ If one of the safety devices is activated
SIKKERHEDSFORANSTALTNINGER/SAFETY PRECAUTIONS
9

Åbning
Lukning
Anvendelse
1. Tryk let på knappen og drej knappen op mod låsnings symbolet som vist i figur 1
2. Løft låget af.
1. Læg låget over trykbeholderens krop, og sørg for, at det sidder korrekt på potten.
2. Tryk drejeknappen ned mod låsesymbolet som vist i figur 2. Det er normalt for låget at kunne dreje
rundt, når det er låst.
3. Efter låsning af låget skal klemmerne fastgøres i lågets kant som vist i figur 3.
1. FØR FØRSTE BRUG Fyld trykbeholderen op til 2/3 med vand, drej trykregulatoren til højtrykspositionen (II)
og indstil højeste temperatur ved varmekilden. Når damp begynder at løsne fra dampudløbet, skru ned
for varmekilden. Efter 15 minutter skal du slukke for varmen. Drej trykregulatoren gradvis mod
trykfrigivelsespositionen. Når der ikke kommer mere damp ud af dampudløbet, og sikkerhedsventilen er
nede, skal du åbne trykkogeren. Skyl det ud og tør det.
2. Sæt maden inde i trykbeholderen. Den minimale mængde væske i gryden er 1/3 af den samlede mængde
trykkogerens kapacitet. Den samlede mængde af maden må ikke overstige 2/3 af den samlede kapacitet.
For mad, der udvides betydeligt under madlavning, såsom ris, dehydreret grøntsager eller stuvet frugt,
må du ikke fylde trykbeholderen med indhold mere end halvdelen af gryden.
10

Indikatorventil
3. Luk låget. Kontroller at den er korrekt fastgjort, dvs. klemmerne er strammet.
4. Kontroller, at trykregulatoren, sikkerhedsventilen eller sikkerhedsventilen inde i låget kan bevæges frit.
5. Indstil trykregulatoren til lavtryksstilling (I) eller til højtryksstilling (II).
6. Madlavning starter, når dampen undslipper i konstant strøm fra dampudløbet med en regelmæssig
hvislende lyd, skru ned for varmen. Det er normalt at se dampafgivelsen fra sikkerhedsventilen, før den er
frigivet fra dampudløbet. Kondensation kan også forekomme i dette område.
7. Så snart sikkerhedsventilen er steget, kan du ikke åbne trykbeholderen, fordi trykket ind i har
overskredet 5 KPA.
8. Når kogningen er færdig, og varmen er slukket, har du to alternativer:
a. Langsom trykudløser, drej regulatoren gradvist mod trykfrigivelsespositionen. Hvis du mærker ualmindelig
udløsning af trykket under dekompression, skal du dreje regulatoren mod lavtryksposition (I) eller
højtryksposition (II). Gentag derefter dekomprimeringsproceduren langsomt, og sørg for, at trykket er
frigivet normalt.
b. Hurtig trykudløser, KUN HVIS NØDVENDIGT: Placer trykkogeren under en kold løbende vandhane, der
styrer strømmen på lågets metaldel. Først når sikkerhedsventilen er nede i sin normale position, hvilket
betyder, at alt trykket er frigivet fra gryden, kan du åbne trykkogeren.
9. Når der ikke kommer mere damp ud af dampudløbet, og sikkerhedsventilen er nede, skal du åbn
trykbeholderen.
c. Begynd madlavning når sikkerhedsventilen fylder op, indikerer det, at trykket i gryden er opbygget, og
tilberedningen starter.
Når trykket er opbygget, viser indikatorventilen den tilsvarende gule linje, og dampen undslipper i konstant
strømning fra udluftningsrøret og en regelmæssig brusende lyd, så skru ned for varmen.
Position(1)
TSænk varmen, når det første gule linje
kommer frem. Madlavning starter.
Advarsel
Forlad ikke trykkogeren uden opsyn under tilberedningen. Vær altid opmærksom på trykkogerens normale
driftstilstand. Kan forårsage fare.
Rør ikke trykkogerens varme overflade med dine hænder eller andre dele af kroppen, da det kan forårsage
forbrændinger.
Brug håndtaget og drejeknappen ved tilberedning og brug den i overensstemmelse med den korrekte
anvendelsesmåde.
Ved madlavning af grød, suppe og andre fødevarer, hvis der er overfyldt, skal du straks reducere varmekilden,
ellers vil det forårsage sprøjt.
Bemærk
Før trykket påføres, er det normalt, at gas undgår udstødningsporten, som er normal. Det er normalt, at
udstødningsporten gør en lille støj efter justering af varmen. Hvis støjen forstærkes, skal du skrue ned eller
slukke for varmen.
Kontroller trykkogeren i henhold til "Ofte stillede spørgsmål og løsninger"
Hvis den røde linje vises på trykindikeringsventilen, betyder det, at trykkogeren er i en unormal tilstand.
Position(2)
Sænk varmen, når andre gule linjer kommer
frem.Madlavning starter.
11

Brug af dampen
FEJLFINDING
1.Placer dampen på stativet.
2.Hæld passende vand i puljen, vandet må ikke nå bunden af damperen.
3.Du kan samtidig lave mad i bunden af damperen med mindst 1/3 væske. De fødevarer, der er anbragt i
dampkøleren, må ikke røre låget.
Slå straks for varmekilden.
Fejlfind trykkogeren i henhold til "Ofte stillede spørgsmål og løsninger.
Når sikkerhedsventilen er steget, skal du ikke forsøge at åbne låget. Du kan kun åbne låget når trykket
på ventilen er faldet helt.
Kan ikke lukke låget?
- Sørg for, at klemmerne er helt åbne, før låget sættes på potten.
- Kontroller god tilstand og korrekt placering af pakningen.
Sikkerhedsventilen stiger ikke?
-Det er normalt i de første par minutter.
-Hvis fænomenet fortsætter, skal du kontrollere at:
-Der er nok væske inde i trykkogeren.
-Varmekilden er højt nok, hvis ikke, øg varmen.
-Trykregulatoren drejes til
-Trykkogeren er lukket korrekt.
-Klemmerne skal være i kontakt med lågets kant.
-Pakningen til låget er placeret korrekt.
-Pakningen er ren og i god stand, ændre det, hvis det er nødvendigt. Kontroller sikkerhedsventilens renhed
og mobilitet.
Sikkerhedsventilen er løftet op, og der kommer ikke damp ud af dampudløbet under tilberedningen?
-Put din trykkoger under koldt vand for at frigøre dampen.
-Det betyder, at trykniveauet endnu ikke er nået, så sæt vælgeren tilbage til startpositionen.
Damp lækker rundt om låget?
Kontroller at:
-Låget er lukket korrekt.
-Pakningen er korrekt monteret på låget.
-Låg, sikkerhedsventil og trykregulator er rene.
-Kanten af gryden er ikke beskadiget.
Kan ikke åbne låget?
Kontroller, at sikkerhedsventilen er i den lave position. Hvis ikke, frigør dampen fra trykbeholderen ved at afkøle
den under rindende vand, hvis det er nødvendigt.
Maden bliver brændt eller under kogning?
Kontroller:
-Madlavningstiden.
-Varmekilden.
-Den korrekte indstilling af trykregulatoren.
-Mængden af væske.
Hvis fødevaren i trykkogeren er brændt, skal du lade potten bløde, inden du rengør den. Brug aldrig blegemidler
eller klorbaserede produkter til at rengøre trykkogeren.
12

13
RENGØRING OG VEDLIGEHOLDELSE
Vask din trykkoger efter hver brug. Når du opbevarer din trykkoger, skal du låse låget over på gryden,
så det er i stabil position.
Rengøring i hånden:
Vask gryden i varmt vand med lidt opvaskemiddel. Du kan bruge en svamp til at vaske indersiden af
potten.
For at rense låget skal du tage trykregulatoren ud af ventilsædet på enhver position til rengøring og
vedligeholdelse som vist i figur 4 og 5. Rengør låget under vand med en svamp og opvaskemiddel
Lad låget dryppe tørt efter rengøring. For at montere, sæt trykregulatoren tilbage i ventilsædet på en
hvilken som helst position.
Opvaskemaskine rengøring:
Du kan vaske selve gryden i opvaskemaskinen.
Du kan ikke sætte låget i opvaskemaskinen!
COOKING TIME
№
Food
Working pressure
Volume
Cooking Time
1.
Kylling
II
1/2
8-15 minutes
2.
Bøf
II
1/2
17-25 minutes
3.
Svinekød
II
1/2
15-25 minutes
4.
Fårekød
II
1/2
10-15 minutes
5.
Kalvekød
II
1/2
16-20 minutes
6.
Lam
II
1/2
12-15 minutes
7.
And
II
1/2
18-20 minutes
8.
Lever
II
2/3
8-10 minutes
9.
Ris
II
1/3
3 minutes
10.
Kartofler
II
2/3
8 minutes
11.
Skrællede kartofler
II
2/3
6 minutes
12.
Guleroder
II
2/3
4 minutes
13.
Rødbede
II
2/3
10 minutes
14.
Frisk fisk
I
1/3
5-8 minutes
15.
Frosset fisk
I
1/3
8-10 minutes
16.
Kål
I
2/3
6 minutes
17.
Blomkål
I
2/3
3 minutes

10.
14
ﺔﻴﺑﺮﻌﻟا

*
1/3
2/3
15

16

17
2/3
15
1/3
2/3
5
.
.
.
.

WWW.DORSCHHOME.DE
Table of contents
Languages:
Popular Electric Pressure Cooker manuals by other brands

Tower Hobbies
Tower Hobbies T80206 Safety and instruction manual

TEFAL
TEFAL Turbo Cuisine Maxi manual

BERGNER
BERGNER San Ignacio COOKCHEF Instrucions for Use | Recipes

Orbegozo
Orbegozo HPL 70 Series instruction manual

Tower Hobbies
Tower Hobbies T16007 Safety and instruction manual

Kaiserhoff
Kaiserhoff KH8700 manual