Elo TouchSystems Praktika Plus XS User manual

1
Schnellkochtopf-Anleitung
Praktika Plus XS
Model ASC18 (2,7l)
D
E
P
PL
CZ
H
RO
GR
BG
D
UK
F
I
D
E
P
PL
CZ
H
RO
GR
BG
D
UK
F
I
D
E
P
PL
CZ
H
RO
GR
BG
D
UK
F
I
D
E
P
PL
CZ
H
RO
GR
BG
D
UK
F
I
SLO
HRV
SRB
MAK
HR
RS
RU
DK
NL
SK
Für eventuelle Rückfragen, Reklamationen und Garan-
tieansprüche ist es von Notwendigkeit, diese Anleitung
aufzubewahren.
In case there are any queries, complaints and warranty
claims it is necessary to retain these instructions.
Il est nécessaire de conserver cette notice pour
d‘éventuelles questions, réclamations et pour faire valoir
la garantie.
Para posibles preguntas, reclamaciones y derechos de
garantía es necesario conservar estas instrucciones.
D
E
P
PL
CZ
H
RO
GR
BG
D
UK
F
I
D
E
P
PL
CZ
H
RO
GR
BG
D
UK
F
I
D
E
P
PL
CZ
H
RO
GR
BG
D
UK
F
I
SLO
HRV
SRB
MAK
HR
RS
RU
DK
NL
SK
D
E
P
PL
CZ
H
RO
GR
BG
D
UK
F
I
ELO-Stahlwaren
Karl Grünewald & Sohn GmbH & Co KG
Dalbergerstaße 20
D-55595 Spabrücken · Germany
Telefon: +49 (0) 6706 – 914 0
Fax: +49 (0) 6706 – 914 222
E-Mail: [email protected]
Internet: www.elo.de
Art. Nr. 03454
03454_PraktikaPlusXS D-UK-F-ES_2013-02-11.indd 68-1 2/11/2013 8:13:12 AM

2 3
Inhaltsverzeichnis/Contents/ Contenu/ Sommaire
Seite Inhalt
04-05 Wichtige Vorsichtsmaßnahmen
06 Einleitung/ Abbildung und Lieferung
07 Sicherheit
08 Gebrauchsanleitung/ Hinweis zum energiesparenden Kochen
09 Topf schließen
10 Beginn des Kochvorganges
10-12 Topf öffnen
12 Reinigen des Sicherheitsventils/Druckventils
13 Pflege und Instandhaltung/ Allgemeine Hinweise
14 Gesundheits- und Warnhinweise / was tun...
15-17 Garzeitentabellen
60 Wichtige Hinweise/Garantie
61 Konformitätserklärung
Page général
32-33 Mesures de précaution importantes
34 Introduction/ Illustration et contenu de la livraison
35 Sécurité
36 Notice d‘utilisation/ Informations pour une cuisson économisant de l‘énergie
37 Fermeture du pot
38 Début de la cuisson
38-40 Ouvrir l‘autocuiseur
40 Nettoyage de la soupape de sécurité/régulation de pression
41 Entretien et maintenance / Indications
42 Conseil sanitaire et avertissement / Comment faire...
43-45 Tableaux des temps de cuisson
64 Important/Garantie
65 Déclaration de conformité
Page content
18-19 Important Safety Precautions
20 Introduction/ Figure and Scope of Delivery
21 Safety
22 Instructions for use/ Tips for energy-saving cooking
23 Closing the Pressure Cooker
24 Starting Cooking
24-26 Opening the Pressure Cooker
26 Cleaning the savety vant / Pressure control valve
27 Care and maintance/ Basic information
28 Health and Warnings / What to do if...
29-31 Tabel of Cooking Times
62 Important Note / Guarantee
63 Declaration of Conformity
Página contenido
46-47 Importantes medidas de precaución
48 Introducción / Ilustraciones y piezas suministradas
49 Seguridad
50 Istruzioni per l’uso/ Consejos para cocinar ahorrando energía
51
Cerrar la olla
52 Inicio de la cocción
52-54 Abrir la olla
54 Limpiar la válvula de seguridad / Sacar la válvula reguladora de presión
55 Cuidado y mantenimiento / Indicaciones generales
56 Aviso sanitario y advertencias /¿Qué hacer si...
57-59 Tabla de tiempos de cocción
66 Aviso importante / Garantía
67 Declaración de conformidad
D
E
P
PL
CZ
H
RO
GR
BG
D
UK
F
I
D
E
P
PL
CZ
H
RO
GR
BG
D
UK
F
I
D
E
P
PL
CZ
H
RO
GR
BG
D
UK
F
I
D
E
P
PL
CZ
H
RO
GR
BG
D
UK
F
I
SLO
HRV
SRB
MAK
HR
RS
RU
DK
NL
SK
03454_PraktikaPlusXS D-UK-F-ES_2013-02-11.indd 2-3 2/11/2013 8:13:13 AM

54 5
Wichtige Vorsichtsmaßnahmen
Bitte beachten Sie folgende Vorsichtsmaßnahmen:
• Lesen Sie sich alle Anweisungen durch.
• Verwenden Sie den Schnellkochtopf nie in der Nähe von Kindern.
• Stellen Sie den Schnellkochtopf nicht in einen heißen Backofen.
• Bewegen Sie den Schnellkochtopf sehr vorsichtig, wenn dieser unter Druck
steht. Berühren Sie nicht die heißen Flächen, sondern verwenden Sie die
Griffe und Knöpfe. Nutzen Sie gegebenenfalls einen Handschutz.
• Setzen Sie den Schnellkochtopf nur für den Zweck ein, für den er vorge-
sehen ist.
• In diesem Topf werden Speisen unter Druck zubereitet. Sie können sich
durch falschen Gebrauch des Schnellkochtopfes Verbrennungen zuziehen.
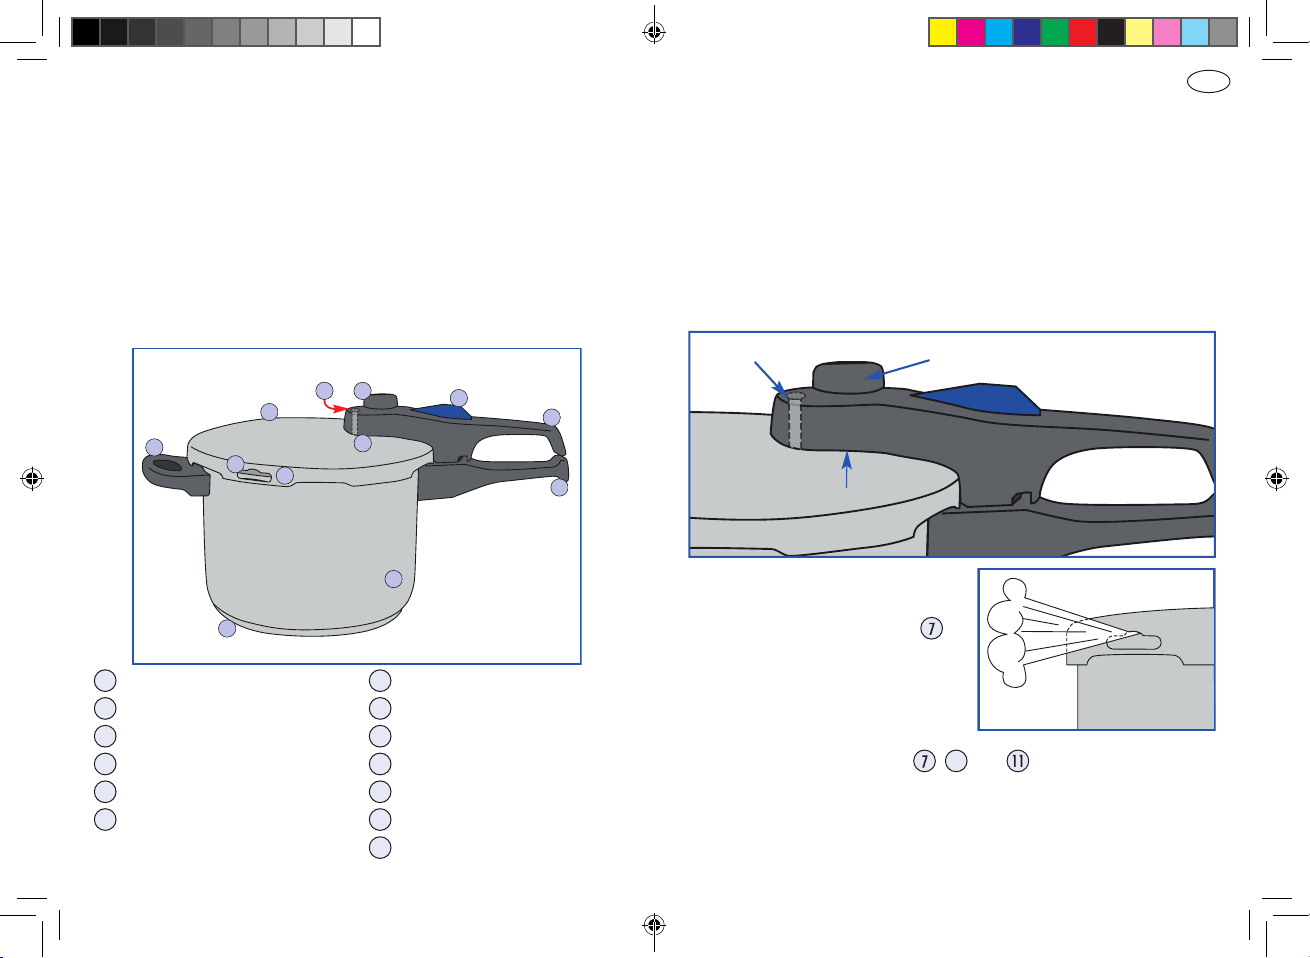
Achten Sie darauf, dass der Schnellkochtopf richtig verschlossen wurde,
ehe Sie ihn auf den Herd stellen. Informationen hierzu finden Sie in der
Gebrauchsanleitung.
• Öffnen Sie den Dampfdruckkochtopf niemals gewaltsam. Vergewissern
Sie sich vor dem Öffnen, dass der Innendruck vollständig abgebaut ist.
Informationen hierzu finden Sie in der Gebrauchsanleitung.
• Erhitzen Sie den Schnellkochtopf niemals, ohne vorher Wasser in den
Schnellkochtopf gefüllt zu haben. Ohne Wasser wird das Gerät schwer
beschädigt.
• Griffe/Stiele, die nicht aus Kunststoff sind, können heiß werden, benut-
zen Sie immer einen Topflappen oder Ähnliches.
• Brennendes Fett nicht mit Wasser löschen, sondern mit einer Löschdecke
oder geeignetem Feuerlöscher.
• Füllen Sie den Dampfdruckkochtopf niemals mit mehr als 2/3 seines Nenn-
volumens. Wenn Sie Nahrungsmittel wie Reis oder getrocknetes Gemüse
zubereiten, die während des Kochvorgangs quellen, füllen Sie den Dampf-
druckkochtopf höchstens bis zur Hälfte seines Nennvolumens.
• Verwenden Sie nur solche Heizquellen, die in der Gebrauchsanleitung zu-
gelassen sind:
• Wenn Sie Fleisch mit Haut gekocht haben (z. B. Ochsenzunge), die unter
Druckeinfluss anschwellen kann, dann stechen Sie nicht in das Fleisch, so-
lange die Haut geschwollen ist. Sie könnten sich Verbrennungen zuziehen.
• Wenn Sie breiige Nahrungsmittel zubereiten, dann rütteln Sie den Schnell-
kochtopf sanft, um zu vermeiden, dass das Essen herausspritzt, ehe Sie
den Deckel öffnen.
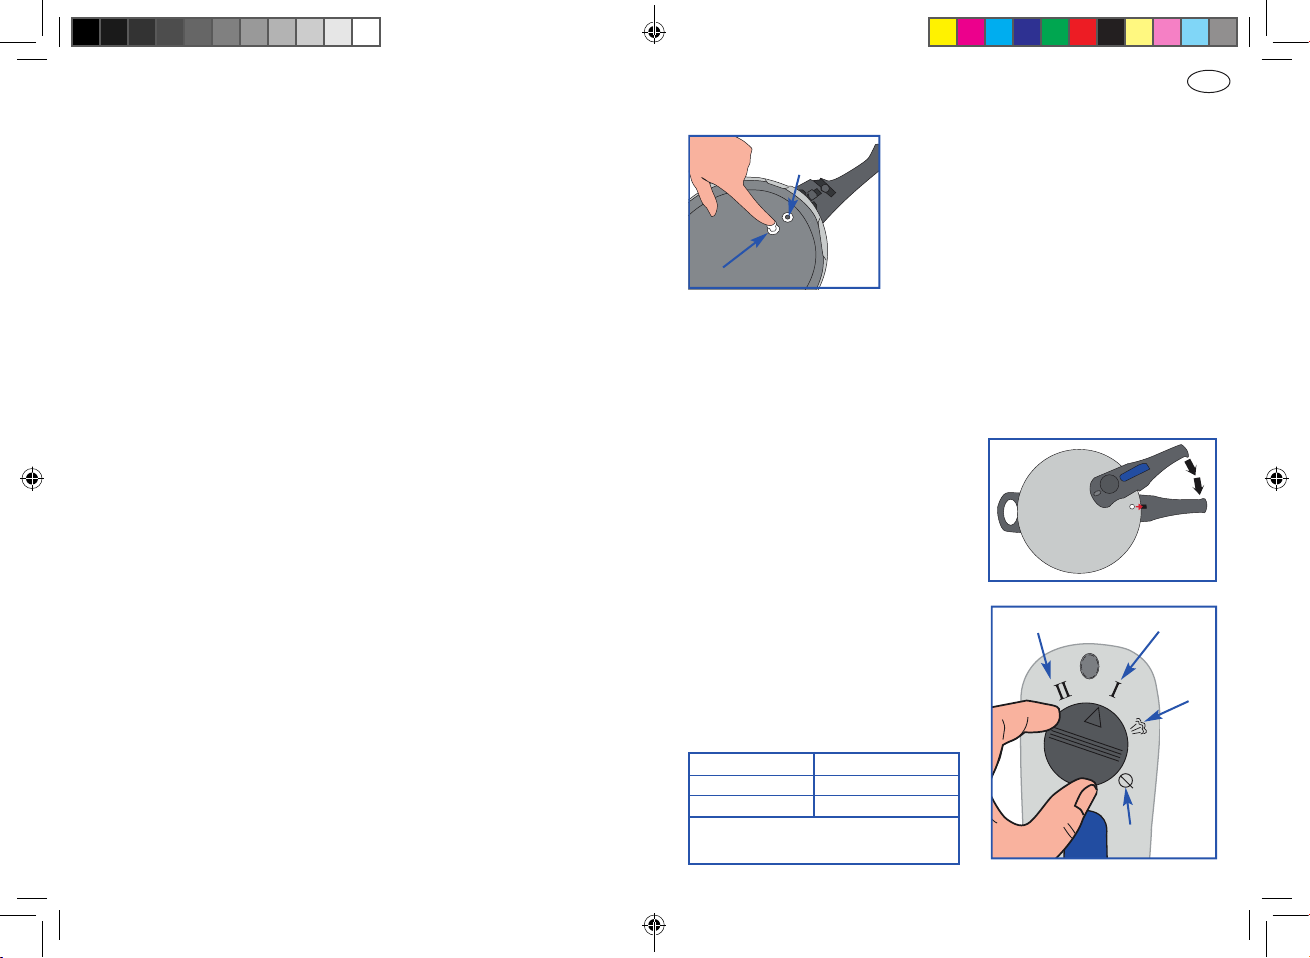
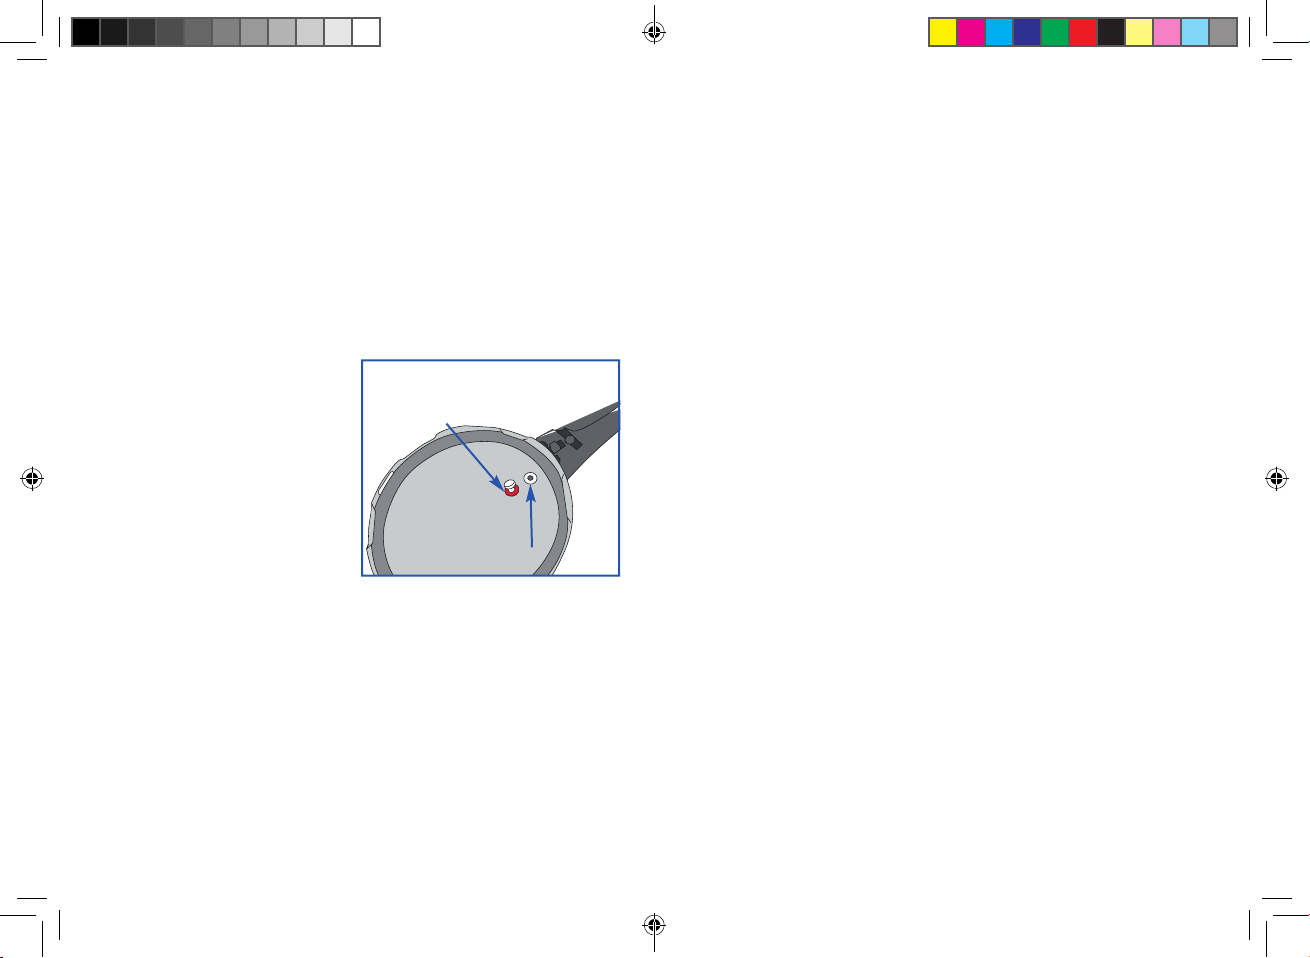
• Vergewissern Sie sich vor jedem Gebrauch, dass die Ventile nicht verstopft
sind. Informationen hierzu finden Sie in der Gebrauchsanleitung.
• Verwenden Sie den Schnellkochtopf nicht, um Nahrungsmittel unter Druck
mit Öl zu frittieren.
• Nehmen Sie an den Sicherheitssystemen, außer der Wartung, die in der
Gebrauchsanleitung aufgeführt ist, keinerlei Eingriffe vor.
• Verwenden Sie nur Originalersatzteile für das betreffende Modell. Ver-
wenden Sie insbesondere den Körper und den Deckel vom gleichen Her-
steller und achten Sie darauf, dass diese kompatibel sind.
• Halten Sie Verpackungs- und Schutzfolien von Kindern fern, es besteht
Erstickungsgefahr
• Bewahren Sie diese Anleitung auf.
• Geben Sie bei Weitergabe des Schnellkochtopfes an Dritte immer die An-
leitung mit
D
E
P
PL
CZ
H
RO
GR
BG
D
UK
F
I
03454_PraktikaPlusXS D-UK-F-ES_2013-02-11.indd 4-5 2/11/2013 8:13:13 AM

76 7
Einleitung
Wir gratulieren Ihnen zum Erwerb Ihres neuen Schnellkochtopfes. Mit diesem
Schnellkochtopf haben Sie nun die Möglichkeit, durch die beiden optimalen
Techniken des verkapselten Sandwichbodens und dem System des Deckels, Ihre
Nahrung optimal zuzubereiten. Trotz des schnellen Garens werden alle Vita-
mine, Mineralstoffe und der Geschmack erhalten.
Abbildung und Lieferumfang
Sicherheit
Das System des Schnellkochtopfes verleiht einen hohen Grad an Sicherheit. Es
ist darauf zu achten, dass der Deckel richtig schließt, nur dann funktioniert das
System. Der Topf verfügt über einen zweistufigen Druckregler, der den von
Ihnen gewählten Druck reguliert, sowie über ein im Deckelgriff eingebautes
Sicherheitsventil (siehe Abb. 2). Bitte beachten: Den Topf nur bis zur maxima-
len Füllhöhe (siehe Innenmarkierung) füllen.
Abb. 1
2
Silikondichtungsring
(Deckelinnenseite)
Druckregelungssventil Abb. 2
Sicherheitsventil
Bei einem übermäßigen Druckanstieg
wird der Gummiring durch eine Aus-
sparung im Deckelrand (Abb. 1, )
herausgedrückt und der Druck kann
entweichen (siehe Abb. 3).
Alle aufgeführten Punkte (außer , 10 und ) sind als Ersatzteile
erhältlich.
Abb. 3
1 Deckelstiel
2 Topfstiel
3 Gegengriff
4 Gummidichtung (innen)
5 Druckregelungsventil
6 Sicherheitsventil
7 Sicherheitsöffnung
8 Topf
9 Deckel
10 Kapselboden
11 Entriegelungsknopf
12
Silikondichtung (Deckelinnenseite)
13
Schraubenschlüssel (ohne Abb.)
D
E
P
PL
CZ
H
RO
GR
BG
D
UK
F
I
Abb. 1
1
2
3
5
8
9
10
74
11
12
6
03454_PraktikaPlusXS D-UK-F-ES_2013-02-11.indd 6-7 2/11/2013 8:13:13 AM

98 9
Gebrauchsanleitung
Vor dem ersten Gebrauch sollte der Schnellkochtopf gründlich mit heißem Was-
ser gereinigt, gespült und sofort abgetrocknet werden.
Bitte kontrollieren Sie den Boden des Kochgeschirrs sowie das Kochfeld auf
Schmutzreste, Aufkleber oder Unebenheiten. Beim Hin- und Herschieben
könnte es zu Beschädigungen kommen.
Zum besseren Öffnen und Schließen des Deckels empfiehlt es sich, den Gummi-
ring mit etwas Speiseöl einzufetten.
Wenn im Schnellkochtopf der entsprechende Druck erzeugt werden soll, der
das Garen der Speisen beschleunigt, muss dieser eine Mindestmenge an Flüs-
sigkeit enthalten (Wasser, Brühe usw.).
Bei der Zubereitung von Speisen mit starker Schaumbildung darf der Topf
nur bis zur Hälfte gefüllt werden.
Wir empfehlen Ihnen bei der Zubereitung von Püree, Eintopf, Suppen usw. den
Topf vor dem Öffnen leicht zu schütteln.
Hinweise zum energiesparenden Kochen
Um wertvolle Energie beim Kochen zu sparen, sollten Sie folgende Tipps
beachten:
• Achten Sie darauf, dass der Bodendurchmesser des Topfes größer ist als
die Herdplatte, nicht umgekehrt; dies kann bis zu 15% Energie einsparen.
• Nutzen Sie die Töpfe wenn möglich immer mit Deckel, dies spart bis zu
20% Energie.
• Nutzen Sie die Nachwärme von Elektro-Kochplatten. Schalten Sie ca.
10 Minuten vor Garende ab. Dies kann bis zu 10% der Energie einsparen.
Topf schließen
Bitte überprüfen Sie die Sicherheits-
vorrichtungen vor dem Schließen des
Topfes.
Die Öffnung des Druckregelungsventils (siehe
Abb. 4) muss sauber und das Sicherheitsventil
darf nicht verklemmt sein. Letzteres können
Sie prüfen, indem Sie mit dem Finger auf den
Stöpsel des Sicherheitsventils drücken (siehe Abb. 4).
Lässt sich der Stöpsel nach innen drücken, so funktioniert das Sicherheitsventil
korrekt. Wenn der Stöpsel nicht nachgibt und verklemmt ist, muss er gelockert
und gereinigt werden, wie auf Seite 12 beschrieben. Setzen Sie den Deckel
auf den Topf, und zwar so, dass die
MarkierungaufdemTopfstiel (schwarzer
Punkt) mit der Markierung „O“ auf dem
Deckel in einer Linie liegt (siehe Abb. 5).
Drücken Sie anschließend den Deckel
leicht nach unten und drehen Sie ihn, bis
beide Stiele übereinanderstehen.
Nun ist der Schnellkochtopf optimal ver-
schlossen. Stellen Sie nun am Druck-
regelungsventil den gewünschten Druck
ein: Hoher Druck (II), niedriger Druck (I)
(siehe Abb. 6)
Abb. 5
D
E
P
PL
CZ
H
RO
GR
BG
D
UK
F
I
Hoher Druck (II)Niedriger Druck (I)
Abdampf-
funktion
Funktion zur
Entnahme
des Druck-
regelungs-
ventils
Abb. 6
Silikon-
dichtungsring
Sicherheitsventil Abb. 4
Modellnummer ASC18-2.7
Durchmesser Ø18 cm
Nennvolumen 2.7 L
Arbeitsdruck I 60Kpa
II 100Kpa
03454_PraktikaPlusXS D-UK-F-ES_2013-02-11.indd 8-9 2/11/2013 8:13:14 AM

1110 11
Beginn des Kochvorganges
Wir empfehlen, bei Beginn des Kochvorganges die Energiequelle auf den höch-
sten Punkt zu stellen, damit im Topf so schnell wie möglich der gewünschte
Druck erreicht wird. Bitte beachten Sie, dass Sie den Schnellkochtopf nicht über
die im Innenbereich angegebene Füllhöhe („Maximum“) befüllen. Das
Gargut könnte sonst beim Kochen das Ventil beschmutzen.
Das Sicherheitsventil wird durch den Druck, der im Topf entsteht, nach oben
gedrückt und blockiert den Entriegelungsknopf. Der unter Druck stehende Topf
kann nicht geöffnet werden.
Sobald Dampf aus dem Druckregelungsventil austritt, bedeutet dies, dass im
Schnellkochtopf genügend Druck vorhanden ist. Sie können nun die Wärme-
quelle kleiner stellen, sodass der Druck jedoch erhalten bleibt, aber nicht zu
viel Dampf entweicht. Von diesem Zeitpunkt an wird die Garzeit gemessen.
Topf öffnen
Schalten Sie zuerst die Energiezufuhr ab und reduzieren den Druck.
Es gibt zwei Öffnungsmethoden, den Deckel zu öffnen:
(1) Langsame Abkühlung:
Schalten Sie die Energiezufuhr ab. Lassen Sie der Topf normal an der Luft
abkühlen, bis der Verriegelungsstift sinkt. Dann können Sie den Deckel öffnen,
indem Sie den Schiebeschalter vorwärts schieben und den Deckelgriff gegen
den Uhrzeigersinn drehen, bis die beiden O-Markierungen sich aufeinander
richten (siehe Abb. 7).
Position für Öffnung
Position beim Schließen
Abb. 7
(2) Schnelle Abkühlung:
Stellen Sie den Dampfdruckkochtopf unter den Wasserhahn, spülen Sie den
Topf langsam mit Kaltwasser, bis der Verriegelungsstift sinkt (siehe Abb. 8).
Dann kann der Deckel wie beschrieben geöffnet werden (siehe Abb. 7).
Abb. 8 Abb. 9
Bemerkung: Spülen Sie den Topf nicht zu stark, um zu vermeiden, dass Wasser
über das Sicherheitsventil oder/und Druckregelventil in den Topf hinein
gelangt. Nach dem Öffnen sollte der Schieberiegel im Anschlag bleiben. Wenn
er in die Schließenposition zurückkehrt, schieben Sie ihn bitte wieder vorwärts
bis Anschlag, ansonsten kann der Deckel nicht richtig auf dem Topf sitzen (siehe
Abb. 9).
D
E
P
PL
CZ
H
RO
GR
BG
D
UK
F
I
03454_PraktikaPlusXS D-UK-F-ES_2013-02-11.indd 10-11 2/11/2013 8:13:14 AM

12 13
Achtung:
Öffnen Sie den Topf nicht, solange der Verriegelungsstift nicht gesunken ist.
Der Topf steht noch unter Druck. Beim Öffnen des Topfes tragen Sie bitte Hand-
schuhe, um Verletzung zu vermeiden.
Bei breiigen Lebensmitteln, wie z. B. Reisbrei, dicke Suppe usw., sollte der
Topf vor der Öffnung leicht geschüttelt werden, damit die Luftblasen beseitigt
werden. DEN DECKEL NIE GEWALTSAM ÖFFNEN!
Reinigen des Sicherheitsventils
Zum Reinigen des Sicherheitsven-
tils muss die Sockelschraube gelöst
werden (siehe Abb. 10). Danach
kann das Sicherheitsventil heraus-
genommen und gründlich gereinigt
werden. Verwenden Sie dazu den
mitgelieferten Schraubenschlüssel.
Das Sicherheitsventil darf nicht
zerlegt werden!
Herausnehmen des Druckregelungsventils
Um den Silikondichtungsring zu reinigen, entnehmen Sie bitte das Druckrege-
lungsventil (siehe Abb.6, Seite 9).
Pflege und Instandhaltung
Reinigen Sie Ihren Schnellkochtopf nach jedem Gebrauch mit heißem Wasser
und einem nicht scheuernden Spülmittel. Deckel und Gummidichtung dürfen
nicht in der Spülmaschine gereinigt werden.
Bei stärkeren, hartnäckigen Verschmutzungen empfiehlt es sich, diese eine Zeit
lang einzuweichen. Kalkrückstände mit Essig entfernen.
Die Gummidichtung darf nicht mit Spülmittel gereinigt werden. Nach
dem Spülen sind Topf und Deckel gut abzutrocknen und mit umgestülptem De-
ckel aufzubewahren. Der Topf darf nicht mit geschlossenem Deckel weggestellt
werden, da dies vorzeitige Materialermüdung des Gummis bewirkt!
Allgemeine Hinweise
Geschraubte Beschläge können sich mit der Zeit lösen, sind aber mit einem
handelsüblichen Schraubendreher leicht wieder anzuziehen. Summgeräusche
können beim Kochen auf Induktionsherden auftreten. Diese sind technisch
bedingt und kein Anzeichen für einen Fehler des Kochgeschirrs. Heizen Sie
Kochgeschirre auf maximal mittlerer Stufe vor. Besonders auf Induktions-
kochfeldern erreichen Geschirre ohne Koch- und Bratgut in kürzester Zeit
Temperaturen von bis zu 500°C.
Sockelschraube
des Sicherheitsventils
(rot gekennzeichnet)
Silikondichtung des
Druckregelungsventils Abb. 10
03454_PraktikaPlusXS D-UK-F-ES_2013-02-11.indd 12-13 2/11/2013 8:13:14 AM

1514 15
Gesundheitshinweis
Bitte beachten Sie, dass es bei Menschen mit Nickelallergie beim Gebrauch von
Edelstahl-Töpfen unter Umständen zu Komplikationen kommen kann.
WARNHINWEISE:
Die Reparatur des Dampfdruckkochtopfs darf nur von einem autorisierten
Fachpersonal durchgeführt werden.
Was tun
... wenn Dampf zwischen Deckel und Topf entweicht?
Dann ist die Gummidichtung defekt oder der Topf ist nicht richtig geschlos-
sen. Ersetzen Sie eine defekte Gummidichtung. Schließen Sie den Topf korrekt
(s. Kap. „Topf schließen“). Sollte die Gummidichtung nur verschmutzt sein, ist
der Gummiring zu reinigen.
... wenn kein Dampf aus dem Druckregelungsventil entweicht?
Dann ist der Topf nicht richtig abgedichtet und muss dahin gehend über-
prüft werden. Zu überprüfen ist auch, ob genügend Flüssigkeit im Topf ist.
MöglicherweiseistzuwenigDruckimTopfvorhanden.RegelnSiedieEnergiezufuhr
vorsichtig /entsprechend nach. Sollte die Gummidichtung verschmutzt oder
defekt sein, ist sie zu reinigen oder zu ersetzen. Einmal im Jahr sollte der
Gummiring erneuert werden.
... wenn zu viel Dampf aus dem Druckventil entweicht?
Dann ist möglicherweise die Wärmequelle zu heiß eingestellt und muss schwä-
cher gestellt werden. Es könnte auch sein, dass das Druckregelungsventil
verschmutzt ist.
D
E
P
PL
CZ
H
RO
GR
BG
D
UK
F
I
15
Garzeitentabellen
Die nachstehend aufgeführten Zeiten sind nur annähernd zutreffend, denn sie
sind selbstverständlich von Qualität und Zustand des Gargutes abhängig.
Nach kurzer Zeit werden Sie selbst über genügend Erfahrungen verfügen und
genau wissen, wie lange das jeweilige Gericht gekocht werden muss.
Tiefgekühltes Gemüse oder Fisch braucht nicht vorher aufgetaut zu werden.
Es genügt die Garzeit ein wenig zu verlängern.
Suppen hoher
Druck
niedriger
Druck
ca. Garzeiten
in Minuten
Bohnensuppe •20
Erbens-, Linsensuppe
(eingeweicht)
•12 – 15
Gemüsesuppe •5 – 8
Gulaschsuppe •15 – 20
Hühnersuppe •15 – 20
Kartoffelsuppe •6 – 8
Knochenbrühe •20 – 25
Reissuppe •8
Rindfleischsuppe •25 – 45
03454_PraktikaPlusXS D-UK-F-ES_2013-02-11.indd 14-15 2/11/2013 8:13:14 AM

1716 17
D
E
P
PL
CZ
H
RO
GR
BG
D
UK
F
I
Gemüse hoher
Druck
niedriger
Druck
ca. Garzeiten
in Minuten
Wasser-
zugabe
Bohnen •8 – 11 200 ml
Blumenkohl •3 – 5 200 ml
Pellkartoffeln •17 150 ml
Salzkartoffeln •7 200 ml
Kohl •8 – 10 100 ml
Kohlrabi •4 – 5 150 ml
Paprikaschoten •3 – 4 100 ml
Rotkraut •8 – 10 100 ml
Sauerkraut •10 – 15 200-300 ml
Sellerie (Knollen) •10 – 12 200 ml
Spargel •5 – 10 500 ml
Spinat •3 100 ml
Fleisch hoher
Druck
ca. Garzeiten
in Minuten
Wasser-
zugabe
Fleischrouladen (Rind) •10 – 12 100 ml
Geschnetzeltes •5 – 8 100 ml
Gulasch •15 – 25 100 ml
Hackbraten •10 – 15 150 ml
Hackfleisch •6 – 10 100 ml
Kalbsbraten •25 – 30 150 ml
Kalbshaxe •28 – 32 150 ml
Kalbskotelett •8 – 10 100 ml
Fleisch hoher
Druck
ca. Garzeiten
in Minuten
Wasser-
zugabe
Kalbsragout • 15 – 23 100-200 ml
Kalbszunge •10-15 mit Wasser bedecken
Lammbraten • 25 – 30 100-150 ml
Rindfleisch zum Sieden •35 – 45 nach Belieben
Rinderbraten •35 – 45 200 ml
Rinderschnitzel •10 – 15 100 ml
Rinderzunge •45 – 55 mit Wasser bedecken
Rollschinken •15 – 20 mit Wasser bedecken
Schweinefleisch
(gesalzen) •14 – 16 mit Wasser bedecken
Schweinefleisch
(geräuchert) •17 – 19 mit Wasser bedecken
Schweinebraten •20 – 30 100-150 ml
Schweinekotelett •10 – 12 mit Wasser bedecken
Schweinehaxe •30 200 ml
Huhn •20 – 30 mit Wasser bedecken
Hasenbraten •15 – 20 100-150 ml
Hirschmedaillons •5 – 10 100 ml
Rebhühner •12 – 20 100 ml
Reh-, Hasen-, Hirsch-,
Wildschweinpfeffer •15 – 18 150-200 ml
Rehkeule •30 150-200 ml
Rehschnitzel •5 – 10 100 ml
03454_PraktikaPlusXS D-UK-F-ES_2013-02-11.indd 16-17 2/11/2013 8:13:15 AM

1918 19
Important Safety Precautions
Please remember the following safety precautions:
• Read all instructions through carefully.
• Never use the pressure cooker near children.
• Do not place the pressure cooker in a hot baking oven.
• Move the pressure cooker very carefully if it is currently under pressure.
Do not touch the hot surfaces, use the handles and knobs. Also use an
oven glove where necessary.
• Use the pressure cooker only for the purpose for which it is intended.
• Food is prepared in this cooker under pressure. You could be badly burned
if you use the cooker in the wrong way. Please make sure that the pressu-
re cooker is properly closed before placing it on the heat source. You will
find more information on this in the instruction booklet.
• Never open the pressure cooker by force. Make sure that the internal
pressure has been fully reduced before opening the cooker. Please refer
to the instructions for further details.
• Never heat the pressure cooker without first putting water into it. If heated
without water, the cooker will be seriously damaged.
• Knobs/handleswhicharenotmade ofsyntheticmaterials maybecomehot,
always use oven gloves or similar
• Do not attempt to extinguish burning fat with water.
• Do not fill the pressure cooker more than 2/3 of its nominal volume. If
you are preparing food such as rice or dried vegetables that may swell
while cooking, fill the pressure cooking no more than half of its nominal
value.
• Use only heat sources which are denoted as approved in the instruction
booklet:
• If you have cooked meat with the skin still intact, (e.g. ox tongue), the
skin can swell under pressure. In this case, do not pierce the meat while
the skin is still swollen. You could be badly burned.
• If you are preparing mushy food, please shake the pressure cooker gently
before you open the lid - this will prevent hot spatter.
• Before each use, please make sure that the valves are not blocked. Please
refer to the instructions for further details.
• Do not use the pressure cooker to fry food under pressure with oil.
• Never tamper with the cooker’s safety systems. Details of care and main-
tenance which you may carry out are contained in the instruction booklet.
• Only use original spare parts for the respective model. Use pot and lid
from the same manufacturer and make sure that they are compatible.
• Keep packaging films and protective sheeting away from children - There
is danger of suffocation!
• Please keep these instructions.
• Always include the instructions for use when lending the pressure cooker.
D
E
P
PL
CZ
H
RO
GR
BG
D
UK
F
I
03454_PraktikaPlusXS D-UK-F-ES_2013-02-11.indd 18-19 2/11/2013 8:13:15 AM

2120 21
Introduction
Congratulations on the purchase of your new Pressure Cooker! With two ad-
vanced design features: an encapsulated sandwich base and modern closing
system, your new pressure cooker is the ideal way of preparing meals. Despite
the reduced cooking time, pressure cooking preserves all vitamins, minerals
and flavors in food.
Figure and Scope of Delivery
Safety
The pressure cooker system is very safe. Care should be taken to ensure that
the lid closes properly so that the system can function as intended. The pressure
cooker has a two-level pressure regulator which regulates the pressure you
have selected as well as a built-in safety vent (see fig. 2) in the lid handle.
PLEASE NOTE: fill the cooker only up to the maximum filling height (see interior
marking).
Abb. 1
2
Silicon seal
(inside of lid)
Pressure regulation valve
Safety vent fig. 2
If the pressure increases too much, the
rubber gasket is pushed out through
an opening in the edge of the lid (fig.
1, no. ), so that the pressure can
escape (see fig. 3).
All the items marked on the diagrams (except nos. , 10 and 11 ) are
available as spare parts.
1 Lid handle
2 Cooker handle
3 Small handle
4 Rubber gasket (inside)
5 Pressure regulating valve
6 Safety vent
7 Safety opening
8 Cooking pot
9 Lid
10 Sandwich base
11 Opening button
12 Silicon seal (inside of lid)
13 Spanner (not shown in the
figure)
Abb. 3
fig. 3
D
E
P
PL
CZ
H
RO
GR
BG
D
UK
F
I
fig. 1
1
2
3
5
8
9
10
74
11
12
6
fig. 1
03454_PraktikaPlusXS D-UK-F-ES_2013-02-11.indd 20-21 2/11/2013 8:13:15 AM

2322 23
Instructions for Use
Before you use your pressure cooker for the first time, wash and rinse it tho-
roughly in hot water and dry immediately.
We recommend lubricating the rubber gasket with a little cooking oil to make
opening and closing the lid easier.
Please inspect the bottom of the cookware and the hob for any remaining dirt,
Sticker and unevenness. Moving the cookware around may cause damage.
To ensure that the correct pressure to speed up the cooking process is produced
in the cooker, the pot must contain a minimum quantity of liquid (water, stock,
etc.).
If you are preparing a dish which creates a lot of froth, the pot must not be
more than half full.
If you are making a puree, casserole or soup, etc., we recommend shaking
the pot gently before opening.
Tips for energy-saving cooking
To save valuable energy when cooking, please bear the following in mind:
• Remember that the pot bottom has a larger diameter than the hot plate,
and not vice-versa; this can save up to 15% energy.
• Always use the cooker with the lid on, this saves up to 20% energy.
• Make use of the after-heat of electrical hot plates. Switch off approxima-
tely 10 minutes before the cooking process is finished. This can save up
to 10% energy.
Closing the Pressure Cooker
Please check the safety devices before closing the pressure cooker.
The pressure regulating valve opening (see fig.
4) must be clean and the safety vent must not
be jammed. You can check this by pressing your
finger on the safety vent stopper (see fig. 4).
If you are able to press the stopper in, the safe-
ty vent is working properly. If the stopper does not respond to the pressure and
is jammed, it must be loosened and cleaned, as described on page 12. Place
the lid on the cooking pot in such a way that the marking on the cooker handle
(black dot) is aligned with the “0” mar-
king on the lid (see fig. 5). Then press
the lid down slightly and turn it until both
handles are on top of one another.
The pressure cooker is now properly
closed.
Now set the pressure you require on the
pressure regulating valve:
High pressure (II), Low pressure (I)
(see fig. 6)
D
E
P
PL
CZ
H
RO
GR
BG
D
UK
F
I
Abb. 5
fig. 5
Silicon
seal
Safty vent fig. 4
High pressure (II) Low pressure (I)
Steam
Release
Function
Function for
removing
the pressure
control valve
fig. 6
Model No ASC18-2.7
Diameter Ø18 cm
Volume 2.7 L
Operating I 60Kpa
Pressure II 100Kpa
03454_PraktikaPlusXS D-UK-F-ES_2013-02-11.indd 22-23 2/11/2013 8:13:15 AM

2524 25
Starting Cooking
When you start cooking, we recommend turning up the heat source to the
highest setting so that the required pressure is reached as quickly as possible
in the pot. Please bear in mind that you should never fill the pressure cooker
above the interior filling mark (“Maximum”). Otherwise the food being cooked
could soil the valve.
The safety vent will be pressed upwards by the pressure created in the pot and
will block the opening button. When the pressure cooker is under pressure it
cannot be opened.
As soon as steam comes out of the pressure regulating valve, this means that
there is sufficient pressure in the pressure cooker. You can now turn down the
heat so that the pressure is maintained but not too much steam escapes. Timing
starts from this point onwards.
Opening the Pressure Cooker
At first, switch of the electric supply and reduce the pressure.
There are two methods in order to open the lid:
(1) Slow cooling:
Switch off the energy supply. Have the cooker be cooled down normally in the
air until the locking pin sinks. Afterwards you can open the lid by pushing the
slide switch forward and turning the lid handle counterclockwise until the two O
markings are facing each other (see fig. 7).
Position open
Position close
fig. 7
(2) Quick cooling:
Place the pressure cooker under the water tap and rinse it slowly with cold
water until the locking pin sinks (see fig. 8). Afterwards the lid can be opened
as described above (see fig. 7).
fig. 8 fig. 9
Remark: Do not rinse the cooker too strongly in order to avoid water entering
the cooker via the safety valve and / or the pressure control valve. After ope-
ning the slide bar should remain in the stop position. If it returns to the close
position, please slide it back until the stop because otherwise the lid will not fit
on the cooker (see fig. 9).
D
E
P
PL
CZ
H
RO
GR
BG
D
UK
F
I
03454_PraktikaPlusXS D-UK-F-ES_2013-02-11.indd 24-25 2/11/2013 8:13:15 AM

2726 27
Attention:
If the locking pin has not sunk (the pressure is still in the cooker), you must
not open the cooker. Please wear gloves when opening the cooker in order to
avoid injuries.
In the case of mushy food such as rice pudding, potage etc. the cooker should
be slightly agitated in order to remove the air bubbles. NEVER OPEN THE LID
BY FORCE!
Cleaning the Safety Vent
To clean the safety vent, first loosen
the holding screw (see fig. 10). You
can then lift the safety vent out and
clean it thoroughly. Use the supplied
spanner for this purpose.
The safety vent may not be
divided!
Removing the Pressure control valve
To clean the silicone sealing ring, please remove the pressure control valve
(see fig. 6, page 23).
D
E
P
PL
CZ
H
RO
GR
BG
D
UK
F
I
Care and Maintenance
After use, wash your pressure cooker with hot water and a non-abrasive
washing-up liquid. The lid and rubber gasket cannot be washed in a dishwasher.
With stronger, more resistant soiling we recommend to soak them for a while.
Do not use any sharp or pointy objects for cleaning, even in case of heavy
soiling. Remove limescale residue by using vinegar.
The rubber gasket must not be washed with washing-up liquid. After
washing, the pot and the lid should be dried thoroughly and stored with the lid
facing upwards. It is not a good idea to put the cooker away with the lid
closed, as this will cause the rubber to deteriorate more quickly.
Basic Information
Screwed fittings can become loose over time. These can, however, easily be
tightened using a standard screwdriver. Induction stoves may sometimes
produce a buzzing noise during cooking. This is due to technical reasons and
does not indicate a fault of the cookware. Preheat the cookware at no higher
than a medium heat. Empty cookware may reach temperatures of up to 500°C
very quickly, particularly on induction hobs.
Holding screw for safety vent
(marked red)
Silicon seal for pressure
regulating valve fig. 10
03454_PraktikaPlusXS D-UK-F-ES_2013-02-11.indd 26-27 2/11/2013 8:13:15 AM

28 2929
D
E
P
PL
CZ
H
RO
GR
BG
D
UK
F
I
Table of Cooking Times
The times given below are only approximate, as they naturally depend on the
quality and condition of the food to be cooked.
You will very quickly learn from experience and know exactly how long each
dish will take to cook.
It is not necessary to defrost frozen vegetables or fish before pressure cooking,
just increase the cooking time slightly.
Health warning
Please note that persons who are allergic to nickel may suffer complications
through using stainless steel pots and pans.
WARNING:
The pressure cooker may only be repaired by authorized qualified personnel.
What to do if
... steam is escaping between the lid and the pot ?
This means either that the rubber gasket is defective or the pot is not properly
closed. Replace the defective rubber gasket. Close the pot correctly (see chapter
“Closing the Pressure Cooker”). If the rubber gasket is just dirty, it should be
washed.
... no steam is coming out of the pressure regulating valve ?
This means that the pot is not correctly sealed and this should be checked. If
the pressure regulating valve is dirty, the valve should be cleaned. Check also
whether there is sufficient liquid in the pot. There may be not enough pressure
in the pot. Carefully readjust the energy supply as needed. If the rubber gasket
is dirty or defective, clean or replace it. The rubber gasket will need replacing
once a year.
... too much steam is escaping from the pressure valve?
The heat source is probably turned up too high and should be turned down.
It could also mean that the pressure regulating valve is dirty.
Soups High
pressure
Low
pressure
approx. cooking
time in minutes
Bean soup •20
Pea or lentil soup
(pre-soaked)
•12 – 15
Vegetable soup •5 – 8
Goulash soup •15 – 20
Chicken soup •15 – 20
Potato soup •6 – 8
Meat stock •20 – 25
Rice soup •8
Beef soup •25 – 45
03454_PraktikaPlusXS D-UK-F-ES_2013-02-11.indd 28-29 2/11/2013 8:13:16 AM

3130 31
D
E
P
PL
CZ
H
RO
GR
BG
D
UK
F
I
Vegetables High
pressure
Low
pressure
approx. cooking
time in minutes
Added
water
Beans •8 – 11 200 ml
Cauliflower •3 – 5 200 ml
Unpeeled potatoes •17 150 ml
Peeled potatoes •7 200 ml
Cabbage •8 – 10 100 ml
Kohlrabi •4 – 5 150 ml
Peppers •3 – 4 100 ml
Red cabbage •8 – 10 100 ml
Pickled cabbage •10 – 15 200-300 ml
Celeriac •10 – 12 200 ml
Asparagus •5 – 10 500 ml
Spinach •3 100 ml
Meat High
pressure
approx. cooking
time in minutes
Added
water
Beef olives •10 – 12 100 ml
Diced meat •5 – 8 100 ml
Goulash •15 – 25 100 ml
Meat loaf •10 – 15 150 ml
Mince •6 – 10 100 ml
Veal joint •25 – 30 150 ml
Leg of veal •28 – 32 150 ml
Meat High
pressure
approx. cooking
time in minutes
Added
water
Veal cutlet •8 – 10 100 ml
Veal stew • 15 – 23 100-200 ml
Tongue of veal •15 – 10 cover with water
Lamb joint • 25 – 30 100-150 ml
Stewing beef •35 – 45 to taste
Beef joint •35 – 45 200 ml
Beef cutlet •10 – 15 100 ml
Tongue of beef •45 – 55 cover with water
Rolled ham •15 – 20 cover with water
Pork (salted) •14 – 16 cover with water
Pork (cured) •17 – 19 cover with water
Pork joint •20 – 30 100-150 ml
Pork cutlet •10 – 12 cover with water
Leg of pork •30 200 ml
Chicken •20 – 30 cover with water
Hare •15 – 20 100-150 ml
Venison medallions •5 – 10 100 ml
Partridge •12 – 20 100 ml
Jugged venison /
hare / boar •15 – 18 150-200 ml
Haunch of venison •30 150-200 ml
Venison cutlet •5 – 10 100 ml
03454_PraktikaPlusXS D-UK-F-ES_2013-02-11.indd 30-31 2/11/2013 8:13:16 AM

33
32 33
Mesures de précaution importantes
Veuillez prendre en considération les points suivants:
• Lire soigneusement les instructions.
• Ne jamais utiliser l’autocuiseur à proximité d’enfants.
• Ne jamais mettre l’autocuiseur dans un four chaud.
• Déplacez l’autocuiseur prudemment quand il est sous pression. Ne touchez
pas les surfaces brûlantes, mais utilisez les manches et la poig née opposée.
Vous pouvez également employer une paire de gants de protection.
• N’utilisez l’autocuiseur que pour la fin, pour laquelle il est prévu.
• Les aliments dans cet ustensile seront préparés sous pression. Une utilisa-
tion inappropriée pourra provoquer des brûlures à l’autocuiseur. Vérifiez
que l’autocuiseur soit bien fermé, avant de le mettre sur la plaque. Vous
trouverez dans cette notice des informations concernant sa fermeture.
• N‘ouvrez jamais l‘autocuiseur de force. Avant l‘ouverture, assurez-vous
que la pression intérieure est complètement retombée. Vous trouverez de
plus amples informations à ce sujet dans le mode d‘emploi.
• Ne jamais surchauffer l’appareil, sans avoir préalablement mis de l’eau.
Sans eau, l’autocuiseur est endommagé.
• Les poignées/manches qui ne sont pas en plastique peuvent chauffer, uti-
lisez toujours des maniques ou similaires.
• Ne pas éteindre la matière grasses en feu avec de l‘eau, mais avec une
couverture ignifuge ou un extincteur adapté.
• Ne remplissez jamais l‘autocuiseur au-delà des deux tiers de sa capacité. Pour
cuire des aliments qui gonflent à la cuisson, tels que le riz ou les légumes secs,
ne remplissez pas l‘autocuiseur au-delà de la moitié de sa capacité.
• Utilisez seulement les sources de chaleur mentionnées ci-dessous:
• Si vous cuisinez de la viande avec sa peau (par exemple: langue de
boeuf), celle-ci peut gonfler en étant sous pression. Ne pas piquer la vi-
ande aussi longtemps que la peau est gonf lée, sinon vous pouvez vous
brûler.
• Si vous préparez des aliments en bouillie, prêtez attention à ne bouger
l’autocuiseur que très doucement pour éviter le giclement de la nourriture
à l’extérieur, avant de soulever le couvercle.
• Avant chaque utilisation, vérifiez que les soupapes ne sont pas obstruées.
Vous trouverez de plus amples informations à ce sujet dans le mode
d‘emploi.
• Ne pas utiliser l’appareil pour frire à l’huile des aliments sous pression.
• Seul le personnel qualifié pour l’entretien peut effectuer des interventions
aux systèmes de sécurité.
• Utilisez uniquement des pièces de rechange originales conformes au
modèle correspondant. En particulier, utilisez une cuve et un couvercle
provenant du même fabricant et assurez-vous que ces derniers sont com-
patibles.
• Conservez les films d’emballage et de protection hors de la portée des
enfants ; il existe un risque d’asphyxie
• Conservez ces instructions.
• Si vous transmettez l’autocuiseur à des tiers, veuillez toujours leur remet-
tre également ces instructions.
D
E
P
PL
CZ
H
RO
GR
BG
D
UK
F
I
03454_PraktikaPlusXS D-UK-F-ES_2013-02-11.indd 32-33 2/11/2013 8:13:16 AM

3534 35
Introduction
Nous vous félicitons pour l’acquisition de votre nouvel autocuiseur. Cet autocu-
iseur vous permet de préparer vos aliments grâce à deux techniques idéales:
le fond sandwich capsulé et le système du couvercle. Bien que sa cuisson soit
rapide, les vitamines, les minéraux et la saveur de vos aliments sont préservés.
Illustration et contenu de la livraison
Sécurité
Le système de l’autocuiseur est très sûr. Il convient de veiller à ce que le couver-
cle soit correctement fermé. Le système peut alors fonctionner. Le pot dispose
d’un régulateur de pression à deux étages chargé de réguler la pression choisie
ainsi que d’une soupape de sécurité intégrée dans la poignée du couvercle
(voir fig. 2). Attention: Veuillez ne remplir l’autocuiseur seulement jusqu’à son
niveau maximum (voir la marque à l’intérieur).
Abb. 1
2
Joint en silicone
(côté intérieur du couvercle)
Soupape de régulation de pression
Soupape de sécurité fig. 2
Lors d’une montée excessive de la
pression, le joint en caoutchouc ressort
par un évidement sur le côté du
couvercle (voir fig. 1, ) et la
pression peut s’échapper (voir fig. 3).
Tous les éléments cités sont disponibles en pièces détachées (à l’exception
de , 10 & 11 ).
fig. 3
1 Manche du couvercle
2 Manche du pot
3 Poignée opposée
4 Joint en caoutchouc (intérieur)
5 Soupape de régulation de pression
6 Soupape de sécurité
7 Ouverture de sécurité
8 Pot
9 Couvercle
10 Fond capsulé
11 Bouton de déverrouillage
12 Joint en silicone (côté intérieur
du couvercle)
13 Clé (non illustrée)
D
E
P
PL
CZ
H
RO
GR
BG
D
UK
F
I
fig. 1
1
2
3
5
8
9
10
74
11
12
6
03454_PraktikaPlusXS D-UK-F-ES_2013-02-11.indd 34-35 2/11/2013 8:13:16 AM

3736 37
Notice d’utilisation
Avant la première utilisation, l’autocuiseur doit être soigneusement lavé et rincé à
l’eau chaude avant d’être séché immédiatement.
Afin de mieux pouvoir ouvrir et fermer le couvercle, il est recommandé de graisser le
joint en caoutchouc avec un peu d’huile de cuisine.
Veuillez contrôler que le fond de l‘ustensile de cuisine, ainsi que la plaque de cuisinière
n‘aient pas de de restes sales, ni d’autocollants, ni d’inégalités. Tirer et repousser les
ustensiles de cuisine peuvent les abîmer.
Afin que l’autocuiseur puisse produire de la pression, ce qui accélèrera la cuisson des
aliments, celui-ci doit contenir une quantité de liquide suffisante (eau, bouillon, etc.).
Pour la préparation de plats avec beaucoup de mousse, le pot ne doit pas être rempli
au-delà de la moitié.
Pour la préparation de purée, de pot au feu, de soupes ..., nous vous recommandons
de secouer légèrement le pot avant de l’ouvrir.
Informations pour une cuisson économisant
de l’énergie
Pour économiser de l’énergie, lors de la cuisson, veuillez respecter les indications su-
ivantes:
• Portez attention à ce que le diamètre du fond du pot soit plus grand que la pla-
que de cuisson et non l’inverse. Votre économie d’énergie pourra atteindre 15%.
• Utilisez le pot, si possible, toujours avec son couvercle, vous économiserez ainsi
jusqu’à 20%.
• Utilisez la chaleur des plaques de cuisson électriques. Eteignez la plaque environ
10 minutes avant la fin de la cuisson. Ainsi l’économie d’énergie pourra aller
jusqu’à 10%.
Fermeture du pot
Veuillez contrôler les dispositifs de sécurité avant de fermer le pot.
Pour ouvrir la soupape de régulation de pression
(voir fig. 4), elle doit être propre et la soupape
de sécurité ne doit pas être bloquée. Vous pou-
vez contrôler ce dernier point en exerçant une
pression avec le doigt sur la tige de la soupape
de sécurité (voir fig. 4).
Si la tige s’enfonce, la soupape de sécurité fonctionne correctement. Si la tige
ne bouge pas et reste bloquée, elle doit être desserrée et nettoyée (description
page 40). Placez le couvercle sur le pot de façon à ce que le repère sur le
manche du pot forme une ligne avec le
repère « O » du couvercle (voir fig. 5).
Puis, appuyez légèrement sur le couver-
cle et tournez-le jusqu’à ce que les deux
manches soient superposés.
L’autocuiseur est à présent correctement
fermé. Réglez maintenant la pression
souhaitée au niveau de la soupape de ré-
gulation de pression:
Haute pression (II), Basse pression (I)
(voir fig. 6)
fig. 5
D
E
P
PL
CZ
H
RO
GR
BG
D
UK
F
I
Joint en
silicone
Soupape de sécurité fig. 4
Haute pression (II) Basse pression (I)
Vapeur
d‘évacuation
Retrait de la
soupape de
réglage de
pression
fig. 6
Numéro de modèle
ASC18-2.7
diamètre Ø18 cm
volume 2.7 L
la pression I 60Kpa
de fonctionnement II 100Kpa
03454_PraktikaPlusXS D-UK-F-ES_2013-02-11.indd 36-37 2/11/2013 8:13:16 AM

3938 39
Début de la cuisson
Nous recommandons de régler, dès le début de la cuisson, la source d’énergie
sur le niveau le plus élevé, afin que la pression souhaitée dans le pot soit
atteinte le plus rapidement possible. Veuillez à ce que le trait « Maximum »
à l’intérieur de l’autocuiseur ne soit pas dépassé.
Si celui-ci est dépassé, votre cuisson salira la soupape de sécurité. Avec
l’augmentation de la pression dans le pot, la soupape de sécurité est poussée
vers le haut et bloque ainsi le bouton de déverrouillage.
Le pot, désormais sous pression, ne peut pas être ouvert. La vapeur qui sort
ensuite de la soupape de régulation de pression indique qu’il y a suffisamment
de pression dans l’autocuiseur. Vous pouvez alors réduire la source de chaleur
de façon à ce que la pression soit maintenue en évitant que trop de vapeur
s’échappe. C’est à partir de ce moment que le temps de cuisson est calculé
Ouvrir l’autocuiseur
Veuillez tout d’abord couper l’alimentation en énergie et réduire la pression.
Il existe deux méthodes pour ouvrir le couvercle:
(1) Refroidissement lent :
Couper l’alimentation en énergie. Laisser refroidir l’autocuiseur normalement,
à l’air ambiant, jusqu’à ce que la goupille de verrouillage baisse. Vous pouvez
alors ouvrir le couvercle en glissant le bouton coulissant vers l’avant et en tour-
nant la poignée du couvercle dans le sens inverse des aiguilles d’une montre,
jusqu’à ce que les deux marques O se trouvent face à face (voir illustration 7).
Position ouverte
Position fermée
Position ouverte
Position fermée
fig. 7
(2) Refroidissement rapide:
Placer l’autocuiseur sous le robinet, le rincer lentement à l’eau froide jusqu’à
ce que la goupille de verrouillage baisse (voir illustration 8). Après cela, ouvrir
le couvercle comme indiqué ci-dessus (voir illustration 7).
fig. 8 fig. 9
Remarque : ne pas rincer l’autocuiseur de manière trop abondante, pour éviter
que de l’eau ne pénètre dans celui-ci via la soupape de sécurité et/ou via
la soupape régulatrice de pression. Après ouverture, le bouton coulissant doit
rester à l’arrêt. Quand celui-ci retourne dans la position de fermeture, veuil-
lez de nouveau le faire glisser vers l’avant jusqu’à l’arrêt ; en cas contraire,
le couvercle ne peut se trouver en position correcte sur l’autocuiseur (voir
illustration. 9).
D
E
P
PL
CZ
H
RO
GR
BG
D
UK
F
I
03454_PraktikaPlusXS D-UK-F-ES_2013-02-11.indd 38-39 2/11/2013 8:13:17 AM
Other manuals for Praktika Plus XS
1
This manual suits for next models
1
Table of contents
Languages:
Other Elo TouchSystems Electric Pressure Cooker manuals