DOT 320 User manual

08591
Gasan Digital 1-Ro2, Geumcheon-gu, Seoul, Korea
10F No. 1005 (Gasan-dong, Woorim Lions Valley 2nd)
Phone Number: +82) 2-864-1113
Fax: +82) 2-864-1989
Email: [email protected]
Homepage: www.dotincorp.com
Dot Pad 320
(DPA320A)
Simple Guide
Dot Incorporation

Table of Contents
Table of Contents 1
1. About Dot Pad 320 (DPA320A) 3
1.1. What is Dot Pad 320? 3
1.2. Dot Pad 320 Appearance 3
1.2.1 Dot Pad 320 Top view 4
1.2.2. Dot Pad 320 Right Side 5
1.2.3. Dot Pad 320 Left Side 6
1.2.4. Dot Pad 320 Bottom Surface 6
1.3. Hardware Specifications 7
1.4 Software Specifications 7
2. Basic Functions 8
2.1. Understanding device information through Dot Pad 320 vibration signals 8
2.2. Checking the battery level 8
3.1 Introduction to Dot Canvas 8
3.2 Connecting Dot Pad 320 to Dot Canvas 9
3.3 Dot Canvas Features 9
3.3.1. Setting 9
3.3.2 Play Scratch 9
3.3.3. Drawing 10
3.3.4. Gallery 10
3.3.5. Online Gallery 10
4. Using DTM (Dynamic Tactile Map) Editor 11
4.1 Introduction: DTM Editor 11
4.2 DTM Editor Screen Layout 11
4.2.1. Content Library 11
4.2.2. DTM Editor Page 11
4.3 Connecting Dot Pad 320 DTM Editor 12
4.3.1 Connecting Dot Pad 320 12
4.3.2 Disconnecting Dot Pad 320 12
4.3.3 Printing on Dot Pad 320 12
4.4 DTM Editor Tools 12
4.5 DTM Editor Tool Shortcuts 13
5. Application of Dot Pad 320 with VoiceOver 13
5.1 Connecting/Disconnecting with iPhone/iPad 13
5.1.1. Connecting iPhone/iPad with the Dot Pad 320 13
5.1.2. Disconnecting the Dot Pad 320 14
5.2. Default Key Settings 14
5.3. Connecting iPhone/iPad with the Dot Pad 320 to read braille and tactile images 14
5.3.1. Reading Braille Text 14
5.3.2. Displaying the Image 14
5.4. Reading images in detail with rotors 15
5.4.1. Adding Image Navigation Options to the Rotor 15

5.4.2. Using Image Inversion 15
5.4.3. Enlarging an Image 15
5.4.4. Scrolling Images Horizontally and Vertically 15
5.4.5. Adjusting the Image Line Thickness 16
5.5. Viewing Images Using Voiceover Recognition 16
5.5.1. Creating Image Recognition Gestures 16
5.5.2. Using the Image Recognition Function to View an Image 16
5.6. Customizing the Dot Pad 320 Keys 16
6. Handling and Safety Precautions 17
7. Customer Support 19

1. About Dot Pad 320 (DPA320A)
1.1. What is Dot Pad 320?
The Dot Pad 320 is a display that can simultaneously represent Braille text and tactile graphics. It connects to
iPhone/iPad with OS 15.2 or above. When you connect to your iPhone/iPad, you can print the pictures,
photos, and icon shapes that appear on the screen as tactile information to the Dot Pad 320 in real-time.
Alternatively, you can use a dedicated SDK released by Dot to output tactile information from specific
applications to the Dot Pad 320.
1.2. Dot Pad 320 Appearance
When the Dot Pad 320 is removed from the box and placed on the desk, it is in the correct position when the
square body is slightly inclined away from the user.

1.2.1 Dot Pad 320 Top view
When the Dot Pad 320 is normally placed, the upper surface of the Dot Pad 320 is divided into the following
parts from nearest to farthest from the body:
- The graphic area: The graphic area takes up the most space from the top view with a total of 300, 8-pin
cells (horizontal 30 cells x vertical 10 cells). It is more compact compared to the Braille text area and has
equal spacing between the pins allowing clear representations of graphics.
- The keyboard area: Starting from the left to the right, the keyboard area consists of the Previous panning
key, Function keys(F1 through F4), and the Next panning key. The shape of the panning keys is a triangle,
which distinguishes them from other Function keys which are in an oval shape.
※ Note: A panning key is a key that moves to the previous and next line along the braille cells.
- Braille text display area: The Braille text display area serves as the braille output of a typical braille
information terminal; it consists of 20 cells in a long horizontally rectangular frame, arranged at standard
braille spacing. Thus, 20 alphabetic characters can be represented at the same time.
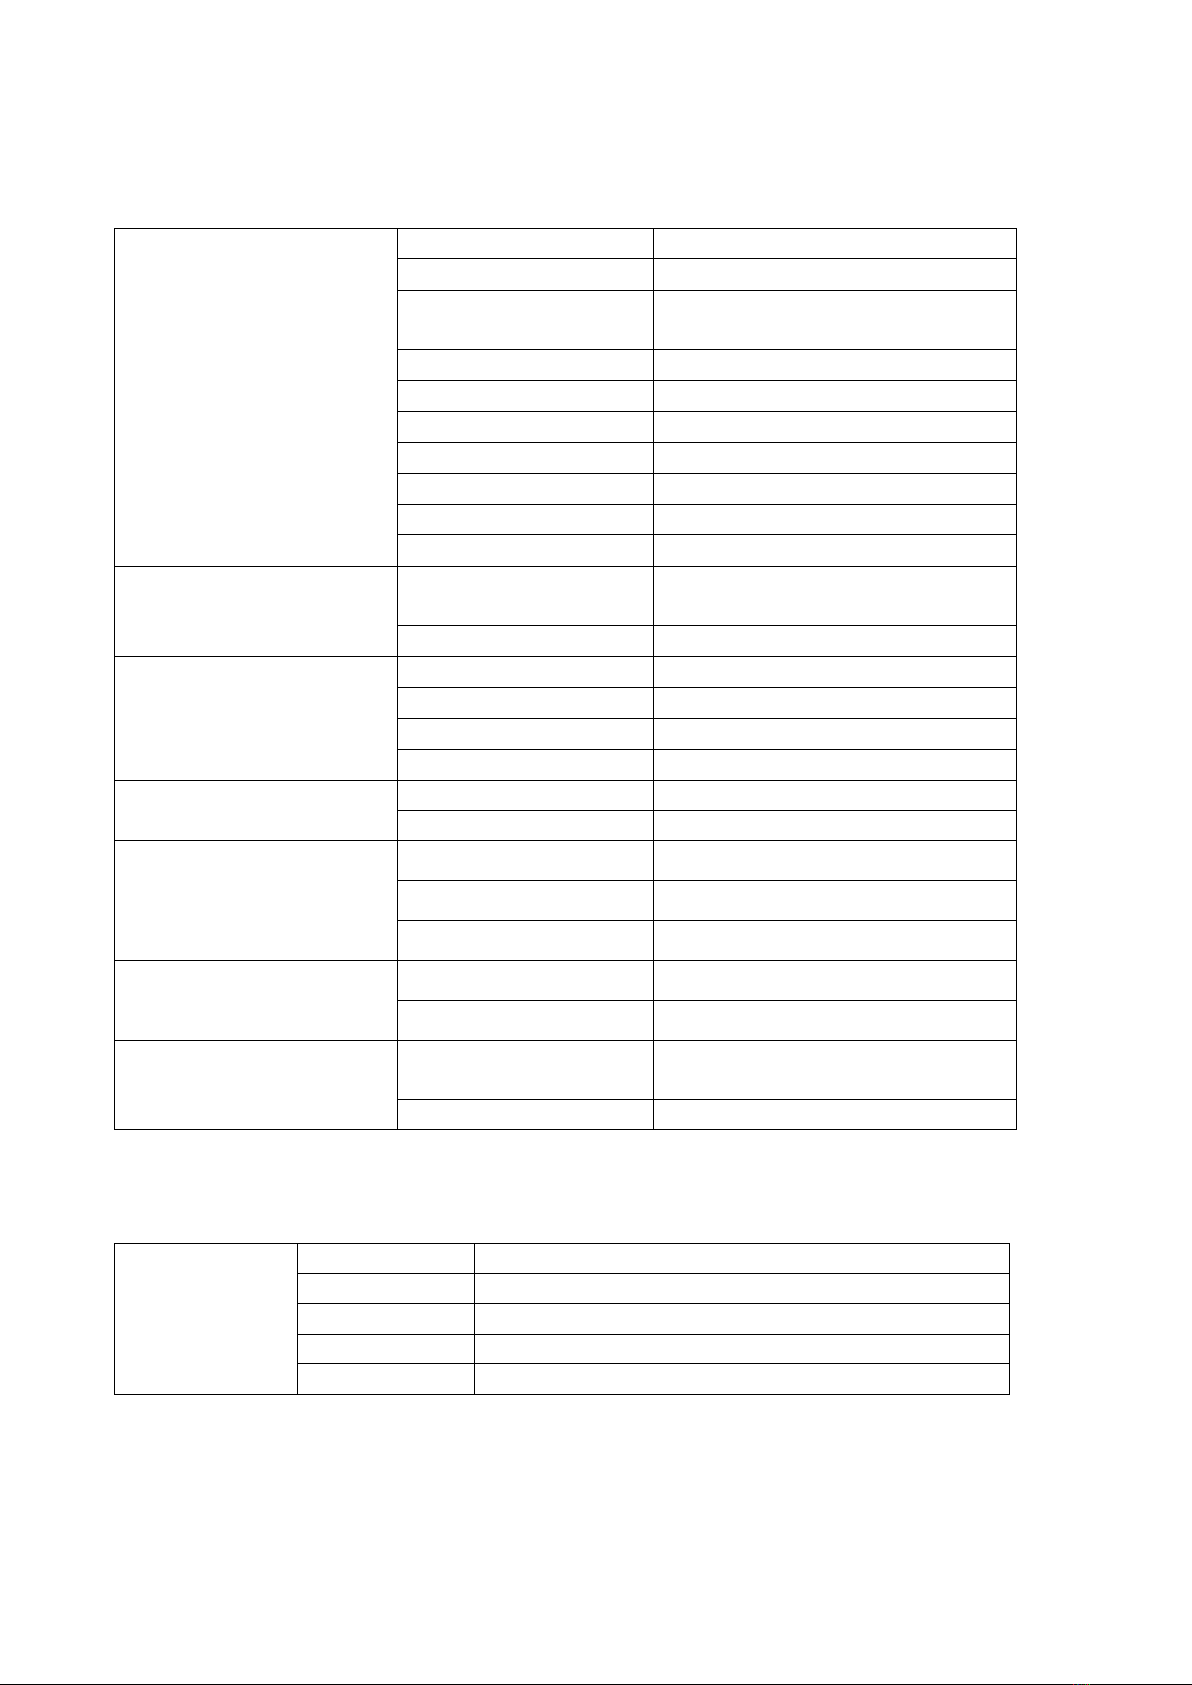
- LED indicator area : Two LED indicators are in the rightmost part of the keyboard area.
LED Color / State
Explanation
LED Color/State
Explanation
Blue / Blinking
Searching for device
Red / Blinking
Charging Error
Blue / turned on
Connected to device
Red / turned off
Fully Charged or
Device turned off
Red / turned on
Charging

1.2.2. Dot Pad 320 Right Side
On the right side of the Dot Pad 320, starting from the rear to the front, there is a USB C type power
charging port, followed by a power switch. A USB C type power port is a power only port. Keep in mind
that there is no data transfer.
The power switch powers on when pushed up to the far side of the body. A long vibration feedback occurs
when turned on. For more information on the vibration pattern, see section “2.1 Understanding device
information with a Dot Pad 320 vibration signal".

1.2.3. Dot Pad 320 Left Side
On the left side of the Dot Pad 320 is a USB C type port for data transfer. You can connect it to your PC via
USB C cable. This port can be controlled by the manager.
1.2.4. Dot Pad 320 Bottom Surface
The bottom surface of the Dot Pad 320 has a battery part and a screw part that can replace the film for braille
cell protection film. The batteries provided in the Dot Pad 320 are not detachable, so when replacing the
batteries, be sure to replace them via Dot Inc. or a company authorized by Dot. Please contact Dot Inc.’s
customer service for more information.

1.3. Hardware Specifications
Hardware Specifications
Tactile Display
300 cells
Braille Display
20 cells
Protective Skin
Graphics area (300 cells) / Text area
(20 cells)
Processor
ARM Cortex-M4 32-Bit 120MHz
RAM
64 Kbyte
Flash Memory
128 Kbyte
External Memory Support
None
Wireless Connection
Bluetooth LE V5.0
Sensor
None
Camera
None
Exterior Specifications
Size (length x width x
height, mm)
273.6(L) x 228.5(W) x 16.3(H)
Weight (g)
1,200 g
Keyboard and buttons
Function Keys
Function Key 4ea
Panning Key
Left, Right
Power Switch
Power ON/OFF 1ea
Keyboard
None
USB interface
USB-C (left)
Data
USB-C (right)
Power and Charging
Audio and video interface
Speaker
None
Microphone
None
HDMI Video Output
None
Temperature
Operating Temperature
0℃ ~ +50℃
Storage Temperature
-20℃ ~ +70℃
Charging and battery
Battery
LI_ION, INR18650 35E, 10.05A,
36.18W[1S3P]
Charge
DC 5V 3A
1.4 Software Specifications
Communication
(Bluetooth)
Specification
Bluetooth V5.0 (LE up to 10Kbps)
Output Power
0 dBm
Data rate
10 kbps
Profile
GAP, GATT, SM, L2CAP and Integrated Public Profiles
Sensitivity
-90 dBm

2. Basic Functions
In this section, you will get to know the different vibration patterns to test the Dot Pad 320’s state and ways
to check the battery level.
2.1. Understanding device information through Dot Pad 320 vibration signals
The vibration pattern of the Dot Pad 320 informs the user with information on battery level, Bluetooth
connection, power status and so on.
Status
Vibration Pattern
Power on
One long vibration
Power Connection
Once connected successfully, vibration will indicate the battery status
Battery Level
1~5 vibrations (according to the battery level)
Bluetooth Connected
Two long vibrations
2.2. Checking the battery level
To check the battery level of the Dot Pad 320, you can press and hold the previous and next panning keys at
the same time for at least 1.5 seconds while powered on, and then release them. The levels for displaying the
remaining battery are divided into 5 levels and are notified by vibration feedback.
Number of
vibrations
5
4
3
2
1
Battery Level
Above 80%
60% ~ 80%
40% ~ 60%
20% ~ 40%
Below 20%
※Please connect the power cable if the battery level is below 20%
3. Using Dot Canvas
3.1 Introduction to Dot Canvas
Dot Canvas is an application that can be used with Dot Pad 320 and expresses all types of information such
as dots(points), lines, planes, shapes, drawings, words, and anything. Dot Canvas application encourages and
increases creativity in visually impaired users by enabling them to create and edit image-based contents
independently without the assistance of a third party.
※Dot Canvas App can be downloaded from App Store.

3.2 Connecting Dot Pad 320 to Dot Canvas
After launching the Dot Canvas application, please select the “Connect Device” button and a ready-to-
connect (Bluetooth pairable) device will be listed together with the strength signal (RSSI). Select the Dot Pad
320 that you want to connect and tap and it will be successfully connected.
※ If the your device is not in the list, disconnect the Dot Pad 320 from Bluetooth in Voiceover settings.
[Settings] > [Accessibility] > [VoiceOver] > [Braille]
3.3 Dot Canvas Features
3.3.1. Setting
Once the Dot Pad 320 is successfully paired to Dot Canvas, the screen will automatically change to select
mode and VoiceOver will focus [Settings] at top right corner.
Users may disconnect the BLE (Bluetooth Low Energy) connection from the Dot Pad 320 as well as change
the language of the braille translation engine. Braille translation engine supports 13 languages. (English,
Korean, Chinese – simplified, French, German, Spanish, Russian, Italian, Arabic, Czech, Vietnamese,
Norwegian, Polish)
※The default language is English and the braille translation engine is only for the text function in Dot
Canvas.
3.3.2 Play Scratch
Users will be able to develop an understanding of length, width, and a sense of area and space by learning
and familiarizing dots(points), lines, and planes through Dot Canvas application’s “Play Scratch” feature.
Draw Freely: Straight line, right angle, right triangle, isosceles triangle, square, pentagon, hexagon, and the
shape circle will be displayed with speech explanation.
Draw Shapes: Square, right triangle, and the shape circle will be displayed on the tactile graphic display.
Users can enhance their sense of space by controlling the length, width and area.
- Select Draw Freely or Draw Shapes. Users will be asked to select geometrical shapes of his or her choice.
The users will access a drawing area where the users can draw and print the image on the Dot Pad 320.
Selected shape will be displayed on the graphic area of connected Dot Pad 320 as a sample.
- Draw Freely allows users a free-to-draw pen as a drawing tool. Draw Shapes allows users to draw
different sizes of shapes by dragging across the screen.
- The users can access the toolbar below the screen by tapping 4 times, allocating the focus to the Close
button within the toolbar.
※ Note: 4 taps are limited within toolbar area. If the users touch the drawing area, the focus will be removed from
the toolbar.
- The list of the tools starting from the right is Close button, Audio button, Clear All button, Sample Print
button, Print button, and Undo button.
- Close Button: Close the current screen
- Sample Print Button: Print the selected
geometric shapes into Dot Pad 320
- Audio Button: Play audio description on
selected geometrical shape
- Print Button: Print the image on drawing
area into Dot Pad 320

- Clear All Button: Delete all drawings
- Undo Button: Undo the previous drawing
- When the users select the audio button, the description of selected shape will be readed out. The users may
experience the tactile form of the shape and learn to draw on the drawing area.
※ Note: With Voiceover feature, each tool button is accessible on the full screen mode. However, once a tool is
selected, the users are limited to the toolbar area which is the button line of the screen.
3.3.3. Drawing
Users will be able to draw their desired image or add text through a variety of drawing tools and features.
- When Drawing is selected, the Canvas page is displayed. As a default mode, a drawing area is ready
to be used with the Pen tool selected. The toolbar is accessible below the screen.
- Tap 4 times at the bottom of the screen to allocate drawing focus to the toolbar. A default focus will
be on the Close button.
- The list of the toolbar from the right is in the following order:
○ Close Button: Close the current drawing. When the Close button is selected, a message
asking either to save the current drawing will appear. If the user wants to save the drawing,
enter a file name and select Save.
○ Save Button: Saves the current drawing/image to the device.
○ Audio Button: Allow the user to listen to text description which is added on Append Text.
○ Append Text Button: Allow the user to input text within the Braille text display area.
※ The language for the Braille can be selected in the Setting.
○ Circle/Right Triangle/Square Button: Allow the users to draw geometric shapes by dragging
and releasing the size of the shape.
○ Pen Button: Allow the users to freely draw.
○ Clear All Button: Clears out all inputs from the canvas.
○ Print Button: Prints the user’s current drawing/image onto the tactile graphic display.
○ Undo Button: Undoes or reverses the user’s last action. Users may reverse more than one
action.
3.3.4. Gallery
Users may view and edit drawings/images stored on the device.
When a drawing/image is selected, the “Print Button” and “Edit Button” are displayed.
- Print Button: Prints saved drawing onto the tactile graphic display.
- Edit Button: Users may edit a selected drawing file which opens through the “Drawing” feature.
3.3.5. Online Gallery
Users can view a variety of tactile graphics and images in the Online Gallery which is Dot’s cloud server.
Tactile images stored in the Online Gallery can be viewed, but can not be edited. After selecting the file, you
can print the image to the Dot Pad 320 via the double tap.
- Double tap to print the selected file into Dot Pad 320
- When the Audio button is selected, the description of the image will be played apart from Voiceover
feature.

4. Using DTM (Dynamic Tactile Map) Editor
※ Please inquire Customer Support to get access to DTM Editor.
4.1 Introduction: DTM Editor
DTM Editor is a Dot Pad 320 optimized web graphic editing tool where users can create, save and share
digital tactile graphics. With the tools available, non-experts can also create and save tactile graphics. Users
can also use and edit the tactile images that are already uploaded on Dot Cloud.
Users can upload image files onto DTM Editor to make it into a tactile graphic automatically. With Dot’s
Braille translator, we made it possible to print Braille from texts on the Dot Pad 320 immediately. DTM
Editor allows multiple Dot Pad 320 to be connected and displayed all at once.
Checklist before using DTM Editor:
(1) Availability of Bluetooth on your PC or Laptop
(2) Web Browser “Google Chrome” to be used
4.2 DTM Editor Screen Layout
The main screen of DTM Editor will show you a login and language button on the top right corner. There are
two languages supported: English and Korean and this can be changed by clicking it. Below the login and
language keys, there is a DTM Editor Editing Tool screen. On the screen there are: 1) Dot Pad 320 Print and
connect 2) DTM Page 3) DTM Editor Toolbar.
4.2.1. Content Library
The users can view tactile graphic content provided by Dot Inc.
- Select a library group to access tactile graphic contents. The selected image will be displayed on the
DTM whiteboard and ready to be printed on the connected Dot Pad 320.
- Contents are not authorized to edit by default. Any user who wishes to create, save, or modify
content on the library, please contact customer support.
4.2.2. DTM Editor Page
1) Connecting Dot Pad 320
- Along with New and Print buttons, Connect button is located at the top of the DTM Editor
screen.
- Once the Dot Pad 320 is connected to the DTM Editor, any tactile graphics displayed on the
DTM whiteboard can be displayed on the Dot Pad 320.
2) DTM Whiteboard
- DTM whiteboard is a drawing area which occupies the largest portion of the screen.
- The users can create tactile drawings or open a drawing file from the library.
3) DTM Toolbox
- DTM Toolbox is located vertically to the left of the screen.

4.3 Connecting Dot Pad 320 DTM Editor
4.3.1 Connecting Dot Pad 320
To connect the Dot Pad 320 to the DTM Editor, click [Dot Pad Conn] on the top right corner of the DTM
Editor Screen. There are two ways to connect the Dot Pad 320. One is via Bluetooth while the other is via
COM (C-type connector).
- If you want to add the device using Bluetooth, click [add device] and it will search for the Dot Pad 320
device that is nearby. Select the Dot Pad 320 that you want to connect and click [Pairing]. 2 vibrations on
the Dot Pad 320 indicates that it is successfully connected. If you want to pair multiple Dot Pad 320,
repeat the [pairing] steps
- If you want to connect via COM (C-type Connector), click [Add Device] and select the USB port that the
Dot pad 320 is connected to.
4.3.2 Disconnecting Dot Pad 320
There are two ways to disconnect the Dot Pad 320.
(1) Click on [Dot Pad Conn] > [Disconnect]
(2) Refresh Page
4.3.3 Printing on Dot Pad 320
DTM Print allows images and drawings to be printed out onto the Dot Pad 320. When the image is being
displayed on the Dot Pad 320, your hands must not be in contact with the display. There may be some delay
when displaying the graphic depending on the connection signal and the number of devices connected.
4.4 DTM Editor Tools
!
Undo/Redo
• Undo or redo the latest work
Pen Size
• Choose the thickness of the pen
Pen
• Draw freely
Vertical Mirror Pen
• Draw a symmetrical image
Move
• Recognize and move images on the
current page as one object
Paint Bucket
• Fill area with dots
• Use for closed shapes and lines
Eraser
• Delete the area you want to modify
• The size of the eraser is proportional
to that of the pen.
All Eraser
• Delete all images from the current page
Line
• Draw lines, straight lines, diagonal
lines, etc.
• Press [Shift] and draw to create a
straight line
Rectangle
• Draw rectangles/squares
• Press [Shift] and draw to create a
square
Circle
• Draw circles and ovals
• Press [Shift] and draw to create a
perfect circle
Triangle
• Draw triangles, right triangles, etc.
• Press [Shift] and draw to create an
acute triangle

Text
• Creates a text box and translates into
Braille directly
• Size and location of the text box can
be adjusted. (Both text and Braille will
be displayed on the web)
Table
• Create a table by selecting the number
of columns and rows, column spacing,
and row spacing
Text File
• Upload a text file (.txt) and translate it
into Braille directly
Image
• Automatically convert tactile graphics
by reading stored image files. Select
[Run]
• Select ‘DTMS’ after setting the clarity
of the tactile graphic. Enter on page.
* Image can only be converted to 1:1 ratio
Rectangle Selection
• Use shortcut keys to copy the selected
image in the rectangle
Lasso Selection
• Use shortcut keys to copy the selected
image in the lasso tool
4.5 DTM Editor Tool Shortcuts
!
Shortcut Keys
Editing Tool
Shortcut Keys
Editing Tool
Ctrl + X
Cut selected
DEL
Delete selected
Ctrl + C
Copy selected
Enter
Commit selected
Ctrl + V
Paste selected
5. Application of Dot Pad 320 with VoiceOver
The Dot Pad 320 can be used with an iPhone or iPad. Also you can use Dot Canvas application and DTM
Editor web software with iphone/ipad and PC that supports Bluetooth.
5.1 Connecting/Disconnecting with iPhone/iPad
Before connecting the Braille Graphic Information Device to your iPhone or iPad, your iPhone/iPad must
have an operating system version of iOS 15.2/iPad OS 15.2 or above. Here's how to check your operating
system version:
- Go to [Settings] > [General] > [Software Update]
- Check if the version is iOS 15.2/iPad OS 15.2 or above.
- If you have an operating system below iOS 15.2 installed, click the Software Update button that appears at
the bottom of the screen to proceed with the operating system update.
- If the update doesn't appear, make sure your iPhone/iPad supports iOS 15.2/iPad OS 15.2.
5.1.1. Connecting iPhone/iPad with the Dot Pad 320
If your iOS or iPad OS is 15.2 or above, follow these steps to connect the braille graphic information device.

- Turn the Dot Pad 320 on. The Dot Pad 320 is on connection standby.
- Go to [Settings] > [Accessibility] > [Voiceover] > [Braille]
- At the bottom of the screen, you'll see a list of braille displays that you can connect to. (Use the four-
finger tab to move to the end of the screen.)
- Use the one-finger swipe gesture to locate and select the "DPA320A xxxx (unique code for each device)"
device. This is the name of the Dot Pad 320 device.
- When connected, Voiceover on your iPhone or iPad indicates that you're connected to a braille display,
and the Dot Pad 320 will vibrate two times
- The Dot Pad 320 is connected successfully.
5.1.2. Disconnecting the Dot Pad 320
- Go to [Settings] > [Accessibility] > [Voiceover] > [Braille]
- Scroll to the bottom of the screen and find the "DPA320A xxxx (unique code for each device)" device.
- Use Voiceover's rotor function by rotating two fingers clockwise or anticlockwise to go through options,
to find [action]. (By default, the rotor value is automatically placed as “action”.)
- Swipe one finger up or down to select [More Information]
- Double-tap with one finger to activate [More information]
- Find and run [Forget this device]
- When the warning pop-up appears, locate, and run [Forget Device]
- When the Dot Pad 320 is disconnected, Voiceover outputs a sound that the braille display is disconnected.
- The Dot Pad 320 is disconnected from the iPhone/iPad.
5.2. Default Key Settings
The Function key can be used to connect with the voiceover:
- F1: Moves from the currently focused object to the previous one. (Swipe one finger to the left)
- F2: Go to Home.
- F3: Executes the currently focused object. (Double tap with one finger)
- F4: Moves from the currently focused object to the next object. (One finger right swipe)
5.3. Connecting iPhone/iPad with the Dot Pad 320 to read braille and tactile
images
The Dot Pad 320 can display braille text and graphics. Braille text is displayed on the braille cells close to
the front, and the graphic appears in the graphics area that occupies the largest area. This section walks you
through Voiceover to view basic braille and graphic information.
5.3.1. Reading Braille Text
The Braille Text area displays texts and its dedicated symbols that the VoiceOver reads out; if the text is too
long, use the previous and next panning keys to move and read the next braille text line.
5.3.2. Displaying the Image
The Dot Pad 320 displays images that the VoiceOver determines as image.

- Move to the home screen with the Dot Pad 320 connected.
- Focus on any application on the home screen.
- The application icon will appear on the graphic area while the text will appear on the Braille Text area
5.4. Reading images in detail with rotors
5.4.1. Adding Image Navigation Options to the Rotor
You can adjust the line thickness of the picture, enlarge the image, and more with the function that
VoiceOver support. To use the related features, you need to add the functions to the rotor.
- Go to [Settings] > [Accessibility] > [Voiceover] > [Rotor]
- Scroll the screen to find [Braille Zoom], [Braille line thickness], [Rotate braille horizontally], [Rotate
braille vertically], [Invert braille], and double tap each item to select it.
- With the message "Selected" the functions has been added to the rotor.
5.4.2. Using Image Inversion
Inverting an image is a function that converts an image’s outline from being embossed to being engraved.
- Focus on any image object. (e.g. application icon on the home screen)
- Notice that the image is displayed in the Dot Pad 320 graphics area.
- Move the rotor of the Voiceover and place it to [Invert braille]
- Swipe down with one finger to activate Invert
- The output image of the image on the Dot Pad 320 is reversed.
- If you want to recover to default, select [Invert braille] on the rotor, and then swipe up with one finger.
5.4.3. Enlarging an Image
Voiceover provides the function to zoom in the image on the Dot Pad 320 from a range of default image
scale,1.0, up to 10.0.
- Focus on the object with an image. (e.g. focus on any application on the home screen)
- In the rotor options, select [Braille Zoom].
- Swipe one finger up and down to adjust the magnification ratio.
- The currently focused graphic appears in the graphics area to match the magnification ratio you specify.
5.4.4. Scrolling Images Horizontally and Vertically
If the image is enlarged at a size that it is difficult to display it all at once in the Dot Pad 320 graphics area,
you can scroll the image left, right, up, and down to see the full picture of the image using [Rotate braille
horizontally] and [Rotate braille vertically]. ※Note: This feature can be used with the image magnified by
more than 1.5 times.
- Focus on the object that contains this image. (e.g. any application on the home screen)
- Align the rotor option with [Rotate braille horizontally].
- Swipe down with one finger to increase the value and scroll left.
- Swipe up with one finger to lower the value and scroll right.
- If you do the same in [Rotate braille vertically], the image displayed in the Dot Pad 320 scrolls up/down.

5.4.5. Adjusting the Image Line Thickness
You can adjust the line thickness of the images displayed on Dot Pad 320.
- Focus on an object that contains an image. (e.g. home screen application)
- In the rotor options, select [Braille Line Thickness].
- Swipe one finger up /down to adjust the line thickness.
- The default value is 0.3 and you can adjust the values from 0.1 to 1.0.
5.5. Viewing Images Using Voiceover Recognition
When Voiceover does not recognize any object as an image, image information can be collected using
artificial intelligence (AI) to view the relevant image on the Dot Pad 320. VoiceOver and Dot Pad 320
outputs the analyzed image.
※To activate this function, the device must be iOS/iPad OS 14 and above.
5.5.1. Creating Image Recognition Gestures
To use Voiceover recognition to send an image to the Dot Pad 320, you must manually add a gesture that
allows you to run Voiceover recognition; here's how:
- Go to [Settings] > [Accessibility] > [Voiceover] > [Recognize Voiceover].
- Locate [Image Description] and make sure that it is turned on.
- If the image description is off, double tap the [Image Description] toggle button to switch it to “On”.
- The data required for the image description is then downloaded.
- After completing the download, use the “Back” gesture or press [Back] to exit out to [VoiceOver].
- In this guide, we're going to set the [four-finger tap] to launch Voiceover Recognition.
- Go to [Commands] > [Touch Gesture] > [Four-finger tap] > [Image Description] in the VoiceOver
category and select
- If it has been added successfully, four-finger tap will activate AI to describe the contents of the image on
the current screen.
5.5.2. Using the Image Recognition Function to View an Image
If your Dot Pad 320 is connected to your iPhone/iPad, and Voiceover Recognition is enabled, manually
launch the image description function using a four-finger tap where you want to view the image. You can
view the analyzed image along with a description of the image by sending it to the Dot Pad 320.
5.6. Customizing the Dot Pad 320 Keys
The panning and function keys on the Dot Pad 320 can be modified to suit the characteristics of your
personal usage. For example, you can modify the F1 key from “move to the previous item” to “toggle the
screen curtain”.
- With your device connected to the Dot Pad 320, go to [Settings] > [Accessibility] > [Voiceover]
>[Braille].
- Find and focus on "DPA320A xxxx (unique code for each device)".

- Adjust the rotor to [Action]. (Rotor default setting is usually set to action.)
- Swipe one finger up/down to select and double tap [More Information]
- Find and select [Braille Command] to find the option category
- Select the desired option from [Braille], [Devices], [Interactive], [Keyboard], [Navigation], [Rotor],
[Voiceover].
- This guide uses [Navigation] as an example.
- Find and select [Browse] > [Next paragraph] > [Assign a new braille key]
- When the pop-up appears, customize a key to perform [Previous Paragraph] on the Dot Pad 320.
- This guide uses the previous panning (left arrow) key.
- If you press the previous panning (left arrow) key, a warning message appears that it is already in use.
- To ignore and modify the key, run the [Assign a new braille key].
- Now the panning key performs the new function of moving to the previous paragraph.
To keep the key intact, use the Back gesture in Voiceover to exit the warning pop-up.
6. Handling and Safety Precautions
The contents of this manual may differ from the actual content depending on the software version of the
product, the specifications of the model, and the user's settings. Do not use the product for any purpose other
than the original purpose. Use with caution as the product may be damaged if impacted.
- Keep the dot pads dry. If it is used in a humid place or is wet with water, the product may not work regularly.
- The dot pad has a built-in magnet. Do not place it close to other magnetic products or metals. There is a risk
of damage to the product.
- Use on a table away from the body and when used in a dusty area, foreign objects may get inside and interfere
with operation.
- Use accessories provided by Dot Incorp., Ltd. Use of other accessories may cause the product to malfunction
and may result in the Company not receiving the warranty service provided by Dot, Inc.
- If pressure is applied while the braille cell is moving, the product may not function normally. In this case, it
is not a breakdown, so we suggest you remove your hand and try again.
- If the product is used in the opposite direction, it may not be able to represent the braille correctly.
- Some product specifications are subject to change without notice to better serve you.
- If the dot pad firmware provided by Dot Incorp., Ltd. is changed or applied to the product through an
unofficial channel, it may cause damage to the product or cause errors. In this case, the warranty service is not
covered.
- Since the dot pad has the possibility of radio interference during use, it cannot perform services related to
human safety.
- When charging the dot pad, the product temperature may rise, and if the temperature of the battery rises
above a certain level, the charging may be automatically stopped for safety reasons.
Use with safety in the following situations:
1. Do not use Dot pad in a severe lightning storm.
During severe lightning and thunder, refrain from using the product and disconnect the charger from the power
source. It can cause injury or a fire.

2.Do not use Dot pad in prohibited areas.
Do not use in areas where use of the product is prohibited, such as airplanes or hospitals. Electronics and
communication products can be affected by electromagnetic waves.
3. Never disassemble and modify.
Do not disassemble or shock the product. There is a risk of electric shock, short circuit, or fire. Warranty
services do not cover disassembly of the product. Do not use it in a damaged or broken state. It causes fires,
burns, and electric shock. In this case, please contact customer service.
4. Use only the correct power cable and the power outlet.
Please connect and use the USB cable correctly to avoid the charging device from loosening. Do not bend,
pull, heat, cut, or loosen the cables. It can cause fire or electric shock. When not in use, disconnect the charger's
cable. There may be a risk of electric shock when used while charging. When removing the adapter, hold the
adapter and remove it. If you remove the adapter by pulling the cable, a disconnection can cause charging
failure.
5. Avoid high temperature and humid environments.
Do not use the product in a hot and humid place. If the product gets wet, turn it off and dry it thoroughly before
using. Do not place it on duvets, carpets, household electric appliances, or in direct sunlight (such as car seats)
for extended periods. The exterior may become deformed, broken, or explode. If the temperature of the product
sharply rises, stop using the product and contact the service center.
*Operating Temperature: 0℃ ~ +50℃ , Storage Temperature: -20℃ ~ +70℃
6. Do not use any chemicals.
Never use chemicals such as alcohol or benzene to clean the product. This may start a fire. If any foreign
objects get on the product or charger, wipe it with a soft cloth.
7. Avoid magnetism.
Do not keep the charging terminals close to any metal such as necklaces, keys, coins, nails, watches, etc. If a
metal object is short circuited with the charging terminal, there is a risk of explosion.
8. Use special caution for children and pets
Store products, chargers, parts, etc. out of reach of children or pets. If it gets in your mouth or is striked, you
may be at risk of electric shock or exposure to electromagnetic waves. Be careful not to allow children or pets
to swallow products, chargers, parts, etc. There is a risk of suffocation, explosion, and fire.
9.Do not use in an explosive atmosphere.
Do not use the product in explosive areas. This may affect high-frequency devices. Do not place the product
on an unstable surface, such as on a shaky or sloping area. The device’s fall may cause injury.
10. Be cautious of explosion.
Do not cover or wrap with fabric materials such as a blanket, during use or when charging. Do not dispose
with general waste. It can cause fires, explosions, and environmental pollution.
11. Avoid excessive contact under heated condition.
Avoid using the product when the temperature on the surface of the product rises above the appropriate level.
If you come into contact with the product in this state for a long time, there is a risk of burns or disturbing skin
pigmentation. If the external protective cover comes off or you experience an allergic reaction to the material
of the product, stop using the product immediately and consult a physician.

12. Keep the Dot pad in a safe place for storage.
When not in use for a long-time, disconnect the charger from the dot pad and store them in a safe place. When
storing the power adapter on the dot pad, be careful not to severely fold or twist the USB cable. If the USB
cable is stored or used with an excessive fold or twist, the USB cable can be stripped off or disconnected and
cause a failure or accident.
13. Be careful in handling the battery.
In hot and humid places, the battery may not charge well or may drain quickly. Do not expose to direct sunlight
or use in a humid place, such as a bathroom.
- If you want to use it again after a long period of not using the device, please use it after fully charging.
- Please note that it may explode if the battery is forcibly removed.
- Do not change, modify, or expose the product to liquids. Once the device is fully charged, disconnect the
charger from the outlet to avoid unnecessary power consumption.
- Please bring your product and charger with you when you visit the service center due to battery problems.
- If the product gets heated while charging, please wear gloves or use a device other than your body to separate
the charger and dot pad.
- Overheating may cause damage to the product. Please unplug the USB cable and contact the Dot Official
Service Center.
14. Do not give any shock or impact.
If you apply strong force to the product, place heavy objects on top, etc., it may cause an impact to the product.
When not in use, store it in a safe place to avoid shock.
7. Customer Support
Dot Email: [email protected]
Dot Phone Number: +82) 2-864-1113
Dot Homepage: https://www.dotincorp.com/
This manual suits for next models
1
Table of contents