DR. BENDER BBM 33 L extra User manual

DR. BENDER
GmbH
Innovative Elektrowerkzeuge
Manual for
drilling motor BBM 33 L extra
115 V
Valid from 06.2018 Art.-Nr. 201284 Subject to alterations
All rights reserved
DR. BENDER
GmbH • D-75382 Althengstett • Tel 07051-9291-0 • Fax 07051-9291-91
Our website address is: http://www.dr-bender.de

2
Conformity Declaration
DR.BENDER
GmbH
Innovative Elektrowerkzeuge
EC declaration of conformity (EG-RL 2006/42/EG)
Hereby the manufacturer
Dr. Bender GmbH
Industriestrasse 22
75382 Althengstett
declares for the product
BBM 33 L extra
The named product is conform to the following Council Directives on approximation of laws of the EEC
Member States:
-Council Directive for machinery (2006/42/EC)
-Council Directive for Electromagnetic compatibility (EMC) (2004/108/EG)
-Low Voltage Guide Lines (2006/95/EG)
Conformity with the requirements of this Directives is testified by complete adherence to the following stan-
dards:
EN 50144-1
EN 50144-2-1
EN 55014-1
EN 61000-3-2
EN 61000-3-3
EN 55014-2
EN 61029-1
The instructions contained in the operating manual for installation and start up the machine have to be fol-
lowed.
Authorised Person for Documentation:
Min Wei
c/o Dr. Bender GmbH
Industriestrasse 22
75382 Althengstett
Deutschland
DR.BENDER GmbH Althengstett, 30.07.2018
Industriestraße 22
D-75382 Althengstett
Tel. 07051/9291-0, Fax 07051/9291-91
Min Wei, Managing Director
This Declaration does not include Assurance of Product Properties.
The Safety Instructions of the enclosed Product Documentation have to be respected.

3
Contents
page
Conformity declaration 2
Contents 3
1.0 Symbol- and Pictograph description 4
1.1 Function description 4
2.0 General instructions 5
2.1 Application 5
2.2 Safety 5
3.0 Transport and storage 6
3.1 Transport 6
3.2 Storage 6
4.0 Main dimensions and technical data 7
4.1 Dimensions 7
4.2 Technical data 7
4.3 Noise emissions and vibrations [EN 50144] 8
5.0 Commissioning 8
5.1 Changing gear 9
5.2 Safety coupling 9
5.3 Core bits 9
5.4 To change a core bit 9
6.0 Safety instructions 10
7.0 Servicing and care 11
7.1 Daily care 11
7.2 After approx. 150 hours of use 11
7.3 After approx. 250 hours of use 11
7.4 Quarterly 11
8.0 Speed adjustment dependent on the cutting speed 12
9.0 Warranty 13
10.0 General safety instructions 14
11.0 Spare parts list 16
11.1 Stone drilling machine complete 16
11.2 Motor complete 18
11.3 Gear complete 20
11.4 Connection cables and accessories 22

4
Warning
The safety instructions contained in this manual must be followed.
Special designs and versions may differ from the standard models in terms of their technical de-
tails. If any points are unclear, we urgently recommend that you contact DR.BENDER GmbH, indi-
cating the machine type and machine number.
1.0 Symbol- and Pictograph description
This sign tells you rules, if you not pay attention for this your health and the function of
the machine is in danger. You have no warranty if the machine breaks down because
you not looking about this.
1.1 Function description
Nameplate
Water connection
Gear control
Switch on/off
Drill-spindle

5
2.0 General instructions
2.1 Application
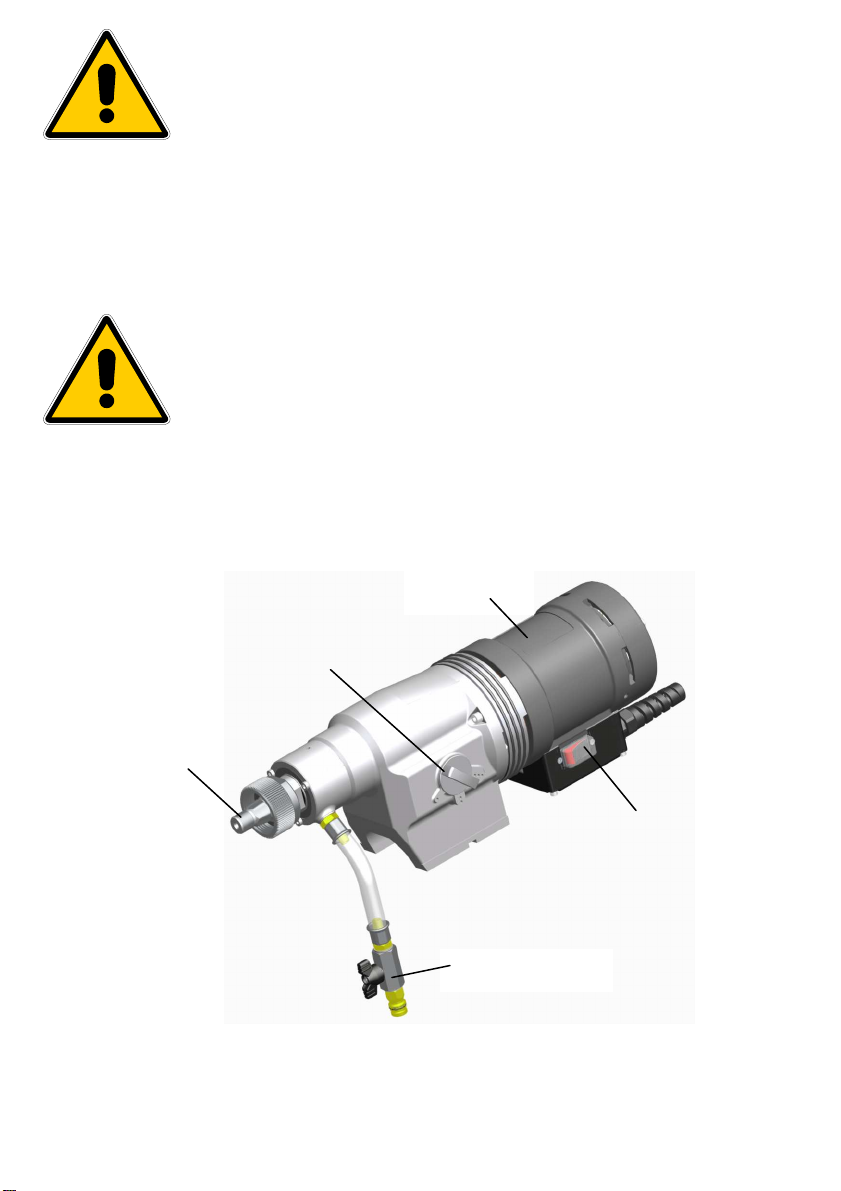
The core drills can be used for the purposes outlined by the data on the model plate. If you are using spe-
cial machines, the details in the quotation and order confirmation also apply.
The core drills are supplied as standard in protection class I, only this can guarantee the full high quality
production of the residual current-operated circuit-breaker or PRCD switch.
If you use suitable core bits, you will be able to drill holes in the most diverse material types:
- Concrete (even if it contains thick reinforcement steel)
- Sandstone and limestone
- All building materials for solid walls
- Asphalt floors
The core drills comply with the regulations issued by the ”Stone and Earth” Professional Association issued
in July 1989. They are machines of category II, which means that they must be placed on stands and be
stable (pursuant to DIN 57100 or VDE 0100), the stand must be equipped with
- a reversing block, and
- a water suction device.
The machine must be connected to the 115 V mains
- direct using a personal safety switch (residual current-operated circuit-breaker or PRCD).
2.2 Safety
Warning
Before using the machine for the first time, check that the conformity of the data
on the model plate with the mains voltage and frequency. Voltage deviations of ±
5 % and/or voltage deviations of ± 2 % are permissible. Repairs must only be
completed by quality persons who have suitable training and qualifications.
The following points are to be given special attention:
- the technical data and details of the permitted use of the machine (commissioning, ambient and
operating conditions) which are set out in the catalogue, the operating manual, the model plate
data and other product information,
- the relevant accident prevention regulations
- the correct use of tools
- the use of personal safety equipment

6
3.0 Transport and storage
3.1 Transport
Warning
The core drills are to be checked for signs for transport damage on receipt. Any
damage must be documented in writing.
3.2 Storage
If possible, the storage site should be dry, clean and have a constant temperature. To ensure that the film
of lubricant in the bearings and sealing system is not lost, the motor shaft should be turned through several
revolutions by hand after a lengthy period of storage, for example at monthly intervals. The roller bearings
in the motors should be replaced (or regreased) if the period between delivery and commissioning is over
four years. If the machines are stored in adverse conditions, this period may differ considerably.

7
4.0 Main dimensions and technical data
4.1 Dimensions
4.2 Technical data
Rated voltage 115 V
Current consumption 30 A
Power requirement 3300 W
Frequency 50 – 60 Hz
Idling speed 360 / 820 / 1240 min
-1
Full speed 180 / 430 / 750 min
-1
Output rating 2400 W
Torque 125 / 59 / 33 Nm
Drilling diameter 45 – 450 mm
Weight 13,2 kg
Core bit connection hex polygon -
Overload coupling torque 260 Nm

8
4.3 Noise emissions and vibrations [EN 50144]
Noise level Noise level Vibration
dB(A) dB m/s
2
82 96 < 2,5
5.0 Commissioning
Check that the mains voltage is identical to the voltage specified on the model plate.
Secure the core drill and the water collector to the drilling stand with its reverse block. The drilling stand
should be as rigid as possible and have precise, low-play guides. Ensure that the core drill axis is parallel
to the axis of the drilling stand.
Insert the core bit and set the speed. The setting instructions are on page 12.
Connect the water supply. Important: Do not exceed the maximum water pressure of 3 bar.
Connect the core drill to the mains using a residual current-operated circuit-breaker box and 1 h coded plug
or a PRCD safety switch. Only use three-core extension cables with a protective conductor and an ade-
quate cross-section. If the cross-section is too low, you may lose excessive power and result in the motor
and cable overheating. An extension cable must have an overload cut-out switch. Recommended cable
cross-sections:
Rated current = 30 A
Cable length m 7,5 15 25 30 45 60
Cable cross section mm
2
2,5 2,5 2,5 4 4 4
Ensure that you have sufficient cooling water for drilling. Only use pure tap water, do not use dirty or waste
water. Adjust the feed speed to the core bit diameter and the drive rating of the core drill so that the rated
current is not exceeded.

9
5.1 Changing gear
Warning
Never change gear using force and only do so when the machine is slowing
down or at a standstill.
To change into the next higher or lower gear, move the gear-change lever through an angle of approx. 50°.
If necessary (if the gear is difficult to engage), turn the drive spindle briefly by hand until the gear engages
easily.
Do not use any tools (pliers, hammer, etc.) to change gear since otherwise gear damage is a natural con-
sequence.
5.2 Safety coupling
The values set out in the table are theoretical values and may be used to provide a rough guide for gear
changing. Since a whole range of other parameters also plays a major role in adjusting the speed, we can-
not offer any guarantee if the tool is damaged when using the values in the table. Drilling work for which the
speeds are outside the range of the core drill (values printed in italics), should only be completed with ex-
treme care and by trained personnel.
5.3 Core bits
New core drill bits equipped with the hex polygon connector are already available. Adapters for continued
use of classic core drill bits are also available. Therefore existing equipment can still be used.
Only use core bits that are suitable for the type of stone.
You will keep the core drill in good condition if you only use core bits that are concentric and not deformed
ones.
Ensure that the diamond segments have an adequate undercut against the core bit body.
Warning
To use wrong tools or accessories is danger for your life.
5.4 To change a core bit
The hex polygon connection of the drill spindle allows for toolless assembly and disassembly of the core
drill bit. As soon as the drill bit is positioned on the drill spindle, both hands can be used for tightening the
safety nut on the hex polygon connector. No tools needed anytime.

10
6.0 Safety instructions
Important
Only use the core drill under supervision. Disconnect the mains plug and check
that the switch has been turned off,
- if you intend to leave the core drill unsupervised,
- for attachment and disconnection work,
- if the voltage drops (below 100 V),
- for adjustments or for fitting an accessory,
Switch off the machine if it stops for any reason. This will prevent its starting suddenly when it is not under
supervision.
Do not use the tool if
-part of the casing is missing or defective,
- If water drips out of the overflow hole, stop work and have the core drill inspected by an authorised
service contractor.
-Only drill above your head with suitable safety equipment (water collector), RCD and transformer
protection class II.
-Connect dust extraction if required.
- After a fault do not switch on the machine again until the core bit can be turned easily.
- Check the area you wish to drill with a line detector to prevent drilling through electric cables, water
or gas lines, etc.
- the switch, lead or plug connector has suffered damage (conduct a visual inspection every day).
-Cooling water must not be allowed to ingress into the motor or the electrical components when op-
erating the core drill in any position.
Do not expose the tool to rain and use not in humidity or wet environment. Use a good lightning. Do not use
the tool near flammable fluids or gase air mixes.

11
7.0 Servicing and care
Warning
Disconnect the mains plug before commencing any servicing or repair work.
You must have the core drill checked by an electrician after every repair (statu-
tory regulation pursuant to VBG4 since 1.1.1990).
7.1 Daily care
Ensure that no water is emitted from the overflow hole. This will cause gear damage and may adversely
affect the electrical safety of the core drill. If water is emitted, see assistance from an authorised service
outlet.
Visual inspection for damage to the switch, connection lead or plug connector
After completing the drilling work clean the core drill. Grease the core bit mounting thread with silicon
grease. The ventilation slits must always be clean and open. Ensure that during the cleaning process, no
water gets into the core drill.
To maintain the seal, oil the drilling spindle as follows
- Disconnect the core drill from the water supply. Open the water connector shut-off cock, add
several drops of oil, close the shut-off cock, add several drops of oil to the overflow hole and
turn the machine briefly by hand.
7.2 After approx. 150 hours of use
After the first 150 hours of use, the gearbox oil must be changed.
7.3 After approx. 250 hours of use
Have the carbon brushes checked, and replaced if necessary, by an electrician.
Avoid adjusting the carbon retaining springs.
Only use original spare parts.
7.4 Quarterly
Have the cable, switch and plug connectors inspected by a specialist (regulation pursuant to VBG4) and
document this inspection. Changing the gearbox oil will produce a considerably increase in the service life
of the gear.

12
8.0 Speed adjustment dependent on the cutting speed
The values set out in the table are theoretical values and may be used to provide a rough guide for gear
changing. Since a whole range of other parameters also plays a major role in adjusting the speed, we can-
not offer any guarantee if the tool is damaged when using the values in the table. Drilling work for which the
speeds are outside the range of the core drill (values printed in italics), should only be completed with ex-
treme care and by trained personnel.
40
1432
1910
2387
2865
3342
3rd gear
50
1146
1528
1910
2292
2674
3rd gear
60
955
1273
1592
1910
2228
3rd gear
65
881
1175
1469
1763
2057
3rd gear
70
819
1091
1364
1637
1910
3rd gear
75
750
1019
1273
1528
1783
3rd gear
80
716
955
1194
1432
1671
3rd gear
85
674
899
1123
1348
1573
3rd gear
90
637
849
1061
1273
1485
3rd gear
95
603
804
1005
1206
1407
3rd gear
100
573
750
955
1146
1337
3rd gear
110
521
694
868
1042
1215
3rd gear
120
477
637
750
955
1114
3rd gear
130
430
588
735
881
1028
3rd gear
140
409
546
682
819
955
3rd gear
150
382
509
637
750
891
3rd gear
160
358
477
597
716
836
3rd gear
170
337
430
562
674
750
3rd gear
180
318
424
531
637
743
2 or 3
190
302
402
503
603
704
2 or 3
200
286
382
477
573
668
2 or 3
220
260
347
430
521
608
2 or 3
240
239
318
398
477
557
2 or 3
260
220
294
367
430
514
2 or 3
280
200
273
341
409
477
2 or 3
300
191
255
318
382
430
2nd gear
320
180
239
298
358
418
1 or 2
340
169
225
281
337
393
1 or 2
360
159
212
265
318
371
1 or 2
380
151
200
251
302
352
1 or 2
400
143
191
239
286
334
1 or 2
420
136
180
227
273
318
1st gear
440
130
174
217
260
304
1st gear
460
125
166
208
249
291
1st gear
480
119
159
200
239
279
1st gear
500
115
153
191
229
267
1st gear
520
110
147
180
220
257
1st gear
540
106
141
177
212
248
1st gear
560
102
136
171
200
239
1st gear
580
99
132
165
198
200
1st gear
600
95
127
159
191
223
1st gear
620
92
123
154
180
216
1st gear
640
90
119
149
179
209
1st gear
660
87
116
145
174
180
1st gear
Bit capacifity ø
concrete
concrete
rock
[mm]
reinforced

13
9.0 Warranty
In keeping with our terms of sale, we offer a warranty for twelve months from the date of sale. This refers to
the free repair of material and workmanship defects, which were verifiably caused before the sale.
An original purchase document must always be submitted in case of a warranty claim. It has to contain the
full address of the dealer, the date of purchase and the type designation of the product. The operating in-
structions of the particular product and the safety instructions must have been followed.
Damages resulting from operational faults cannot be acknowledged as warranty cases.
The products of the manufacturer have been developed and produced for specific applications. No war-
ranty claim is accepted in case of non-compliance with the due employment according to the operating in-
structions, in case of the employment for other purposes than originally intended or the employment of in-
adequate accessories.
The periodical maintenance and cleaning of the products according to the directions of the operating in-
structions is absolutely necessary. The intervention of third persons (opening the machine) renders any
warranty claim void.
Maintenance and cleaning operations cannot be claimed on the basis of warranty.
Make sure only original spare parts and original accessories are used. They are available at the authorized
specialized product dealer. If non-original parts are used, consequential damages and increased hazard
cannot be ruled out. The producer is not liable for such damages. Disassembled or partially disassembled
hand saws and those repaired with non-original parts are excluded from the warranty.
Certain components, such as carbon brushes, ball bearings, switches, power-supply lines, gaskets, etc.,
are exposed to usage dependent or to normal wear. These wearing parts are not object of this warranty.
Wearing parts are marked on the spare parts lists.

14
10.0 General safety instructions
1. Read and follow these instructions before you use the tool. Keep these safety instructions in a safe
place.
2. Keep your workplace tidy. Untidiness in the workplace can cause accidents.
3. Protect yourself from electric shocks. Refer to the applicable regulations. Avoid physical contact with
earthed parts, such as pipes, heaters, furnaces and refrigerators.
4. Keep children away. Do not allow other people to touch the tool or cable, keep them away from
where you are working.
5. Keep your tools in a safe place. Unused tools should be kept in a dry, locked room out of the reach of
children.
6. Do not overload your tool. It will work better and more safely in the specified capacity range.
7. Use the correct tool. Do not use tools that are too weak or mounted tools for heavy work. Do not use
tools for purposes and work for which they have not been designed.
8. Wear suitable clothing. Do not wear excessively baggy clothing or jewellery, which may be caught by
moving parts. For working outdoors, we recommend the use of rubber gloves and sturdy shoes.
Wear a hairnet if you have long hair.
9. Use goggles. Use a breathing mask for work that generates dust.
10. Do not use the cable for any purpose other that that for which it is designed. Do not carry the tool by
the cable and do not use it to pull the plug out of the socket. Protect the cable from heat, oil and
sharp edges.
11. Check the connection lead and plug every time before you use the tool for signs of damage. If they
are damaged, have them replaced by a specialist. Always keep the connection lead away from the
working area of the machine.
12. Secure the workpiece. Use clamps or a vice to hold the workpiece. This will make it more secure that
if you hold it in your hand and will allow you to use both hands to control the machine.
13. Do not overstretch yourself. Avoid abnormal body positions. Ensure that you have a stable area on
which to stand and keep your balance at all times.
14. Look after your materials with care. Keep your tools sharp and clean so that they produce good safe
results. Check the plug and cable at regular intervals and have them replaced by a specialist if they
suffer any damage. Check the extension cable at regular intervals and replace damaged cables.
Keep the handles free of oil and grease.
15. Disconnect the mains plug from the supply when the tool is not in use and when changing the tool.
15. Do not leave a tool spanner on the tool. Before switching on the tool check that the wrench and set-
ting tools have been removed.
16. Avoid the machine starting when you do not intend it to. Do not carry a tool that is connected to the
mains supply with your finger on the switch. Ensure that the switch is turned off when you connect
the tool to the mains supply.
18. Electric tools outdoors and in wet areas: Mobile tools which are used outdoors should be connected
to the mains supply using a residual-current circuit breaker or the like for added safety. This is par-
ticularly important when working with freehand tools. If there is a water supply, you should use an
isolation transformer and a voltage supply of 115 V; please specify in your order.
19. For outdoors work, only use extension cables, which are approved for this purpose and marked ac-
cordingly.
20. Be vigilant at all times. Watch your work. Proceed sensibly. Do not use the tool if you are not concen-
trating fully on what you are doing.
21. Important:
Safety equipment (such as overcurrent protection devices, undervoltage trips, safety couplings etc.)
are tools but do not offer guaranteed safety. As a responsible manufacturer we tailor these tools to
each other so that they offer the best possible protection. But without the care and caution of the use,
these tools may even cause damage it they are not used properly. Have the slip couplings, in particu-
lar, checked during the quarterly inspection to ensure that it is correctly adjusted and functions prop-
erly. This inspection should be conducted by the manufacturer or an authorised service outlet and
documented.

15
22. Check the machine every day for signs of damage, conduct a visual inspection:
Before reusing the tool, carefully check the safety equipment or slightly damaged parts to ensure that
they offer perfect and proper function. Check that all moving parts function correctly, that they do not
jam and that none of the parts are damaged. All parts must be correctly fitted and satisfy all the con-
ditions to ensure the perfect operation of the tool. Damaged safety equipment and parts must be re-
paired or replaced properly by a specialist service contractor. Do not use any tools, which cannot be
switched on and off using the switch. Pay particular attention to ensuring electrical safety: Cables?
Plugs? Switches? Do all the components satisfy safety regulations?
23. Repairs may only be completed by trained personnel. Before being used for the first time and after all
repair work, the safety of electric tools must be checked by an electrician pursuant to VBG 4, § 5.
This inspection must also be conducted and documented at regular intervals – at least once per year.
24. Please note that as the operator you are responsible for complying with any additional regulations.
For example if electric tools are used in a wet and/or damp environment, the regulations of the
”Stone and Earth” Professional Association must be satisfied.
25. Electrical safety and fire safety: We now also recommend the additional safety and fire safety for all
out tools, as set out in the new version of VDE 0100 which can be achieved by using low cost resid-
ual current-operated circuit-breakers or DI/PRCD switches.

16
11.0 Spare parts list
11.1 Stone drilling machine complete

17
Item Art. No. Description No.
1 201284 Stone drilling machine, complete 1
2 300741 Motor, complete 1
3 201281 Gear, complete 1
4 800077 Locking washer 3
5 900318 Allen bolt 3
6 300074 Water connection, complete 1 **
7 800733 Hose complete 1
8 800028 Sealing ring 3
9 800023 Ball cook complete 1
10 800020 Slot-in nipple 1
11 800040 O-ring 1
Wearing parts
**

18
11.2 Motor complete

19
Item Art. No. Description No.
1 300741 Motor complete 1
2 200839 Motor casing 1
3 401554 Magnet casing 1
4 900011 Hexagon socket set screw 1
5 900229 Washer 1
6 800076 Locking washer 5
7 900412 Flat-head screw 1
8 300068 Brush bridge 1
9 800064 Carbon brush 2 **
10 900180 Spring washer 2
11 900332 Cheese-head screw 2
12 900183 Wave spring washer 4
13 900399 Slotted cheese head screws 2
14 400036 Air baffle disc 1
15 302099 Switch box 1
16 802733 Cable grommet 1 **
17 801263 Toggle switch 1
18 900458 Countersunk screw 2
19 800174 Protective cap 1 **
20 401334 Cover plate 1
21 401667 Attempt current limiters 1
22 801354 Interference-suppression capacitor 1
23 900704 Hexagon socket head cap screw 4
24 400943 Armature 1
25 900483 Grooved ball bearings 1 **
26 900329 Grooved ball bearings 1 **
27 901094 Locking ring 1 **
28 900708 Shaft sealing ring 1 **
29 800122 Ball bearing compensating disc 1
30 300029 Bearing cap 1
31 800089 O ring 1 **
32 800077 Locking washer 3
33 900312 Allen bolt 3
Item Art. No. Description No.
34 200379 Intermediate cover 1
35 900168 Needle sleeve 2 **
36 900156 Needle sleeve 1 **
37 800083 O ring 1 **
38 800354 O ring 3 **
Wearing parts**

20
11.3 Gear complete
This manual suits for next models
1
Table of contents
Other DR. BENDER Engine manuals
Popular Engine manuals by other brands

MagneMotion
MagneMotion MagneMover LITE User manual addendum

Tecumseh
Tecumseh LH195SA/LH195SP (HSSK40-55) Operator's manual

Horizon Hobby
Horizon Hobby EVOLUTION 62GX instruction manual

Nakanishi
Nakanishi BMS-4020-MQL Series Operation manual

DLE
DLE 65 user manual

Bombardier-Rotax
Bombardier-Rotax 462 Operator's manual