Dr. Bridge KHG User manual

WWW.KHGUARDIAN.CO M
V8.0C Profashional Edition 2017-01-09


Contents
Main Features
Installation Instruction
Main Display
KHG System Setup
The Meaning of Log Field
Error Message and Troubleshooting
Additional User Instructions
The KHG exterior & features
Main Control of KHG
P1
P5
P1
P5
P7
P10
P10
P12
P1
P2
Quick Install
User Manual
Appendix P15

Main Features
The resolution of the Standard Edition is 0.33 dKH.
Continuous measuring test accuracy is +/- 0.33dKH.
Measurement range: 5 -12 dKH.
Use only one reagent for each test. The used reagent goes directly to the aquarium without any safety
concern. Each test only takes around 3 ~ 4 cc. reagent.
It supports remote terminal function to monitor and control the instrument via any web browser on the same
local network. No need to install any software or APP. Simply use web browser for operation.
SD memory card preinstalled for the long-term data logging.
Version “C” has an automatic dKH controlling feature. It automatically calculates how much sodium
bicarbonate solution should be added to the aquarium with the reference of the desired dKH target value,
aquarium total water volume, and current testing value. Then the controller dose-in the solution accordingly.
Automatic measuring interval can be set from 30 to 240 minutes. Each measurement takes about 3 to 7
minutes.
With the “C” version, no need to change the existing calcium reactor and alkalinity dosing. We do
recommend to slightly decrease your current dKH dosing parameters below your desired target, and let
KHG do the nal ne tuning for your tank automatically.
Installation Instruction
Page 1
•
•
•
•
•
•
•
•
•
User Manual
Display Panel.
Control Button.
Sodium Bicarbonate Pump.
Tank Water Input Pump.
Waste Water Purge Pump.
pH Probe.
Observation Window.
Probe Holder.
Reaction Chamber.
The KHG exterior & features
1
2
3
4
5
6
7
8
9
(Figure 1)
2
3
4
6
78
9
5
1

Number 1 button.
Number 2 button.
Number 3 button.
Number 4 button.
Current system status.
The time remaining until next testing.
The last pH value obtained by the KHG.
The last dKH value obtained by the KHG.
When installing KHG, please ensure the KHG is placed on level ground and is completely upright (Figure
4). At least a construction grade levelling tool must be used to make sure the placement of KHG is level on
the X, Y, and Z axis. Complete levelling is crucial as to keep the sodium bicarbonate solution from dripping
on the optical and electronical components before entering the reactor chamber. KHG will fail if solutions
contaminates the optical and electronics.
1
5
7 8
2
6
3 4
Page 2
2.
1
2
3
4
5
6
7
8
KHG display panel
1.
(Figure 3)
User Manual
Quick Install
(Figure 2)
DC 12V Power
LCD Display Panel
pH Probe
Water Form Tank
Purge to Tank
Reagent Solution Sodium Bicarbonate
Ethernet (RJ45)
1
6
8
7
2
3
5
4
KRS
S.W IN
S.W OUT
S.S IN
S.S OUT

pH probe calibration instruction :
SW IN
Saltwater in. This tube connects to your tank water
for the sample to be taken. Source of tank water must
be ltered by 500 micron or less to keep tubes free of
blockage. Please make sure the medical grade check
valve (included with KHG) is installed in the right
direction.
SW OUT
Saltwater OUT. This tube are for purging reaction chamber water. Please make sure the medical grade
check valve (included with KHG) is installed in the right direction.
S.S. IN
Sodium Bicarbonate Solution IN. This tube connects to your Sodium Bicarbonate Solution Reservoir.
S.S. OUT
Sodium Bicarbonate Solution OUT. This tube connects to your tank or sump. It delivers the sodium
bicarbonate solution to your tank to use in combination with the KH auto correction feature of KHG.
KS
Reagent Solution. This tube connects to the KHG reagent solution bottle.
Please insert the pH probe into pH 7.0 calibration solution of at least 1.5 cm deep.Press and hold number
2 and number 4 buttons simultaneously for 3 second until you hear a beep and release both buttons.
Now the pH 7.0 calibraion is done.
Rinse pH probe with distilled water, and pat dry with ne tissue paper. When drying, please do not twist
dry probe surface with the tissue paper as this will damage the coating on the probe sensor, and will
render the probe inaccurate.
Please keep KHG no more than 100 centimetres away
from your tank. It is necessary to keep KHG within this
distance to ensure the sample delivered by the SW IN
tube is same as your concurrent tank water.
For "C" model, there are 5 silicon tubes ends that
connects outside of the KHG. The uses of each are as
follows :
Before proceeding to pH 4 calibration, please rinse pH probe with distilled water and pat dry with ne
tissue paper. Care must be taken not to twist dry with tissue paper as described in point “a” above.
Page 3
3.
4.
5.
(Figure 4)
User Manual

You must perform the 2 point calibration in the order of pH7 rst and pH4 follows. You must complete all
calibration before proceeding to next installation step. 2 point calibrations must be performed every time
you attempt to recalibrate.
Please insert pH probe into pH4 solution of at least 1.5 cm deep.Press and hold number 1 and number
3 buttons simultaneously for 3 seconds until you hear a beep and release both buttons. Now the pH 4.0
calibration are complete.
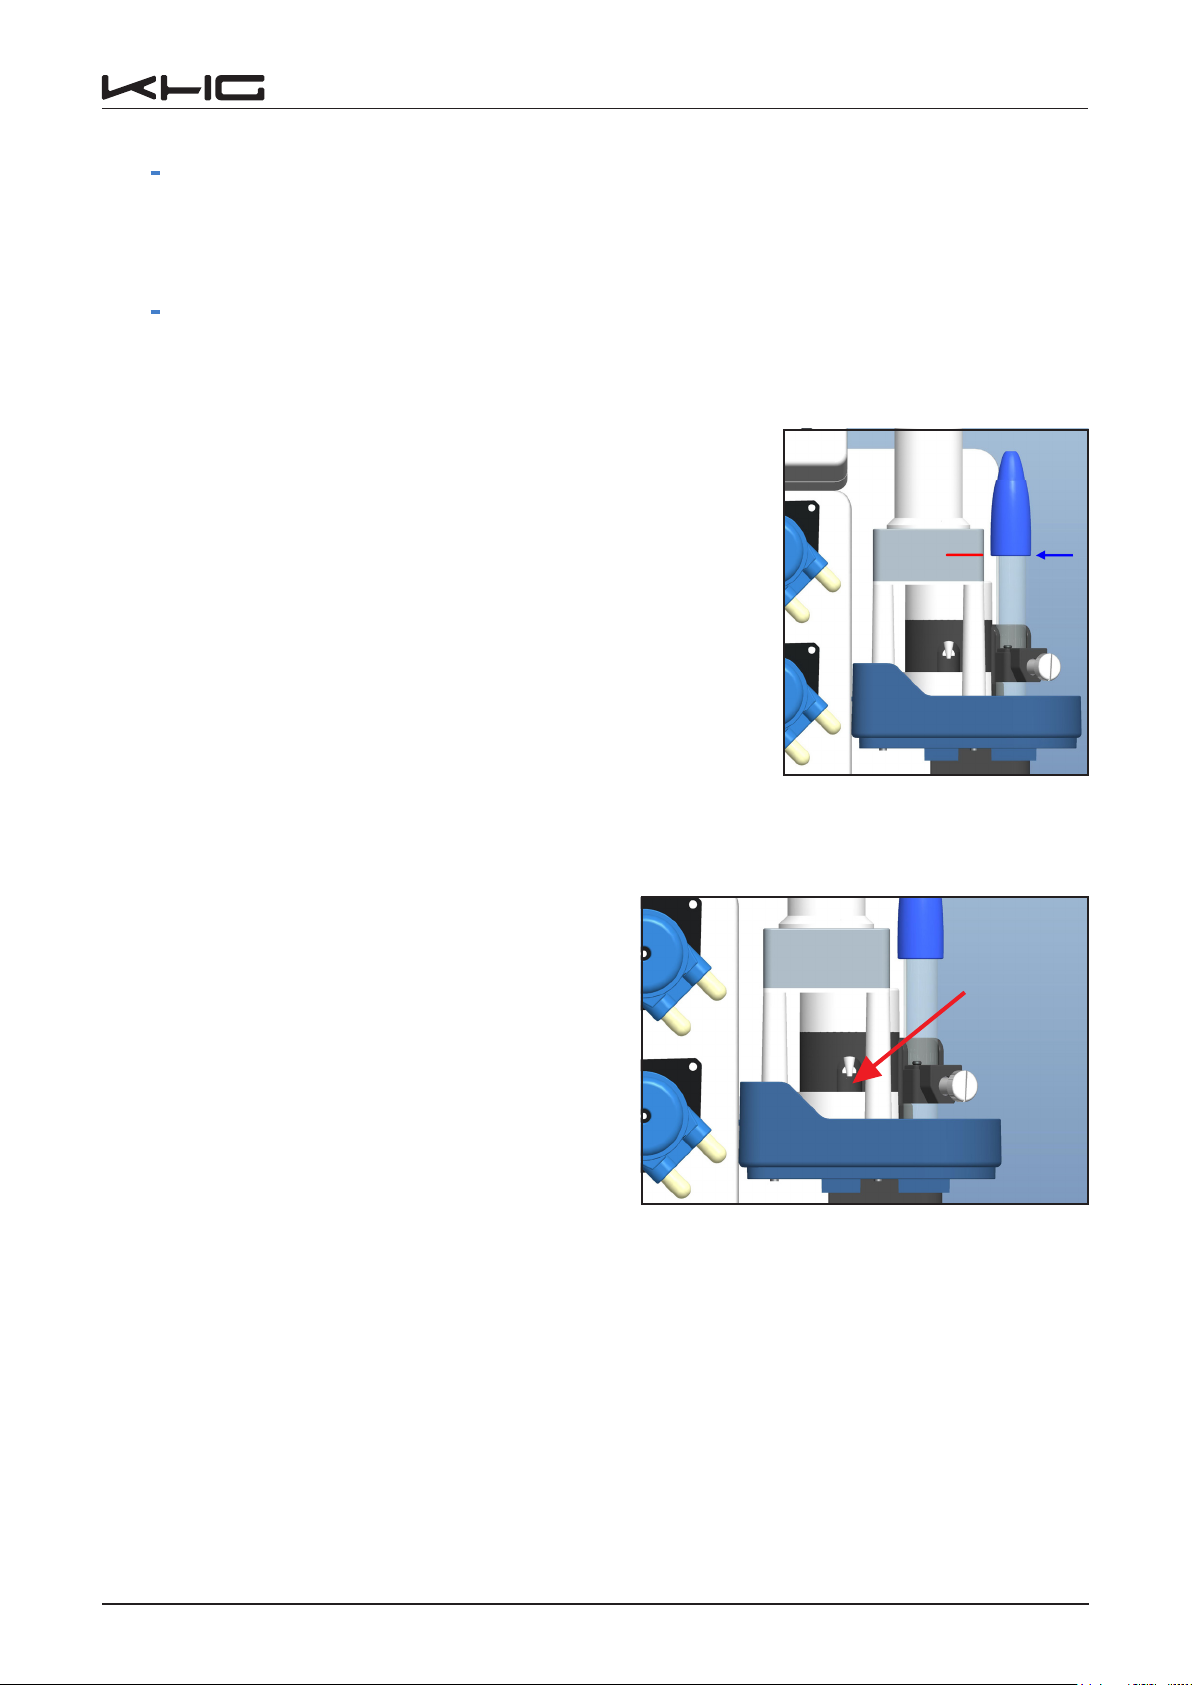
Please insert the calibrated pH probe until the cap of pH probe is
level with the Red line. (Figure 5) Hand tighten the white knob to
secure pH probe in place. Over tighten the white knob could break
the glass sleeve of pH probe.
Please recheck and make sure all tubes are connected as instructed
above. Go to your browser and click on “SW Tube De-Gas” to purge
air from your tank water inlet tube. First attempt to draw tank water
and purge air, KHG may show NSWE error message (No Salt Water
Entering). To cancel the error message, you should press and hold
the number 4 button until you hear a beep and release button.
Please click on the “SW Tube De-Gas” for as many times as out of
the inlet tube.
Please click on the “KS De-Gas” on your browser
to purge air from your KHG reagent solution tube.
Please look into the observation hole (Figure 6) until
you see reagent solution is dropping at the rate of
one drop per 3 seconds. Please let reagent solution
to drop at least 10 times before cancelling the air
purging by clicking on the “RESET” in your browser
screen, or press and hold number 4 button for 3
seconds to stop the purging procedure. If KHG shows
“KS_ERR”, there may be blockage in the tube and
KHG will force into areboot. At the same time please check if the tube is free from blockage and make sure
there are reagent solution in the storage bottle.
Next please key in your last known dKH value into the “Last KH (dKH)” under the “System Setup”. Please
also make sure the number you entered is not 1.5 dKH away from your desired alkalinity target level (“KH
Auto Correction”). Next click on “SAVE” to save your settings and KHG will enter a forced reboot.
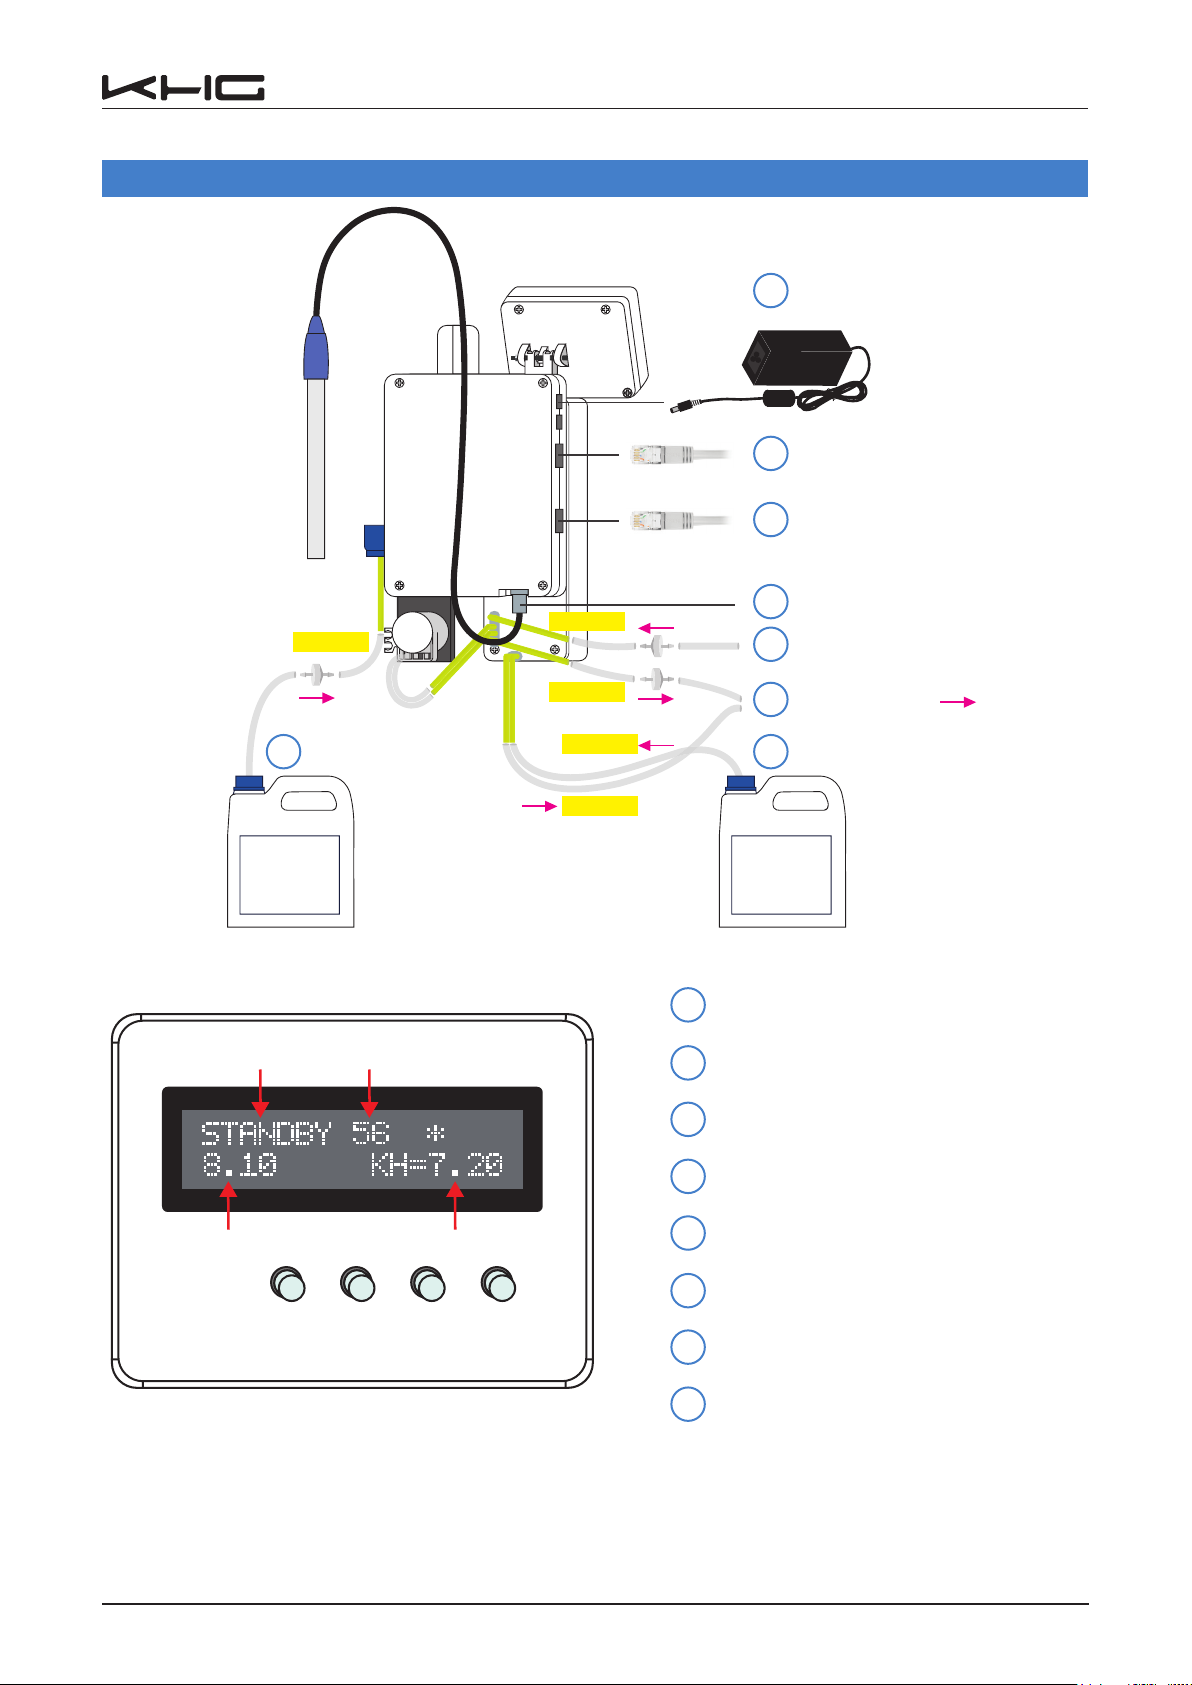
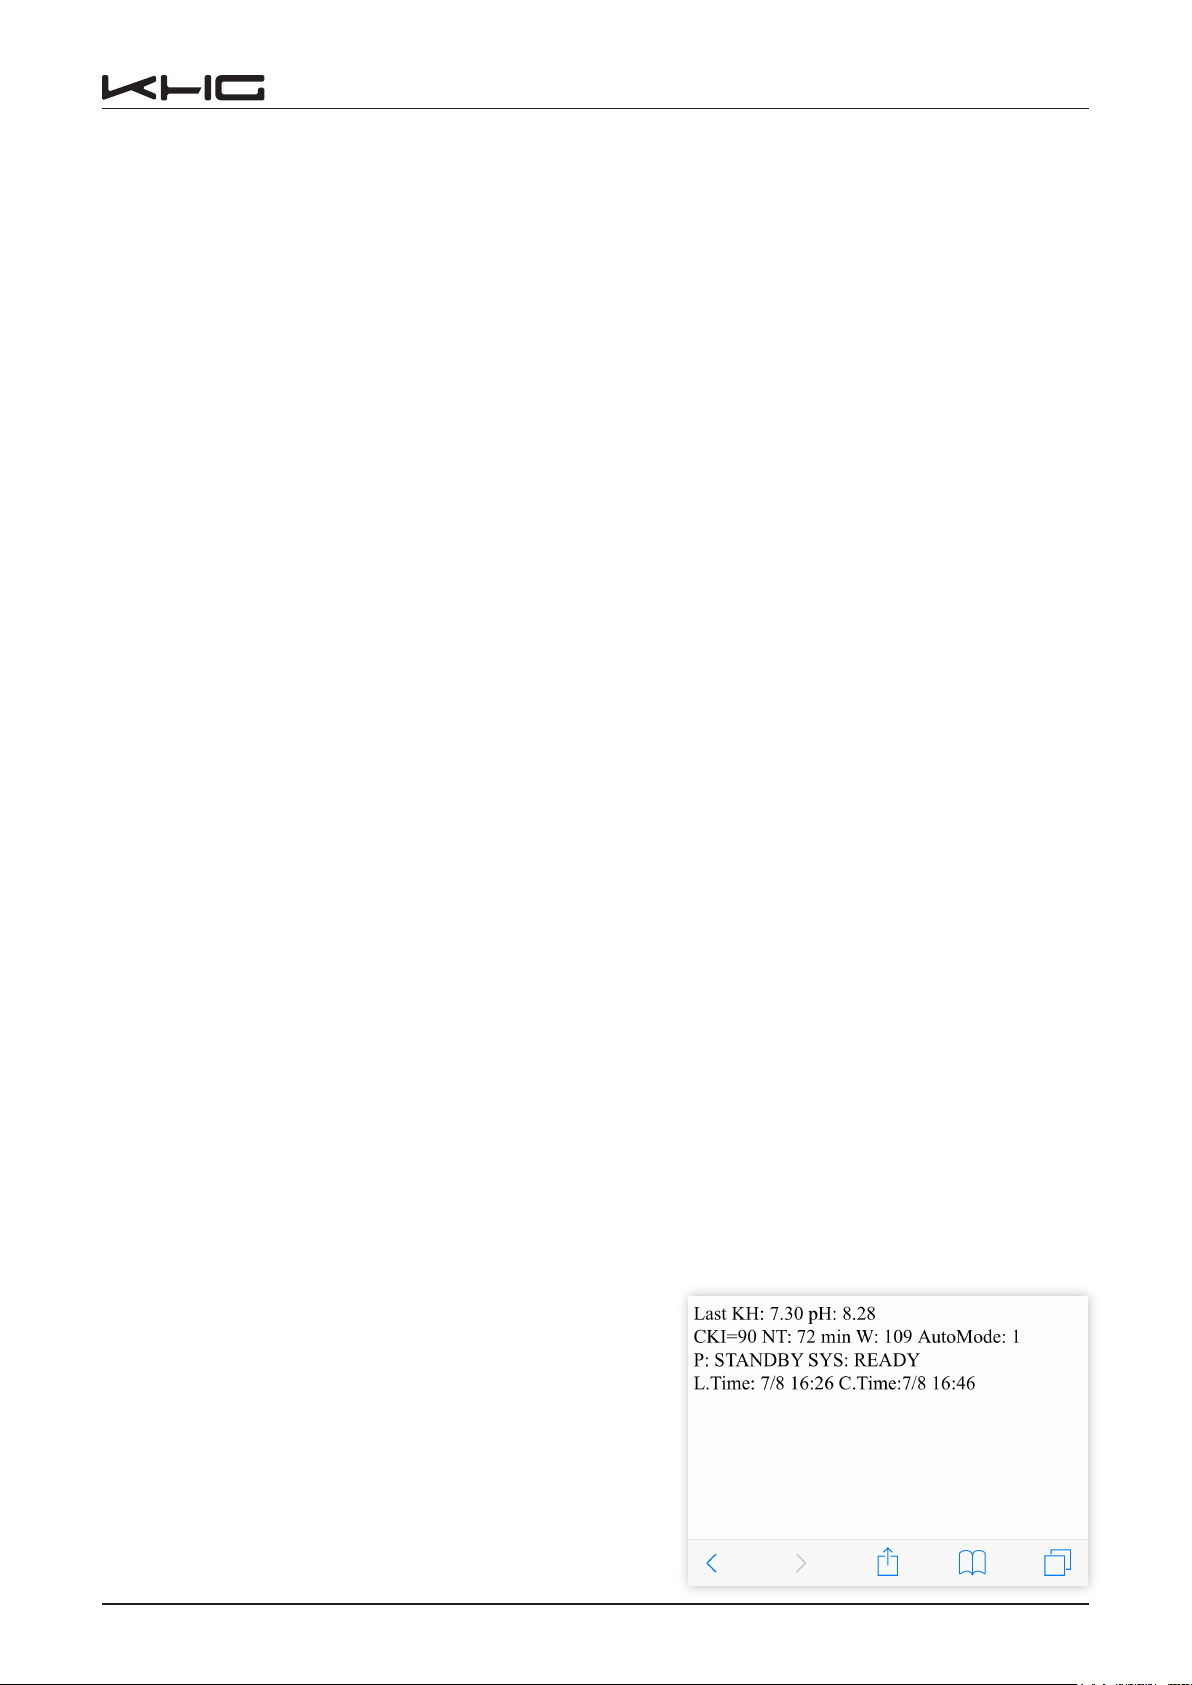
After a successful reboot of KHG, the LCD display will show STANDBY. Please enter KHG main control
page in your browser, and click on “GET dKH”. KHG will perform a full test. After the test has been done,
KHG will return back to standby mode.
Page 4
6.
7.
8.
9.
10.
(Figure 6)
(Figure 5)
User Manual
required until tank water are owing
Observation hole

Please make sure the RJ45 network cable is securely attached and connect
KHG to your home router or LAN. After switching on KHG, the display panel
will show the IP and port number automatically assigned by the network DHCP
(Figure 7). Please write down the IP and port number shown on the display,
and enter it to the browser of your computer or mobile device to access controls
of the KHG.
If your network DHCP did not automatically assign an IP to KHG, the default IP
will be 192.168.1.10.
For example, if the display were shown as Figure 7, then you should enter
http://172.22.20.158:8090 into your browser. When the login window appears
as Figure 8, enter the password (default setting is "Admin") and Click Login
button, then you will be able to access the controls of KHG as Figure 9.
Page 5
Main Control of KHG
Main Display
Get dKH
Press to test and obtain KH value. Counter will be reset after the
testing is completed.
Purge Chamber
Press to purge and empty all solutions in the reactor chamber.
This must be performed every time you intend to move the
KHG. It is crucial to purge reaction chamber to prevent solutions
damaging the optical lens and other electronic components.
Failure to purge chamber could result in KHG failure.
SW Tube De-Gas
Press to pump saltwater sample into the reaction chamber. This
is normally only used at initial setup of KHG, or after reassembly
of the step motor head. By pressing it, saltwater will pump water
up the feeder tube, purging gas from the tube. If there were
blockage in the feeder tube, after a preset amount of time no
water has been pumped into the reaction chamber, the display
would show S.W_ERR error message.
1.
2.
3.
Please note, if the alkalinity obtained by the KHG deviate by 1.5 dKH from your desired dKH setting (“KH
auto correction”), KHG will show error messages. KHG will assume this is a major deviation and will
suspend all subsequent dosing of sodium bicarbonate solution and enter into a forced reboot and return
back to standby mode. If the tested value is larger than the “KH auto correction” by +1.5 dKH, KH>ERR will
appear. If the tested value is less than the “KH auto correction” by -1.5 dKH, KH<ERR will appear.
11.
(Figure 7)
(Figure 9)
User Manual
(Figure 8)

Last KH: n.nn
This is the last dKH value obtained by the KHG.
pH: n.nn
This is the last pH value obtained by the KHG.
CKI = nn
This is the testing interval (unit: minutes). Testing Interval
can be changed in the KHG system setup.
KS De-Gas
Press to purge gas from the feeder tube of KH reagent solution. Please look into the observation window to
check if KH reagent solution are owing into the reaction chamber. After seeing reagent solution is owing
and the LED is blinking steadily, please press the “RESET” button to stop.
ENG Mode ON
Advanced function only. Do not use unless being instructed by a qualied KHG support staff.
ENG Mode OFF
Advanced function only. Do not use unless being instructed by a qualied KHG support staff.
Test KH doser
Press to test if the Sodium Bicarbonate solution is pumping.
Test accelerator
Press to test if the reaction chamber agitator is functioning normally.
RESET
Press to reset warning signals. Also used to stop KS De-Gas function.
Refresh
Press to refresh your browser display on your computer or mobile devices.
Display Record
Press to display the log.
Reboot
Press to force reboot of the KHG.
System Setup
Press to enter into system setup screen.
Denition of the data shown on the bottom of the main control page (Figure 10):
Page 6
5.
6.
7.
8.
9.
10.
11.
12.
13.
•
•
•(Figure 10)
User Manual
4.

NT: nn min
This is the time (minutes) remaining until next testing.
W: nnn
This is the step motor setting value to control how many steps motor will turn to pump water into the
reaction chamber (unit: steps).
AutoMode: n
Automatic testing mode (1 = ON, 0 = OFF).
P: STANDBY
Current system status.
SYS: READY
Sublevel control status (For support staff use only).
L.Time: MM/DD hh:mm
Date and time of the last testing performed.
C.Time: MM/DD hh:mm
Date and time of the current testing performing.
Page 7
•
•
•
•
•
•
•
KHG System Setup
Auto mode:
Default value is 1. 1 means KHG is in automatic mode. Any other value will disable
automatic mode.
Check intervals (Min):
This is to set the minutes intervals between each KHG test. Unit is minutes. We
recommend setting the intervals to 180 minutes. You can shorten the testing
interval time, but that will also use up KH reagent solution faster.
No_SW_ERR :
This is to set the alarm if the number of steps of the step motor has turned, but
still not enough water has been pumped into the reaction chamber. Default value
is from 140 to 160. The unit is number of steps for the step motor. This is useful
to determine if there were blockage in the SW feeder tube. Depending on how
far your KHG is placed from the tank water source and how much head there
are to pump water into the reaction chamber. You can adjust this value to best
suit your environment. However, caution must be taken if you deviate from the
recommended range too far, it may result in excessive water being pumped out of
your system.
1.
3.
2.
(Figure 11)
User Manual

Err Range (dKH) :
This is to set the variance range in comparison to the previous dKH value. If the difference of this test
deviates a preset error range from the last known dKH value, the KHG will setup second testing immediately
to verify the result. The unit of value is dKH. We recommend to set it at 0.5 dKH.
Err Try :
This is to set the number of retest to be taken, if the Err Range condition were met.
Last KH (dKH) :
This is only used after a system reset or diagnostics, or if instructed by a qualied KHG support staff.
ADJ KH (dKH) :
This is to force adjustment (correction) of the value obtained by KHG. This is normally used if you believe
there is a constant deviation between the value tested by KHG versus another test kit, and you believe
KHG's value need to be adjusted every time. You can enter the deviation in here. The adjustment value can
be either positive or negative.
Enable KH Auto :
Enter “1” to activate automatic mode. Any other number will cancel the automatic mode. (Feature not
available fo M model.)
KH auto correction :
This is to set your desired tank dKH value. The unit is dKH. As a full functioning dKH controller, KHG not
only monitors your tank alkalinity, but with KH auto correction, KHG will also actively maintain your desired
dKH level. Regardless if you normally maintain your tank alkalinity by kalkwasser, calcium reactor, or
alkalinity dosing, we highly recommend you set your usual alkalinity dosing to a level slightly below your
desired target, and let KHG do the nal ne tuning for your tank automatically. (Feature not available fo M
model.)
For example. If your desired tank dKH is 7.5, then please set this number at this eld. At the same time,
please setup your normal alkalinity dosing to near 7.0, and let KHG do the rest. KHG will calculate the
difference of the actual tank alkalinity level versus the desired target. Taking account of the total tank
volume, KHG will calculate how much sodium bicarbonate solution to add after each testing.
M.L.Q :
MLQ sets the maximum amount of sodium bicarbonate that KHG can add at any given time. Unit is milliliter
(ml). This is the safety feature for your tank to prevent too much alkalinity to be added into the tank at any
given time. (Feature not available fo M model.)
For example, if this time KHG determines 80 ml should be added into your tank, but you have set the MLQ
at 35 ml, then KHG will only add 35 ml this time into the tank.
Page 8
4.
5.
6.
7.
8.
9.
10.
User Manual

Total volume (L) :
This is to set the total water volume of your tank in Liters. KH auto correction will use this data to calculate
how much sodium bicarbonate solution are needed after each testing. (Feature not available fo M model.)
SYS_Sound :
Set as “1”, system sound will be ON. Any other number will deactivate system sound. Canceling system
sound will NOT silence alarm.
PORT :
This is to be used only as instructed by your network administrator. Default value is 8090.
Timezone :
This is to set time zone (UTC) at your location.
NTP Server :
This is only to be used if instructed by your network administrator.
MAC :
MAC Address of this KHG and cannot be changed.
S/N :
Serial Number of this KHG and cannot be changed.
SAVE :
Save all settings above to the memory. KHG will force reboot after new settings have been saved.
New PW :
Please enter new password. Password allows maximum 8 characters include spaces, numbers, letters or
mixed. No special character allow. Case sensitive.
Conrm PW :
Please re-enter new password. Press “Change Password” after to complete and store your change. No
reboot necessary.
Clear SD:
Press “DO” to initiate SD card memory purge. KHG has log feature for user analysis. However, the record
log takes up memory on the SD card, and we recommend performing the SD card memory purge every 3
months. Low available SD card memory will slow down the display refresh speed. Every time you do a “Clear
SD”, please unplug KHG from power outlet for 3 seconds and reconnect the power cord to the electrical
outlet. This will reboot the system to re-enable the logging function.
Page 9
11.
12.
13.
14.
15.
17.
18.
19.
20.
21.
16.
User Manual

Page10
4.
4.
Error Message and Troubleshooting
The Meaning of Log Field
SW>ERR = System water intake error
A.
B.
C.
D.
1.
Please go to control menu and press “SW Tube De-Gas” and also check if the Sodium Bicarbonate
pump is functioning.
Please check all sections of tank water intake tube and make sure they are free of blockage.
Please gently open the “Reaction Chamber” and make sure the white water level sensor is freely
movable up and down.
Sensor may be malfunctioned. Please contact your dealer.
eg: 10/07 15:07:49 W.131 %0 AK.35.00 KH :7.90
•
•
•
•
•
10/07 22:12
Date / Time.
W.131
Tank Water Input Pump run how many pitches.
%0
optically matching agent dropped speed to assess the percentage of possible errors.
AK.35.00
calculated automatically supplemented 22.15 cc baking soda.
KH :7.90
KH value 7.90 dKH (not before adding baking soda).
(Figure 12)
User Manual

Page 11
SW<ERR = Reaction chamber water purging error
A.
B.
C.
D.
2.
Please go to control menu and press “Purge Chamber” and make sure the “Waste Water Purge
Pump” is functioning.
Please check all sections of purge tube and make sure they are free of blockage
Please gently open the “Reaction Chamber” and make sure the white water level sensor is freely
movable up and down.
Sensor may be malfunctioned. Please contact your dealer.
KS_ERR = KRS solution suction error
A.
B.
C.
D.
E.
3.
Please check if the KRS solution has depleted and needs replacement.
Please check all sections of KRS solution intake tube and make sure they are free of blockage.
Please go to control menu and press “KS De-Gas” and also check if the KRS pump is functioning.
If the KRS pump is turning, please look into the observation window and check if the drop sensor light
is blinking when each drop of the KRS solution is dropping. (One short blink, One long blink)
Sensor may be malfunctioned. Please contact your dealer.
KH>ERR = KH value high error
A.
B.
C.
D.
E.
F.
4.
This error message indicates the tested value is 1.5dKH larger than the “KH auto correction” setting.
System would recognize this as obnormality.
Please check if your “KH auto correction” setting is a reasonable.
Please check if your KRS solution tube has too much air bubbles.
Please check if the pH probe are secured at proper depth.
Please check if the dilution ratio of your sodium bicarbonate solution is correct.
If all settings are correct, please contact your dealer.
KH<ERR = KH value low error
A.
B.
C.
D.
5.
This error message indicates the tested value is 1.5dKH lower than the “KH auto correction” setting.
KHG will stop dispensing Sodium Bicarbonate until this error has been cleared.
Please check if your “KH auto correction” setting is a reasonable.
Please check if your KRS solution tube has too much air bubbles.
Please check if the pH probe are secured at proper depth.
Please check if the dilution ratio of your sodium bicarbonate solution is correct.
If all settings are correct, please contact your dealer.
E.
F.
User Manual

AC_ERR = KH accelerator error
A.
B.
C.
6.
Please gently open the “Reaction Chamber” and check if the small white agitator is missing.
Please check if the pH probe are secured at proper depth.
Accelerator may be malfunctioned. Please contact your dealer.
pH<ERR = pH reading low error
A.
B.
C.
D.
E.
F.
7.
This error message will occur if the pH reading is below 4.5. Alarm will activate.
Please check if the pH probe is properly secured in the socket.
Please execute the pH probe calibration procedure.
Please gently open the “Reaction Chamber” and check if it is dry inside.
If the “Reaction Chamber” is dry, please check the water level sensor if it can move up and down
freely.
If all settings are correct, please contact your dealer.
pH>ERR = pH reading high error
A.
B.
C.
D.
8.
This error message will occur if the pH reading is higher then 8.8. Alarm will activate.
Please check if the pH probe is properly secured in the socket.
Please execute the pH probe calibration procedure.
If all settings are correct, please contact your dealer.
Page12
4. Additional User Instructions
1.
2.
3.
Upon initial assembly and installation, please make sure to perform 5 (ve) dKH readings to ensure optimal
performance and accuracy.
Upon using KHG, at any time if you wish to move KHG, you must use the "Purge Chamber" function to
completely drain out all liquids in the Reaction Chamber. Moreover, please detach and invert the Reaction
Chamber from the unit and pat dry the insides with paper towel. Failure to do so may cause the corrosive
salt water to spill and may damage the parts of KHG. In severe cases, the damage maybe permanent.
Only use KHG approved pH probe. Non-approved pH probe would result inaccuracy. If possible, please
always have a spare pH probe at hands ready to use. We recommend exchange the pH probe every three
months, and perform pH4 and pH7 calibration every time at the exchange. When removing a pH probe for
storage, you must thoroughly clean the probe, pat dry the surface. To store the pH probe, the glass bulb at
the tip of the probe must be immersed in 3M potassium chloride solution.
User Manual

Page 13
Life of pH probe is approximately 18 months, and may reduce accuracy after long exposure to salt water.
Please do not allow pH probe to dry completely for 12 hours or more, it could result in permanent damage
of the probe.
Use of non-approved KHG reagent solution is strictly prohibited. The factory supplied KH reagent is
a special mixture of reagents. We carefully select reputable reagent chemical suppliers with quality
certifications. Non-KHG approved reagents may damage the patent pending interference resistant rare
earth material coating in the Reaction Chamber, and may result in permanent damage to the accuracy.
Factory supplied KHG reagent solution are concentrated. To achieve the best accuracy, users must proper
dilute it. You should use 1500 grams of RODI water for dilution. Please note the unit of RODI water is
grams, not mililiter. Please use a electronic scale to weigh 1500 grams of water at room temperature, and
keep the error to within 0.1 grams. Each new dilution of the KHG reagents is enough for approximately 2
month, based on 4 hours test interval and about 4 grams of reagent consumed per test.
To best protect your reef tank inhabitants, we did not add preservatives to the factory supplied KHG
reagents. However, the lack of preservatives may result in black color bacteria substances growing in the
tubing. From the test result of using KHG in the last 4 years, these substances do not cause inaccuracy
to the tests, and do not have negative inuences to the reef tank inhabitants. If accidental diluted reagent
solution exposure to your eyes or skin, please do not panic and simply rinse with large quantities of fresh
tap water. Please keep KHG reagent solutions away from children at all times.
KHG currently is not WIFI capable due to various country regulations. You must use RJ45 network cables
to physically connect KHG to your LAN. There is a 12V power jack already provided with KHG that can be
used in conjunction with RJ45 WIFI Bridge. If user wish to make KHG WIFI capable, please contact with
your seller or authorized dealer. KHG parent company does not offer WIFI related support for the users.
KHG does not support xed IP and must be attached to the network that uses DHCP. For any reasons if
KHG fails to obtain IP from the DHCP server, KHG will x itself at default settings :
IP : 192.168.1.120
Submask : 255.255.255.0
Gateway : 192.168.1.1
Port : 8090
Please note the above default setting cannot be changed.
If your mobile devices are in this IP range, you can connect to the KHG by entering below in your browser :
http://192.168.1.120:8090
4.
5.
6.
7.
8.
9.
User Manual

Each time KHG reboots, it will attempt to obtain time to the network time server. If not obtainable from the
network server, KHG will use its internal clock. If the internal clock also fails, the date and time will display
"Time N/A".
Due to strict regulation of mailing battery on the aircrafts, KHG will only be shipped without internal battery.
For instructions how to obtain and install internal battery, please contact your dealer.
When positioning the KHG, the intake tube must be within 100cm and the KHG must not be positioned
below the water surface of the location of intake tube water source.
To prevent siphoning of tank water via KHG, the Reaction Chamber purge tube and the Sodium Bicarbonate
tube must not be immersed into the tank.
KHG intake tube shall not be positioned to the bottom of the tank, and should be protected to prevent debris
from entering into the intake tube and result in blockage in the tubing.
The "C" version of the KHG comes with auto supplementation of Sodium Bicarbonate. To use this feature,
please prepare your Sodium Bicarbonate solution by mixing 65 grams of sodium bicarbonate powder per
one liter of water. Please keep the error tolerance to within 5%.
We would strongly recommend to keep KHG in a protected container away from saltwater splashes. Please
contact your dealers for details.
Please do not attempt to open the cover of the KHG other than normal cleaning along the path of the liquid
tubings. Warranties are void if the KHG body cover has been opened.
Please do not apply lubricants to the heads of the Sodium Bicarbonate pump, Tank Water Intake Pump and
Waste Water Purge Pump. Use only dry paper towels to wipe clean if necessary.
KHG Reagent Pump should be taken apart for lubrication every 6 months. Use only Molykote EM-30L
Grease for lubrication. Other lubricants are strictly prohibited. The tubing for the peristaltic motor should be
replaced at least once a year.
Complete system test will be performed on every KHG during factory pre-shipment tests. Salt residue may
be present in the tubing upon purchase. The residue will be purged out during the initiatial setup.
KHG maybe customized according to your need. Please contact your dealer if you deemed necessary.
Please do not attempt to alter KHG by yourself or the warranty will be void.
10.
11.
12.
13.
14.
15.
16.
17.
18.
19.
20.
Page14
User Manual
21.

Display Panel Short-Cuts:
To calibrate pH 4: Press and hold buttons 1 + 4 for 3 seconds.
To calibrate pH 7: Press and hold buttons 2 + 4 for 3 seconds.
To KS_DS_Gas: Press and hold buttons 1 + 2 for 3 seconds.
To SW_Tube De_Gas: Press and hold buttons 1 + 3 for 3 seconds.
To Purge Chamber: Press and hold buttons 3 + 4 for 3 seconds.
To C.W. & dKH (Get dKH): Press and hold buttons 2 + 3 for 3 seconds.
1.
2.
3.
4.
5.
6.
Page15
User Manual
Table of contents
Popular Aquarium manuals by other brands

JBL
JBL LED SOLAR NATUR manual

Kollercraft
Kollercraft Betta Bowl Aquarium How to set up

ViaAqua
ViaAqua LV Series quick start guide

Royal Exclusiv
Royal Exclusiv Bubble King DeLuxe 200 VS14 datasheet

AquaticLife
AquaticLife T5HO G3 Installation, operation, maintenance guide

Aqua Medic
Aqua Medic 200.05 Operation manual