Dr.Dabber Switch User manual

4/9/22, 4:49 PM
Switch Knowledge Base - Dr. Dabber Knowledge Base
https://drdabber.helpscoutdocs.com/article/98-switch-knowledge-base
1/9
Switch Knowledge Base
Switch
SWITCH Introduction (https://www.youtube.com/watch?v=thJhTgRD2mE)
The Switch is our first induction heating unit capable of vaporizing oil or leaf materials with precise power and
carefully calibrated temperature profiles. Induction heating is significantly faster than any other heating method
currently available and designed to create an even heating surface temperature with less hot-spots, providing a
consistent flavor during the vaporizing experience. There are no electrical connections to the heating element that
can wear out or break over time. All these induction heating benefits work together to give you a totally unique,
precise and practical vaporizing experience. The Switch has a quality tactile satin finish which feels as soft as
silicone and can easily be gripped.
The Basics
Multiple Modes for Multiple Materials:
Leaf Mode
Oil Mode
Advanced Mode (25 Heat Settings for Oil & Leaf)
Crystal Mode (Additional Accessory Required)
Precision Heating Induction Cups:
White Ceramic
Black Ceramic
Crystal/Quartz (Sold Separately)
Smooth Ceramic (Sold Separately)
Sapphire (Sold Separately)
SIC(Sold Separately)
AlN(Sold Separately)

4/9/22, 4:49 PM
Switch Knowledge Base - Dr. Dabber Knowledge Base
https://drdabber.helpscoutdocs.com/article/98-switch-knowledge-base
2/9
Custom Hold Times:
Need more heat for longer? Set your own hold time that works best for you!
Self Cleaning Mode:
A high energy heat cycle that burns away any remaining residue in the Ceramic Induction Cups.
Self Cleaning Cycle (https://www.youtube.com/watch?v=vfak6D-tsQc)
Standby Lighting:
25 LED Light Show Options
Stealth Mode (No Top Lights)
Standby Light Options (https://www.youtube.com/watch?v=uZcAHcNHEMM)
Glass Percolator Attachment:
50mm Ground Glass Fitting
Beautiful Hourglass Profile
Heavy Duty Borosilicate
Stylish Design:
Quality Tactile Satin Finish
Solid Foundation
Simple & Intuitive Interface
Technical Specs:
Output Power up to 120 watts
Battery Capacity of 33.3 watt-hours
64kb memory
LiFePO4 non-volatile battery cells built into battery pack (non-explosive batteries, one of the safest on the market)
Pass through charging
Over-voltage, over-current, under-voltage, over-temperature, short-circuit, and reverse-polarity protection built into
the unit
How to use your Switch
User Guide (https://www.youtube.com/watch?v=GXzhWHiy0rI&t=31s)
1. Fill glass attachment with water and place on Switch unit.
2. Load induction cup and place inside heating chamber with included tweezers.

4/9/22, 4:49 PM
Switch Knowledge Base - Dr. Dabber Knowledge Base
https://drdabber.helpscoutdocs.com/article/98-switch-knowledge-base
3/9
3. Select mode by flipping the switch to oil or leaf mode.
4. Select power with (+) or (-) buttons. Battery level is indicated with Pink LEDs once power level is confirmed.
5. Place carb cap on glass attachment and press (GO) button. Enjoy Vapor.
Quick Tips & Tricks (https://vimeo.com/650453718)
We recommend using all included silicone seals (Carb Cap Seal & Glass Attachment Seal) for maximum vapor
production.
Your SWITCH has standard oil and flower modes, advanced mode, and crystal mode.
Advanced Mode (https://www.youtube.com/watch?v=751DOOOKz-U&t=4s)
To access advanced mode, start with the switch in the OFF position. Hold the (GO) button and power your device
on by switching it to either Leaf or Oil mode to enter the corresponding advanced mode. The front LEDs will
illuminate in a Rainbow pattern indicating the device is in advanced mode. Advanced mode is included for those
who want more flexibility in fine tuning ideal temperatures.
Crystal Mode (https://www.youtube.com/watch?v=SAn5Iml66Rw)
To access crystal mode, the Switch must be powered down from advanced mode.To enter crystal mode, press
and hold the (+) button and power on the device by flipping the power switch to either Leaf or Oil. The front LEDs
will illuminate Whiteindicating crystal mode.
To return to advanced mode from crystal mode, press and hold the (+) button while the device is in the off position,
then power the device on by flipping the power switch to either Leaf or Oil mode. To return to standard mode from
advance mode, power down the device from advance mode. Press and hold the (GO) button while the device is in
the off position, then power the device on by flipping the power switch to either Oil or Flower. The front LEDs will
illuminate Yellow for standard oil mode and Green for standard flower mode.
Training Hold Time (https://www.youtube.com/watch?v=dt2Lg4KC7Bs&t=10s)
In advanced and crystal modes, you may train the hold time of your Switch unit. The "hold time" is the length of
time the Switch remains activated, so you may enjoy your hit, which is indicated with a green light. Select your
desired temperature, then press and hold the GO button. Continue holding the GO button until you are satisfied
with the amount of hold time. Once the GO button is released, the Switch unit will remember this hold time on all
further heating cycles in advanced/crystal mode. You may train the Switch as many times as you like, it will only
remember the most recent train time. Standard hold time is 15 seconds. The minimum trainable hold time is 5
seconds. The longest trainable hold time is 30 seconds.
The Induction system will heat any conductive materials placed inside the induction chamber. Therefore, ceramic
or glass loading tools are suggested, but metallic loading tools will not harm the device. We recommend pre-
loading your product in the induction cups to prevent any issues. Pre-loading is also convenient and helps
preserve the taste of the terpenes in your oils.

4/9/22, 4:49 PM
Switch Knowledge Base - Dr. Dabber Knowledge Base
https://drdabber.helpscoutdocs.com/article/98-switch-knowledge-base
4/9
We recommend filling your Switch glass attachments with water just above the perc holes. Fill the water from the
mouthpiece until it has reached the appropriate height. Over filling the attachment may cause splash back. Using
water in the glass attachment cools and filters vapor for a cleaner hit.
When using upgraded Directional or Bubble carb caps, we recommend using the silicone seal from your standard
carb cap and placing it on your Switch glass attachment. This will help to create maximum vapor production. Video
for reference. (https://vimeo.com/643681920)
Flower Use and Tips
When using the Switch with flower, we recommend starting low temp (around 400) and working your way up to find
the best temp for you personal needs. We recommend setting the temp at 420 for a more traditional vaping
experience. Higher heat settings (above 600) will give more of a bong-like experience, providing heavy head and
body highs. Temp guide for reference (https://www.instagram.com/p/BuARlYRHMvs/).
Press flower down firmly in induction cups (about finger tight) and make sure to stir your flower in between heating
cycles to get the most from your materials.
Take long, slow drags for best results.
Dry flower may require lower heat settings and fresh or dense flower may require slightly higher heat settings.
Water levels will impact vapor density. We recommend water levels about a 1/2 inch above the peculator holes, but
you may need to increase or decrease water levels based on the desired vapor density.
The Switch can vaporize flower in many different ways. Experiment with different heat settings, water levels,
material packing, and draw lengths/hold time to find the best settings for your personal needs.
We recommend using the ceramic leaf filter with dry herb. This filter helps heat the induction cups evenly for better
vapor production and keeps dry herbs inside the induction cup while in use. You may use a torch to clean the
ceramic filter or soak in isopropyl alcohol for 10-20 minutes
We recommend Directional Caps and the Sidecar Glass Attachment for flower use, but all caps and glass
attachments will work great as well.
Charging your Switch
The Switch unit will illuminate the current power percentage in Pink after confirming/changing the heat setting. Five
solid Pink lights indicate 100% charged. These Pink LED lights will begin to flash when the unit has less than a
10% charge.We only recommend charging your unit once it reaches less than a 20% charge(One Pink LED)and

4/9/22, 4:49 PM
Switch Knowledge Base - Dr. Dabber Knowledge Base
https://drdabber.helpscoutdocs.com/article/98-switch-knowledge-base
5/9
removing your unit from the charger as soon as it is fully charged. This will help extend the overall lifespan of your
battery. Leaving your unit plugged in for extended periods will shorten the lifespan of the battery.
Cleaning your Switch
Cleaning Guide (https://www.youtube.com/watch?v=gmc_2spj7Ww&t=38s)
(https://www.youtube.com/watch?v=gmc_2spj7Ww&t=38s)The Switch comes with a programmed self-cleaning
cycle for Standard Ceramic induction cups. Make sure to clean out any residue inside the induction chamber
before using the self cleaning cycle. Press and release (+) button, then press hold the (+) button for 5 seconds or
until the heating chamber lights illuminate PURPLE and the unit starts a heating cycle with the ascending red LED
lights. The unit may need to start a cooling cycle, with the descending blue LED lights, when the cleaning cycle is
complete. Cooling cycle will only activate if the unit becomes too warm to function correctly.The cooling cycle may
last anywhere from 1-5 minutes after a cleaning cycle. You may also use a torch to clean induction cups or soak
them in isopropyl alcohol for 10-20 minutes.
*Cleaning cycle will not activate in Crystal Mode.*
Make sure to keep your Switch unit and induction cups clean. Remove the glass attachment and induction
cupfrom the unit. Using a cotton swab or paper towel dipped inisopropylalcohol, we recommend 91% or higher
isopropyl alcohol for best results, clean any residue in and around the induction chamber. Let all parts air dry
completely before use.
We recommend using a cotton swab to clean out induction cups after every use. This will help preserve the
lifespan and flavor of these parts. Dry cotton swab immediately after every dab. Then use a cotton swab dipped in
ISO, while the cup is still warm, to remove any left over residue.
To clean glass attachments, fill with isopropyl alcohol and shake vigorously until all blemishes are removed. You
may need to repeat this step. Completely rinse with water and let air dry.
You may use a torch to clean Quartz, SIC, AlN, Sapphire, and Smooth Ceramic induction cups or soak in
isopropylalcohol for 10-20 minutes. Use constant motion while torching. Do not let hot inserts/cups come in
contact with cool surfaces while warm. Let inserts/cups cool naturally at room temperature. Video for reference.
(https://vimeo.com/648689825)
Switch Temperatures
Temp Guide (https://www.instagram.com/p/BuARlYRHMvs/)
(https://www.instagram.com/p/BuARlYRHMvs/)Advanced and Crystal Mode Approximate Temperature Ranges:

4/9/22, 4:49 PM
Switch Knowledge Base - Dr. Dabber Knowledge Base
https://drdabber.helpscoutdocs.com/article/98-switch-knowledge-base
6/9
1 Purple LED is the lowest power setting (~300°F|148.8°C degree range)
1 Purple (300°F|148.8°C) 2 Purple (320°F|160°C) 3 Purple (340°F|171.1°C) 4 Purple (360°F|182.2°C) 5 Purple
(380°F|193.3°C)
1 Blue (400°F|204.4°C) 2 Blue (420°F|215.5°C) 3 Blue (440°F|226.6°C) 4 Blue (460°F|237.7°C) 5 Blue
(480°F|248.8°C)
1 Cyan (500°F|260°C) 2 Cyan (520°F|271.1°C) 3 Cyan (540°F|282.2°C) 4 Cyan (560°F|293.3°C) 5 Cyan
(580°F|304.4°C)
1 Green (600°F|315.5°C) 2 Green (620°F|326.6°C) 3 Green (640°F|337.7°C) 4 Green (660°F|348.8°C) 5 Green
(680°F|360°C)
1 Yellow (700°F|371.1°C) 2 Yellow (720°F|382.2°C) 3 Yellow (740°F|393.3°C) 4 Yellow (760°F|404.4°C) 5 Yellow
(780°F|415.5°C)
5 Yellow LED's is the highest power setting (equivalent to ~780°F|415.5°Cdegree range)
*All temperatures are approximate ranges and may vary on induction cup used.*
Compatible Items
The Switch is compatible with our 5 different induction cups. All Switch Kits
(https://www.drdabber.com/collections/switch/products/switch-free-gift) will come with 2 ceramic inductions cups.
However, we do offer additional inserts to be purchased separately.
Leaf Cup (Black) (https://www.drdabber.com/collections/switch/products/switch-leaf-ceramic-induction-cup-black)
// Oil Cup (White) (https://www.drdabber.com/collections/switch/products/switch-oil-ceramic-induction-cup-
white):These Gr2 Titanium cups have a medical grade ceramic coating on the heating surface for optimal heat
distribution.
Quartz Cup (https://www.drdabber.com/collections/switch/products/switch-quartz-induction-cup):Asolid, quartz
dish insert inside a titanium induction cup.Designed for use with oil but can also be used for low heat flower
vaporization.Please note, for optimal results, the Switch must be in crystal mode to use the Quartz insert.
Smooth Ceramic Cup (https://www.drdabber.com/collections/switch/products/switch-smooth-white-ceramic-1pk-
oil-induction-cup): Aceramic dish insert inside a titanium induction cup. Unlike the all-in-one Standard Ceramic
Induction Cup, the Smooth Ceramic Cup is made of a significantly thicker ceramic, which retains heat longer while
also offering ideal heat distribution. The Smooth Ceramic Cup isused for vaporizing oils, but can also be used for
low heat flower vaporization.Please note, for optimal results, the Switch must be in crystal mode to use the
Smooth Ceramic insert.

4/9/22, 4:49 PM
Switch Knowledge Base - Dr. Dabber Knowledge Base
https://drdabber.helpscoutdocs.com/article/98-switch-knowledge-base
7/9
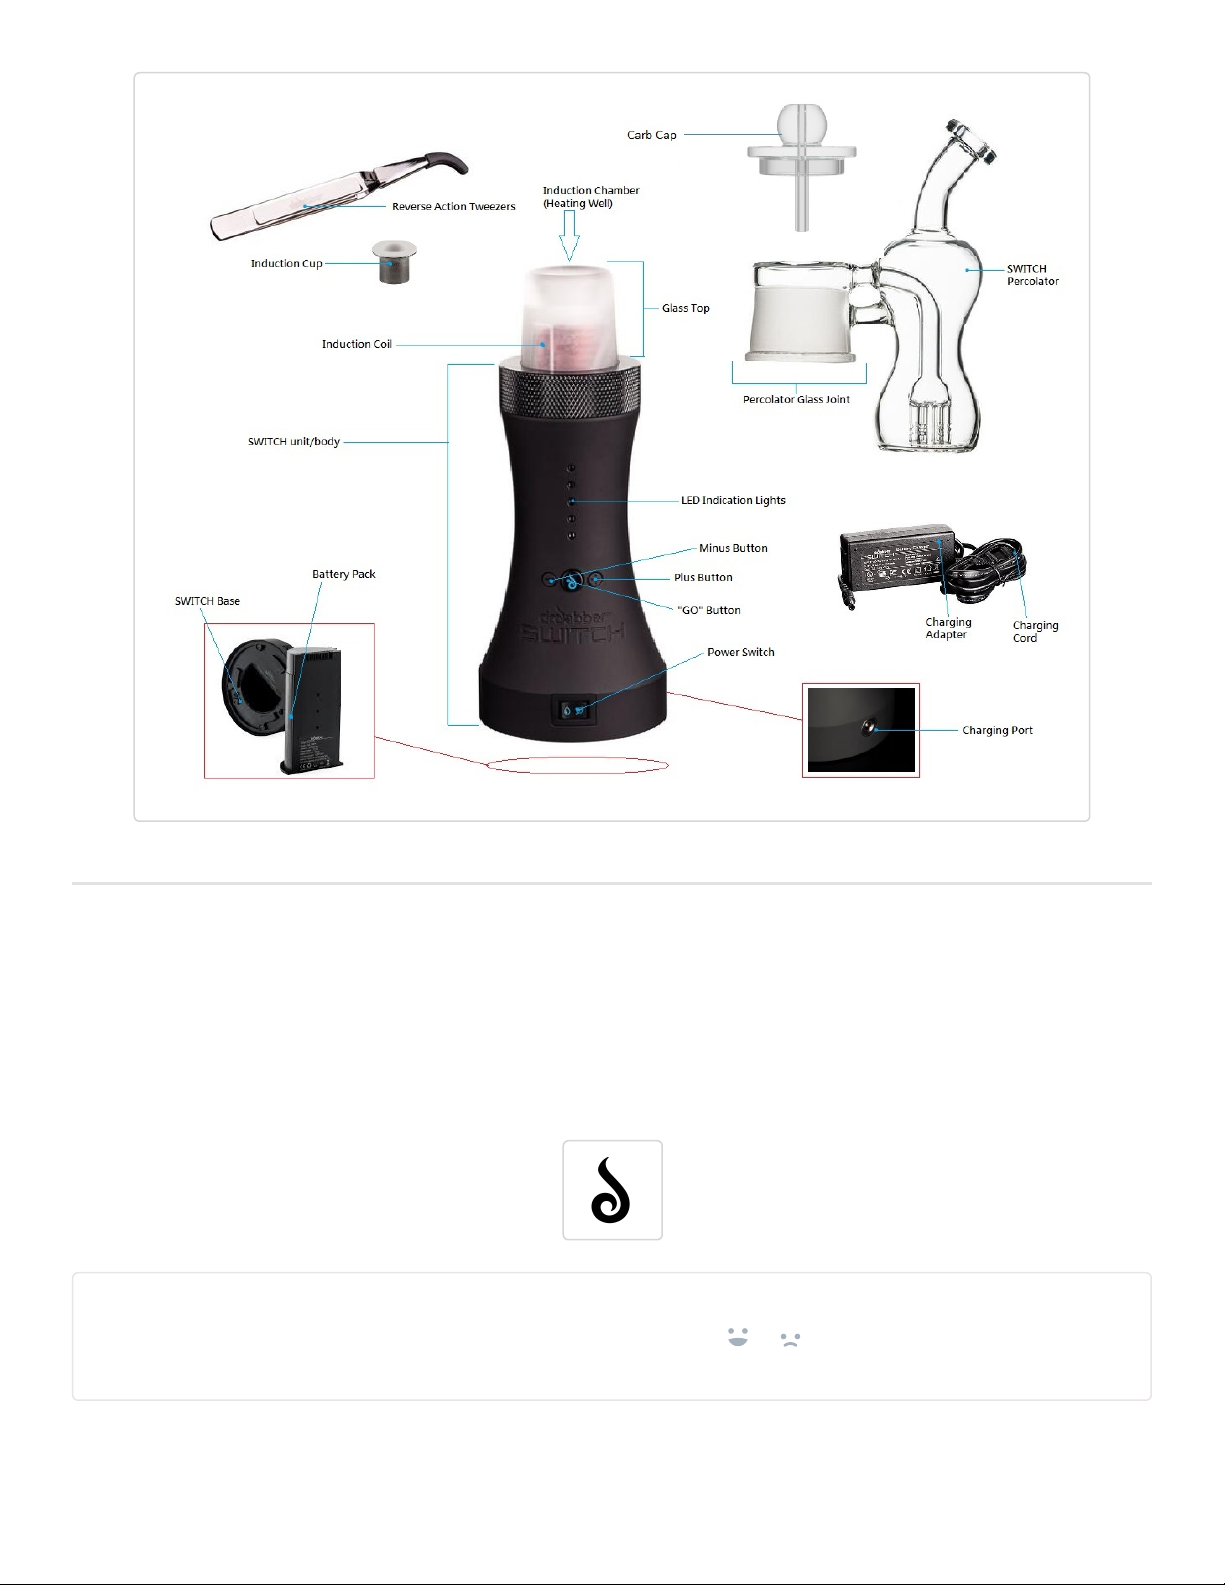
Sapphire Cup (https://www.drdabber.com/collections/switch/products/switch-sapphire-induction-cup-1):The
Sapphire Induction Cup is an ultra premium accessory designed for use specifically with oil for the Switch. Placed
inside a Titanium Cup, the Sapphire Insert provides the cleanest surface possible for your oil and concentrates -
truly a luxury dabbing experience.Please note, for optimal results, the Switch must be in crystal mode to use the
Sapphire insert.
SIC Cup (https://www.drdabber.com/collections/switch-collection/products/switch-sic-induction-cup):TheSIC
(Silicon Carbide) Induction Cup is an ultra premium accessory designed for use specifically with oil for theSwitch.
Placed inside a Titanium Cup, theSIC Insertis lightweight and extremely durable, able to withstand very high
temperatures.With the SIC Induction Cup's higher thermal conductivity, you can achieve your desired heat at a
much lower temperature setting while obtaining great flavor- truly a luxury dabbing experience.Please note, for
optimal results, theSwitchmust be in crystal mode to use the SIC insert.
ALN Cup: (https://www.drdabber.com/products/switch-aln-induction-cup?_pos=1&_sid=bcfd821cc&_ss=r) The
SWITCH: AlN (Aluminum Nitride) Induction Cup is the most premium induction cup available for the Switch. This
accessory is used in a variety of industries such as medical, defense, and even aerospace, due to its extensive list
of impressive capabilities.The SWITCH: AlN Induction Cup also provides a level of thermal expansion similar to
Silicone, meaning this accessory can experience high temperatures without cracking or being damaged. Aluminum
Nitride is also able to withstand extreme and rapid changes in temperature, is non-toxic, chemically safe, hard to
oxidize, and provides the purest and most flavorful experience for SWITCH users.Please note, for optimal results,
theSwitchmust be in crystal mode to use the SIC insert.
(https://www.drdabber.com/products/switch-aln-induction-cup?_pos=1&_sid=bcfd821cc&_ss=r)Ceramic Filter
(https://www.drdabber.com/collections/switch/products/switch-ceramic-filter):The Ceramic Filter is specifically
designed for low-temperature flower vaporization. Acting as a cap for theSwitchInduction Cup, the ceramic filter
creates an 'oven' effect when used with flower andkeeps dry herbs inside the induction cup while in use.
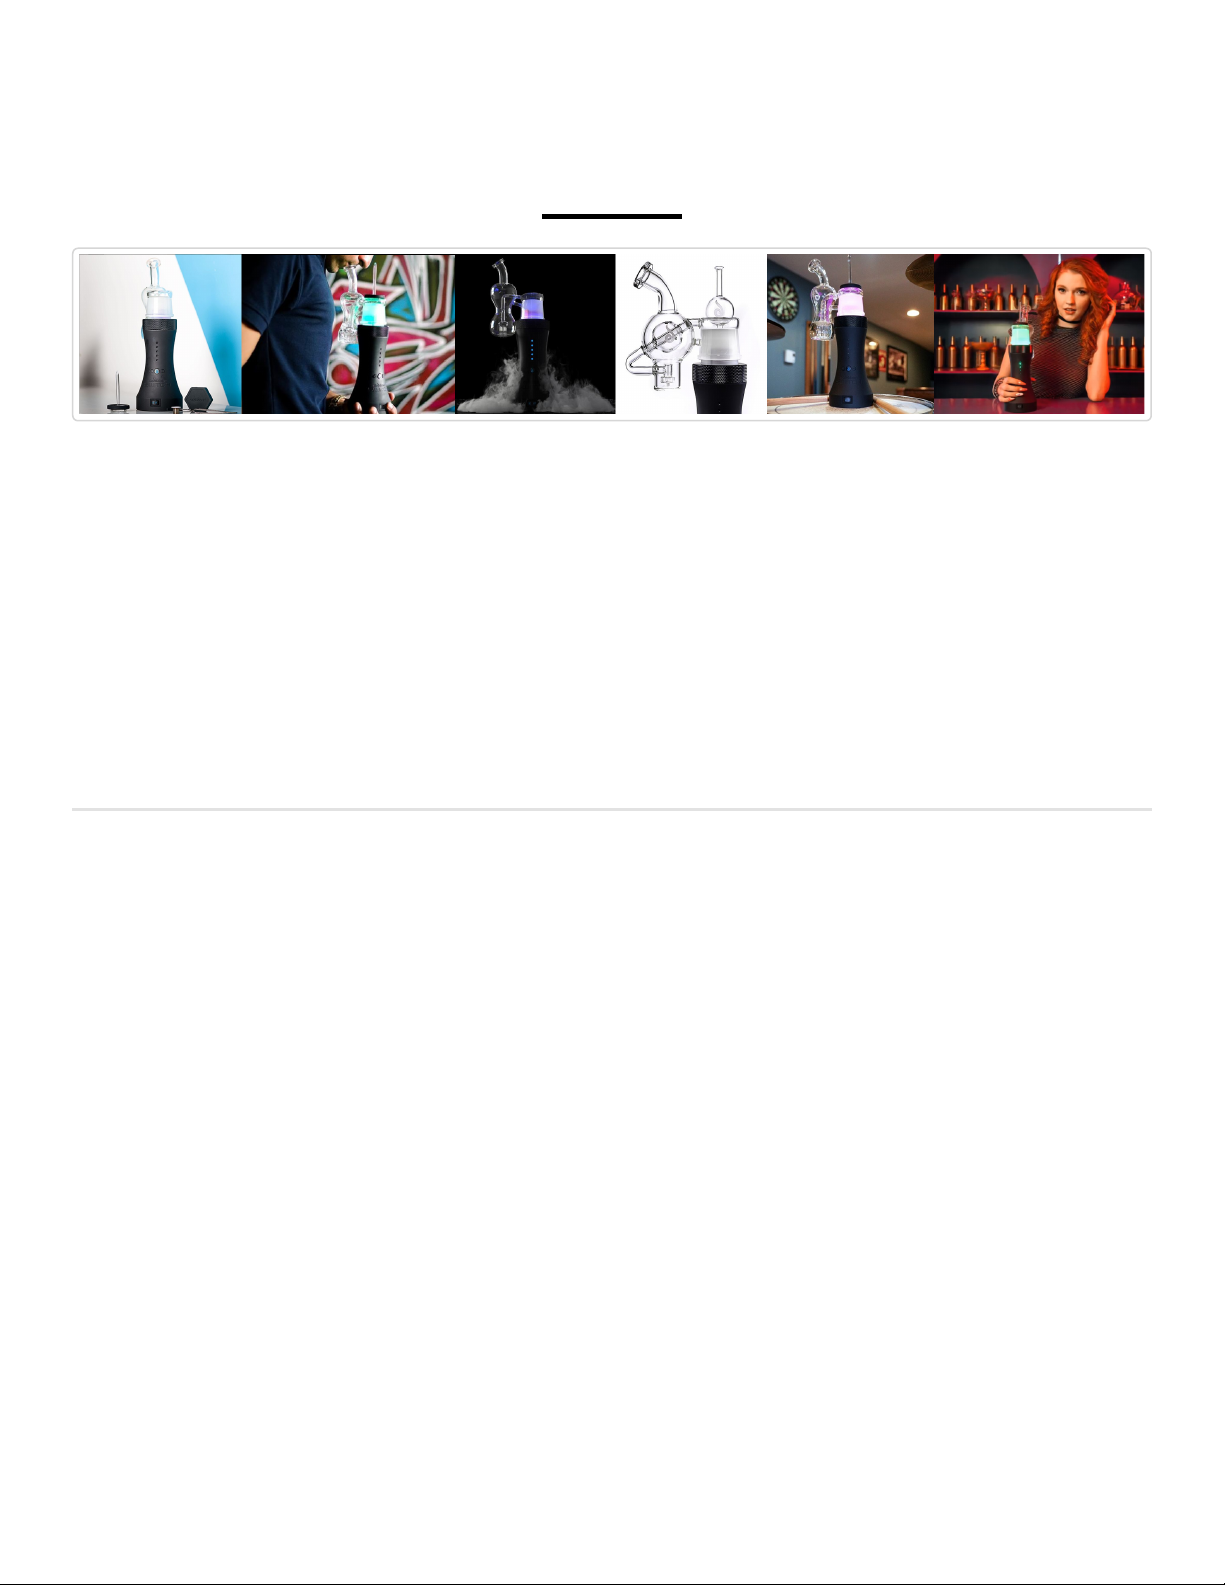
Additional accessories include glass attachments, carb caps, and glassblower tubes.
When using upgraded Directional or Bubble carb caps, we recommend using the silicone seal from your
standard carb cap and placing it on your Switch glass attachment.This will help to create maximum vapor
production. Video for reference. (https://vimeo.com/643681920)
Troubleshooting
Most issues with theSwitchcan be resolved with a soft reset. To reset the SWITCH unit, turn the unit off and
remove the battery for at least 30 seconds. Replace the battery and test functionality. Removing the battery will
NOT void your warranty. The battery is located under the bottom base plate.To remove the base plate, hold the
switch unit upright and slightly twist this plate until it falls away from the unit. The base plate is held in place with
magnets, so you just need to twist it enough to disengagethe magnets. Make sure to remove the glass attachment
and induction cup before flipping your unit upside down. Here is a quick instructionalvideo on how to remove the
battery pack. (https://vimeo.com/645375041)

4/9/22, 4:49 PM
Switch Knowledge Base - Dr. Dabber Knowledge Base
https://drdabber.helpscoutdocs.com/article/98-switch-knowledge-base
8/9
Find Us!
Feel free to check out our instruction videos by visiting our Dr. Dabber YouTube Channel
(https://www.youtube.com/channel/UC0NVkIgwKy-ttYw9RSumj6w/videos) or follow us on Instagram
(https://www.instagram.com/drdabber/), Twitter (https://twitter.com/DrDabber), Discord
(https://discord.gg/FruQXQh6), and Facebook (https://www.facebook.com/drdabber/).
Did this answer your question?

4/9/22, 4:49 PM
Switch Knowledge Base - Dr. Dabber Knowledge Base
https://drdabber.helpscoutdocs.com/article/98-switch-knowledge-base
9/9
© Dr Dabber (https://www.drdabber.com/) 2022. Powered by Help Scout (https://www.helpscout.com/knowledge-base/?
utm_source=docs&utm_medium=footerlink&utm_campaign=Docs+Branding)
Last updated on March 24, 2022 Still need help? Contact Us (/contact)
RELATED ARTICLES
Switch User Manual (/article/76-switch-user-manaul)
Other manuals for Switch
1
Table of contents
Other Dr.Dabber Vaporizer manuals