Dragon Touch Y88X User manual

USER MANUAL

41 - 50
21 - 30
11 - 20
01 - 10
31 - 40 51 - 60
日本語
CONTENTS

Browse the Web
Visit your favorite websites.
Check your e-mail
Keep in touch with friends and family.
Watch YouTube™ videos
Browse the world’s most popular video- sharing community.
Read your favorite books
Download thousands of books with the included E-book reader*.
Discover thousands of apps for Android™ Games, applications, and more with Play Store
(Customer need to download it from Google Play Store).
Connect to the Internet wirelessly
High-speed Wi-Fi 802.11 b/g/n networking.
Enjoy your media library anywhere.
Portable powerhouse plays popular music, video, and photo formats.
Micro SD memory card reader.
Increase your storage capacity (up to 64 GB supported)
Built-in camera
Convenient Front-facing Camera 0.3MP / Rear Camera 2.0MP.
Automatic orientation detection
Read any way you want; the display adjusts automatically!
Reading books in the ePub format requires the included E-book reader application.
FEATURES UNIT AT A GLANCE
1. Front Camera
2. Power Button / Screen Saver
3. Headphone: Audio output connection for headphones.
4. VOL+ / VOL-
5. MicroSD Card Slot
6. MIC: Use internal MIC to record voice.
7. Micro USB Port: Connect to a USB device.
8. DC Power Port
9. Rear Camera
10. Speaker
3
4
5
2
1
6
7
8
9
10
English
1 2

GETTING STARTED
Turning on / off the tablet
To turn on the tablet:
Press and hold the Power button until the LCD screen turns on. Wait until the Home screen
appears, the tablet is now ready for use.
To turn off the tablet:
1. Press and hold the Power button until the Device Options menu appears.
ABOUT APPLICATIONS
To open an application, touch the application icon on the home screen or in the Launcher where you can tap the
icon right up on the home screen to get in. Launcher screen:
2. Tap “OK” to turn off the tablet.
Turning on / off the screen (Sleep mode)
When the tablet is on, you can turn off the screen to save battery power. Simply press the power button
once to turn the screen off. Press the power button again to turn the screen back on.
To save battery power, the screen can be set to turn off automatically when the tablet is not in use
(between 1 minute and 30 minutes).
This screen timeout option can be found in the Display menu.
Unlocking the screen
When the screen turns off, you will have to unlock the screen when you turn it back on.
To unlock the screen, swipe up the lock icon.
The screen shown above is for illustrative purposes only. We reserve the right to modify and improve
the final list of applications available on the tablet.
3 4

ABOUT APPLICATIONS
Preinstalled Applications
Some applications have been installed on your tablet for your convenience.
These applications include:
PREINSTALLED APPLICATIONS
Installing Applications
You can also download an install additional applications from the device’s applications
marketplace, the web browser, or other sources.
The tablet must be set to allow installation of applications from non-Market sources. The
Unknown sources option can be set in the Application settings menu.
CONNECT TO A WI-FI NETWORK
The Notification bar displays icons that indicate your tablet’s Wi-Fi status.
Notification that an open Wi-Fi network is in range.
Connected to a Wi-Fi network (waves indicate connection strength).
[no icon] There are no Wi-Fi networks in range, or the Wi-Fi radio is off.
1. Turn on the Wi-Fi radio if it is not already on. To turn on Wi-Fi:
a. Go to the Home screen: Press the home botton.
b. Open the Settings menu: tap the icon right up on the home screen to get into the launcher,
then tap settings icon.
c. Open the Wireless & networks menu: Slide the icon to ON status.
Browse the web.
Perform simple mathematical operations.
Take pictures or videos with the camera.
Check your e-mail.
Play music.
Access the Settings menu to adjust the tablet’s options.
When Wi-Fi is on, the tablet will look for and display a list of available Wi-Fi networks.
Notes: If a network that you have connected to previously is found, the tablet will connect to it. If you
don’t see your network in the list, you can force the tablet to re-scan. To scan for networks, tap the
Menu key, and then touch Scan.
2. Select an available Wi-Fi network to connect to:
In the same Wi-Fi settings menu above, tap a network in the list.
If the network is open, the tablet will prompt you to confirm connection to the network.
Tap connect to confirm.
If the network is secured (as indicated by a Lock icon), the tablet will prompt you to enter a password
or other credentials. Tap the Wireless password box to show the on-screen keyboard and then use it
to enter the password. Tap connect to confirm.
5 6

When you have successfully connected to a Wi-Fi network, the Notifications bar at the upper
right of the screen will show a Wi-Fi signal indicator.
Notes: To learn about how to add a Wi-Fi network when it is not in range or when the router
is set to obscure the network name (SSID), or to configure advanced Wi-Fi options, please
refer to the manual.
CONNECT TO A BLUETOOTH DEVICE
1. Turn on Bluetooth.
Go to Settings > Bluetooth.
2. Tap the device in the Devices list, then follow the onscreen instructions to connect to it. The
tablet must be within about 30 feet (10 meters) of the Bluetooth device.
OPTIONAL CONNECTIONS
Connecting to a Computer
Connect the tablet to a computer to transfer files.
1. Connect your tablet to the computer.
With the included USB cable: Plug the small end of the cable into the USB 2.0 high speed
connector of the tablet. Plug the large end of the cable into an available USB 2.0 high speed
port on the computer.
2. When your tablet is connected, slide down the USB icon then touch icon USB
connected.
3. Mount the storage.
Touch button Transfer files(MTP) to mount the tablet’s built-in storage. When it is mounted, you
can copy files to or from your tablet.
7 8

9
SPECIFICATIONS
Processor
RAM
Storage
Display
Wi-Fi Networking
Audio Output
PC Interface
Additional Features
Operating System
Power
Playback Time
(hours)
RK3126 (Quad-core Cortex-A7 up to 1.2GHz)
1GB DDR3
8GB/16GB(Optional ) flash built-in;
Micro SD card slot (max.64GB supported)
7'' 1024*600, Capcitive touchscreen
IEEE 802.1 1 b/g/n
3.5mm headphone
USB 2.0 high speed
Up to 6 hours music, 3 hours video, 3 hours web browsing
Built-in microphone
Front facing camera(0.3MP) Rear camera (2.0MP)
1X1W speaker
Android 8.1 (Go edition)
Rechargeable Li-poly battery Power Adapter (DC 5V, 1.5A)
Bluetooth 2.0
CONTACT US
For any inquires, issue or comments concerning our products, please send E-mail to the
address below, and we will respond as soon as possible.
E-mail: [email protected]
Google, Android, Google Play and other marks are trademarks of Google LLC
English
10

Deutsch
Surfen Sie im Web
Besuchen Sie Ihre Lieblingswebseiten.
Checken Sie Ihre E-Mails
Bleiben Sie mit Freunden und Familie in Verbindung.
Schauen Sie YouTube™ Videos
Durchforsten Sie die weltweit berühmteste Video-Sharing Community.
Lesen Sie Ihre Lieblingsbücher
Laden Sie tausende von Büchern mithilfe des integrierten E-Book Readers* herunter.
Entdecken Sie tausende von Android™ Spiele Apps, andere Anwendungen und mehr mit dem
Play Store (muss installiert sein).
Verbinden Sie sich kabellos mit dem Internet
High-speed Wi-Fi 802.11 b/g/n Netzwerk.
Genießen Sie Ihre Medienbibliothek überall.
Das tragbare Tablet spielt berühmte Musik, Videos und jegliche Foto Formate ab.
Micro SD Kartenleser.
Erweitern Sie die Speicherkapazität (bis zu 64 GB wird unterstützt).
Eingebaute Kamera
Praktische, nach vorne gerichtete Kamera mit 0.3MP / Kamera auf der Rückseite 2.0MP.
Automatische Ausrichtungserkennung
Lesen Sie so, wie Sie es möchten. Der Bildschirm passt sich automatisch an!
Um Bücher im ePub Format zu lesen, wird die integrierte E-Book Reader Anwendung benötigt.
EIGENSCHAFTEN DAS GERÄT AUF EINEN BLICK
1. Vordere Kamera
2. Power: Drücken Sie den Knopf, um das Gerät einzuschalten oder um den Bildschirm
ein-und auszuschalten. Drücken und halten Sie den Knopf, um zum Ausschalten
Menü zu gelangen.
3. Kopfhörer: Audio Ausgang Verbindung für Kopfhörer.
4. VOL+ / VOL-
5. MicroSD Karte
6. Mikrofon: Verwenden Sie das integrierte Mikrofon, um Ihre Stimme aufzunehmen.
7. USB Stecker: Verbinden Sie ein USB Gerät.
8. Hintere Kamera
9. Lautsprecher
10. Speaker
3
4
5
2
1
6
7
8
9
10
11 12

INBETRIEBNAHME
Das Tablet ein- und ausschalten
Um das Tablet einzuschalten:
Drücken und halten Sie den Power Knopf bis der LCD Bildschirm angeht. Warten Sie bis
der Startbildschirm erscheint. Das Tablet kann nun bedient werden.
Um das Tablet auszuschalten:
1. Drücken und halten Sie den Power Knopf bis das Optionen Menü des Geräts erscheint.
ÜBER DIE ANWENDUNGEN
Um eine Anwendungen zu öffnen, berühren Sie das Anwendungssymbol auf dem Startbildschirm oder im
Startprogramm, wo Sie durch Tippen auf das Symbol oben rechts auf dem Startbildschirm hingelangen.
Startprogramm Bildschirm:
2. Berühren Sie Ausschalten auf dem Bildschirm, um das Tablet auszuschalten.
Den Bildschirm ein- und ausschalten (Standby)
Wenn das Tablet eingeschaltet ist, können Sie den Bildschirm ausschalten, um Strom zu
sparen. Drücken Sie einfach den Power Knopf einmal, um den Bildschirm auszuschalten.
Drücken Sie den Power Knopf erneut, um den Bildschirm wieder einzuschalten.
Um den Stromverbrauch zu minimieren, kann das Gerät so eingestellt werden, dass der
Bildschirm automatisch ausgeschaltet wird, wenn das Tablet nicht in Gebrauch ist (zwischen
1 und 30 Minuten).
Die Einstellung für die Dauer kann im Display Menü gefunden werden.
Den Bildschirm entsperren
Wenn der Bildschirm ausgeht, müssen Sie ihn beim erneuten Anschalten entsperren.
Um den Bildschirm zu entsperren, wischen Sie beim Schloss Symbol nach oben.
Der Bildschirm, der hier gezeigt wird, dient nur zu Erklärungszwecken. Wir behalten uns das Recht vor, die
endgültige Anwendungsliste, die auf dem Tablet verfügbar sein wird, entsprechend zu verändern und zu
verbessern.
13 14

ÜBER DIE ANWENDUNGEN
Vorinstallierte Anwendungen
Manche Anwendungen wurden zu Ihrer Bequemlichkeit auf dem Tablet schon vorinstalliert.
Diese Anwendungen beinhalten:
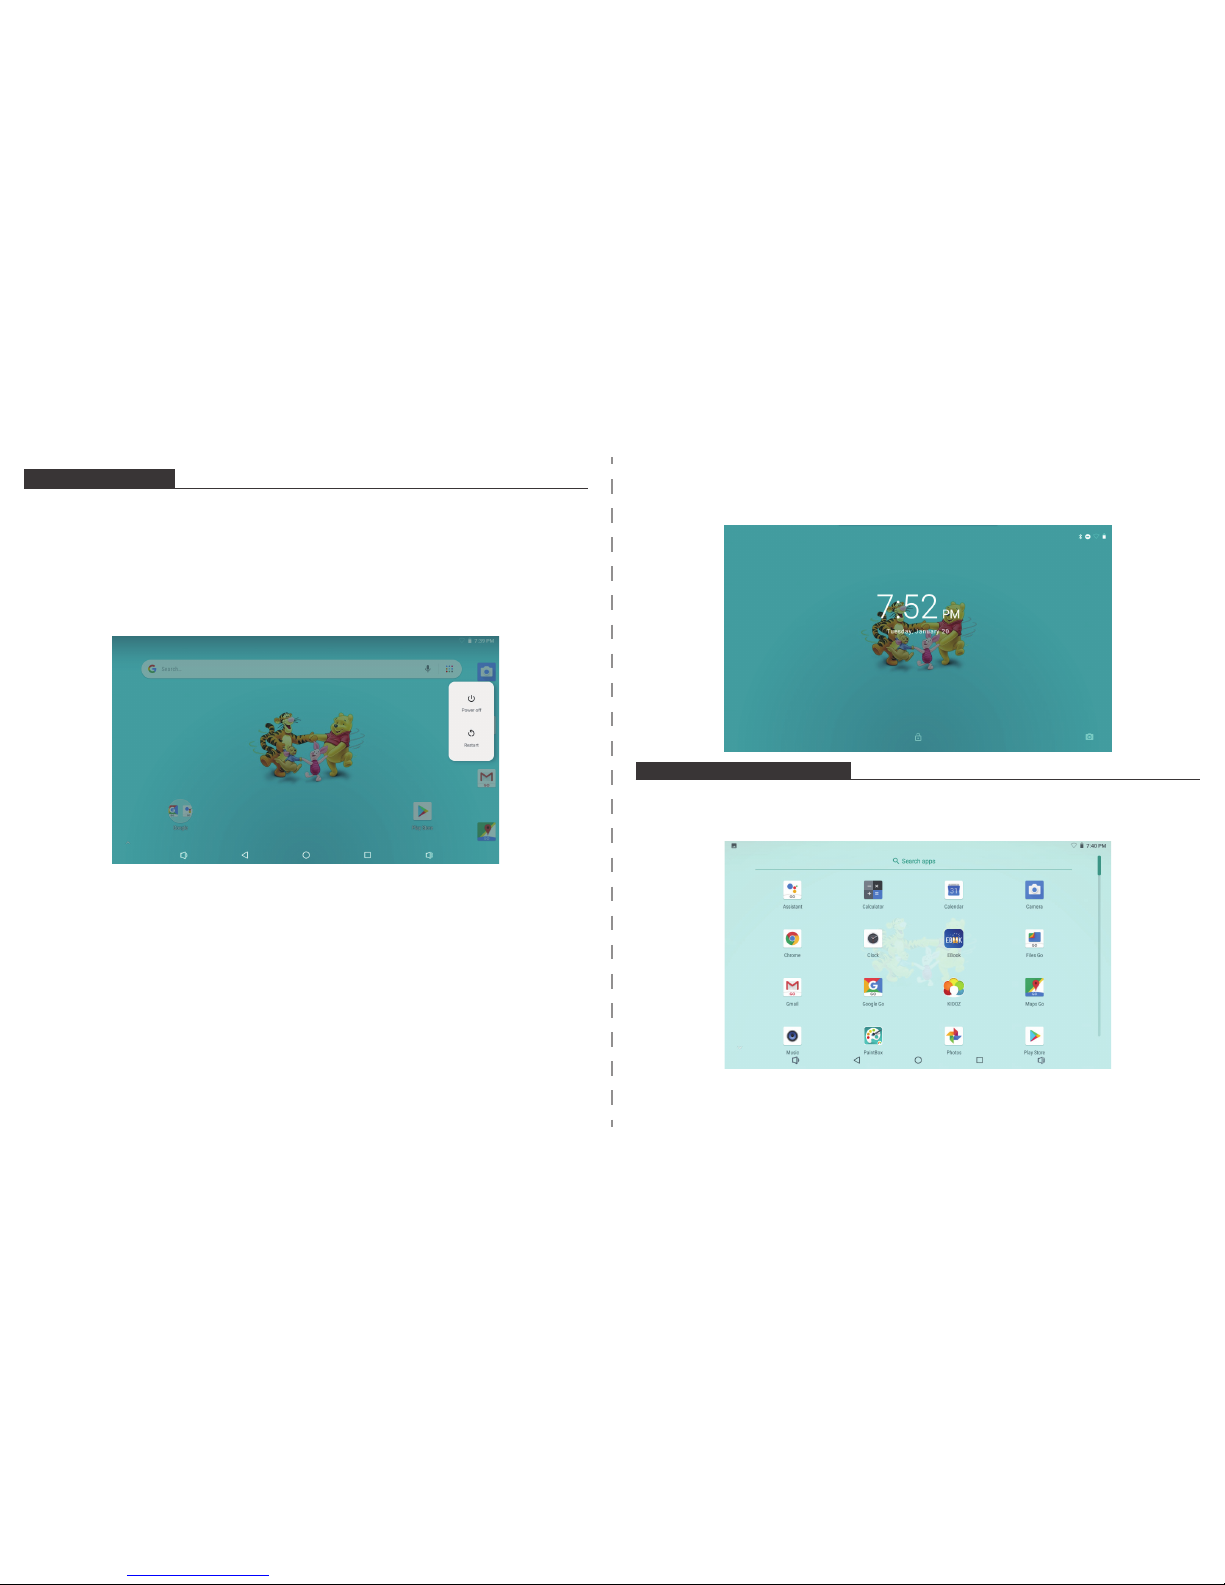
VORINSTALLIERTE ANWENDUNGEN
Anwendungen installieren
Sie können auch zusätzliche Anwendungen vom Anwendungsshop des Geräts, über den Web
Browser oder anderen Quellen herunterladen und installieren.
Das Tablet muss so eingestellt werden, dass es die Installation von Anwendungen aus anderen
Quellen erlaubt. Die Einstellungen für unbekannte Quellen kann in den
Anwendungseinstellungen vorgenommen werden.
VERBINDUNG ZU EINEM Wi-Fi NETZWERK
Die Benachrichtigungsleiste zeigt Symbole, welche den Wi-Fi Status Ihres Tablets erkennen
lassen.
Benachrichtigung, dass ein offenes Wi-Fi Netzwerk in Ihrer Nähe ist.
Mit einem Wi-Fi Netzwerk verbunden (die Wellen zeigen die Stärke der Verbindung an).
[kein Symbol] Es befindet sich kein Wi-Fi Netzwerk in der Nähe oder der Wi-Fi Funk ist
ausgeschaltet.
1. Schalten Sie den Wi-Fi Funk ein, wenn er nicht schon eingeschaltet ist. Um Wi-Fi
einzuschalten:
Surfen Sie im Web.
Führen Sie einfache mathematische Berechnungen durch.
Nehmen Sie Fotos oder Videos mit der Kamera auf.
Checken Sie Ihre E-Mails.
Spielen Sie Musik ab.
Greifen Sie auf die Einstellungen zu, um Ihr Tablet anzupassen.
Wenn das Wi-Fi eingeschaltet ist, wird das Tablet nach Wi-Fi Netzwerken suchen und eine Liste
von verfügbaren Netzwerken anzeigen.
Hinweis: Falls ein Netzwerk gefunden wird, mit welchem Sie schon einmal verbunden waren,
wird sich das Tablet automatisch mit diesem erneut verbinden. Falls Sie Ihr Netzwerk nicht in
der Liste finden, können Sie das Tablet zu einem erneuten Suchvorgang zwingen.
Um nach Netzwerken zu suchen, drücken Sie den Menü Knopf und dann berühren Sie
Durchsuchen.
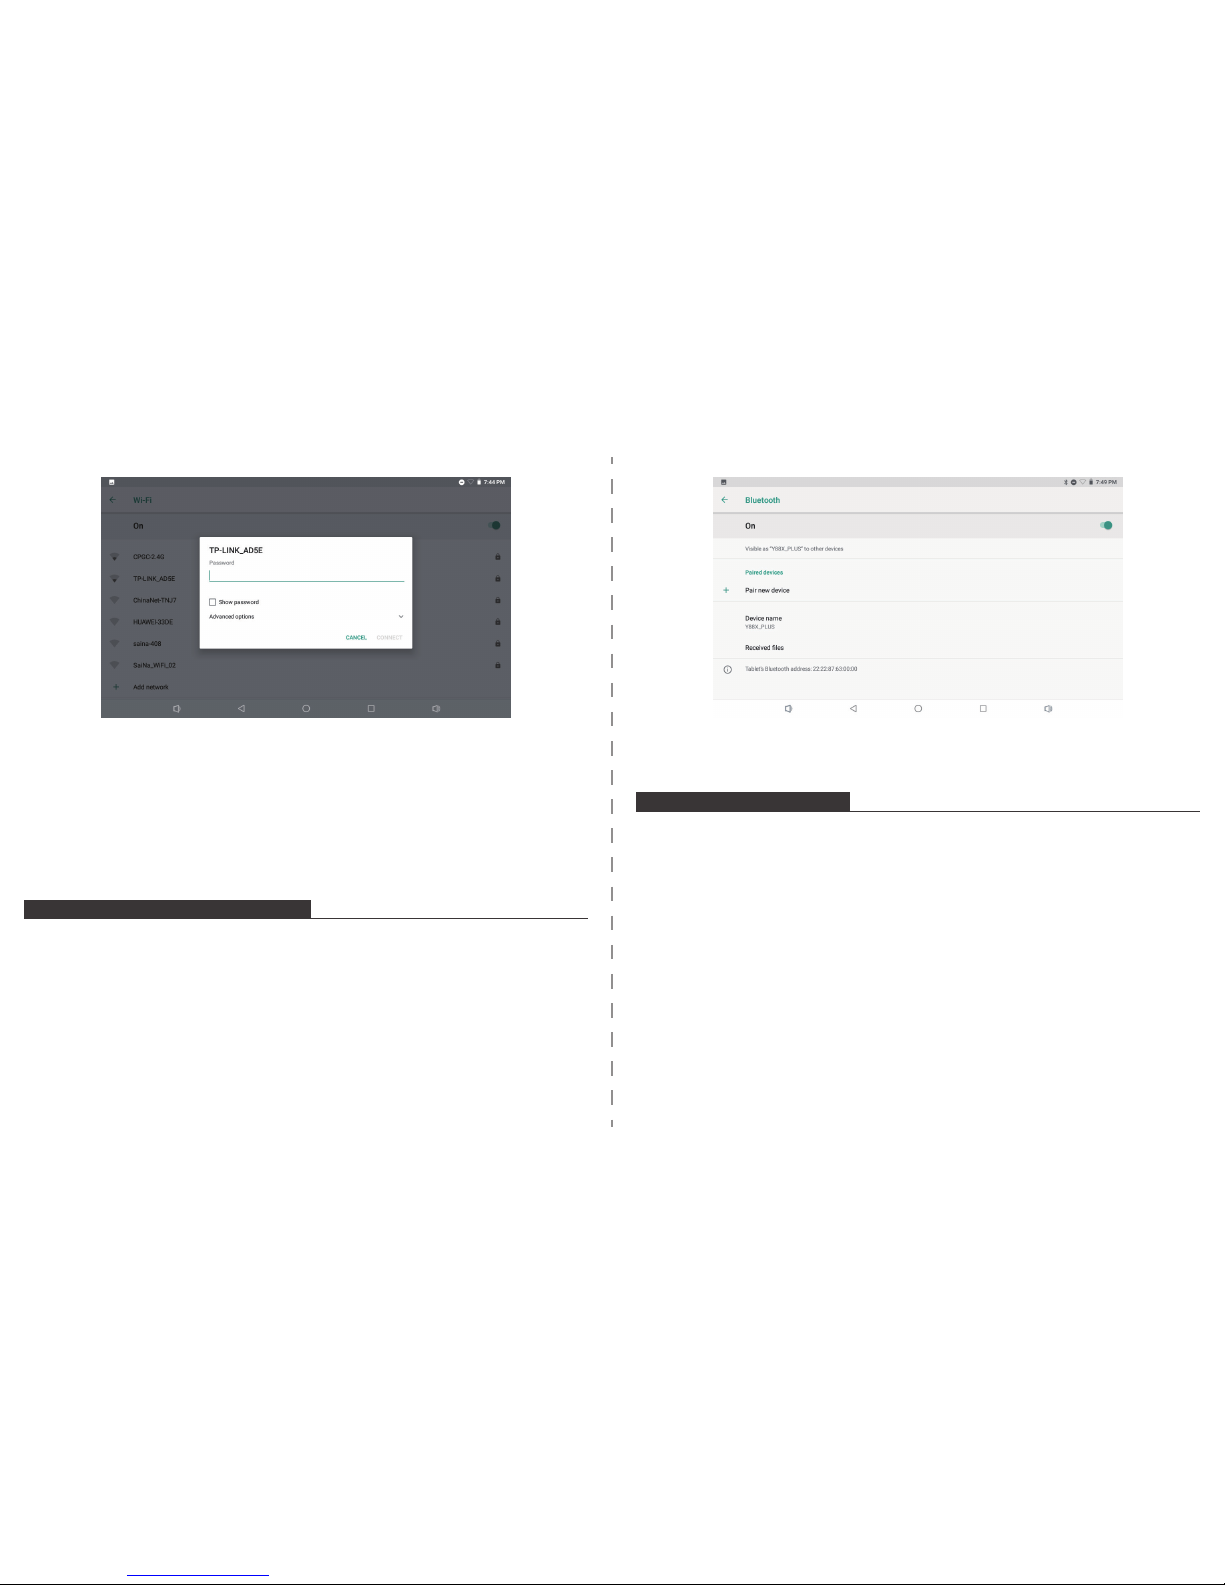
2. Wählen Sie ein verfügbares Wi-Fi Netzwerk aus, um zu verbinden:
Drücken Sie im selben Menü wie oben auf ein Netzwerk aus der Liste.
Wenn das Netzwerk offen ist, wird das Tablet sofort nach einer Bestätigung fragen, sich mit
dem Netzwerk zu verbinden.
Berühren Sie Verbinden um zu bestätigen.
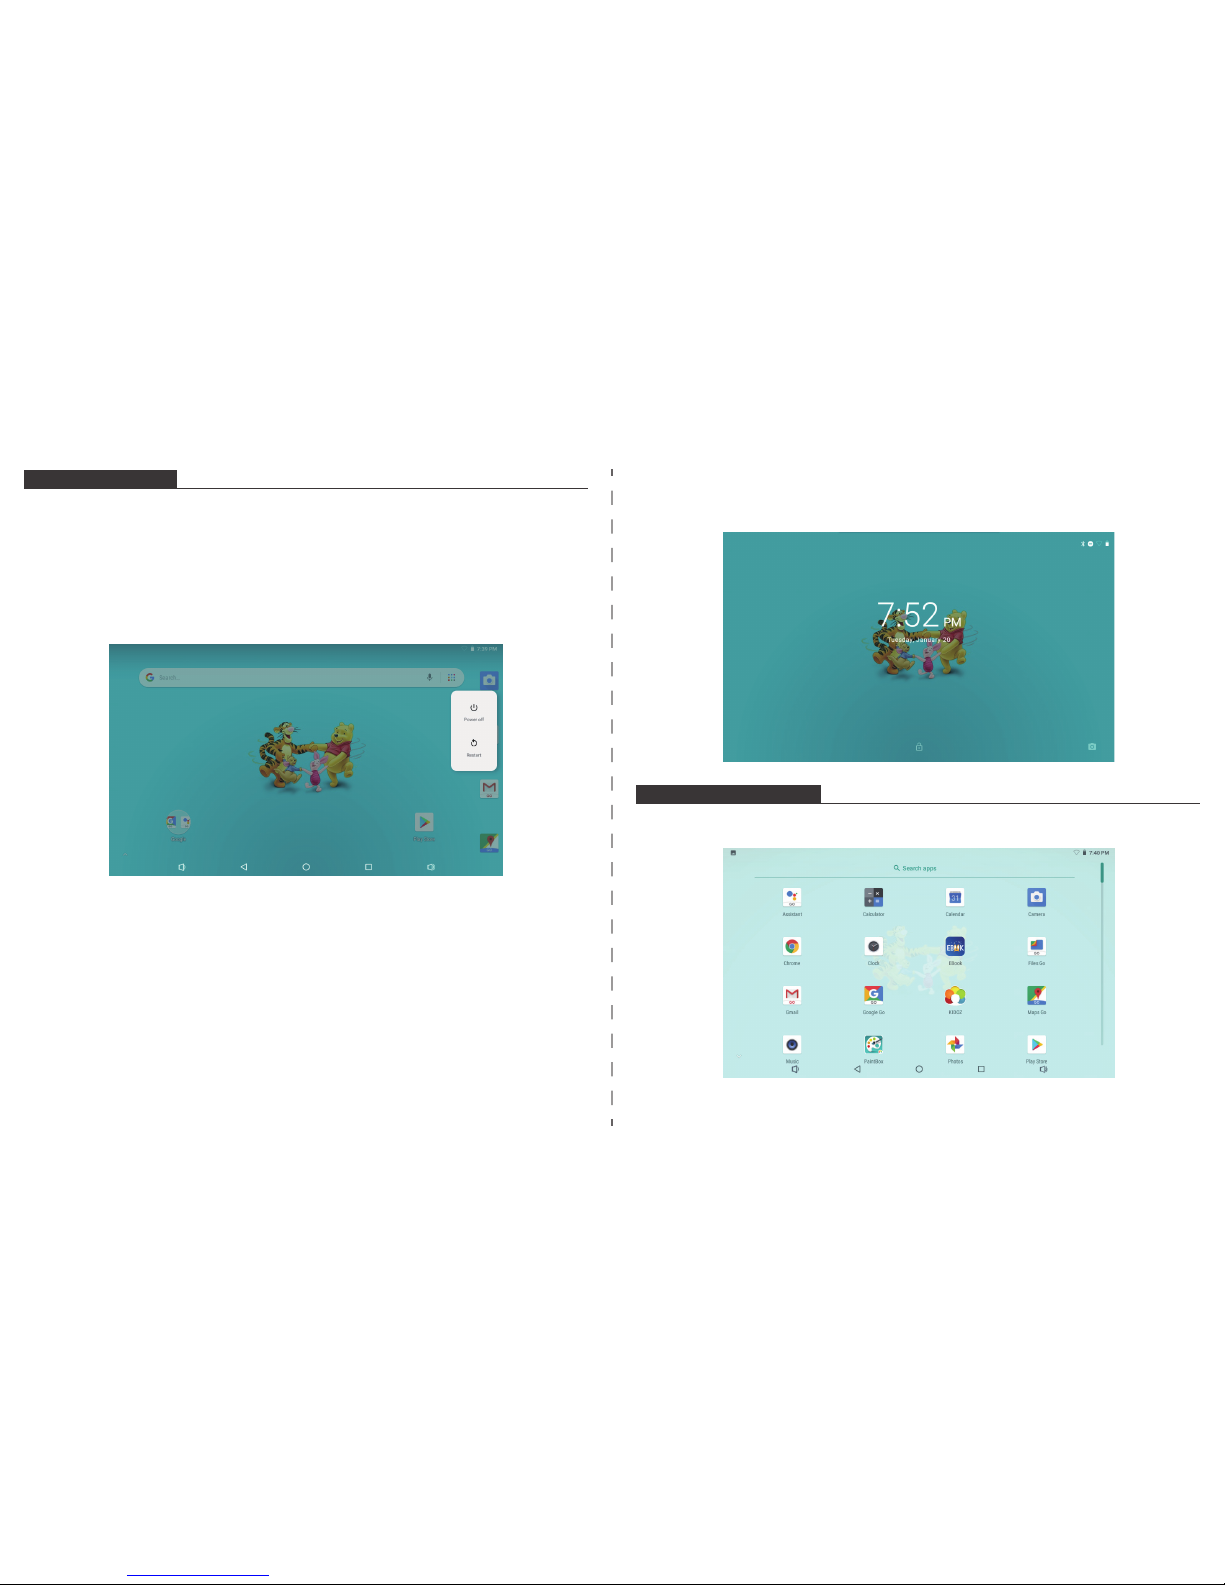
a. Gehen Sie zum Startbildschirm: Drücken Sie den Home Knopf.
b. Öffnen Sie das Einstellungsmenü: tippen Sie das Symbol rechts oben auf dem
Startbildschirm um zum Startprogramm zu gelangen. Drücken Sie dann das
Einstellungssymbol.
c. Öffnen Sie das Drahtlos & Netzwerk Menü: Wischen Sie das Symbol auf AN.
15 16

Wenn Sie sich erfolgreich mit einem Wi-Fi Netzwerk verbunden haben, wird auf der
Benachrichtigungsleiste oben rechts auf dem Bildschirm eine Wi-Fi Signalanzeige sichtbar sein.
Hinweis: Um zu lernen, wie man ein Wi-Fi Netzwerk hinzufügt, welches sich außerhalb Ihrer
Reichweite befindet oder wessen Netzwerk Namen (SSID) durch den Router verdeckt wird
oder um fortgeschrittene Wi-Fi Optionen zu konfigurieren, wenden Sie sich bitte an das
Handbuch.
MIT EINEM BLUETOOTH GERÄT VERBINDEN
1. Schalten Sie Bluetooth an.
Gehen Sie zu den Einstellungen > Bluetooth.
2. Tippen Sie ein Gerät in der Geräteliste an. Folgen Sie dann den Anweisungen auf dem
Bildschirm, um sich mit dem Gerät zu verbinden. Das Tablet muss sich in unmittelbarer Nähe
(ca. 10 Meter) zum Bluetooth Gerät befinden.
WEITERE VERBINDUNGEN
Mit einem Computer verbinden
Verbinden Sie das Tablet mit einem Computer, um Dateien zu übertragen.
1. Verbinden Sie Ihr Tablet mit dem Computer
Mit dem beigefügten USB Kabel: Stecken Sie das kleine Ende des Kabels in den USB 2.0
High-Speed-Stecker des Tablets. Stecken Sie das große Ende des Kabels in den vorhandenen
USB 2.0 High-Speed-Stecker des Computers.
2. Wenn das Tablet verbunden ist, streichen Sie das USB Symbol nach unten und
berühren Sie das Symbol USB Verbunden.
3. Den Speicher freigeben.
Berühren Sie die Taste Daten Übertragen (MTP), um den eingebauten Speicher des Tablets
freizugeben. Wenn er freigegeben ist, können Sie Dateien auf und von Ihrem Tablet kopieren.
Falls das Netzwerk geschützt ist (angezeigt durch das Schloss Symbol), wird das Tablet Sie
dazu auffordern, ein Passwort oder Ähnliches einzugeben. Berühren Sie das Passwortfeld der
drahtlosen Verbindung um die Bildschirmtastatur aufzurufen und ein Passwort einzugeben.
Berühren Sie Verbinden um zu bestätigen.
17 18

TECHNISCHE DETAILS
Prozessor
RAM
Speicher
Bildschirm
Wi-Fi
Audio Ausgang
PC Schnittstelle
Zusätzliche
Eigenschaften
Betriebssystem
Power
Wiedergabezeit
(Stunden)
RK3126 (Quad-core Cortex-A7 bis zu 1.2GHz)
1GB DDR3
8GB/16GB Optional ) Flash eingebaut;
Micro SD Kartenschlitz (max.64GB unterstützt)
7'' 1024*600, kapazitiver touchscreen
IEEE 802.1 1 b/g/n
3.5mm Klinke
USB 2.0 High Speed
Bis zu 6 Stunden Musik, 3 Stunden Video, 3 Stunden Internet Surfen
Eingebautes Mikrofon Vorderkamera(0.3MP)
Hinterkamera (2.0MP) 1X1W Lautsprecher
Android 8.1 (Go edition)
Wiederaufladbare Li-poly Batterien. Power Adapter (DC 5V, 1.5A)
Bluetooth 2.0
KONTAKT MIT UNS
Für Anfragen, Probleme oder Kommentare zu unseren Produkten senden Sie bitte eine
E-Mail an an die untenstehende Adresse, und wir werden so schnell wie möglich
antworten.
E-mail: [email protected]
Google, Android, Google Play and other marks are trademarks of Google LLC
Deutsch
19 20

Español
Navegar la Web
Visitar sus sitios web favoritos.
Revisar su correo electrónico
Mantenerse en contacto con amigos y familiares.
Ver los videos de YouTube™
Explorar la comunidad más popular del mundo de compartición de vídeos.
Leer los libros favoritos
Descargar miles de libros con el dispositivos de lectura* de E-book incluido.
Descubrir miles de aplicaciones para juegos, aplicaciones y más de Android™ en la Tienda
de Juegos.( El cliente necesita descargarlo desde Google Play Store.)
Conectar a Internet de forma inalámbrica
Red 802.11 b/g/n Wi-Fi de alta velocidad.
Disfrutar de su biblioteca multimedia en cualquier lugar.
La central eléctrica portátil reproduce música, vídeo y formatos de fotos populares.
Lector de tarjetas de memoria Micro SD.
Aumentr su capacidad de almacenamiento (hasta 64 GB apoyado)
Cámara incorporada
Fácil cámara frontal 0.3MP / cámara trasera 2.0MP.
Detección automática de la orientación
Léalo como quiera; ¡la pantalla se ajusta automáticamente!
Leer los libros en formato ePub requiere la aplicación del lector de E-book incluido.
CARACTERISTICAS UN VISTAZO DE LA UNIDAD
1. Cámara frontal
2. Botón de encendido / Protector de pantalla.
3. Auriculares: Conexión de salida de audio para auriculares.
4. VOL+ / VOL-
5. Ranura para tarjeta microSD
6. MIC: Se usa el micrófono interno para grabar la voz.
7. Puerto micro usb: Conectarse a un dispositivo USB.
8. DC
9. Cámara trasera
10. Altavoz
3
4
5
2
1
6
7
8
9
10
21 22

PARA EMPEZAR
Encender o apagar la tableta
Para encender la tableta:
Mantener presionada el botón de Encendido hasta que se encienda la pantalla LCD.
Espere hasta que aparezca la pantalla de inicio, la tableta estará lista para su uso.
Para apagar la tableta:
1. Mantener presionada el botón de Encendido hasta que aparezca el menú Opciones del
dispositivo.
ACERCA DE LAS APLICACIONES
Para abrir una aplicación, toque el icono de la aplicación en la pantalla de inicio o en el
Iniciador, donde puede tocar el icono directamente en la pantalla de inicio para entrar.
Pantalla de inicio:
2. Toqcar OK en la pantalla para apagar la tableta.
Encendido y apagado de la pantalla (en espera)
Cuando la tableta está encendida, puede apagar la pantalla para conservar la energía de la
batería. Simplemente presione el botón de Encendido una vez para apagar la pantalla.
Pulse de nuevo el botón de Encendido para volver a encender la pantalla.
Para conservar la energía de la batería, la pantalla se puede configurar para que se apague
automáticamente cuando la tableta no esté en uso (entre 1 y 30 minutos).
Esta opción de tiempo de espera de la pantalla se encuentra en el menú Pantalla.
Desbloquear de la pantalla
Cuando la pantalla se apague, tendrá que desbloquearla cuando la vuelva a encender.
Para desbloquear la pantalla, deslice hacia arriba el icono del candado.
La pantalla que se muestra arriba es sólo para fines ilustrativos. Nos reservamos el derecho
de modificar y mejorar la lista final de aplicaciones disponibles en la tableta.
23 24

ACERCA DE LAS APLICACIONES
Aplicaciones preinstaladas
Algunas aplicaciones han sido instaladas en su tableta para su conveniencia.
Estas aplicaciones incluyen:
APLICACIONES PREINSTALADAS
Instalación de aplicaciones
También puede descargar una instalación de aplicaciones adicionales desde el mercado de
aplicaciones del dispositivo, el navegador web u otras fuentes.
La tableta debe configurarse para permitir la instalación de aplicaciones de fuentes no
comerciales. La opción Fuentes desconocidas se puede configurar en el menú
Configuración de la aplicación.
CONÉCTESE A UNA RED WI-FI
La barra de notificaciones muestra iconos que indican el estado de Wi-Fi de su tableta.
Notificación de que una red Wi-Fi abierta está dentro del alcance.
Conectado a una red Wi-Fi (las ondas indican la intensidad de la conexión).
[no icon] No hay ninguna red Wi-Fi al alcance, o la radio Wi-Fi está apagada.
1. Encender la radio Wi-Fi si no está encendida. Para activar Wi-Fi:
a. Ir a la pantalla de inicio: Pulse la tecla Inicio.
b. Abrir el menú Configuración: toque el icono en la pantalla de inicio para entrar en el
lanzador y, a continuación, toque el icono Configuración.
c. Abrir el menú Redes inalámbricas y redes: Deslice el icono hasta el estado ON.
Navegar la Web.
Realizar operaciones matemáticas simples.
Tomar fotografías o vídeos con la cámara.
Revisar su correo electrónico.
Producir música.
Acceder al menú Configuración para ajustar las opciones de la tableta.
Cuando la conexión Wi-Fi está activada, la tableta buscará y mostrará una lista de redes Wi-Fi
disponibles.
Notas: Si se encuentra una red a la que se ha conectado anteriormente, la tableta se
conectará a ella. Si no ve su red en la lista, puede forzar a la tableta a volver a escanearla.
Para buscar redes, puntee en la tecla Menú y, a continuación, toque Escanear.
2. Seleccionar una red Wi-Fi disponible a la que conectarse:
En el mismo menú de configuración de Wi-Fi de arriba, toque una red de la lista.
Si la red está abierta, la tableta le pedirá que confirme la conexión a la red.
Tocar la conexión para confirmar.
Si la red está protegida (como se indica en el icono de bloqueo), la tableta le pedirá que
introduzca una contraseña u otras credenciales. Toque Conectar para confirmar.
25 26

Cuando se haya conectado correctamente a una red Wi-Fi, la barra de notificaciones
situada en la parte superior derecha de la pantalla mostrará un indicador de señal Wi-Fi.
Notas: Para obtener más información sobre cómo agregar una red Wi-Fi cuando no está
dentro del alcance o cuando el enrutador está configurado para ocultar el nombre de red
(SSID), o para configurar opciones avanzadas de Wi-Fi, consulte el manual.
CONECTAR A UN DISPOSITIVO BLUETOOTH
1. Activar Bluetooth
Ir a Configuración > Bluetooth.
2. Puntar en el dispositivo en la lista Dispositivos y siga las instrucciones en pantalla para
conectarse a él. La tableta debe estar a una distancia de aproximadamente 30 pies (10
metros) del dispositivo Bluetooth.
CONEXIONES OPCIONALES
Conexión a un ordenador
Conectar la tableta a un ordenador para transferir archivos.
1. Conectar su tableta a la computadora.
Con el cable USB incluido: Enchufe el extremo pequeño del cable en el conector de alta
velocidad USB 2.0 de la tableta. Conecte el extremo grande del cable a un puerto USB 2.0
de alta velocidad disponible en el ordenador.
2. Cuando la tableta esté conectada, deslice el icono USB hacia abajo y luego toque
el icono USB conectado.
3. Montar el almacenamiento.
Botón táctil Transferir archivos (MTP) para montar el almacenamiento integrado de la
tableta. Cuando está montado, puede copiar archivos a o desde su tableta.
27 28

Español
ESPECIFICACIONES
Procesador
RAM
Almacenamiento
Pantalla
Redes Wi-Fi
Salida de audio
Interfaz de PC
Características
adicionales
Sistema Operativo
Potencia
Tiempo de
reproducción (horas)
RK3126 (Corteza de cuatro núcleos-A7 hasta 1,2 GHz)
1GB DDR3
Flash opcional de 8GB / 16GB incorporado;
Ranura para tarjetas Micro SD (máx. 64GB)
7'' 1024*600, Pantalla táctil cautiva
IEEE 802.1 1 b/g/n
Auriculares de 3,5 mm
USB 2.0 de alta velocidad
Hasta 6 horas de música, 3 horas de vídeo,
3 horas de navegación web
Micrófono incorporado Cámara frontal (0.3MP)
Altavoz 1X1W
Android 8.1 (Go edition)
Batería recargable de poliéster de litio,
Adaptador de alimentación (DC 5V, 1.5A)
Bluetooth 2.0
CONTÁCTENOS
Para cualquier consulta, problema o comentario sobre nuestros productos, por favor envíe
un correo electrónico a la dirección que aparece a continuación, y le responderemos lo
antes posible.
E-mail: [email protected]
Google, Android, Google Play and other marks are trademarks of Google LLC
29 30

Français
Surfez sur le Web
Visitez vos sites préférés.
Vérifiez votre e-mail
Restez en contact avec vos amis et votre famille.
Regarder des vidéos sur YouTube™
Feuilletez la communauté de partage de vidéos la plus populaire au monde.
Lisez vos livres préférés
Téléchargez des milliers de livres via le lecteur de livre électronique inclus*.
Découvrez des milliers d'applications pour Android ™ Jeux, applications et plus encore via
Play Store (installation requise par le client).
Connectez-vous à Internet sans fil
Réseau Wi-Fi de haut débit 802.11 b/g/n
Profitez de votre médiathèque où que vous soyez.
Une centrale portable prend en charge les formats de musique populaire, vidéo et photo.
Lecteur de carte mémoire Micro SD.
Augmentez votre capacité de stockage (supportez jusqu'à 64 GB).
Caméra intégrée
Caméra frontale 0.3MP / Caméra arrière 2.0MP pratique.
Détection de l'orientation automatique
Lisez de façon comme vous voulez; l'affichage s'ajuste automatiquement!
La lecture de livres au format ePub nécessite l'application de lecteur de livre électronique
incluse.
CARACTÉRISTIQUES UNITÉ EN UN COUP D'CEIL
1. Caméra Frontale
2. Bouton Power: Appuyez pour allumer l'appareil, allumer ou éteindre l'écran.
Appuyez longuement pour accéder au menu “Mise hors tension”.
3. Écouteur: Connexion de sortie audio pour les écouteurs.
4. VOL+ / VOL-
5. CARTE MicroSD: Insérez ici les cartes mémoire microSD externes.
6. MIC: Utilisez le MIC interne pour enregistrer la voix.
7. PORT USB: Connectez à une périphérique USB.
8. DC
9. Caméra Arrière
10. Haut-parleur
3
4
5
2
1
6
7
8
9
10
31 32

COMMENCEZ
Allumer ou éteindre la Tablette
Pour allumer la tablette:
Appuyez sur le bouton Power de façon prolongée jusqu'à ce que l'écran LCD s'allume.
Attendez que l'écran d'Accueil apparaisse, la tablette est maintenant prête pour l’utilisation.
Pour éteindre la tablette:
1. Appuyez sur le bouton Power de façon prolongée jusqu'à ce que Le menu Options de
l'appareil apparaisse.
A PROPOS DES APPLICATIONS
Pour ouvrir une application, appuyez sur l'icône de l'application sur l'écran d'accueil ou
dans le Lanceur où vous pouvez appuyer sur l'icône directement sur l'écran d'accueil pour
y accéder. Écran Lanceur:
2. Touchez ok sur l’écran pour éteindre la tablette.
Allumer ou éteindre l'Écran (Mise en veille)
Lorsque la tablette est allumée, vous pouvez éteindre l'écran pour économiser la batterie.
Il suffit d'appuyer une fois sur le bouton Power pour éteindre l'écran. Appuyez sur le
bouton Power de nouveau pour rallumer l’écran.
Pour économiser la batterie, l'écran peut être configuré pour s'éteindre automatiquement
lorsque la tablette n'est pas utilisée (entre 1 minute et 30 minutes).
Cette option de délai d’écran se trouve dans le menu Affichage.
Déverrouiller l'Écran
Lorsque l'écran s'éteint, vous devrez le déverrouiller pour le rallumer.
Pour déverrouiller l’écran, balayer l’icône de verrouillage du bas vers le haut.
L'écran présenté ci-dessus est uniquement à des fins d'illustration. Nous réservons le droit
de modifier et d’améliorer la liste finale des applications disponibles sur la tablette.
33
34

A PROPOS DES APPLICATIONS
Applications Préinstallées
Certaines applications ont été installées sur votre tablette à votre disposition.
Ces applications incluent:
APPLICATIONS PRÉINSTALLÉES
Installez les Applications
Vous pouvez également télécharger une autre application pour l’installer à partir du marché
des applications, du navigateur Web ou d’autres sources.
La tablette doit être configurée pour permettre l’installation d’applications provenant de
sources non-Market. L'option Sources Inconnues (Unknown sources) peut être définie dans le
menu Paramètres de l’Application (Application Settings).
CONNECTEZ À RÉSEAU WI-FI
La barre de Notification affiche des icônes indiquant le statut Wi-Fi de votre tablette.
Notification qu'un réseau Wi-Fi ouvert est à portée.
Connecté à un réseau Wi-Fi (les ondes indiquent la qualité de la connexion).
[sans icône] Il n'y a pas de réseaux Wi-Fi à portée ou la radio Wi-Fi est éteinte.
1. Allumez la radio Wi-Fi si elle ne l’est pas déjà. Pour activer Wi-Fi:
a. Aller à l'écran d'accueil: Appuyez sur le bouton Home.
b. Ouvrez le menu Paramètres: appuyez sur l'icône sur l'écran d'accueil pour accéder au
Lanceur, puis appuyez sur l'icône Paramètres.
c. Ouvrez le menu Wireless & networks: faites glisser l’icône sur le statut ON.
Surfez sur le web.
Effectuer des opérations mathématiques simples.
Prendre des photos ou des vidéos avec la caméra.
Vérifiez votre courrier électronique.
Jouer de la musique.
Accédez au menu Paramètres pour configurer les options de la tablette.
Lorsque le Wi-Fi est activé, la tablette recherche les réseaux et affiche une liste des réseaux
Wi-Fi disponibles.
Remarques: Si un réseau auquel vous vous êtes connecté précédemment est trouvé, la
tablette s'y connectera. Si votre réseau ne figure pas dans la liste, vous pouvez permettre à la
tablette de renouveler une recherche. Pour rechercher des réseaux, appuyez sur la touche
Menu, puis sur la touche Rechercher (Scan).
2. Sélectionnez un réseau Wi-Fi disponible auquel vous pouvez connecter:
Dans le même menu de Paramètres Wi-Fi (Wi-Fi settings) ci-dessus, touchez un réseau dans
la liste.
Si le réseau est ouvert, la tablette vous invitera à confirmer la connexion au réseau.
Touchez Connecter pour le confirmer.
Si le réseau est sécurisé (comme indiqué par une icône de verrouillage), la tablette vous
invitera à entrer un mot de passe ou d'autres informations d'identification. Appuyez sur la
case Mot de passe Wireless pour afficher le clavier à l'écran, puis utilisez-le pour saisir le mot
de passe. Touchez Connecter pour le confirmer.
35 36
Table of contents
Languages:
Other Dragon Touch Tablet manuals

Dragon Touch
Dragon Touch NotePad T10M User manual

Dragon Touch
Dragon Touch NotePad-K10 User manual

Dragon Touch
Dragon Touch NotePad 102 User manual

Dragon Touch
Dragon Touch KidzPad Y88X 10 User manual

Dragon Touch
Dragon Touch Y80 User manual

Dragon Touch
Dragon Touch V10 User manual

Dragon Touch
Dragon Touch M7 User manual

Dragon Touch
Dragon Touch Y88X Plus User manual

Dragon Touch
Dragon Touch KidzPad Y88X 10 User manual

Dragon Touch
Dragon Touch K10 User manual