Draper 78772 User manual

SOLDERING
IRON & GAS
TORCH
GAS
TORCH
78772
78776
2 IN 1 COMPACT
EN
Original Instructions
Version 1 – March 2023
1. Specication
2. HealthandSafetyWarnings
• Observe all standard safety precautions and good
practices when working with naked ames, solder and
ammable fuels.
• Keep the work environment clear and well-lit, with
bystanders at a safe distance.
• Keep this product out of reach of children at all times.
• ALWAYS wear appropriate eye and face protection and
protective gloves when using this product.
− Take additional precautions when using chemicals
like ux or solder paste; refer to the manufacturer
instructions for safe use.
• Check the torch for damaged, clogged or corroded parts
and leaks before every use.
− DO NOT use the product if it is damaged or leaking
in any way; contact Draper Tools for repair and
replacement options.
− If you suspect that the product is leaking gas, move
it to an external environment immediately.
Important: The product can be tested for leaks by
dabbing soapy water solution on joints and
connections while gas is added to or stored in the
product. Leaks will create a steady feed of soapy
bubbles at the breach point.
• Use ONLY in well-ventilated environments.
• DO NOT use this product in environments where paint
fumes, solvents and other ammable materials are
present.
• Use only good quality butane gas.
WARNING!Butanegasishighlyammable;
handle it carefully and in accordance with the
instructions on the canister.
• During rst use, allow a few minutes for the product to
settle once ignited before directing it towards the
workpiece.
WARNING!Themetalpartsofthetorchbecome
veryhotduringuse.DONOTtouchthebarrel,
soldering tip or workpiece until they have cooled
thoroughly.
WARNING! NEVER direct the product towards
skin,clothingorotherammablematerials,or
lookdirectlydownthebarrel.
Stock No. 78772 78776
Part No. GT6 GT10
Fuel type Butane Butane
Fuel capacity 15ml 15ml
Approx. temperature 200–400°C 1,300°C
Operating time (one gas lling) 50 mins approx. at low setting 50 mins approx. at low setting
Dimensions W 53 × H 185 × D 150mm W 53 × H 175 × D 100mm
Net Weight 170g 160g

• DO NOT use this product to light cigarettes or pipes.
• To prevent damage caused by reected heat, avoid
directing this product directly downwards when used as
a torch.
• DO NOT leave the product running while unattended.
• DO NOT expose the product to temperatures above 49°C
(120°F) or to prolonged periods of sunlight.
• ALWAYS switch o the product while it is not in use and
move the ame adjustment dial to its lowest position.
• After each use, ensure that the ame is fully
extinguished and the product has completely cooled
before storing.
• Stand the product upright while it is not in use.
− NEVER place the torch onto ammable substances.
• DO NOT attempt to disassemble or modify this tool in
any way.
• ALWAYS refuel outside.
• NEVER smoke while refuelling.
WARNING! This product is not insulated against
electricity. NEVER use this product on
workpieces that are connected to electrical
power.
4. Refuelling
WARNING!Beforellingtheproduct,ALWAYS
ensurethatboththeon/oleverandtheame
adjustment dial are in their lowest positions.
ONLYusebutanegastofueltheproduct.
Important: This product is not shipped with butane gas
and MUST be fuelled before use.
1. Turn the torch upside-down and push the butane
can nozzle rmly into the lling valve (D).
2. Filling begins automatically and takes only a few
seconds.
3. The fuel level can be viewed through the window (F)
beneath the on/o lever (H).
4. Allow a few minutes after lling for the gas in the
product to stabilise.
WARNING! Allow escaped gas to disperse
beforelightingthetorch.NEVERlightthe
product while a gas canister is inserted
intothellingvalve.
3. Identication
A. Barrel
B. Barrel guard
C. Barrel locking nut
D. Filling valve
E. Flame adjustment dial
F. Fuel level window
G. Ignition button
H. On/o lever
I. Soldering tip
Stock No.78776 Stock No.78772
(I)
(C)
(A)
(A)
(B)
(H)
(G) (G)
(E)
(F)
(D) (D)
(H)
(E)
(F)
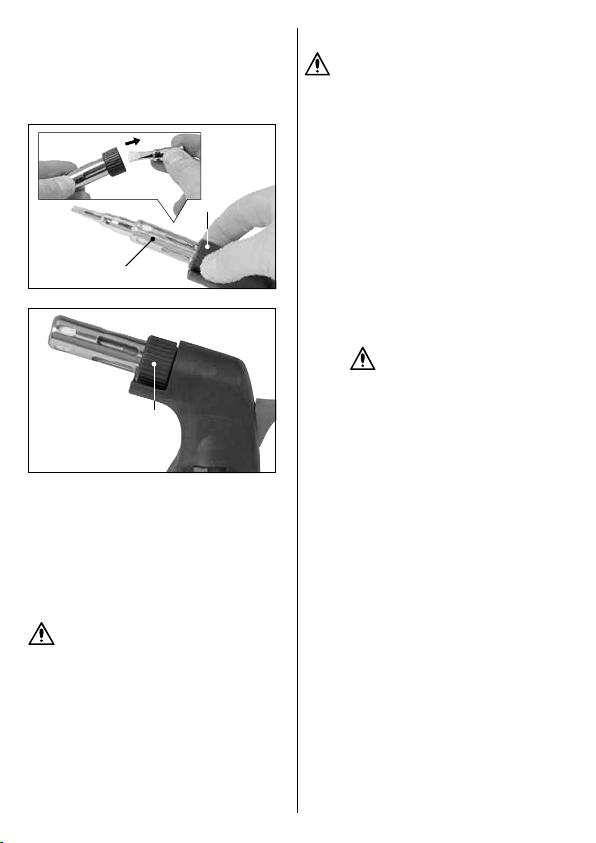
5. InstallingandRemovingthe
SolderingTip
Important: These instructions apply to 78772 only.
The product is supplied with a removable soldering tip (I),
allowing it to be operated as a gas torch or a soldering iron.
1 Fig.
(C)
2 Fig.
(C)
To use the tool as a gas torch, remove the soldering tip:
1. Loosen the barrel locking nut (C) and slide the
components o the barrel.
2. Push the soldering tip inwards and remove it,
keeping the barrel guard (B) in place.
3. Screw the locking nut and barrel guard back onto
the barrel, ensuring a secure t.
WARNING! DO NOT operate the product without
thebarrelguardinplace.
To use the tool as a soldering iron, install the soldering tip:
1. Loosen the barrel locking nut (C) and slide the barrel
guard (B) o the barrel.
2. Insert the soldering tip outwards through the barrel
guard so that it emerges from the smaller end.
3. Screw the locking nut components back onto the
barrel, ensuring a secure t.
6. IgnitionandUse
WARNING! Keep your hands and face away from
thebarrelwhenignitingandoperatingthe
product.Gripthetorchbythehandleonly.
1. Install or remove the soldering tip (I) as appropriate;
see 5 Installing and Removing the Soldering Tip
(78772 only).
2. Fuel the product and allow the gas to settle.
3. Move the on/o lever (H) to the ON position to start
the fuel supply.
4. Depress the ignition button (G) repeatedly until the
ame is lit.
5. Adjust the size and temperature of the ame using
the ame adjustment dial (E).
6. Allow approximately 30 seconds for the ame to
reach temperature, then direct it safely towards the
workpiece.
− If using the product as a torch, direct the ame
towards the workpiece at a distance.
WARNING! DO NOT hold the product
too close to the workpiece while using
itasagastorch.Heatreectedback
towards the product may cause damage
or injury. NEVER allow the product to
touch the workpiece.
− If using the product as a soldering iron (78772
only), place the soldering tip against the
appropriate area of the workpiece and apply
solder to the point of contact as required.
Important: DO NOT apply excessive solder; use
only as much as is required for the connection.
7. To switch o the product, fully lower the ame
adjustment dial and move the on/o lever to the OFF
position. Allow the torch to cool thoroughly.
Important: Avoid using the product in sideways or inverted
orientations as this may interrupt the ow of fuel to the
ame.
(B)

7. MaintenanceandDisposal
WARNING! ALWAYS ensure that the control lever
is in the OFF position and that the torch is
completelycoolbeforemaintainingorstoringthe
product.
• Keep the barrel clean and dry.
− Use a dry cloth ONLY to clean the barrel.
− Clean the soldering tip using a wet sponge while the
tip is hot.
WARNING! Take care not to touch any
partoftheheadassemblywhilethe
soldering tip is hot.
− DO NOT use solvents or other aggressive chemicals
to clean the product as they may damage plastic or
insulated parts.
• Keep the air vents of the barrel free from dust and
obstructions.
• Store the product in a clean, cool and dry location, out
of direct sunlight and out of reach of children.
At the end of its working life, dispose of the product
responsibly and in line with local regulations. Recycle
where possible. Exhaust the fuel before disposing of the
product and dispose of butane separately and responsibly.
8. ExplanationofSymbols
Warning!
Read the instruction sheet
Max. potential operating time per refuel
Approximate temperature up to 1,300°C
Temperature range
Helpline: +44 (0) 23 8049 4344 Sales Desk: +44 (0) 23 8049 4333 General Enquiries: +44 (0) 23 8026 6355 Website: drapertools.com Email: [email protected]
Draper Tools Limited, Hursley Road, Chandler’s Ford, Eastleigh, Hampshire, SO53 1YF, UK Delta International BV, Oude Graaf 8, 6002 NL, Weert, Netherlands 0623
This manual suits for next models
1
Other Draper Flashlight manuals


