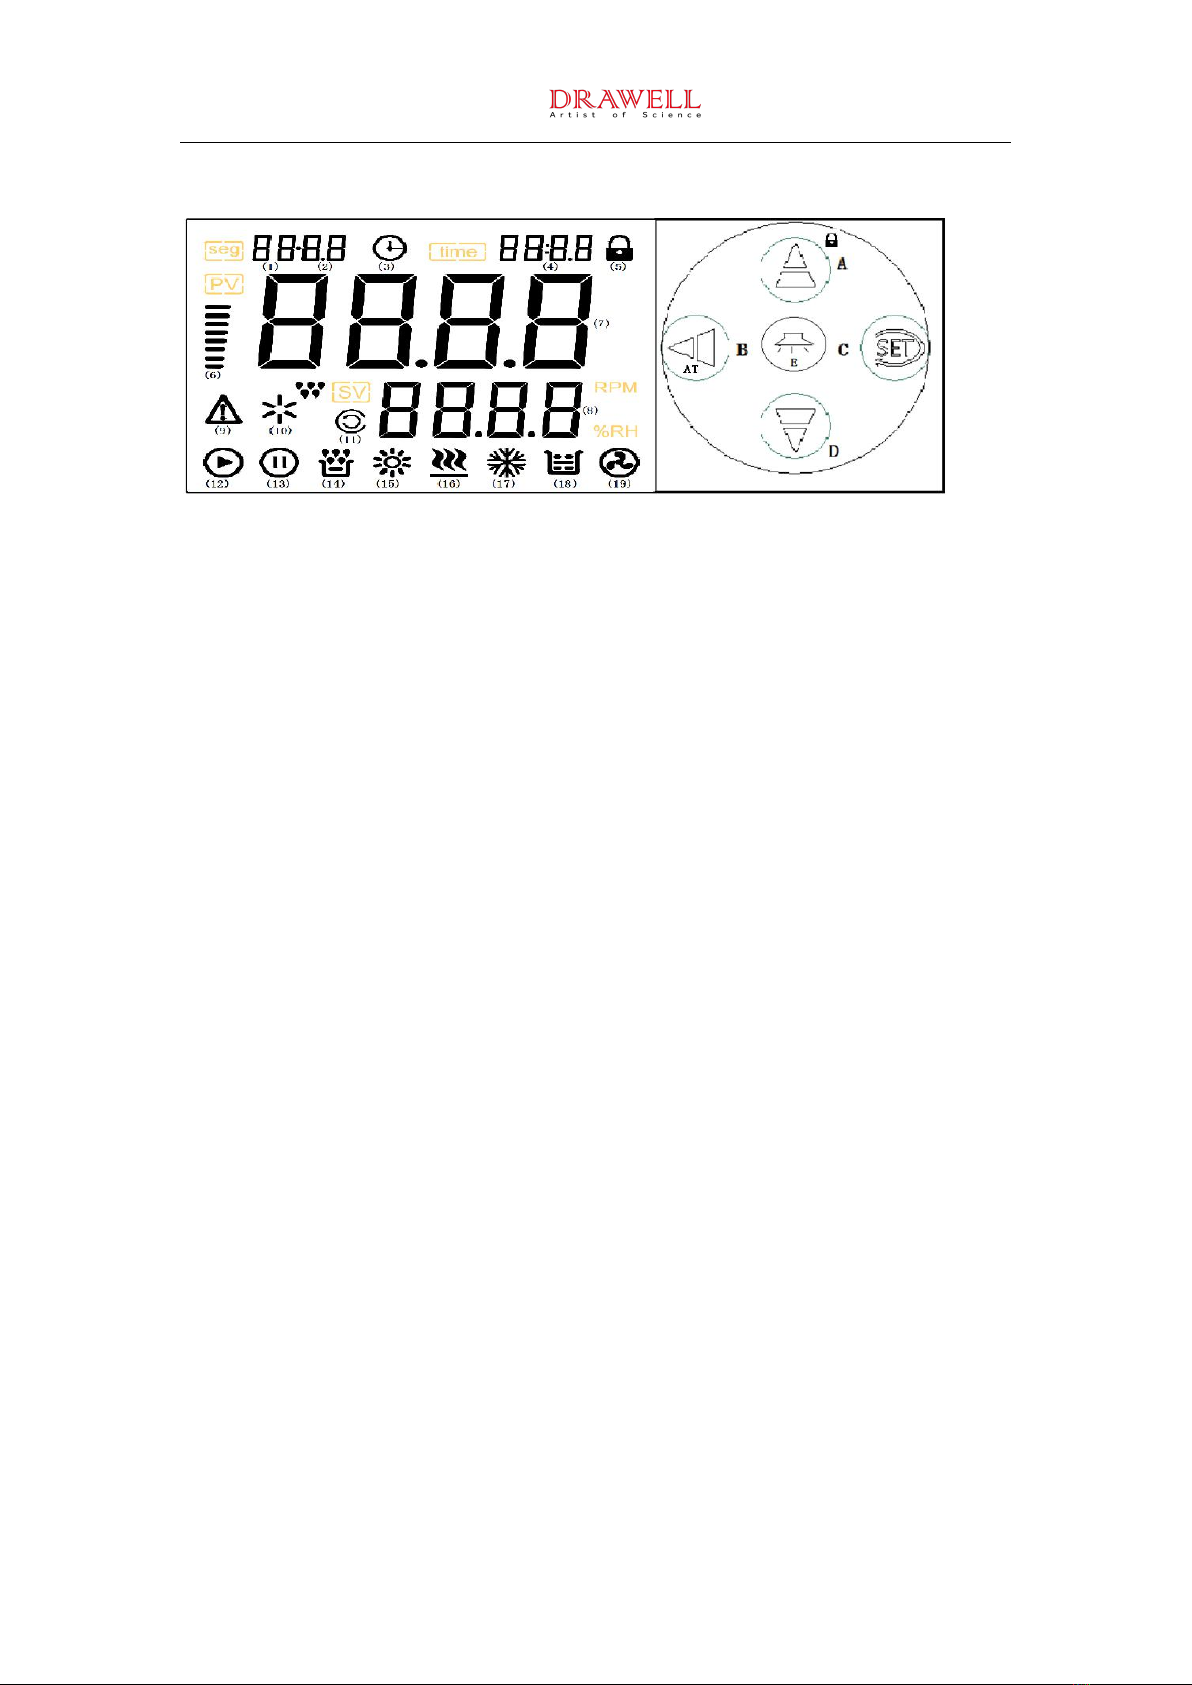
Drawell DW-LBI Series User manual

.
DW-LBI Series
Biochemical Incubator
(Instruction)
Please read operating manual before installation and operation.
Drawell International Technology Limited
Chongqing Drawell Instrument Co., Ltd.
Shanghai Drawell Scientific Instrument Co.,Ltd.
Chongqing Center : Suite 2705,Building No.12,Shiyou Road No.1, Yuzhong District,
Chongqing, China.
Shanghai Office : Suite 1117,Lane561 XiuChuan Rd.,PuDong New
Area,Shanghai,China
Homepage : www.drawell.com.cn
Tel : 0086-023-63268643
Email : sales05@drawell.com.cn

Contents
I: Precautions ……………………………………………...........1
II: Application……………………………………………………..1
III: Technical Specifications……………………………………..2
IV: Installation requirements………………………...................2
V: Operation Instruction………………………………………….3
VI: Wiring diagram...................................................................6
VII: Malfunction handling……………………….........................7
VIII: Transportation and storage………………………………...7
IX: After-sales service………………………………………….....7
X: Packing List……………………………………….…………….8

1
Thanks for purchasing the equipment, please carefully read the manual before operating.
I. Precautions
When no lighting is needed in the chamber, please turn off the light so as not to affect
the temperature of the upper layer. Turn off the power supply before changing the light
tube.
Handle with care. The angle between the instrument and the ground shall not be less
than 45°.
There is a water outlet pipe behind the equipment. When the inside temperature is
low, a small amount of water will be discharged. Please use a pipe to connect to the
container or sewer.
Do not use acid or alkali and other corrosive articles to wipe the surface. The inside
chamber can be cleaned regularly with dry cloth.
When the set temperature is lower than the room temperature, the over temperature
alarm will be generated if the door opening time is too long, which is not a fault.
When change the fuse tube, please cut off the power supply and replace the one
with the same model and specification.
Fans are installed in the operation room. Don’t put fingers or any objects into the
cover. Please cut off the power supply before maintenance.
Please turn off the power switch when stop using.
Please do not put inflammable, explosive or toxic, strong acid and strong alkali
articles in the working chamber of the instrument!
II:Application
It’s widely used for drying, baking, melting wax and sterilization in factories, mines,
universities, scientific research and laboratories.
III. Technical Specifications

2
Note:Performance parameters are tested under non-load conditions: ambient
temperature is 20°C, relative humidity is 50% RH.
IV. Installation requirements
1) The instrument should be placed in a constant temperature environment, and the
recommended temperature difference is 23 ± 5 ℃;
2) The distance between the equipment and the wall must be more than 10cm and the
button operation position shall be reserved on the right side.
3) Avoid direct sunlight and keep away from heating equipment;
4) Place the equipment on the horizontal ground, lock the front caster to make the box flat.
5) Turn on the 220V/50Hz power supply and it should be grounded. The equipment
shell should be grounded reliably and placed in a sheltered place from the sun, cool
and ventilated.
V. Operation instruction
Model
DW-LBI-
80
DW-LBI-150
DW-LBI-200
DW-LBI-250
DW-LBI-300
DW-LBI-400
Chamber Volume
80L
150L
200L
250L
300L
400L
Temperature Range
0~60 ℃
Display Resolution
0.1 ℃
Temperature Stability
±1℃
Temperature
Uniformity
±1℃
Timing Range
0~9999min
Power Rating(W)
180
250
300
350
400
550
Refrigerant
R134a
Power Supply
220V , 50Hz
Continuous Operation
Long continuous operation
Chamber
Size(W×D×H)cm
40×37×55
45×42×85
45×45×100
48×49×107
52×50×117
58×54×127
Exterior
Size(W×D×H)cm
54×57×107
59×62×137
59×64×152
62×68×159
66×69×169
72×74×179
Package Size
(W×D×H)cm
70×73×126
75×78×156
75×80×171
78×84×178
82×85×188
88×90×198
Net/Gross Weight(kg)
50/85
90/120
95/138
103/147
115/157
135/170

3
Panel:
2) Controller instructions:
(1) Cycles: display the number of cycles when it is a program segment;;
(2) Program segments: display the number of segments in program mode;
(3) Appointment time indicator: it lights when the appointment is turned on;
(4) Time: program segment time or fixed value timing time;
(5) Key lock;
(6) Reminder of temperature rise or fall;
(7) Measuring temperature;
(8) Set temperature;
(9) Alarm indicator: flashes when the machine is shut down or abnormal;
(10) Standby;
(11) Spare lights;
(12) Fan running indicator: it lights up when it starts running;
(13) Stop indicator: it turns on when the machine stops;
(14) Standby;
(15) Ultraviolet or illuminating lamp indicator: always on for illumination, flashing for UV
disinfection;
(16) Heating indicator light: on when heated;
(17) The refrigeration indicator: lights when there is refrigeration output and flashes when
refrigeration is delayed;
(18) Standby;
(19) Fan indicator light: lights up when the fan is workingt; ℃symbol: lights up when the
temperature unit is Celsius, ℉symbol: lights up when it is Fahrenheit;
3) Keyboard operation instructions
A: Key ∧: modify the parameter value; (long press for 5S to modify the existing running
time, with program has this function). Tap Lock or Unlock.
B: Shift key: Shift modification of parameter value, long press to start/stop temperature
auto-tuning, click to query ambient temperature.
C: SET key: Enter parameter setting,long press for 5 seconds to enter LK or exit
parameter setting.
D: Key ∨: Modify the parameter value, long press for 5 seconds to enter manual UV

4
disinfection.
E: Illumination key: Press to start or stop the illumination.
Parameter specifications:
1. In the standard state, long press the SET button, the upper row on screen displays LK,
adjust LK=8, press the SET button to enter setting
2. Temperature parameter setting: In the standard state, long press the SET button, the
upper row on screen displays LK, adjust LK=3, press the SET button to enter the
temperature setting.
Symbol
Item
Value
Description
Factory set
value
KS
Power
on/Start
0~2
0: Stop state when power is on 1: Run from
the first stage when power is on; 2: Run from
the place where the power was last cut off
after power on.
0
md
Program
mode
0~1
0: Customized control; 1: Multi-segment
programming control.
0
tn
Timing
method
0~1
0:Start running timer, 1:when temperature
stable start timing (only fixed value)
1
Hn
Timing Unit
0~1
0:minutes,1:hour
0
Fn
High and
low fan
switch
0~100
Start the low-speed fan when the
temperature is between the( set value + Fn)
and (the set value-Fn); start the high-speed
fan when the temperature is outside (the set
value + Fn) to (the set value-Fn)
1
Ly
Lighting
delay
0~9999
The lighting lamp is turned on,it will
automatically turn off when the delay time is
not 0. when "Delay time is 0 ",the delay is
invalid, the lighting must be turned off
manually.
0~9999M/h
(0)
srt
Disinfection
delay
0~9999
The disinfection lamp is turned on, when
the delay time is not 0, it will automatically
turn off when the time is up. When delay time
is 0 , the delay is invalid, the lighting must be
turned off manually.
0~9999M/h
(0)
mon
Scheduled
boot time
setting/
scheduled
boot month
setting
0~9999
Function one; the meter without Beijing time
will automatically turn on after mon minutes;
Function two; the instrument with Beijing
time, when Beijing time reaches the set time
(day, Hr, mTn) here, it will be turned on,
when Mon is greater than 12 ,the same as
function one.
0

5
Symbol
Item
Value
Description
Factory
set value
AL
Setting
value for
lower
deviation
alarm
-50. ~
100.0℃
0 means no alarm, 1 menas lower
deviation alarm. When the
temperature is less than
(temperature set value-AL)℃, the
refrigeration will be turned off. The
abnormal indicator lights up and the
buzzer sounds.
6.0℃
AH
Setting
value for
upper
deviation
alarm
-50. ~
100.0℃
Upper deviation alarm, when the
temperature exceeds (temperature
set value + AL) ℃, turn off the
heating. When the temperature is
lower than (temperature setting
value-AL) ℃, turn off the
refrigeration. The abnormal indicator
light is on and the buzzer sounds.
6.0℃
AP
Max.
Protection
temp
Max.measur
ement temp.
When the temp. exceeds AP, the
heating will be cut off. When the
temp. exceeds the AP parameter for
2 minutes, the buzzer keeps beeping
and all outputs are turned off. It must
be powered off to recover.
120.0℃
P
Heating
proportional
band
1.0~60.0℃
Proportional adjustment, the smaller
the Pu, the faster the response
speed.
6.5℃
I
Heating
integration
time
1~3600S
Integral action time constant, the
smaller the Iu, the stronger the ability
to correct the static error.
240
d
Heating
differential
time
0~3600S
Differential action time constant, the
larger the du, the stronger the ability
to prevent over-temperature.
180
Ar
Heating
overshoot
suppression
0~100%
Used to suppress temperature
overshoot.
80%
t
Heating
control cycle
1~99S
Control heating output cycle
5S
ct
Compressor
protection
delay
(0~9999)S
Compressor delay protection time,
the two start-up time is ≥CT seconds;
Note that when Ct=0, there is no
refrigeration function.
120S
CL
Turn off
refrigeration
(0~10.0) ℃
In the switching mode, the
measured temp. <(set temperature +
CL), turns off the refrigeration. Used
to initialize parameters. Note: when
CL=0, manual mode is valid.
0
CH
Turn on
efrigeration
(0~10.0) ℃
In the switching mode, the measured
temp.> (set temp. + CH) ,turns on the
refrigeration. Used to initialize
parameters. Note: Manual mode is
valid when CH=0
0
pb
Zero
adjustment
of
temperature
(-199~999)
Correction around zero degrees,
can be used to correct the error
generated during the temp. sensor
measurement. PB=Mercury
thermometer reading value-current
measurement value.
0

6
pk
Full
adjustment
of
temperature
(Slope)
(-19~2000)
In the vicinity of the set temperature,
when there is a deviation in the
temperature, the value can be
adjusted Pk=4000×[mercury reading
value-current measurement value] ÷
current measurement value.
0
cb
Ambient
temperature
correction
-60.~100.0
cb = actual ambient temp.-currently
measured ambient temp.
0
rl
Temp.
lower limit
setting
-60.~100.0
The lower limit of set measurement
temperature
-40.0
rh
Temp.upper
limit setting
-60.~100.0
The upper limit of set measurement
temperature
100.0
VI:Wiring diagram
VII:Malfunction handling

7
Problems
Causes
Solution
No power supply
Socket without power
Change socket
Not plugged or wire broken
Plug well or connect wire well
Fuse is open
Change fuse
Power switch not on
Switch on.
The temperature does not
rise or fall
Setting temperature is wrong
Adjust setting temperature
The temperature controller is broken
Change the temperature controller
The cable is loose
Tighten the cable.
Timing setting is incorrect
Reset or cancel timing
Big deviation of
temperature
Temperature sensor is broken
Change temperature sensor
Fan is broken
Change the fan
The meter is not corrected
Correct the meter
Note: Maintenance operations shall be carried out by qualified personnel. Please turn off
the power supply before repairing.
VIII. Transportation and storage
1) Handle with care. Do not transport upside down.
2) Store the instrument in a room with relative humidity no more than 80%, no corrosive
gas and good ventilation.
IX:After-sales service
The warranty for the drying oven is 12 months from delivery (except for the heating
elements). If damaged due to non-human factors or can not work normally during
warranty period, our company is responsible for free repair or replacement of product
parts. Beyond the warranty, we try our best to provide convenience for users.
X: Packing List
Item
Name
Category
Qty.
Remark

8
We reserve the right to change the data in the manual without prior notice. The company
has the final interpretation right.
1
Biochemical incubator
Machine
1 Set
2
User Manual
Document
1 Copy
3
Fuse
Spare parts
1pc
4
This packing list
Document
1 pc

9
Drawell International Technology Limited
Chongqing Drawell Instrument CO,.Ltd
Add:Suite 2705,Building No.12,Shiyou Road No.1,Yuzhong District,
Chongqing,China
Tel: 0086-023-63268643
Shanghai Drawell Scientific Instrument Co.,Ltd
Add : Suite 1117,Lane561 XiuChuan Rd.,PuDong New Area,Shanghai,China
Web : www.drawell.com.cn
This manual suits for next models
6
Table of contents
Other Drawell Accessories manuals
Popular Accessories manuals by other brands

Halsey Taylor
Halsey Taylor WM8 Series owner's manual

PCB Piezotronics
PCB Piezotronics 137B21B Installation and operating manual

IMI NORGREN
IMI NORGREN 34D Series Operation manual

SPX Cooling Technologies
SPX Cooling Technologies 1000 Engineering Data & Specifications

Fresh 'N Rebel
Fresh 'N Rebel Powerbank 5200mAh manual

Hytronik
Hytronik HMW39/RF Installation and instruction manual