manuals.online logo
Brands
  1. Home
  2. •
  3. Brands
  4. •
  5. dreo
  6. •
  7. Fan
  8. •
  9. dreo DR-HAF004S User manual

dreo DR-HAF004S User manual

Looking for help?
Contact us to get expert support.
DR-HAF004S
www.dreo.com
support@dreo.com (888) 290-1688
Mon - Fri, 9:00 am-5:00 pm PST/PDT
www.dreo.com
Smart Air
Circulator Fan
USER MANUAL
Your support means the world to us. We
hope you enjoy our product as much as
we did creating it.
,,
Thanks for
Choosing
DREO!
@Dreo
CONTENTS
4
2
6
1
5
3
3-51-2
TROUBLESHOOTING
IMPORTANT SAFETY
INSTRUCTIONS
CLEANING AND
MAINTENANCE
67-11
15
12-14
7
16
DREO CUSTOMER
CARE
KNOWING YOUR
AIR CIRCULATOR
FAN
CONNECTING TO
YOUR AIR
CIRCULATOR FAN
USING YOUR AIR
CIRCULATOR FAN
12
FOR HOUSEHOLD USE ONLY READ
AND SAVE THESE INSTRUCTIONS
Make sure that the voltage of your electricity supply is the same as that
indicated on the appliance.
Always unplug before cleaning or leaving the appliance unused for a long
period of time. Keep your hands dry when plugging/unplugging.
Do not operate any air circulator with a damaged cord or plug. Discard air
circulator or return to an authorized service facility for examination and/or repair.
Do not run cord under carpeting. Do not cover cord with throw rugs, runners,
or similar coverings. Do not route cord under furniture or appliances. Arrange
WARNING:
air circulator with any solid-state speed control device.
Electricity Safety
1.
2.
3.
4.
Use 24V/2.0A power adapter only. Turn off the appliance before plugging.6.
WARNING: To reduce the risk of fire, electric shock or injury to persons, do not
use replacement parts that have not been recommended by the manufacturer
(e.g. parts made at home using a 3D printer).8. If the supply cord is damaged, it
must be replaced by the manufacturer or its service agent or a similarly qualified
person in order to avoid a hazard.
7.
5.
Check the appliance regularly and
refer to TROUBLESHOOTING or
contact our customer support if it
shows any of the following signs:
- Power cord or plug is damaged.
- Loud noise, unusual smell or excessive heat.
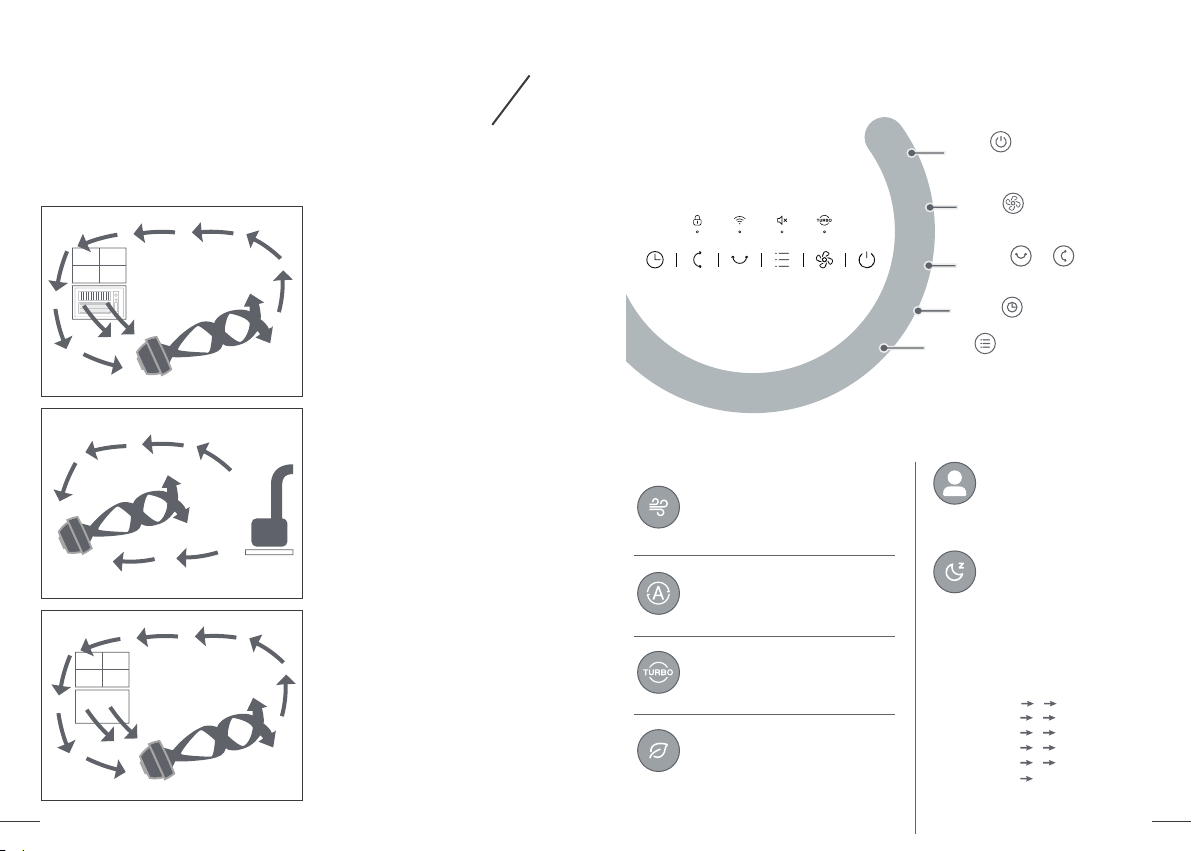
Gentle Reminder:
Model DR-HAF004S
Power Supply
Rated Power
Power Adapter
48W
Battery Type CR2025 3V
IMPORTANT SAFETY
INSTRUCTIONS 1
READ ALL CAUTIONARY
MARKINGS ON THE APPLIANCE
AND SAFETY INSTRUCTIONS
IN THE USER MANUAL BEFORE
USE.
Do not cover the
air inlet and outlet
while in operation.
Do not use the air
circulator near
flammables and
combustibles.
Children shall not play with the appliance. Cleaning and maintenance shall
not be performed by children without supervision.
Use the appliance as described in the user manual only. Any other use not
injury.
This appliance can be used by children aged above 8 years and persons with
reduced physical, sensory or mental capabilities or lack of experience and
knowledge if they have been given supervision or instruction concerning use
of this appliance in a safe way and understand the hazards involved.
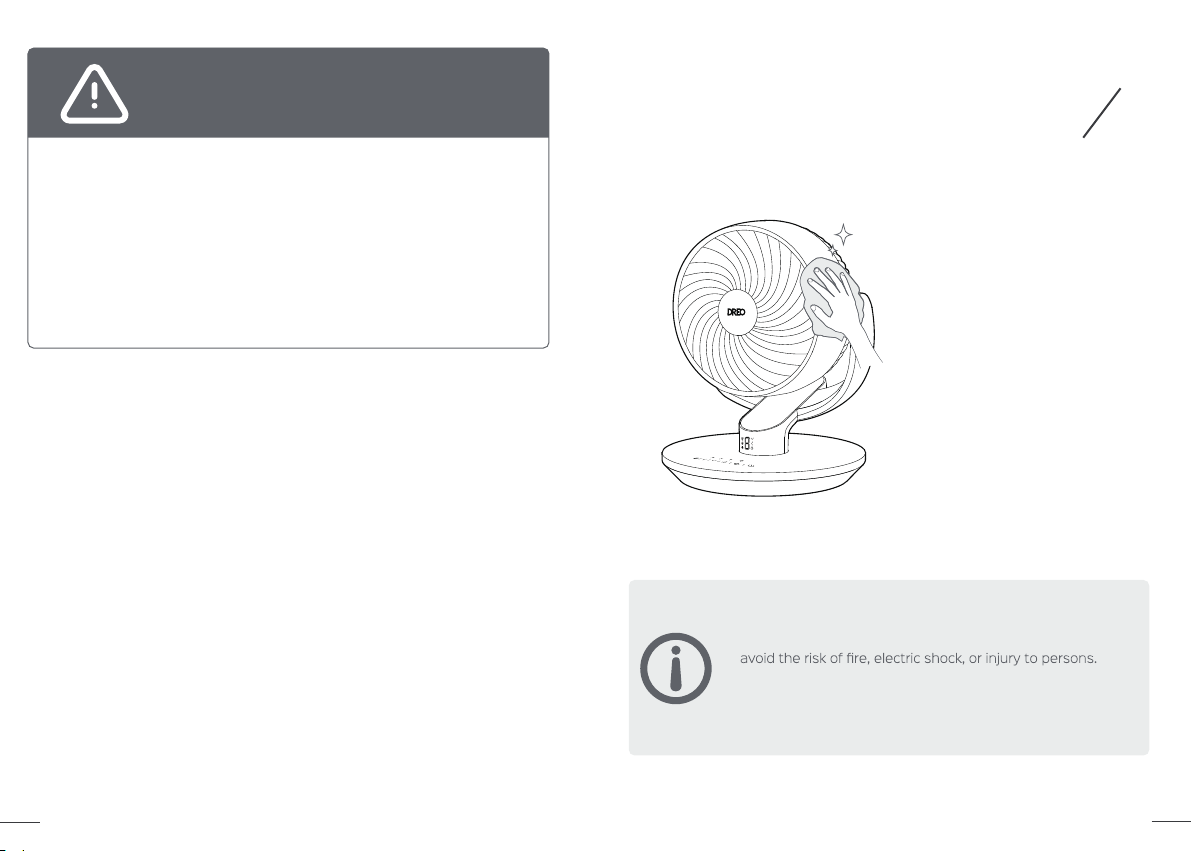
Do not immerse in water and any other liquids.
operate the unit close to the curtain. Do not hang foreign objects
on the grille to prevent damaging the balance of the fan or rotational structure.
environment or the place where acid or alkali is stored.
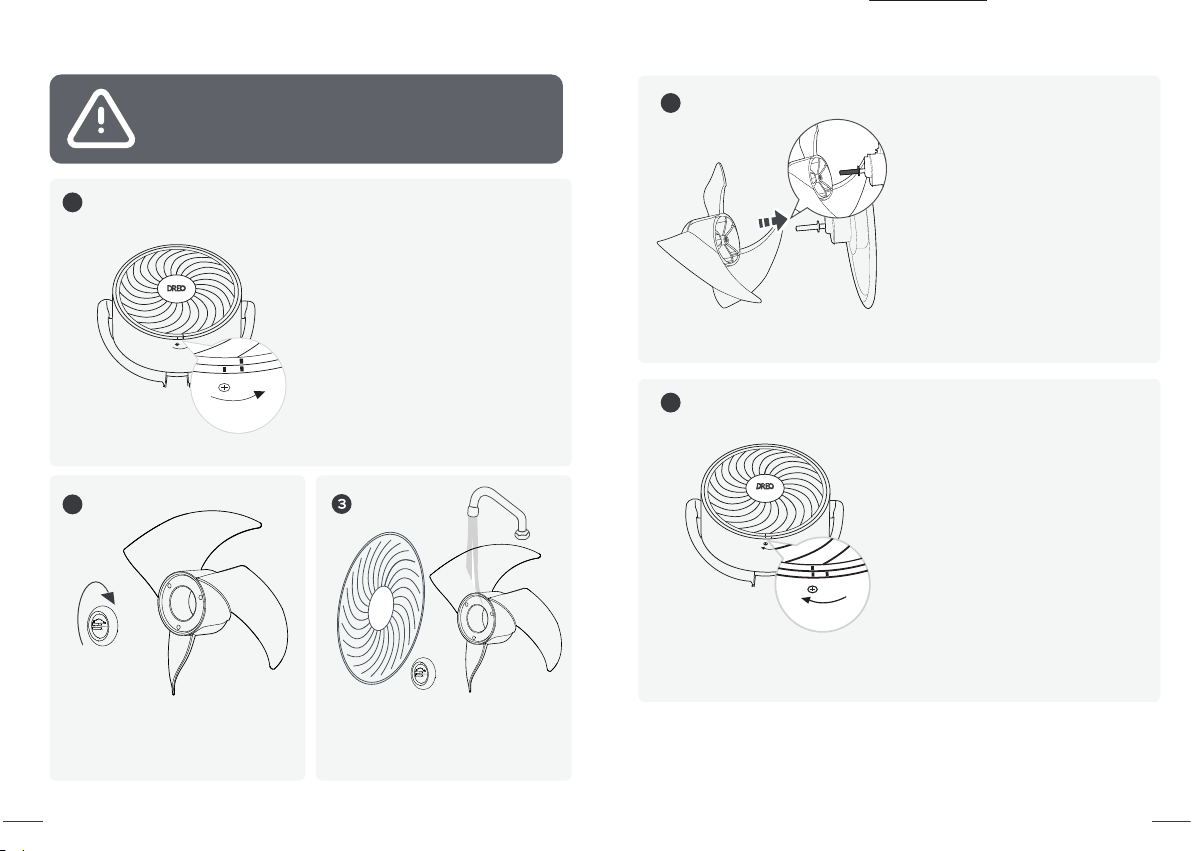
Do not use the appliance until the base is installed.
Do not
iunder any circumstances.
Do not dismantle, repair, or modify. All servicing should be performed by
General Safety
Operation Safety
1.
2.
3.
1.
2.
3.
4.
5.
Do not6.
operate the fan under overly humid, high-temperature, dusty
Do not7.
Fans should never blow directly on infant, the elderly and patients for a
long time.
8.
WARNING:
24A 2.0A
Input:
120V~60Hz 1.2A
Output:
24A 2.0A
2
4
Package Contents
User
Manual
Remote Control
(Battery Included)
Quick Start
Guide
Air Inlet
KNOWING YOUR
AIR CIRCULATOR
FAN
3
Air Outlet
LED Display
Control
Panel
Base
Control Panel
Power Button
• Turn power on/off
• Long press 10 seconds to reset to factory settings
Timer Button
Select to set a timer (0-8h)
Mode Button
• Switch between Normal/Auto Mode
•Long press 3s to mute/unmute
Fan Speed Button
• Adjust airflow speed (1-9 levels)
•Long press 3s to turn on/off Turbo mode
Power Input
Power Adapter
Horizontal Oscillation Button
• Long press 5s to start network settings
and device pairing
Touch to change the horizontal angle. Display
will flash & 0/1/2/3/4 indicating the current
angle 0°/30°/60°/90°/120°
•
Vertical Oscillation Button
•
• Long press 3s to turn on/off Child Lock
Touch to change the vertical angle. Display will
flash & 0/1/2/3 indicating the current angle
0°/30°/60°/90°
6
CONNECTING TO
YOUR AIR
CIRCULATOR FAN
3
Before connecting the appliance to your mobile
This device includes the radio transmitting module
whose CMIIT ID is FCC ID: 2A3SYMBL01.
device, please scan the QR code on the left or go
to the app store and search“Dreo”, then select
and download the app.
You can use the Dreo app to connect your smart air circulator
fan to Amazon Alexa or Google Assistant.
Please follow the in-app instructions to set up your voice
assistant.
NOTE: You must create a Dreo account to access voice
assistants.
Launch Dreo and sign in or create account by following in-app
Enable Bluetooth on your mobile device and plug in your fan.
instructions.
Hold the Oscillation button for 5 seconds to start WiFi connection
settings.
Follow in-app instructions to complete WiFi connection.
Tap + Add Device and select the fan you want to link.
1
4
5
3
2
(Tip: The WiFi icon will keep flashing when pairing.)
You're now ready to control the appliance on your app.
6(Tip: To restart connection settings, hold the Oscillation button
again for 5 seconds.)
5
LED Display
Normal
Mode
Fan Speed
Auto Mode
Fan Speed /
Timer Hour /
Oscillation
Angle
Horizontal
Oscillation
Vertical
Oscillation
Timer
NOTE:
This appliance features auto-brightness. The display adapts
automatically based on the ambient lighting conditions.
Long press 10 seconds power button to unpair WiFi and restore
factory settings.
7
4
8
USING YOUR
AIR CIRCULATOR
FAN
General Operations
Working Modes
1
2
3
4
5
Touch to set a timer.
Getting the Most out of Your
Air Circulator
Touch to turn on the air circulator
fan.
Touch to adjust the airflow
speed.
Touch or to change
the airflow direction.
Touch choose a working mode.
Normal Mode
Air circulator runs at the fixed
speed.
Auto Mode
Air circulator speed adapts to the
ambient temperature.
Natural Mode
Air circulator runs at alternating
speeds.
(Available in the Dreo
app)
Sleep Mode
(Available in the Dreo
app)
Mute auto on.
Fan speed changes according to
temperatures or time you desire.
Air circulator speed decreases every
30 minutes.
Speed decreases by two levels at
most and will remain constant if at
level 3, 2, or 1:
For level 1: 1
Custom Mode
(Available in the Dreo
app)
For level 9: 9 8 7
For level 8: 8 7 6
For level 7: 7 6 5
For level 6: 6 5 4
For level 5: 5 4 3
For level 4: 4 3
For level 3: 3
For level 2: 2
Use with Air Conditioner
Position the air circulator in front
of your AC to circulate cold air and
provide better cooling.
Summer:
Use with Heater
Send the heat to corner of the
room and circulate warm air faster.
Winter:
Circulation
Make the indoors as fresh and
pleasant as the outdoors.
Spring & Fall: Turbo Mode
Air circulator runs at the maximum
speed.
10
Battery Replacement
Note: If the indicator on the remote
control doesn’t turn on any more,
please consider replacing the battery.
1Press the locking button to pop
out the battery holder.
2Replace with the same battery
type with the (+) side facing up.
3Push in the holder until securely
locked into place.
Remote ControlAdditional Features
Memory
If the fan is turned OFF or disconnected from power,
it will operate under the previous settings (except the
timer setting) when it is turned ON again.
Countdown Display
When long pressing buttons for Factory Reset, Child
Lock, Mute, and WiFi Connection, a countdown will show
on the display accordingly.
Display will show “ ” during the update process. Do
not operate until the update is completed.
Check the firmware version on the Dreo app and
update regularly for the air circulator to work more
efficiently.
Firmware Update
9
When the fan is ON/OFF, touch the timer button
repeatedly to set a timer from 1 to 8 hours. When
the timer ends, the fan will stop/start running
automatically. To cancel, set the time to 0 hour.
Note: When the auto off timer is enabled, display will return
Display will show 8 if the timer is beyond 8 hours. To set a timer
beyond 8 hours, please go to the Dreo app.
to fan speed after 3 seconds.
Timer
Child Lock
Long press the Vertical Oscillation button for 3
seconds to turn on/off Child Lock.
Note: Child Lock doesn’t apply to the remote control.
You can also turn off Child Lock by re-plugging in or through
the Dreo app.
Power
Power Indicator
Increase
Fan Speed
Decrease
Fan Speed
Vertical
Oscillation
Mode
Timer
Horizontal
Oscillation
CR2025 3V
1
2
3
This product contains a lithium button/coin cell battery. If a new or
used lithium button/coin cell battery is swallowed or enters the body
it can cause severe internal burns and can lead to death in as little
as 2 hours. Always completely secure the battery compartment. If the
battery compartment does not close securely, stop using the product,
remove the battery, and keep it away from children. If you think
batteries might have been swallowed or placed inside any part of the
body, seek immediate medical attention.
The batteries must be disposed of properly, including keeping them
away from children. Even used cells may cause injury.
Chemical BurnHazard. Keep batteries away
from children.
WARNING
Always unplug the fan before any cleaning or maintenance
Do not immerse in water or get water inside the motor
housing.
Do not use any chemical agents when cleaning the fan.
Store in a cool, dry place and cover it to protect from dust.
CAUTION
CLEANING AND
MAINTENANCE 5
Outer Surface
Gently wipe off the dust with a soft,
dry cloth.
1.
2.
3.
4.
12
11
2
14
13
Front Grille and Blades
To reduce the risk of electrical shock and injury
to persons, turn off and unplug the appliance
before any cleaning and maintenance.
WARNING
1
Remove the screw on the front grille,
rotate the grille counterclockwise to
take it off.
Remove the blade cap by rotating it
as shown and take the blade
assembly out of the shaft.
5
Align the point on the front grille with the
right point on the casing as shown, then
rotate the grille clockwise and install the
screw back in place.
Rinse cap, blades, and grille under
running water or with a clean, damp
cloth.
4
Dry up all parts, and insert the
blade assembly back into the
shaft by aligning the centers.
Make sure that the cord is connected to a powered outlet and the
mains voltage corresponds with the voltage indicated on the air
circulator.
Place the air circulator on a flat, level surface.
Be sure not to insert anything into the air inlet and outlet.
TROUBLESHOOTING
My air circulator won’t turn on!
My air circulator is shaky and wobbling!
My air circulator is making vibration
and noise!
1.
2.
6DREO CUSTOMER
CARE
Default 12-Month Warranty
Extend Your Warranty
This appliance is covered by Dreo warranty for 12 months from the date of its
original purchase.
We can only provide after-sales service for products that are sold by Dreo or
Dreo authorized retailers and distributors. If you have purchased the appliance
from a different place, please contact your seller for return and warranty issues.
Accident, misuse, or repairs performed by unauthorized personnel.
Any unit that has been tampered with or used for commercial purposes.
Normal wear and tear of wearable parts.
Damage caused by non-observance of the User Manual, e.g. connection to
an unsuitable mains supply or noncompliance with the instructions.
Partially or completely dismantled appliances.
Defects caused by or resulting from damages from shipping or from repairs,
service, or alteration to the product or any of its parts that have been
perform ed by a repair person not authorized by Dreo.
The warranty will not apply in cases of:
Extend your warranty by registering your new appliance on our website
https://dreo.com/warranty.
1.
2.
3.
4.
5.
6.
7.
support@dreo.com(888) 290-1688
Mon -Fri, 9:00 am-5:00 pm PST/PDT
www.dreo.com
7
15 16
If your problem is not listed or still persists, please contact our
Customer Support (see page 16)
Rev_1.1_EN
www.dreo.com
Shenzhen Hesung Innovation
Technology Co., LTD
26F, Bldg A7, Creative City, Shenzhen, China MADE IN CHINA 5018396
Intertek
CM

Other dreo Fan manuals

dreo DR-HTF008S User manual

dreo

dreo DR-HTF008S User manual

dreo DR-HTF008 User manual

dreo

dreo DR-HTF008 User manual

dreo PolyFan 513S User manual

dreo

dreo PolyFan 513S User manual

dreo DR-HTF001 User manual

dreo

dreo DR-HTF001 User manual

dreo Lynx S CF511S User manual

dreo

dreo Lynx S CF511S User manual

dreo Cruiser Pro T3 User manual

dreo

dreo Cruiser Pro T3 User manual

dreo Fox One CF312 User manual

dreo

dreo Fox One CF312 User manual

dreo DR-HTF008 User manual

dreo

dreo DR-HTF008 User manual

dreo PolyFan 513S User manual

dreo

dreo PolyFan 513S User manual

dreo DR-HTF005 User manual

dreo

dreo DR-HTF005 User manual

dreo DR-HTF007 User manual

dreo

dreo DR-HTF007 User manual

dreo DR-HTF007S User manual

dreo

dreo DR-HTF007S User manual

dreo DR-HTF007S User manual

dreo

dreo DR-HTF007S User manual

dreo DR-HTF001S User manual

dreo

dreo DR-HTF001S User manual

dreo Nomad One User manual

dreo

dreo Nomad One User manual

dreo CF714S User manual

dreo

dreo CF714S User manual

dreo DR-HTF005 User manual

dreo

dreo DR-HTF005 User manual

dreo Pilot Max S User manual

dreo

dreo Pilot Max S User manual

dreo DR-HTF007S User manual

dreo

dreo DR-HTF007S User manual

dreo Lynx CF511 User manual

dreo

dreo Lynx CF511 User manual

dreo DR-HAF001S User manual

dreo

dreo DR-HAF001S User manual

dreo Fox One CF312 User manual

dreo

dreo Fox One CF312 User manual

Popular Fan manuals by other brands

Nibe Contura C500 Style Installation instruction

Nibe

Nibe Contura C500 Style Installation instruction

emerio FN-114201.3 instruction manual

emerio

emerio FN-114201.3 instruction manual

Westinghouse ETL-ES-Quince-WH10 owner's manual

Westinghouse

Westinghouse ETL-ES-Quince-WH10 owner's manual

Kichler Lighting Crystal Bay instruction manual

Kichler Lighting

Kichler Lighting Crystal Bay instruction manual

Perel CFANT01N user manual

Perel

Perel CFANT01N user manual

Vent-Axia MX 10/10 Instructions for use

Vent-Axia

Vent-Axia MX 10/10 Instructions for use

Panasonic Whisper Green FV-08VKM3 Service manual

Panasonic

Panasonic Whisper Green FV-08VKM3 Service manual

Hunter 20406 installation manual

Hunter

Hunter 20406 installation manual

Hunter Orleans 82004 Parts guide

Hunter

Hunter Orleans 82004 Parts guide

NuAire DRI-ECO-HEAT-HC Installation and Maintenance

NuAire

NuAire DRI-ECO-HEAT-HC Installation and Maintenance

Honeywell TWINDOW HW-628 owner's manual

Honeywell

Honeywell TWINDOW HW-628 owner's manual

DYNABREEZE FA-26243 Instructions & user's manual

DYNABREEZE

DYNABREEZE FA-26243 Instructions & user's manual

Hunter 52381 installation manual

Hunter

Hunter 52381 installation manual

Ebmpapst A4D630-AR01-01 operating instructions

Ebmpapst

Ebmpapst A4D630-AR01-01 operating instructions

Aire Spring Haven 04612 instruction manual

Aire

Aire Spring Haven 04612 instruction manual

Exodraft RSV Installation and operation manual

Exodraft

Exodraft RSV Installation and operation manual

Stulz Air Booster 2 operating instructions

Stulz

Stulz Air Booster 2 operating instructions

Scarlett Comfort SC-SF111B16 instruction manual

Scarlett

Scarlett Comfort SC-SF111B16 instruction manual

manuals.online logo
manuals.online logoBrands
  • About & Mission
  • Contact us
  • Privacy Policy
  • Terms and Conditions

Copyright 2025 Manuals.Online. All Rights Reserved.