DRIFT GHOST 4K User manual
EN I
GHOST 4K
LCD Module Quick Guide

1
Thank you for purchasing the Drift Ghost 4K LCD Module
CUSTOMER SUPPORT
Download the full manual and check our ocial website for firmware
updates, customer support, and info on all of our products.
https://driftinnovation.com/
If you have any suggestions, comments or concerns; please contact our
customer support team at:
WARRANTY
Warranty does not apply if the product is damaged due to physical abuse,
mishandling, accident, fire, frostbite, water damage, negligence or failure
to follow the supplied operating instructions. For more information on
your warranty, see:
https://driftinnovation.com/warranty

EN 2
Getting Started
Module Removal + Attachment
Navigation + Gestures
Screen Lock + Power Down/Up
Mode Menu
Recording Mode Settings Menu
Advanced Settings Menu
General Settings Menu
Gallery Menu (playback and deleting files)
Button Control
Disclosures
3
4-5
6
7
8
9-10
11
12
13-15
16
17
Contents

3
Securement Pins
F
Rear Button
Middle Button
Front Button
G
H
I
Module Notch
Module Dock Area
30 Pin Connector
LCD Touch Screen
Female Connector
Getting Started
A
D
B
E
C
A
B
G
C
H
D
E
I
F

EN 4
Module Removal
Before removing a
module, please ensure
that the camera is
powered o.
If your camera has
a module docked,
remove by following
these instructions:
1. Place index finger
onto the module
notch.
2. Pull outwards,
pivoting on the
module.
Dethatching the
module exposes the
female connector and
module dock area.
A tool may be used
alternatively to
remove the module.

5Module Attachment
Warning: Please ensure that the connectors are plugged together; if securement pins have locked
into place, but the connector remained undocked; remove the module and repeat attachment.
During step 2, you may press the module firmly on the connector side area, to ensure connector
docking before securement pins locking into place.
SCREEN + CAMERA POWER ON/OFF
The LCD module will turn on/o automatically when docked onto the Ghost 4K.
1. Press and hold the button to power the camera and LCD module on.
2. To power o, press and hold the button for 3 seconds.
Before installing,
please ensure that the
camera is powered
o. To attach, follow
these instructions:
1. Place the module
on the camera
body, ensuring that
the module’s 30
pin connector is
above the camera’s
female connector.
2. Press down
on both ends
simultaneously,
until the module
clicks into place.

EN 6
Navigation centres from the Ghost 4K Live View (Live View Main screen). When
the camera is powered on, this is the default screen showing current mode, mode
settings, battery and SD card status, as well as a live image. Additional information is
displayed in settings such as Car DVR and when Wi-Fi is On.
Navigation + Gestures
Mode Icon
Mode
Settings
Battery +
SD Status Wi-Fi Icon
when setting
is ON
DVR Interval
when mode
is selected
Three gestures are used to operate the camera: swiping, tapping and press holding.
Swiping
From the Main Screen,
swipes accesses menus.
In menus swipes allow
browsing through lists.
Press-Hold
Press hold activates and
deactivates screen locking
and LCD power in the
Main screen.
Tapping
Tapping is used at
all stages to select
an option; turning a
setting on/o.
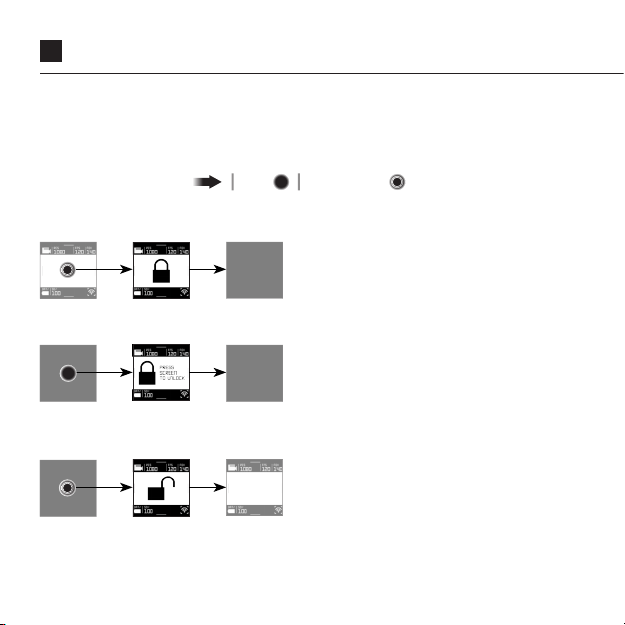
7Screen Lock + Power Down/Up
To lock and power down touchscreen:
Locked screen
To unlock and power up touchscreen:
In the unlocked state, from the Live View
screen, press hold on the centre of the
LCD touchscreen. A locked icon will
display, and the screen will power down.
Tapping on the screen when locked
will display a locked screen reminder,
followed by return to a powered down
screen state.
With the camera on, in the locked
state, press hold on the centre of the
LCD touchscreen, the LCD screen will
brighten and show the Live View screen.
The LCD module can be locked and powered down from the Live View screen, to
prevent accidental touch input, and conserve battery life.
Swipe Tap Press Hold
Gesture Key:

EN 8
Mode Menu
In the Mode Menu three icons are shown on the left: a camera, video camera and
reset icon. Tapping these icons shows related options in the right column.
After selecting a recording mode, the Ghost 4K will return to the Live View screen
in the chose mode. After selecting and confirming the ‘Format SD Card’ option, the
camera will return to the Live View screen in the last chosen recording mode. After
selecting and confirming the ‘Reset Settings’ option, the camera returns to the Live
View screen in the last recording mode with default settings.
Tap the camera icon
to select a photo
mode: still, timelapse,
photoburst
Tap the video icon to
select a video mode:
Video Tagging, Video,
Car DVR
Tap the restart icon to
select a restart option:
Reset to factory settings,
Format SD Card
Swipe up from the Live View
screen to access the Mode
Menu, swipe down from the
Mode Menu to return to the
Live View screen.
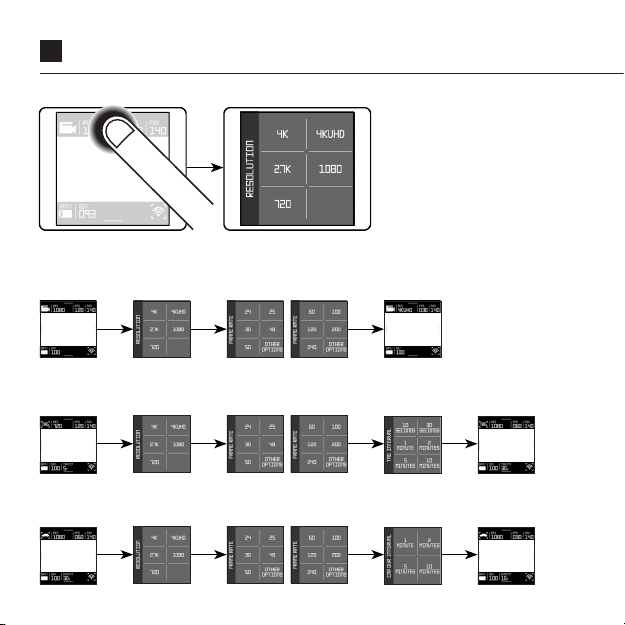
9Recording Mode Settings Menu
Video: Select a resolution to move onto frame rate selection.
Select a frame rate to return to the Live View with selected changes.
Car DVR: Select a resolution to move onto frame rate selection. Select a frame
rate to move onto Car DVR intervals, select an interval to return to Live View.
Video Tag: Select a resolution to move onto frame rate selection. Select a frame
rate to move onto Video tagging intervals, select an interval to return to Live View.
On the Live View screen,
mode settings are
presented in the top bar;
resolution, frame rate,
and interval settings are
available according to the
current mode. Tap the top
bar to access the settings
for the current mode.
Other manuals for GHOST 4K
1
Table of contents
Languages:
Popular Camera Accessories manuals by other brands

Viltrox
Viltrox EF-NEX Mount instructions

Calumet
Calumet 7100 Series CK7114 operating instructions

Ropox
Ropox 4Single Series User manual and installation instructions

Cambo
Cambo Wide DS Digital Series Main operating instructions

Samsung
Samsung SHG-120 Specification sheet

Ryobi
Ryobi BPL-1820 Owner's operating manual


