Moza SLYPOD PRO User manual

User manual 用户手册

1
Battery and Charging
The MOZA SLYPOD PRO comes with a built-in lithium battery. Before using the
SLYPOD PRO, please fully charge the SLYPOD PRO to activate the battery. To
charge use the Type-C USB port and a USB power source like a phone charger or
power bank. Solid red indicates the SLYPOD PRO is charging, solid blue indicates
the charging has finished. The SLYPOD PRO will automatically stop charging when
the battery is full.
Note:
1. It’s recommended to use the original charging cable provided in the package.
2. Do not overcharge or over-discharge the battery, otherwise the battery cell will
get damaged.
3. If the battery is idle for a long time, please recharge and discharge it every 3
months to keep it active.

2
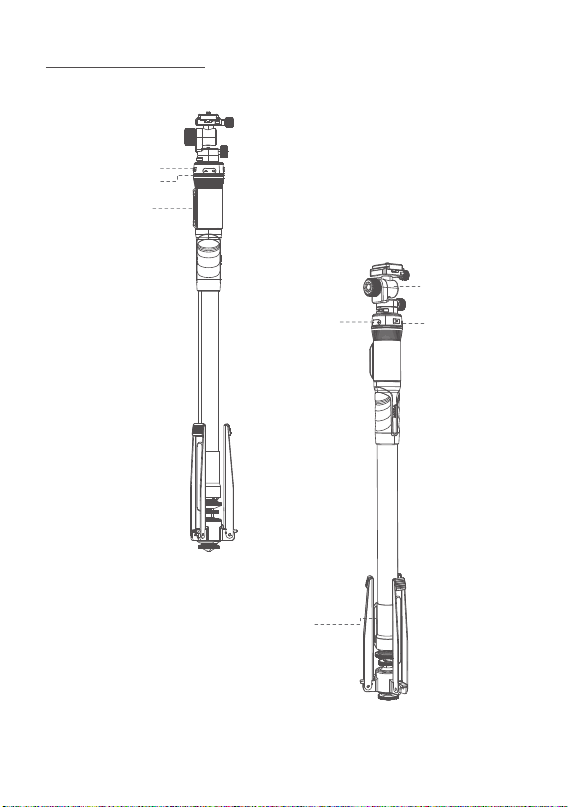
MOZA SLYPOD PRO Overview
Operation Button
Charging Port
Power Button
Indicator Light
Arca-Swiss
Quick Release
1/4” and 3/8”
Extension Hole
Pan-and-Tilt Head
3
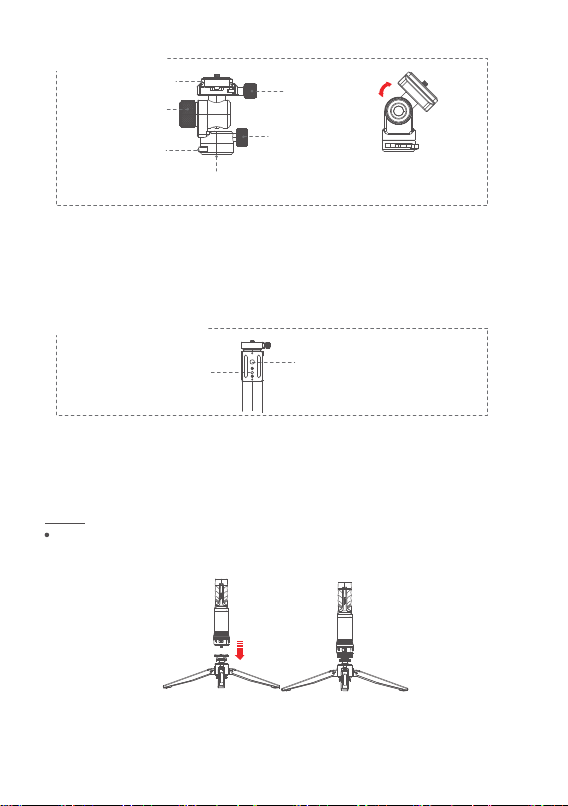
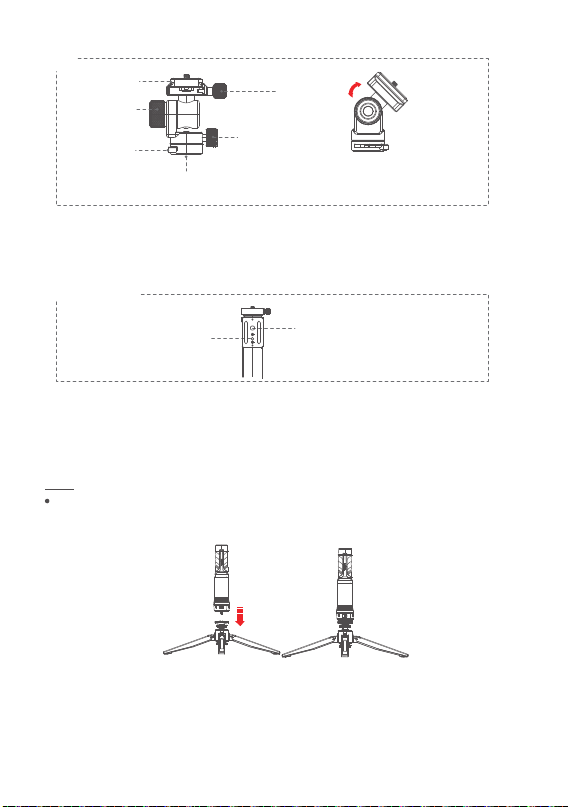
● Release the heading adjustment knob to adjust the heading angle of
gimbal and ensure the gimbal’s position and level.
● Release the roll and pitch adjustment knob and adjus the angle of
roll/pitch at the same time, and then screw it when it is suitable.
● Release the gimbal lock and install the standard Arca quick release
plate, then lock the gimbal.
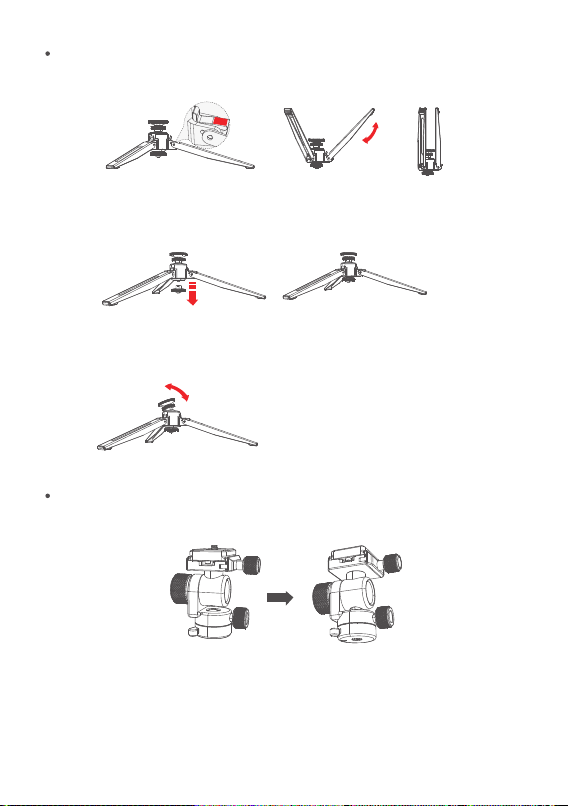
Attaching the Tripod to The SLYPOD PRO
Align the tripod with the 1 / 4" mount of the SLYPOD PRO. Rotate the tripod until
it is hand tight.
Install
Arca-Swiss Quick Release
Pan-and-Tilt Head
Pan Knob Screw
Knob Screw
Pan-Tilt Lock
Quick Release
Plate Pan-Tilt Lock
The SLYPOD PRO’s body is supported by an Arca-Swiss quick release plate
with a 1/4” and a 3/8” mount. Use the SLYPOD PRO like a motorized slider by
mounting the SLYPOD PRO horizontal.
3/8” Mount
1/4” Mount
1/4” and 3/8”
Extension Hole

4
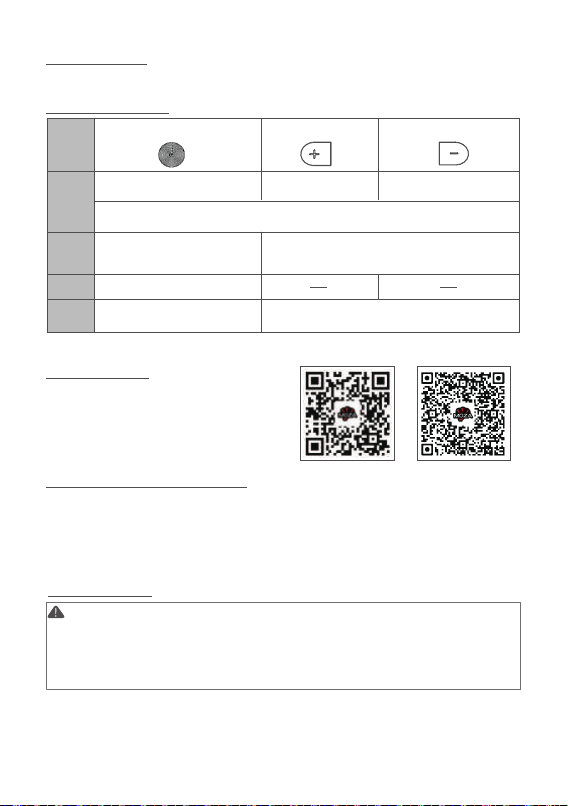
The folding method of tripod
Main body and gimbal
Tighten the gimbal head to the 1/4 screw of the main body, and then tighten the
wrench to fix the head.
1. Retroflex Folding
2. Shaking the lock to fold
3. Shaking the damping
5
Getting Started
Device Connection (Wireless)
Download the "MOZA Master" App.
a. Turn on the SLYPOD PRO and mobile phone Bluetooth.
b. Launch the "MOZA Master", select the device to connect.
c. Enter the operation interface after connection is completed.
Button Operations
App Operation
Stop
Up(+)/Down(-)
From green to blue, then to green
Stop + Turn Off
(Blinking red)
Shot
To reset, click all three buttons at the same time. (White Light will blink )
Start to extend Start to retract
Be on reciprocating mode
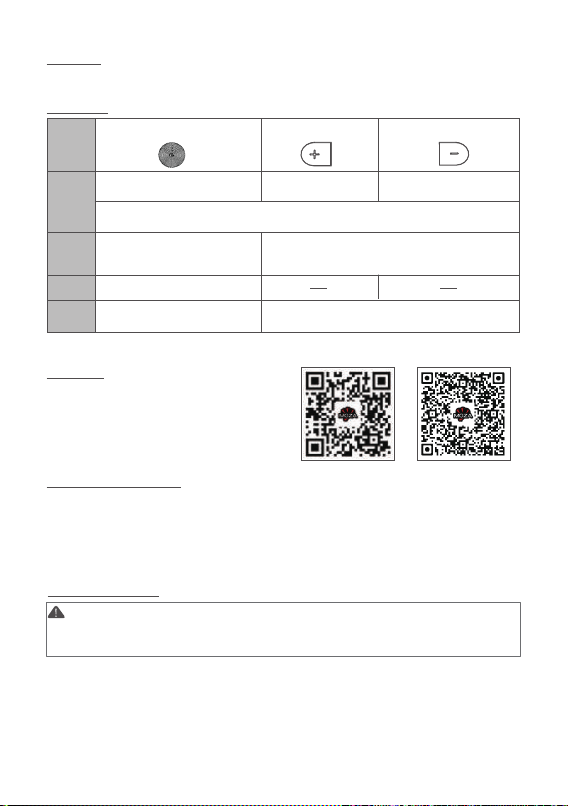
Power on/off: Long press the power button 3 seconds.
IOS Android
App Download
Scan the QR code below or search the
App Store to download the MOZA Master
App.
Power Button Extend+ Retract-
Long
press
Click
once
Double
click
Triple
click
Before the first operation, it is required to setup the SLYPOD PRO according
to the instructions. Please use the latest App version. For App updates,
please check our official website and App store. When the SLYPOD PRO is
controlled by the App, buttons will be disabled. (Except for the power
button).

6
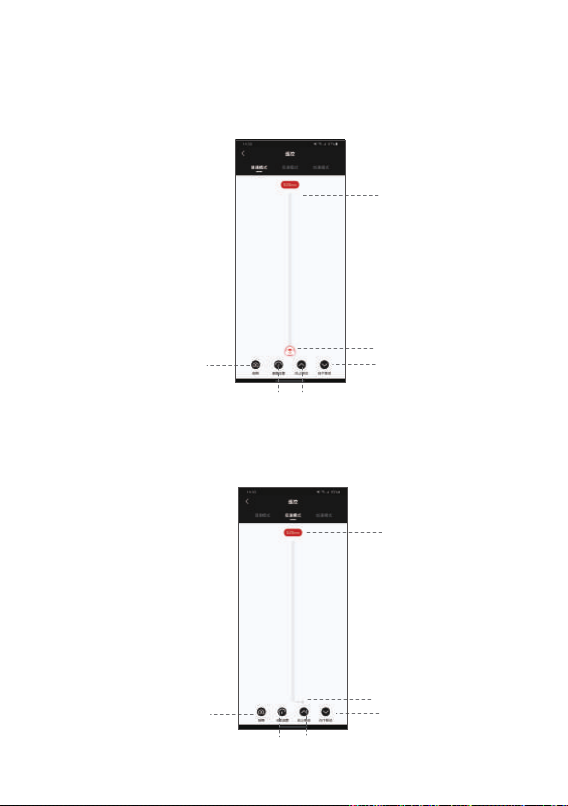
Control the camera
to take photos
Set the up-and-down
movement speed
of the SLYPOD PRO
Operating Point, the
current movement
distance is 0mm
Maximum moving
distance is 520mm
Long tap to control the
movement, click again to
stop movement
● Regular Mode
Long tap to control the
movement, click again
to stop movement
Control the camera to
take photos
The current movement
distance is 0mm
Maximum moving
distance is 520mm
Tap to control the
movement, click again
to stop movement
● Gearshift Mode
Tap to control the movement,
click again to stop movement
Slide the red operating point from the starting point to any position, the SLYPOD PRO will move
accordingly. Release the operating point, the SLYPOD PRO will stop moving. Long tap the
“Downwards” or “Upwards” icon, the SLYPOD PRO will automatically move up or down. Tap the
“Downwards” or “Upwards” icon again to stop the movement. Tap the ‘Take photo’ icon, and
SLYPOD PRO will control the camera to take a photo. (Please make sure your SLYPOD PRO is
connected with the camera control cable, the camera control cable needs to be purchased
separately). Speed Setting: Click Speed icon to set the speed, and the SLYPOD PRO will move
according to the set speed.
Tap the “Upwards” or “Downwards” icon to control the movement of SLYPOD PRO. Tap again to
stop the movement. Tap Take photo icon to control the camera to take a photo. (Please make sure
your SLYPOD PRO is connected with the camera control cable, the camera control cable needs to
be purchased separately). Speed Setting: Tap speed icon to set the speed, the SLYPOD PRO will
move from the current speed to the set speed and then decelerates to the end position. (The end
position speed is 0)
Set the up-and-down
movement speed of
the SLYPOD PRO
7
● Segmentation Mode
Select the segmentation mode, add a path (Click to add the path. 5 paths is the most that can
be added, tap confirm before adding the next path).Slide the S operating point and the E operating
point to any position to set the starting position and end position of the first path. Slide the E operating
point to set the end position of the second, third, fourth or fifth path. Then the starting point of the
next path will be the end position of the previous one.
Tap to start
Path
number
Tap to confirm the
path before adding
the next path.
Beginning (number
shows the distance
from the origin)
Tap to the red
area to set the
running time
S operation
point
E operation
point
End (number
shows the
distance from
the origin)
Tap to
delete
the path
Tap to reset
the path
Tap to add
the path
Tap the “Upwards” and the device will move up automatically; Tap again and the device stops
moving. Tap the “Downwards” and the device will move down automatically; Tap again and the
device stops moving. Tap ‘Take photo’, the SLYPOD PRO controls the camera to take a photo.
(SLYPOD PRO needs to be connected to the camera with the camera control cable, the camera
control cable needs to be purchased separately) Speed setting: Drag the white mark to set the
device acceleration speed, and the device will continue to accelerate to the end position
according to the set speed (When the SLYPOD PRO extends to 520mm or retracts to 0mm,it will
reach the setting speed)
● Acceleration Mode
8
Set path
running time
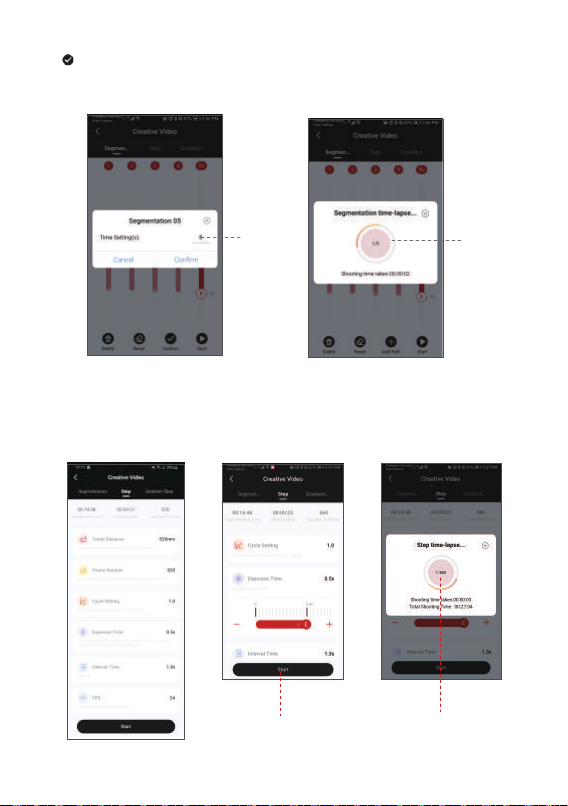
Tap to confirm the path and set the running time. After confirming the first path, another path can
be added. Tap Confirm and the SLYPOD PRO will run according to programed movement. Using
Segmentation mode and the camera connection cable the SLYPOD Pro will activate the camera’s
shutter for a motion controlled time-lapse.
Tap on the red
circular area,
the SLYPOD PRO
can control the
camera to
take pictures
● Step Time-Lapse
Select Step mode to set Travel Distance, Frame Number, Cycle Setting, Exposure Time, Interval
Time and FPS. Click “+”“-” to adjust the parameter, click to start, the SLYPOD PRO will run
according to the set parameters, the interface will display Shooting Time Taken, Total Shooting
Time, Total number of photos. Enter the Step Time-lapse interface, click on the red circular area,
the SLYPOD PRO can control the camera to take pictures. (SLYPOD PRO needs to be connected
to the camera with the camera control cable)
Tap Start, the SLYPOD PRO
will run according to
the setting
Tap on the red circular area,
the SLYPOD PRO can control the
camera to take pictures
9
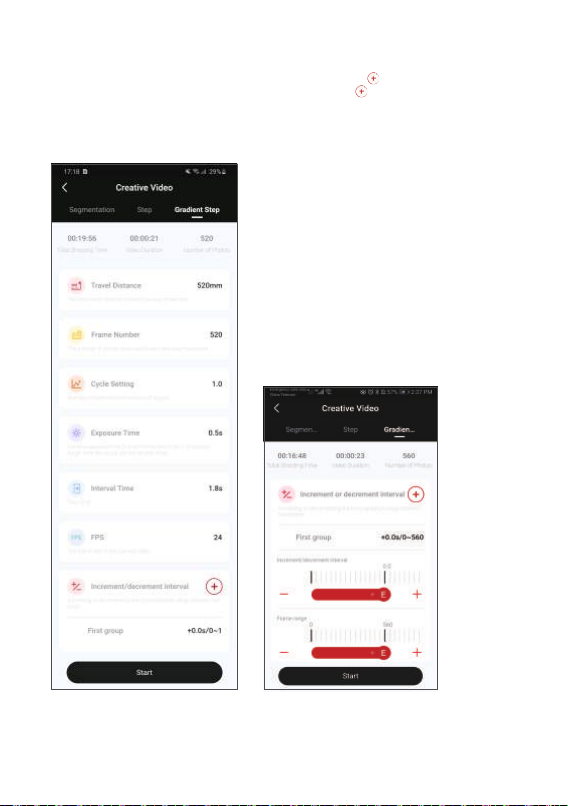
● Gradient Step Time-Lapse
Select Gradient Step Time-lapse, set the travel distance, frame number, cycle setting, exposure
time, interval time, FPS, increment and decrement of interval. Tap to add the first group of
increment or decrement of time and frame number. Tap again to add a second group (5
groups can be added at most). Tap Start, the device will move according to the settled
parameters. The interface will show the total shooting time, video duration, and the number of
photos. During the shot, click the center red area, the SLYPOD PRO will control the camera to
take photos.(SLYPOD PRO and camera need to be connected with camera shutter control
cable)

10
Firmware Upgrade
Updating the firmware of SLYPOD PRO should be done in the charging state. When in
charging state, turn on the device, connect the SLYPOD PRO to the App, enter the
operation interface and start the firmware upgrade. The SLYPOD PRO must be restarted
after the firmware upgrade succeeds. If the upgrade fails, the process needs to be
repeated until the upgrade succeeds.
● Indicator Light Color Setting
Enter the operation interface, select Setting-Indicator Light, up to 5 kinds of indicator
light colors can be set based on personal preference.
Tap to control the camera
Tap to start the
Gradient Step
Time-lapse
11
Color Definition
Red Light and Green Light on (Solid Orange)
Red light flashing + automatic homing stop
(press the start button, red light flashing, no start)
Storage Length:650mm(Main Body)
Storage Length:865mm (Main Body andTripod)
Expanded Length:1180mm(Main Body andTripod)
Tripod:520g
11.4V~16.8V
-10℃~50℃
2.4G
Type-C
2600mAh
14.4V
Type-C USB
5V 2A/9V 2A/12V 1.5A
4H
90 min
SLYPOD PRO
Solid red
Solid blue
Charging
Charging completed
Power on Solid green
Low-voltage alarm
Low voltage alarm
Calibration
Calibration is needed when there is abnormality with the movement. There are two ways
to calibrate the SLYPOD PRO: Click all three buttons (power, +, -) at the same time or
enter the operation interface to start calibration in the App.
Subscribe Gudsen MOZA official YouTube channel for the latest tutorials.
Charging
Lift the rubber dust cover from the charging port to access a Type-C port. The SLYPOD
PRO can be charged by mobile phone charger, mobile power bank, etc. It will
automatically stop charging when the battery is full. Please disconnect the charger when
the SLYPOD PRO is full. It is recommended to use the original charging cable provided.
Specifications
Size
Weight
Payload
Operating speed
Operating Voltage
Battery Life
Working Temperature
Communication
Interface
Battery Model
Battery Capacity
Battery Voltage
Charging Port
Charging Voltage
Charging Time
Main Body: 1460g
PTZ Head: 330g
Vertical: 6kg
Horizontal: 3.5Kg
Highest: 40mm/s
Lowest: 0.5mm/s
Bluetooth
Lithium-ion Battery

12
电池及充电说明
SLYPOD PRO 使用内置锂电池,首次充电使用时,请先给SLYPOD PRO充满电以激活电
池,保证产品顺利使用。红灯常亮表示设备充电中,蓝灯常亮显示充电完成。SLYPOD
PRO使用Type-C接口,手机充电器、移动电源等都可以给SLYPOD PRO充电,电池充满
后将停止充电。
1.使用SLYPOD PRO过程中,请使用包装内提供的原装充电线!
2.切勿过充、过放电池,否则将对电芯造成损害;
3.若长期闲置电池,请每隔3个月左右重新充放电一次以保持电池活性。
13
认识MOZA SLYPOD PRO
操作按键
充电插口
电源按键
指示灯
阿卡尺
寸快装
1/4”,3/8”
扩展螺丝孔
云台
14
● 松开航向调节旋钮,调整万向云台航向角度,保证万向云台位置水平
● 松开横滚俯仰调节旋钮,同时调整横滚/俯仰角度,合适后旋紧
● 松开云台锁,安装标准阿卡快装板后,锁紧云台锁即可
三脚架与主机部分
将三脚架上1/4”螺丝孔对准主机1/4”螺丝。旋转手柄直至扭紧,完成三脚架与主机部分
组装。
组装
阿卡尺寸快装
云台
航向调节螺丝
俯仰横滚
调节螺丝
云台锁
快装支架 云台锁
主机上阿卡尺寸快装含有1/4”扩展螺丝孔和3/8”扩展螺丝孔,拓展更加丰富,能够
匹配安装不同型号的拍摄设备。(连接独脚架、三角架等,此时SLYPOD PRO呈滑
轨形态)
3/8”螺丝孔
1/4”螺丝孔
1/4”,3/8”
扩展螺丝孔
15
三脚架折叠方法
主机与云台部分
将万向云台旋紧于主体1/4螺丝,然后锁紧扳手,云台固定成功
1. 反折方法
2. 摇动锁开启方法
3. 摇动阻尼调节方法
16
开机使用
连接设备(无线连接)
下载并安装“MOZA Master”APP
a. 打开手机蓝牙打开设备电源
b. 打开MOZA Master选择要连接的产品,点击连接,完成连接,
c. 连接成功后选择产品,进入该设备的操作界面。
操作说明
APP操作方法介绍(APP版本2.0.5 )
电源
立即停止
上升(+)/下降(-)
由绿色变为蓝色,再变为绿色
停机+自动复位停机
(红灯闪烁)
长按
单击
双击
三击
拍摄
撑杆零位自校准(白灯闪烁)
启动伸长 启动缩短
伸长+
进入往复模式
缩短-
注意:首次连接需根据引导流程进行产品激活。请以最新版本APP为准;如有更新,
恕不另行通知,请关注官网、微信公众号各大应用商城。通过App控制SLYPOD PRO
时,除了电源键,其余的物理按键将会失效。
长按3S:开机/关机
IOS Android
APP下载
您可以直接扫描二维码下载“MOZA
Master”,也可以直接在手机应用商店
中搜索“MOZA Master”进行下载
17
点击拍照,控制
相机拍摄一张照片
设置设备上
下移动速度
操作原点
显示当前设备
移动距离0mm
设备伸出
最大长度
520mm
长按设备下移
松开停止运动
●
普通模式
长按设备上移
松开停止运动
点击拍照,控制
相机拍摄一张照片
显示当前设备
移动距离0mm
设备伸出
最大长度
520mm
单击设备下移
再次单击停止运动
● 变速模式
单击设备上移
再次单击停止运动
滑动红色操作点从起点至任意位置,设备会跟随滑动。长按向上移动,设备会向上移动,
松开停止运动;长按向下移动,设备会向下移动,松开停止运动。双击向上移动,设备自
动向上运行;再次单击,设备停止运动。双击向下移动,设备自动向下运行;再次单击,设
备停止运动。点击拍照,SLYPOD PRO 控制相机拍摄一张照片(SLYPOD PRO 需连接相机
控制线,相机控制线需另购)。
速度设置:点击设置设备运行速度,设备按照所设置的速度持续运动。
单击向上移动,设备自动向上运行,再次单击,停止运动; 单击向下移动,设备自动向下运
行,再次单击,停止运动;点击拍照,SLYPOD PRO 控制相机拍摄一张照片。( SLYPOD
PRO 需连接相机控制线 )
速度设置:点击设置设备运行速度,设备从当前速度运动到设置速度再减速运动到终点位置
(终点位置速度为0)。
设置设备上
下移动速度

18
● 分段模式
选择分段模式,添加路径(点击 添加路径最多可添加5段路径,确认路径条后才能添加下个
路径条)后,滑动路径条S操作点和E操作点至任意位置,设置第一条路径条的起点位置与终点
位置。滑动E操作点可设置(第2、3、4、5条)路径条终点,此时下一段起点是上一段终点。
点击开始运行
路径序号
点击确认路径条
设置后才能添加
下个路径条
起点(数字
显示移动到
当前位置)
点击设置路
径运行时间
S操作点
E操作点
终点(数字
显示移动到
当前位置)
点击删除
路径条
点击重置
路径条 点击添加
路径条
单击向上移动,设备自动向上运行;再次单击,设备停止运动。单击向下移动,设备自动向
下运行;再次单击,设备停止运动。点击拍照,SLYPOD PRO 控制相机拍摄一张照片。
(SLYPOD PRO 需连接相机控制线,相机控制线需另购)
速度设置:拖动白色标识设置设备加速速度,设备按照所设置速度持续加速运动到终点位
置(即伸出指到达520mm,缩回指到达0mm时的速度)。
●
加速模式

19
设置路径
运行时间
点击 确认路径条,设置运行时间。确认路径条后才能添加下个路径条。点击运行标识,设
备将在设置倒计时结束后按照设置启动设备运行。此时进入分段延时拍摄中界面,点击中心红
色圆形区域SLYPOD PRO 可控制相机拍照。(SLYPOD PRO 需连接相机控制线)
点击红色圆形
区域SLYPOD PRO
可控制相机拍照
● 步进延时摄影
选择步进模式,点击设置步进总长,移动帧数,循环设置,曝光时间,间隔时间与FPS。
点击“+”“-”调整数值,设置完成,点击开始,设备将按照所设置的数据进行步进移动
,界面显示设置最终生成拍摄总时间,视频时长和照片总数。进入步进延时拍摄中界面,
点击中心红色圆形区域SLYPOD PRO 可控制相机拍照。(SLYPOD PRO 需连接相机控制
线)
点击开始设备按照
设置开始运行
点击红色圆形区域
SLYPOD PRO 可控制相
机拍照
Other manuals for SLYPOD PRO
1
Table of contents
Other Moza Camera Accessories manuals


Popular Camera Accessories manuals by other brands


Ametek
Ametek Motec MC5201 Series Installation and operating instructions

Olympus
Olympus Waterproof Case PT-17 instruction manual

Vinten
Vinten Protouch Pro-6HDV System Maintenance manual and parts list

Nikon
Nikon FSB-3 instruction manual

Ikelite
Ikelite EOS 5D Mark II - EOS 5D Mark II 21.1MP Full Frame CMOS Digital SLR... instruction manual

VARO
VARO POWERPLUS POWDP9021 manual


