DryBell Guitar Effects
Vibe Machine V-1 up to serial No. #702 User’s manual ENG rev.2 11/2013
www.drybell.com
DryBell
Doc. No. DM0923 / Page 1
I N T R O D U C T I O N Vibe Machine™
…up to serial No. #702
Thank you for purchasing the Vibe Machine V-1 pedal from DryBell. The Vibe Machine is a top quality ni-Vibe® type pedal developed to the highest standards. It was
designed with discrete transistors, just like the classic ni-Vibe, but made with small electronic SMD technology. Its reduced size makes it perfect for a smaller
pedalboard. Currently (2013), Vibe Machine is the smallest vibe pedal in the world with all original ni-Vibe options and more. Enjoy!
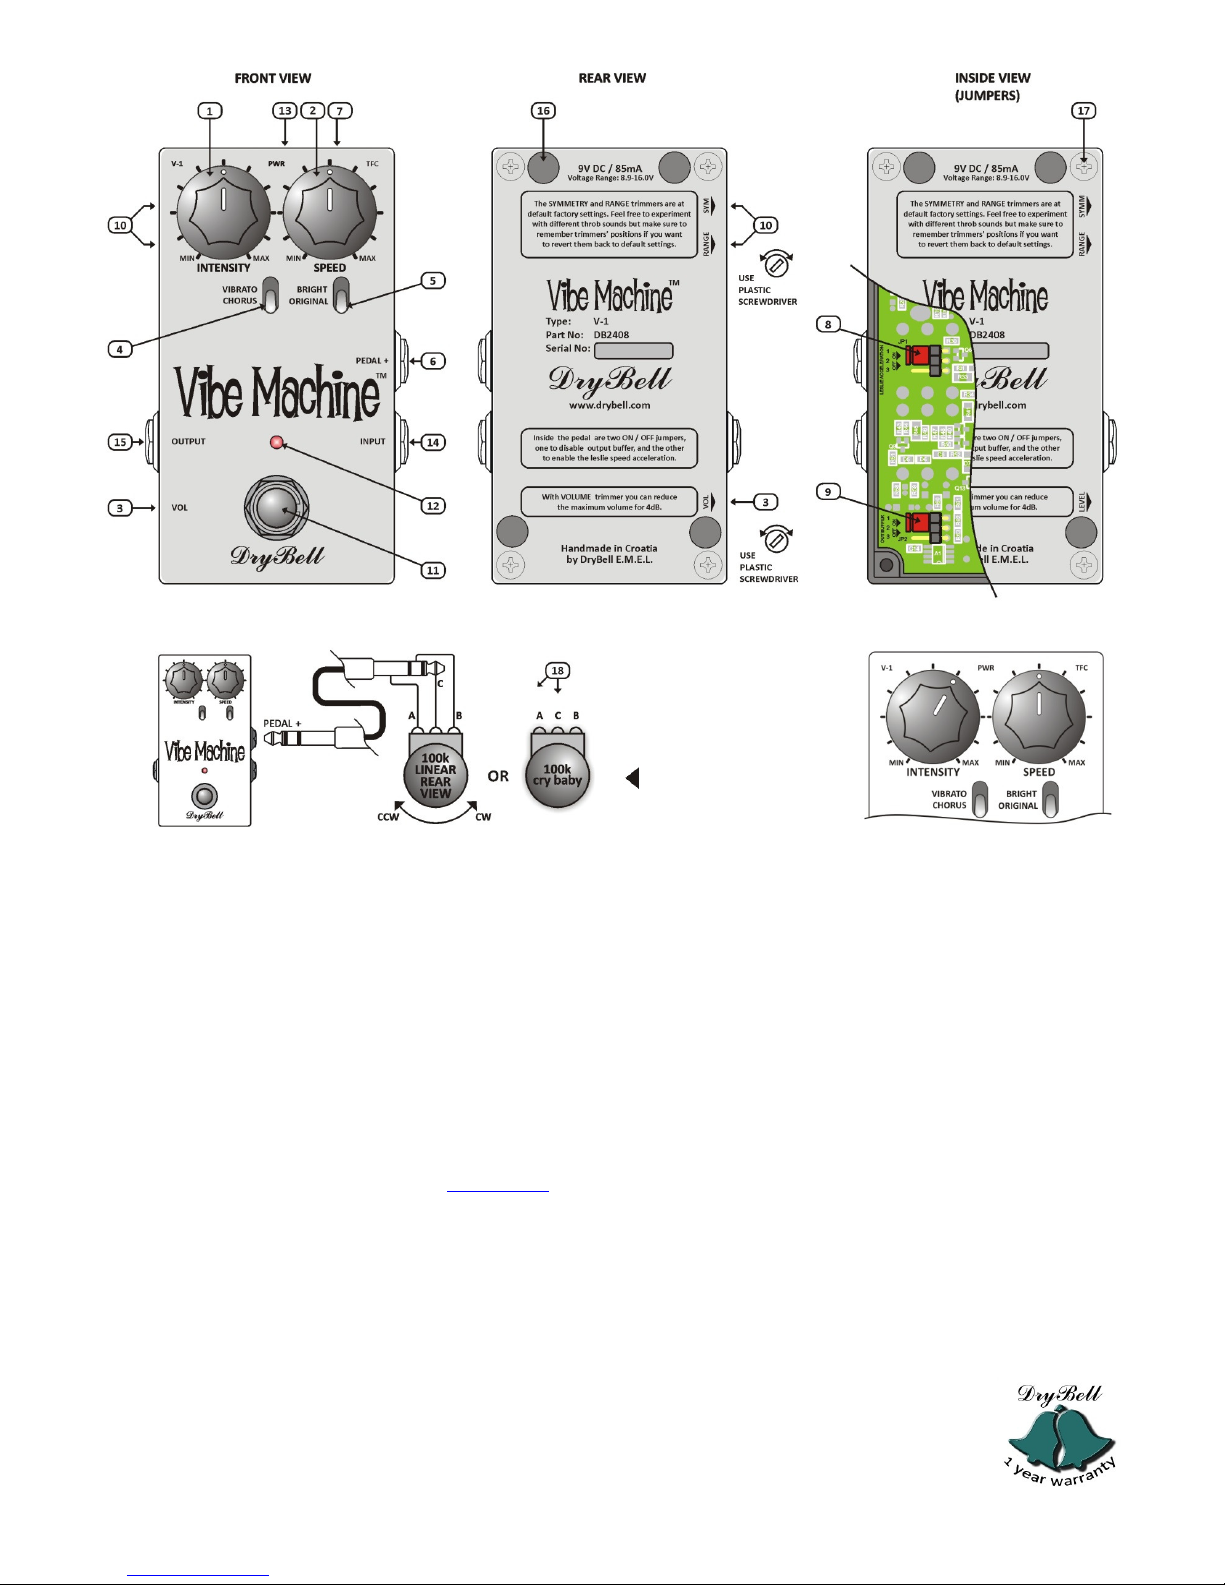
INTENSITY (pot) 1
Controls the depth and the character of the chorus (vibe) or vibrato sound and it defines the strength and dynamic of the pulsing nature of the effect. A more
pronounced pulsing feel starts from around the 2 o’clock position and onwards. The contour of the intensity knob is custom designed to enable a quick and easy set
up of different vibe sounds.
SPEED (pot) 2
The speed knob adjusts the speed pulsations of the vibe (chorus) or vibrato sound. Its size and placement also makes foot control possible.
VOLUME (side t imme ) 3
This trimmer adjusts the level of the output signal. At minimal setting the volume is reduced by 4dB, and the maximum setting gives a slight boost to input signal. So
find your preferred effect volume and leave it. In bypass this trimmer has no effect. To set it please use a small plastic screwdriver.
VIBRATO/CHORUS (switch) 4
This toggle switch selects between the classic vibe/chorus sound and the vibrato sound, a very under used part of vibe pedals, this effect can give a great sense of
movement when used in the right way.
BRIGHT/ORIGINAL (switch) 5
Original ni-Vibe pedals had relatively low input impedance and a warm tone, so for that vintage “Vibe” set the switch to the “ORIGINAL” position. For a brighter tone
flip the switch up to the “BRIGHT” position, this setting turns on the input FET buffer. If the Vibe Machine is the first (or only pedal) in your effect chain this setting will
use the entire tonal range of your pickups. If any other pedal with a similar buffer is placed before the Vibe Machine the BRIGHT/ORIGINAL switch will have no effect.
PEDAL+ (exp ession pedal jack) 6
For external speed control you can use an expression pedal or a passive volume pedal. This should be plugged in to the jack marked “Pedal +” above the input jack. Try
to use expression pedals that have a linear 100kΩ potentiometer (18). Excellent results can also be achieved with a classic wah (crybaby) potentiometer. See the
expression pedal wiring diagram on page 2 of this manual.
TFC OUTPUT (cont ol output fo cont olling custom pedalboa ds) 7
When the V-1 pedal is turned on, a control voltage appears on the TFC output. For example, if you use an automatic looper on custom pedalboards, you can turn the
Vibe Machine on, and automatically any other pedal (or something else) in your chain is activated/deactivated. This system significantly extends the capabilities of
your pedalboard. Visit drybell.com for more information.
LESLIE SPEED ACCELERATION (inte nal jumpe ) 8
When using an expression pedal it is possible to turn on the Leslie cabinet mechanical inertia (speed up/slow down). When this option is enabled, every time you
move the expression pedal to a new position the oscillations gradually speed up or slow down to the new position. This option has no effect on a regular speed
potentiometer of the Vibe Machine, only on the expression pedal if it's connected. To activate the Leslie speed acceleration option you need to remove the pedal’s
underside panel, and set the jumper (8) to its 'ON' position. By default, this option is disabled.
OUTPUT BUFFER (inte nal jumpe ) 9
The original ni-Vibe had a high output impedance. Therefore, longer cables from a pedalboard to an amplifier tend to drown treble tones. As high impedance lines
are more sensitive to interferences, hum and noise are increased. If the output buffer is activated, i.e. line impedance is low, all mentioned interferences are reduced.
By default, this option is enabled. To deactivate the output buffer you need to remove the underside panel of the pedal, and set the jumper (9) to 'OFF' position.
Please see additional info in our FAQ section at drybell.com.
RANGE & SYMMETRY (facto y-set side t imme s) 10
These trimmers are used for setting a desired throb sound. They are carefully calibrated by us before shipping. If you still want to experiment use a small plastic
screwdriver to adjust the trimmers. You can achieve a variety of throb sounds. Be sure to mark each trimmer’s position with a Sharpie or black marker because they
are very sensitive to small adjustments
, then you will be able to return to your pedal’s original settings.
TRUE BYPASS with PULSING LED (footswitch) 11, 12
Each time you press the footswitch (11), the effect is turned on or off. This means that when the pedal is off, internal circuits (and buffers also) have no effects on the
signal path. When the effect is active, the red LED (12) will flash in time to your speed setting. The Vibe Machine V-1 does not have a buffered bypass. Please see
additional info in our FAQ section at drybell.com.
POWER SUPPLY (no batte y, only adapte ) 13
You can use unregulated or regulated 9V DC / 120mA adapters. The maximum recommended voltage on DC power supply input is 16V. The maximum allowable short-
term voltage is 25V. If you use high voltages in the recommended range (16V max) the Vibe Machine will generate more heat, this is normal. Vibe Machine has an
internal protection against reverse power polarity and static discharges.
INPUT and OUTPUT (jacks) 14,15
The input is on the right; the output is on the left side of the pedal.
(Continued):
TFC output ON / OFF voltage: ON state = 8.3V DC, OFF state = 0V
TFC output impedance: 500Ω
TFC output connector type: Barrel, Plug 4.0mm/1.7mm, Center Positive
Length: 112 mm / 4,42 inch
Width (W/O jacks): 60 mm / 2,37 inch
Height (W/O potentiometers): 31 mm / 1,22 inch
Weight: (W/O package): 0,270 kg / 0,56 lb
Weight: (with package): 0,48 kg / 1,06 lb
Standard color/finish: Red Candy / Powder coating
Note:
Uni-Vibe
® is registered trademark of Jim Dunlop Manufacturing.
Vibe Machine™
is a trademark of DryBell Electronic Musical Equipment Laboratory.