manuals.online logo
Brands
  1. Home
  2. •
  3. Brands
  4. •
  5. Wampler
  6. •
  7. Music Pedal
  8. •
  9. Wampler Thirty something User manual

Wampler Thirty something User manual

TM
Thirty
something
TM
Having already taken on and mastered the vintage American amps (the Tweed
‘57 and the Black ’65) it was time for Brian Wampler to tackle one of the most
iconic tones ever, the classic brilliance and chime of early British tube ampliers.
With a heritage stretching just as far back as it’s American counterparts, these
amps made early history with bands such as The Shadows and The Beatles, and
were also responsible for one of the most iconic and easily identiable guitar
tones of all time – Dr. Brian May of Queen.
The tones that have been found in these amps have gone on to be a cornerstone
of many great songs over the years. From U2 to Bryan Adams, Brad Paisley to
Ronnie Wood - these amps have built a foundation of tone throughout history.
This is not the rst time Brian Wampler has taken on these tones. One of his rst
releases was the called the Cranked AC, some of you may have owned it. Those
that did have considerable respect for it but it has been long discontinued - since
then many have been repeatedly asking us to rerelease it. However, Brian wasn’t
convinced he had nailed that tone he kept hearing in his head. It sounded great,
but it was just missing something special.
After almost 3 years of putting it away, getting it out again, tweaking here and
tweaking there, he is ready to release his take on those famous tones again. The
Thirty Something is his interpretation of those amps.
If you want that beautiful high end chime, or want to sound like a Shadow, a
Beatle, a Queen, a Stone or any other of the thousands of great musicians who
have used these amps - this is the pedal for you.
To get the most out of your new pedal, you'll want to become very familiar with the controls. The Thirty Something features
switchable gain stages, Bass and Treble EQ, a Top Cut control and a completely independent pre gain Boost to bring out the
tones you want. Inside the pedal there is a small trim pot gain control that controls the input gain headroom. If your guitar has
higher output pickups and you are struggling to achieve a true clean tone, drop this back a little until you reach the perfect
balance between sparkling clean and breaking up.
Bypass Switch – The footswitch in the Thirty Something is wired with true bypass switching to ensure you don't have anything
in the way when you disable your pedal. When you activate the pedal via this switch, the blue LED to the immediate left of the
“headroom” switch will light up.
Boost – activates the Class-A pre-gain booster circuit. The Boost reacts just like the classic top boosters used by many great guitar
players and will send the level of overdrive up considerably when turned on. This feature accomplishes this by boosting just the
right amount of mids and high end going into the gain circuit. If the main circuit is not activated, The Boost will act as an
independent top booster that will drive the amp or any subsequent eects unit in the chain harder. When this feature is activated
the red LED immediately to the right of the “headroom”switch lights up.
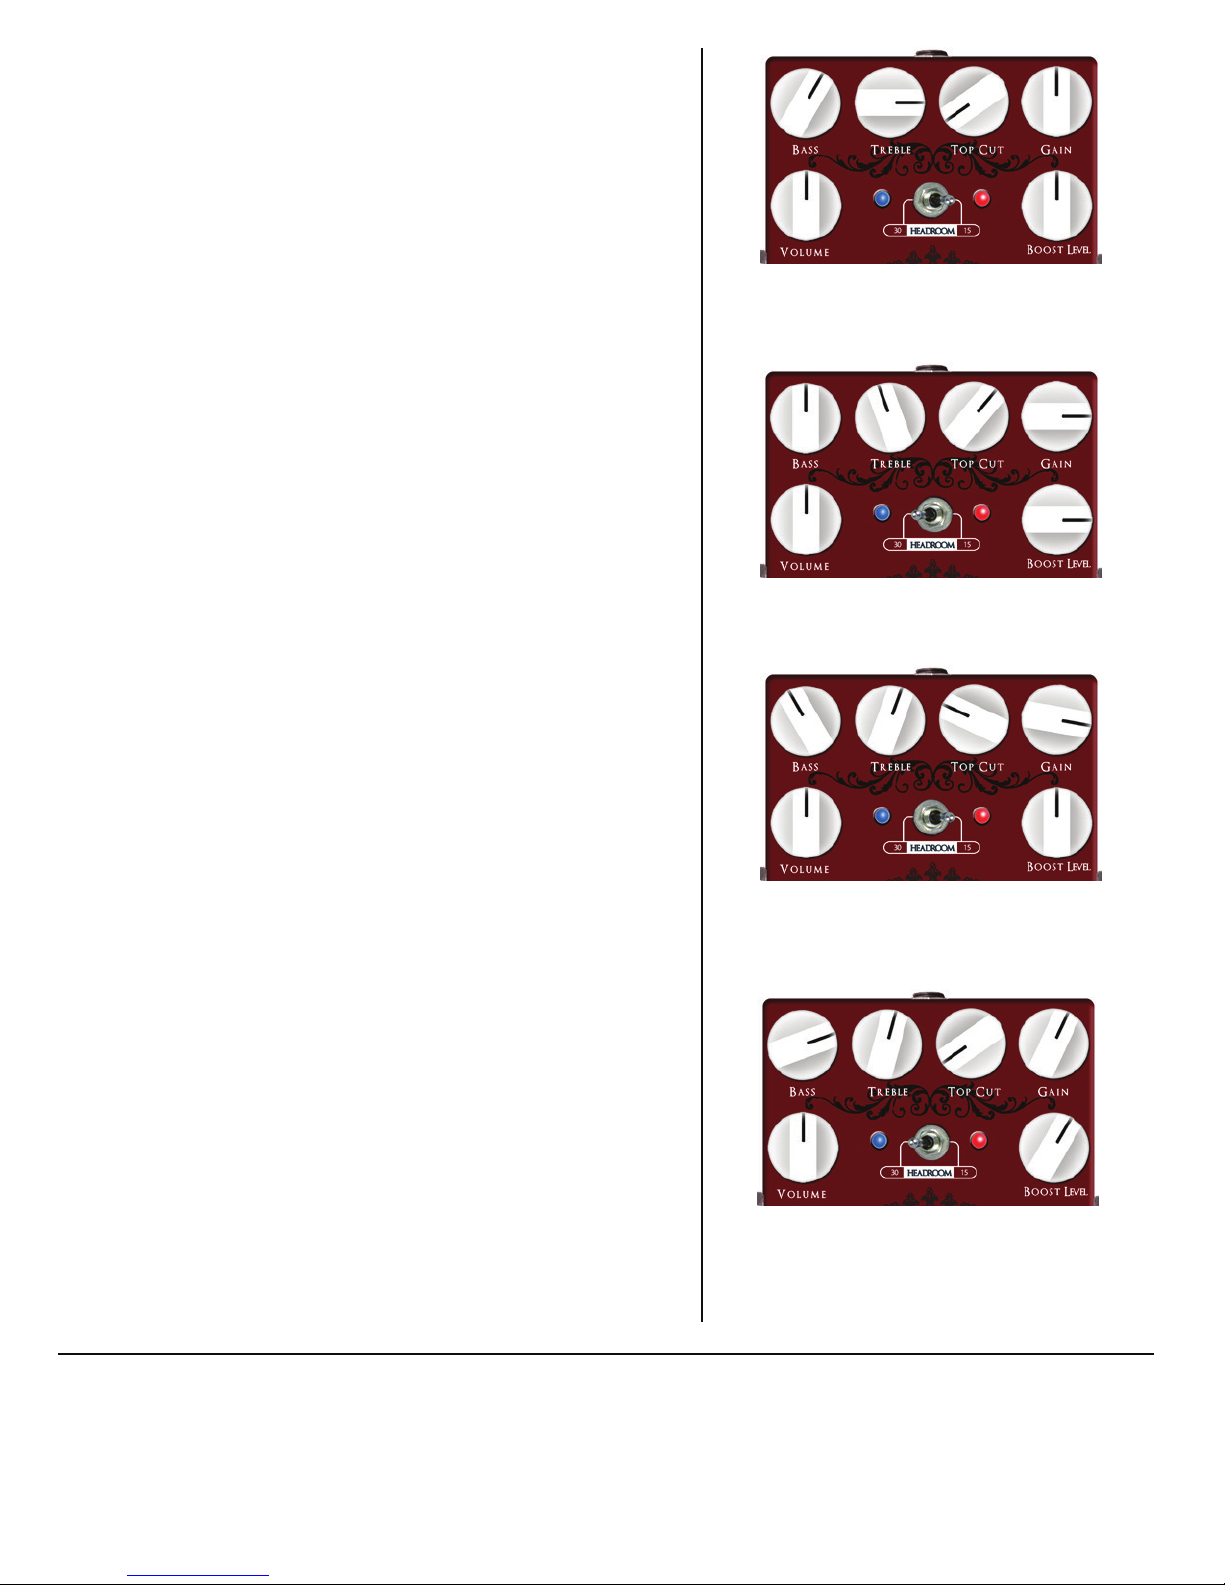
Bass – Adjusts the amount of bass applied to the eected signal. If you are
using an “S style”single coil guitar rather than a humbucker loaded
instrument, you may nd you need more bass to“fatten” up the tone.
When in the fully counterclockwise position, the tone will be much
thinner and brighter and when fully clockwise it will be fuller, darker and
heavier around the low end.
Treble – Works in the same way as the bass knob but controls the amount
of treble on the eected signal. Again, fully counterclockwise the treble is
reduced considerably and clockwise brings it forward. You may have to
tweak both the treble and bass controls simultaneously to nd your sweet
spot.
Top Cut – Just like the original ampliers that inspired this pedal, the top
boost can be used to tame some of the high end; by denition this pedal
is very bright. With that said, if you have a bright sounding amp/guitar you
may need to adjust accordingly to compensate for some of the high
tones. When the knob is fully counterclockwise the entire range of highs is
allowed through. As you turn the knob clockwise the highs are cut more.
Gain – Increases the amount of overdrive produced by the pedal. When
fully counterclockwise there is no additional gain applied. As the gain
knob is turned clockwise, the amount of gain correspondingly increases.
This control works very closely with the “headroom”switch. You will notice
more of a pronounced midrange hump as the gain is increased. This eect
is extremely accurate to the sound of how the original amps reacted/
sounded when being driven!
Volume - Adjusts the output volume of the eected signal. Fully counter-
clockwise is “o ” and clockwise is considered to be “wide open”!
Boost Level - Adjusts the amount of volume that is applied before the
main gain circuits. Like the volume control, counterclockwise is “o ” and
clockwise is “full”. When the main pedal is not activated, this will act as an
independent Class-A booster.
Headroom - Gain stage control. When in the “30” position, there is more
headroom and the pedal takes longer across the gain control sweep to
reach a saturated overdrive. This gives you a broader range of clean and
lightly overdriven tones. When in the“15”position, the headroom is much
lower and the overdrive arrives much quicker; this gives you the greater
option of overdriven tones. Just keep in mind that the gain knob should
be used in conjunction with this control!
Power Requirements
The pedal can be powered by a 9V battery. The battery terminal is located inside the pedal. If
using a power supply, power needed for the pedal is 9V DC, regulated, center pin negative, as
supplied by most standard Boss™/Ibanez™/Etc. supplies. The pedal can be safely powered with a
multi-supply, like the Visual Sound 1SPOT™. The pedal was designed explicitly around the usage
of a 9V DC power source, and is intended to sound its best at 9V. To avoid damage to the pedal,
do not exceed 9V DC, do not use center pin positive adapters, and do not use AC power. Using an
incorrect power adapter can lead to damage and will void the warranty on the pedal. This pedal
draws 13mA.
Please note: If you are using a battery, it will drain when the input cord is plugged in.
Return and Warranty Policy
For direct sales, there is a 7-day “no questions asked” period where you may return the pedal for any reason, provided that it is in its original condition. Please retain
all packaging within this period in case you decide to return it! We only require that you pay shipping back. The 7 days start when you receive the pedal. This does
not apply to dealer or retailer sales – see their individual return policies for specic information.
All Wampler Pedals, Inc. pedals carry a 5-year, fully transferable warranty that covers defects due to parts and labor. The warranty begins at the point of purchase.
Please remember to register your pedal as soon as possible after purchase at the following web page to ensure quicker service if you should ever need to make a
warranty claim: www.wamplerpedals.com/warranty_registration
For warranty repairs or questions, please feel free to contact us at www.wamplerpedals.com/contact_us.html
Chimey, alive and crystal clear. The pop band to end all pop
bands. Boost OFF, volume to suit (to give it“Shadow”, increase
cut to around“3pm”.
A Shadow of the Fab Four
May your tone be Regal.
A punchy overdriven tone, heard on classic studio album
from one of the biggest bands of the 70’s, 80’s and 90’s. Boost
ON, volume to suit.
Let’s get Petty
If you want to be a Heartbreaker, you need the tone. Boost
OFF, volume to suit. (dependent on your guitar, you may need
to increase the“Top Cut” a touch.
Edgy Bloody Sunday (live).
Percusive and full of attack, just the right amount of grit,
compression and brightness to cut the guitars through any mix
without any delay. Boost ON, volume to suit (for studio tones,
turn the boost o).
Suggested Settings
Any trademarks attributed that are not owned by Wampler Pedals, Inc. are for
demonstrative purposes only, and are property of their respective owners

Other Wampler Music Pedal manuals

Wampler Black '65 Vintage Overdrive User manual

Wampler

Wampler Black '65 Vintage Overdrive User manual

Wampler Pinnacle User manual

Wampler

Wampler Pinnacle User manual

Wampler Euphoria User manual

Wampler

Wampler Euphoria User manual

Wampler Plextortion. Distortion User manual

Wampler

Wampler Plextortion. Distortion User manual

Wampler Collective Triumph Overdrive User manual

Wampler

Wampler Collective Triumph Overdrive User manual

Wampler ANDY WOOD GEARBOX User manual

Wampler

Wampler ANDY WOOD GEARBOX User manual

Wampler Ethereal User manual

Wampler

Wampler Ethereal User manual

Wampler TERRAFORM User manual

Wampler

Wampler TERRAFORM User manual

Wampler Plexi-Drive User manual

Wampler

Wampler Plexi-Drive User manual

Wampler Faux AnalogEcho User manual

Wampler

Wampler Faux AnalogEcho User manual

Wampler FAUX Spring REVERB User manual

Wampler

Wampler FAUX Spring REVERB User manual

Wampler Clarksdale Delta Overdrive User manual

Wampler

Wampler Clarksdale Delta Overdrive User manual

Wampler Velvet Fuzz User manual

Wampler

Wampler Velvet Fuzz User manual

Wampler cataPulp User manual

Wampler

Wampler cataPulp User manual

Wampler Tweed '57 Original Tone User manual

Wampler

Wampler Tweed '57 Original Tone User manual

Wampler METAVERSE User manual

Wampler

Wampler METAVERSE User manual

Wampler decibel+ User manual

Wampler

Wampler decibel+ User manual

Wampler Faux Spring Reverb User manual

Wampler

Wampler Faux Spring Reverb User manual

Wampler SLOstortion User manual

Wampler

Wampler SLOstortion User manual

Wampler Sovereign Distortion User manual

Wampler

Wampler Sovereign Distortion User manual

Wampler TERRAFORM User manual

Wampler

Wampler TERRAFORM User manual

Wampler The Paisley Drive User manual

Wampler

Wampler The Paisley Drive User manual

Wampler Faux Tape Echo User manual

Wampler

Wampler Faux Tape Echo User manual

Wampler PANTHEON DELUXE User manual

Wampler

Wampler PANTHEON DELUXE User manual

Popular Music Pedal manuals by other brands

Zoom 506II Bass Operation manual

Zoom

Zoom 506II Bass Operation manual

Dunlop MXR Phase 45 Operation manual

Dunlop

Dunlop MXR Phase 45 Operation manual

Costalab DUAL DRIVE quick start guide

Costalab

Costalab DUAL DRIVE quick start guide

Rocktron Reaction Compressor instruction manual

Rocktron

Rocktron Reaction Compressor instruction manual

pigtronix DISNORTION user guide

pigtronix

pigtronix DISNORTION user guide

FuzzDog GimpFX Ultr-Fk manual

FuzzDog

FuzzDog GimpFX Ultr-Fk manual

Yamaha FC900 operating manual

Yamaha

Yamaha FC900 operating manual

Darkglass Electronics Super Intelligent Footswitch user manual

Darkglass Electronics

Darkglass Electronics Super Intelligent Footswitch user manual

Vox Pedal owner's manual

Vox

Vox Pedal owner's manual

Zeppelin Design Labs QUAVERATO Assembly instructions

Zeppelin Design Labs

Zeppelin Design Labs QUAVERATO Assembly instructions

Servus Pedale GLAM manual

Servus Pedale

Servus Pedale GLAM manual

Mod PERSUADER DELUXE manual

Mod

Mod PERSUADER DELUXE manual

TC Electronic ND-I user manual

TC Electronic

TC Electronic ND-I user manual

Alexander F-13 Neo Flanger manual

Alexander

Alexander F-13 Neo Flanger manual

REVV G8 Noise Gate quick start guide

REVV

REVV G8 Noise Gate quick start guide

MORLEY PARTLIST manual

MORLEY

MORLEY PARTLIST manual

Iron Ether Oxide owner's manual

Iron Ether

Iron Ether Oxide owner's manual

BYOC Vibrato BA662A instructions

BYOC

BYOC Vibrato BA662A instructions

manuals.online logo
manuals.online logoBrands
  • About & Mission
  • Contact us
  • Privacy Policy
  • Terms and Conditions

Copyright 2025 Manuals.Online. All Rights Reserved.