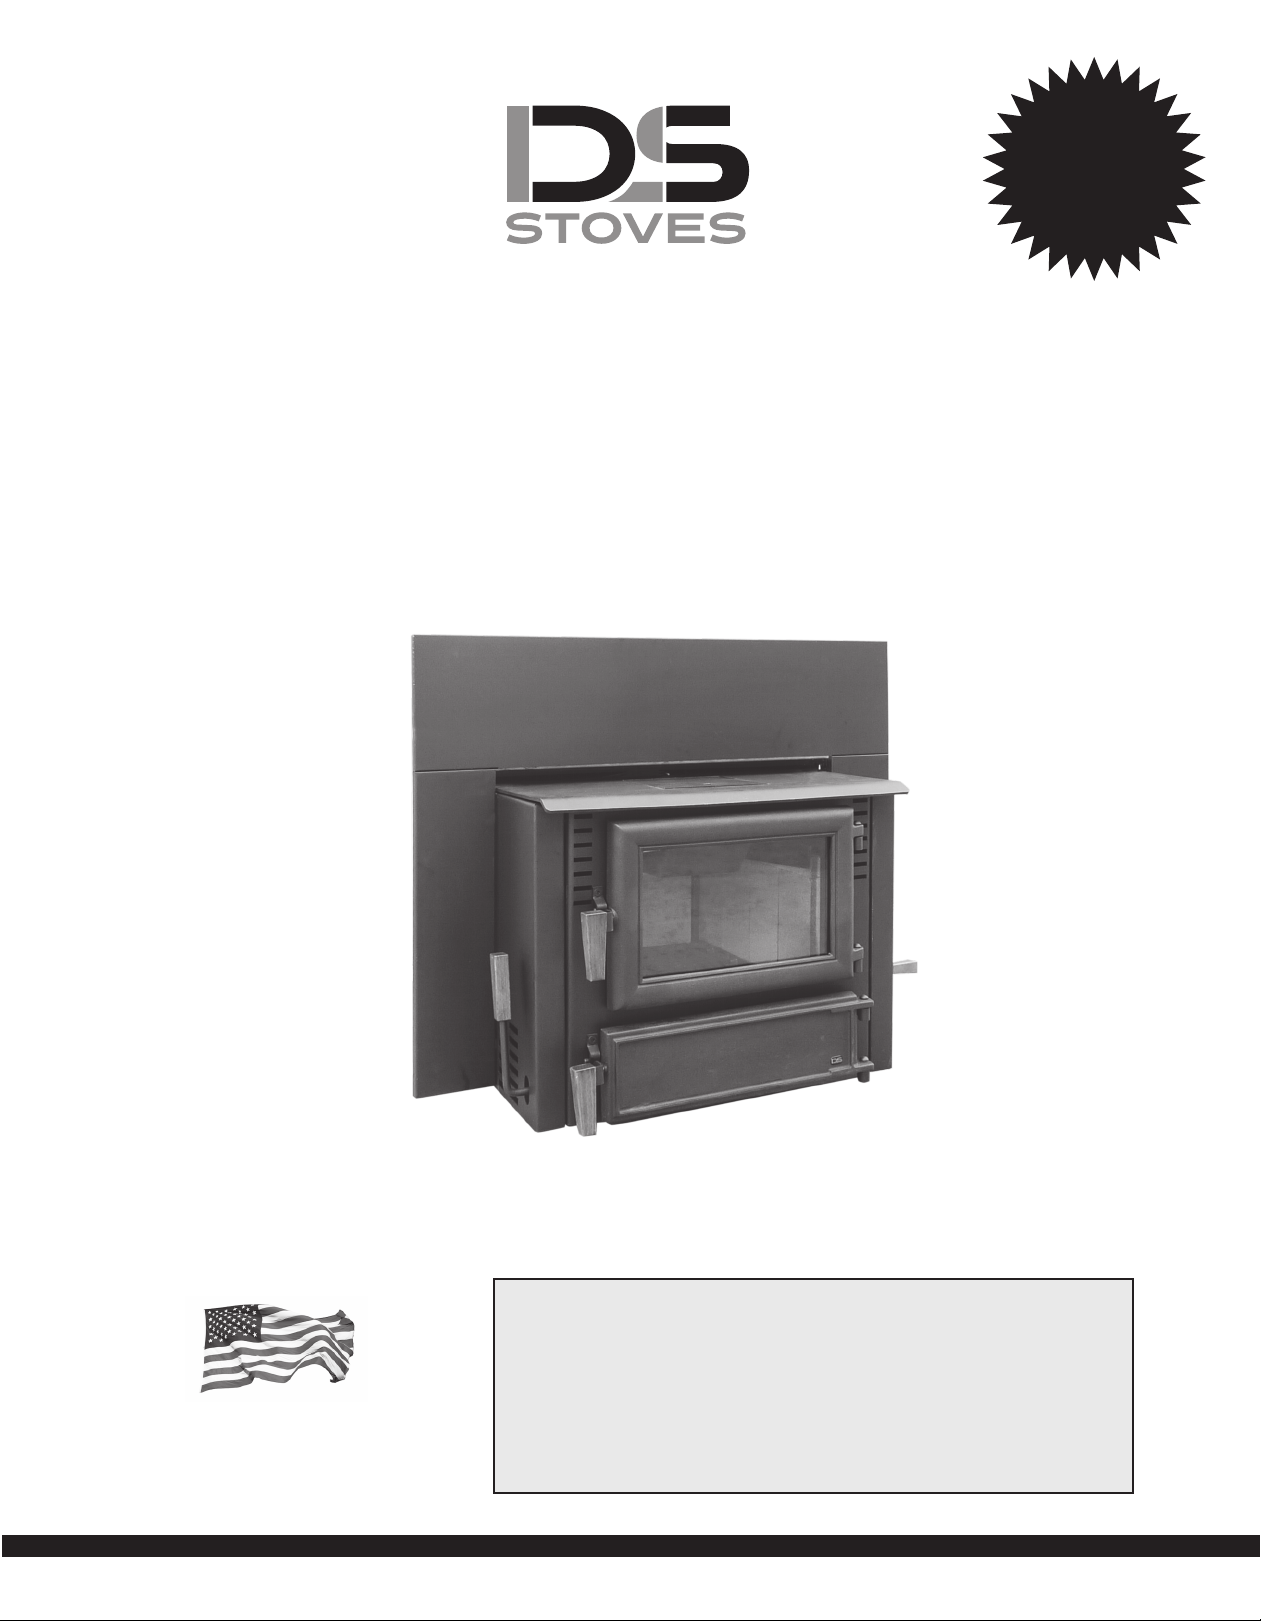
DS Stoves FP16 User manual

DS Firepla e Inser t
High Effi ien y Hopper Fed Coal Insert
OWNER’S MANUAL
Before you install or operate a DS
Firepla e Insert, you must:
- Read all instru tions arefully
- Install smoke and arbon monoxide
dete tors.
Do Not
Discard
This
Man al
Model FP16
This insert meets
Test Standards:
UL 1482 - ETLM 78-1
ULC S628
MADE IN USA
By
D.S. MACHINE SHOP

1. Read all instructions carefully before installing or operating any D.S. insert
2. You must install smoke an carbon monoxi e etectors before you install or operate any
insert. Check your local co es, this installation must comply with their rulings.
3. Do not open bottom door to increase draft. It is designed only to empty ashes.
4. Never leave insert doors open when unattended
5. Do not hook up a coal insert to an aluminum type B gas vent. Use a code approved Class A
chimney liner with a 6” diameter that is 20’ high, minimum.
6. On all new installs connecting to an existing chimney liner, a level 2 chimney inspection must be
done by a Certified Chimney Sweep.
7. Clean chimney before installing insert. If there is creosote attached to the liner you could create a
serious chimney fire.
8. Never leave children unsupervised when they are in same room as insert. Provide a sturdy barrier
to keep children and pets a safe distance from the insert, or they could get severely burned.
9. Keep insert area clear from all combustible materials, gasoline, and other flammable vapors
and liquids.
10. Do not operate insert with fuel load door or ash removal door open.
11. Check the clearance to combustible walls and floors as shown on the UL Listing plate.
12. Do not allow anyone who is unfamiliar with the insert to operate it.
13. Spend some time with your insert to become well acquainted with the different settings and how
each will affect its burning patterns. It is impossible to state just how each setting will affect your
insert because of variations in each installation, and chimney drafts.
14. Be extremely careful when removing the ash pan. It can get very hot!
15. Do not install this insert in a mobile home or trailer.
16. Fasten chimney liner adapter to insert with at least 3 screws.
17. If this insert is installed in a factory built fireplace then fireplace must be listed per UL 127
or ULC S610.
Safety Instr ctions
2
Starting a Fire
1. When starting a fire, set hot air regulator and air wash to medium. Located at right side of Insert.
2. Open fire door and place wads of crushed paper in the firebox. Turn on blower, setting should be
on high. NOTE: Never turn blower off while insert is in operation.
3. Put kindling on top of paper. NOTE: You can also buy Fire Starter Gel or Bricks made by Rutland
Products. www.rutlandproduct.com Or use charcoal briquettes.
4. Ignite paper or fire starter product.
5. Leave fire door open slightly until the smoke clears out. DO NOT leave insert unattended with the fire
door open!
6. Once kindling is ignited add larger pieces of wood. After wood fire is well established add a 2” layer
of coal.
7. Once first layer of coal is glowing red add another 2” layer of coal. Repeat this until you have about
a 6” layer of glowing red coals. Don’t add too much coal at a time or you could smolder the fire. You
do not have an established fire until you have 6 inches of red coals on top of the grates.
8. If you have a coal hopper, you can now fill your hopper. The coal hopper holds approximately 20 lbs.
of coal, and has a burn time of 12-24 hours.
9. Once you have an established fire set your regulator,
blower, and air wash to meet your needs, and reload
coal as needed. You can add 30 lbs. or more coal per feeding. Adjust hot air regulator and air wash
together. When one is on low they should both be on low. When one is on high they should both be
on high. If you experience coal gas explosions turn air wash to high.
Operation Instructions
All D.S. Fireplaces must be installe by a NFI Certifie Technician

3
10. The insert is designed to burn coal at a predetermined firing rate. Over firing occurs when the ash
door is left open during operation or a highly volatile fuel, i.e. large amounts of small kindling is used.
11. Do not exceed 600odegrees on top of insert.
12. NOTE: Shake ashes every 12 hours if possible. You must keep your ashes cleaned out from under
the grates. This may require emptying your ash pit daily. If there is no air space under the grates, the
grates will warp and become inoperable.
13. Regularly check the fit on the load, hopper and ash doors. They must fit tightly. If it does not, check
for deterioration or wear of the ceramic rope seal. Replace defective seals.
14. Inspect and clean your chimney liner regularly.
15. In the event of a chimney fire, shut all draft controls off and call your fire department immediately.
Alert everyone in the house. If flue is still burning vigorously, throw baking soda into
firebox or discharge a fire extinguisher into fire box. After the chimney fire is over, have a certified
chimney sweep complete a level 2 chimney inspection before farther use of your chimney.
16. With new steel there is a small amount of oil or dirt on the metal. You may smell an odor. This is
normal during the first operation. You may want to assemble the insert out of doors and build a
small fire in it to “BURN OFF” this dirt and oil before installing unit.
17. Equip your home with fire extinguishers, carbon monoxide and smoke detectors.
18. Do not burn garbage, gasoline or any other flammable liquids in this insert.
19. Do not burn insert over 600oF or warranty will be void!
Fireplace Insert Annual Maintenance - After every burn season
1. Clean out firebox and ash pan area after each heating season.
2. Replace any cracked or broken firebrick! (very important) If this is not followed your insert is at risk
for warping and may void your warranty.
3. Take out coal hopper, remove baffle insulation and reburn baffles. Clean them with vacuum
cleaner or blow gun. Once cleaned everything can be reinstalled back into insert.
4. Check grates and shaker handle for wear or warping and replace if necessary. Check for any
loose hardware on doors, door latches and shaker handle, tighten or replace as needed. Check
all gaskets on window glass, hopper, fire and ash doors for deterioration or tears, replace where
necessary. Also check seal of doors by closing doors on a piece of paper. If you can move the
piece of paper between door frame and gasket, replace door gasket.
5. Clean inside of chimney liner at least once annually (in Spring). For longer life oil inside of liner
with vegetable oil.
Fireplace Insert Specifications - FP16
• Approx. BTU 105,000
• Heating Capacity (sq ft) 2000
• Fire Box Size (wxdxh) 16 x 18 x 11
• Fire Box Capacity 60 #
• Coal Hopper Capacity 20 #
• Approx. Coal Capacity w/Hopper 80 #
• Flue Size 6”
• Fire Door Gasket 62” of 3/4” Rope Gasket
• Ash Door Gasket 50” of 3/4” Rope Gasket
• Window Gasket 52” of 7/8” Window Gasket
• Fireplace Insert Weight 480 lbs

4
Locating Insert
Use a Class A stainless steel 6” diameter chimney liner that reaches to the top of your chimney. The
minimum height of a chimney system for the D.S. Fireplace Insert is 20 feet. The chimney must exceed
the roof of a house at a minimum of 3 feet at any point of exit. In a pitched roof installation the chimney
must be 2 feet higher than anything within a 10 foot radius of the chimney. It is important to have a
chimney draft of 0.06 water column. It is required to abide by the manufacturer’s instructions on Class A
chimneys as well as local building codes. It is not recommended to build a chimney on an addition that is
lower than the main part of your house. Never connect this unit to a chimney serving another appliance.
Should you have a problem with inadequate draft you should see page 11.
Chimney Req irements
Side View
CAUTION:
Keep furnishings and ther
c mbustible materials away
fr m the insert.
Liner Hookup To Insert
You will need to attach an appliance
adapter on the bottom end of your liner. Then
you can either put 3 screws in the exhaust
collar of the insert from the outside top of the
insert or from the inside of the firebox. To
access the exhaust collar from the inside of
the insert you will need to remove the coal
hopper and baffle.
10 feet
3 feet minimum
20 feet minimum
2 feet

Clearance Requirements
5
Fireplace Insert Chimney,
Clearance Requirements an
Specifications
1. Insert must be installed in and existing masonry
or factory built fireplace. aintaining all clearance to
combustibles.
2. Insert must be installed on a noncombustible
surface.
3. Locate and read clearance to combustibles in
manual before installing unit. The most important
consideration in installing your insert is adequate
clearance between the insert and any combustible
surface. An Insert that is located to close to a man-
tel, trim, furniture or any combustible materials may
cause a fire.
4. A noncombustible base must extent at least 16”
beyond front of insert and 8” beyond each side of
load and ash doors.
5. Do not connect this unit to a chimney flue serv-
icing other appliances. A “6” Class A” chimney liner
must extend from insert to top of chimney. It is rec-
ommended to wrap liner with foil faced insulation to
enhance performance of chimney.
Fireplace
Insert
Sidewall
Mantle
Trim
Minimum Clearances to
Combustible Materials
U it to Sidewall A - 10”
U it to Right Side Faci g B - 9”
U it to Left Side Faci g B - 9”
U it to Top Faci g C - 25”
U it to Ma tle D - 30”
Floor Protectio i Fro t of Door E - 16”
Floor Protectio each Side of Door F - 8”
Hot Air Regulator with Draft Intake
Chain A justment

6
Assembly Diagram
3 Studs
Surroun Instructions
1. Bolt surround top to sides using 4 - 1/4x 1/2bolts
and 4 – 1/4nuts. ake sure the hooks are turned
towards center.
2. Fasten sheet metal brackets to right and left side of
fireplace insert using 4 - #14 x 3/4screws. (do not
tighten)
3. Fasten surround attachment to top of insert (do not
tighten) using 3 - #14 x 3/4screws.
4. Attach surround to insert.
5. Determine the depth of your fireplace, and where
you want your insert placed. You have a 2”
adjustment, see page 10. Set surround accordingly
and tighten all screws. You may want to consider
putting card board or carpet on your hearth so you
can slide insert back into place with out scratching
hearth surface. Once fireplace is in position remove
card board or carpet.
Sides
Must turn
hooks
towards
center
Stud
Surround attachment
Sheet Metal Bracket

7
Assembly Diagram
Blower Instructions
On the front lower right corner you will find a speed con-
troller. This is where you can turn blower off and on or
choose the speed of your blower. NOTE: Never turn blow-
er off while insert is in operation.
If your blower needs serviced or replaced
there are two ways of accomplishing this.
Access through firebox.
• Clean out firebox.
• Remove two back brick on left side of firebox. Remove
back row of firebrick, 11 gauge SS heat shield and the
blanket insulation.
• Take the 12 bolts out of blower cover plate located at the
back of firebox. Pull blower right into the firebox.
Disconnect wiring and remove blower from insert.
Access from back of unit
• Remove blower access panel from back of unit.
• Remove 4 bolts that hold blower in place.
• Pull blower straight out the back of unit. Disconnect wiring
and remove blower from insert.
Blower Plate
Power cord can be left
or right side of insert.

8
Assembly Diagram
Front Loa ing Baffle Option
We have a front loading baffle as an option that can
be purchased separately.
1. You will need to remove hopper, baffle insulation
and baffles that were shipped with insert to install
front loading baffle.
2. To install front loading baffle you will want to stack
your three pieces of insulation on the right side
baffle piece that has the square stock welded to it.
Insulation belongs on top. Slide the right side baffle
with the insulation up and into the right side of
insert.
3. Now take left side baffle piece and slide it up in
beside right side baffle sliding your top return bend
over the square stock welded to the right side
baffle. This will interlock your right and left baffle
pieces.
4. Do not push baffle the whole way to the back of
insert yet.
5. Now slide your insulation across the
top from right to left. You should have
FP16 RBR
FP16-BBI
73/4x101/4
FP16 LBR
FP16 FLRBR
FP16 FLLBR
Hopper
three pieces of insulation beside each
other covering the top of the baffle.
Slide the top side of insulation under
return bend of baffle.
6. Push baffle back into position. ake
sure holes on bottom back corners of
baffle connect to square tubing at
back corners of firebox, this is very
important for the function of your
baffle.
Coal Hopper Standard Baffle Coal Hopper Standard Baffle Insulation
FP16-BSI / FP16BBI
Coal Hopper Front Loading Baffle Insulation
Coal Hopper Front Loading Baffle
FP16-BSI 51/2x 183/4

9
11/4 x 31/4x 81/4
Back
Left Side Right Side
11/4 x 11/4x 9
11/4 x 11/4x 9
Fire Brick List
8 pcs – 1-1/4 x 4-1/2 x 9 (sides bottom)
3 pcs – 1-1/4 x 4-1/2 x 8-1/4 (back)
2 pcs – 1-1/4 x 1-1/4 x 9 (sides top)
1 pc – 1-1/4 x 3-1/4 x 8-1/4 (back)
Assembly Instr ctions
Parts List – Fireplace Insert FP16
1-Right Side Sheet Metal . . . . . . . . . . . . . . . . . .FP16-RSS
1-Left Side Sheet Metal . . . . . . . . . . . . . . . . . . . .FP16-LSS
2-Surround Sides . . . . . . . . . . . . . . . . . . . . . . . . . .FP16-SSS
1-Surround Top . . . . . . . . . . . . . . . . . . . . . . . . . . .FP16-SST
2-Oversized Surround Sides (optional) . . . . .FP16-OSS
1-Oversized Surround Top (optional) . . . . . .FP16-OST
1-Back Sheet Metal . . . . . . . . . . . . . . . . . . . . . . . . .FP16-BS
1-Removable Coal Hopper (hopper only) . . . . . .FP-CH
1-Coal Hopper Door . . . . . . . . . . . . . . . . . . . . . . .FP16-HD
1-Right or Left Firebrick Angle . . . . . . . . . . . . . .FP16-FA
1-Ash Shaker Bar Assembly . . . . . . . . . . . . . . . . .FP-ASBA
4-Cast Iron 4” x 16” Grates . . . . . . . . . . . . . . . .4X16-C1G
2-Cast Iron Grate Rails for 2 – 4” grates . . . . . . . .44-GR
1-Cast Iron Fireplace Insert Fire Door . . . . . . . . . .X -FD
1-Cast Iron Ash Door 20” x 6” . . . . . . . . . . . . . . . . .20-AD
1 Ash Pan 15-1/2” wide x 21-1/2” long x 2-1/2”
deep . . . . . . . . . . . . . . . . . . . . . . . . . . . . .155-215-25AP
1-Hopper Steel Lever w/wood handle . . . .FP16-HDH
2-Wood Door Handles for re and ash doors X -WDH
1-Wood Shaker Bar Handle . . . . . . . . . . . . . . .X -05WH
2-Wood Handles for Air Wash and Hopper
door . . . . . . . . . . . . . . . . . . . . . . . . . . . . . . . . . .X -03WH
2-Metal Door Handle (re and ash doors) . . .X -FDH
2-Door Latches (re and ash doors) . . . . . . . . . . .X -DL
1-62” 3/4” Rope Gasket (re door) . . . . . . . . . . . .34-GR
1-50” 3/4” Rope Gasket (ash door) . . . . . . . . . . . .34-GR
1-29” 5/8” Rope Gasket (hopper door) . . . . . . . . .58-GR
1-Fire Door Glass . . . . . . . . . . . . . . . . . . . . . . . . . . . . .X -GL
1-Blower . . . . . . . . . . . . . . . . . . . . . . . . . . . .RB-312 Blower
1-9 Foot Power Cord . . . . . . . . . . . . . . . . . . . . . . . . .KK9SC
1-Left Baffle Re-burn . . . . . . . . . . . . . . . . . . . . . .FP16-LBR
1-Right Baffle Re-burn . . . . . . . . . . . . . . . . . . . . .FP16-RBR
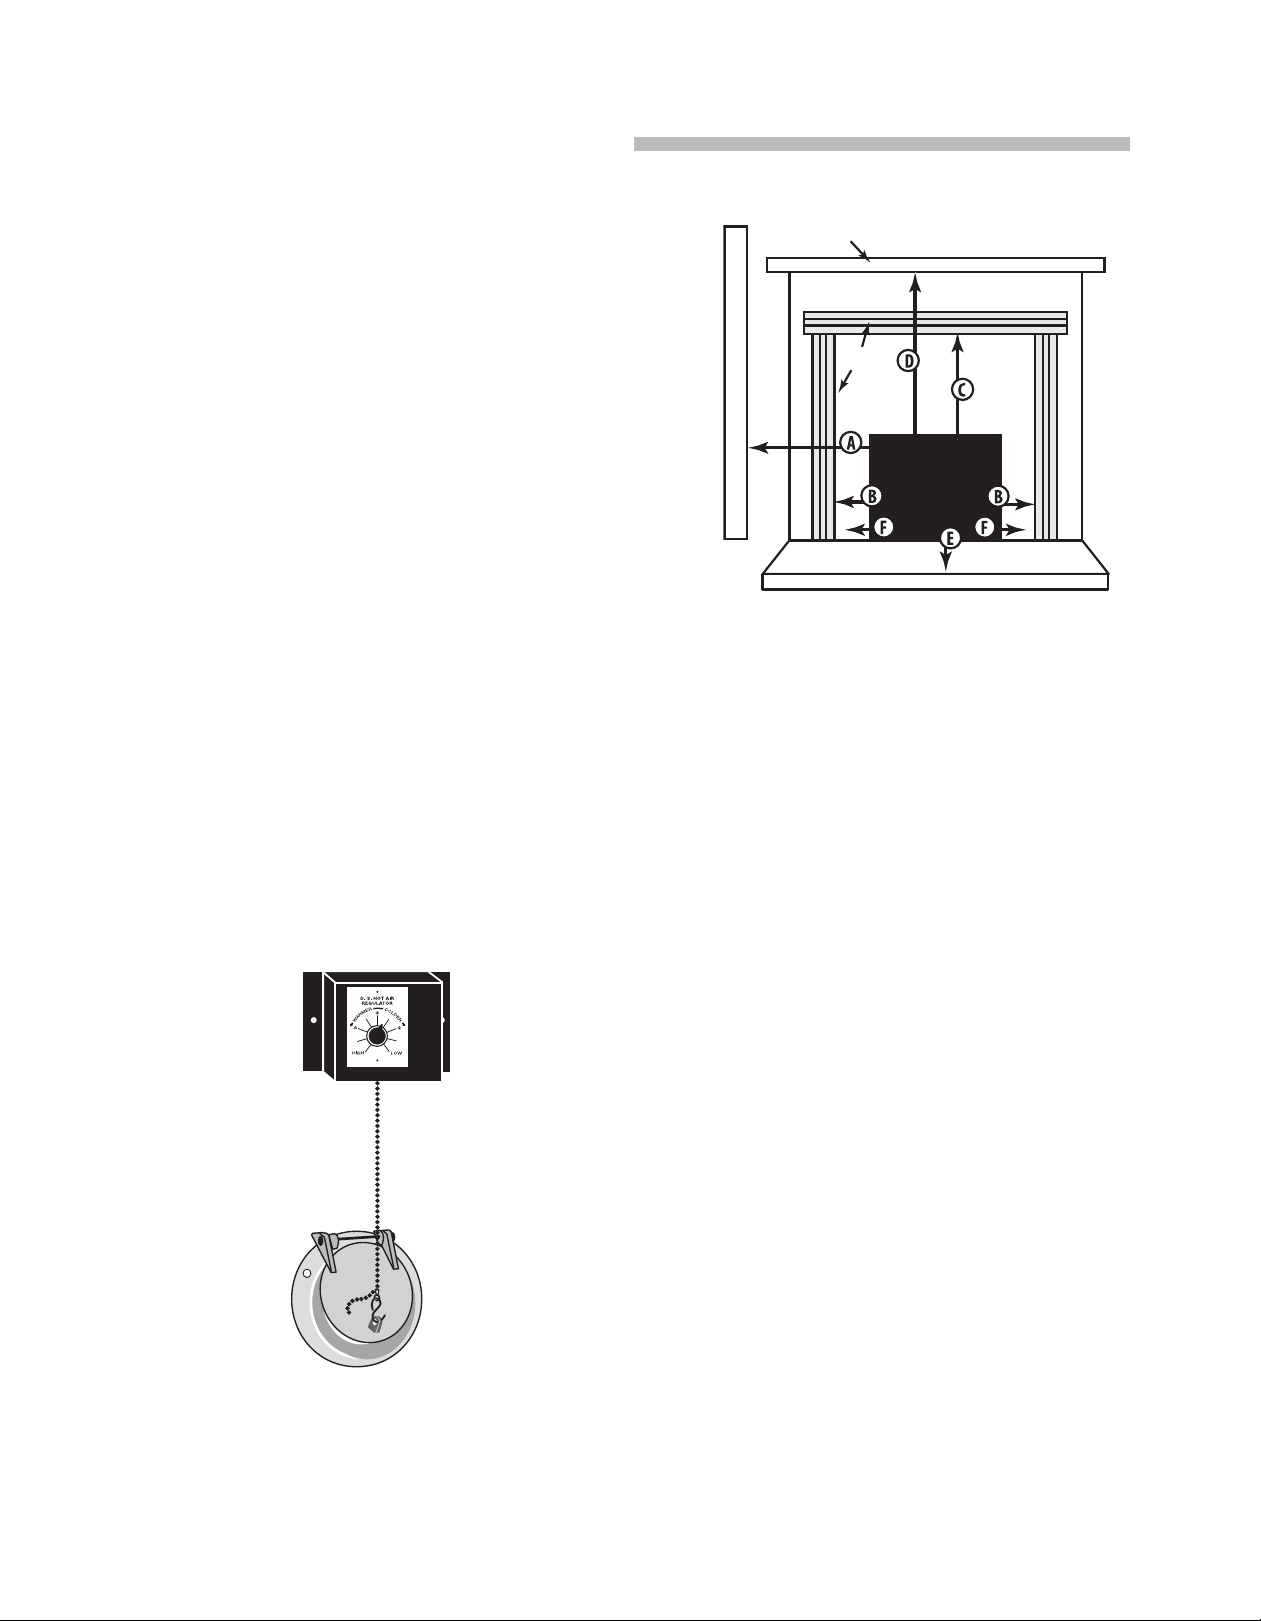
1-Hot Air Regulator . . . . . . . . . . . . . . . . . . . . . .FP16-HAR
1-Hot Air Regulator Chain . . . . . . . . . . . . .Hot A-Chain
1-Hot Air Regulator Fittings . . . . . . . . . .Hot A-Fittings
1-Hot Air Regulator Knob . . . . . . . . . . . . . .Hot-A-Knob
1-Draft Cover Plate . . . . . . . . . . . . . . . . . . . . . . .FP16-DCP
1-Draft Intake Cover Lid . . . . . . . . . . . . . . . . . . .FP16-DIC
1-Back Baffle Insulation (for top back of
re-burn baffle) . . . . . . . . . . . . . . . . . . . . . . . . .FP16-BBI
2-Side Baffle Insulation (for top sides of
re-burn baffles) . . . . . . . . . . . . . . . . . . . . . . . .FP16-BSI
1-Ash Pan Back Insulation
(for behind ash pan) . . . . . . . . . . . . . . . . . .FP16-APBI
1-Firebox Back Insulation
(blanket insulation) . . . . . . . . . . . . . . . . . . . .FP16-FBI
1-Firebrick Heat Deector
(11ga.SS 8-1/4 x 16-1/4 . . . . . . . . . . . . . .FP16-FBHD
1-Blower Speed Controller . . . . . . . . . . . . . . . .FAB-1100
11/4 x 41/2x 81/4
4 - 11/4 x 41/2x 9 4 - 11/4 x 41/2x 9

10
FP16 Meas rements
Oversized surround - 46” wide x 34” high
42”
30”
8.25” c
17” minimum
19” maximum
27.5”
30.75”
24”
8.25” c
/
/
30”
24.5”
27.5”
30.75”
Top View
Right Si e View
Front View

11
Problem 1 - Ina equate heat being elivere to your home,
Solution:
- Check home insulation – is it adequate?
- You might have poor circulation. For example, If your insert is in the basement and it is
warmer there than the first floor, put in a few floor vents to help move the hot air to where
it’s needed. See page 4
- If you have hot air regulator set at High and insert does not heat properly, shorten chain
one or more notches (see page 5). DO NOT exceed 600oF on top of insert. Overheating will
damage insert.
- Do you have a good draft of 0.06 water column. (Can be checked by a certified chimney sweep)
- If not, check and clean chimney.
- Is blower turned to high?
Problem 2 - Insert burns too hot
- Turn Hot Air Regulator to low. If it does not burn low enough, lengthen chain one or more notches at
draft intake (see page 4)
- Check gasket in Bottom Ash Door (replace if needed). Ash door must be sealed.
- Put Air Wash on Low.
Problem 3 - Poor raft
- Check and clean chimney liner
- Check chimney draft – there should be 0.06 inches of water column. This service is provided by a
certified chimney sweep.
- Check ash pit. If it is too full - empty it.
- There might be a cracked chimney liner. If so you need to reline chimney before further use of
insert.
- ake sure no other fuel burning devices are connected to the chimney impairing the draft.
- Check chimney for possible down draft caused by taller surrounding trees or objects.
Problem 4 - O or from first fire
- Uncured paints and oils will create an odor that can last a few hours. Odors can continue to develop
if you make hot fires until the paint cures.
Problem 5 - Coal gas explosions
- Oiled or wet coal could make matters worse. Coal gas explosions come from lack of oxygen, or lack
of secondary air. Set air wash on high.
Problem 6 - Blower oes not run
- Is blower plugged in?
- Is speed controller turned on?
- Did fireplace overheat?
- If fireplace top temperature exceedes 600 degrees fahrenheit it is considered to be overheating.
Blower in back of fireplace insert has a built in safety that shuts blower down when it overheats.
If this happens you will need to turn blower off and let fireplace insert cool down, and turn blower
back on after it has cooled down. If blower does not run, check capacitor located right
side panel.
Trouble Shooting

L I M I T E D W A R R A N T Y
DS Fireplace Insert
High Effiency Hopper Fed Coal Insert
Please read this warranty carefully!
D.S. Stoves warrants this Fireplace Insert against premature failure of any component
due to workmanship quality or materials. So long as it is owned by the original purchaser,
subject to terms, limitations and conditions herein set out. Soft coal is prohibite in any
DS Fireplace Insert. This warranty is voi if Soft Coal is burne in this unit.
Time Perio
1 - Firebox Five Years
2 - All doors - (fire and ash door) Five Years
3 - Cast Iron Components (grates and grate rails) Five Years
4 – All Electrical Components One Years
D.S. Stoves door glass, gaskets, paint or enameled parts, firebrick, and furnace cement
are not covered by this Limited Warranty.
D.S. Stoves will replace, at no charge to the owner, any defective part which D.S. Stoves
determines affects the operation of the insert.
The owner is responsible for labor and costs to complete the repair. The owner may at
his option and with D.S. Stoves approval, have the insert shipped to the factory for repair.
All labor and material costs for repair at the factory will be borne by D.S. Stoves.
The owner is responsible for all shipping costs.
Failure to follow installation and basic operation recommendations written in this manual,
negligence, abuse modifications to the insert or over firing 600oF maximum, as
determined by D.S. Stoves or its authorized dealers. Will also void warranty.
U.S. Environmental Protection Agency. This Heater is ONLY for burning coal. Use of other
Solid Fuel except for coal ignition purposes is a violation of Federal Law.
This Limited Warranty is in lieu of all other warranties either expressed or implied.
D.S. Stoves is not responsible for accidents due to improper installation or failure to follow
instructions.
– D.S. Stoves
238-B Old Leacock Road
Gordonville, PA 17529
717-768-3853
DSFireplaceInsert05202019
Table of contents
Popular Indoor Fireplace manuals by other brands

Glow Fire
Glow Fire Schiller Assembly instructions

Mendip Stoves
Mendip Stoves Christon 550 insert Operation and installation manual

Kingsman
Kingsman MQRB4436 installation instructions

Regency
Regency Classic I1200S Owners & installation manual

Montigo
Montigo C34-DV instructions

Temco
Temco TBREF36 Homeowner's installation & operating manual

Heatilator
Heatilator GDST5244I owner's manual

LOHBERGER
LOHBERGER COOK ME Operating manual with installation instructions

Superior
Superior VRT2536WS Installation and operation instructions

Monessen Hearth
Monessen Hearth Lo-Rider Vent Free Firebox LCUF32-R Product specifications

Dimplex
Dimplex DF2624L manual

Valor
Valor LT2 2700K manual