Dual NavAtlas XNAV3550 User manual


Preface . . . . . . . . . . . . . . . . . . . . . . . . . . . . . . . . . . . . . . . . . . . . . .
Safety Information/Precautions . . . . . . . . . . . . . . . . . . . . . . . . . .
Introduction . . . . . . . . . . . . . . . . . . . . . . . . . . . . . . . . . . . . . . . . . .
Package Contents . . . . . . . . . . . . . . . . . . . . . . . . . . . . . . . . . . . . .
Control Locations . . . . . . . . . . . . . . . . . . . . . . . . . . . . . . . . . . . . . .
Getting Started . . . . . . . . . . . . . . . . . . . . . . . . . . . . . . . . . . . . . . . .
Main Menu Screen . . . . . . . . . . . . . . . . . . . . . . . . . . . . . . . . . . . . .
Maps . . . . . . . . . . . . . . . . . . . . . . . . . . . . . . . . . . . . . . . . . . . . . . . .
Transferring Files . . . . . . . . . . . . . . . . . . . . . . . . . . . . . . . . . . . . .
Before You Navigate . . . . . . . . . . . . . . . . . . . . . . . . . . . . . . . . . . . . .
Initial Startup . . . . . . . . . . . . . . . . . . . . . . . . . . . . . . . . . . . . . . . . .
Main Navigation Screen Buttons . . . . . . . . . . . . . . . . . . . . . . . . .
Basic Settings . . . . . . . . . . . . . . . . . . . . . . . . . . . . . . . . . . . . . . . .
Entering an Address . . . . . . . . . . . . . . . . . . . . . . . . . . . . . . . . . . .
Selecting Points of Interest Nearby . . . . . . . . . . . . . . . . . . . . . . .
Selecting Points of Interest by City . . . . . . . . . . . . . . . . . . . . . . . .
Starting Navigation . . . . . . . . . . . . . . . . . . . . . . . . . . . . . . . . . . . .
Map Buttons . . . . . . . . . . . . . . . . . . . . . . . . . . . . . . . . . . . . . . . . . .
Map Display in Navigation Mode . . . . . . . . . . . . . . . . . . . . . . . . . .
Battery Information . . . . . . . . . . . . . . . . . . . . . . . . . . . . . . . . . . . .
Specifications . . . . . . . . . . . . . . . . . . . . . . . . . . . . . . . . . . . . . . . . . . . . . . .
Warranty . . . . . . . . . . . . . . . . . . . . . . . . . . . . . . . . . . . . . . . . . . . . .
1
2
3
4
5
6
7
12
13
14
15
16
20
23
24
25
26
27
30
31
32
33
Page

The XNAV3550 combines state-of-the-art turn-by-turn navigation with a built-in multimedia
player. Before operating, take a few minutes to review the safety and operating instructions in
this Quick Start Guide so you can quickly and safely become familiar with its many features.
This Quick Start Guide explains the system functions, and provides details on:
• Safety information
• Control locations
• Setting up the unit
• Multimedia functions
• Basic navigation functions
• System preferences
For detailed navigation functions and operation, please visit our website at www.dualav.com.
This unit includes an internal lithium-polymer battery, and should be fully charged prior to
first operation. Refer to page 6 to charge the unit for first time use.
Illustrations used throughout this manual may differ from the actual device.
When turned on for the first time (or if the unit has been idle for several days, or been moved
more than 250 miles while turned off), it can take several minutes to acquire a GPS signal.
If no GPS signals are received after several minutes, please reset the GPS in the SETTINGS
menu. Refer to page 11 for more details.
POWER

WARNING! PLEASE READ AND FOLLOW THE FOLLOWING SAFETY PRECAUTIONS. FAILURE
TO FOLLOW THE INSTRUCTIONS BELOW MAY INCREASE YOUR RISK OF COLLISION,
PERSONAL INJURY OR DEATH.
The warning screen is displayed each time the Navi Icon is selected as a reminder to make
use of the system’s navigational aids in a safe manner. Before using the XNAV3550, read this
entire Quick Start Guide. Make sure that you are familiar with the features and know how to
operate the system.
Proper use of the XNAV3550 includes the following guidelines: The navigation system is not
a substitute for your personal judgment. The route suggestions should never supersede any
local traffic regulation or your personal judgment and /or knowledge of safe driving practices.
Prior to completing any maneuvers suggested by your navigation system (for example, a
U-turn or a left turn), verify that you can legally and safely complete the maneuver. Do not
follow route suggestions if they direct you to perform an unsafe or illegal maneuver, would
place you in an unsafe situation, or would route you into an area that you consider unsafe.
Glance at the screen only when necessary and safe to do so. Let the voice guide you. If
prolonged viewing is necessary, pull off the road to a safe location.
The database may not include all emergency service providers. Use your own best judgment
and ask for directions in these situations. If the vehicle is in motion, only a passenger should
program the unit. The driver should not program the unit unless the vehicle is parked in a
safe location. The map database provides information on suggested routes without regard
to factors that may affect your driving experience or the time required to arrive at your
destination. For example, the system does not reflect road detours, closures or construction,
some road characteristics (e.g., road surface, slope or grade, weight or height restrictions,
etc.), temporary traffic congestion, weather conditions, and similar factors.

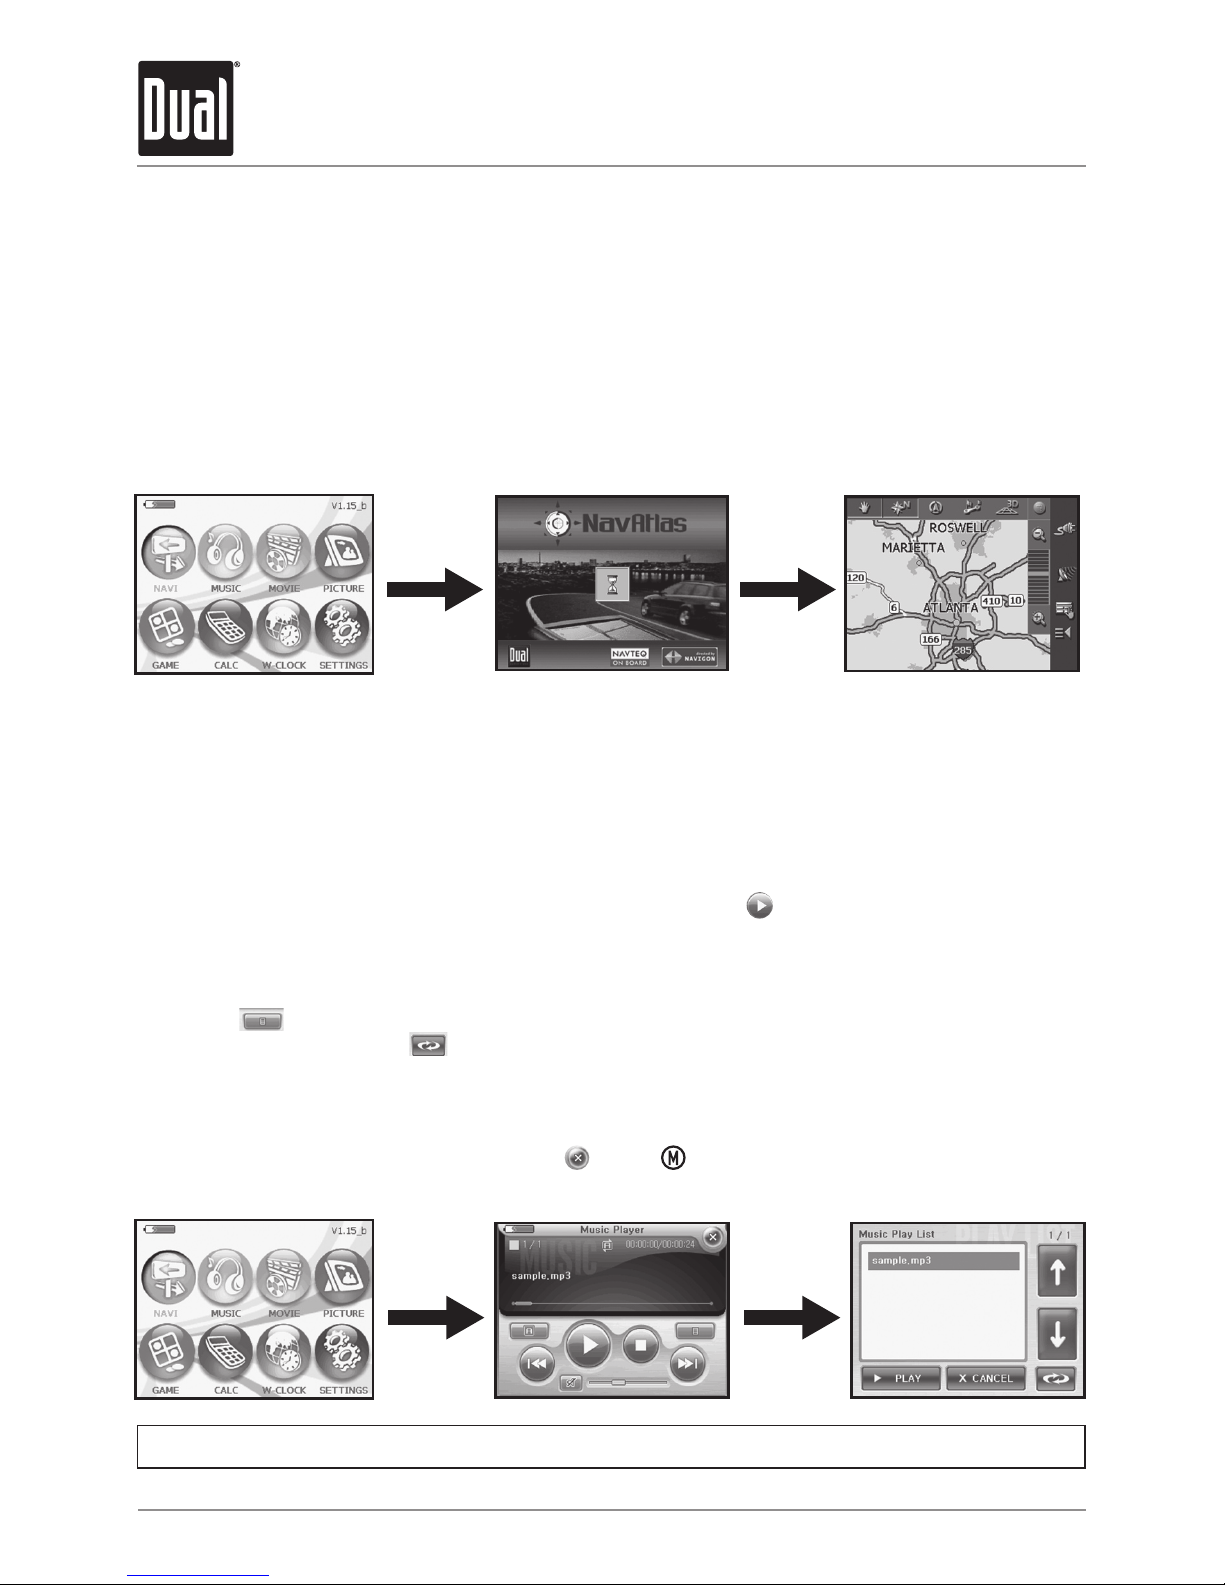
As you travel, your navigation system functions as your copilot, providing turn-by-turn visual
and voice assistance to direct you to your selected destination. Because the system knows
where you are and where you want to go, it can quickly calculate step-by-step directions that
provide a route to any destination available on the included navigation map. The map includes
millions of roadway and mapping destinations, and pre-programmed point of interest (POI)
locations in several different categories. Simply enter your desired destination into your
navigation system, and its advanced intelligence does the rest.
With your navigation system, if you deviate from the planned route, the navigation system will
automatically recalculate the route to determine a new one from your current location.
The navigation system uses Global Positioning System (GPS) satellites, and a digital roadway
map database to calculate and display travel directions. The system’s GPS antenna receives
signals from a constellation of 24 satellites orbiting the earth and uses the strongest of
signals to determine your position within 10 ~ 200 meters (depending on circumstances). The
navigation system’s sophisticated software provides the highly accurate positioning necessary
to provide real-time, accurate, turn-by-turn route guidance.
The navigation system’s computer considers vehicle speed and heading changes, together
with longitude and latitude information, to accurately determine vehicle heading and
position on a digital map. This information is relayed to you as you proceed to your selected
destination through audible suggestions, turn symbols, and the on-screen map.
Signals from GPS satellites are used to determine the vehicle location. Three (good) or four
(best) satellites must be received to accurately determine location. The GPS reception status is
indicated by the GPS satellite indicator on the map. See the GPS indicator section on page 17
for more information.
The map database used by your navigation system was created using high-resolution aerial
and land based data collection and is stored on a memory card. This data is enhanced with
useful travel information and approximately two million points of interest locations in several
different categories, such as tourist attractions, gas stations, airports, and restaurants.
While the database was judged to be as accurate as possible at the time of its release, a
map database can never be 100% accurate. Road information that is maintained in the map
databases, such as turn restrictions or road names, may change over time. In addition,
points of interests, such as restaurants, hotels, and gas stations, also change over time. The
complexity of keeping this directory current means that some information may be missing or
out-of-date at times.

VERSION 1.0
XNAV3550
QUICK START GUIDE
XNAV3550
PORTABLE GPS NAVIGATION SYSTEM

3
2
1
5
2
42 2
1
3
1Main Menu Button
Left/Right Turn Indicators
Display On/Off
Zoom In
Zoom Out
2
3
4
5
1Stylus Slot
Speakers
Docking Mount
SD Card Slot
2
3
4
4
1
3
2
1
1GPS Antenna
Audio Out
Power On/Off
2
3
1Volume
12VDC Input
2
2

Your device has an SD card slot located in the bottom of the unit. Digital maps and other data
including MP3 files, AVI files and image files can be added. To install the memory card, insert
it with the contacts pointing up into the slot, and the label facing the front of the device. To
remove the card, power off the unit, slightly push in on the card to release it, then pull it out of
the slot.
1. First, clean the surface
of the suction cup and
windshield. Push the
center of the suction cup
firmly onto the windshield,
then press the suction
lever down. Note: The
suction cup adhesion is
affected by high and low
temperatures.
3. Connect the supplied
DC power adapter to the
12VDC connector located
on the right side of the
unit. Plug the other end
into a standard vehicle
cigarette outlet to charge
the internal battery.
2. Insert mounting tabs into
the bottom of unit. Squeeze
the left and right latches
on the sides of the mount.
Push the mount against
the unit and release the
latches to engage.

Press button to turn the unit on. The main menu will appear in a few seconds.
Press again to turn the unit off.
Press to turn the LCD display on/off. The unit will continue to operate when the LCD is
turned off. Turning the LCD display off will conserve battery power.
When you turn on the XNAV3550 the main menu screen appears as shown below. At the top
left corner is a battery status indicator, indicating the amount of charge remaining.
On the main menu, you will find the eight modes of operation (NAVI, MUSIC, MOVIE, PICTURE,
GAME, CALC, W-CLOCK and SETTINGS).
Each button represents a software function (NAVI, MUSIC, MOVIE, PICTURE, GAME, or CALC)
or a user setup function (W-CLOCK or SETTINGS). To access any of the modes, just tap the
corresponding icon. Press or the button to return to the main menu.

This function guides you to your destination using voice prompts and mapping, showing
crossroads, city names and much more. It also provides various map-guiding modes and the
approximate time left until you arrive at your destination. For your safety, it also lets you know
when to make a turn by blinking LEDs on the left/right side.
Touch the ‘NAVI’ icon on the main menu screen, and wait for the navigation program to load
all the necessary data. For instructions on basic navigation, skip to page 15.
Want to listen to your favorite music on the go? Since the XNAV3550 includes a built-in MP3
player, just download and save your favorite MP3s to the root folder of an SD card and play.
Touch the ‘MUSIC’ icon on the main menu screen. Press the icon to begin playback. Adjust
the volume using the rotary control located on the right side of the unit. Use the slide control
in the middle of the player skin to select a specific point of the track.
Press the icon to display a playlist from which you can select a specific music track.
In playlist mode, press the icon to select between random playback or alphabetical
playback.
Additional buttons are visible in the lower section of the player skin, including previous/next
track, play/pause, mute and repeat. Press or the button to return to the main menu.

The XNAV3550 includes a built-in video player. Download and save your favorite AVI video files
to the root folder of any SD card, then enjoy them on the XNAV3550.
Touch the ‘MOVIE’ icon on the main menu screen. Press the icon to begin playback. Use
the slide control near the top of the player skin to select a specific point of the movie. To view
the movie in full screen mode, touch the movie anywhere. Adjust the volume using the rotary
control located on the right side of the unit.
Additional buttons are visible at the top and on the right side of the player skin, including
rewind, fast forward, play/pause and mute. Press the icon to display a playlist from which
you can select a specific movie file. Press or the button to return to the main menu.
The XNAV3550 includes a built-in image viewer. Download and save GIF, JPG, PNG or BMP
image files to the root folder of any SD card, then view them on the XNAV3550.
Touch the ‘PICTURE’ icon on the main menu screen. The left arrow returns to the previous
image while the right arrow advances to the next image. To view the image in full screen
mode, touch the image anywhere. Press the +/- buttons to zoom in/out x2 or x4 times and
touch the arrows on screen to navigate the image when in zoom mode.
Press the icon to view the photo album. The photo album viewer changes images every 3
seconds - creating a slideshow effect. Touch the image to cancel. Press the icon to display
a view list from which you can select a specific image. Press or the button to return to
the main menu.

Touch the ‘GAME’ icon on the main menu screen. Rules of play:
1. Player’s stone color is white.
2. Each player who can block both ends either horizontally, vertically or diagonally can turn
the stones trapped in between into the color of the player who blocked both ends.
For example, if white stone blocked both ends horizontally, the black stones trapped in
between will turn into white stones.
3. In the end, whoever has more black or white stones wins.
Press or the button to return to the main menu.
Touch the ‘CALC’ icon on the main menu screen. The maximum number of digits that can
be entered is 13 (including decimal places). Maximum number of decimal places for an
input value is 3. If the number of decimal places exceed the maximum number of digits, no
further input is possible. Maximum number of digits for a result value is 15 (including decimal
places). If a value exceeds 15 digits, the calculation is not processed. Press or the button
to return to the main menu.

Touch the ‘W-CLOCK’ icon on the main menu screen. The cursor is located at the default
city. Subsequently, the cursor is located at the city most recently searched. When the
cursor is located at a city, the time in that city is displayed. The red crosshairs display the
corresponding coordinates. Press or the button to return to the main menu.
NOTE: The world clock is only available after a GPS signal has been acquired.
Touch the ‘SETTINGS’ icon on the main menu screen. Touch Screen Set or Config Set to enter
the desired setup menu. Touch SAVE to save settings and return to the main menu.
Calibration Calibrate the touch screen
LCD Brightness Adjust LCD display brightness
LED Brightness Adjust left/right LED indicator brightness
Opening Screen Set default mode when power is turned on
Language Set default operating system language
Popup Sound Select default popup sound
Button Sound Select default button sound
Auto Booting Set to ON to have the unit turn on automatically
with the vehicle
GPS Reset Press to reset the GPS receiver

Your XNAV3550 includes the entire seamless USA map pre-loaded on the included SD card.

Insert Map database DVD into DVD ROM drive. Insert the SD memory card into an SD card
reader. Once the SD reader recognizes your SD card, move the desired files/folders to the
SD card. Refer to the instructions provided with your SD card reader for more information.
Dual Electronics Corporation does not provide any guarantee for lost or damaged data.
The following alternate maps are included on the Map Database DVD-ROM.
The pre-loaded USA map must be deleted from the SD card in order to use any of the
following alternative maps.

Use of NavAtlas Navigator software is executed at your own risk.
To protect yourself and others from accidents, do not program
the navigation system while driving. Enter or select your destination
and activate the navigation system before you begin to drive!
Do not look at the display unless it is absolutely safe to do so!
Safe driving should always be your first priority!
The rules of the road and traffic signs must be obeyed prior to
following instructions from the navigation system.
Do not follow the instructions of NavAtlas Navigator unless
circumstances and the road traffic regulations allow you to do so.
NavAtlas Navigator will automatically reroute you to your destination
when you have gone off course.
When the reception of GPS signals is obstructed, NavAtlas Navigator
software does not stop - but navigation will be interrupted.
As soon as the GPS signal becomes unobstructed, the navigation
system will recognize a change in your current position and
automatically update the route.
When you quit navigation mode, the main navigation screen appears.
You may then indicate another destination or resume by selecting a
destination from the Recent destinations list.
When you have reached your destination the system will announce
“You have reached your destination!”
When turned on for the first time (or if the unit has been idle for
several days, or been moved more than 250 miles while turned off), it
can take several minutes to acquire a GPS signal.
If no GPS signals are received after several minutes, please reset the
GPS in the SETTINGS menu. Refer to page 11 for more details.
The NavAtlas Navigator includes two user modes. Standard mode is
the default, and provides reduced functionality to allow quicker access
to simple operations. Work in Standard mode if you do not need such
functions as Route Planning, or indicating a destination on the map.
These Quick Start Guide instructions are for Standard mode only. For
detailed navigation functions and Extended mode operation, please visit
our website at www.dualav.com.

Turn on the XNAV3550. From the main menu, tap the NAVI icon. The
navigation software will load in approximately 10 seconds. The first
time you select the NAVI icon a brief introduction will appear.
Tap the right triangle to advance to
the next page or tap the button
to quit the introduction and proceed
to the warning screen.
Tap the . If you tap
the button, the unit will
return to the main menu. If you
tap , the main navigation
screen will appear.
Tap to immediately
begin viewing your current location
on the map, or, tap to
begin navigating. Use the Zoom
in/Zoom out key on the right side of
the unit to adjust the map view.
The GPS signal status icon in the middle right must be green to
show your current location on the map or to begin navigation.
When you start NavAtlas Navigator, it shows the last screen that
was displayed when NavAtlas Navigator was last turned off. You may
easily access the main navigation screen from any other screen by
tapping the button.

Tap the button to indicate a new destination for navigation.
For details, please refer to “Entering a destination”, page 23.
Tap the button to navigate to your home address.
For details, please refer to “Saving your home address”, page 21.
Tap the button to select a saved destination.
Tap the button to select a previous destination.
Tap the button to display the map.
Tap the button to modify the settings.
Tap the button to exit the navigation and return to the main menu.

The following buttons appear at the right of every input screen (except
where indicated):
Tap this icon to return to the previous screen (This icon is not available
in the main navigation screen).
Tap this icon to open the main screen. (This icon is not available in the
main navigation screen).
The GPS symbol is located at the middle right side of the screen.
The different GPS symbols have the following significance:
Signal strength is not strong enough for navigation purposes. (Satellite
waves are red color).
Signal strength is strong enough to begin navigation. (Satellite waves
are green color).
The battery indicator is located at the top right corner of the screen.
The different battery indicators have the following significance:
Unit is running off of battery power. Full green bars indicate a full
charge. Bars change from green to orange as battery level drops.
Unit is running off of vehicle power and battery is being charged.
Unit is running off of vehicle power and battery is fully charged.

– Function only while in map view mode.
– Rotate the control upward to increase the volume;
downward to decrease.
- Press to return to the main menu.
– A software keyboard appears at the bottom of the
screen when text entries are necessary.
You may carry out all entries by using the included stylus or tapping
your finger directly on the character keyboard. Only capital letters may
be entered.
Special characters are not necessary when entering a destination’s
city or street name. NavAtlas Navigator replaces these characters
automatically. Example: If you were looking for a city called “Héroïnès“,
you would simply type “HEROINES“.
Tap the key to insert a space.
Tap the key to delete the character to the left of the insertion mark.
Other manuals for NavAtlas XNAV3550
1
Table of contents
Other Dual GPS manuals

Dual
Dual XGPS160 User manual

Dual
Dual XGPS170 User manual

Dual
Dual NavAtlas XNAV3550 User manual

Dual
Dual NavAtlas XNAV9525 User manual

Dual
Dual XGPS190 User manual

Dual
Dual XGPS160 User manual

Dual
Dual XDVDN9131 Operating instructions

Dual
Dual XGPS170 User manual

Dual
Dual XGPS150 User manual

Dual
Dual NavAtlas XNAV3500P User manual