Ducasa Colorado DGi+ User manual

Models:
Colorado DGi+ 450
Colorado DGi+ 750
Colorado DGi+
Towel rail
Manual towel rail Colorado DGi+_v10 · E1400298 · 20220110
NOTE
A qualied electrician must carry out the electrical installation of this towel rail. The electrical
installation must comply with current UK regulations. Any claim on the warranty could be invalid
if these requirements have not been met.
Amazon Alexa and Google Home compatible

CONTENT
IMPORTANT INFORMATION . . . . . . . . . . . . . . . . . . . . . . . . . . . . . . . . . . . . . . . . . . . . . . . . 3
TECHNICAL DATA . . . . . . . . . . . . . . . . . . . . . . . . . . . . . . . . . . . . . . . . . . . . . . . . . . . . . . . . 4
GENERAL INFORMATION . . . . . . . . . . . . . . . . . . . . . . . . . . . . . . . . . . . . . . . . . . . . . . . . . . 4
CONTROL OPTIONS . . . . . . . . . . . . . . . . . . . . . . . . . . . . . . . . . . . . . . . . . . . . . . . . . . . . . . 4
ELECTRICAL POWER SUPPLY . . . . . . . . . . . . . . . . . . . . . . . . . . . . . . . . . . . . . . . . . . . . . 4
INSTALLATION INSTRUCTIONS . . . . . . . . . . . . . . . . . . . . . . . . . . . . . . . . . . . . . . . . . . . . 5
Location of the towel rail . . . . . . . . . . . . . . . . . . . . . . . . . . . . . . . . . . . . . . . . . . . . . 5
Components . . . . . . . . . . . . . . . . . . . . . . . . . . . . . . . . . . . . . . . . . . . . . . . . . . . . . 6
Mounting . . . . . . . . . . . . . . . . . . . . . . . . . . . . . . . . . . . . . . . . . . . . . . . . . . . . . . . 6
BUTTON/DISPLAY LAYOUT . . . . . . . . . . . . . . . . . . . . . . . . . . . . . . . . . . . . . . . . . . . . . . . . 7
SWITCHING ON . . . . . . . . . . . . . . . . . . . . . . . . . . . . . . . . . . . . . . . . . . . . . . . . . . . . . . . . . . 7
SWITCHING OFF: . . . . . . . . . . . . . . . . . . . . . . . . . . . . . . . . . . . . . . . . . . . . . . . . . . . . . . . . . 7
NOTIFICATION AREA: . . . . . . . . . . . . . . . . . . . . . . . . . . . . . . . . . . . . . . . . . . . . . . . . . . . . . 7
USING WITH SMARTCOMMAND TEVOLVE APP . . . . . . . . . . . . . . . . . . . . . . . . . . . . . . . 7
Connecting to the smart command tevolve app . . . . . . . . . . . . . . . . . . . . . . . . . . . . . . 7
Geolocation . . . . . . . . . . . . . . . . . . . . . . . . . . . . . . . . . . . . . . . . . . . . . . . . . . . . . 8
USING WITHOUT SMARTCOMMAND TEVOLVE APP . . . . . . . . . . . . . . . . . . . . . . . . . . . 8
Using in operating modes . . . . . . . . . . . . . . . . . . . . . . . . . . . . . . . . . . . . . . . . . . . . 8
Setting the time and date . . . . . . . . . . . . . . . . . . . . . . . . . . . . . . . . . . . . . . . . . . . . 9
Entering a program . . . . . . . . . . . . . . . . . . . . . . . . . . . . . . . . . . . . . . . . . . . . . . . . 9
Set program temperatures . . . . . . . . . . . . . . . . . . . . . . . . . . . . . . . . . . . . . . . . . . 10
Boost . . . . . . . . . . . . . . . . . . . . . . . . . . . . . . . . . . . . . . . . . . . . . . . . . . . . . . . . . 10
DISPLAY SETTINGS . . . . . . . . . . . . . . . . . . . . . . . . . . . . . . . . . . . . . . . . . . . . . . . . . . . . . 11
KEYPAD LOCKING (ANTI-TAMPER) . . . . . . . . . . . . . . . . . . . . . . . . . . . . . . . . . . . . . . . . 11
ADVANCED SETTINGS . . . . . . . . . . . . . . . . . . . . . . . . . . . . . . . . . . . . . . . . . . . . . . . . . . . 11
PASSWORD . . . . . . . . . . . . . . . . . . . . . . . . . . . . . . . . . . . . . . . . . . . . . . . . . . . . . . . . . . . . 13
RUNBACK MODE . . . . . . . . . . . . . . . . . . . . . . . . . . . . . . . . . . . . . . . . . . . . . . . . . . . . . . . . 13
ACTIVATING RUNBACK MODE . . . . . . . . . . . . . . . . . . . . . . . . . . . . . . . . . . . . . . . . . . . . 14
SETBACK . . . . . . . . . . . . . . . . . . . . . . . . . . . . . . . . . . . . . . . . . . . . . . . . . . . . . . . . . . . . . . 14
MAX TEMPERATURE . . . . . . . . . . . . . . . . . . . . . . . . . . . . . . . . . . . . . . . . . . . . . . . . . . . . . 14
ERROR CODES . . . . . . . . . . . . . . . . . . . . . . . . . . . . . . . . . . . . . . . . . . . . . . . . . . . . . . . . . 15
TROUBLESHOOTING . . . . . . . . . . . . . . . . . . . . . . . . . . . . . . . . . . . . . . . . . . . . . . . . . . . . 15
DEFAULT VALUES . . . . . . . . . . . . . . . . . . . . . . . . . . . . . . . . . . . . . . . . . . . . . . . . . . . . . . . 16
ECODESIGN TABLE . . . . . . . . . . . . . . . . . . . . . . . . . . . . . . . . . . . . . . . . . . . . . . . . . . . . . . 17
MAINTENANCE AND CARE . . . . . . . . . . . . . . . . . . . . . . . . . . . . . . . . . . . . . . . . . . . . . . . 20
CORRECT DISPOSAL OF THIS PRODUCT . . . . . . . . . . . . . . . . . . . . . . . . . . . . . . . . . . 20

3
IMPORTANT INFORMATION
• Caution: parts of this product may become very hot and cause burns. Extra care should
be taken if children and vulnerable people are present.
• Children under 3 years of age should be kept away from this appliance unless they are
under continuous supervision.
• Children aged between 3 and 8 years old must only switch the appliance ON or OFF,
provided that the appliance has been placed or installed in a normal position and that
these children have or have been instructed to use the device safely and understand the
potential hazards.
• Children between 3 and 8 years old should not plug in, adjust, clean, or carry out user
maintenance.
• This device can be used by children at least 8 years of age and
by persons with reduced physical, sensory or mental abilities or
no experience or knowledge, if they are properly supervised or
if instructions for the safe use of the device have been given to them and the risks
involved have been addressed.
• Children should not play with the device.
• Cleaning and user maintenance should not be performed by unattended children.
• To avoid danger to very young children, it is recommended to install this towel heater so
that the lowest heating bar is at least 600 mm above the oor.
• This appliance must only be installed according to this installation manual and must be
installed by an authorized person.
• If the power cable is damaged, it must be replaced by the manufacturer, its after-sales
service or similarly qualied persons in order to avoid a hazard.
• All work on the electrical parts must be carried out by a qualied professional.
• A power management system or power failure device is not compatible with our devices.
If one is used it will damage the Colorado DGi+ thermostat and will invalidate your
warranty.
• For safety reasons, it is strictly forbidden to rell the towel rails. If necessary, contact the
manufacturer’s after-sales service or a qualied professional.
• To ensure proper operation and avoid overheating, the electronic controller must not be
covered by a towel or a bathrobe.
• Before servicing the towel rail, turn it o and let it cool down. Never use abrasives and
solvents.
• The towel rail is lled with a heat transfer uid dangerous to health if swallowed. In the
event of a leak, contact your installer and take any precautionary measures to prevent
any ingestion of uid by users, especially young children and vulnerable persons.

4
MODEL Power (W) Dimensions (mm)
WxHxD Net Weight (kg)
Colorado DGi+ 450 450 500 x 1020 x 70 13
Colorado DGi+ 750 750 500 x 1400 x 70 18
TECHNICAL DATA
GENERAL INFORMATION
Colorado DGi+ is manufactured in steel, with a white nish. It is simple to t and maintenance-free.
Fast to heat up and fully programmable either directly into the towel rail or by using the
App.
• Designed and fabricated in accordance with EN 60335-1, EN 60335-2- 43 and EN 55014 (regulations
for domestic appliances)
• Standard colour White (RAL 9010)
• Class II and IP44 Rated
• 220-240V A.C.
• Wall mounted
• Forced function button (BOOST): operation for a specied time
• Large TFT display.
• CR2032 lithium battery for time retention
CONTROL OPTIONS
The towel rail is designed to be used in conjunction with the system and App, providing
total control of your heating system from anywhere in the world via the internet. The App is available for both
Android and iOS devices and oers the ultimate in control and energy monitoring.
Search for “Tevolve” on the either the Google Play Store or the Apple App Store.
Scan this QR code to access to the download.
It is also possible to programme each towel rail individually without the App by using the built
in controls and screen. This may be convenient for single heaters however we recommend
the Gateway to control multiple heaters.
The Colorado DGi+ is also compatible with Amazon Alexa and Google Home via the
System and App.
For instructions on how to link them, visit https://ducasa.co.uk/smartcommand/voicecontrol
ELECTRICAL POWER SUPPLY
A qualied electrician must carry out the electrical installation of this towel rail. The electrical installation
must comply with current regulations. Any claim on the warranty could be invalid if these requirements have
not been met.
The towel rail requires a 220-240V, 50Hz power supply.
Connecting wires:
Brown: Live
Blue (or grey): Neutral
NOTE: The towel rail does not require an earth wire.
The connecting wires must be of the appropriate section, in regards to the length of cable, type of cable and
power rating of the towel rail.
The towel rail must be connected into a connecting box. According to regulations, the towel rail must be
connected to the power supply by means of an all-pole circuit breaker with a contact gap of at least 3mm or
by a thermal-magnetic circuit breaker.
tevolve app heattend

5
INSTALLATION INSTRUCTIONS
LOCATION OF THE TOWEL RAIL
It is essential to mount the towel rail with the control box on the lower right hand side.
To avoid risks this appliance must be installed with the lowest heated rail at least 600mm above the oor.
In bathrooms, the towel rail must never be installed in such a way that the switches and other control
devices can be touched by a person in the bathtub or shower.
This product is rated as IP44 and can be located in zone 2, the area stretching 60cm outside the perimeter
of the bath and to a height of 2.25m from the oor. If you are in doubt please contact a qualied electrician
for advice.
The towel rail under no circumstances, should be installed below an electric power point.
ZONE
0
ZONE
1ZONE
2
ZONE
2
ZONE
2
60cm
60cm
60cm
225cm
ATTENTION!
ENSURE THE CORRECT ORIENTATION OF
TOWEL RAIL BEFORE INSTALLATION

6
A
G
BH
F
C
DE
COMPONENTS
The components for fastening the towel rail to a wall are supplied in a bag together with the appliance.
There are four support assemblies, each consisting of the following components:
(A) 1 plastic tube Ø28 x 65mm + screw M5
(B) 1 plastic tube Ø20 x 55mm with threaded inserts
(C) 1 screw M6
(D) 1 plastic retainer (conic 15º)
(E) 1 plastic cap
(F) 1 screw Ø3 x 10mm
(G) 1 screw Ø6 x 50mm
(H) 1 nylon stopper Ø10mm
MOUNTING
The towel rail is xed to the wall by four support assemblies. Two support assemblies should be positioned
between the 2nd and 3rd horizontal tubes from the top and two between the 2nd and 3rd horizontal tubes from
the bottom.
STEP 1
First, the 4 supports are placed on the towel rail, take a piece (B), x the piece (D) with the screw (C) and
insert it between two tubes from the front, taking care that the conical part of parts (B) and (D) faces inside
the appliance. Repeat this in all four support positions.
STEP 2
Once the brackets are attached to the appliance, check their position and mark the 4 support points on the
wall. Drill the holes in the wall and insert the plug (H).
STEP 3
We take part (A), insert the screw (G) and x it on the wall plug.
Insert part (B) into part (A) and t the screws (F), do not tighten them.
STEP 4
Once all the supports are in place, place the covers (E) on the piece (D).
Check that the towel rail is in a perfectly vertical position and tighten the screws (F).

7
Wednesday
11:00
Wed. 11:00h
21.5°C
Set point: error messages
err03
EASY MODE
EASY
Low Surface
Temperature
MODE
LST 75%
open window
self adaptive
AWAY status for
geofencing
MODE / OK CONFIG
Wed. 11:00h
21.5°C
Set point:
COMFORT
BUTTON/DISPLAY LAYOUT
The control is based on six buttons and a TFT display.
Current time
Current mode
(AUTO, MANUAL, OFF)
Set point temperature
Day of the week Radio paired icon
Notication area
Heating
indicator
Boost ON/OFF Decrease
Increase Mode/OK
AUTO / MANUAL
BOOST/
CONFIG
(long press)
Towel rail controls
Note: The 4 symbols on the side of the screen
will change depending on the menu that the
user is accessing.
The rst press of any button will wake up the towel rail any further
button presses will activate the function required.
When the towel rail is in OFF mode, it will keep
the programs and will continue to communicate
with the gateway (if
connected) but will not heat.
To turn the towel rail back on, press the On/
O button again, it will return to the last selected
mode (MANUAL or AUTO).
NOTIFICATION AREA:
The notication area will show you if any
additional features listed later in this manual have
been activated:
USING WITH SMARTCOMMAND TEVOLVE APP
CONNECTING TO THE SMART COMMAND TEVOLVE APP
To use your Colorado DGi+ via the
App you must rst connect
and register your Gateway
. To do this follow the instructions in the gateway
manual.
Ensure you have downloaded and logged
into the App using your
user name and password, then press the + icon
on the home screen, and follow the on-screen
instructions.
Please Note: Paired
devices will show in the
order they were added onto
the App and will be called
Radiator1, Radiator2 etc.
We highly recommend
renaming each towel rail
as they are paired to avoid
confusion. To do this select
the paired towel rail and
press the settings icon
where you can rename it.
Your Colorado DGi+ is
now ready to be controlled
from the
App.
If the Colorado DGi+ has been linked to the
Gateway and for some
reason communication is lost, the Link icon
disappears and the antenna starts ashing
on the Colorado DGi+ screen. It will continue
to operate in the mode it was in prior to losing
communication.
SWITCHING ON
Once the towel rail has been mounted on the wall
and correctly connected to the mains electricity power
supply, press the main On/O button on the left side
of the towel rail control.
The screen will show various information and the
towel rail is ready to operate.
SWITCHING OFF:
To switch o the towel rail, press the On/O button
on the left side of the towel rail control until the symbol
appears as shown in the following screen:
No devices were found in this home. To
add a new one click on the button with the
symbol .
Smart Command tevolve
Friday 19th Nov 2021, 11:29

8
Wednesday
11:00
21.5°C
Wed. 11:00
Set point:
COMFORT
Wed. 11:00h
21.5°C
Set point:
21.5°C
Wed. 11:00
Set point:
COMFORT
If you don’t have the access to the
App or are unable to pair using the method
above , press the Link button on the Gateway
3
for 3 seconds.
Once the orange LED starts to ash, press the
CONFIG button on the Colorado DGi+ and press
the +/- button until the RF icon
ashes. Then press OK
‘Link’ together with an antenna
icon will appear in the top right
of the screen.
Your Colorado DGi+ is now
connected to the Gateway.
Please Note: Once the
Gateway’s link button is pressed you have one
minute to add a heater. When the heater has
been added, you have one minute to add a further
heater without pressing button
3
GEOLOCATION
This mode allows your
system to reduce the set temperature by a number
of degrees that is congured for each device from
the App when you are away from home. The
default is 2 degrees.
Geolocation is activated from the
App within the Homes setting. If activated,
all connected devices in
the house will use this feature and AWAY will be
shown on the Colorado DGi+ display.
If any button is pressed
on any connected
device, all
devices in the
house will exit Geolocation
mode for 2 hours, unless
it’s turned back on again.
USING WITHOUT SMARTCOMMAND TEVOLVE APP
USING IN OPERATING MODES
To assist with the operation of the Colorado
DGi+, the TFT screen is backlit and will stay
illuminated for approximately 10 seconds after the
last button is pressed. (To change the backlight
duration, see the section on DISPLAY)
When the towel rail is operational and the room
temperature is lower than the set temperature the
heating symbol will be shown indicating that
the towel rail is producing heat.
The following screens show MANUAL, AUTO
and OFF modes.
To scroll between MANUAL and AUTO press
Mode/OK button.
To enter and exit OFF mode press the ON/OFF
button. When OFF mode is exited, it returns to the
mode used prior to entering OFF mode.
When the towel rail is in MANUAL mode the
temperature can be adjusted by pressing the +/-
button. The towel rail will regulate the room to the
chosen set temperature.
When the towel rail is in AUTO mode the
temperature can be adjusted by pressing the +/-
buttons. This change will remain active until either
the next programme change or until midnight when
the temperature will revert to the preset value.
When the temperature has been adjusted in
AUTO mode a hand will show beside the auto to
symbol to show the amended set-point.
To return to AUTO mode press the Mode/OK
button.
NOTE: To rapidly change the temperature set-
point in any mode press and hold the +/- button.
orange
green

9
TIME
DATE
DST
TIME SETTINGS
CONFIG
COMFORT
ECO
ANTI-FROST
PROGRAM
SETTINGS
COMFORT TIME
Settings
DISPLAY
Settings
ADVANCED
Settings
SETTINGS
22:00
TIME SETTINGS
TIME
TIME
DATE
DST
TIME SETTINGS
Day
Month
Year
01
01
2019
TIME SETTINGS
DATE
DST
OFF
ON
TIME SETTINGS
Wednesday
add period
COPY
ON OFF mode
PROGRAM
00:00 23:59
Wednesday COPY
07:00 12:00 x
17:00 20:00 x
ON OFF mode
PROGRAM
add period
Wednesday COPY
07:00 12:00 x
ON OFF mode
PROGRAM
add period
CONFIG
COMFORTCOMFORT
ECO
ANTI-FROST
PROGRAM
SETTINGS
Wednesday
add period
COPY
ON OFF
mode
PROGRAM
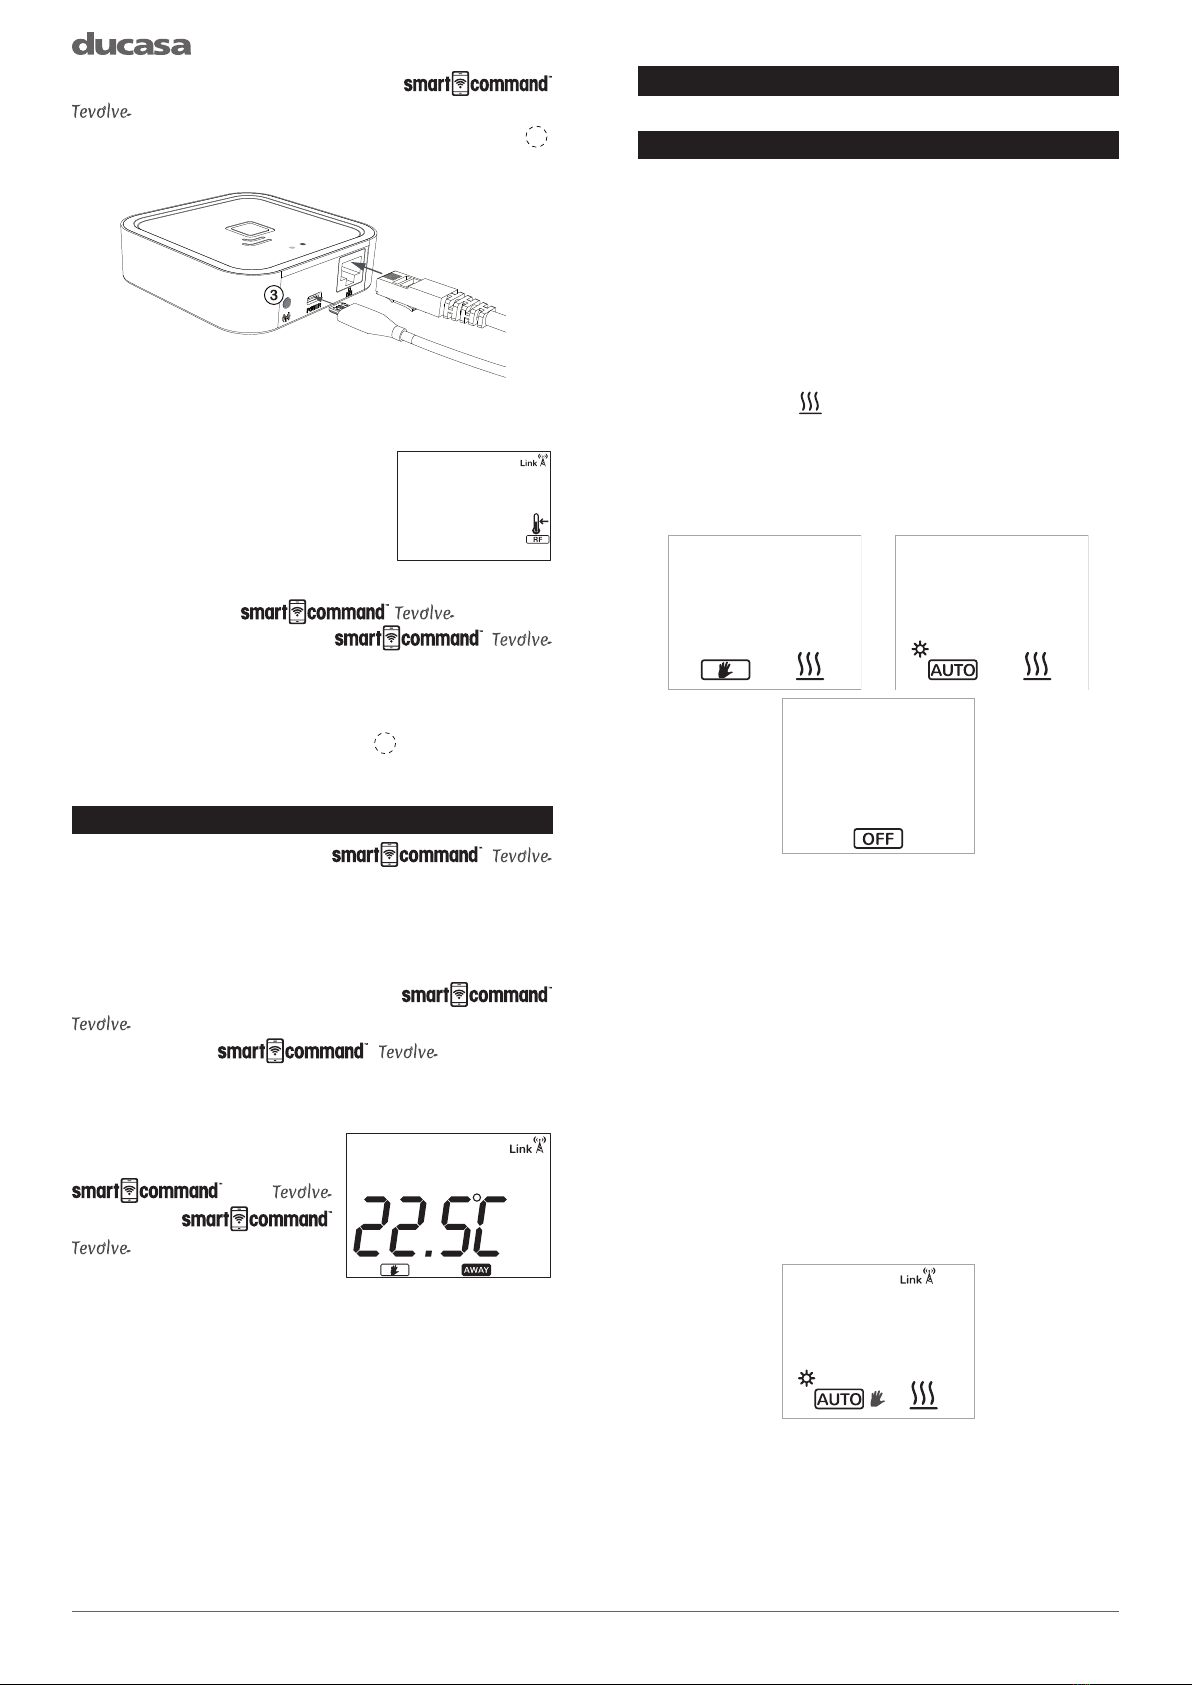
SETTING THE TIME AND DATE
If you have paired the towel rail to a
Gateway then the time is
automatically updated.
To set the Clock on an unpaired Towel rail, press
and hold the CONFIG button until the CONFIG
menu is shown and then select SETTINGS using
the +/- button, press Mode/OK and then select
TIME Settings using the +/- button and press
Mode/OK again.
In the TIME menu the
Time, Date and Daylight
Savings (DST) can be set.
These can be adjusted by
pressing the +/- button and
then pressing the Mode/OK
button.
Select TIME and press Mode/OK.
The current set time is
shown on the display, to
change the time move the
underline to the hours using
the +/- button and press
Mode/OK.
The hours will ash, use
the +/- button to adjust to the correct value and
press Mode/OK, then move to the minutes using
+/- button and repeat to set the correct time. Once
complete press the CONFIG button to exit.
To set the Date select the Date function, press
Mode/OK and enter the Day, Month and Year,
using the method used for setting the time.
To exit the Date function, press the CONFIG
button.
To turn Daylight savings
on or o, select the DST
function from within the time
settings and then use the +/-
button to cycle the function
ON or OFF. Press Mode/OK
to conrm
ENTERING A PROGRAM
The AUTO mode of the towel rail allows you to
run a program designed to accommodate your
lifestyle. To enter a new program into the towel
rail press and hold the CONFIG button until the
CONFIG menu appears, then use the +/- buttons
to select PROGRAM and press Mode/OK.
To enter a program into the towel rail rst select
the day of the week in the upper left corner of
the programming screen by using the +/- button
and press Mode/OK, change the day to the day
you want to program using +/- button and press
Mode/OK.
Once the correct day is
selected, select “add period”
using the +/- button and press
Mode/OK. The underline will
change to a box around the
times that can be changed.
Press Mode/OK and the ON time will begin to
ash.
Change the ON time to
when you want the towel rail
to begin heating (7:00 in our
example), press Mode/OK
and the OFF time starts to
ash. Change the OFF time
to when you want the towel rail to stop heating
(e.g:12:00).
Once the times have
been entered, choose the
temperature required for
the heating period either
Comfort or Economy .
Select using +/- button and
conrm with Mode/OK.
Any time periods outside of Comfort or Economy
are automatically set to Anti-Frost .
To set the Comfort, Economy and Anti-Frost
temperatures refer to the section called set
program temperatures
Once the period has been created choose either
“OK” to save or “x” to delete using the +/- button
and press Mode/OK. Extra heating times can be
added by selecting “add period” using +/- button
and repeating the above procedure.

10
22.5°C
1h 35m
BOOST
set temp
+
TIME
1h
BOOST
Set time:
OK
21.5°C
Wed. 11:00
Set point:
COMFORT Next Program ON Time
Starts at:Tue. 20:00
Set point:
21.5°C
Wed. 11:00
Wednesday COPY
07:00 12:00 x
17:00 20:00 x
ON OFF mode
PROGRAM
add period
Copy Wednesday to:
Mon
PROGRAM
Tu e
Thu
Sat
Wed
Fri
Sun
OK CANCEL
CONFIG
COMFORT
ECO
ANTI-FROST
PROGRAM
SETTINGS
COMFORT
COMFORT
21.0°C
Set point:
OK
ECO
18.0°C
Set point:
OK
ANTI-FROST
7.0°C
Set point:
OK
The rst press of any button will wake up the towel rail any further
button presses will activate the function required.
Once the program for the
day is complete, it can be
copied to other days in the
week by selecting COPY from
the programming screen. To
do this use the +/- button to
select “COPY” and then Mode/OK to conrm.
The copy screen will
appear and the day that is
being copied from will not be
available. (Wednesday in the
example.)
Select the days to copy using +/- button to
highlight a day and then Mode/OK to select it.
Once you are happy with the selection use +/-
button to highlight “OK” and press Mode/OK.
The screen will change back to the program
menu.
To Exit press CONFIG and the screen will revert
to the current mode of operation (MANUAL or
AUTO).
To make sure your program is running Press
the Mode/OK button until is shown at the
bottom of the screen.
The screen will alternate between the current
programmed temperature mode and the next
programmed Comfort/Economy ON time.
At any time, the temperature can be temporarily
overridden using the +/- buttons. At the next
programmed mode change or midnight whichever
is soonest, the radiator will return to the
programmed temperature
.
SET PROGRAM TEMPERATURES
To adjust the temperatures used in AUTO mode,
press and hold the CONFIG button until the
following screen appears:
Select either Comfort, Eco or Anti-Frost by using
the +/- button and press Mode/OK to enter the
adjustment setting.
Press the +/- button to change the temperature
and then press Mode/OK to conrm and return to
the CONFIG screen. Repeat the above process
for the other program temperatures.
BOOST
The towel rail has a Boost mode that allows the
user to temporarily override
the current operating mode.
The Boost button will
immediately turn on the towel
rail for 1 hour at 2ºC warmer
than room temperature.
To adjust the BOOST temperature, use the +/-
buttons.
To adjust the duration, press
the CONFIG button, the
BOOST time setting screen
will be displayed; set the
required time between 1
hour and 24 hours using the
+/- buttons. To return to the
BOOST screen press the CONFIG button.
You can quickly adjust the duration with the
BOOST button . Each press will increase the
duration of BOOST mode by 1h.
To return to the previous mode and cancel the
Boost mode, press the Mode/OK button.

11
Brightness Level
1 2 3 4
ON
Level
OFF 1 2 3
OFF
Level
DISPLAY SETTINGS
Backlight Time
5 10 30 always
DISPLAY SETTINGS
Eco Display
OFF
ON
DISPLAY SETTINGS
Beep
OFF
ON
DISPLAY SETTINGS
ENTER CODE
TO LOCK
- - - - OK
LOCKED
ENTER CODE
TO UNLOCK
- - - - OK
Units
Control Type
Temp Offset
Open Window
Self Adaptive
ADVANCED
SETTINGS
CONFIG
COMFORT
ECO
ANTI-FROST
PROGRAM
SETTINGS
COMFORT TIME
Settings
DISPLAY
Settings
ADVANCED
Settings
SETTINGS
Brightness Level
Backlight Time
Eco Display
Beep
DISPLAY SETTINGS
DISPLAY SETTINGS
The DISPLAY menu on the towel rail allows the
user to customise how the towel rail looks whilst
the screen is on and o, it also allows the button
sound to be controlled.
To open the DISPLAY menu, press and hold
CONFIG until the CONFIG menu appears, select
SETTINGS using +/- button and press Mode/OK,
nally select DISPLAY using +/- button and press
Mode/OK.
To adjust the brightness of
the screen, select Brightness
level and press Mode/OK.
The ON levels are between
1=25%, 2=50%, 3=75% &
4=100%.
The OFF levels are O,
1=3%, 2=10% and 3=20%.
Chose the level required and
press Mode/OK.
To set the time the screen
stays on for after the
last button press, select
Backlight Time using +/-
button from the DISPLAY
menu and chose how many
seconds are required.
Conrm with Mode/OK. The
factory default is 10s.
The towel rail features a “responsible
consumption” Eco Display
mode, this mode will show
a coloured bar across the
bottom of the screen to
encourage the user to set an
economical temperature.
This feature is turned on
and o in the ECO DISPLAY
menu.
To de-activate the beep
when each key is pressed
enter the BEEP menu and
select either On or O, using
the +/- button and then press
Mode/OK to conrm
KEYPAD LOCKING (ANTI-TAMPER)
The keypad can be locked
to prevent any unauthorised
person (children, people
in public places, nurseries,
oces, hotels etc.) altering
the settings of the towel rail.
A Password is required
to lock the keypad (0 0 0 0
by default), See Password
Settings section for further
details on changing
passwords.
To Lock the towel rail Press
and hold the +/- buttons until
the lock screen appears.
Enter the password on the
screen using +/- buttons
followed by Mode/OK.
The screen will change to show the Lock screen
and any button presses will be ignored and the
locked screen displayed.
To unlock the keypad press and hold the +/- until
the unlock screen appears. Enter the password
using the +/- buttons and then press Mode/OK.
If the incorrect password is entered “INVALID
CODE” will be displayed.
When the keypad is locked the towel rail will still
receive communications from the
Gateway.
ADVANCED SETTINGS
The Advanced settings
menu is password protected
to prevent any inadvertent
changes to the factory
settings.
To access the Advanced
settings rst press Mode/OK until the CONFIG
menu appears, then press +/- until SETTINGS is
highlighted and press Mode/OK.
Next press +/- until ADVANCED settings is
highlighted and then press Mode/OK, then enter
the password (default 0 0 0 0).

12
OFF
ON
Open Window
Wed. 11:00h
21.5°C
Set point:
OFF
ON
Self Adaptive
OFF
ON
EASY mode
OFF (100%)
75%
50%
20%
LowSurfaceTemp
Wed. 11:00h
21.5°C
Set point:
COMFORT
EASY
set temp
21.5°C
Set point:
Wed. 11:00
LST 23%
Wed. 11:00h
21.5°C
Set point:
PID
Hysteresis .25°C
Hysteresis .35°C
Hysteresis .5°C
Hysteresis .75°C
Control Type
Display temp
22.5°C
Offset +1.1°C
Temp. Offset
Celsius
Fahrenheit
UNITS
Use the +/- buttons to highlight the setting you
want to adjust and Mode/OK to enter.
The advanced settings are listed below:
.
The units menu allows the
main temperature units of
the towel rail to be chosen
between Celsius (°C) and
Fahrenheit (°F). Change
using +/- buttons and conrm
with Mode/OK.
This setting shows the
type of thermostat accuracy
currently being used. There
are 6 types of control. To
change the thermostat
accuracy use the +/- button
to highlight and conrm using the Mode/OK
button.
This setting is used to
balance two radiators in
the same room or to sync
the Colorado DGi+ with a
thermostat.
The compensation can
be adjusted by +/- 3°C and is adjusted in 0.1°C
increments. Use +/- buttons to change the Oset
value, which will automatically be applied to the
Display temperature. Once you have applied your
Oset value press Mode/OK button to conrm.
In order to save energy, if a
window opens and causes a
sudden drop in temperature
the towel rail will stop heating.
If the towel rail is heating,
it will be disconnected for
30 minutes and shows the
Open Window icon on the
display.
The towel rail will restore
normal function in any of
these situations:
- After 30 minutes
- If the temperature increases by 0.2ºC for 1
minute from the point of activation.
- Pressing any key on the Heater
By default, open window detection is turned o.
Use +/- button to select ON or OFF and then press
Mode/OK to save your change.
With this feature activated
the towel rail will learn
what time it should switch
on to achieve the required
room temperature at your
programmed time. The
towel rail will monitor the
room temperature over
a rolling 10 day period to
establish how quickly the
room reaches temperature
and uses this information
to switch the towel rail on at
the correct time.. To turn on/o use the +/- buttons
and conrm with Mode/OK.
The Low Surface
Temperature (LST) menu
will allow the output of the
heater to be limited to a
lower setting to prevent
the surface of the heater
becoming too hot.
It is recommended that if
the LST function is activated
then the towel rail should be
locked with a non-standard
password after activation to
prevent the function being turned o.
(See Password Section for details on changing
the factory default password).
To cycle between the dierent outputs use the
+/- buttons and conrm the selection with Mode/
OK.
EASY Mode is a simple
mode of operation where
only the +/- buttons on
the towel rail operate to
increase or decrease the
temperature. The Mode/OK
button is de-activated.
When running in Easy
mode the screen will show
EASY in the notication area
to let the user know that the
mode is active.
To exit EASY mode press
and hold the CONFIG button
for 10 seconds, then select
“o”, using the +/- button
and conrm by pressing
Mode/OK.

13
Status ON
Change
Password
Runback Config
Setback
Max. Temp.
Runback
Confirm
OK CANCEL
RESET
Status ON
Change
Password
Status
ON
OFF
Password
Status ON
Change
Password
CONFIRM NEW
PASSWORD
1 2 3 4 OK
ENTER
PASSWORD
- - - - OK
Runback: See Runback
Section on page 14
Password: See Password
Section on page 14
Resetting the towel rail
will return all settings to the
factory defaults and will also
delete any ‘pairing’ with a
Gateway.
To activate the RESET feature select “OK” using
the +/- buttons and then press the Mode/OK
button to conrm.
PASSWORD
The Password Function of the towel rail serves
a number of functions; Keylock, Advanced menu
access and also Runback access when the
Runback is activated. The Default password from
the factory is four zero’s (0 0 0 0), however it is
strongly recommended that once installation is
complete that an alternative code is set.
To access the password function enter the
ADVANCED SETTINGS menu (see above) and
then select PASSWORD.
The password can be turned on or o and
changed.
To turn the password on or o, select Status
using +/- buttons and press Mode/OK.
Select either “ON” or “OFF” using +/- buttons
and press Mode/OK.
If you are reactivating the password then the
Enter New password screen is shown (The
password will always default back to 0 0 0 0).
If the password is turned o, the Keylock,
Advanced Settings menu and Runback controls
are accessible without entering a password.
The rst press of any button will wake up the towel rail any further
button presses will activate the function required.
To Change the password code when the
password is active select Change from the
password screen and using +/- buttons and press
Mode/OK.
Enter the new password using +/- buttons and
Mode/OK to conrm the new number. Once “OK”
is highlighted press Mode/OK
RUNBACK MODE
The towel rail comes with a Runback mode for
use when the heater will be installed in areas
where restricted user control is required.
When Runback Mode is active it allows the user
to set the towel rail to run for a specic pre-set
amount of time and temperature. It is also possible
to set a maximum temperature (Max Temp) above
the Runback setting to allow the user to increase
the temperature within the limits allowed.
After the Runback time period ends the room
temperature will return to o (7°C) until the
Runback is restarted.
It is also possible to set a minimum temperature
to be maintained (Setback) outside of the Runback
mode; when setback mode is activated the room
temperature will only fall as low as the Setback
temperature. The temperature will be maintained
at this point until Runback is restarted.
NOTE: Any display settings will be used in
RUNBACK mode, eg. Backlight time and intensity,
Eco mode etc. These should be adjusted prior to
setting Runback to Active.

14
Runback Config
Setback
Max. Temp.
Runback
Max Temp.
25.5°C
Runback
Settings
Max Time
RunBack Temp
Runback
Max Time
30 min
Runback
Temp
22°C min
Runback
30Minutes
Runback
22.5°C
set temp
TIME
Setback Config
OFF
ON
Settings
Runback
Setback Temp.
17°C
Runback
TIME
set temp
17°C
Setback
Runback Config
Setback
Max. Temp.
Runback
Runback Config.
OFF
ON
Settings
Runback
Temperature
Time
Runback ON, Setback OFF,
Max Temp OFF
Runback
Set point
Initial room Temperature Heating End
Heating Start
Min radiator
Temp (7ºC)
Temp Range available to User
SETBACK
As well as being the
temperature the towel
operates in after Runback
has ended, the setback
setting is used to limit the
lowest temperature that
the towel rail can be set to
while running Runback.
This temperature can be
set between 7°C (minimum)
and 0.5°C less than the
Runback temperature set-
point.
When Setback is
operational, the screen will
show “Setback” and the set-
point.
MAX TEMPERATURE
The Max Temperature
setting allows you to set a
temperature higher than the
Runback temperature
Both the Setback and Max
temp are set with the +/-
buttons from their respective
menus, using Mode/OK
button to enter the desired
mode.
The graphs below show
typical scenarios for each of the settings.
When Setback and Max temp is OFF, the user
has a choice between the minimum towel rail
temperature of 7°C and the Runback temp setting.
Outside of the Runback period the temperature
will fall as low as 7°C if the towel rail is not re-
activated.
ACTIVATING RUNBACK MODE
Runback mode is activated
from the Advanced settings
menu.
The main Runback screen
has 3 options:
• Runback Cong
• Setback Cong
• Max Temp
Set Runback to ON to
activate the mode.
Note: The Runback settings menu is not
available unless the Runback mode has been
turned on.
The Default time for
Runback to operate is
30 minutes, this can
be increased in ½ hour
incriments up to 8 hours
(480 mins) by using the +/-
buttons and conrming by
pressing Mode/OK.
0 → 30 → 60 → 90 → 120
→ 150 → 180 → 210 → 240
→ 270 → 300 → 330 → 360
→ 390 → 420 → 450 → 480
→0
Select one of the above values, this is how
long Runback will operate for before the Setback
temperature operates. If Setback isn’t activated
then Runback will restart.
After the Runback has expired the next activation
will start at the previous time selected. i.e. If the
previous setting was 60min, the next activation
will start at 60min.
The temperature that
the towel rail runs at when
Runback is activated is
set in the Runback Temp
menu. Use +/- to set the
temperature and press
Mode/OK to conrm.
Please note that the
Runback temperature
cannot be set higher than
the Comfort setting in the
main menu.

15
21.5°C
Wed. 11:00
Set point:
COMFORT
21.5°C
Wed. 11:00
Set point:
COMFORT
21.5°C
Wed. 11:00
Set point:
COMFORT
Time
Runback ON, Setback ON,
Max Temp OFF
Runback
Set point
Temperature
Heating End
Heating Start
Setback Limit
Temperature
Temp Range available to User
Runback ON, Setback ON,
Max Temp ON
Temperature
Runback
Set point
Heating End
Time
Temp. increased
By user to Max.
Max Temp.
Set point
Heating Start
Setback Limit
Temperature
Temp Range available to User
When Runback and Setback are activated then
the user has a limited choice of temperature
between the Setback setting and the Runback
setting.
Outside of the Runback period the temperature
will fall to the Setback temperature if the towel rail
is not re-activated.
When all 3 settings are activated then the user
has a choice between Setback as a minimum and
the Max temp setting as a maximum.
The Towel rail will always come on at the
Runback set point.
In the example above the user has activated
Runback and then increased the temperature to
the Max Temp set point after a time.
ERROR CODES
The Towel rail continuously checks to ensure
that it is working correctly all the time, however
in some cases the towel rail may display an Error
code on the screen.
Below you will nd each code and a short
description on the cause of each issue.
OC Disconnected or Open circuit temperature
sensor.
SC Damaged or Short circuit temperature
sensor.
TROUBLESHOOTING
If the power of the Lithium
battery drops, in the screen,
a small icon will remind the
user that the battery is at.
When a towel rail has been
paired with a
Gateway, the text
“Link” and an antenna with
ashing waves appears on
the top right of the screen.
When the Gateway is
not powered or it is too far
away from towel rail, the
Link text alternates with a
red antenna without waves
to tell you that the towel rail
cannot communicate with
the Gateway..
If a towel rail is paired with a Gateway, and the
internet connection is lost the heating system is
not accessible from the
App.
However the programe remains in the towel rail
memory and continues with the last user setting
so long as the lithium battery is not at.
The Lithium battery (CR2032) life is around 5
years from date of manufacture, this life can be
decreased depending storage conditions.
To change the battery contact your installer or
an electrician.

16
DEFAULT VALUES
Default mode: OFF
Type of control: PID
Temperature oset: 0°C
Open window detection: Disabled
Adaptive Start: Disabled
Programming in one hour intervals,
All programmed hours in anti frost mode
Set point temperatures:
• Anti-freeze 7°C
• Eco 18°C
• Comfort 21°C
• Manual temperature: 21°C
• Boost mode temperature: 21°C
• Boost mode time: 1 hour
Low Surface Temperature: Disabled
Password status: Activated
Password: 0000
Units: °C
Keyboard: Unlocked
Easy mode: Disabled
Runback mode: Disabled
Setback: Disabled
Runback temperatures and defaults:
• Antifreeze: 7°C
• Eco: 18°C
• Comfort: 21°C
• Max. Temperature of Runback: 21°C
• Max time of Runback: 30. Minutes
Screen brightness on: Max (4)
Screen brightness o: Min (OFF)
Screen time on: Min (5s)
Beep: Disabled
EcoDisplay: Disabled
DST: Disabled
Default date: 01-01-2019 (Tuesday)

17
ECODESIGN TABLE
Models Colorado DGi+ 450 Colorado DGi+ 750
Heat output
Nominal heat output (Pnom) 0.45 kW 0.75 kW
Maximum continuous heat output
(Pmax,c)0.45 kW 0.75 kW
Auxiliary electricity consumption
At nominal heat output (elmax) 0.0005 kW 0.0005 kW
At minimum heat output (elmin) 0.0005 kW 0.0005 kW
In standby mode (elSB) 0.0005 kW 0.0005 kW
Type of heat output/room
temperature control: Electronic room temperature control plus week timer
Other control options: Room temperature control, with open window detection
With adaptive start control
With distance control option
Heattend Products Ltd,
https://www.heattend.co.uk/
Email: [email protected]

18
NOTES

19
NOTES

MAINTENANCE AND CARE
Ducasa towel rails require very little maintenance.
The surfaces of the towel rail must not be cleaned with an abrasive product or those containing granular
substances.
We recommend regular cleaning with PH neutral products.
In order to clean the towel rail, it is recommended that the electric power is switched o.
CORRECT DISPOSAL OF THIS PRODUCT
(Waste Electrical & Electronic Equipment)
(Applicable in the European Union and other European countries with separate
collection systems)
This marking shown on the product or its literature, indicates that it should not be
disposed of with other household wastes at the end of its working life.
To prevent possible harm to the environment or human health from uncontrolled waste
disposal, please separate this from other types of wastes and recycle it responsibly to
promote the sustainable reuse of material resources.
Household users should contact either the retailer where they purchased this product, or their local
government oce, for details of where and how they can take this item for environmentally safe recycling.
Business users should contact their supplier and check the terms and conditions of the purchase contract.
This product should not be mixed with other commercial wastes for disposal.
UK Distributor of Ducasa Products:
Heattend Products Ltd
Web: www.heattend.co.uk
Email: [email protected]
This manual suits for next models
2
Table of contents
Other Ducasa Bathroom Fixture manuals
Popular Bathroom Fixture manuals by other brands

Healthcraft
Healthcraft PLUS Series installation instructions

Twin Star Home
Twin Star Home 30BV34004 Assembly instructions

Concept2
Concept2 4-part corner entry with swing doors Assembly instruction

KIKKA BOO
KIKKA BOO KAI Instructions for use

PierDeco
PierDeco AQUAMASSAGE PD-840 owner's manual

Delta
Delta 579-DST Series quick start guide