Ducky 14s User manual

DUCKY 14s CATAMARAN MANUAL

OWNER:
Full Name:
Address:
Owner of
Ducky-14s №
UA-UKN D14
has read and accepted for execution of instructions of this "Manual"
signature
Owner’s Copy
OWNER:
Full Name:
Address:
Owner of
Ducky-14s №
UA-UKN D14
has read and accepted for execution of instructions of this "Manual"
signature
Ukon-A Co., Ltd. Maker’s Copy

GENERAL INFORMATION
1. Purpose
Sailing-motor collapsible catamaran designed for boating, brief cruises or rides with sails or
outboard motor. Commercial transportation of passengers is not allowed.
2. Key Features
Length Overall, m
4.40
Width Overall, m
2.05
Width of Hull, each, m
0.45
Full Displacement Draft (Centerboard is set down), m
1.00
Full Displacement Draft (Centerboard and Rudder are lifted), m
0.18
Height Overall, m
7.00
Light displacement, kg
65
Load Capacity, kg
250
Sail Area, m²:
Main Sail
Gennaker
8.5
-
Allowable Outboard Motor Power, kW
2.0
Number of Crew (minimum / maximum), pers.
1 / 2
Operating Pressure in Floats, bar
0.15
Approximate assembly time, min.
Approximate disassembly time, min.
30
20
Packing Dimensions:
Packing 1, m
Packing 2, m
Packing 3, m
Sail
1.80 x 0.25 x 0.25
1.80 x 0.25 x 0.25
0.8 x 0.4 x 0.3
1.95 x 0.22 x 0.22
3. Stability and Unsinkability
Catamaran is highly stable, and the capsize is unlikely for most cases with wise control, except
intense regimes.
It is not recommended to allow the windward float to takeoff from water as the righting
moment will decrease, while the upsetting moment will be same or will increase, resulting in
catamaran rollover.
Overkeel is also possible at beam to sea sailing with wave condition close to extreme mode.
Catamaran Recovering from capsized state is possible by one person.
Catamaran remains afloat in case of any of the four sections of floats damage.
Helmsman (or in his absence, the person responsible for the catamaran safety) remains
responsible for boat stability and unsinkability during exploitation even in case of meeting the
requirements of this manual.
.
4. Crew
One person with Yacht Helmsman qualification is enough for catamaran steering. The
maximum amount of people onboard must not exceed 2 persons.
.

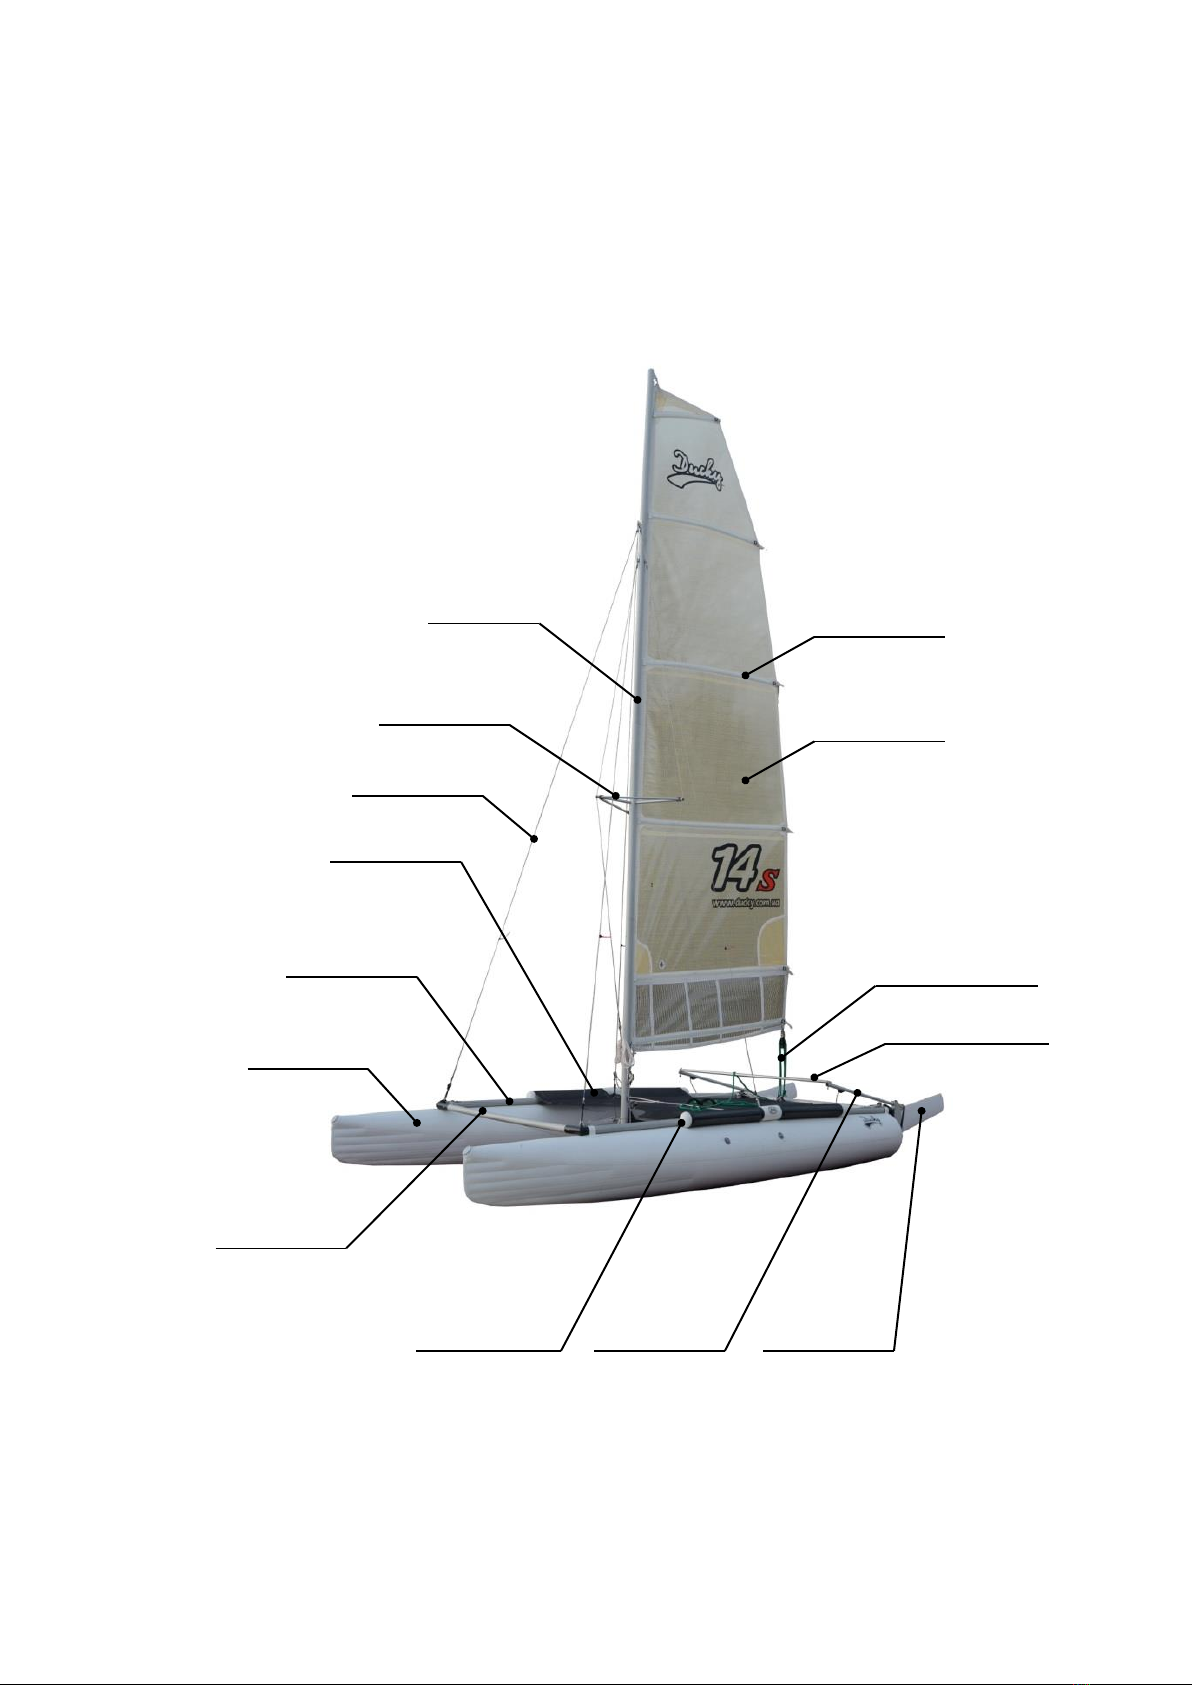
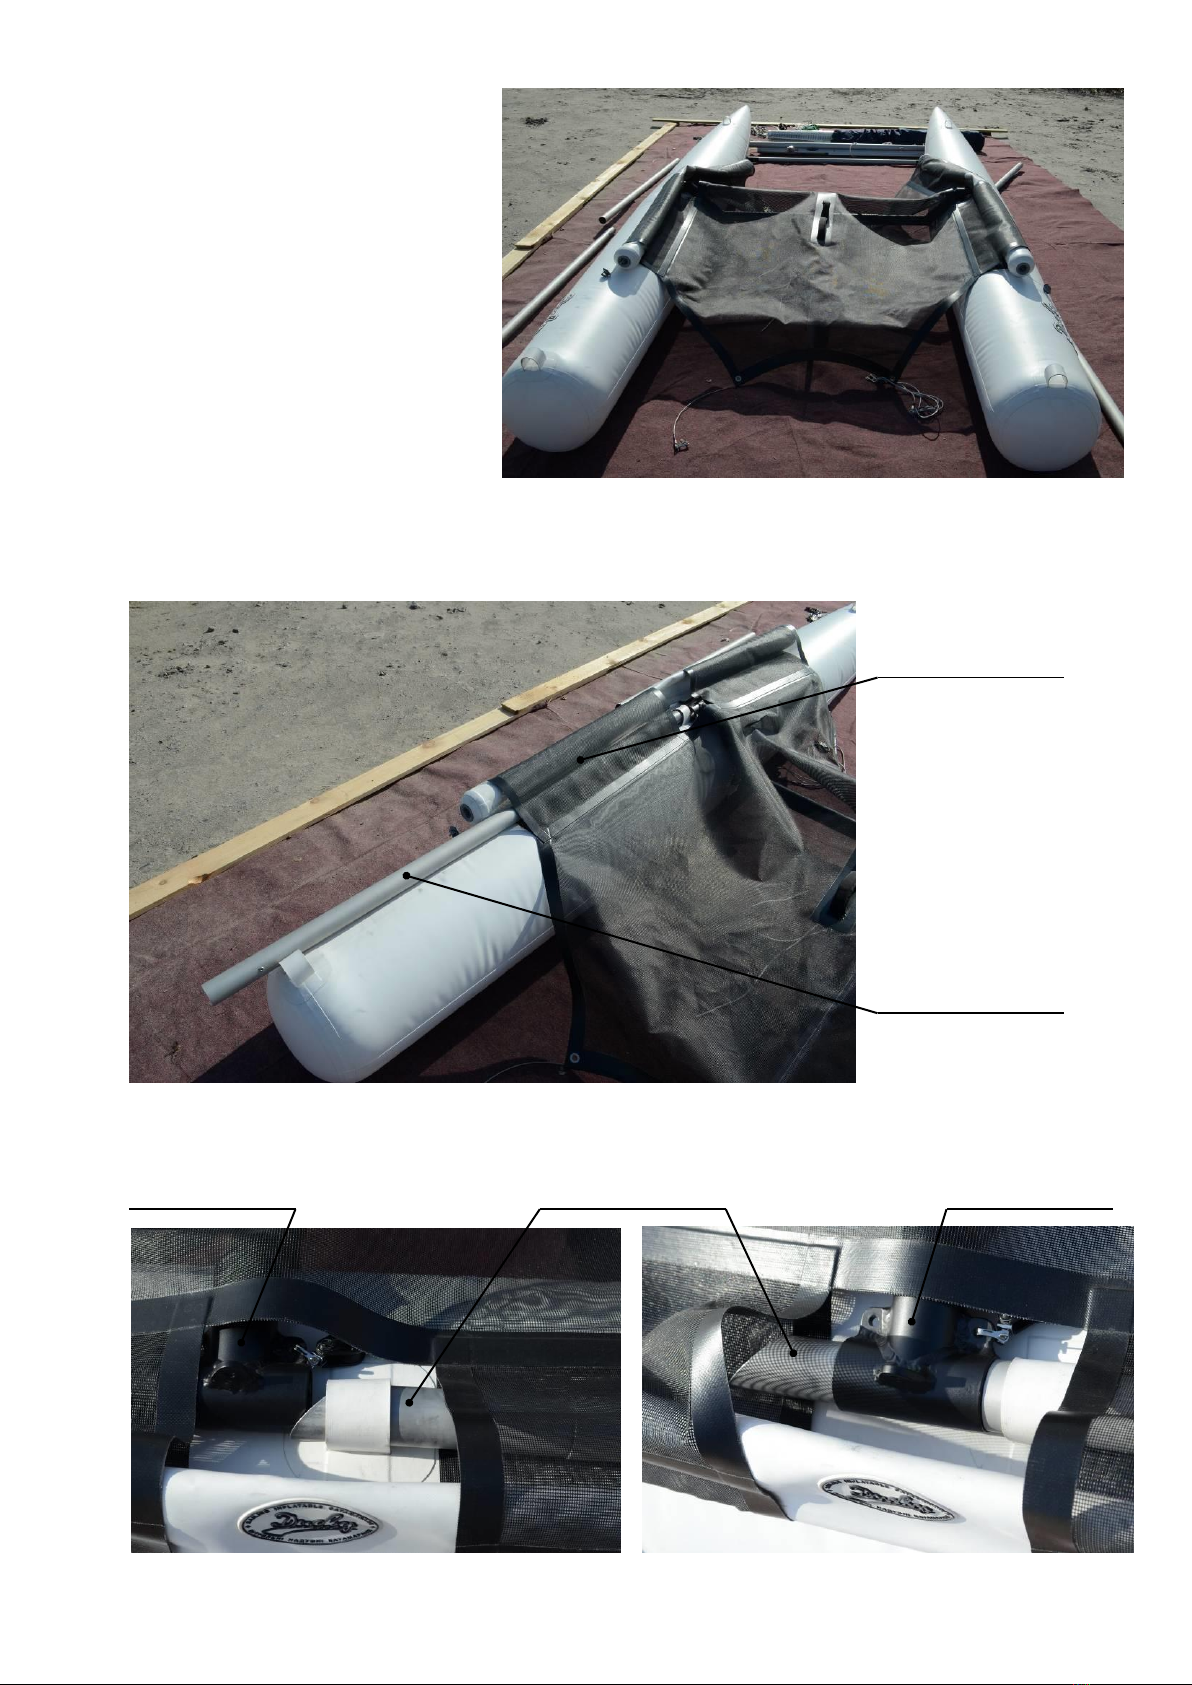
CATAMARAN CONSTRUCTION
Floats provide the buoyancy of catamaran. They are made from PVC fabrics and have
impermeable partitions dividing every float into two compartments. Every compartment is
equipped with a valve for filling with air. The floats are attached to the bridge with loops.
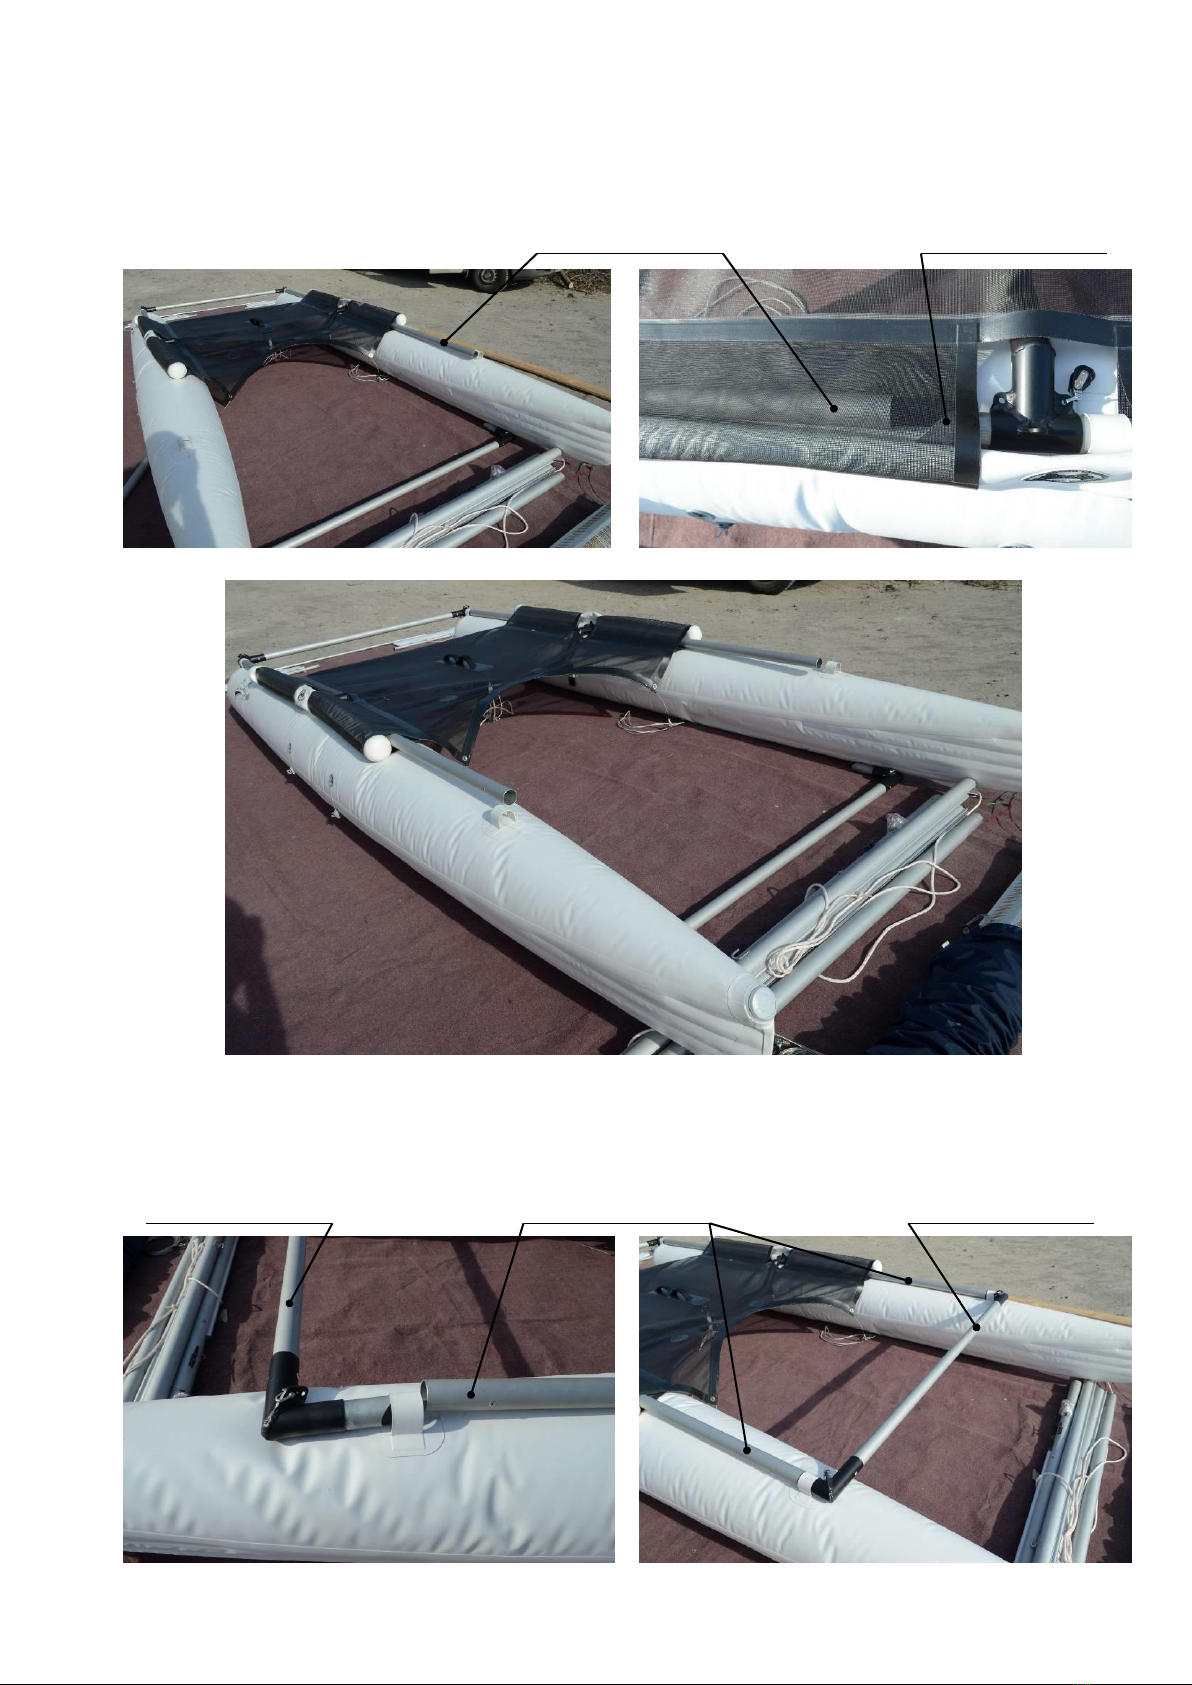
Bridge is аload-bearing unit of catamaran and takes on the loading of rigging, crew, etc. It is
made up of two compound longitudinal beams –stringers, three transverse beams –bow
beam, centerboard beam, stern beam, and diagonal cable tension braces - lower bridle.
Stringer beams consist of two parts: bow part and stern part.
Trampoline is made from PVC net and serves for crew accommodation. Trampoline’s sleeves
are put on the stringer beams. Trampoline is tensioned with cables and inflatable cylinders.
Centerboard unit consists of the centerboard and the centerboard beam. The centerboard is used
to reduce the drift of catamaran when sailing upwind. Rubber expander holds the centerboard in
operational (vertical) position. Expander absorbs the hitting of underwater obstacles, thus
allowing avoid the serious damage of the centerboard. In moorage (horizontal) position
centerboard is raised by halyard and held with clam cleat on the mast.
Rudder unit consists of two rudder blades and two rudder boxes. Rudders are used to control the
catamaran. They are mounted in the rudder boxes, that are attached to stern beam. Rubber
expanders hold the rudder blades in operational (vertical) position. Expanders absorb the hitting
of underwater obstacles, thus allowing avoid the serious damage of the rudder blades. In moorage
(horizontal) position rudder blades are raised by halyard and held with clam cleat on the rudder
tiller.
Rigging consists of the mast and sail. The mast consists of four pieces which are interconnecting.
Standing rigging includes forestay and shrouds which hold the mast in position. Tensioning of
shrouds and forestay is done by forestay's lanyard.
Running rigging includes tackle to control sail: the main-sheet and main traveler.

GENERAL VIEW
Forestay
Stringer
Spreader
Mast
Float
Bow Beam
Trampoline
Cylinder
Rudder
Tiller
Rudder
Blade
Tiller Crossbar
Trampoline
Mainsheet
Sail (Main)
Batten

CATAMARAN ASSEMBLY
Note: Some parts of your catamaran may differ from those shown on the photos.
A catamaran is packed into three packing and a
separate package is with a sail. Two long packing
include beams of bridge, mast, rudder and
centerboard units, standing rigging, and trampoline. In
the third packing there are floats, rudder blades,
running rigging and pump.
Sail
Mast
Bow Beam
Spreader
Cable Tensioners
Forestay and
Shrouds
Sheets
Bow Part of
Stringer
Float
Trampoline
Centerboard Beam
балка
Centerboard
Stern Part of
Stringer
Stern Beam
Rudder Box
Rudder Blade
Tiller Crossbar

Centerboard
Centerboard
Beam
1. Inflate the floats, but do not make the pressure
up to working level. That in the future will
facilitate the assembly process.
2. Put the centerboard on the centerboard beam.
Connect the both parts of the centerboard beam.
3. Install the Centerboard Beam into Sleeves of floats, as shown in the photo.
Sleeve
Centerboard
Beam

4. Roll out the trampoline.
5. Install the Stern parts of the stringers (two pipes with a 45-degree cut end). To do this, in turn,
pass each stern part of stringer through the trampoline sleeve and through the sleeve on the float.
Then attach the stern parts of stringers to the Centerboard beam.
Stern part of Stringer
Trampoline Sleeve
Centerboard
Beam
Centerboard
Beam
Stern part of
Stringer

6. Set up the Stern beam. For this, attach the Stern beam to Stern parts of stringers. By turning the
stern part of the stringer, achieve the deepest insertion of the stern beam.
Stern part of Stringer
Stern Beam
Stern Beam
Stern part of Stringer

7. Install the Bow parts of the stringers. To do this, in turn, pass each bow part of stringer through
the trampoline sleeve and join the bow part of stringer with the stern one. By turning the bow
part of the stringer, achieve the deepest insertion.
8. Set up the Bow beam. For this, attach the Bow beam to Bow parts of stringers. By turning the
bow part of the stringer, achieve the deepest insertion of the bow.
Stern part of
Stringer
Bow part of
Stringer
Bow part of Stringer
Bow Beam
Bow Beam

9. Set up the Diagonal cable tension braces - Lower bridle. With the help of brackets, fasten
the two front cables in the corners of the bow beam to the lower holes. Secure the two rear
short cables in the corners of the centerboard beam. Secure the remaining two long rear cables in
the corners of the stern beam to the lower holes.
Rear Short Cables
Rear Short Cables
Front Cables
Front Cable
Rear Short Cable
Rear Long Cable

10. Set up the Forestays and Shrouds. They are rolled in a hank. Shrouds are attached with
brackets to the ears on the left and right side of the centerboard beam. Forestays are fastened
with rope lanyards to the brackets on the bow beam, when installing the mast.
11. Assemble the mast. For this, interconnect the four mast segments.
Forestays and Shrouds
Jumper Stays

12. Install Jumper stays. To do this, unwind the jumper stays along the mast. Put two Side jumper
stays on Eccentrics. Connect the Central jumper stay, which has the part of Turnbuckle, with the
mating part of the turnbuckle on the mast. Tighten the turnbuckle.
Important!!! The two side jumper stays have a fixed length and, after putting on the
Spreader, they create initial deflection of mast. The mast will align after installing the central
jumper stay. The length of the central jumper stay is adjusted by Turnbuckle. This is an alinement
item. Depending on its length, the mast may have a different deflection. As shorter the jumper
stay, there is less deflection of the mast. Avoid excessive tightening of the turnbuckle and the
appearance of reverse deflection of the mast. Try to achieve almost straight mast after installing
the central jumper stay on the spreader.
13. Install the Spreader. To do this, insert the spreader spars into the corresponding holes in the
mast. Starting from the side jumper stays, pull them like a bow string and put them on the
corresponding Spars. Fix the jumper stays with screws. For convenience, while stretching, rest
your knee on the mast. This will give additional deflection of the mast and simplify the process of
stretching.
Spreader
Spreader Spars
Side Jumper Stay
Turnbuckle
Eccentric

14. Install the Mast on the Mast Foot and secure it with a button lock.
15. Fix the Shrouds and Forestays on the mast. For this, untangle the shrouds and forestays along
the mast. Put the ring with shrouds and forestays on the mast hook. Make sure that the guys are
on the edges and the forestays are in the center.
16. Raise the mast into a vertical position. If
the mast is raised by two people, then one of
them lifts the mast starting from the top and
goes to its base. The second person, at the
same time, is in front of the bow beam and
pulls on the forestays and finally raises the
mast into the vertical position. If the mast is
lifted by one person, then he raises the mast
from the top and goes to its base along the
trampoline until the mast is in an upright
position. After that it’s necessary to hold the
mast with forestays and walk to the bow.
Shroud
Forestays
Mast Foot
Mast

17. One by one, fix on the bow beam the forestays of starboard and portside, tighten them with a
rope lanyard and secure with a knot.
18. Attach the Trampoline Front Cable to the bow beam with shackles. Attach the Trampoline Rear
Cable to the stern beam with shackles. Stretch the trampoline up using the blocks located on the
trampoline front and rear cables.
Forestay
Lanyard
Trampoline Front Cable
Trampoline Front Cable Blocks
Trampoline Rear Cable
Trampoline Rear Cable Blocks

19. Tie one end of Centerboard Expander Cord to one of rear long cables brackets. Put the free
cord end with plate through another rear long cable bracket, then through the hole in the plate.
Tie a knot at the end of the cord. Adjust the degree of expander tension by shortening or
lengthening the cord, using the plate on the cord.
20. One by one pull of the centerboard expanders and lock them in the carbine of centerboard
expanders cord. For convenience, you can put the catamaran on its side. The expanders lower the
centerboard into position. Their tension should be enough to keep the centerboard in the working
position, but at the same time, should be enough to allow the raise of centerboard with halyard
into moor position.
Centerboard Expander Cord
Cord Length Adjustment Plate
Carbine
Centerboard Expanders

21. Attach the Block of the centerboard halyard, which will raise the centerboard into moor
position, to Mast foot plate with Shackle. Put the free end of halyard into the block on the mast.
22. Stretch the trampoline up. For this, inflate the
trampoline cylinders. For stronger tension of trampoline,
you can use a hand or foot pump with increased pressure,
for example, as shown in the photo.
23. In turn, setup the rudder boxes onto rudder joint units and fix them with locking rings.
Centerboard Halyard
Shackle
Mast Block
Locking Ring
Rudder Box

24. One by one install rudder blades into rudder boxes and fix them with the Rudder Blade Axles.
Put the locking rings on the rudder blade axles.
25. In turn, lay the rudder blade halyard, that raises the rudder into moor position, in each Rudder
Box. To do this, pass the free end of halyard through the block on the rudder blade, and then
secure it in the rudder box with a knot. For convenience of mounting, fold the end of halyard in
half, insert it into the tiller, turn it 90 degrees so that the end bends around the sleeve in the tiller.
Fix the end in the rudder box with a knot.
Locking Ring
Rudder Blade Axle
Rudder Blade Halyard
Rudder Blade Block

26. In turn, put on the rubber expanders that lower the rudders and lock them in the working
position.
27. Install the Traverse (Crossbar), that connecting the tillers to each other. To do this, install the
traverse on the tillers and secure it with pins.
28. Setup the Main Sheet Traveller on the stern beam. Make a round wiring: tie the end to the
traveller on the stern beam, pass the free end through the block on the stern node, then pass it
through the trampoline sleeve, then pass it through the block on the centerboard beam, then run
it on the trampoline to the block on other side of centerboard beam, guide it through this block,
then lead it through the trampoline, then put it through the block on the stern beam node and
secure it with the knot on the traveller.
Main Sheet Traveller
Expander
Traverse
Traverse Pin

29. Attach the Main Sheet Lower Block to the traveller.
30. Hoist the mainsail up. For this, tie the mainsail halyard to the mainsail head corner. While
hoisting mainsail, fix battens with tension straps. When the mainsail is fully hoisted up, lock the
mainsail halyard with the horn cleat. Lightly pull the luff of the sail with the Mainsail downhaul.
Main Sheet Lower Block
Mainsail Halyard
Table of contents
Other Ducky Boat manuals