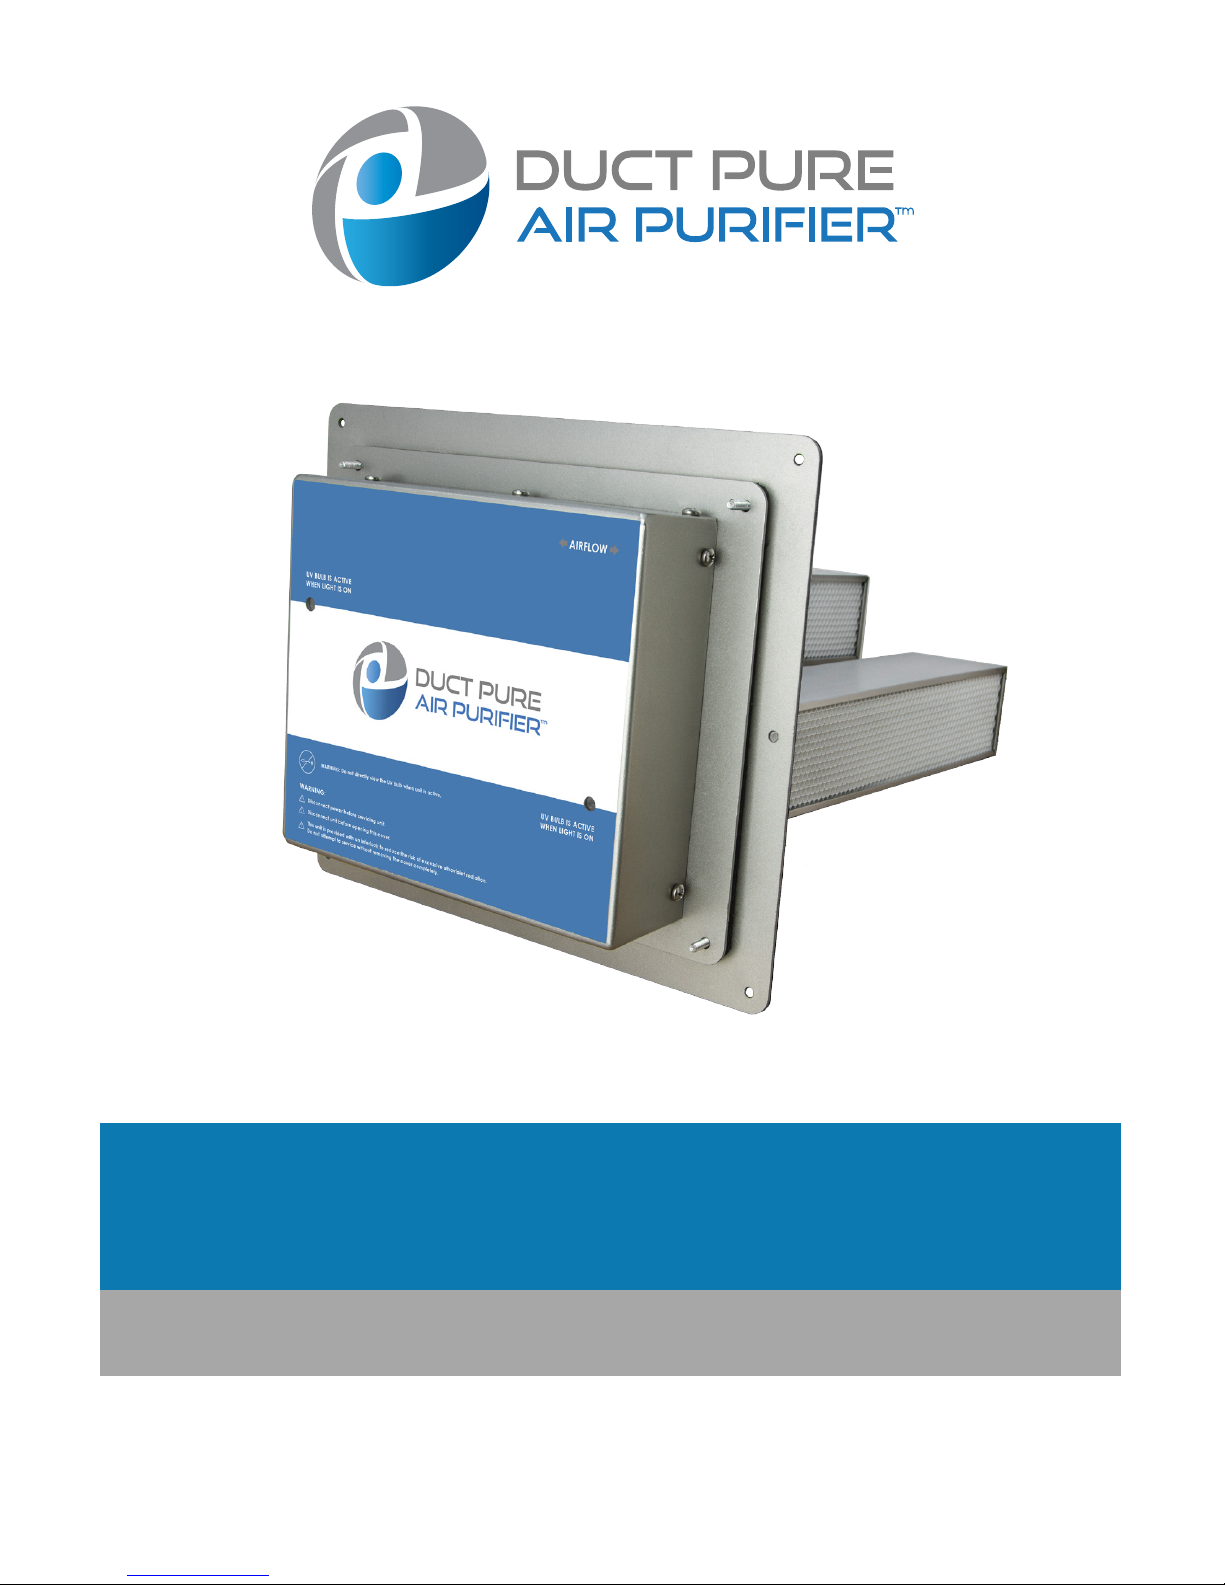
Duct Pure 80k User manual

Caution: Read manual carefully for proper procedures and operation.
• Specifications • Installation • Maintenance
80K Owner’s Manual

2
CONGRATULATIONS
CONTENTS
Product Contents .......................................................3
Installation Hardware .................................................... 3
Replacement Parts ......................................................3
About Duct Pure 80K ....................................................4
Specications ..........................................................4
Recommended Installation Tools .......................................... 5
Installation Requirements .................................................5
Installation ...........................................................6 - 8
Maintenance/UV Lamp Indicator. . . . . . . . . . . . . . . . . . . . . . . . . . . . . . . . . . . . . . . . . . 9
Changing the PCO Cell .................................................10
on your purchase of an Duct Pure 80K air purification enhancement system.
This unit is designed to be installed into an existing HVAC system, and used
as a virtually maintenance free enhancement to current air purification
technology.
Please read and follow all service procedures outlined in this manual.
Please record the name and phone number of your Dealer
Name
Phone #
Please record the serial number of your Duct Pure 80K
Serial #

3
PRODUCT CONTENTS
INSTALLATION HARDWARE
REPLACEMENT PARTS
(8) Self-tapping Screws
(4) Brass Thumb Nuts
The PCO Cell is the only replacement part available for the Duct Pure 80K.
Please contact your distributor for your new cell replacements.
PCO Cell Part Number: CELL-HV-14-O3-GT
PCO Cells
Adhesive Gasket Plate
Ballast

4
SPECIFICATIONS
ABOUT Duct Pure 80K
WARNINGS
WARRANTY:
• 2 Year Manufacturer’s Warranty
FEATURES:
• Replaceable PCO Cell
ELECTRICAL:
• 120VAC - 277VAC 50/60Hz AC Line Operation
• 33W power consumption
MECHANICAL:
• Distribution via air handler
Duct Pure 80K is a new generation HVAC Air purification system. Designed to
work with existing purification technology to reduce odors, smoke, and a broad
spectrum of indoor air contaminants.
Duct Pure 80K is easily mounted into air conditioning and heating system air ducts
where many problem can start. When the HVAC system is in operation, Duct
Pure 80K creates an Advanced Oxidation Process consisting of hydroperoxides,
superoxide-ions, and a safe low level ozone-all friendly oxidizers that revert back
to oxygen and hydrogen after the oxidation of a pollutant.
Used in conjunction with other current purification systems, Duct Pure 80K can
boost effectiveness and help distribute their benefits throughout your home.
To reduce the risk of electric shock, this equipment may have a grounding type
plug that has a third (grounding) pin. This plug will only t into a grounding type
power outlet. If the plug will only t into a grounding type power outlet. If the plug
does not t into the outlet, contact qualied personnel to install the proper outlet.
Do not alter the plug in any way.
WARNING! - UV light in operation. Disconnect unit from power supply before
servicing. Failure to follow warnings may result in severe eye damage.
!
SIZE: (HxWxD)
• 9 13/16” x 11 5/16” x 17”
WEIGHT:
• 4.5 lbs.
COVERAGE:
• Up to 10,000ft

5
RECOMMENDED INSTALLATION TOOLS
INSTALLATION REQUIREMENT
1. Unit should be installed downstream of
the air handler in the HVAC system.
2. The ductwork around the installation
area should be cleaned and dry to
insure proper adhesion of the gasket
materials and any tape used.
3. Two circular openings, measuring
approximately 3.5” (8.89cm) each, will
need to be cut into the existing duct
work to install the unit properly.
ELECTRICAL REQUIREMENT
HARDWIRING REQUIREMENT
To use the 120V plug, be sure to locate the unit within 6 ft. of a standard 120V grounded outlet.
Long term use on an extension cord is not recommended due to safety considerations.
Permanent wiring of the unit into your HVAC system, or installations using a 220V plug
(not included) should be done by a licensed HVAC Installer or Electrical Contractor only.
For 110V or 220V Applications: Black = L1, White = Neutral, Green - Ground
For International Applications: Brown = L1, Blue = L2, Green/Yellow = Ground
SIZE: (HxWxD)
• 9 13/16” x 11 5/16” x 17”
WEIGHT:
• 4.5 lbs.
COVERAGE:
• Up to 10,000ft
A
A - 3.5” Hole Saw Bit
B - 3/8” Drill Bit
C - Drill/Power Driver
B C D E F
D - Utility Knife
E - Tin Snips
F - Phillips Head Screwdriver

6
INSTALLATION
1. Find a suitable location to mount your
Induct Unit.
2. If necessary, cut away insulation for your
plate to adhere to the duct.
3. Using the Adhesive Gasket Plate, trace the
hole locations onto the duct.
4. Use the Hole Saw and Drill to cut out the
marked holes.

7
ALTERNATIVE CUTTING METHOD
1. Using the Adhesive Gasket Plate, trace the
hole locations onto the duct.
2. Drill holes around the outside edges of the
prviously marked holes but inside the outer
holes of the Adhesive Gasket Plate.
3. Use the Tin Snips to cut out the space
around the marked holes.

8
INSTALLATION
5. Remove the plastic backing on your
Adhesive Gasket Plate.
6. Press the Adhesive Gasket Plate onto the
duct. Secure with the (8) Self-Tapping Screws.
7. Place the Unit and Cells through the
openings and secure with the (4) Brass
Thumb Nuts.
8. Plug the Unit Power Cable into the
receptacle or have a Licensed Electrician
or HVAC Installer to hardwire the unit
directly into the HVAC system.

9
MAINTENANCE / UV LAMP INDICATOR
DISPOSAL OF THE PCO CELL
Your Duct Pure 80K unit requires no periodic
maintenance beyond normal replacement of the
PCO cell every 3 years.
Note: For optimal performance, we recommend the
replacement of the PCO cell every 3 years, especially
if the UV lamp appears to be operating normally.
The UV lamp operation indicator on the face of
the unit will glow when the UV lamp is in use. If the
indicator does not glow and the unit has power, the
PCO cell should be replaced.
Please do not throw a used PCO Cell in the garbage.
The special germicidal UVX bulb used in the Duct
Pure 80K contains a very small amount of mercury.
Contact your local Waste Management Center for
a proper disposal procedure.
UV LAMP OPERATION INDICATOR

10
CHANGING THE PCO CELL
1. Remove the Unit Power Cable from the
receptacle or ensure the unit isn’t powered.
2. Remove the (4) Brass Thumb Nuts from the
Unit Cover and Remove the Unit Cover and
PCO Cells.
3. Remove the (4) Screws holding the PCO
Cells in plae and remove the PCO Cells
from the Unit Cover.

11
CHANGING THE PCO CELL
4. Exchange the Old PCO Cells with the new
PCO Cells and replace the (4) Screws that
hold them in place.
5. Replace the Unit Cover and PCO Cells in the
duct and secure with the (4) Brass Thumb Nuts.
6. Place the Unit Power Cable back into the
receptacle or repower your unit.

WARRANTY INFORMATION
Table of contents