DUDOFF MH-F2B User manual

C
MIXED
HOB
MH-F2B
User Instructions
induction
hi-light

2
~ 2 mm
Fig. 2
min. 50 mm
50
mm
20 mm
Fig. 3
Fig. 1
A C DB
F
E
A1
G1
F1

3
mm03
1
2
3
mm04
1
2
3
Fig. 4
50 mm
700 mm
680 mm
380 mm
375 mm
675 mm
400 mm
52 mm

4
Fig. 7
Fig. 6
3 24 1
NL2 L1
2P+N
1
2
4
3
L1
L2
N
L1
3 24 1
N
1P+1N
1
2
4
3
L1
N
2 Ph + N
4 x 1.5 mm²
H 05 V2V2 - F
1 Ph + N
3 x 2.5 mm²
H 05 V2V2 - F

5
GENERAL INFORMATION
Carefully read this use and maintenance
manual, where important information
about installation, use and maintenance
safety is provided. Keep this manual for
future reference. Any installation operation
(electric connections) shall be performed
by specialized personnel, in compliance
with all standards and regulations in force.
INTENDED USE
• This cooktop is intended for use in
households and similar environments.
• This cooktop is not intended for outdoor
use.
• This cooktop is not to be used in mobile
locations such as ships.
• Use the cooktop only in household-
type situations for the preparation and
warming of food. All other types of use
are not permitted.
• Individuals who are incapable of
using the appliance safely because
of their physical, sensory or mental
capabilities or their lack of experience or
knowledge must not use this appliance
without supervision or instruction by a
responsible person.
SAFETY INSTRUCTIONS
• Children under 8 years of age must be
kept away from the cooktop unless they
are under constant supervision.
• Children 8 years and older must only be
allowed to use the cooktop if they have
been given supervision or instruction
concerning use of the appliance in a
safe way and understand the hazards
involved.
• Children shall not play with the appliance.
• Cleaning and user maintenance shall not
be made by children without supervision.
• WARNING: The appliance and its
accessible parts become hot during use.
Care should be taken to avoid touching
heating elements.
• WARNING: Unattended cooking on
a hob with fat or oil can be dangerous
and may result in re. NEVER try to
extinguish a re with water, but switch off
the appliance and then cover ame e.g.
with a lid or a re blanket.
• WARNING: The cooktop is hot during
use and remains so for some time after
being switched off. The risk of burns
remains until the residual heat indicators
have gone out.
• CAUTION: The cooking process
has to be supervised. A short term
cooking process has to be supervised
continuously.
• DANGER OF FIRE: Do not store items
on the cooking surfaces!
• Metallic objects such as knives, forks,
spoons and lids should not be placed on
the hob surface since they can become
hot.
• Always switch the cooking zones off
after use!
• The appliance is not intended to be
operated by means of an external timer
or separate remote-control system.
• RISK OF ELECTRIC SHOCK! If the
cooktop is defective or chipped, cracked
or broken in any way, immediately
switch it off and do not continue to use
it. Disconnect it from the electrical power
supply.
• For users who wear a pacemaker: When
the cooktop is in use it is surrounded by
an electromagnetic eld. It is unlikely that
this will affect a pacemaker. However, if
in doubt consult the manufacturer of the
pacemaker or your doctor.
Objects affected by electromagnetic
elds, for instance credit cards, CDs and
calculators, should be kept away from
the cooktop when it is on.

6
INSTALLATION INSTRUCTIONS
These installation instructions are
intended for a specialized installer
and are meant as guidelines for the
hob installation, adjustment and
maintenance, in compliance with any
regulations and standards in force. If
a built-in oven or any other appliance
generating heat is to be mounted
directly under the vitro-ceramic hob,
IT IS NECESSARY THAT SUCH
AN APPLIANCE (the oven) AND
THE VITRO-CERAMIC HOB ARE
PROPERLY INSULATED. Failure
to comply with this precaution might
result in the incorrect operation of the
TOUCH CONTROL system.
POSITIONING
This household appliance has been
designed for built-in installation onto a
worktop, as shown in the figure (Fig.2).
Use sealing material along the whole
perimeter - Fig.4 (Cut dimensions-
Fig.2). This operation is necessary
in order to prevent any liquid from
entering inside the hob, being that the
flatness of the top, the glass and their
coupling cannot be assured.
Fix the appliance on the worktop by
using the 4 supports, taking the work
top thickness into account (Fig.2).
If, after installation, the lower part of
the appliance is accessible from the
lower part of the cabinet, it will be
necessary to mount a spacing panel at
the distances given (Fig.3).
If the appliance is installed under an
oven, this step will not be necessary.
The appliance is not intended to be
operated by an external timer or a
separate remote control system.
VENTILATION
(Fig.5)
The distance between the cooktop and
built-in kitchen’s furnitures or cooking
apparatuses must guarantee sufcient
ventilation of the air. Not to use the
cooktop if in the oven is in course the
pyrolysis process.
ELECTRIC CONNECTIONS
(Fig.7)
Before carrying out any electric
connections, please make sure that:
- the ground electric cable is 2 cm.
longer than the other cables;
- the electrical system meets any
requirement mentioned in the rating
label found on the underside of the
work top;
- the electrical system is equipped with
an efficient grounding system and
compliant with any standards and law
directives in force.
In the case the appliance is not
equipped with a power cord and/or
the related plug, please use a material
suitable for the power absorption value
mentioned in the rating label and for
the operating temperature. If a direct
connection to the electric network is
required, you need to use an omnipolar
power switch with a switch-contact gap
of at least 3 mm, suitable for the value
mentioned in the label, and compliant
with the related standards in force (the
yellow/green ground connection shall
not be interrupted by the change-over
switch).
Once the appliance installation is
completed, the omnipolar switch shall
be easily accessible.
WARNING! THIS APPLIANCE MUST
BE GROUNDED
The electrical safety of this appliance
can only be guaranteed when continuity
is complete between it and an effective

7
earthing system, which complies
with current local and national safety
regulations.
It is most important that this basic safety
requirement is present and regularly
tested and, where there is any doubt,
the electrical wiring in the home should
be inspected by a qualied electrician.
The manufacturer cannot be held liable
for the consequences of an inadequate
earthing system such as an electric
shock.
The manufacturer cannot be held
liable for damage which is the direct or
indirect result of incorrect installation
or connection.
CLEANING AND MAINTENANCE
(Fig.6)
• Remove any residues of food and
drops of grease from the cooking
surface by using the special scraper
supplied on request.
• Clean the heated area as thoroughly
as possible using suitable products,
and a cloth/paper, then rinse with
water and dry with a clean cloth.
• Using the special scraper immediately
remove any fragments of aluminium
and plastic material that have
unintentionally melted on the heated
cooking area, or residues of sugar
or food with a high sugar content. In
this way, any damage to the cooktop
surface can be prevented.
• Under no circumstances should
abrasive sponges, or corrosive
chemical detergents, such as oven
sprays or stain removers, be used.
• Do not use water spray and steam to
clean the appliance.
COOKING TECHNOLOGY
This hob combines the convenient
qualities of hi-light (radiant) cooking
with the benets of induction
technology.
Both hi-light and induction cooking
zones rely on electricity for power.
With a hi-light cooking zone, a heating
element warms the burner, which then
transfers heat energy to the pan for
cooking.
With a magnetic induction cooking
zone, an electric current passes
through a coil, which generates a
magnetic eld in the burners. This
magnetic eld excites electrons in the
pan itself, causing the pan to heat up.
The burner itself is not designed to
warm up the way it would on a standard
electric stove.
NOTE: Only ferromagnetic cookware
can be used with induction technology,
including cast iron and stainless steel.
To determine whether the cookware is
suitable for induction cooking, check
whether the base of the pot or pan
attracts a magnet.
It is recommended to use at-bottom
pans with a diameter equal to or
slightly larger than that of the heated
area (Fig.6).
Do not use pans with a rough base in
order to prevent scratching the heat
surface of the cooking hob.
USE
Use the touch control system in the
corresponding position according to
individual cooking needs. Keep in mind
that the higher the number, the more
heat is produced.

8
CONTROL PANEL (Fig.1):
~ 2 mm
Fig. 2
min. 50 mm
50
mm
20 mm
Fig. 3
Fig. 1
A C DB
F
E
A1
G1
F1
A. ON/OFF key
A1.Led ON/OFF key
B. Slider
C. Selection key double cooking zone/
Booster
D. Key Pause/Recall
E. Cooking zone display
F. Display Timer
G. Indicator of dual active cooking zone
(Hi-Light )
• Switching the appliance on:
Press A key to switch the hob on.
All the displays relative to the cooking
zones switch on in the standby
position.
The control unit remains active for 20
seconds.
If no cooking zone is selected within
this time, the appliance switches off
automatically.
• Switching the cooking zone on:
Select the area of cooking and pressing
one of the Edisplay.
Slide the slider B to increase and
decrease the power of the cooking zone.
The power of the single cooking zone
can be adjusted in 9 different positions,
and will be displayed on the display
bright and with the display to number
from “1to 9”.
•(Hi-Light) Switching the double
cooking zone on:
To activate this feature, select the plate
with the double cooking zone and adjust
the power with the slider B.
Press the key Cto enable the double
cooking zone, the G1 led lights up.
Press again the key Cto disable the
double cooking zone, the G1 led lights off.
• (Induction) Booster function:
After selecting a cooking zone activate the
Power Booster by pressing the key C.
This function activates the selected
cooking zone at maximum power for 10
minutes. During this time the display
shows , when the time elapses it will turn
to 9. To disable the function press key C.
• Auto function:
After you have selected a cooking zone
you can activate the Auto function. While
setting the power acting on the slider B,
hold for about 2 seconds on the value
reached and the display will show the
symbol ashing (the cooking zone
reaches for few minutes the maximum
available power that depends on the
power setting), at the end it will return to
previous value.
• Residual Heat:
If the temperature of the cooking zone
is still high (over 50°) after it has been
switched off, the relative display will
indicate the symbol (residual heat). The
symbol will only switch off when the burn
risk in no longer present.
• Pot detection:
if the symbol should appear on one of
the cooking zone displays, it means that:
1) The recipient being used is not suitable
for induction cooking.
2) The diameter of the recipient used is

9
inferior to that allowed by the appliance.
3) No recipient is present.
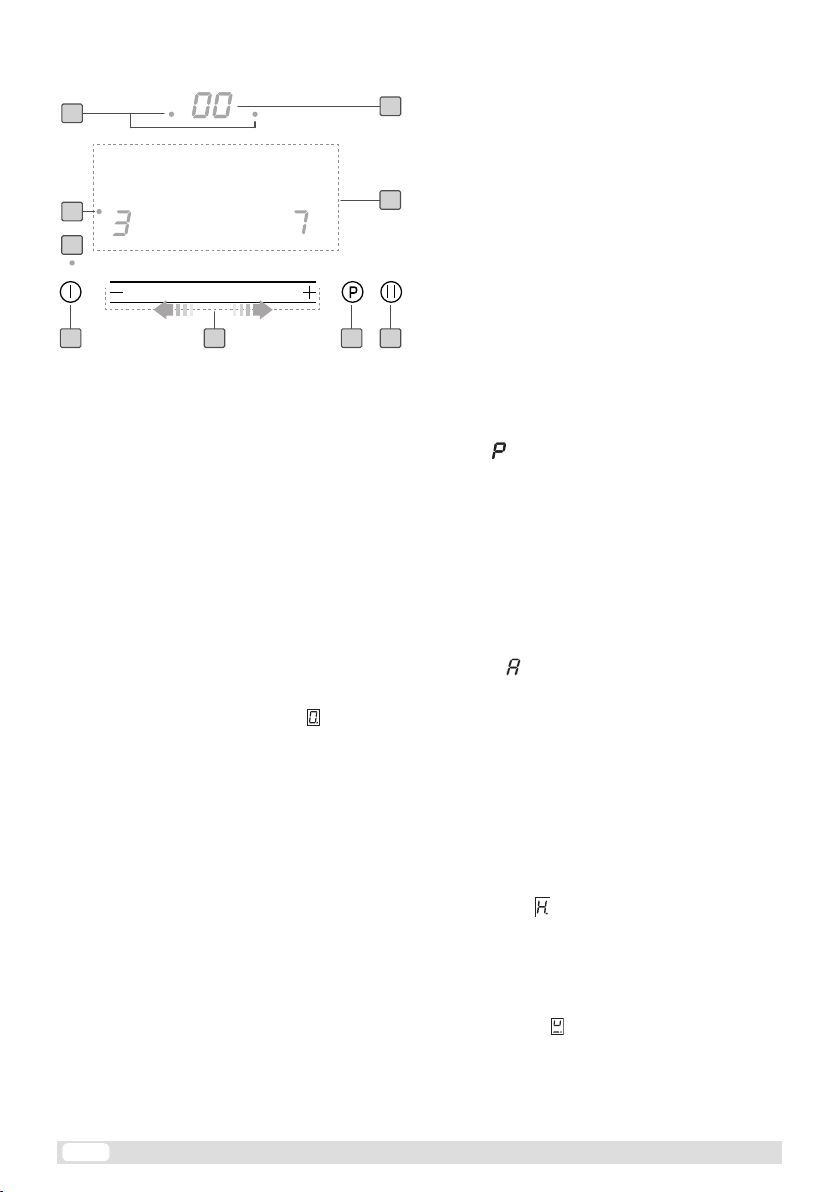
• Timer:
This feature allows you to set the time
(from 1 to 99 minutes) to automatically
turn off the cooking zone selected.
Activate a cooking zone and adjust the
power. Enable the timer on the display
by pressing F.The display will show the
symbol and the LED on the selected
zone set on one corner of the Fdisplay
will ash. Scroll bar slider B to set the
desired value (eg 3 min.). Press Fon
the display which will display the scroll
bar slider back and set the desired value
(eg, 23min.) On the display and conrm
by pressing F. If you wish to conrm a
time less than 10min timer. (eg 3 min.)
Conrm by pressing twice on the display
F. The timer will automatically turn off the
cooking zone and you will hear a beep
that can be turned off by pressing any of
the commands.
• Egg timer/reminder:
This feature allows you to set a reminder
sound.
To access this feature none of the cooking
areas shall be in operation. Turn on the
stove using the Abutton, activate the
timer by pressing the display area F
and adjust any time between 1 to 99
minutes as described in the previous
paragraph TIMER. After confirmation of
the memorandum, the LED will remain
active on the Akey and the display F with
the time previously set. At this point you
can turn back the hob with the Abutton
and adjust the cooking zones. When the
timer expires you will hear a beep that
can be turned off by pressing any of the
commands. With the reminder you can
not access the active timer.
• Pause:
When at least one cooking zone is
operating it is possible to momentaneously
pause the appliance switching off the
heating elements by pressing the Dkey.
When the pause function is active the
relative led is on and all displays Ewill
show the symbol . The pause may
last for 10 minutes. If the status is not
terminated within this time the appliance
switches off. The pause function can be
deactivated by pressing the Dkey and
within 10 seconds any of the control keys.
Previously programmed timers will be
stopped during the pause.
• Recall:
When the appliance has been switched
off by mistake it is possible to quickly recall
the previously active settings by pressing
the on-off Akey withing 6 seconds, then
pressing the Dkey within another 6
seconds. If the recall function is available
the relative led will be enlighted when the
appliance is swithcehd on again.
• Control panel lock:
It is possible to block the controls to prevent
the risk of unintentional modication of
the settings (children, cleaning etc.).
Switch on the hob with Akey, and within
10 seconds, simultaneously press the
display Ein the lower right corner and the
Dkey, then press againn the display Ein
the lower right corner. All displays Ewill
show the symbol .To temporarily unlock
the commands and return to action on the
adjustments (eg, stop the cooking), you
must simultaneously press the dispaly
E in the lower right corner and press D
key. When the Control lock is on, you can
always switch off the hob. In this case, the
Control lock remains active even at restart
hob. To unlock the hob permanently,
press simultaneously the display Ein

10
the lower right corner and the Dkey, then
press the Dkey again. The hob will shut
off automatically.
• Switching the cooking zone off:
Select the cooking zone by pressing the
corresponding display E. Slide left on the
slidebar B until until reaching position .
• Switching the appliance off:
To turn off the hob entirely hold down the
A key.
• Safety switch:
The appliance has a safety switch that
automatically switches off the cooking
zones when they have been operating for
a certain amount of time at a given power
level.
POWER
LEVEL
OPERATING TIME LIMIT
(hours)
1 - 2 6
3 - 4 5
5 4
6 - 7 - 8 - 9 1,5
THE MANUFACTURER DECLINES ALL RESPONSIBILITY FOR EVENTUAL
DAMAGES CAUSED BY BREAKING THE ABOVE WARNINGS.
THE WARRANTY IS NOT VALID IN THE CASE OF DAMAGE CAUSED BY
FAILURE TO COMPLY WITH THE ABOVE-MENTIONED WARNINGS.
DISPOSAL OF OLD ELECTRICAL
APPLIANCES
• Old electrical and electronic appliances
often still contain valuable materials.
However, they also contain harmful
substances that were essential for the
proper functioning and safe use of the
equipment. Handling these materials
improperly or disposing of them in your
household waste can be harmful to your
health and the environment. Therefore,
please do not dispose of your old
appliance with regular household waste.
• Old appliances may contain materials
that can be recycled. Please contact
your local recycling authority about the
possibility of recycling these materials.
• Please be sure that your old appliance
does not pose a danger to children while
being stored for disposal.


3PCLIOBIH721TDD 09 novembre, 2016
Table of contents
Other DUDOFF Hob manuals
Popular Hob manuals by other brands

arcelik
arcelik HIMW 75225 S user manual

Panasonic
Panasonic KY-R647EL Operating and installation instructions

Innocenti
Innocenti ICONFECO60W user manual

Foster
Foster 7334240 user manual

AEG Electrolux
AEG Electrolux 79301 KF-N Installation and operating instructions

AGA
AGA DC3 User's guide & installation instructions