Durite 0-775-05 User manual

Operating Instructions - 0-775-05
12/24v 1T4R 1 Camera to 4 Monitors
2.4GHz 7″ Digital Wireless CCTV System
Please read this manual thoroughly before operating the
device, and keep it for future reference.
V 1.2

Contents
1. Precautions...............................................................................................................1
2. Features.................................................................................................................... 3
3. Technical Specifications......................................................................................... 3
4. Accessories...............................................................................................................4
5. Parts Identification................................................................................................... 5
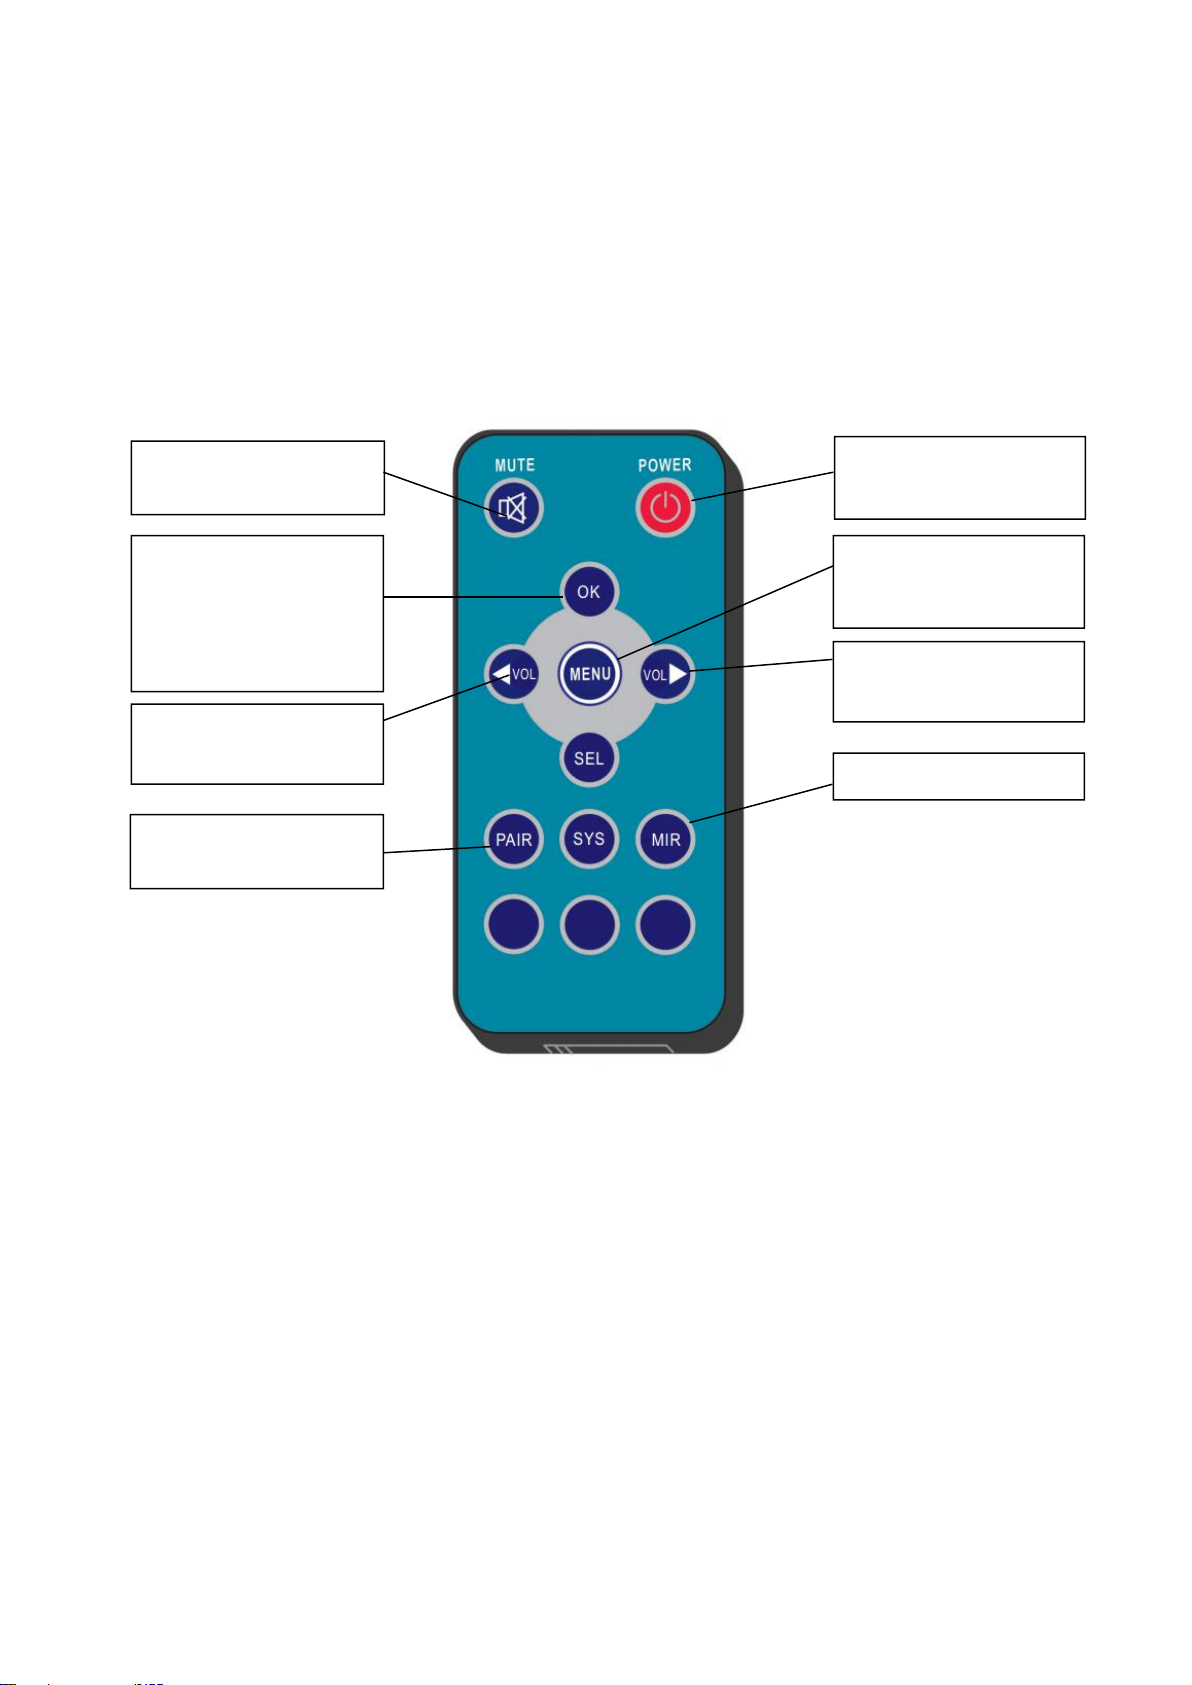
6. Remote Control Operation..................................................................................... 6
7. Basic Operation........................................................................................................8
8. Menu.......................................................................................................................... 9
9. Recording Time......................................................................................................14
10. Installation Tips....................................................................................................14
11. Troubleshooting................................................................................................... 15

1
1. Precautions
●Storage and Keeping
1. Do not expose the monitor to excessive heat or cold. The storage temperature of this
device is -30~+80℃, and the operating temperature is -20~+70 ℃. The humidity is
Rh90%.
2. Never use this device near a bathtub, wash basin, kitchen, damp basement, swimming
pool or similar places.
3. Never use this device in environments with excessive moisture, dust or smoke.
4. Avoid dropping or striking this device.
5. Avoid using this device in enclosed spaces, areas with excessive vibration or subject to
severe impacts.
6. Never puncture, scratch or use abrasive cleaning materials on this device.
7. Do not place cables where they may be pinched or stepped on.
8. Leave at least a 2" space between the monitor and walls, cabinets or other objects to allow
adequate air circulation around the device.
9. The monitor is not designed to be waterproof.
●Operating Precautions
1. The device may be powered by DC power 10V - 32V (eg.12V or 24V ACC).
2. Make sure all cables are connected properly. Observe polarity. Improper cable connections
may damage the monitor. Remove the power cable connections when you do not intend to use
the device.
Warning!
1. High voltage is present within the monitor. The opening of the case should be by professionals.
2. Do not watch the video while driving unless you are monitoring the rear view camera display.
Special Notice
Occasionally, a few highlights or dark spots may occur on the LCD screen. This is a very common
phenomenon in active matrix display technology, and doesn’t necessarily indicate any defects or faults. Never
try to repair this device by yourself. In case of any problems, please turn off the display at once and notify our
company or authorized dealer. The monitor is a complex device. Any disassembly or modification may lead to
damage and void the warrantee.

2
●Maintenance
1. Remove all the cable connections from the monitor before cleaning the device.
2. Use a mild household detergent and clean the unit with a slightly damp, soft cloth.
Never use strong solvents such as thinner or benzine, as they might damage the finish
of the device.
This symbol is intended to alert the user to the presence of uninsulated
"dangerous voltage" within the product's enclosure that may be of sufficient
magnitude to constitute risk of electric shock to persons.
This symbol is intended to alert the user to the presence of important
operating and maintenance (servicing) instructions in the literature
accompanying the appliance.
This symbol is intended to alert the user not to waste electrical and
electronic equipment.
CAUTION
You are cautioned that any changes or modifications not expressly approved in this
manual could void your warrantee and necessitate expensive repairs.
●Declaration of conformity
This device complies with Part 15 of the FCC Rules. Operation is
subject to the following two conditions:
(1) This device may not cause harmful interference.
(2) This device must accept any interference received, including
interference that may cause undesired operation.
RISK OF ELECTRIC SHOCK
DO NOT OPEN
CAUTION: TO REDUCE THE RISK OF ELECTRIC SHOCK
DO NOT REMOVE COVER(OR BACK).
NO USER-SERVICEABLE PARTS INSIDE.
REFER SERVICING TO QUALIFIED SERVICE PERSONNEL

3
2. Features
1. TFT LCD monitor with wide angle view and high resolution display.
2. Support 1T1R \ 1T2R \ 1T3R \ 1T4R.
3. NORMAL, MIRROR, FLIP and MIR-FLIP viewing available.
4. Support recording in AVI signal format.
5. Auto dim function available.
6. Full-function remote control.
7. 1 wireless camera input.
8. Wide voltage input: 10 - 32V.
9. On-board speaker.
3. Technical Specifications
LCD size
7"
Resolution
800 x 3 (RGB) x 480
Contrast
500:1
Brightness
400 cd/m²
Viewing Angle
U: 50 / D: 70, R/L: 70
Dot pitch
0.0642(W) x 0.1790(H)
Aspect Ratio
16:9
Channel
1 channels
Operating Frequency
2400 - 2483.5 MHz
Receiving Sensitivity
-89 dBm
Decompression Form
MPEG4
Modulation
2.4G FSK/GFSK
Time Delay
200ms
Transmitting Distance
120 M
Micro SD Card
Max 128G
System Format
PAL / NTSC
Power Supply
DC 10-32V
Power Consumption
Max. 6W
Loudspeaker
1.5W/8Ω
Operating temperature
-20~+70ºC,RH90%
Storage temperature
-30~+80ºC,RH90%
Special Notice
All specification are subject to change without notice.

4
4. Accessories
Special Notice
Accessory supply may be different for different application.
U-Support Bracket
Center Mount Bracket
Sun Shield
Power cable
IR Remote control
Angle Adjustment Screws

5
5. Parts Identification
Power switch
Volume increase
Press OK button to enter
menu item or save user
settings.
Press OK button -
shortcut for start/stop
recording.
Press OK button for 3
seconds - shortcut for
PAIRING.
Loudspeaker
Menu
Digital Color
LCD screen
Power indicator
Remote control
sensor
Light level
sensor
Mounting bracket installation
Volume decrease
Micro SD Card Slot

6
6. Remote Control Operation
Press to select MUTE
or enable sound
Press OK button to enter
menu item or save user
settings.
Press OK button - shortcut
for start/stop recording.
process
Volume decrease and
menu selection left
decrease and menu selection
Press to turn on/off the
monitor
Press to show menu or
exit menu
Volume increase and
menu selection right
MIR-Flip selection
Fast pairing when camera
is activated

7
● MUTE(Mute)
Press to select MUTE or enable sound
● POWER(Power switch)
Press to turn on/off the monitor
● OK
Press OK button to enter menu item or save user settings. Press OK button - shortcut for start/stop
recording
● MENU
Press to show menu or exit menu
● VOL
Volume decrease and menu selection left
● VOL
Volume increase and menu selection right
● PAIR
Fast pairing when camera is activated
● MIR
MIR-Flip selection

8
7. Basic Operation
7.1 Installation of Center Mounting Bracket:
①Adjust monitor level by sliding the support to the
desired height.
②Adjust the angle of the monitor and tighten the
knob on the center mounting bracket.
7.2.Installation of U-support Bracket
Support attaching piece
Knob
Battery
Camera
DC/ 12V
Automobile
application

9
8. Menu
●Press MENU to display the following options and settings:
●Adjust PICTURE and MIR-FLIP only on RX1. RX2/3/4 setting will also be changed.
1. PICTURE 4. RECORD
2. MIR-FLIP 5. PLAY
3. SYSTEM 6. PAIRING
RX1 RX2/RX3/RX4
(1) Press or to select PICTURE. Press OK to enter.
RX1 RX2/RX3/RX4
Press or to select BRIGHTNESS / CONTRACT / HUE / VOLUME, press OK
to enter. Press or to adjust. Press OK to exit. Press MENU return to main

10
menu.
(2) Press or to select MIR-FLIP. Press OK to enter.
Press or to select NORMAL / MIRROR / MIR-FLIP / FLIP. Press MENU
return to main menu
(3) Press or to select SYSTEM, Press OK to enter .
TIME:Press or to select TIME. Press OK to set. Press or to adjust.
Press OK to continue setting.
AUTO-DIM: Press or to select AUTO-DIM. Press OK to enter, and then
press or to select ON/OFF. When set as ON, backlighting automatically
adjusts in accordance with the outer brightness.

11
ELETRONIC DISTANCE LABEL: Press or to select ELETRONIC DISTANCE
LABEL. Press OK to enter, press or to select ON/OFF to open or close the
electronic distance label. When it is on, the electronic distance label will be
Displayed.
(4) Press or to select RECORD, Press OK to enter.
Press or to select OVERWRITE / FORMAT, press OK to enter. When the
icon turns yellow, press or to select ON or OFF. Press OK to exit. Press
MENU return to main menu.
OVERWRITE: Previous video file will be overwritten when disk is full.
FORMAT:Micro SD card must be formatted before being used. All files in Micro SD
card will be lost once disk is formatted.

12
(5) Press or to select PLAY, Press OK enter .
Press or to select DATE , Press OK to enter.
Press or to select TIME & CHANNEL, Press OK to enter.

13
(6) Press or to select PAIRING, then press OK to enter.Or Press OK for 3 seconds to enter
PAIRING.
Manual pairing:
1. Press pairing button on the camera for 5 seconds to clear historical pairing data.
2. Select a monitor to pair. Select PAIRING in monitor menu and press OK button or press OK button
on monitor for 3 seconds. Monitor displays the message “PAIRING START 50”, counts down from
50s
3. Press pairing button on the camera.
4. Monitors are paired in sequence of 1 2 3 4.
5. If pairing is completed, the video will be displayed. If it is failed, a message “No Signal” will be
displayed. Repeat the pairing procedure.

14
9. Recording Time
With Micro SD cards in different capacities, please refer to the table below for recording time under 2
different image modes.
This table is for reference only. Data may vary under different environments.
Micro SD
MODE
8G
16G
32G
64G
128G
SINGLE
(640x480x1)
14h
28h
55h
110h
220h
10. Installation Tips
10.1 Antennas should be vertically lined to the ground. Make sure there is no obstacle
around antennas.
10.2 Magnet based extension antenna should be attached on the top of the vehicle.
Make sure there is no obstacle around or between 2 antennas.

15
11. Troubleshooting
The symptoms described below do not necessarily mean a failure within the display.
Please check the following items before you initiate request for repair.
Symptoms
Possible Causes/Solutions
No picture, no sound
Improper connection of automobile adapter. Use of un-authorized power supply.
Power switch is on OFF position.
No signal
Check whether the camera has power supply. Pair the monitor and the camera
again.
No sound
Check whether the sound volume is turned off or set too low.
Dark picture
Check whether brightness and contrast are adjusted correctly.
No color
Adjust the HUE settings.

Table of contents
Other Durite Security System manuals