Dutch & Dutch Studio 8m. User manual

Studio 8m.
Owner’s manual
Version 0.4
April 2016

DUTCH & DUTCH B.V.
KEILESTRAAT 9A
3029 BP ROTTERDAM
THE NETHERLANDS
+3110 737 0863
WWW.DUTCHDUTCH.COM

Important safety information
·Read this manual before rst use and retain it for future reference
·Follow all safety instructions
·Electrical safety
This is a Class I appliance which requires a protective earth connection. Always ensure
that the device is properly grounded. Do not defeat the purpose of the grounding type
mains connector. Do not modify the power cord. Take care to route the power cord in
such a manner that it is not likely to be pinched, walked on, or stressed in any other way.
If the power cord is damaged, replace it with an equivalent type.
Unplug the power cord during a thunderstorm or when left unused for a long time.
·Moisture
Do not use this product in moist or wet conditions. Make sure that no liquids can be
spilled or splashed on the product. Do not place objects containing liquids on the product.
If liquid should spill into the product, do not use it anymore. Unplug the power cord and
have the product serviced by a qualied technician.
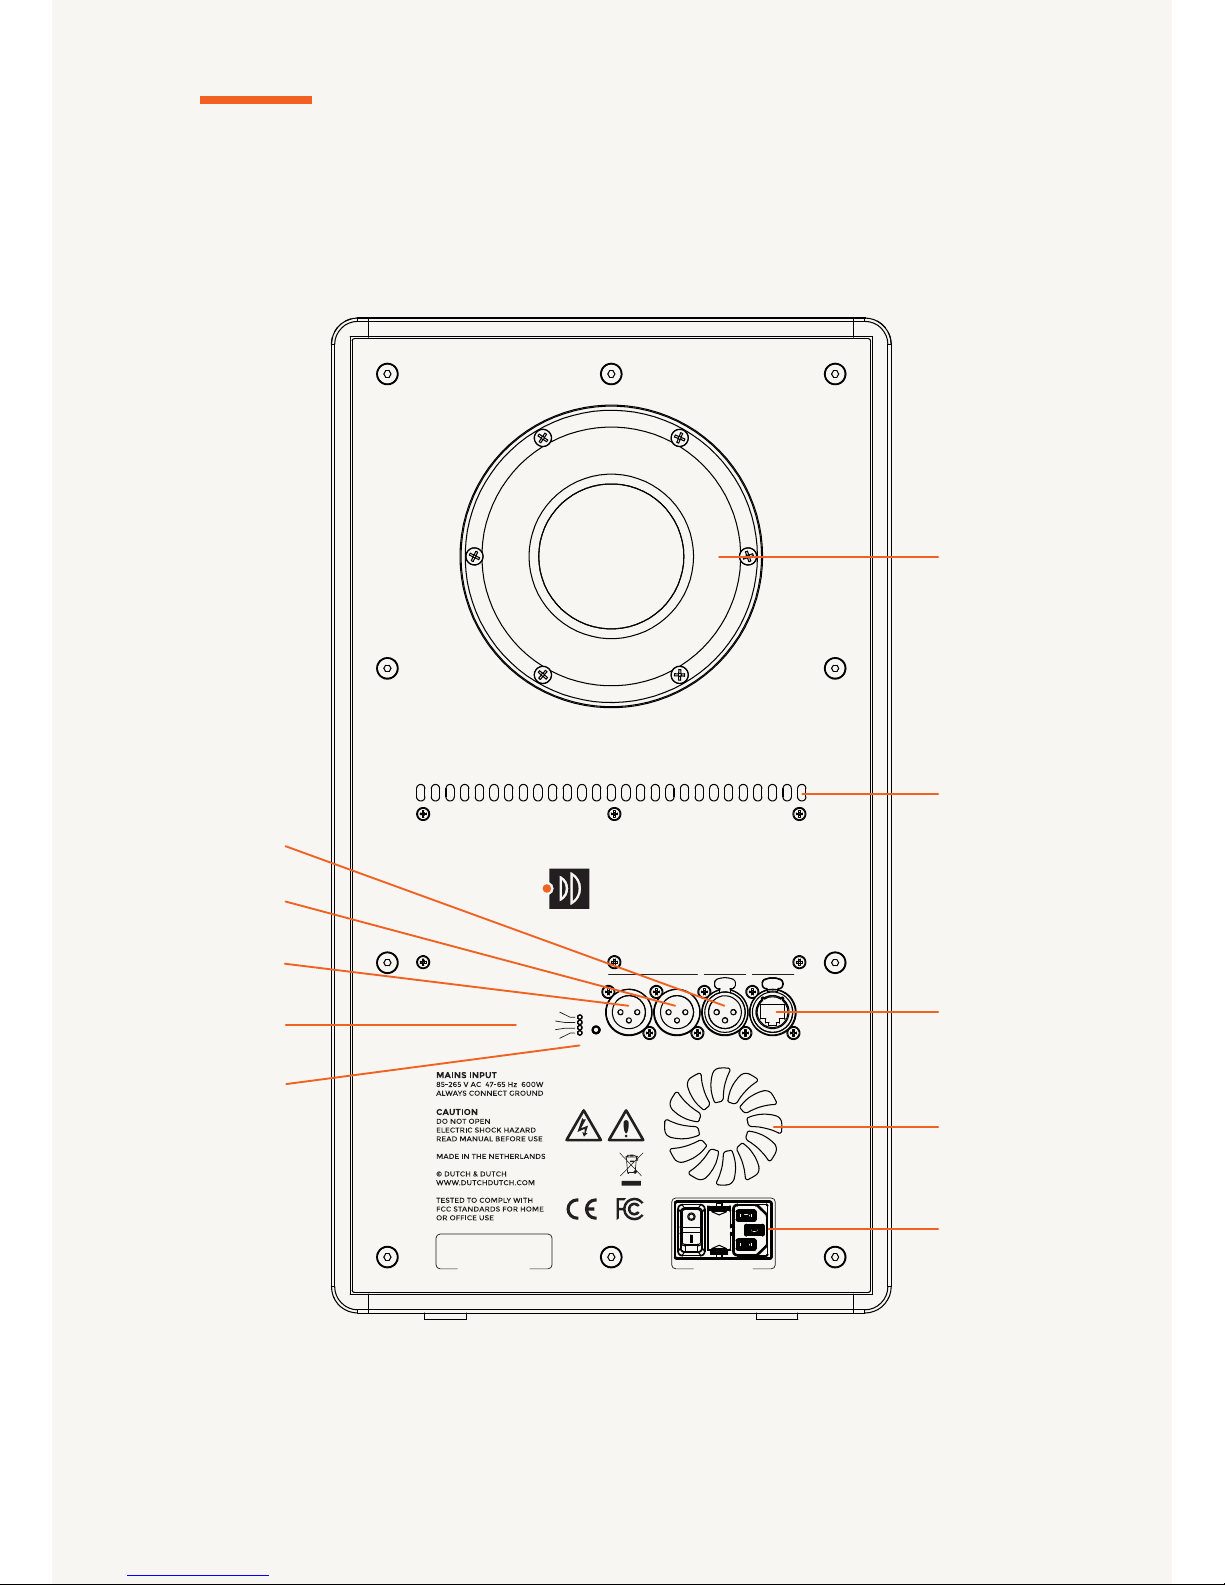
·Heat and ventilation
This product contains components that can get warm and require proper ventilation
in order to function properly. Do not block any of the ventilation openings on the back
panel.
Additionally, make sure not to use the product in the direct vicinity of a heat source.
·Sound pressure
Professional audio equipment is capable of producing sound pressure levels that can
cause hearing impairment. Local laws regarding exposure to such sound pressure levels
should be observed and hearing protection should be used if necessary.
·Rigging and mounting precautions
When mounting or installing loudspeakers, use only those accessories that have been
approved by Dutch & Dutch. This is the only way that safe operation is guaranteed.
Furthermore, make sure that all load–bearing components and structures are able to carry
their loads, taking legally applicable safety factors into account.
When either the mounting accessories or the rigging points on the loudspeaker cabinet
have visible damage such as cracks, corrosion, bending or warping, damaged screw
threads and so forth, the affected device should be taken out of service immediately. Safe
operation can not be guaranteed when damage to load–bearing components is apparent.
Perform a thorough visual inspection before use to ensure that this is not the case.
·Cleaning
Use only a dry or damp cloth to clean the product.
·Maintenance and service
This product may only be serviced by a qualied technician. Any attempt at servicing or
disassembling the product beyond the measures explicitly mentioned in this manual will
void the manufacturer’s warranty.
3

IF YOU HAVE A QUESTION ABOUT THE TECHNOLOGY, DESIGN,
SPECIFICATIONS, OPERATION, ACCESSORIES OR APPLICATIONS
OF YOUR DUTCH & DUTCH PRODUCT, DO NOT HESITATE TO
CONTACT US AT SUPPORT@DUTCHDUTCH.COM
DUTCH & DUTCH RESERVES THE RIGHT TO CHANGE THE
SPECIFICATIONS OF ITS PRODUCTS AND/OR THE CONTENTS OF
THIS MANUAL WITHOUT NOTICE. THE UP-TO-DATE VERSION OF
THIS MANUAL CAN ALWAYS BE FOUND AT DUTCHDUTCH.COM
4

Important safety information 3
Contents 5
General information 6
Introduction 6
Quality assurance & control 6
Contents of the box 6
Accessories 6
Manual contents 6
Product conguration 7
Tweeter and waveguide 7
Woofer and reex cabinet 7
Crossover and electronics 7
Front panel overview 8
Rear panel overview 9
Product operation 10
Connecting to mains power 10
Status LED 10
Connecting to a local area network 10
Audio input 10
Looping output 10
Subwoofer output 11
Settings pushbutton 11
Cooling fan 11
Fuse 11
Basic sound optimization 12
Basic triangle 12
Listening distance 12
Listening height 12
Horizontal (‘landscape’) operation 13
Toe-in 13
Limited warranty 15
Coverage 15
Handling 15
Contents
5

Introduction
Congratulations on your purchase of the Dutch & Dutch Studio 8m. The Dutch & Dutch Studio
Series combines world–class acoustical engineering with unique Clerk™ communications and
signal–processing, packaged in an extremely durable product.
The Dutch & Dutch Studio 8m is a powerful, versatile, high resolution studio monitor for
listening distances from 0.5 metre upwards. Besides supreme sound quality, it provides many
ltering and equalization options. It has clean, dynamic sound, extremely precise imaging and
an incredibly wide sweet spot.
This manual contains information on how to handle, install, use and maintain the product, as
well as important safety instructions.
Quality assurance & control
Every Dutch & Dutch product is thoroughly inspected and tested before shipping, as certied
by the QC note you will nd enclosed with the product. If any sign of damage or malfuction is
present upon arrival of the product, please do not throw away any of the packaging material
and immediately contact your Dutch & Dutch sales representative.
Contents of the box
The box should contain:
·1 Dutch & Dutch Studio 8m loudspeaker;
·1 IEC power cord matching your regional power outlets;
·1 QC note;
·1 manual (such as this one)
If any of these items should be missing, please contact your Dutch & Dutch representative.
Accessories
Several accessories are available for the 8m, such as wall brackets, stands, and protective
front grilles. Even if your application requires special accessories, Dutch & Dutch may be able
to provide them or consult you on alternative solutions. See dutchdutch.com or contact your
Dutch & Dutch representative for more information.
General information
6

Product conguration
Tweeter and waveguide
A ferrouid–enhanced 1” aluminium/magnesium alloy dome tweeter is coupled to a highly
optimized 8” constant directivity waveguide. Together with the optimized bafe dimensions
and large bafe edge roundovers, this ensures an extremely smooth frequency response both
on and off axis. The extremely stiff and light membrane is resonance-free throughout the
audible range.
Woofer and reex cabinet
The 8” woofer has an extremely stiff aluminium cone. Its edge is additionally stiffened to
avoid membrane and surround resonances in the woofer’s operating range. The long voice
coil is wound on an aluminium former, providing excellent power handling and low thermal
compression. The rear–ring bass reex vent has a large surface area for consistent loading,
regardless of sound level. Symmetrical termination ares on both sides reduce turbulence
noises and woofer offset to an absolute minimum.
13-ply birch wood panels, which are more than twice as stiff as the commonly used MDF, are
applied in the cabinet. Combined with the rabbeted joints and extensive bracing, this results in
an extremely strong, rigid construction.
The outer bafe is made of strong glassber–reinforced nylon-6 and damped with a special
sound deadening compound to avoid resonances. It is afxed with six threaded rods, which
double as tensioning elements for the cabinet, thus further reducing resonances.
Crossover and electronics
The drivers are crossed over with steep lter slopes at 1500 Hz for optimal driver integration. FIR
ltering ensures excellent driver integration, high power handling and perfect impulse response.
A separate compartment houses the ampliers, which provide 250 W to the woofer and 100 W
to the tweeter, as well as the signal processing and communication electronics. Filtering, room
correction and equalization options are accessible through the platform–independent Clerk™
interface, enabling easy integration into any system.
7

Front panel overview
MAINS INPUTSERIAL NUMBER
NETWORKIN
THRUSUB
OUT
+4 dBu
-10 dBV
AES3 L
AES3 R SET
INPUT
Studio Series
8m
1. TWEETER
2. WOOFER
3. STATUS
INDICATOR
8

Rear panel overview
MAINS INPUTSERIAL NUMBER
NETWORKIN
THRUSUB
OUT
+4 dBu
-10 dBV
AES3 L
AES3 R SET
INPUT
Studio Series
8m
12. FAN INLET
5. FAN OUTLETS
8. SUBWOOFER
OUTPUT
11. NETWORK
CONNECTOR
13. MAINS
INPUT
4. BASS REFLEX
PORT
9. INPUT
INDICATOR
10. INPUT
SWITCH
6. AUDIO INPUT
7. AUDIO
THROUGHPUT
9

Product operation
Connecting to mains power
The 8m accepts AC mains voltages between 85 and 265 V and net frequencies between 47 and
65 Hz. There is no difference in amplier output power between 120 V and 230 V mains voltages.
An IEC power cord, suited to your regional power outlets, is supplied with the 8m. Plug it into
the IEC receptacle (13), then plug the other end into your wall socket.
Status LED
The logo on the 8m’s front (3) doubles as a status indicator.
·Off: the loudspeaker is switched off entirely
·Dimmed pulse: the loudspeaker is in standby mode
·Bright pulse: the loudspeaker is muted
·Quick pulse: there is an error. Open the Dutch & Dutch app to see what is wrong. Alternatively,
try performing a software reset (see “Settings pushbutton”). If the fault can not be remedied,
contact your Dutch & Dutch representative.
·On: the loudspeaker is switched on.
In case the illumination of the logo is undesirable, it can be dimmed or switched off from the
Dutch & Dutch app. Please keep in mind that the loudspeaker’s status can only be monitored
through the app in this case.
Connecting to a local area network
The 8m has an RJ45 receptacle (11), which can be used to connect it to your local area network
(LAN), allowing the Dutch & Dutch app to nd your speakers.
Audio input
The 8m can be connnected to either digital (AES3) or (balanced) analog sources. There is one
female XLR connector (6) that can be used to present these signals to the 8m. Make sure the
correct preset is selected (see “Settings pushbutton”).
Although it is possible to connect unbalanced sources with adapter cables, Dutch & Dutch
strongly recommends that balanced sources are used in order to obtain optimal gain and
sound quality.
Looping output
There is a male XLR loopthrough (7) connector that can be used to loop the signal to another
8m. Make sure that both loudspeakers are set to the correct AES3 channel in case you are
looping an AES3 signal (See “Settings pushbutton”).
10

Subwoofer output
The second male XLR connector (8) is a subwoofer output, intended for use with an external
active subwoofer. Various ltering and equalization options such as high– and low pass lters,
peak lters, delays and phase inversion can be applied to the subwoofer output.
Settings pushbutton
Although most settings are only available through the application, basic settings can be
adjusted with the "Set input" pushbutton (10) on the rear panel. Pushing the button briey
will toggle the input setting between the analog high level (+4 dBu), analog low level (-10 dBV),
AES3 left channel, AES3 right channel and AES3 mono input settings. The four LEDs indicate
the selected setting.
·Analog high level (+4 dBu): this setting should be used with professional audio equipment
that uses the +4 dBu alignment level. The maximum peak input before clipping is +24 dBu.
·Analog low level (-10 dBV): this setting can be used with equipment that has a lower output
level, such as consumer electronics The maximum peak input before clipping is +10 dBV.
·AES3 left (AES3 L): the left channel of a supplied AES3 signal will be used.
·AES3 right (AES3 R): the right channel of a supplied AES3 signal will be used.
·AES3 mono (both “AES3 L” and “AES3 R” indication LEDs are illuminated): the AES3 signal
will be mixed to a mono signal.
In case you which to reset the loudspeaker to its factory settings, push the button for 5 seconds.
This will also clear all equalizing lters and return the input to the +4 dBu setting.
Cooling fan
The 8m is equipped with a hybrid cooling system. During normal use, convection cooling will
sufce to keep the amplier and electronics at normal operating temperature range. In extreme
cases where heavy use is combined with high environmental temperatures, a fan provides
additional cooling as necessary. The fan speed is regulated to maintain a low noise level.
Fuse
A 10A fuse is located in the fuse drawer next to the mains input and power switch (13). If the
loudspeaker should not switch on upon operation of the power switch, inspect the fuse to
make sure that it is intact. You can pry open the fuse drawer with a small at screwdriver and, if
necessary, replace the fuse inside. Make sure to use the correct rating.
However, if a fuse fails, it is most likely due to an internal electrical fault and replacing the fuse
will not solve the problem. In case the new fuse also fails, the product needs to be serviced.
11

Basic sound optimization
The 8m, through its highly optimized acoustic design, is
very exible with regard to acoustics, providing superior in–
room performance. Still, The performance of your monitor
system is heavily inuenced by the acoustic properties of
the listening room. Positioning the loudspeakers in the
right manner will be helpful in achieving optimal sound.
Basic triangle
When using the 8m to make a two–channel stereo setup,
position them in an equilateral triangle with your listening
position.
Listening distance
The normal equalizer settings for the 8m yield a at
response at listening distances of 1 metre (3’3”) or more.
If you wish to use the 8m at even closer range, you can
select the special neareld setting in Clerk. This setting
compensates for neareld bafe effects and low frequency
boost. This way, you can use the 8m at listening distances
down to 0,5 metres (1’8”) without compromising sound
quality.
The strength of the (accurate) direct sound from your
monitors decreases by 6 dB per doubling of the listening
distance. However, the strength of the (uncorrelated)
reverberant sound in your room is more or less constant.
As such, choosing a smaller listening distance can
dramatically increase sound clarity.
Listening height
The reference axis of the 8m is perpendicular to the
bafe and equidistant to the woofer and tweeter axes.
The loudspeakers should ideally be positioned in such a
manner that the axis is near ear height. However, as long
as you are within 10° of the reference axis, variations in
frequency response are near imperceptible.
A two–channel stereo setup
Recommended listening distance
Recommended listening height
60°
20°
> 50 CM
12

Horizontal (‘landscape’) operation
While recognizing it as a common practice, Dutch &
Dutch advises against using loudspeakers with the
midwoofer and tweeter horizontally aligned. Although
the 8m has a low and very steep crossover and is thus not
as sensitive to interference lobing as more conventional
designs, it is simply not ideal with regard to off axis
frequency responses.
If horizontal operation is absolutely unavoidable, make
sure that you orient the loudspeakers with the tweeters
on the inside and aim them directly at your listening
position.
Toe-in
The on and off axis frequency responses of the 8m are
very similar; the 8m sounds equally good whether you’re
straight in front of it or at an angle. As such, the direct
sound will not be signicantly affected by toeing in the
loudspeakers (aiming them at your listening position).
This, in turn, allows you to adjust stereo imaging without
compromising the spectral balance of the sound.
Generally speaking, more toe–in will yield a more
focused, precise, and drier sound by reducing the
strength of lateral reections. Using less toe-in will
increase lateral reections, resulting in livelier sound
and a wider perceived sound stage. You can experiment
with different toe–in angles to tweak the stereo image
to your requirements or taste.
Try to avoid placing the loudspeakers directly above or
next to reective surfaces, such as a mixing console, hard
walls and so forth. Reections from such objects will
interfere with the direct sound from your loudspeakers,
causing dips in the frequency response.
A setup without toe–in
A setup with toe–in
Listening setup for horizontal operation
13

Technical specications
*IN HALF SPACE RADIATION CONDITIONS
**EXCLUDES RUBBER FEET
DRIVERS:
CROSSOVER:
ENCLOSURE TYPE:
MAX LINEAR SPL @ 1M:
AMPLIFIER POWER:
AMPLIFIER TYPE:
SYSTEM SNR:
MAINS INPUT VOLTAGE:
DIMENSIONS (H X W X D):
WEIGHT:
CABINET CONSTRUCTION:
ANALOG INPUT:
ANALOG OUTPUT:
DIGITAL INPUT:
DIGITAL OUTPUT:
NETWORKING:
PROTECTION FUNCTIONS:
LF: 8” ALUMINIUM CONE
HF: 1” ALUMINIUM / MAGNESIUM ALLOY DOME
1500 HZ, 8TH ORDER, PHASE COHERENT
BASS REFLEX
106 DB CONTINUOUS FROM 35 HZ UPWARDS*
LF: 245 W
HF: 100 W
CLASS D, POWER FACTOR CORRECTION, HYBRID COOLING
>118 DB
100 – 240 V AC, 50 – 60 HZ
480 X 270 X 380 MM** (19 X 10.5 X 15 IN)
15 KG (33 LBS)
ENCLOSURE: 18 MM BIRCH PLYWOOD
OUTER BAFFLE: INJECTION MOULDED ABS
BALANCED AUDIO OVER XLR
SENSITIVITY SWITCH: +4 DBU / -10 DBV
PEAK INPUT LEVEL: +24 DBU / +10 DBV
DSP CONTROLLED OUTPUT FOR ACTIVE SUBWOOFER
AES3 OVER XLR
LEFT / RIGHT / MONO CHANNEL SWITCH
AES3 LOOP THROUGH OVER XLR
ETHERNET OVER RJ45
THERMAL
DC / CLIPPING
DRIVER OVERLOAD
14

Limited warranty
Dutch & Dutch designs its products for longevity and uses only the best available components.
However, no amount of care can fully exclude product failure. In the unfortunate event that the
product malfunctions, we will repair or replace it.
Coverage
The Dutch & Dutch limited warranty on this product is valid for 5 years after the rst consumer
purchase and covers any defect or failure directly attributable to faulty design, materials, and
workmanship. The Dutch & Dutch limited warranty does not cover:
·Damage sustained during shipment;
·Damage resulting from improper use, abuse, accidents, neglect, or failure to comply with
the safety instructions in this manual;
·Damage resulting from repairs or modications made by anyone who is not a technician
approved by Dutch & Dutch;
·Damage to any product on which the Dutch & Dutch serial number is missing, illegible or
modied;
·Claims based on misinformation or misrepresentation by a reseller.
Handling
If your product is faulty, contact Dutch & Dutch through one of the channels indicated in this
manual. You will receive instructions on how to ship the affected product to us.
If the fault is covered by warranty, Dutch & Dutch will pay all expenses involved in repairing or
replacing the product and shipping it back to you.
15
Table of contents
Popular Subwoofer manuals by other brands

Ground Zero
Ground Zero URANIUM GZUW 8SQ owner's manual

Rockford Fosgate
Rockford Fosgate FFS1024 Installation and operation manual

RE Audio
RE Audio REX8 owner's manual

Hifonics
Hifonics MAXXIMUS Series installation guide

Fluance
Fluance DB-200 instruction manual

Harman
Harman JBL Synthesis SSW-1 owner's manual