Dyflexis Rex-O-Matic Noa User manual

Quick Start
Guide
Rex-O-Matic Noa
Version: 1.0
EN / NL / DE / FR / ES
Ihr Rex-O-Matic ist in drei einfachen Schritten einsatzbereit
1. Montage Rex-O-Matic
Platzieren Sie den Rex-O-Matic auf eine stabile Ober-
äche. Befestigen Sie das Gerät vorzugsweise mit den
mitgelieferten Montagematerialien an der Wand. Hinweis:
Der Rex-O-Matic sollte nicht direktem Sonnenlicht oder
einer nassen Umgebung ausgesetzt werden.
2. Rex-O-Matic einschalten
Schließen Sie zuerst das Internetkabel und dann das
Electrokabel an. Schalten Sie den Rex-O-Matic ein, indem
Sie die Taste unter dem LED-Streifen drücken.
Der Rex-O-Matic stellt innerhalb von Minuten automatisch
eine Verbindung zum Internet her. Wenn die Verbindung
erfolgreich hergestellt wurde, leuchtet das Netzwerk-
symbol in der oberen linken Ecke weiß auf.
3. Anmelden und Registrieren Ihrer Mitarbeiter.
Gehen Sie über das Menüsymbol oben rechts zu den
erweiterten Einstellungen und scannen Sie die Karte des
Administrators, um Zugriff zu erhalten zum System. Regi-
strieren Sie Ihre Mitarbeiter über die Option „Mitarbeiter“
im Menü. Sie wählen einen Mitarbeiter aus, indem Sie auf
den Namen klicken. Wählen Sie dann „Karte/Pass hinzufü-
gen“ und halten Sie die persönliche Mitarbeiter-Karte/Pass
davor . Sobald die persönliche Mitarbeiter-Karte oder
Pass registriert ist, hören Sie einen kurzen Signalton.
Wenn Sie die Funktion der Fingererkennung verwenden
wollen von dem Rex-O-Matic, können Sie pro Mitarbeiter
einen Fingerscan durchführen (es werden lediglich 5
kleine Punkte des Fingers umgerechnet in eine Alphanu-
merischen Code). Wählen Sie „Fingerscan hinzufügen“
und wählen Sie in den darauf folgenden Bildschirmen aus,
welche Finger Sie scannen möchten.
Wenn Sie für einen Mitarbeiter sowohl eine Karte/Pass als
auch einen Fingerscan hinzufügen, kann der Mitarbeiter
beide Optionen zum Ein- und Ausstempeln verwenden.
Wenn Sie alle Mitarbeiter registriert haben, ist der Rex-O-
Matic einsatzbereit. Ihre Mitarbeiter können jetzt ein- und
ausstempeln.
Weitere Informationen.
Die Sicherheitsanleitung und Weitere Informationen nden
Sie in der Dyexis Knowledge Base (Wissensbank) unter
dyexis.com/noa oder scannen Sie den folgenden QR
Code. Wenn Sie Unterstützung bei der Installation Ihres
Rex-O-Matics benötigen, können Sie sich wenden an
Ihre Dyexis-Supportabteilung unter +49 2114 1872 707
(verfügbar während der Bürozeiten) oder senden Sie eine
E-Mail an support@dyexis.de.
de
En tres sencillos pasos, Rex-O-Matic estará listo para su uso
1. Instalar el Rex-O-Matic
Coloque el Rex-O-Matic en una supercie estable. Fije el
aparato preferentemente a la pared con los materiales de
jación suministrados. Atención: el Rex-O-Matic no debe
estar expuesto a luz solar directa ni debe colocarse en
ambientes húmedos.
2. Puesta en marcha del Rex-O-Matic
Conecte primero el cable de red y después el cable de
alimentación. Encienda el Rex-O-Matic presionando el
botón situado debajo de la tira LED.
El Rex-O-Matic se conectará automáticamente a internet
en pocos minutos. Si la conexión es correcta, se iluminará
en blanco el icono de red situado en la esquina
superior izquierda.
3. Registrar a sus empleados
Vaya a la conguración avanzada a través del icono del
menú en la parte superior derecha y escanee el pase de
administrador para acceder. Registre a sus empleados a
través de la opción «empleados» en el menú. Para selec-
cionar a un empleado, haga clic en su nombre. Después,
seleccione «añadir pase» y sostenga el pase personal
frente al aparato . Cuando se haya registrado el pase,
escuchará un pitido.
Si utiliza un Rex-O-Matic con lector de huellas dactila-
res, puede añadir un escaneo de huella por empleado.
Seleccione «escanear huella» y elija qué dedo(s) desea
escanear en las siguientes pantallas.
Si añade un pase y una huella dactilar, el empleado podrá
utilizar ambos para char tanto a la entrada como a la
salida. Cuando haya añadido a todos los empleados, el
Rex-O-Matic estará listo para su uso. Desde ahora, los
empleados pueden char a la entrada y a la salida.
Más información
Para más información y conocer todas las instrucciones
de seguridad, acceda a la base de Dyexis a través de
dyexis.com/noa o escaneando el código QR. Si necesita
ayuda durante la instalación, póngase en contacto con
el centro de soporte de Dyexis a través del número
+31 (0)880 111 567 (disponible en horario de ocina)
o envíe un correo electrónico a support@dyexis.com.
es
Votre Rex-O-Matic prêt à l’emploi en trois simples étapes
1. Installez le Rex-O-Matic
Placez le Rex-O-Matic sur une surface stable. Fixez de
préférence l’appareil au mur avec le matériel de xation
fourni. Remarque: le Rex-O-Matic ne doit pas être placé
en plein soleil ni dans un environnement humide.
2. Mettez le Rex-O-Matic en marche
Connectez le câble réseau. Branchez le cordon d’alimen-
tation. Allumez le Rex-O-Matic en appuyant sur le bouton
sous la bande LED.
Le Rex-O-Matic se connectera automatiquement à Internet
en quelques minutes. Une fois la connexion établie, l’icône
réseau dans le coin supérieur gauche s’allume en
blanc.
3. Enregistrez vos employés
Rendez-vous aux paramètres avancés avec l’icône de
menu en haut à droite, puis scannez le badge d’adminis-
trateur pour accéder à cette section. Vous pouvez désor-
mais enregistrer vos employés par le biais de l’option de
menu « Employés ». Sélectionnez un employé en cliquant
sur son nom. Sélectionnez ensuite « Ajouter un badge » et
mettez le badge de l’employé devant le lecteur . Un bip
vous signale l’enregistrement du badge.
Si vous utilisez un Rex-O-Matic avec lecteur d’empreintes
digitales, vous pouvez scanner les doigts par employé.
Sélectionnez « Ajouter un scan des doigts » et choisissez
le(s) doigt(s) que vous souhaitez scanner dans les écrans
suivants.
Si vous ajoutez à la fois un badge et une empreinte digi-
tale, l’employé peut utiliser les deux options pour pointer.
Une fois que vous avez enregistré tous les employés, le
Rex-O-Matic est prêt à l’emploi. Vos employés peuvent
désormais pointer.
Plus d’informations
Pour plus d’informations et toutes les instructions de
sécurité, consultez la base de connaissances Dyexis
en vous rendant sur dyexis.com/noa ou en scannant le
code QR. Si vous avez besoin d’aide pour vous connecter,
veuillez contacter le service d’assistance Dyexis par
téléphone au +32 (0)3 808 36 97 (disponible pendant les
heures de bureau) ou envoyez un e-mail à
support@dyexis.be.
fr
Administrator
Employee
1x
1x
4x
1x
1x
5x
Box
content

Administrator
Employee
Your Rex-O-Matic is
ready to use in three
simple steps
en
Go to the advanced settings via the menu icon at
the top right, then scan the admin card to gain access.
You can now register your employees, via
“employees” in the menu.
Select an employee by clicking on the name. Then select
“add card” and hold the personal card in front of the card
reader . When the card is registered you will hear a beep.
If you use a Rex-O-Matic with a ngerprint reader, you can
perform a nger scan per employee. Select “Add nger
scan” and choose which nger(s) you want to scan in the
subsequent screens.
If you add both a card and a ngerprint, the employee
can use both options to clock in and out. Once you have
registered all employees, the Rex-O-Matic will be fully
operational. Your employees can now clock in and out.
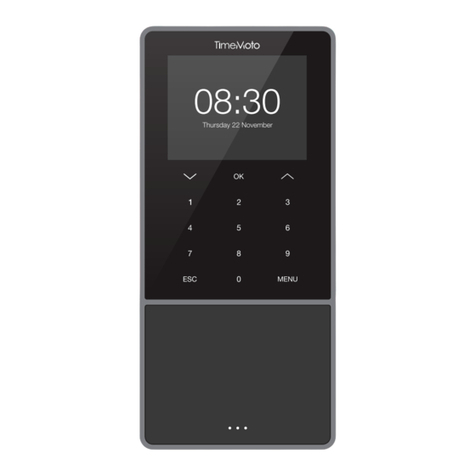
Network icon
Power button
For more information and the safety instructions, visit the
Dyexis Knowledge Base at dyexis.com/noa or by scanning
the QR code. If you need help connecting the hardware, please
contact the Dyexis helpdesk at +31 (0)880 111 567 (available
during oce hours) or send an email to support@dyexis.com.
Place the Rex-O-Matic on a stable surface.
Preferably x the device to the wall with the
supplied mounting materials.
Note: The Rex-O-Matic should not be placed in
direct sunlight or in a damp environment.
Information
First, connect the network cable and second the power
cable. Switch on the Rex-O-Matic by pressing the button
under the LED strip.
The Rex-O-Matic will automatically connect to the internet
within a few minutes. When the connection is successfully
established, the network icon in the top left corner
will light up white.
In your Dyexis software you can check the status
of your Rex-O-Matics on the settings page. The green
dot indicates that the Rex-O-Matic is connected.
Administrator
Employee
Administrator
Employee
Administrator
Employee
Administrator
Employee
Administrator
Employee
Administrator
Employee
Menu icon
Fingerprint
reader
Card reader
Administrator
Employee
Administrator
Employee
In drie eenvoudige stappen is uw Rex-O-Matic klaar voor gebruik
1. Monteer de Rex-O-Matic
Plaats de Rex-O-Matic op een stabiele ondergrond.
Bevestig het apparaat bij voorkeur aan de muur met
de bijgeleverde bevestigingsmaterialen. Let op: de
Rex-O-Matic mag niet in direct zonlicht geplaatst
worden en niet in een vochtige omgeving.
2. Start de Rex-O-Matic
Sluit eerst de netwerkkabel aan en vervolgens de
voedings kabel.Zet de Rex-O-Matic aan door de knop
onder de ledstrip in te drukken.
De Rex-O-Matic zal binnen enkele minuten automatisch
met het internet verbinden. Als de verbinding succesvol
tot stand is gekomen, zal het netwerk icoon in de
linkerbovenhoek wit oplichten.
3. Registreer uw medewerkers
Ga naar de geavanceerde instellingen via het menu icoon
rechtsboven en scan de administratorpas om toegang
te krijgen. Registreer uw medewerkers via de optie ‘mede-
werkers’ in het menu. U selecteert een medewerker door
op de naam te klikken. Selecteer hierna ‘pas toevoegen’ en
houd de persoonlijke pas voor het frontje . Zodra de pas
geregistreerd is, hoort u een piepje.
Als u gebruikmaakt van een Rex-O-Matic met een vinger-
afdruklezer, dan kunt u per medewerker een vingerscan
uitvoeren. Selecteer ‘Vingerscan toevoegen’ en kies in de
vervolgschermen welke vinger(s) u wilt scannen.
Als u zowel een pas als een vingerafdruk toevoegt, kan
de medewerker gebruik maken van beide mogelijkheden
om in te klokken en uit te klokken. Als u alle medewer-
kers heeft geregistreerd, is de Rex-O-Matic klaar voor
gebruik. Uw medewerkers kunnen vanaf nu inklokken en
uitklokken.
Meer informatie
Ga voor meer informatie en de veiligheidsinstructies
naar de Dyexis kennisbank via dyexis.com/noa of
scan de QR code. Als u ondersteuning nodig heeft bij het
aansluiten, neem dan contact op met de Dyexis Support
afdeling. Vanuit Nederland via telefoonnummer 0880 111
567 ( tijdens kantooruren) of via support@dyexis.com.
Vanuit Belgie via telefoonnummer +32 (0)3 808 36 97
(tijdens kantooruren) of via support@dyexis.be.
nl
3. Register your employees2. Start the Rex-O-Matic
1. Mount the Rex-O-Matic
Handleiding Rex-O-Matic Noa zigzag.indd 6-10Handleiding Rex-O-Matic Noa zigzag.indd 6-10

Administrator
Employee
Your Rex-O-Matic is
ready to use in three
simple steps
en
Go to the advanced settings via the menu icon at
the top right, then scan the admin card to gain access.
You can now register your employees, via
“employees” in the menu.
Select an employee by clicking on the name. Then select
“add card” and hold the personal card in front of the card
reader . When the card is registered you will hear a beep.
If you use a Rex-O-Matic with a ngerprint reader, you can
perform a nger scan per employee. Select “Add nger
scan” and choose which nger(s) you want to scan in the
subsequent screens.
If you add both a card and a ngerprint, the employee
can use both options to clock in and out. Once you have
registered all employees, the Rex-O-Matic will be fully
operational. Your employees can now clock in and out.
Network icon
Power button
For more information and the safety instructions, visit the
Dyexis Knowledge Base at dyexis.com/noa or by scanning
the QR code. If you need help connecting the hardware, please
contact the Dyexis helpdesk at +31 (0)880 111 567 (available
during oce hours) or send an email to support@dyexis.com.
Place the Rex-O-Matic on a stable surface.
Preferably x the device to the wall with the
supplied mounting materials.
Note: The Rex-O-Matic should not be placed in
direct sunlight or in a damp environment.
Information
First, connect the network cable and second the power
cable. Switch on the Rex-O-Matic by pressing the button
under the LED strip.
The Rex-O-Matic will automatically connect to the internet
within a few minutes. When the connection is successfully
established, the network icon in the top left corner
will light up white.
In your Dyexis software you can check the status
of your Rex-O-Matics on the settings page. The green
dot indicates that the Rex-O-Matic is connected.
Administrator
Employee
Administrator
Employee
Administrator
Employee
Administrator
Employee
Administrator
Employee
Administrator
Employee
Menu icon
Fingerprint
reader
Card reader
Administrator
Employee
Administrator
Employee
In drie eenvoudige stappen is uw Rex-O-Matic klaar voor gebruik
1. Monteer de Rex-O-Matic
Plaats de Rex-O-Matic op een stabiele ondergrond.
Bevestig het apparaat bij voorkeur aan de muur met
de bijgeleverde bevestigingsmaterialen. Let op: de
Rex-O-Matic mag niet in direct zonlicht geplaatst
worden en niet in een vochtige omgeving.
2. Start de Rex-O-Matic
Sluit eerst de netwerkkabel aan en vervolgens de
voedings kabel.Zet de Rex-O-Matic aan door de knop
onder de ledstrip in te drukken.
De Rex-O-Matic zal binnen enkele minuten automatisch
met het internet verbinden. Als de verbinding succesvol
tot stand is gekomen, zal het netwerk icoon in de
linkerbovenhoek wit oplichten.
3. Registreer uw medewerkers
Ga naar de geavanceerde instellingen via het menu icoon
rechtsboven en scan de administratorpas om toegang
te krijgen. Registreer uw medewerkers via de optie ‘mede-
werkers’ in het menu. U selecteert een medewerker door
op de naam te klikken. Selecteer hierna ‘pas toevoegen’ en
houd de persoonlijke pas voor het frontje . Zodra de pas
geregistreerd is, hoort u een piepje.
Als u gebruikmaakt van een Rex-O-Matic met een vinger-
afdruklezer, dan kunt u per medewerker een vingerscan
uitvoeren. Selecteer ‘Vingerscan toevoegen’ en kies in de
vervolgschermen welke vinger(s) u wilt scannen.
Als u zowel een pas als een vingerafdruk toevoegt, kan
de medewerker gebruik maken van beide mogelijkheden
om in te klokken en uit te klokken. Als u alle medewer-
kers heeft geregistreerd, is de Rex-O-Matic klaar voor
gebruik. Uw medewerkers kunnen vanaf nu inklokken en
uitklokken.
Meer informatie
Ga voor meer informatie en de veiligheidsinstructies
naar de Dyexis kennisbank via dyexis.com/noa of
scan de QR code. Als u ondersteuning nodig heeft bij het
aansluiten, neem dan contact op met de Dyexis Support
afdeling. Vanuit Nederland via telefoonnummer 0880 111
567 ( tijdens kantooruren) of via support@dyexis.com.
Vanuit Belgie via telefoonnummer +32 (0)3 808 36 97
(tijdens kantooruren) of via support@dyexis.be.
nl
3. Register your employees2. Start the Rex-O-Matic
1. Mount the Rex-O-Matic
Handleiding Rex-O-Matic Noa zigzag.indd 6-10Handleiding Rex-O-Matic Noa zigzag.indd 6-10

Quick Start
Guide
Rex-O-Matic Noa
Version: 1.0
EN / NL / DE / FR / ES
Ihr Rex-O-Matic ist in drei einfachen Schritten einsatzbereit
1. Montage Rex-O-Matic
Platzieren Sie den Rex-O-Matic auf eine stabile Ober-
äche. Befestigen Sie das Gerät vorzugsweise mit den
mitgelieferten Montagematerialien an der Wand. Hinweis:
Der Rex-O-Matic sollte nicht direktem Sonnenlicht oder
einer nassen Umgebung ausgesetzt werden.
2. Rex-O-Matic einschalten
Schließen Sie zuerst das Internetkabel und dann das
Electrokabel an. Schalten Sie den Rex-O-Matic ein, indem
Sie die Taste unter dem LED-Streifen drücken.
Der Rex-O-Matic stellt innerhalb von Minuten automatisch
eine Verbindung zum Internet her. Wenn die Verbindung
erfolgreich hergestellt wurde, leuchtet das Netzwerk-
symbol in der oberen linken Ecke weiß auf.
3. Anmelden und Registrieren Ihrer Mitarbeiter.
Gehen Sie über das Menüsymbol oben rechts zu den
erweiterten Einstellungen und scannen Sie die Karte des
Administrators, um Zugriff zu erhalten zum System. Regi-
strieren Sie Ihre Mitarbeiter über die Option „Mitarbeiter“
im Menü. Sie wählen einen Mitarbeiter aus, indem Sie auf
den Namen klicken. Wählen Sie dann „Karte/Pass hinzufü-
gen“ und halten Sie die persönliche Mitarbeiter-Karte/Pass
davor . Sobald die persönliche Mitarbeiter-Karte oder
Pass registriert ist, hören Sie einen kurzen Signalton.
Wenn Sie die Funktion der Fingererkennung verwenden
wollen von dem Rex-O-Matic, können Sie pro Mitarbeiter
einen Fingerscan durchführen (es werden lediglich 5
kleine Punkte des Fingers umgerechnet in eine Alphanu-
merischen Code). Wählen Sie „Fingerscan hinzufügen“
und wählen Sie in den darauf folgenden Bildschirmen aus,
welche Finger Sie scannen möchten.
Wenn Sie für einen Mitarbeiter sowohl eine Karte/Pass als
auch einen Fingerscan hinzufügen, kann der Mitarbeiter
beide Optionen zum Ein- und Ausstempeln verwenden.
Wenn Sie alle Mitarbeiter registriert haben, ist der Rex-O-
Matic einsatzbereit. Ihre Mitarbeiter können jetzt ein- und
ausstempeln.
Weitere Informationen.
Die Sicherheitsanleitung und Weitere Informationen nden
Sie in der Dyexis Knowledge Base (Wissensbank) unter
dyexis.com/noa oder scannen Sie den folgenden QR
Code. Wenn Sie Unterstützung bei der Installation Ihres
Rex-O-Matics benötigen, können Sie sich wenden an
Ihre Dyexis-Supportabteilung unter +49 2114 1872 707
(verfügbar während der Bürozeiten) oder senden Sie eine
E-Mail an support@dyexis.de.
de
En tres sencillos pasos, Rex-O-Matic estará listo para su uso
1. Instalar el Rex-O-Matic
Coloque el Rex-O-Matic en una supercie estable. Fije el
aparato preferentemente a la pared con los materiales de
jación suministrados. Atención: el Rex-O-Matic no debe
estar expuesto a luz solar directa ni debe colocarse en
ambientes húmedos.
2. Puesta en marcha del Rex-O-Matic
Conecte primero el cable de red y después el cable de
alimentación. Encienda el Rex-O-Matic presionando el
botón situado debajo de la tira LED.
El Rex-O-Matic se conectará automáticamente a internet
en pocos minutos. Si la conexión es correcta, se iluminará
en blanco el icono de red situado en la esquina
superior izquierda.
3. Registrar a sus empleados
Vaya a la conguración avanzada a través del icono del
menú en la parte superior derecha y escanee el pase de
administrador para acceder. Registre a sus empleados a
través de la opción «empleados» en el menú. Para selec-
cionar a un empleado, haga clic en su nombre. Después,
seleccione «añadir pase» y sostenga el pase personal
frente al aparato . Cuando se haya registrado el pase,
escuchará un pitido.
Si utiliza un Rex-O-Matic con lector de huellas dactila-
res, puede añadir un escaneo de huella por empleado.
Seleccione «escanear huella» y elija qué dedo(s) desea
escanear en las siguientes pantallas.
Si añade un pase y una huella dactilar, el empleado podrá
utilizar ambos para char tanto a la entrada como a la
salida. Cuando haya añadido a todos los empleados, el
Rex-O-Matic estará listo para su uso. Desde ahora, los
empleados pueden char a la entrada y a la salida.
Más información
Para más información y conocer todas las instrucciones
de seguridad, acceda a la base de Dyexis a través de
dyexis.com/noa o escaneando el código QR. Si necesita
ayuda durante la instalación, póngase en contacto con
el centro de soporte de Dyexis a través del número
+31 (0)880 111 567 (disponible en horario de ocina)
o envíe un correo electrónico a support@dyexis.com.
es
Votre Rex-O-Matic prêt à l’emploi en trois simples étapes
1. Installez le Rex-O-Matic
Placez le Rex-O-Matic sur une surface stable. Fixez de
préférence l’appareil au mur avec le matériel de xation
fourni. Remarque: le Rex-O-Matic ne doit pas être placé
en plein soleil ni dans un environnement humide.
2. Mettez le Rex-O-Matic en marche
Connectez le câble réseau. Branchez le cordon d’alimen-
tation. Allumez le Rex-O-Matic en appuyant sur le bouton
sous la bande LED.
Le Rex-O-Matic se connectera automatiquement à Internet
en quelques minutes. Une fois la connexion établie, l’icône
réseau dans le coin supérieur gauche s’allume en
blanc.
3. Enregistrez vos employés
Rendez-vous aux paramètres avancés avec l’icône de
menu en haut à droite, puis scannez le badge d’adminis-
trateur pour accéder à cette section. Vous pouvez désor-
mais enregistrer vos employés par le biais de l’option de
menu « Employés ». Sélectionnez un employé en cliquant
sur son nom. Sélectionnez ensuite « Ajouter un badge » et
mettez le badge de l’employé devant le lecteur . Un bip
vous signale l’enregistrement du badge.
Si vous utilisez un Rex-O-Matic avec lecteur d’empreintes
digitales, vous pouvez scanner les doigts par employé.
Sélectionnez « Ajouter un scan des doigts » et choisissez
le(s) doigt(s) que vous souhaitez scanner dans les écrans
suivants.
Si vous ajoutez à la fois un badge et une empreinte digi-
tale, l’employé peut utiliser les deux options pour pointer.
Une fois que vous avez enregistré tous les employés, le
Rex-O-Matic est prêt à l’emploi. Vos employés peuvent
désormais pointer.
Plus d’informations
Pour plus d’informations et toutes les instructions de
sécurité, consultez la base de connaissances Dyexis
en vous rendant sur dyexis.com/noa ou en scannant le
code QR. Si vous avez besoin d’aide pour vous connecter,
veuillez contacter le service d’assistance Dyexis par
téléphone au +32 (0)3 808 36 97 (disponible pendant les
heures de bureau) ou envoyez un e-mail à
support@dyexis.be.
fr
Administrator
Employee
1x
1x
4x
1x
1x
5x
Box
content
Table of contents