Dynamix DW-Phone/H User manual

DYNAMIX DW-Phone/H
User’s Manual

Chapter 1 Introduction ...................................................................................................................... 3
Product Description..................................................................................................................... 4
1.Features and Specification ............................................................................................... 4
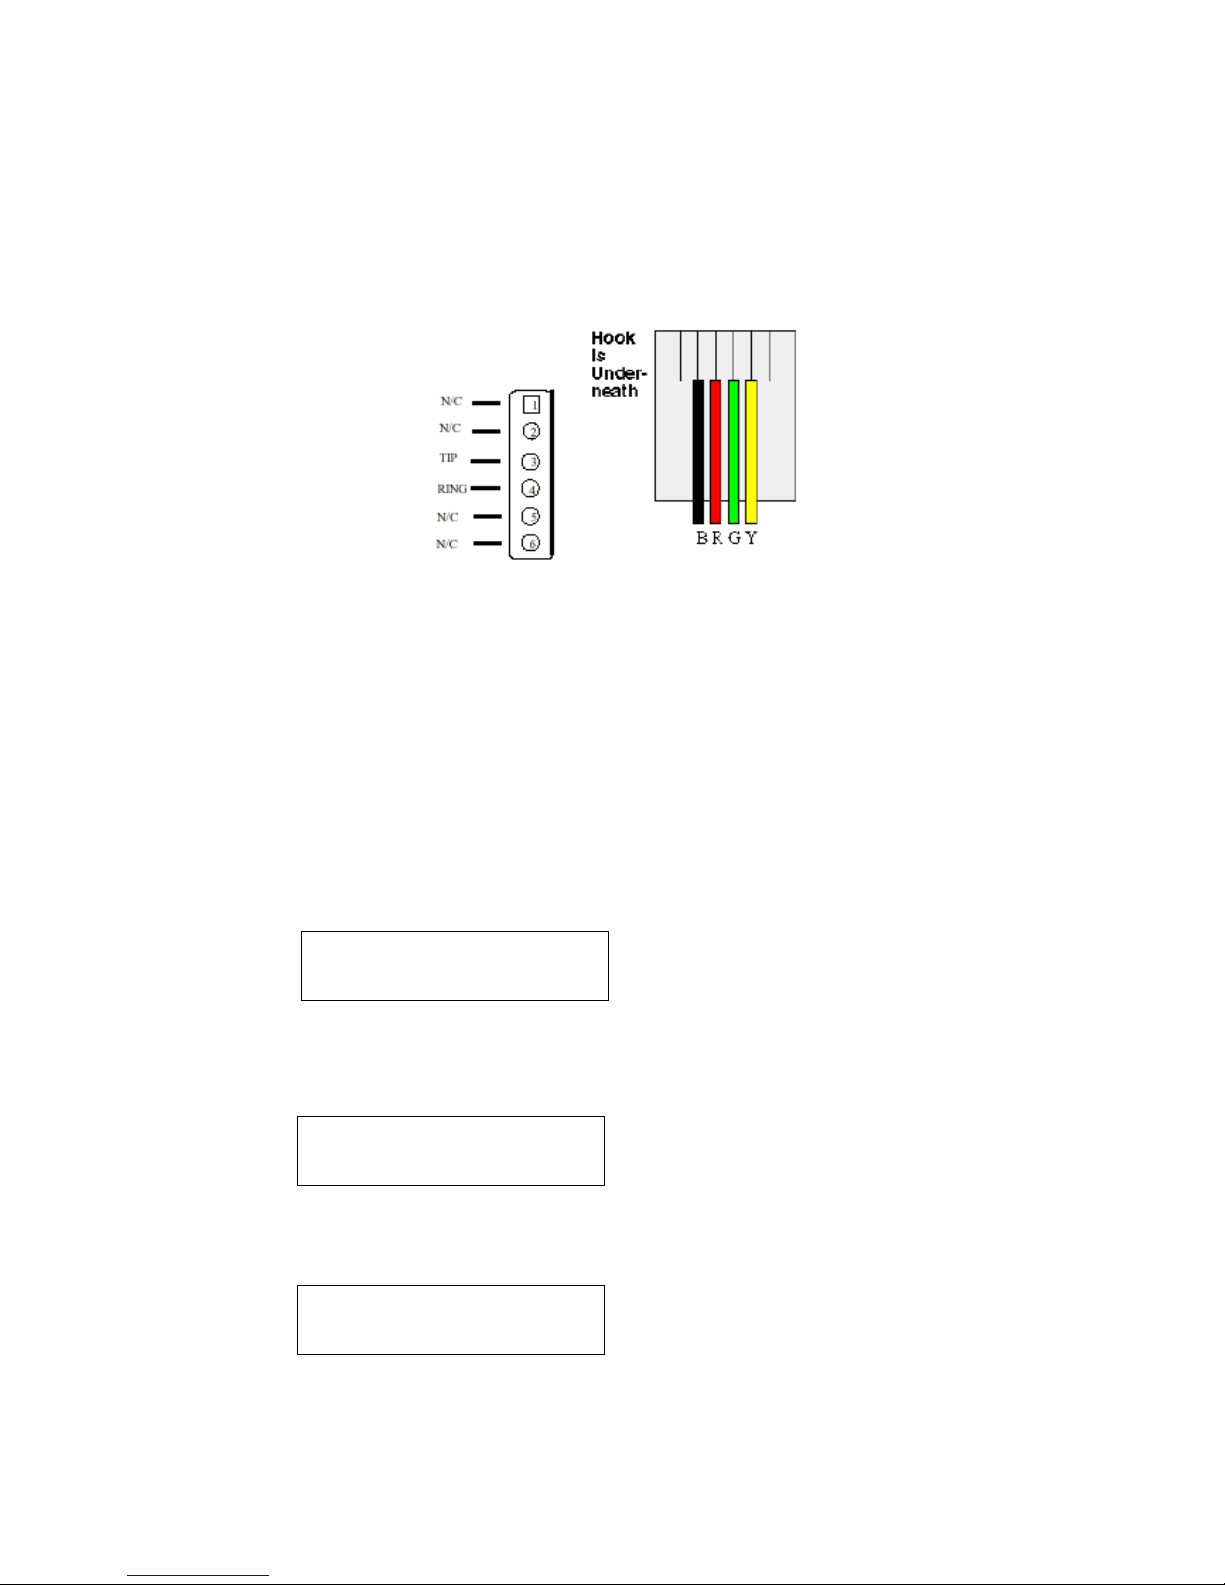
2.Appearance......................................................................................................................... 6
Chapter 2 Operating Procedure – LCD Display Configuration .................................................. 9
1.Initialize IP PHONE ................................................................................................................ 9
2.LCD Configuration ................................................................................................................. 11
Chapter 3 Advanced Configurations via Telnet........................................................................... 17
1. [help] command..................................................................................................................... 17
2. [quit] command...................................................................................................................... 18
3. [reboot] command................................................................................................................. 18
4. [flash] command.................................................................................................................... 18
5. [commit] command ............................................................................................................... 18
6. [ifaddr] command .................................................................................................................. 19
7. [time] command..................................................................................................................... 20
8. [ping] command..................................................................................................................... 20
9. [pbook] command ................................................................................................................. 21
10.[ddns] command .................................................................................................................. 22
11.[pppoe] command ................................................................................................................ 23
12.[sysconf] command.............................................................................................................. 24
13. [h323] command ................................................................................................................. 25
14. [voice] command................................................................................................................. 27
14. [rbtone] command............................................................................................................... 28
15. [tos] command..................................................................................................................... 29
16. [tone] command .................................................................................................................. 30
17. [support] command............................................................................................................. 31
18. [bureau] command.............................................................................................................. 32
19.[rom] command .................................................................................................................... 32
20.[passwd] command.............................................................................................................. 33
Chapter 4 Web Configuration ..................................................................................................... 35
Step 1. Browse the IP Address predefined via Keypad or TELNET.................................. 36
Step 2. Input the login name and password.......................................................................... 36
Step 3. The web interface main screen ................................................................................. 37
Step 4. Start configure .............................................................................................................. 37
1.Network Configure ........................................................................................................... 38
2. H323 Configure ............................................................................................................... 40
3. System Configure ........................................................................................................... 42
4. PPPoE Configure............................................................................................................ 43
Chapter 5 Upgrade the IP PHONE ............................................................................................. 55
1

Download Procedure ............................................................................................................. 55
1.LCD Panel Control........................................................................................................... 55
2.Remote Control: Telnet ................................................................................................... 55
3.Web Management............................................................................................................ 57
2

Chapter 1 Introduction
The IP PHONE is a full-featured IP-based telephone system, which provides VoIP service
on LAN or any IP based environment. By using IP environment for voice communication,
company or individual can save lots of expenses and make data and voice network
converged.
IP PHONE also supports PSTN analog line connection. Therefore, it can perform as the
same as traditional POTS (Plain Old Telephone Service).
3

Product Description
1.Features and Specification
Basic Features:
ITU-T H.323 v3 compliance
DTMF detection/generation
TFTP/FTP software download
Remote configuration/reset via Telnet
LED indication for system statusSpeaker, Hold ,Mute , Message , PSTN
Network Interface :
- Switch Hub inside, providing 2 RJ-45 sockets for 10/100Base-T connection
- 1 RJ-11 socket for PSTN connection
Microsoft Net Meeting v3.0 compatible
SNTP (Simple Network Time Protocol)
Call HOLD/TRANSFER/FORWARD/MUTE
PSTN/IP side access switch
10 Direct Line Button for speed dial
Speaker Mode
System Configuration from keypads and displayed on LCD
Ring Tone selection
Password setting for security
Function Keys : Speaker , Redial , Mute , Hold , Transfer , Forward , Message , PSTN
Ten sets last Phone Number redial
Dial plan
Provide TOS(Type Of Service) function
GateKeeper mode or Peer to Peer mode selection
Caller ID:
IP side display H323-ID and E.164.
Display the count of total call received.
Display un-answered call name, number.
Show caller’s name, number, calling time.
Volume Adjustment:
Speaker volume level adjustable.
Handset Receiver volume level adjustable.
4

LCD:
2 lines, 24 character Dot Matrix display.
Indicator messages of HOLD, MUTE, PSTN, Directed Line 1~10.
Display current date and time.
Display of call duration.
Audio features:
Codec -- G.711 a/µlaw, G.723.1 (6.3Kbps),G.729, G.729a
VAD (Voice Activity Detection), CNG (Comfort Noise Generate)
G.168/165-compliant adaptive echo cancellation
Dynamic Jitter Buffer
Bad Frame Interpolation
Provide H.245 Out-band DTMF message
Call Transfer (H.450.2)
Call Forward (H.450.3)
Call Hold (H.450.4)
Gain (Voice Volume) Settings
Provide Call Progress Tone: Dial tone, busy tone, call-holding tone and ring-back tone
Firmware Upgrade:
Firmware version displayed on LCD.
Two ways to upgrade firmware:
- Download by KEYPAD configuration.
- Download by Telnet.
Management Features:
Two easy ways for system configuration
- TELNET
- IP PHONE KEYPAD (can only upgrade application rom file)
- Web Browser
5

2.Appearance
1.Front View and Keypad function
C: Cancel and Clear♦
♦
♦
♦
♦
: Move to left /previous and right/next .
OK: Press OK to confirm the modification.
Direct Line (DL) Button 1 – 10: User press DL button to do speed dial according to
phone book data 1-10 (please refer to LCD configuration-Phone Address Book or
Advanced Configurations via Telnet-[pbook] command ).
Number 1 –10, * and #: The function is as the same as the general phone set.
Corresponding list of keypad and symbol:
1 “Space” ; “,” ; “.” ; “!” ; “1”
2 “A” ; “ B” ; “C” ; “2”
3 “D” ; “E” ; “F” ; “3”
4 “G” ; “H” ; “I” ; “4”
5 “J” ; “K” ; “L” ; “5”
6 “M” ; “N” ; “O” ; “6”
7 “P” ; “Q” ; “R” ; “S” ; “7”
8 “T” ; “U” ; “V” ; “8”
6

9 “W” ; “X” ; “Y” ; “Z” ; “9”
* “-“ ; “?” ; “*”
0 “0”
# “_” ; “@” ; “#”
MUTE: Mute the voice of MIC and let others can’t hear from user in communication.♦
♦ PSTN: Press PSTN to switch IP PHONE as PSTN or IP Phone Mode. In PSTN mode,
“PSTN” characters will be displayed on LCD left bottom side, then users can dial out as
if standard telephone set in PSTN ; in IP Phone mode , “GK” characters will be
displayed on LCD left bottom side.
Note:1. When IP PHONE is in PSTN mode, only PSTN and SPEAKER function key can
work.
2. On LCD will display ”…Incoming Call... ” to notice user when IP PHONE has both
IP and PSTN side incoming calls.
3. If in communication with IP side, user can press HOLD to hold IP side, then press
PSTN to pick up PSTN side, after that can press HOLD again to retrieve IP side.
4. If in communication with PSTN side, user must hang up PSTN side before pick up
IP side.
HOLD: To hold a call with H.450 function.♦
♦
♦
♦
♦
♦
♦
♦
SPEED: Press SPEED and number (Phone book index) to do speed dial according to
phone book data (please refer to LCD configuration-Phone Address Book or Advanced
Configurations via Telnet-[pbook] command ).
FORWARD: Forward a incoming call to another IP device by H.450 forward
function.(please refer to LCD configuration-Indicate Forward Type)
MESSAGE and its indicated LED light: When missing the incoming calls, the
message LED will be flashing. User can know the information of miss call by pressing
the message button.
TRANSFER:
1. Transfer a call by H.450 transfer function. Press TRANSFER button in
communication and press phone No. which user want to transferred to can transfer
this call .
2. Change characters to be capital or lowercase: when press TRANSFER before press
letters can switch type of letters.
REDIAL: Redial the last outgoing call.
+ and - : Adjust the voice volume in communication.
SPEAKER: Speaking without picking up handset.
7
Note: All function keys mentioned above (except Number 1 –10, * and # ) are effective

only in IP Phone mode.
2.Back View
DC 9V: DC 9V power input outlet♦
♦
♦
♦
LAN: RJ-45 connector, connected directly to the Hub through the straight CAT-5 cable.
PC: RJ-45 connector, connected directly to the PC through the straight CAT-5 cable
Line: RJ-11 connector, connected directly to the PSTN analog line.
Note: There are two LED indicated lights: LINK/ACT and 10/100 for LAN port and PC port.
When network status is in normal, LED of LINK/ACT will be flashing; when transmit rate is in
10 mbps/100mbps, LED of 10/100 will light off/on .
3.Specification of connector
Ethernet Port
Ethernet port is for connecting IP PHONE to network, transmit rate supports 10/100
Base-T.
Ethernet connector LAN
8

1 RJ11connector
RJ11 connector is for connecting IP PHONE with PSTN.
RJ11connector
Chapter 2 Operating Procedure – LCD Display
Configuration
1.Initialize IP PHONE
1. When power on the IP PHONE, the LCD screen shows as below.
IP-Phone
Board Start Booting
2. Wait around one minute until the IP PHONE finishes boot program initialization.
3. User can see flashing greeting as below:
System Initializing…………..
4. Then IP PHONE get into standby mode:
IP-Phone
GK 10:10:10AM
The main LCD screen would be shown as similar as above. The GK word means the IP
9

PHONE is in GateKeeper Mode, and when IP PHONE is connected to SNTP server, on
LCD will show current time from SNTP server.
5. After pressing the PSTN button, the GK word will be replaced by PSTN. Then IP
PHONEis in PSTN Mode. Please notice that in PSTN mode user must plug PSTN
line in RJ-11 port.
IP-Phone
PSTN 10:10:10AM
Press or to enter configuration mode then press OK Bottom to enter certain menu.
There are 6 selections for configuration.
1. System Configuration (mandatory, protected by password)
2. User Line Number (mandatory)
3. Ring Configuration
4. Indicate Forward Type
5. Message Box
6. Phone Address Book
Note: LCD Panel of IP PHONE is operated manually by moving or on the keypad.
Press OK to enter separate configuration menu. Press C to go back to the main
menu.
10

2.LCD Configuration
User can set the following 10 configurations manually by operating the commands
displayed on LCD.
Note: Any configurations that have made for the IP PHONE, user has to do Reboot in the
selection 1→5 “Reboot”.
1. System Configuration (mandatory, protected by password)
Please Enter Password:
User must key in password to enter this menu, selections under this command
are all important ones, which can only be configured by administrators.
Note:
1.Password to enter System Configuration:
H.323 token password (please refer to item 9), default value is x. (Please press
TRANSFER button to switch as lowercase characters first.)
2.If user forget password, please contact with our company, we will generate a specific
password according to MAC address of IP PHONE.
1. Connect Configuration
There are ten sub-configurations included in Connect Configuration. It is
necessary for user to set it in order to run the IP PHONE correctly.
In addition, user has to prepare one valid IP Address to meet your network
environment. (Global public IP Address or Virtual IP Address)
(1) IP address
In this configuration mode, user presses the prepared IP Address on the IP
PHONE keypad. Please input IP address as format: xxx.xxx.xxx.xxx.
(2) Subnet Mask:
User has to press the subnet mask IP Address on the IP PHONE keypad.
(3) Gateway
User has to press the default gateway IP which meets IP Address on the IP
PHONE keypad.
(4) Primary DNS
User can set IP address of Domain Name Server, then for GateKeeper and
Phone book can enter URL address or IP address. Please refer to 3.9
[pbook] and 3.12 [h323] command.
(5) Secondary DNS
User can set IP address of secondary DNS, once primary DNS cannot
work normally, IP PHONE can refer to secondary DNS.
(6) GateKeeper
11

User has to offer one available GateKeeper server IP Address and set this IP
Address on the IP PHONE keypad.
(7) Second GateKeeper
IP PHONE provide alternative GateKeeper feature, if IP PHONE can’t register
to Main GateKeeper for 10 times, it will try to register to the Second
GateKeeper. When main GateKeeper can’t work normally, IP PHONE can still
keep working with Second GateKeeper
(8) SNTP Configuration
IP PHONE supports that user can assign one SNTP (Simple Network Time
Protocol) Server in your country by setting in IP PHONE. User has to offer one
available SNTP server IP Address and set this IP Address on the IP PHONE
keypad.
(A)SNTP Mode: User can set different time can set SNTP function too be
on/off/broadcast, which means IP PHONE will capture current time
from SNTP server or not, or broadcast to find a SNTP server and
capture current time.
(B)SNTP Server: User can specify a SNTP server for IP PHONE to
capture current time.
(C)Time Zone: User can set time zone according to the location IP
PHONE is. For example, in Taiwan the time zone should be set as
8,which means GMT+8.(user can press “*” as “-“)
Note: If user didn’t set SNTP server, on LCD won’t display current time
.
(9) Connection Mode
There are 2 types for IP PHONE to connect to the other devices. They are GK,
P2P. The default mode is in GK mode. When user would like to connect via P2P
mode, the IP PHONE must change as well. Move the “~” symbol by press or
on the keypad to select one mode.
(10) DHCP Mode (ON/Off)
User can set IP PHONE in DHCP mode, which means IP PHONE will get a
dynamic IP automatically.
(11) Token Password
(A) LCD menu password: User can enter LCD system configuration by key in
this password
(B)H.235 security: To set RRQ/ARQ authentication token password. If IP
PHONE wants to register to a GateKeeper, which implement H.235
12

security token feature, IP PHONE has to set a RRQ/ARQ authentication
token password, which is provided by GateKeeper manager. IP PHONE
can’t work normally with this GateKeeper unless Token Password is set.
(12) GRQ Option
To set auto discovery function OFF or ON. If this function is enabled and
IP address of GateKeeper is set as 255.255.255.255, IP PHONE will
multicast to search a GateKeeper on network with configured
GateKeeper ID(please refer to (12)Gatekeeper ID); if IP address of
GateKeeper is set, before IP PHONE register to the assigned
GateKeeper, it will send out GRQ(GateKeeper Request) message with
configured GateKeeper name to GateKeeper first.
(13) GateKeeper ID
To set GateKeeper name for GateKeeper discovery. When IP PHONE
send out GateKeeper discovery message will search GateKeeper with
this GateKeeper name
2. User Line Name
User has to identify one ID name for the IP PHONE to register to the
GateKeeper.
3. Firmware Update
(1) Download method
There are two methods to download new rom file, please move the “~” symbol
by press or on the keypad to select TFTP or FTP method, then press OK
to confirm it.
(2) Set File Server IP
User has to offer one TFTP/FTP server IP Address and set this IP Address on
the IP PHONE keypad. The IP Address is necessary for upgrading IP PHONE
new application rom file.
(3) Set FTP user account
User has to press user name and password for FTP server login .It is
necessary for upgrading IP PHONE new application rom file in FTP method.
(4) Indicate file name
User has to press the file name of new application rom file prepared for
upgrading
13

(5) Start Download
Press OK to start download new application rom file. After download is finished,
IP PHONE will automatically reboot.
(6) Firmware Version
Show versions of all rom files and hardware.
Note:
1.Download via LCD command can only upgrade new application rom file.
2.If IP PHONE fails to upgrade via LCD menu, IP PHONE will automatically
reboot.
4. Hardware Test
IP PHONE provides self-test for all functions buttons. Please follow the direction
from LCD panel to operate and verify it.
5. PPPoE Configuration
(1) PPPoE Mode
Choose ON or OFF to enable or disable PPPoE function.
(2) Username And Password
To set PPPoE connection user name and password.
(3) Retry When Disconnect
Choose ON or OFF to enable or disable this function. If user enable this
function, after PPPoE being disconnected, IP PHONE will automatically
reboot to re-connect, and after reboot, if IP PHONE still can’t get contact
with server, IP PHONE will keep trying to connect. On the other hand, if
user disable this function, IP PHONE won’t reboot and keep trying to
connect.
6. Reboot
It is necessary and important for user to reboot it after any configurations has
been made to the IP PHONE .
2. User Line Number
User has to identify at least one number for the IP PHONE to register to the
GateKeeper. User can set up to 10 different numbers.
(1) Line Number 1
(2) Line Number 2
(3) Line Number 3
(4) Line Number 4
(5) Line Number 5
(6) Line Number 6
14

(7) Line Number 7
(8) Line Number 8
(9) Line Number 9
(10) Line Number 10
Note: User can set six zero “000000” on LCD to disable this number and the
number after this one. Ex. Line Number 1-5 are configured, if user set Line 3
as “000000”, Line number 3-5 will be disabled.
3. Ring Configuration
(1) Ring Style Selection
There are three tone styles for IP PHONE . Move the “~” symbol by press or
on the keypad to select the tone style preferred, then press OK to confirm it.
Choose Tone Style:
Low Middle High
(2) Ring Volume Control
User can adjust ring volume by by press or on the keypad to decrease or
increase volume.
4. Indicate Forward Type
There are two selections to activate or deactivate forward function. After selection
please press OK
(1).Activate : choose under which situation to forward call to another endpoint.
After selection please press OK, then enter LINE NUMBER of another
endpoint prepared to forward to.
1. Busy
When IP PHONE is in busy status, the incoming call will be directly
forwarded to the assigned phone number.
2. No response
When IP PHONE is continuing ringing around 10 seconds, the incoming call
will be directly forwarded to the assigned phone number.
3. Unconditional
It is included the above two types. Whether the IP PHONE is in which status, it
will be automatically forwarded to the assigned phone number.
15

(2).Deactivate : choose under which situation to deactivate forward function. After
selection, please press OK , then user can see LINE NUMBER of the endpoint which is
already configured to forward to, now press OK again.
Note: The number that user prepares to forward to is E.164 number
which is registered on the GateKeeper.
5. Message Box
If there is an unanswered IP call, it will be kept in message box . MESSAGE LED will
be flashing until user press MESSAGE to check miss call and re-press MESSAGE
to return to main screen.
1. New Callto see all incoming-call records in message box.
2. Historyto see all records in message box.
6. Phone Address Book
1. Display
Display all name and telephone number recorded to the phone address book.
2. Add
Add and save name, telephone number and IP address of the phone address
book.
3. Edit
Edit name, telephone number, and IP address of Phone book.
4. Delete
Delete the record in the phone address book.
Note: When key in IP address in Pbook table, please do not add 0 before
IP address (ex.10.1.1.1 please do not key in 010.001.001.001).
7. PPPoE Information
All items below can only be displayed when PPPoE connection is established, user
can check related information here.
1. PPPoE Status
2. Note Information
3. PPPoE IP address
4. Destination Host
5. DNS Primary
6. Subnet Mask
7. Authentication
8. Protocol
9. Device
16

Chapter 3 Advanced Configurations via Telnet
After initializing the IP PHONE IP Address setting (please refer to LCD Configuration:
1.Connect Configuration), user can enter into configuration mode via telnet. There are 18
commands listed below.
Note:
1.After user enter IP PHONE configuration via telnet, please use login : ”root”,
password : ”press enter” to enter command line.
2.Each command user must key-in with lower case, but contents of configurations
such as h.323 alias or user name etc, user can set as capital case.
3.User who changes any configuration needs to do the commit command then
reboot command.
1. [help] command
Type help or man or ?to display all the command lists. The following figure is shown all
commands of IP PHONE .
17

2. [quit] command
Type quit/exit/close will logout IP PHONE and Telnet Program.
3. [reboot] command
After typing commit command, type reboot to restart the IP PHONE .
Sometimes after user type reboot, on terminal screen will display :"Data modified,
commit to flash rom?", which means IP PHONE will record call history or not.(ex.
REDIAL , outgoing and incoming call data)
4. [flash] command
This command will clean the configuration stored in the flash rom to default value and
reboot the IP PHONE .
Note: After user upgrade new software version, suggested to execute this command to
make sure new software work well on IP PHONE .
Note: To execute the command flash –clean, all configuration of IP PHONE
stored on flash rom will be cleaned. It is authorized for the user whose login
name is “root” only.
5. [commit] command
Save any changes after configuring the IP PHONE .
18

6. [ifaddr] command
Configure and display the IP PHONE IP information.
1. -ip, -mask, -gate: Set IP PHONE IP Address, subnet mask and default gateway
respectively.
2. -dhcp: When DHCP function enables (ifaddr –dhcp 1), IP PHONE will automatically
search DHCP server after execute the commit and reboot command.
Note: After IP PHONE catch a dynamic IP address form DHCP server, user can see
this IP address on LCD connect configuration.
3. -sntp: When sntp server is available, enable IP PHONE SNTP function and point to
sntp server IP address. (ifaddr –sntp 1 “xxx.xxx.xxx.xxx”)
4. -dns:User can set Domain Name Server IP address. Once IP PHONE can connect
with DNS server, user can specify URL address instead of IP address for gatekeeper
and phone book IP address. (please refer to 12.[h323] command and 3.9[pbook]
command)
5. –timezone:User can set different time zone according to the location IP PHONE is.
For example, in Taiwan the time zone should be set as 8,which means GMT+8. (GMT-8:
ifaddr –timezone -8)
6. -ipsharing: If IP PHONE is behind a IP-sharing , user can enable IP sharing function
and specify public IP address.(ifaddr –ipsharing 0/1 “public IP address of IP
sharing” , 0 for disable and 1 for enable)
7. –ipchange: If user uses NAT device which support multiple public IP address, and IP
PHONE enable IP change function, IP PHONE will register to Gatekeeper with the
public IP IP PHONE uses but not the IP NAT uses.
8. –http: set http port. User can configure IP PHONE via web browser, default http port is
80, if port 80 is not available or user has more than 1 IP PHONE behind NAT, http port
can be changed to another available port.
19
Table of contents
Other Dynamix Telephone manuals