Dynamix DW-Phone S User manual

D
Dy
yn
na
am
mi
ix
x
D
DW
W-
-P
Ph
ho
on
ne
e/
/S
S
U
Us
se
er
r
M
Ma
an
nu
ua
al
l

Chapter 1 Overview of the Dynamix DW-Phone/S 3
1. Hardware Overview .................................................................................................... 4
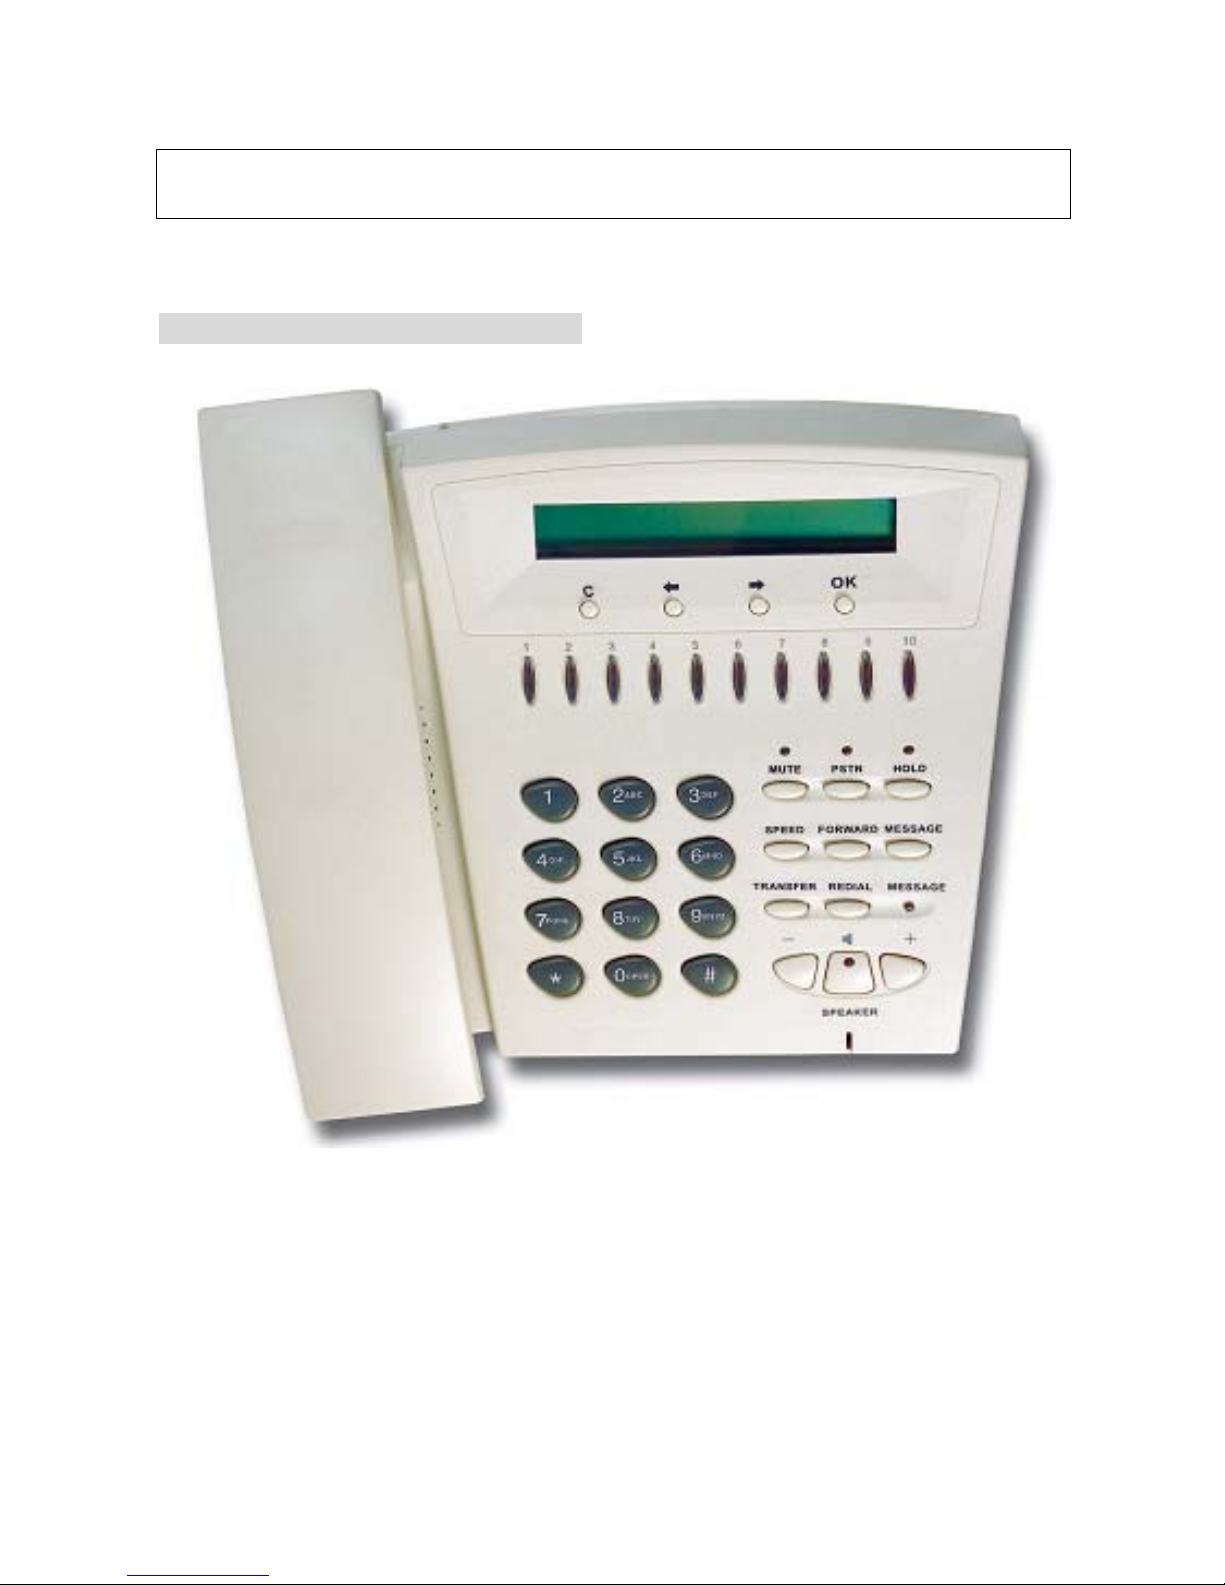
1.Front View and Keypad function ............................................................................ 4
2.Back View .............................................................................................................. 7
3.Specification of connector ...................................................................................... 7
2. Software Features and Specification .......................................................................... 9
Chapter 2 Configuring the SIP-Phone through LCD Phone menus 11
1. Initialize SIP-Phone ................................................................................................. 11
2. LCD Menu Configuration .......................................................................................... 13
Chapter 3 Configuring the SIP-Phone through Web Pages 18
Step 1. Browse the IP Address predefined via Keypad................................................. 19
Step 2. Input the login name and password.................................................................. 20
Step 3. Enter the web interface main screen ................................................................ 21
Step 4. Start to configure .............................................................................................. 21
1. Network Interface ................................................................................................ 22
2. SIP Information ................................................................................................... 25
3. System Configuration.......................................................................................... 27
4. PPPoE Configure ................................................................................................ 28
5. Voice Setting ....................................................................................................... 29
6. Phone Book ........................................................................................................ 30
7. DSCP Configure.................................................................................................. 31
8. Password ............................................................................................................ 33
9. Rom Configuration .............................................................................................. 34
10. Flash Clean....................................................................................................... 35
11. Commit Data ..................................................................................................... 36
12. Reboot System.................................................................................................. 37
Chapter 4 Configuring the SIP-Phone through Telnet command lines 38
1. [help] command........................................................................................................ 38
2. [quit] command......................................................................................................... 39
3. [debug] command..................................................................................................... 39
4. [reboot] command..................................................................................................... 39
5. [flash] command ....................................................................................................... 39
6. [commit] command ................................................................................................... 40
7. [ifaddr] command...................................................................................................... 40
8. [time] command........................................................................................................ 41
9. [ping] command........................................................................................................ 41
10. [pbook] command................................................................................................... 42
11. [pppoe] command ................................................................................................... 43
12. [sysconf] command................................................................................................. 44
1

13. [sip] command ........................................................................................................ 44
14. [security] command ................................................................................................ 45
15. [voice] command .................................................................................................... 46
16. [tos] command........................................................................................................ 47
17. [rom] command....................................................................................................... 48
20. [passwd] command................................................................................................. 49
Chapter 5 Upgrading Software on the SIP-Phone 51
1.From LCD Phone Menu............................................................................................. 51
2. Web Management .................................................................................................... 52
3. Remote Control: Telnet............................................................................................. 53
2

Chapter 1 Overview of the Dynamix DW-Phone/S
Dynamix DW-Phone/S is a full-featured IP-based telephone set via Ethernet base
communication. Over the office LAN connection, it provides IP-PBX solution such as
station-to-station call, IP call and local PSTN/PBX Extension call via PSTN Gateway.
Dynamix DW-Phone/S provides two 10/100BaseT switch/hub RJ-45 ports allow connecting
to office LAN and PC simultaneously. It is compatible with ADSL or Cable Modem provided
by ITSP, ISP or Carrier Company to provide VoIP services to residential and SOHO
application. SIP-Phone is also an integrated Analog Phone provides IP call or PSTN call
selection. When external power is down, it can be a Plain Old Telephone set (POTs).
It provides internal high-quality speakerphone, programmable keys and feature buttons.
Dynamix DW-Phone/S also embedded with a dot matrix of two lines 24 characters LCD,
which can display date and time, calling party name, calling party number, and digits dialed
and etc.
3

Note:
(**): May be not available right now, please contact with your distributor.
1. Hardware Overview
1.Front View and Keypad function
LCD: 2 lines, 24 character Dot Matrix display.♦
♦
♦
♦
♦
♦
C: Jump out current LCD menu.
: Move to previous selection or clear previous data.
: Move to right or next selection.
OK: Press OK to confirm the modification.
Direct Line (DL) Button 1 – 10: User press DL button after off-hook to do speed dial
4

♦
according to phone book data from 1-10 (please refer to LCD configuration-3.Phone
Book; Advanced Configurations via Telnet- 10.[pbook] command, or Web
Configuration-Phone Book chapter.
Number 1 –10, * and #: The function is as the same as the general phone set.
Corresponding list of keypad and symbol:
1 “1”
2 “A” ; “ B” ; “C” ; “2”
3 “D” ; “E” ; “F” ; “3”
4 “G” ; “H” ; “I” ; “4”
5 “J” ; “K” ; “L” ; “5”
6 “M” ; “N” ; “O” ; “6”
7 “P” ; “Q” ; “R” ; “S” ; “7”
8 “T” ; “U” ; “V” ; “8”
9 “W” ; “X” ; “Y” ; “Z” ; “9”
* “.” ; “@” ; “_” ; ”-“ ; “,” ; “!” ; “?” ; “*”
0 “0” ; “Space”
# “#”
MUTE: Mute the voice of MIC and let others can’t hear from user in communication.♦
♦ PSTN: Press PSTN to switch SIP-Phone as PSTN or IP Phone Mode. In PSTN mode,
“PSTN” characters will be displayed on LCD left bottom side, then users can dial out as
if standard telephone set in PSTN; in IP Phone mode, “PROXY ” characters will be
displayed on LCD left bottom side. (**)
Note:
1. When SIP-Phone is in PSTN mode, only PSTN and SPEAKER function key can work.
2. On LCD will display ”…Incoming Call... ” to inform user when SIP-Phone has both IP and
PSTN side incoming calls.
3. If in communication with IP side, user can press HOLD to hold IP side, then press PSTN
to pick up PSTN side, after that can press HOLD again to retrieve IP side.
4. If in communication with PSTN side, user must hang up PSTN side before pick up IP side.
HOLD: To hold a call, after press HOLD button, both sides will hear hold tone.♦
♦
♦
SPEED: Press SPEED and number (Phone book index) after off-hook can do speed dial
according to phone book data (please refer to 3.LCD configuration-6. Phone Book or
Advanced Configurations via 4.Telnet- 10.[pbook] command).
FORWARD: Forward an incoming call to another IP device. (Please refer to LCD
configuration-Forward Type) (**)
5

♦
♦
MESSAGE and its indicated LED light: When having missed incoming calls, the
MESSAGE LED will be flashing. User can check the information of missed calls by
pressing the MESSAGE button. (**)
TRANSFER:
1. Transfer a call to the third site. When A and B are in communication, A wants to
transfer this call to C, A can press TRANSFER button, now B will hear hold tone, and
A will hear dial tone, then A can press phone number of C, after C picks up, A can talk
with C, after A hangs up, B and C can be connected.
Note:
1. A cannot press phone number of C before hearing dial tone.
2. A cannot hangs up before C picks up.
2. Change characters to be capital or lowercase: when pressing TRANSFER before
press letters can switch input type of letters.
REDIAL: Redial the last outgoing call.♦
♦
♦
+ And -: Adjust the voice volume heard of communication.
SPEAKER: Hand free mode. User can talk without picking up handset.
Note:
All function keys mentioned above (except dialing keypad) are effective only in IP
Phone mode. (**)
6

2.Back View
DC 9V: DC 9V power input outlet♦
♦
♦
♦
LAN: RJ-45 connector, connected directly to the Hub through the straight CAT-5 cable.
PC: RJ-45 connector, connected directly to the PC through the straight CAT-5 cable
Line: RJ-11 connector, connected directly to the PSTN analog line.
Note:
There are two LED indicated lights: LINK/ACT and 10/100 for LAN port and PC port.
When network status is regular, LED of LINK/ACT will light on; when SIP-Phone is
transmitting or receiving data, LED will be flashing; when transmit rate is in 10 mbps or
100mbps, LED of 10/100 will light off or light on.
3.Specification of connector
1 Ethernet Port
Ethernet port is for connecting SIP-Phone to network, transmit rate supports 10/100
Base-T.
Ethernet connector LAN
2 RJ11connector
RJ11 connector is for connecting SIP-Phone with PSTN.
7

RJ11connector
8

2. Software Features and Specification
Application:
ISP/ITSP (Internet Telephony Service Provider)
IP-PBX with office telephony services
Multi-nation enterprise communication
SOHO Telephony
Calling Features
Call Hold
Call Transfer
Call Forward (**)
10 sets last number Redial
Ten configurable speed dials
Network Supported
Fixed IP
Dynamic Host Configuration Protocol (DHCP)
PPPoE connection (When PPPoE disconnect, SIP-Phone can automatically
re-connect)
Behind NAT IP Sharing Device
Support QOS by setting DSCP (Differentiated Service Code Point) parameters of VoIP
packet
Support 802.1p1q (VLAN) (**)
Audio Features
G.711 a/µ-Law, G.723.1, G.729, G.729a
VAD, CNG
G.165/G.168 compliant echo cancellation
Programmable Dynamic Jitter Buffer
Bad Frame Interpolation
Gain/Attenuation Settings
9

Provisioning and Configuration
SIP (RFC3261) compliance
LCD configuration password protection (**)
Provide Proxy Mode or Peer-to-Peer Mode (Non Proxy Server needed) selection
Ring tone, Speaker and Handset volume adjustable
Dial path selection (PSTN or IP mode) (**)
Support DNS server inquiry
Management Features:
Software Upgrade: TFTP/FTP download
Three easy ways for system configuration
- LCD Front Panel
- Web Browser
- TELNET
Environmental
Humidity: 10 to 90 % (Non-condensing)
Operational Temperature: 0 to +40 °C
Certification
CE, 3C
10

Chapter 2 Configuring the SIP-Phone through LCD Phone
menus
Note:
1. After any configuration is made for the SIP-Phone, user has to do Reboot in the
selection 7 “Reboot”.
2. We suggest user to set IP address via LCD menu 52.3.4.5 first, then go to
chapter 3 to do other detail configurations via web browser.
1. Initialize SIP-Phone
1. When power on the SIP-Phone , the LCD screen shows as below. Now SIP-Phone is
running Boot sector program.
IP-Phone
Board Start Booting
2. When SIP-Phone finishes boot program initialization. User can see flashing greeting
as below:
System Initializing…………..
3. Then SIP-Phone get into standby mode:
SIP-Phone
Proxy 10:10:10AM
The main LCD screen would be shown as similar as above. “Proxy” means the
SIP-Phone is in Proxy Mode, and when SIP-Phone is connected to SNTP server, on
LCD will show current time captured from SNTP server.
4. When SIP-Phone is under peer-to-peer mode, on LCD will show “P2P” instead of
“Proxy”.
SIP-Phone
P2P 10:10:10AM
5. After pressing the PSTN button, the “Proxy” or “P2P” will be replaced by “PSTN”.
11

Please notice that user must plug PSTN line in RJ-11 port when SIP-Phone is in
PSTN mode. (**)
IP-Phone
PSTN 10:10:10AM
6. Press or to enter configuration mode then press OK button to enter sub menus;
press C can jump out current menu to previous level.
1. Call List (**)
2. Forward Type
3. Phone Book
4. Ringer Settings
5. Network
6. Advanced Settings (protected by password)
7. Reboot
12

2. LCD Menu Configuration
User can set the following configurations by LCD keypad.
Note:
1. Press TRANSFER before input data can switch characters to be capital or
lowercase.
2. Press SPEED before input data can switch input mode as character mode or IP
mode; for example, user wants to enter IP address, after pressing SPEED can
enter digits directly.
3. When user is inputting data, press Cwill jump out to menu list, press will
clear previous input data.
1. Call List (**)
If there is an unanswered IP call, it will be kept in message box. MESSAGE LED will
be flashing until user press MESSAGE to check miss call and re-press MESSAGE
to return to main screen.
(1) Missed Callsto see all missed calls in message box.
(2) Received Callsto see all received calls in message box.
(3) Dialed calls: to see all dialed calls in message box.
2. Forward Type (**)
There are 3 selections in Forward type, user must select under which condition to
forward calls.
(1) Busy
When SIP-Phone is in busy status, the incoming call will be forwarded
to the assigned phone number.
A. Activate
Enter a forwarded phone number to activate busy forward function.
B. Deactivate
Deactivate Busy Forward function.
(2) No Response
When SIP-Phone hasn’t been picked up for around 10 seconds, the
incoming call will be forwarded to the assigned phone number.
A. Activate
Enter a forwarded phone number to activate no response forward
function.
B. Deactivate
13

Deactivate No Response Forward function.
(3) Unconditional
It is included the above two types. Whether the SIP-Phone is in which
status, calls will be automatically forwarded to the assigned phone
number.
A. Activate
Enter a forwarded phone number to activate Unconditional Forward
function.
B. Deactivate
Deactivate Unconditional Forward function.
3. Phone Book
1. List
List all records of name, telephone number, and IP address in the phone
address book.
2. Edit/Delete
Edit or delete a record of name, telephone number, and IP address of the
phone address book.
3. New
Add a new record of name, telephone number, and IP address of the phone
address book.
4. Ringer Settings
1. Volume
User can adjust ring volume by press or on the keypad to decrease or
increase ringer volume.
2. Style
There are three tone styles for SIP-Phone. Move the “>” symbol by press or
on the keypad to select the tone style preferred, then press OK to confirm it.
5. Network
1. Information
User can press or to check current network status:
14

(1) Mode: Display current network connection mode of SIP-Phone to be
Static (Fixed IP), DHCP, or PPPoE.
(2) IP, Mask, Gateway: display current IP information.
2. Network Mode
Set network mode of SIP-Phone to be Static (Fixed IP), DHCP, or PPPoE.
3. IP address
Set IP address of SIP-Phone.
4. Subnet Mask:
Set subnet mask address of SIP-Phone.
5. Default Gateway
Set default gateway address of SIP-Phone.
6. Domain Name Server
Set IP address of Domain Name Server. Once SIP-Phone can connect to DNS
server, user can set URL address for Proxy server or Phone book instead of IP
address.
7. PPPoE Configuration
(1) User Name
Set PPPoE connection authentication user name.
(2) Password
Set PPPoE connection authentication password.
(3) Auto Re-connect
Choose ON or OFF to enable or disable this function. If user enables this
function, after PPPoE disconnected, SIP-Phone will automatically reboot to
re-connect, and after reboot, if SIP-Phone still can’t connect with server,
SIP-Phone will keep trying to connect. On the other hand, if user disables
this function, SIP-Phone won’t reboot and keep trying to connect.
8. SNTP Configuration
(1) SNTP Mode:
User can set SNTP function to be on or off, which means SIP-Phone will
capture current time from SNTP server or not.
(2) SNTP Server:
User can specify a SNTP server for SIP-Phone to capture current time.
(3) Time Zone:
User can set time zone via pressing or according to the location
SIP-Phone is. For example, in Taiwan the time zone should be set as
GMT+8:00.
15

9. Behind IP-Sharing
(1) If SIP-Phone is behind IP sharing or NAT device, on IP sharing must
enable “DMZ” function or set “Virtual Server” to open ports (UDP port:
5060 and 16384).
(2) User must enter public IP address of IP sharing.
6. Advanced Settings (protected by password)
Please Enter Password: (**)
User must key in password to enter this menu, selections under this command
are all important ones, which can only be configured by advanced users.
Note:
1. Default Password to enter is empty, please press OK to enter sub-menus.
2. If user forget password, please contact with your distributor, we will
generate a specific password according to your MAC address of
SIP-Phone.
3. User can also try to configure SIP-Phone via Telnet or Web browser with
default IP address: 10.1.1.3.
1. SIP Settings
(1) Connect Mode
Select SIP connection mode to be peer-to-peer mode or Proxy mode.
(2) Proxy
A. Proxy
Set Proxy IP address or Domain Name.
B. Outbound proxy
Set Outbound Proxy IP address or Domain Name.
C. Proxy port
Set Proxy port for SIP-Phone to send messages.
D. Expire (in seconds)
Set expire time of registration, in the duration of 2/3 expire time,
SIP-Phone will re-register to Proxy Server again.
(3) User Info
A. User Name
Set User Name of SIP-Phone to register to Proxy Server. If Proxy
server doesn’t request specific User name, please enter Line
number here.
B. Line Number
16

Set Line Number of SIP-Phone to register to Proxy Server.
C. Password
Set User Password of SIP-Phone to register to Proxy Server. This
configuration is not necessary, if Proxy server doesn’t request
client to set password, user only has to set User Name the same
as Line Number.
2. Firmware Update
(1) Download method
There are two methods to download new version file, please move the
“>“ symbol by press or on the keypad to select TFTP or FTP method,
then press OK to confirm it.
(2) FTP/TFTP Sever
User has to offer one TFTP/FTP server IP Address and set this IP Address
via keypad. The IP Address is necessary for upgrading SIP-Phone new
application rom file.
(3) Set FTP user account (**)
User has to input user name and password for FTP server login .It is
necessary for upgrading SIP-Phone new application rom file via FTP
method.
(4) File Name
User has to press the file name of new application rom file prepared for
upgrading
(5) Start to Upgrade
Select YES or NO to start upgrade. After download is finished, press OK
then SIP-Phone will ask if need to reboot. (**)
(6) Firmware Version
Show versions of all software and hardware. (**)
Note:
Download via LCD command can only upgrade new application rom file.
4. LCD Menu Password
Set entry password of phone LCD menu.
7. Reboot
Reboot machine. It is necessary and important for user to reboot SIP-Phone
after any configurations has been made. SIP-Phone will ask user again before
reboot.
17

Chapter 3 Configuring the SIP-Phone through Web Pages
The HTTPD web management interface provides user an easier way to configure rather
than command line method through TELNET.
The configuration function and steps are similar with the way through command line. Please
refer to the chapter 4- Configuring the SIP-Phone through Telnet command lines for more
detail information. Below is a guide for user to configure via web interface.
18

Step 1. Browse the IP Address predefined via Keypad
Please enter IP address (user have to set via LCD menu first) of SIP-Phone in web browser.
If user failed to set IP address via LCD menu, the default IP address of SIP-Phone is
10.1.1.3, user can try to connect to SIP-Phone via this default IP via web interface.
19
Table of contents
Other Dynamix Telephone manuals