Dyness Junior Box User manual

Junior Box
USER MANUAL Balcony Solar System
File version-20231108-V1-EN Information might be subject to change without notice during product improving.

©Dyness reserves the copyright of this document
1
Product Overview
What's in the Box
Overview
Dyness Junior Box
MC4 DC Output Cable(3m) ×2
User Manual
TOP
FRONT
BOTTOM
RIGHT
LEFT

©Dyness reserves the copyright of this document
2
➊BMS
➎MC4 ports for PV2-
➋MC4 ports for PV1+
➏MC4 ports for PV2+
➌Power Button
➐MC4 ports for DC-(To Micro INVT)
➍MC4 ports for PV1-
➑MC4 ports for DC+(To Micro INVT)
Button Controls
Button
Action
Function
Press for 3 seconds
Turn Junior Box on
Press for 3 seconds
Turn Junior Box off
Install Your Junior Box
Option A: Position your Junior Box on a hard, level floor.
Getting Started
➊
➋
➌
➍
➎
➏
➐
➑

©Dyness reserves the copyright of this document
3
Option B: Mount your Junior Box onto a solid concrete wall using additional mount
brackets*.
*Mount brackets need to be purchased separately
Single Junior Box
1. Connect Junior Box to the micro inverter using the included MC4 output cables.
2. Connect the micro inverter to a home outlet using the original cable.
3.
Connect the solar panels to Junior Box using solar panel extension cables.
Connect Cables

©Dyness reserves the copyright of this document
4
4. Press the power button for 3 seconds to turn on your Junior Box.
When powered on, the BMS status LED will display blue .
Blue light
MC4 DC Output Cable
Solar Panel Extension Cable

©Dyness reserves the copyright of this document
5
Extended Junior Box
Junior Box supports up to 3 stack expansions (Extended Battery)* with a capacity of 6.4KWh
1.
Install the stack connector* on the battery expansion port on the top of the bottomExtended
Battery , and stack the Junior Box on the bottom module.
*The stack connector is an extended battery accessory
2. Connect the Junior Box(built-in MPPT module) to the micro inverter using the included MC4
DC Output Cable(3m).
3. Connect the micro inverter to a home outlet using the original cable.
4. Connect solar panels to Junior Box using Solar Panel Extension Cable
Stack Connector
Install the stack connector on the battery
expansion port on the top of the bottom module

©Dyness reserves the copyright of this document
6
5. Press the power button for 3 seconds to turn on your Junior Box.
When powered on, the BMS status LED will display blue .
*Note: 1. The Extended Battery sold separately.
2. Do not stack two Junior Boxes directly.
Blue light
MC4 DC Output Cable (3m)
Solar Panel Extension Cable
No need to install MPPT module

©Dyness reserves the copyright of this document
7
Dyness Smart ESS App Instruction
Dyness Smart ESS App for Smart Control
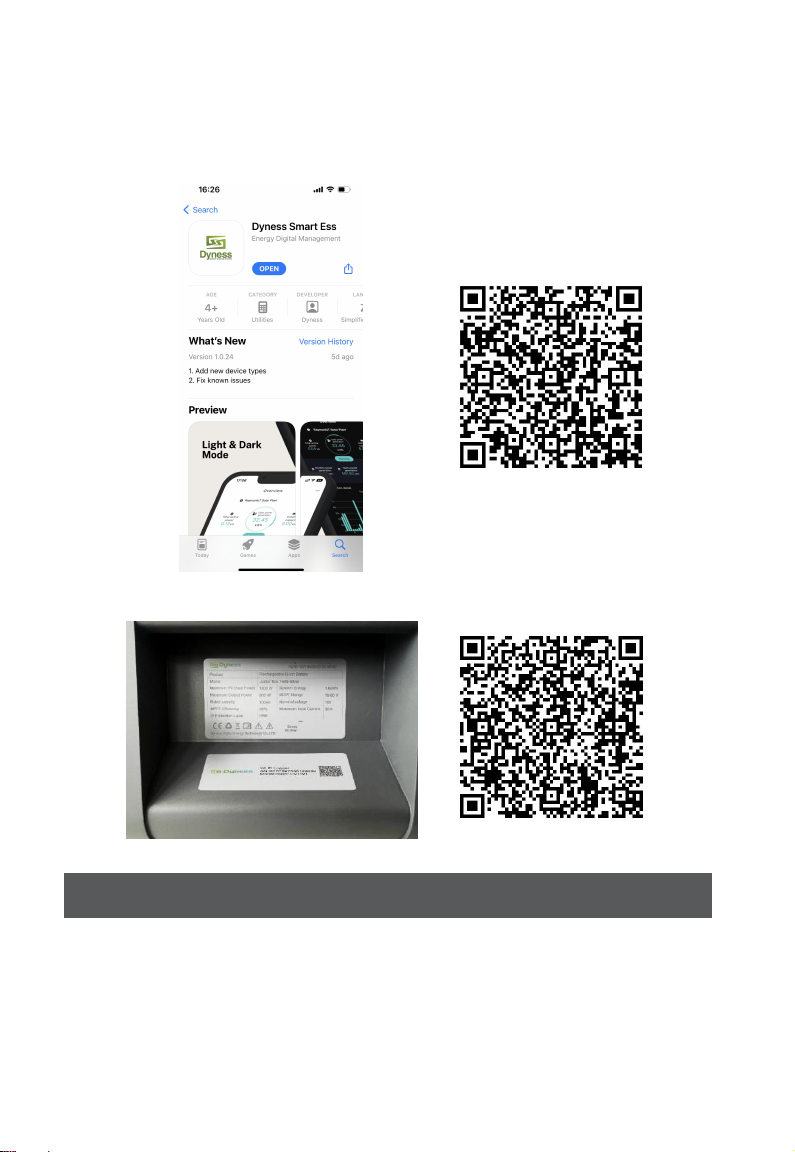
Download the Dyness Smart ESS App to get full functionality of your Junior Box
from the App
Store (iOS devices) or Scan QR Code(Android devices).
WIFI distribution network, use Dyness smart ESS app to scan the QR code in the Wi-Fi Logger label
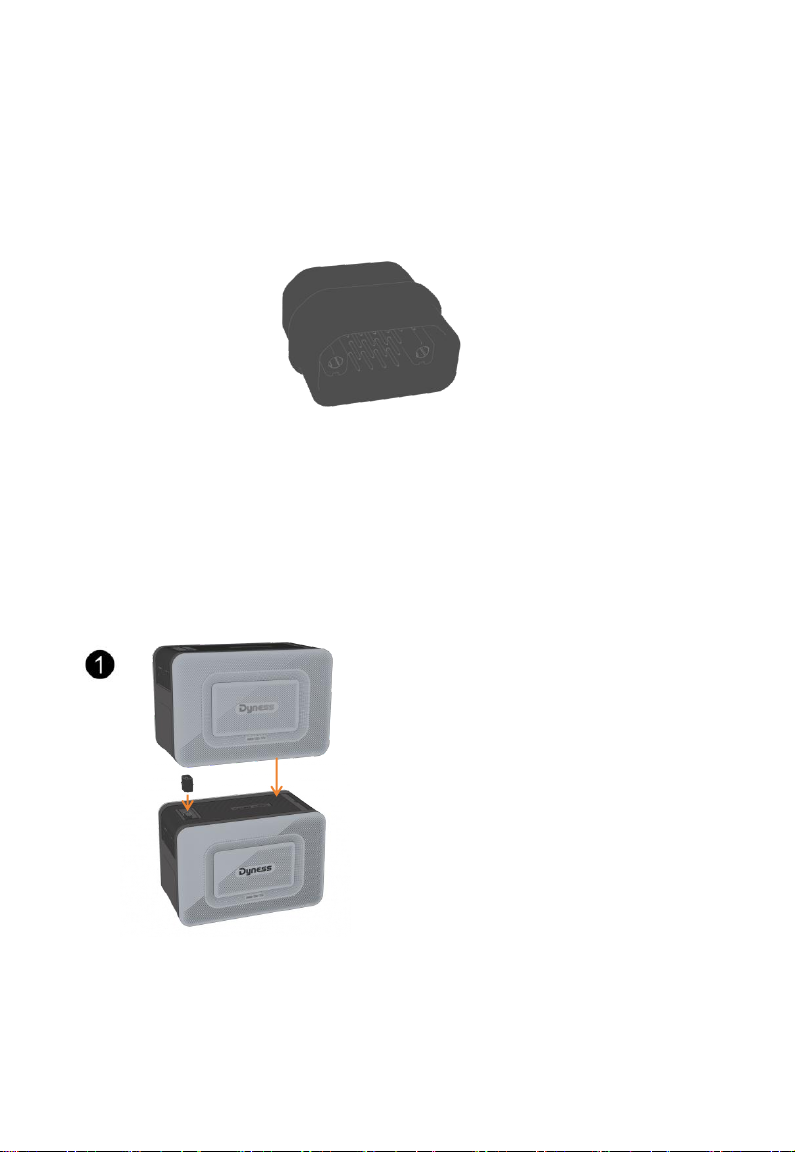
For optimal performance, follow the instructions below to store and maintain your Junior
Box regularly.
Keep the product on a flat surface when using, charging, and storing.
Use a cotton cloth and water to clean. Do not use steel wool or other hard materials for
Storage andMaintenance

©Dyness reserves the copyright of this document
8
cleaning.
For long-term storage, charge and discharge Junior Box once every 3 months (discharge Junior
Box to 20%, then recharge it to 80%).
If the BMS fails, it can be removed and replaced with a new BMS, as shown in the following
figure. Before removing the BMS, ensure that the battery is turned off.
➊
Insert two flat-head screwdrivers into the middle of the BMS
➋Pull out the BMS that needs replacing
➌Insert the new BMS

©Dyness reserves the copyright of this document
9
If the MPPT fails and needs to be replaced, first plug the MC4 wiring harness, then press the MPPT
buckle and pull out the MPPT module.
BASIC
Battery Type
LiFePO4
System Energy
1.6KWh
Dimensions
420mm*283.5mm*245mm
Weight
18KG
Protection Level
IP55
Cycle Life
≥8000 Cycles
Warranty
10 Years
Charging Temp. Range
0 °C to 55 °C
Discharging Temp. Range
-20 °C to 55 °C
APP
Yes
Communication
RS485
Max.PV Input Power
(
W
)
1200W
Max. Input Voltage
(
V
)
65V
MPPT Range(V)
18-60V
Click here to pull out the MPPT
module
Pull out the MPPT
module
Specifications

©Dyness reserves the copyright of this document
10
Max.Input/ Output Currrent(A)
30A
Max. Output(W)
800W
Expansion
Expansion Method
Stackable
Maximum Expansion Modules
4
(Junior Box+3Extended Battery)
Maximum expansion energy
6.4KWh
Specifications are subject to change without notice.
Safety Information
1. Please carefully read the documents before installing, operating or maintaining the
equipment. The documents are subject to change due to product updates or other
reasons.
2. Do not put heavy objects on the equipment.
3. Ensure that all cables and connectors are intact and dry before connecting to prevent
electric shocks.
4. Do not install or operate the equipment in extreme weather events such as lightning,
snow, heavy rain, strong wind and so on.
5. Do not damage, smear or rip off any warning labels on the equipment.
6. Do not hit, pull, drag, squeeze or step on the equipment, or throw it into the fire, as there
is risk of explosion.
7. After installing, please clean the remains of the installation, such as boxes, clipped cable
ties, ripped insulation materials, etc.
8. Do not modify or repair the equipment, please contact our customer service or qualified
personnel if necessary.
9. Use tools and the equipment correctly to prevent personal injuries and product damage.
10. Understand the components and function of the grid-tied PV power system. Make sure
that all electrical connections, and voltage and frequency at the connection point meet
the local microinverter grid-tie requirements and electrical standards.
11. The installation location should be convenient for you to put out the connectors.
12. Before you pull out the AC (or battery) connector from the microinverter, disconnect the
cable from the AC socket (or battery's) end.
13. Do not clean the product with harmful chemicals or detergents.

©Dyness reserves the copyright of this document
11
14. Misuse, dropping, or excessive force may cause product damage.
15. Do not use or store this product in direct sunlight for a long period, such as in a car, cargo
bed, or any other place where it will be exposed to high temperatures. Doing so may
cause the product to malfunction, deteriorate, or generate heat.
16. Do not use this product near strong static electricity or strong magnetic fields.
17. Do not immerse the product in water. If the product accidentally falls into water, place it
in a safe, open place and keep it away from fire until it is completely dry.
Environment requirements
1. Make sure the equipment is installed, operated or stored in a well ventilated place.
2. Do not install or operate the equipment near flammable, explosive, corrosive, caustic or
moist sources.
3. Do not expose the equipment to strong electromagnetic fields to avoid radio
interference.
Customer Service
Email:sales@dyness-tech.com
Tel:+86 400 666 0655
Web:www.dyness.com
For more details, please scan the QR code or visit: https://www.dyness.com/qa
Or scan the QR code below:

No. 511 Chenzhuang West Road, Sanshui Street,
Jiangyan District, Taizhou City
Address:
Tel: +86 400 666 0655
Web: www.dyness.com Official Website Digital version access
Other manuals for Junior Box
1
Table of contents