e.Green Heater EGH-9008 System manual
Owner’s manual & Operating Instructions
e
●GREEN HEATER™
The Heater that handles our world with care.
Power Information
& Specifications
Model Type A/C Volts atts BTU
EGH-9008
9
Fins
Radiator 110-120 1000-1050 6850-7200
Congratulations on your purchase of this

“
ENERGY SAVING
,
ECOFRIENDLY PODUCT
”.
IMPORTANT INSTRUCTIONS
PLEA E READ AND AVE THE E AFETY IN TRUCTION
When using electrical appliances, basic precautions should always be followed in
order to reduce the risk of fire, electric shock, and injury. Carefully read all of the
instructions below before using this heater.
1. This heater is hot when in use. To avoid burns, do not let bare skin touch
the heater’s hot surfaces. Use the provided handle when moving this
heater.
2. Keep items such as pillows, bedding, linens, curtains, clothes, paper and
furniture at least 2.5 feet (0.5m) from the front of the heater. Keep these
items away from the sides and rear of the heater.
3. Use extreme caution when the heater is used by or near children, disabled
or whenever the heater is left operating unattended.
4. The appliance should always be in the upright position when in use.
5. Do not cover the heater, this may cause overheating.
6. Do not place or use the heater in wet or damp locations such as
bathrooms or laundry areas. Never place the heater where it might fall
into or near water and do not use the heater to dry wet clothes.
7. Do not use this heater in or near areas where gasoline, paint or other
such liquids are used or stored.
8. Do not use the power supply cord to move the appliance. The power
supply cord should not touch the heating panels while in use. Do not run
the power supply cord under carpeting or cover with throws or rugs. Keep
away from traffic areas where it will not be tripped over.
9. Disconnect the power supply cord when not in use. Ensure the controls
are turned off and then remove the plug from the outlet.
10. Do not operate the heater if it has a damaged cord or plug, after the
heater malfunctions, has been dropped or damaged in any manner.
Return the heater to an authorized dealer for any repairs & adjustments.
11. Only use this heater as described in the owner’s manual. Any other
method used may cause fire, electric shock or injury.
12. Avoid the use of extension cords. If extension cords must be used,
minimize the risk of overheating by using a UL listed, minimum # 14AWG
and rated no less than 850 watts.
UNPACKING AND SET-UP INSTRUCTIONS
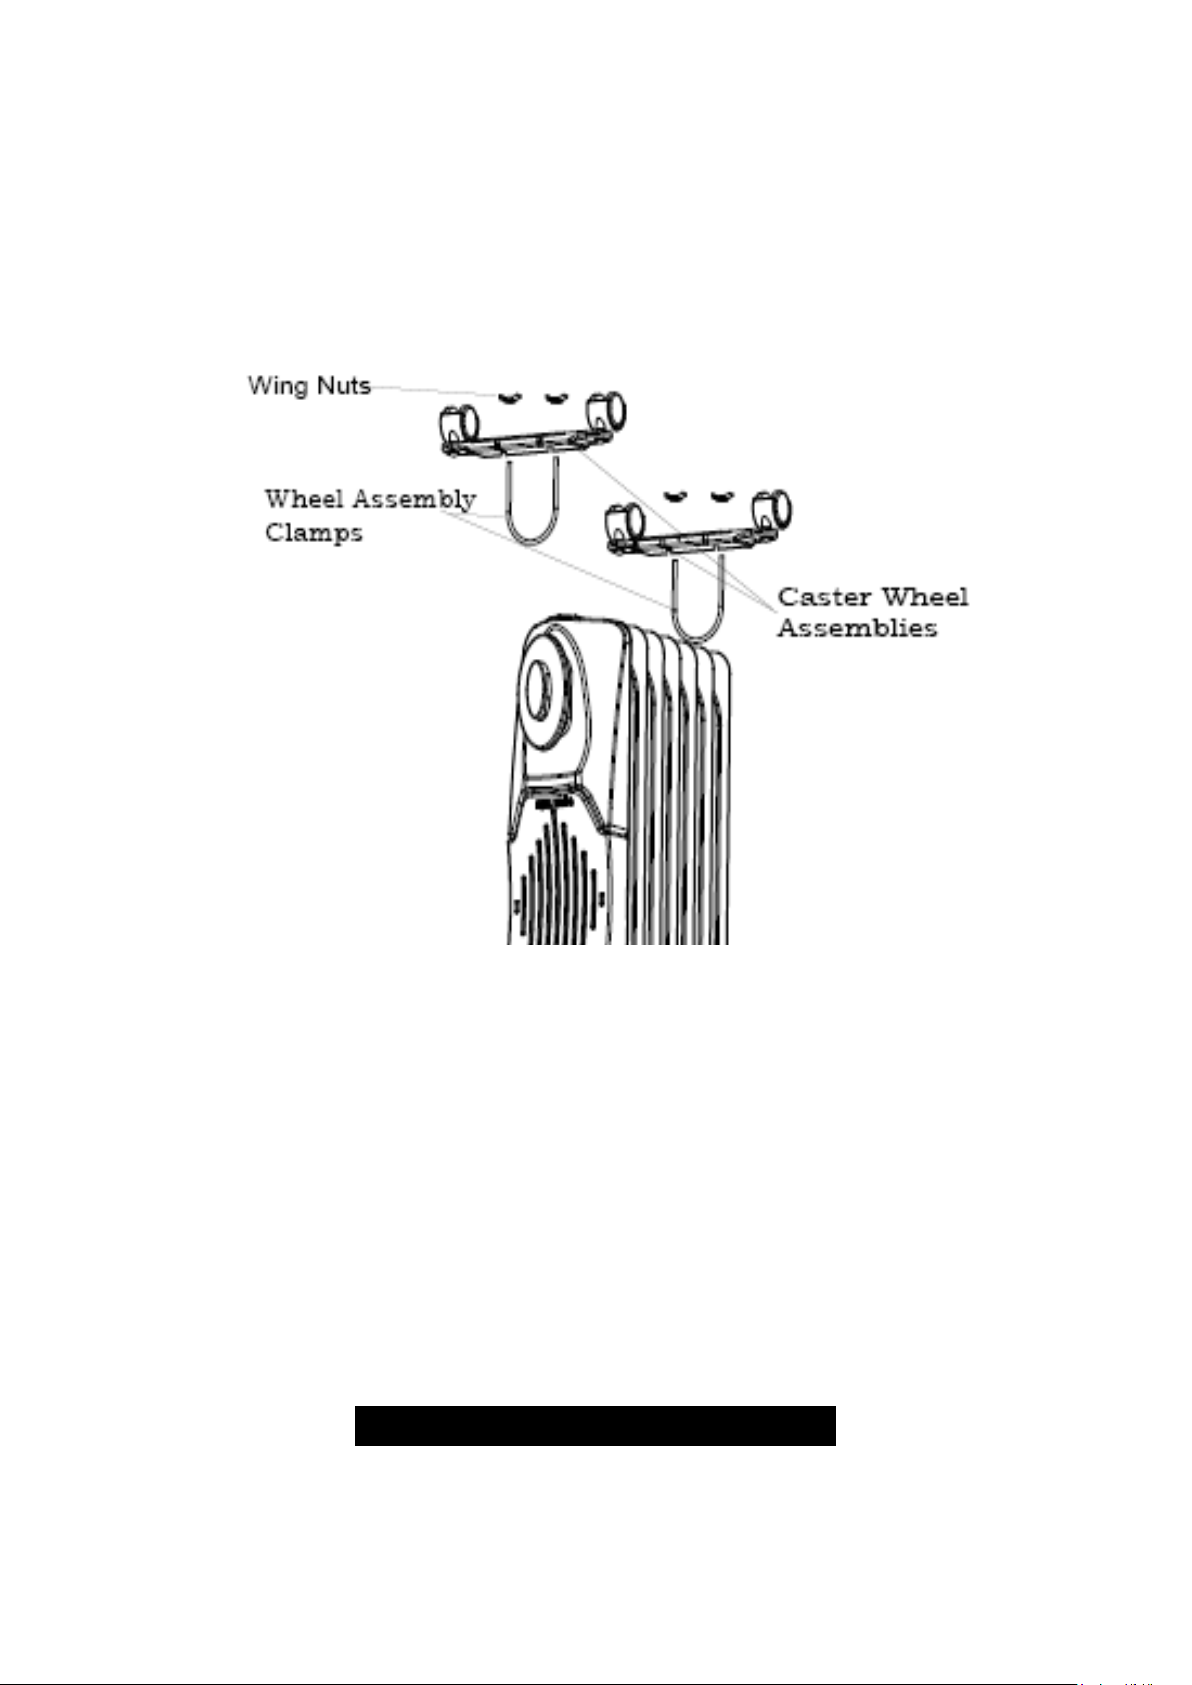
Carefully unpack your heater and remove the wheel assemblies from the
packaging.
1. MAKE SURE THE HEATER IS UNPLUGGED AND TURNED OFF.
2. CAREFULLY PLACE THE HEATER UPSIDE DO N.
3. Insert the “Wheel Assembly Clamps” into the base of the heater, between
the first & second panel at one end and the eighth & ninth panel at the
other end of the heater.
4. Insert the open end of the “Wheel Assembly Clamps” into the holes of one
of the support bars of the “Caster Wheels Assembly”
5. Insert the Wing nuts and screw them in tightly.
6. Repeat steps 3 & 4 with the second “Wheel Assembly Clamp” and support
bar of the “Caster Wheels Assembly”
7. Turn your heater to the upright position.
8. Your heater is now ready to use.
ARNING:
Only operate the heater in the upright position with the wheels on
the bottom and controls on top. Operating the heater in any other position and
without the wheel assemblies attached could result in personal injury, property
damage and/or damage to your heater.
OPERATING INSTRUCTIONS

IMPORTANT
Your heater is equipped with a polarized alternating current line plug
(a plug with one blade wider than the other) or a three prong (ground) plug.
This plug will fit into the power outlet only one way. This is a safety feature.
If you are unable to insert the plug fully into the outlet, try reversing the
plug. If the plug still does not fit, contact your electrician to replace your
outlet. DO NOT destroy the safety feature of the polarized plug by forcing it
into a non-polarized outlet, or by modifying the prongs down to fit.
1) For continuous (uninterrupted) heat:
a) Place the heater
on a firm, level surface away from obstructions and at
least 2.5 feet away from walls, furniture, curtains, and plants or any other
combustible objects or materials.
b) Turn the Timer witch Knob counterclockwise (left) to “ON” position.
c) Turn the Main Power witch knob clockwise (right) to “ON” position.
d) Observe and follow all safety precautions.
2) For up to 2 hours of continuous heat.
a) Place the heater
on a firm, level surface away from obstructions and at
least 2.5 feet away from walls, furniture, curtains, and plants or any other
combustible objects or materials.
b) Turn the Timer witch Knob clockwise (right) and select the desire time
10-120 minutes maximum.
c) Turn the Main Power witch knob clockwise (right) to “ON” position.
d) Observe and follow all safety precautions.
3) To cancel all operations turn the Main Power witch Knob counterclockwise
(left) to “OFF” position.
WARNING: This heater features an overheat protection feature that shuts the
unit off if it overheats due to abnormal conditions.
This heater is equipped with a “tip-over shutoff safety switch. The heater can
only operate in an upright position.
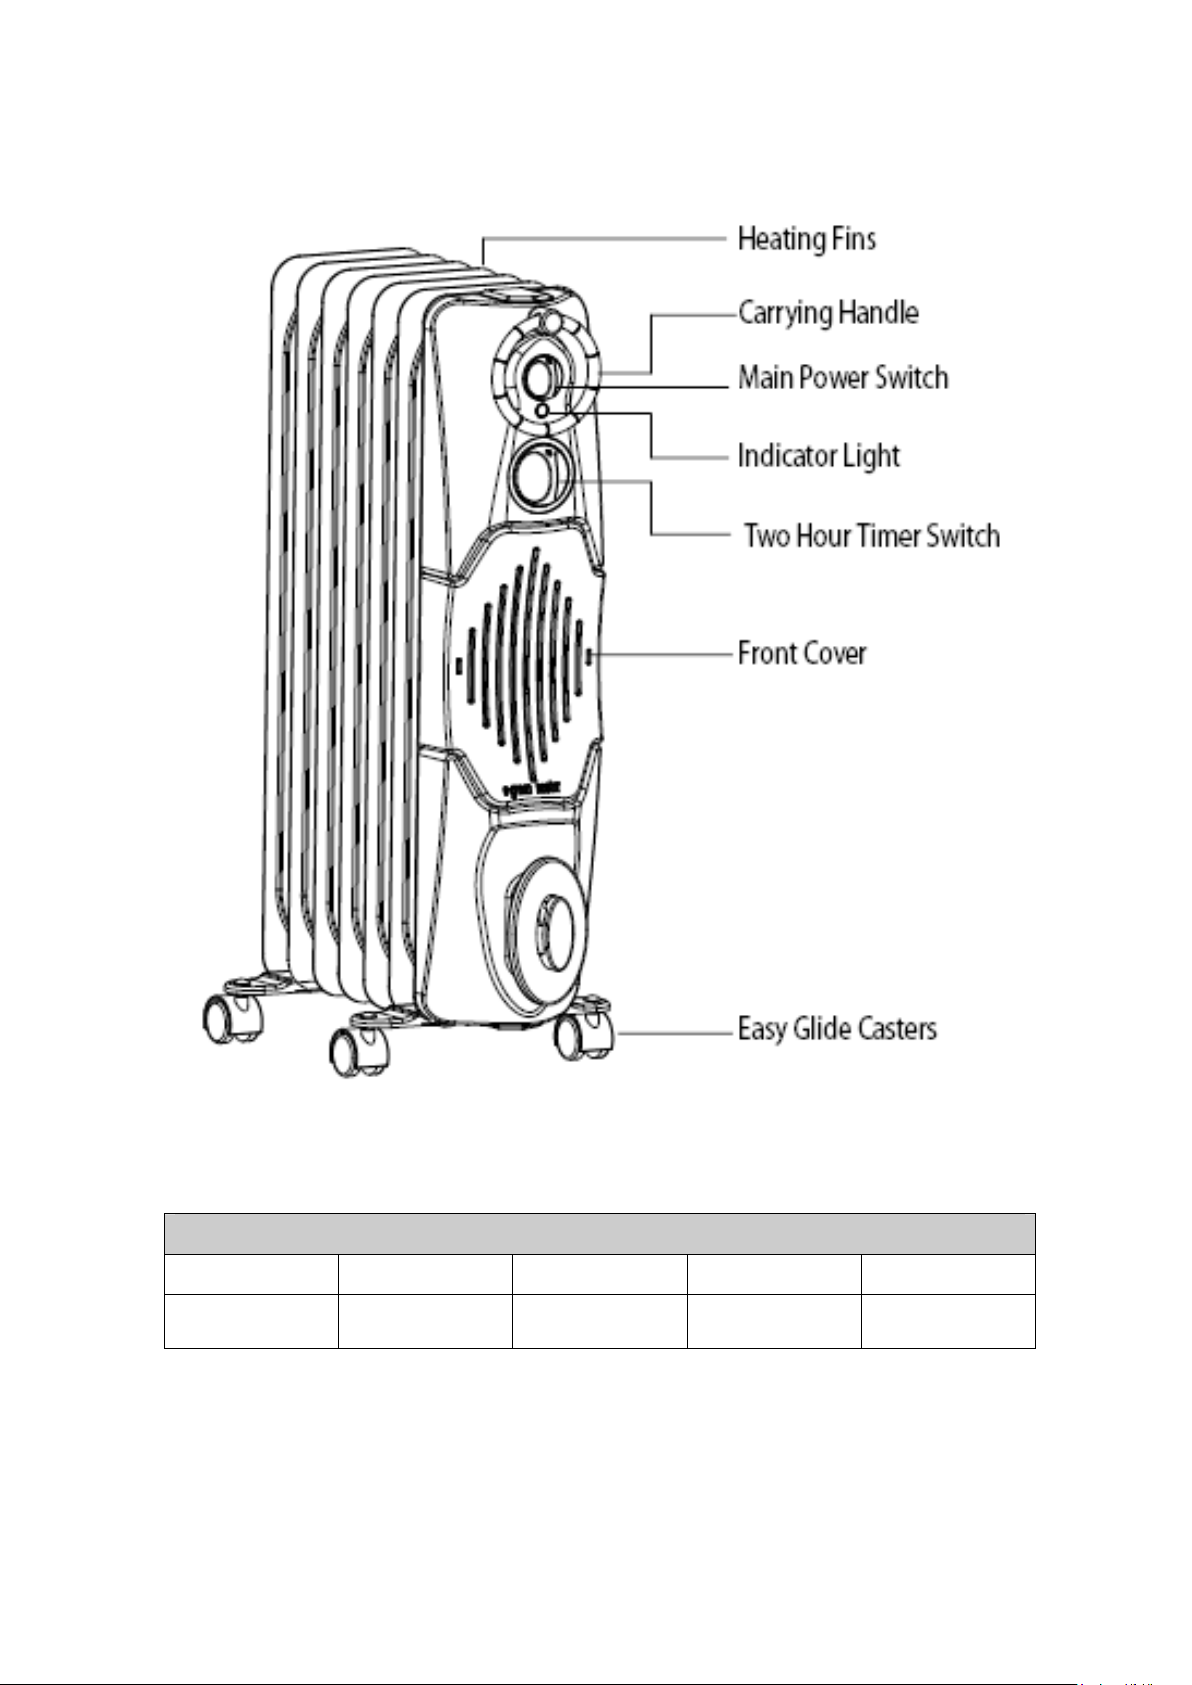
ADDITIONAL FEATURES
This heater also includes the following additional features:
• Convenient front carrying handle.

• Heavy duty caster wheels for easy maneuvering from room to room.
• Cord storage compartment for neatly storing the power cord when the
heater is not in use.
TROUBLESHOOTING
If this heater fails to operate, please follow these instructions:
• Ensure that the circuit breaker or fuse is working properly.
• Make sure the heater is plugged in and that the electrical outlet is
working properly.
• Check for any obstructions in, near, or around the heater. If you find any
obstructions turn the heater “OFF”. Unplug the heater and wait a few
minutes for it to cool down. Carefully remove the obstruction. Plug the
heater in and turn it on again by referring to the OPERATIING
INSTRUCTIONS.
IF YOU EXPERIENCE A PROBLEM WITH YOUR HEATER
• IF THE POWER UPPLY CORD I DAMAGED.
• IF THERE I AN ETHANOL LEAK.
• IF THE HEATER HA BEEN ACCIDENTLY DAMAGED IN ANY WAY.
DO NOT ATTEMPT TO REPAIR THE HEATER YOUR ELF A DOING
O MAY VOID THE WARRANTY AND CAU E DAMAGE OR
PER ONAL INJURY.
Please refer to these instructions leaflet for troubleshooting.
If the problem persists, contact us by referring to the
“ ervice & upport” information on this leaflet.
CLEANING AND STORAGE
THE
e .GREE N HE AT E R ™
I VI RTUALLY MA I NTE N A N C E FREE.
AL AYS TURN THE PO ER S ITCH OFF AND UNPLUG THE HEATER
BEFORE DUSTING. Be sure to save the carton for off-season storage.
• To clean the heater, first turn the heater’s Power witch to the “OFF”
position. Unplug it and wait for the heater to cool down.

• Use a soft damp cloth to clean and dust.
• NEVER U E ANY CLEANING PRODUCT .
• Never use any harsh chemicals to clean the surface
• Never Use any abrasive materials on the surface of the heater and the
front cover.
GUARANTEE AND CUSTOMER SERVICE
• Before delivery all our products are subjected to rigorous quality
control.
In addition your heater is guaranteed for a period of one (2) years
from the date of purchase, providing your heater was operated as per
the OPERATING IN TRUCTION in the O NER’S MANUAL.
During this period we will repair or replace the product or any
defective parts free of charge during the warranty period.
• We are under no liability in respect of any defects arising from willful
or accidental damage, fair wear or tear, faulty installation, handling or
maintenance of the product, connection to an unsuitable electric
supply, negligence, abnormal conditions, failure to follow our
instructions, misuse or alteration or repair of the product without our
approval.
SERVICE & SUPPORT INFORMATION
Please visit our website www.egreenheater.com for additional service information
and FAQ.
Date Purchased
Retailer’s name & address
Local ervice Depot
Information
Additional Information
Notes

tore tamp
This product can be recycled, Contact your neighborhood recycling centre.
Table of contents


