E-Tel freeride FR200 User manual

The FreeRide Users Guide
The quickest way to get the most out of your FR200 & FR210
© Copyright 2000, 2001 e-tel corporation. All rights reserved.

Quick Start:
Using the speakerphone: press , then press number buttons to enter the number and make a
call without the handset. Face the FreeRide and speak in a normal voice. Press to end the call.
To switch from speakerphone to handset during a call, lift the handset.
Adjust volume during a call by pressing either – or +.
Press M to mute or ‘unmute’ your own voice.
Redialing: press Dial twice.
Putting a call on hold: press Hold. To get the call back, press the Line button on which the call
is held. If FreeRide rings and you can’t answer, you’ve probably pressed a button. Press Cancel
several times, until nothing happens in the display. Then answer. If FreeRide asks for Station
Name Here, ignore it until you get to “Entering Station Name” on page 10.
BUT before anything else, you need to know...
HOW THE ARROW BUTTONS WORK
HOW SHIFT, PRIMARY, AND SECONDARY BUTTON FUNCTIONS WORK
HOW THE CANCEL BUTTON WORKS
HOW THE SELECT BUTTON WORKS
HOW THE SAVE BUTTON WORKS
If you try to figure this out on your own, you’ll be here all day. If you use the Guide it’ll take half
an hour.
So read on....
You need to know...
How primary and secondary button functions work
Every FreeRide button can have a primary and a secondary function. For example, on the Dial
button, the secondary function is Callers. To use the primary function, press the Dial button. To
use the secondary function, press Shift, then Callers.
How the Shift button works
Whenever you press Shift, an up arrow appears at the lower right end of the display. If you
change your mind, press Shift again to cancel.
How the Save button works
You have to press Shift first, then press the Save button, to save entries or finish things.

How the Cancel button works
Press Cancel to exit from a menu or function. You can also press Cancel when you are entering
names or numbers, to throw away changes instead of saving them. In fact, if you can’t figure out
what’s going on, you can press Cancel to get you out of anything and start again.
How the Select button works
Press the Select button to choose the option, or to work with a displayed item or menu. When
scrolling through lists of things, or looking through menu items, press Select to choose
something. It’s like clicking on something with a mouse button to select it.
How the buttons work
Use these buttons to select things, to scroll through lists, or to move the cursor in the display.
You’ll also need to know this, but maybe later...
How to set your FreeRide with time, date, and name. Page 10
How lists work Page 13
How to use the directory and speed dialing Page 14
Auto redialing Page 19
How to edit numbers before dialing Page 20
How to display information about calls Page 21
How to change button functions Page 22
A DETAILED TABLE OF CONTENTS IS NEXT.
AN INDEX IS AT THE BACK OF THE GUIDE.

Table of Contents
INTRODUCTION TO FREERIDE ..............................................................................................................................5
•F
REERIDE EXPLAINED ........................................................................................................................................ 5
•HOW FREERIDE WORKS ..................................................................................................................................... 5
•H
OW THE BUTTONS WORK ................................................................................................................................. 6
•HOW THE DISPLAY WORKS................................................................................................................................. 7
•ICONS................................................................................................................................................................. 8
•MOVING AROUND IN THE DISPLAY ..................................................................................................................... 8
SETTING BASICS......................................................................................................................................................... 9
•I
NTRODUCTION................................................................................................................................................... 9
•C
HANGING SETTINGS........................................................................................................................................ 10
•S
ETTING TIME .................................................................................................................................................. 10
•SETTING DATE ................................................................................................................................................. 11
•E
NTERING STATION NAME................................................................................................................................ 12
•A
DJUSTING RING .............................................................................................................................................. 13
•L
ABELING A BUTTON........................................................................................................................................ 14
USING LISTS ............................................................................................................................................................... 14
•H
OW LISTS WORK ............................................................................................................................................ 14
•D
IRECTORY STRUCTURE ................................................................................................................................... 15
•FIXING A PARTIAL DIRECTORY ITEM................................................................................................................. 16
•CHANGING DIRECTORY ITEMS .......................................................................................................................... 16
•LOCKING AND UNLOCKING DIRECTORY ITEMS.................................................................................................. 17
•L
INKING SPEED DIAL BUTTONS ........................................................................................................................ 17
•USING THE DIRECTORY..................................................................................................................................... 18
•USING THE DIALED LIST ................................................................................................................................... 18
•U
SING THE CALLERS LIST................................................................................................................................. 18
•D
ELETING FROM LISTS ..................................................................................................................................... 19
•COPYING FROM DIALED OR CALLERS LIST TO DIRECTORY ................................................................................ 19
•C
HANGING ITEMS IN THE DIALED AND CALLERS LISTS...................................................................................... 19
CALLING...................................................................................................................................................................... 20
•M
AKING CALLS................................................................................................................................................ 20
•USING THE HANDSET ........................................................................................................................................ 20
•U
SING THE SPEAKERPHONE .............................................................................................................................. 21
•A
DJUSTING HANDSET AND SPEAKERPHONE VOLUME........................................................................................ 21
•TRANSFERRING CALLS ..................................................................................................................................... 21
•R
EDIALING ....................................................................................................................................................... 21
•R
EDIALING A BUSY NUMBER ............................................................................................................................ 21
•E
DITING A NUMBER BEFORE DIALING .............................................................................................................. 22
ANSWERING ............................................................................................................................................................... 22
•A
NSWERING CALLS .......................................................................................................................................... 22
•D
ISPLAYING CALLER INFORMATION ................................................................................................................. 22
•H
OLDING AND RETRIEVING A CALL .................................................................................................................. 23
•A
NSWERING SECOND CALLS............................................................................................................................. 23
•D
ISPLAYING ACTIVE AND HELD CALLS ............................................................................................................ 23
•U
SING DO NOT DISTURB .................................................................................................................................. 23
•CHECKING VOICE MAIL.................................................................................................................................... 24
BUTTONS MENU........................................................................................................................................................ 24
•B
UTTON FUNCTIONS......................................................................................................................................... 24
•C
HANGING BUTTON FUNCTIONS ....................................................................................................................... 25
FREERIDE SAFETY AND WARRANTY................................................................................................................. 25
•S
AFETY INSTRUCTIONS ..................................................................................................................................... 25
•P
RODUCT WARRANTY ...................................................................................................................................... 26
INDEX ...........................................................................................................................................................................26
Introduction to FreeRide
• FreeRide Explained
FreeRide is a smart phone, flexible, and powerful. You can set up speed dialing, and a list of your
most-often called telephone numbers. Make calls with the handset, or hands-free with the
speakerphone. Adjust the volume as you speak, and mute FreeRide for privacy. Built into
FreeRide are all sorts of functions, provided by the Gateway. Every button has two functions,
most of which you can change to suit your own needs. The FreeRide display is easy to read, and
tells you a great deal about what happens on your own FreeRide while you’re out.
• How FreeRide Works
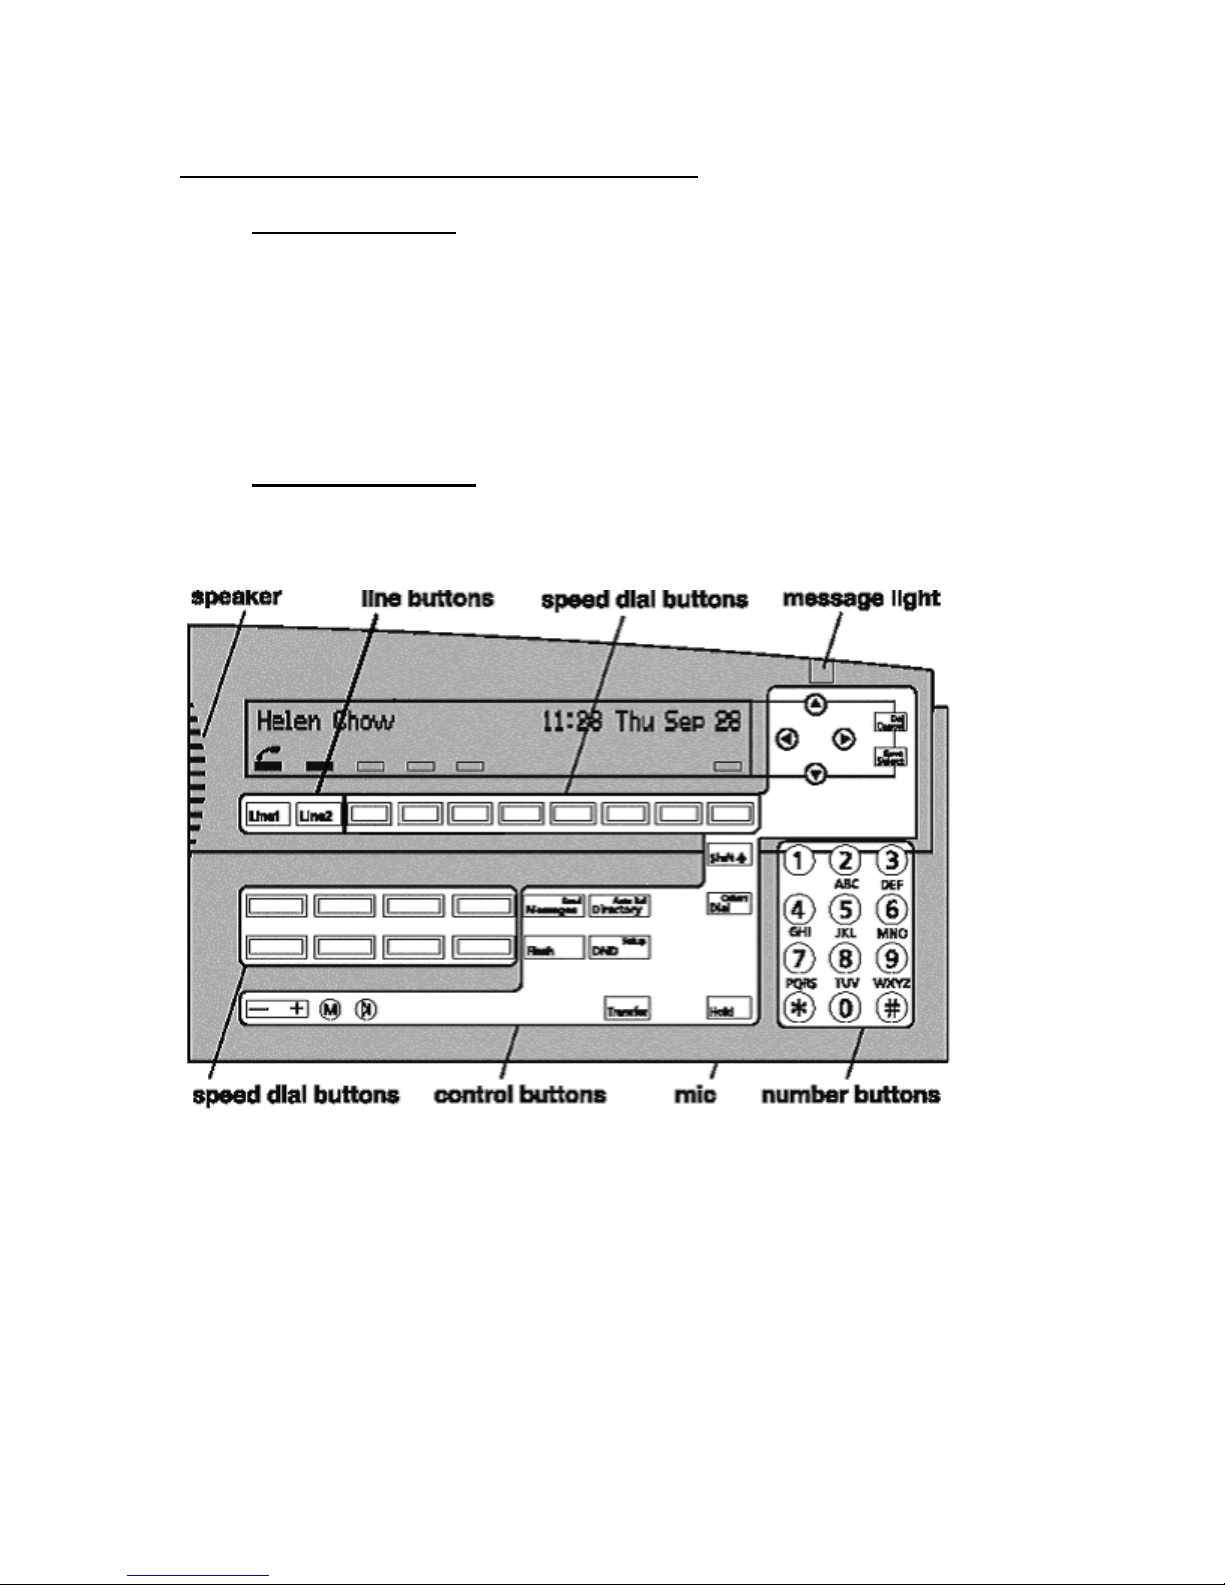
The illustration shows the basic grouping of FreeRide buttons by function. Your FreeRide may
have different labels on some buttons.
Press a line button to select an external line. FreeRide has two lines.
Press a speed dial button to dial a linked Directory item.
Press number buttons for numbers, letters, or special characters.
Press control buttons to operate many basic functions of FreeRide.
A description of each button and button type is in the following pages.

• How the Buttons Work
To use the primary function, press the button. To use the secondary function, press Shift, then
when an up arrow appears in the display, press the button.
BUTTON FUNCTIONS
Line 1, Line 2 - Select an external line.
Display more information, or move the cursor in the display.
Cancel Exit from a menu or function, or reject an editing change.
Del Delete single characters or list entries.
Select Select the displayed option.
Save Save entries or choices.
Shift Select the secondary function of a button by pressing this button first.
Speed Dial Speed dial a linked Directory item.
Voice Mail Linked to a directory entry, which redials voice mail system
Directory Display the Directory.
Auto Rdl Redial a busy number.
Dial Call a displayed number or display the Dialed list.
Callers Display the Callers list.
Flash Signal that special instructions will follow.
DND Turn the Do Not Disturb function on or off.
Setup Display the setup menu.
Transfer Put a call on hold to transfer it.
Hold Put an outside call on hold. Press sound control buttons to control sound on the speaker and
handset.
+–Adjust the volume of the handset, speakerphone, or ringer.
M Mute. Turn the handset or speaker microphone on or off.
Speakerphone. Turn on the speakerphone instead of the handset.

• How the Display Works
The display shows text and icons to give information about the status of FreeRide. The display is
blank only if FreeRide is not receiving power. The illustration shows an example of a FreeRide
that is powered, and in use. Text can display name, number, time, date, length of call, prompts,
and menu options. If you have a long FreeRide, the display looks like this:
If you have a short FreeRide, the display looks like this
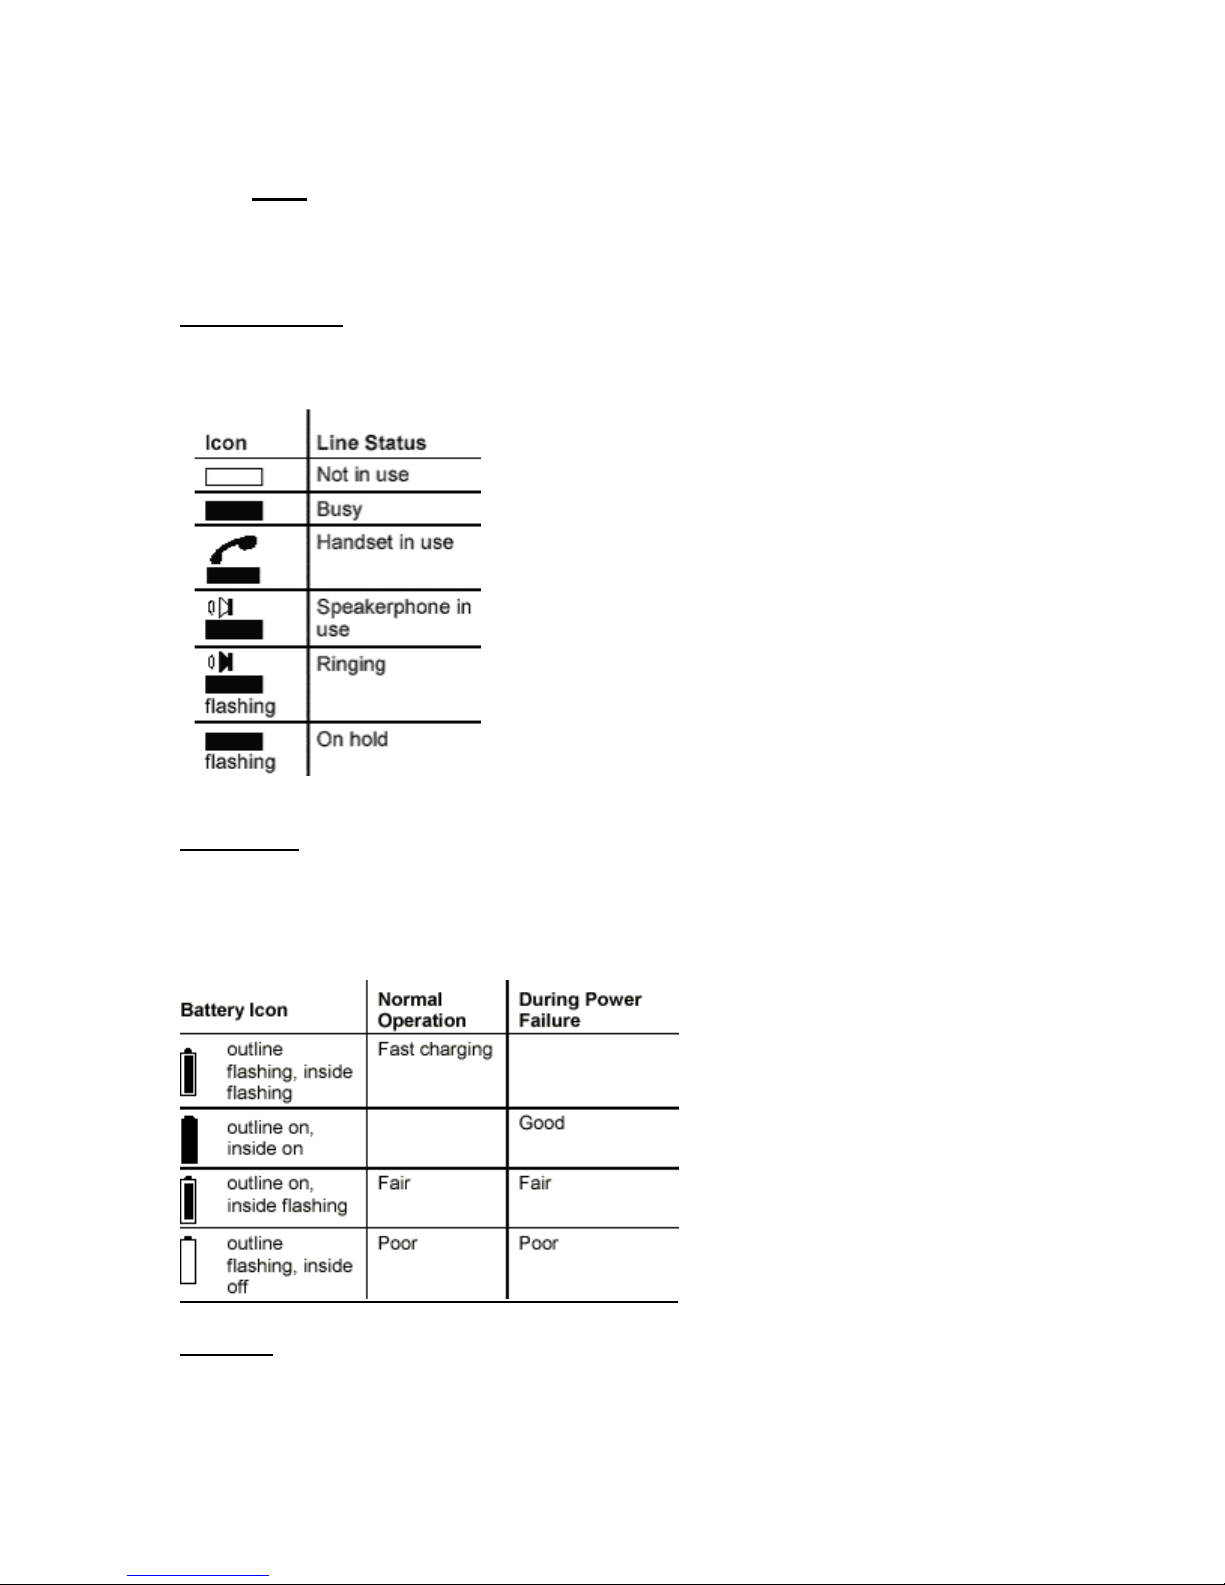
• Icons
Icons show the status of lines, handset, speakerphone, batteries, and use of the Shift button.
Twenty seconds after a power failure, all flashing display icons stop flashing.
Line Status Icons
Icons for line status appear above the Line buttons. Line icons are always present in the display.
If no icon appears above a line, the button function has not been assigned.
Battery Icon
Normal operation is when the FreeRide is receiving power through the line cord. No battery icon
appears when FreeRide operates normally with good batteries. Replace the NiCad batteries every
five years.
Shift Icon
Whenever you press Shift, an up arrow appears at the lower right end of the display

• Moving Around in the Display
To enter or edit information in the display, press or to move the cursor.
When you open a list or a menu, the first item is displayed. Press or to scroll through the
items.
Three periods after a menu option mean you need to press Select to display the next level of
options.
For example, in the Setup menu, when you see
Buttons… press Select to see the options.
Setting Basics
• Introduction

The basic settings of a FreeRide are: time, date, and station name. These settings can be easily
changed.
• Changing Settings
Set up a FreeRide for a new user by changing the basic settings for time, date, and station name.
Getting out of things
Press Cancel repeatedly to get out of something and start again.
Using Set Up Mode
Use setup mode to set and change the time, the date, the station name, and the functions of
buttons.
Press Shift, then Setup to put the FreeRide into setup mode.
Press Cancel to get out of setup mode.
Tip: Press Cancel repeatedly to return to the basic display.
• Setting Time
The displayed time can be either 24 hour or 12 hour.
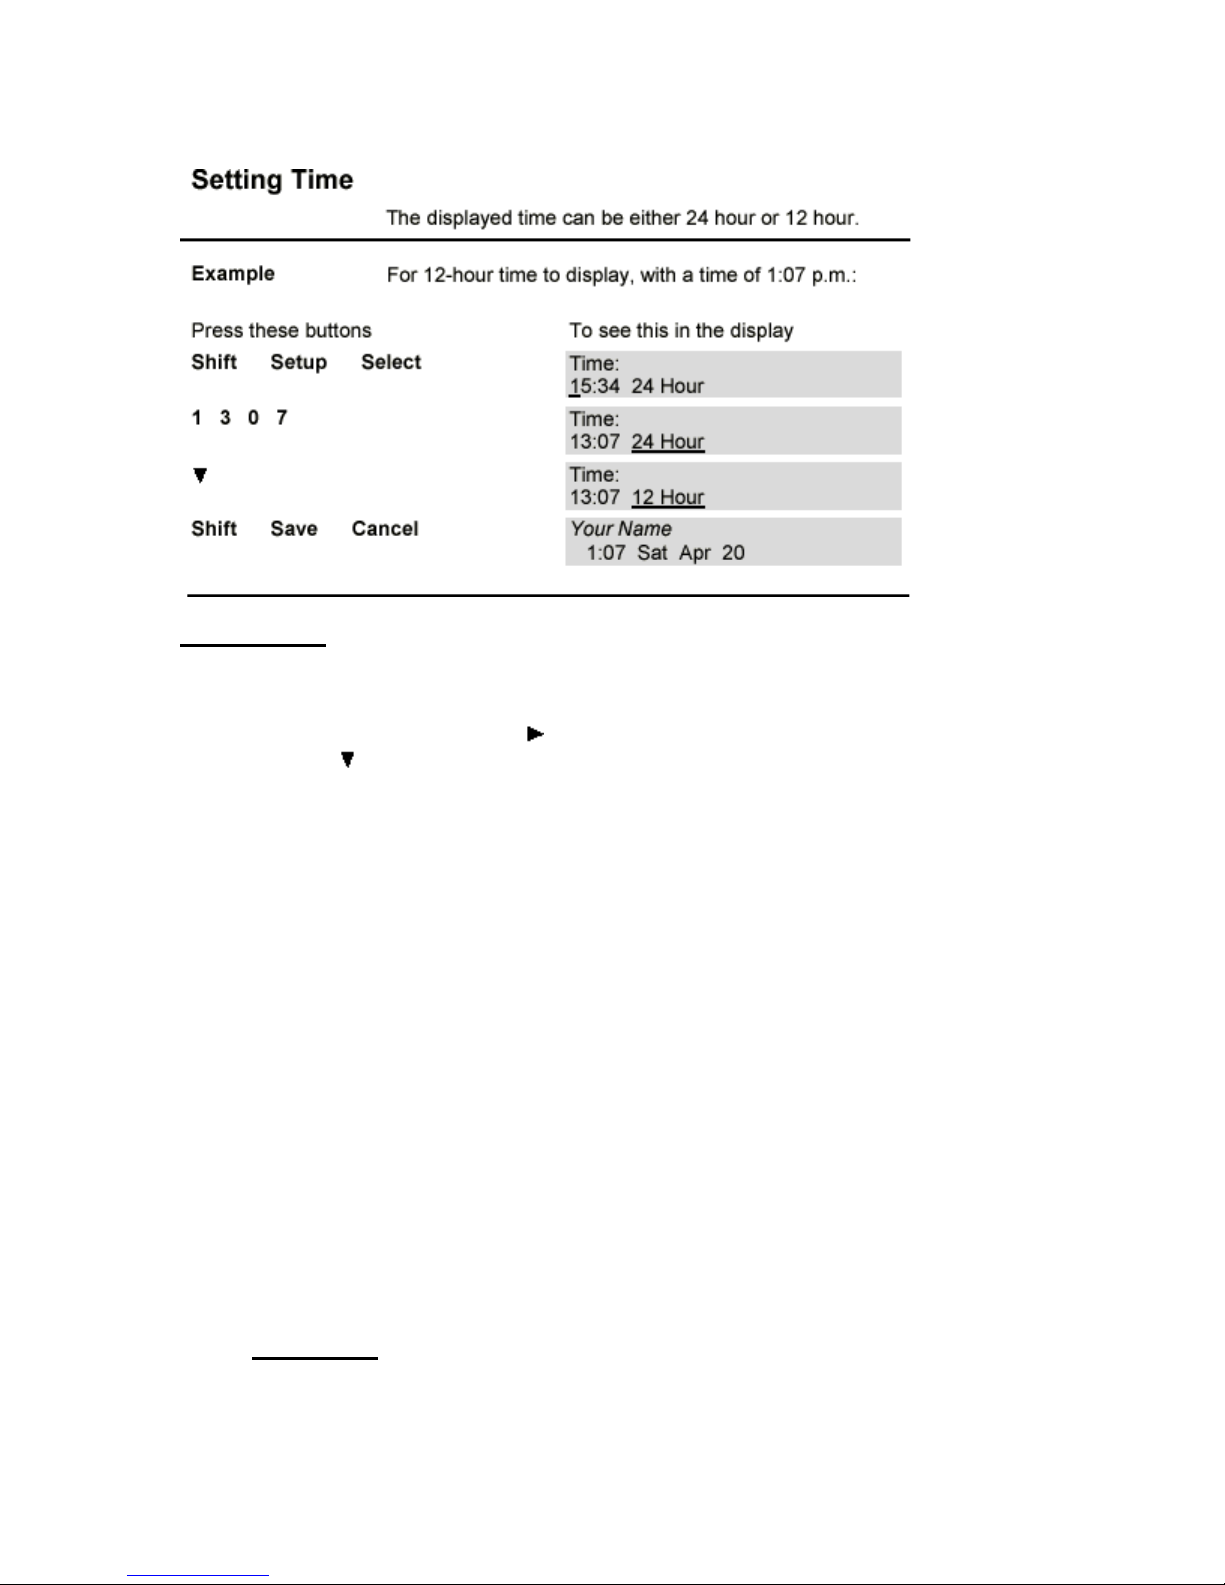
To set the time:
1. Press Shift then Setup, then Select.
2. Press number buttons to enter the time as 24- hour time.
If the time is correct, press to move past the time to the type of time.
3. Press to select a display of either 24 Hour or 12 Hour time. If you select 12-hour
type of time, it doesn’t display until you save your settings, and return to the main
display.
4. Press Shift, then Save to save your entry, then press Cancel to get out of the setup
mode.
• Setting Date
Example For Tuesday, May 2, 2000:
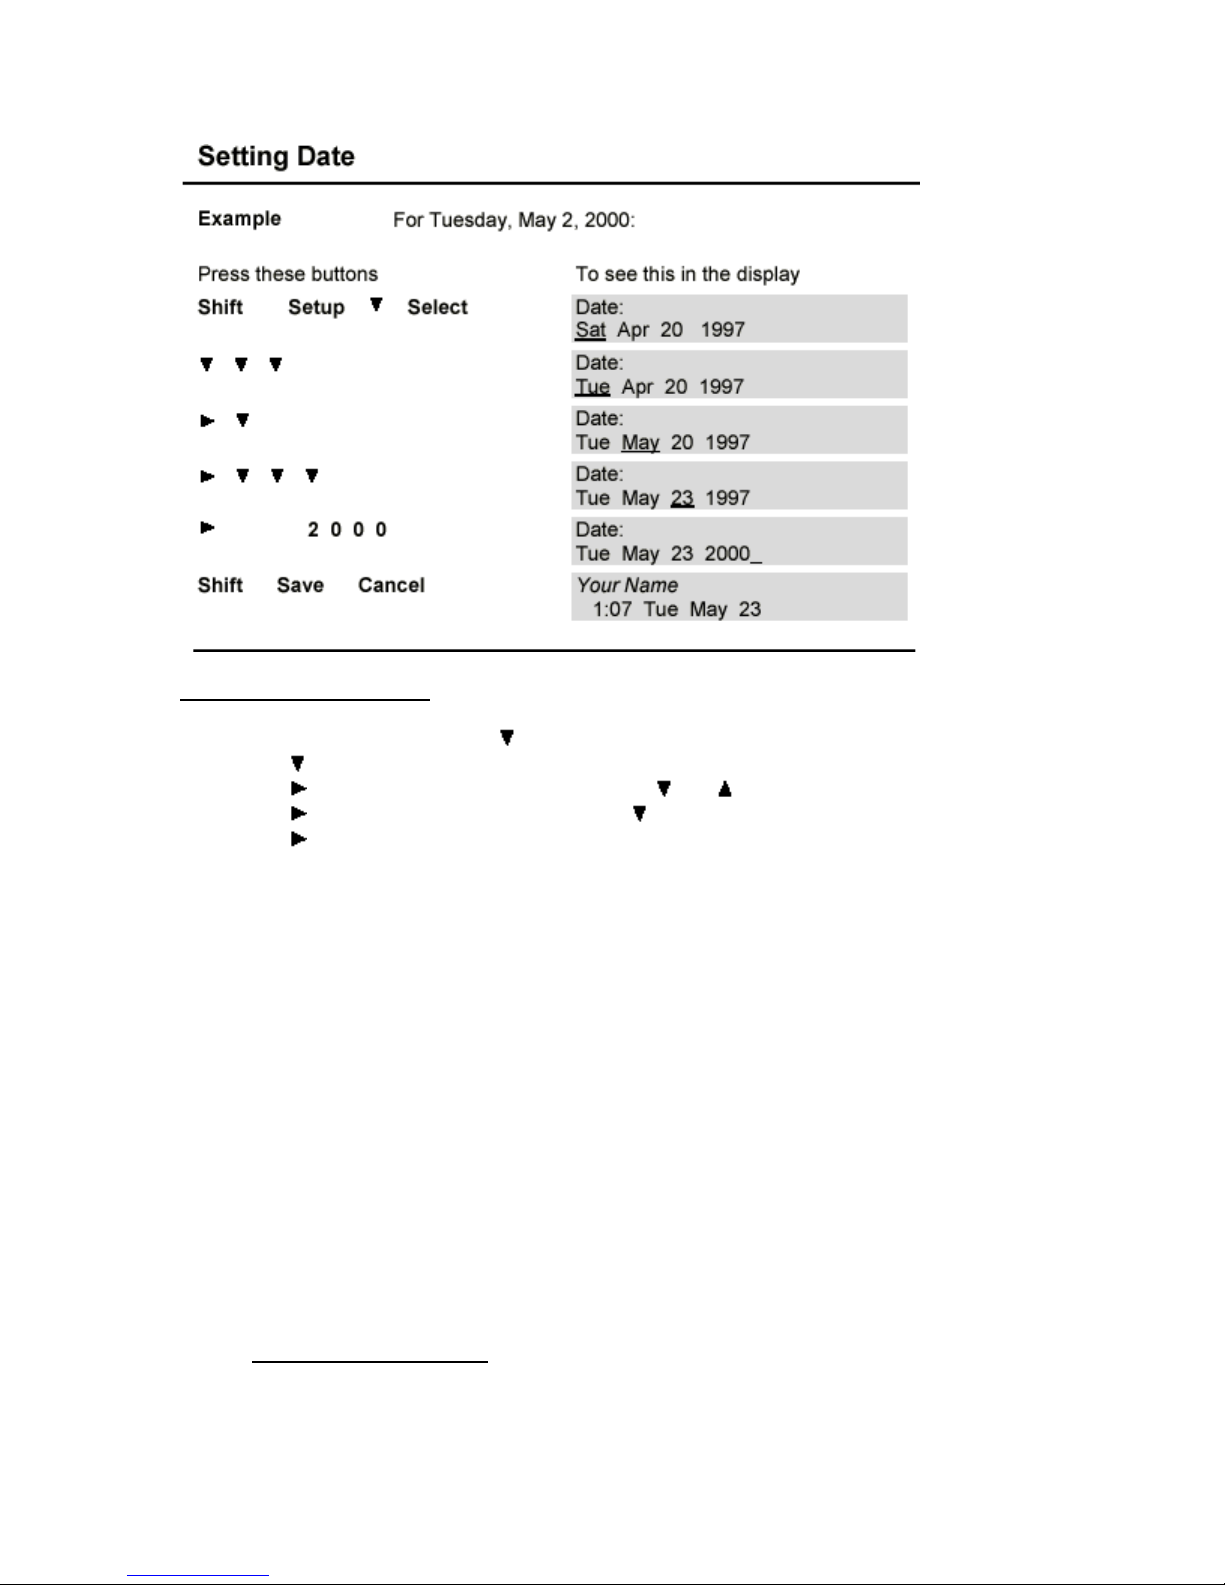
Procedure To set the date:
1. Press Shift, then Setup, then , then press Select. The cursor is under the day of the week.
2. Press to select a different day.
3. Press to move to the month, then select with and .
4. Press to move to the day, then select with .
5. Press to move to the year, then press number buttons to enter the year.
6. Press Shift, then Save to save your entry, then press Cancel to get out of the setup mode
• Entering Station Name
On the FreeRide, you can enter up to 15 characters, including spaces, for the station name. To
delete a character, put the cursor in the space and press Shift, Del.
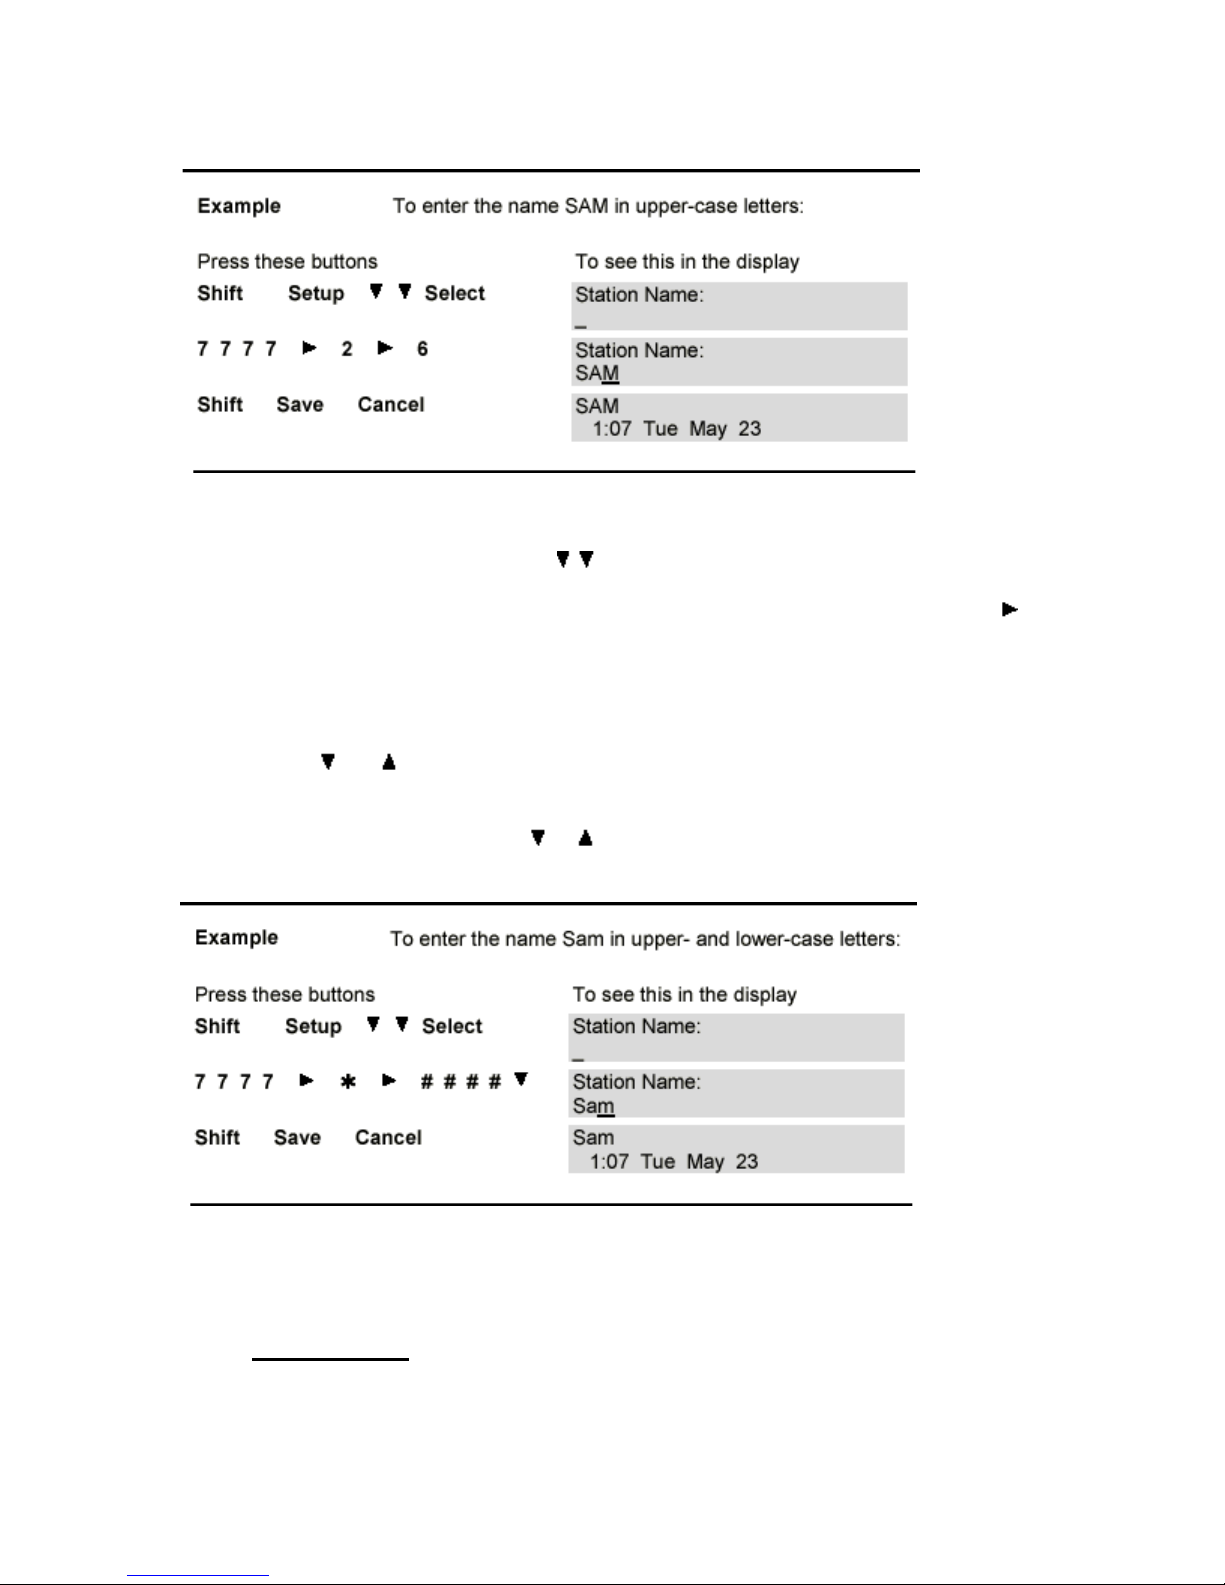
Procedure To set the station name:
1. Press Shift, then Setup, then , then press Select. The cursor is in a blank space
for the first letter, or under the first letter of a name.
2. Press a numbered button to select and enter an upper-case letter, then press to
move to the next space. To delete a character, put the cursor in the space and press
Shift, Del.
3. Press Shift, then Save to save your entry, then press Cancel to get out of the setup
mode.
4. To enter the station name in upper- and lower-case letters, search for the letters with
the and buttons,
Or use the *button for vowels, and the # button for some
lower-case letters, then the or buttons to scroll through the rest of them
• Adjusting Ring
Each line on FreeRide can have a different ringing sound. You can also turn off ringing for any
line.

Ring Sound
To change the ringing sound:
1. Hold down the button for the line until you hear a beep.
2. Press ,Select, then until you find the sound you want.
3. Press Shift, Save to save your selection, then Cancel.
Ringer Volume
To change the volume of the ringing sound, hold down the + – button while the handset is down
and the speakerphone is off.
Ring Repetition
To change the number of times a line rings before stopping:
1. Hold down the Line button until you hear a beep.
2. Press , Select. The message Abbrev. (Rings): displays
3. Press to select the number of rings.
4. Press Shift, Save to save your selection, then Cancel.
• Labeling a Button
To identify the blue, unlabeled buttons, use the extra labels that come with FreeRide as you enter
button settings.
1. Lift off the button cap by prying up each side with the tip of a small screwdriver, or a
nail file, or even an unbent paper clip.
2. Write the primary and secondary setting names on the label.
3. Stick the label on the button.
4. Replace the button cap
Using Lists
• How Lists Work

FreeRide has three lists: a Directory, a Dialed list, and a Callers list. The Directory is a list that
you create. The Dialed and Callers lists are records that FreeRide creates from the calls you make
and receive.
• Directory Structure
A Directory item has a name and a number. The Directory stores up to 40 entries, arranged
alphabetically.
To enter a new Directory item:
1. Press Directory to display the first directory item.
2. Press Shift , to display New Name Here, if it is not already displayed, then
press Select. The FreeRide Directory has two types of fields for entering
information: name and number.
3. Enter characters in the name field. Press after each letter, to move to the
next letter. For special characters press the or or 1 or 0 buttons
repeatedly. You can also press * or # repeatedly for shortcuts.
4. Press to move to the number field. You can enter only numbers and
some special characters in the number field. You don’t have to put a hyphen
or parentheses or spaces in telephone numbers. Just put the numbers in a
string with nothing between them. It you need a pause for an outside line, or
to get long distance, or some other special signal, look for the character to

enter in “Special Characters in the Number Field” on the next page. For
special characters press the or buttons.
5. Press Shift, Save to save the item in the Directory, then Cancel to exit.
.
• Fixing a Partial Directory Item
If you find a partial Directory item, or if you get only part way through entering something in the
Directory, you can always fix it later.
1. Press Directory, then or to find the item, then press Select to be able to fix it.
2. Press or to move the cursor, then number buttons to add to or change the item.
3. When the item is fixed, press Shift, Save to save the changes, then press Cancel to
exit.
• Changing Directory Items
You can change Directory entries that are not locked.

Tip: When you edit a speed dial number, you are editing the Directory item. Display or edit a
speed dial number by holding down the button until it beeps, then press Select to edit.
To edit a Directory item:
1. Press Directory, then or to find the number. Or hold down a speed dial button,
then press or .
2. Press Select to be able to change the item.
3. Press or to move the cursor.
4. Edit the name or number by pressing number buttons.
5. Press Shift, Save to save the edits, then press Cancel to exit.
• Locking and Unlocking Directory Items
You can lock a Directory item so that it cannot be changed nor deleted, even accidentally.
To lock a Directory item:
1. Press Directory to display the directory.
2. Press or to find the item.
3. Hold down Transfer until appears before the number. To unlock an item, hold
down Transfer until disappears. If you do not have a Transfer button, see
“Changing Button Functions” on page 22 for information on assigning this function to
a button.
• Linking Speed Dial Buttons
Speed dial buttons are linked to Directory items. You can set up speed dial buttons to call the
numbers assigned to them. A button does not store a number. It is linked to a Directory item. If
the Directory item is deleted, the speed dial button no longer dials the number. To link a speed
dial button to a Directory item:
1. Press Directory, then or to find the Directory item.
2. Hold down the speed dial button until you hear a tone.
3. Press Cancel to exit.
To make a secondary link, press Shift before you hold down the speed dial button.
Tip: Use the button labels that come with your FreeRide to label your linked speed dial buttons.
CAUTION: You can’t unlink a button. You can change the link. But if you delete the link, you
delete the Directory item. Link to another item, don’t delete.
If you cannot assign a link to a Directory item, the button does not have Speed Dial function.
Before you can link a button to a Directory item, the button must have a uniquely-numbered
Speed Dial function, between SD1 and SD20. Please see “Buttons Menu” on page 22, to assign

button functions. If you link a speed dial button to a locked Directory item, you must unlock that
Directory item before you can change the link.
• Using the Directory
After you’ve entered items in the Directory, you can scroll through the Directory and select an
item to dial. This saves time in looking up telephone listings, and trying to remember long-
distance numbers.
To dial a Directory item:
1. Press Directory, then or to find the Directory item.
2. Press Dial to call the displayed number.
TIP: The Directory is sorted with numbers and non-alphabetical characters first, then
upper-case letters, then lower-case letters. To find a Directory item, you can press the
numbered button corresponding to the first letter in the name, then press or to find
the item.
• Using the Dialed List
The Dialed list records the last 15 outgoing calls. Each record includes the name or number, and
the time, date, and length of the call. The most recent call is displayed first. If several calls were
made, one after the other, to the same number, only the last call appears in the Dialed list. Use
the Dialed list to find a previously-called number. Press Dial to call the displayed number.
To display the Dialed list:
1. Press Dial to display the most recently dialed number.
2. Press to display earlier calls.
3. Hold down to see time, date, and length of a call.
4. Press Cancel to exit.
• Using the Callers List
The Callers list records the last 25 incoming calls. Each record includes the time, date, and length
of the call. The Callers list also records the time and date of missed calls. With Gateway Caller
ID, the name or number of the caller is displayed. The most recent call is displayed first. If you
missed several calls from the same caller, the time and date of the most recent call and the
number of missed calls are displayed. If you answered several calls from the same caller, each
call is a separate record.

To display the Callers list:
1. Press Shift, Callers to display the most recent call.
2. Press to display earlier calls.
3. Hold down to see time, date, and length of a call.
4. Press Cancel to exit.
• Deleting from Lists
You can delete any Directory item that is not locked and any record from the Dialed and Callers
lists.
CAUTION: Use a lot of caution in deleting an item in the Directory. If it is linked to a speed dial
button, the button won’t work after the Directory item is deleted.
To delete an item from a list:
1. Press Directory, or Dial, or Shift, Callers to display the list.
2. Press or to find the number.
3. Press Shift, Del to delete the item.
4. Press Cancel to exit.
When you assign a setting to a speed dial button, you are linking the button to a Directory
item. If you delete that item, you disable the speed dial button.
• Copying from Dialed or Callers List to Directory
You can copy a number from the Dialed or Callers list to the Directory. You cannot copy a
number that was speed dialed. It is already in the Directory.
To copy a number to the Directory:
1. Press Dial, or Shift, Callers to display the Dialed or Callers list.
2. Press or to find the number.
3. Press Shift, Save to save the entry to the Directory. You hear a confirmation tone or, if
the Directory is full, an error tone.
4. Press Directory. The copied item is displayed, and labeled Saved. If not, find the
entry with or .
5. Press Select to enter or edit the name.
6. Press Shift, Save to save the item, and Cancel to exit
• Changing Items in the Dialed and Callers Lists
You can edit, but not save, a number in the Dialed or Callers list. For example, if you call a
foreign country and reach a wrong number, display the Dialed list to see if you dialed the number
correctly. Rather than dial the whole number again, edit the incorrect number, then press Dial.
To edit a number in the Dialed or Callers list:

1. Press Dial or Shift, Callers to display the list.
2. Press or to find the number.
3. Press Select. Dialing Editor: is displayed. If a number is not displayed, you can enter
one at the flashing cursor.
4. Press or to move the cursor.
5. Edit the number by pressing the number buttons. To insert a digit, press Shift, .
6. Press Dial to call the edited number. The edited number is saved as a record in the
Dialed list.
Calling
• Making Calls
You can use either the handset or the speakerphone when calling. During a call you can switch
from one to the other and adjust volume.
• Using the Handset
This manual suits for next models
1
Table of contents


