e-TWOW BOOSTER V User manual

USER MANUAL
PORTABLE ELECTRIC SCOOTER


2
CONTENTS
1. STANDARD INSTRUCTIONS 4
2. BEFORE USE / SAFETY INSTRUCTIONS 5
3. BOX CONTENT 8
4. MAIN PARTS 9
5. SCOOTER PARTS DIAGRAM 10
6. FOLDING, UNFOLDING AND ADJUSTING THE HANDLEBAR HEIGHT 11
7. OPERATING INSTRUCTIONS 12
8. RIDING OPERATION 16
9. WARNINGS 18
10. BATTERY AND CHARGER 20
11. CLEANING AND MAINTENANCE 21
12. STORAGE AND MAINTENANCE 21
13. TROUBLESHOOTING 22
14. PROTECT THE ENVIRONMENT 22
15. TRADE MARK AND LEGAL STATEMENT 23
16. TECHNICAL SPECIFICATIONS 24

3
EN
THANKS FOR CHOOSING THE E-TWOW PORTABLE ELECTRIC SCOOTER
Thank you for choosing the E-TWOW portable electric scooter (hereinafter referred
to as scooter). The scooter is a recreational vehicle that allows you to travel in an
ecient, fun, economic and ecologic manner.

4
1. STANDARD INSTRUCTIONS
The scooter is a two-wheeled vehicle, designed for adults over the age of 18. It
can support a maximum weight of 100 kg. For a safe operation, we recommend a
minimum weight of 50 kg. The scooter is sold fully assembled and it comes with a
dedicated charger.
The operating instructions found in this manual are valid for all E-TWOW scooters.
The manual comes with a separate Specication Sheet where you can see the par-
ticular features of each scooter model.
This manual includes basic operational instructions for the scooter. It cannot cov-
er all situations where injury or death may occur. THE USERS MUST USE GOOD
JUDGMENT AND COMMON SENSE TO DETECT AND AVOID THE HAZARDS AND
DANGERS that they may encounter when riding the scooter. By using the scooter,
you accept the inherent risks of operating it.
Before using the scooter, carefully read all the instructions in this manual. Pay par-
ticular attention to the “SAFETY INSTRUCTIONS” chapter. Please keep this manual
for future reference.
IMPROPER USE OF THE SCOOTER AND FAILURE TO FOLLOW THESE WARN-
INGS MAY CAUSE SERIOUS ACCIDENTS. USE THE SCOOTER WITH ATTEN-
TION AND CAUTION FOR A SAFE OPERATION. ALWAYS STAY ALERT!
Your scooter came with a warranty certicate at the time of purchase. To obtain repair
or a replacement under this warranty you must ensure the retailer or online store
where the scooter was purchased has indicated the location and date of purchase
on the warranty certicate. You must also include a copy of the certicate you mailed
in with your scooter when you mail or present your scooter for repair or replacement
Please request a warranty certicate from your reseller if one hasn’t been oered!
For any warranty related issues please contact the company where you purchased
the scooter from or contact us directly at service@e-twow.com.

5
EN
2. BEFORE USE / SAFETY INSTRUCTIONS
To safely ride the scooter and to avoid accidents, collisions or loss of control, please
carefully read the following instructions. The use of the scooter in violation of the
warnings and instructions found in this manual is at your own risk and E-TWOW is
relieved of any liability regarding any damages caused by inappropriate use of the
scooter.
The warnings and instructions found in this manual are marked with dierent sym-
bols. Please read and understand the meaning of each symbol:
This symbol is a warning that indicates a potential hazard, which could
cause damage to goods, minor injuries, serious injury or even death.
This symbol indicates a restriction.
This symbol indicates a requirement that needs to be followed.
Attention!
Check local laws and regulation to see where you can legally use the scooter. Respect
all applicable laws in your country for pedestrians and vehicles. Where there are no
regulations, follow the safety instructions in this manual.
E-TWOW assumes no liability for any damages, accidents or legal disputes resulting
from non-compliance with local laws or safety guidelines in this manual.
• Always inspect the scooter prior to use. Properly inspecting and maintaining
your scooter can reduce the risk of injury.
• The scooter can support a maximum load of 100 kg.
• Always wear a safety helmet and other protective equipment when riding
the scooter. Use an approved bicycle or skateboard helmet that ts properly with the
chin strap in place and protects the back of your head. Local legislations may require
riders of two-wheeled vehicles to wear a helmet and other protective gear.
• When you ride the scooter for the rst time, make sure to rst practice in a
wide area, where there are no children, pedestrians, pets or other vehicles. You should
only ride in public spaces, once you have mastered the scooter riding techniques.
• The scooters are sold with the speed limited according to the legal regulations.
Any modication made by the users, the resellers/ dealers/distributors is done on
their own account, and E-TWOW assumes no legal responsibility in these cases.
We recommend a maximum speed of 25 km/h. For your own safety, please limit the
speed to 20 km/h. Avoid using the scooter at night. If you must ride the scooter at
night, limit the speed to 12 km/h or less, turn on the headlight and wear reective
riding equipment.
• The scooter should only be charged in temperatures ranging from 0 to 40
degree Celsius, and it should only be used (discharged) in temperatures ranging from
-10 to 60 degrees Celsius.
• Slow down or get o the scooter when riding in poor road conditions. Don’t
ride the scooter on ice or other types of slippery terrain surfaces.
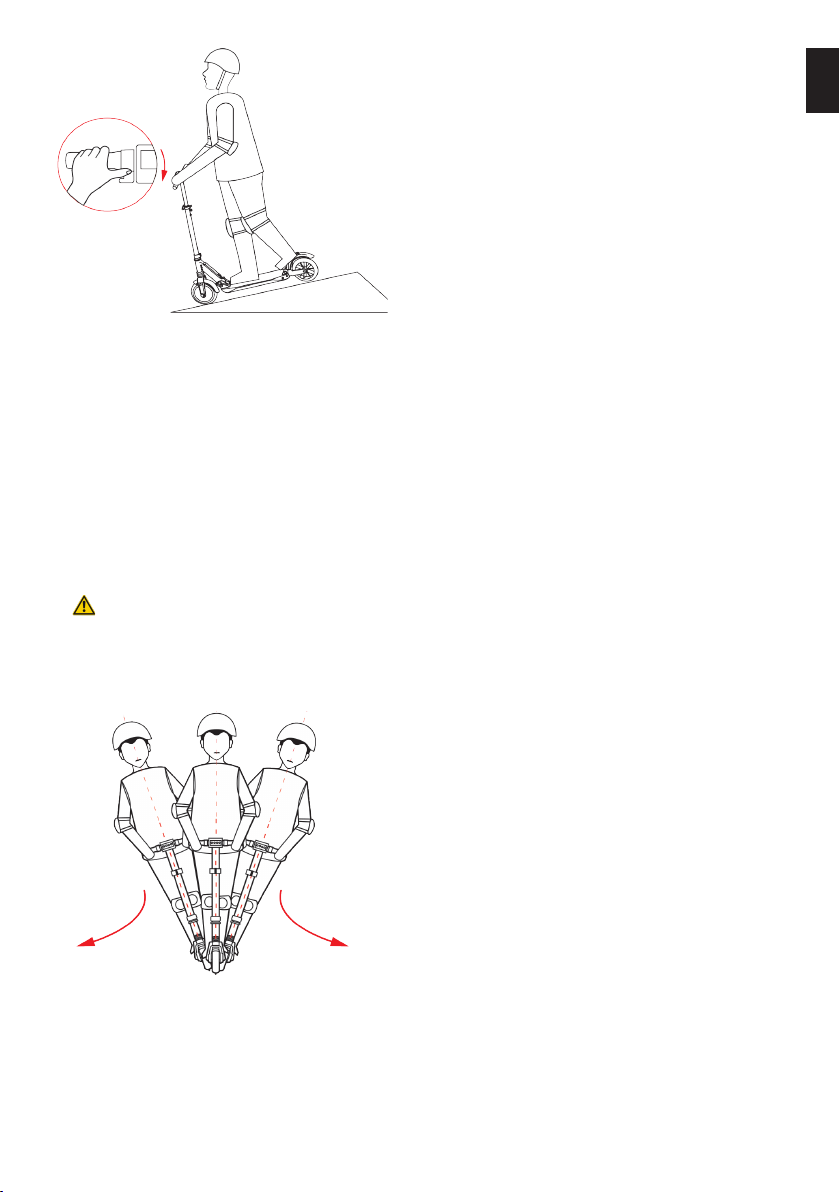
• Adjust the handlebar to the right height, to ensure a safe riding experience.

6
• To avoid damaging the scooter’s electrical parts, please do not immerse the
scooter in water with the depth of more than 4 cm, and don’t wash it with water
under pressure (for more information, please read the Cleaning and Maintenance
chapter).
• For your own safety and in order to protect the scooter, please don’t ride the
scooter in bad weather such as heavy rain or snow.
• Make sure that the voltage indicated on the charger is the same as that of
the power supply. Furthermore, avoid connecting other devices in the same outlet as
the scooter’s charger, to prevent overheating. If you must plug several power plugs
into the socket, make sure that the total power doesn’t exceed rated power of the
household outlet. Immediately interrupt the scooter’s charging operation in the un-
likely event that it is not working properly.
Examples of abnormal or faulty situations:
• The plug and charging cable have become abnormally hot.
• The charging cable is damaged or there is a voltage drop.
• There is unpleasant smell.
• There is another anomaly or malfunction.
Consult your place of purchase or service center for checking or repairing.
WARNING!
This scooter can be used by children above the age of 10 years and by per-
sons with reduced physical, sensory or mental capabilities or lack of experience and
knowledge, as long as the scooter’s speed has been limited to 6 km/h and if they
have been given supervision or instruction concerning use of the scooter in a safe
way and understand the hazards involved with using the scooter.
WARNING! Risk of Fire- No User Serviceable Parts: User unauthorized in-
tervention in the battery compartment is at risk of re.
Restrictions!
• For safety reasons, please do not carry two adults at the same time, and
don’t carry children or pets on the scooter.
• Never ride the scooter barefoot or in open-toed shoes or high-heels.
• Children shall not play with the scooter.
• Cleaning and maintenance should only be done by the user and they should
never be done by unattended children.
• Don’t clean the scooter when it is connected to the power supply. For your
own safety and to avoid damaging the scooter, follow the instructions from the
“CLEANING AND MAINTENANCE” chapter.
• Do not ride the scooter on public roads or on roads assimilated to public
roads, trac lanes or unsafe roads, and do not violate legal regulations.
• Do not make any dangerous actions when riding and never ride with one
hand only. Keep your feet on the scooter.
• Do not attempt to ride the scooter up and down stairs with steps that are
taller than 3 cm, it may overturn causing injuries and/or damages to the rider and/or
scooter.

7
EN
• Don’t allow babies or children to play with the scooter’s plastic wrappings
(they may cause suocation)
• Do not connect or disconnect the charger with wet hands.
• Do not disassemble, repair or modify the scooter. The scooter does not con-
tain fuses or light bulbs that can be replaced by the user. Any repairs or modica tions
shall only be made by authorized service personnel.
• Do not leave the scooter and the charger in the reach of children under 8
years of age.
• Don’t ride the scooter if you have previously consumed alcohol.
• Don’t use the phone or other similar devices while riding the scooter.
• Don’t modify the scooter using parts from other producers, as these parts
may not be compatible with the original parts. The scooter has been designed ac-
cording to the E-TWOW standards. Any necessary repair should only be made with
original and approved parts. Any modication made to the scooter will void the war-
ranty.
• Do not use excessive force on the scooter’s parts to avoid any malfunctions
or deformations.
• Do not use the scooter at elevations greater than 2000 m above sea level.

8
3. BOX CONTENT
When opening the box, make sure it contains the fully assembled scooter, along with
the charger and the user manual. Check that all the components are present and in
good condition. If you are missing any components, contact your dealer or your near-
est service center. Please keep the box and the packing materials in case you need
them to transport your scooter in the future.
SCOOTER
CHARGER
USER MANUAL

9
EN
4. MAIN PARTS
1. Handlebar 6. Battery charging port
2. Display 7. Folding lever
3. LED headlight 8. Folding axle
4. Folding hock 9. Rear brake
5. Folding hock

10
5. SCOOTER PARTS DIAGRAM
1. Acceleration lever
2. Power button
3. Settings button
4. On/o light button
5. Horn button
6. Handlebar
7. Controller
8. Folding bar
9. Front fender
10. Battery front cover
11. Protection cover
12. Folding buttons
13. Electromagnetic brake lever

11
EN
6. FOLDING, UNFOLDING AND ADJUSTING THE HANDLEBAR HEIGHT
(a) (b (c)
Folding steps
• To fold the scooter start by adjusting the handlebar’s height to the minimum.
Do this by opening the lock lever as shown in gures (a) and (b).
• Next, press down on the display as shown in gure (d), while also pushing
the height button, as shown in gure (c), to lower the handlebar’s height. Push the
lock lever back into lock position.
• Next, press the folding buttons while also while pulling sideways the handle-
bar grips as shown in gure (e) and then fold them downwards.
• Next, press the folding lever in the direction of the arrows, while slightly push-
ing the handlebar forward, as shown in gures (f) and (g)
• Continue folding the scooter until the folding hook enters the opening located
on the rear brake, as shown in gure (h).
(d) (e) (f)

12
Unfolding steps
• Press the rear fender to release the folding hook from the opening located on
the rear brake. Then, lift the handlebar until it reaches its normal position. You should
hear a click when the locking bolt comes into place.
• Raise the two handles of the handlebar until they align into the normal posi-
tion.
• Push the lock lever as shown in gures (a) and (b). Next press the button
shown in gure (c) and lift the handlebar to the desired height, securing the height
button in one of the two holes. Close the lock lever and make sure to always keep it
secured and tightly closed.
7. OPERATING INSTRUCTIONS
ON/OFF
Press the switch for 3 sec, and the display will light up, indicating that the power is
on. Press for 3 seconds if you want to turn it o. The scooter will turn o if you don’t
use it for more than 3 minutes.
Speed control
Press the acceleration lever with the right thumb to control the speed (1-30 km/h)
Braking system
The scooter features a dual braking system: an electromagnetic brake on the front
wheel and a mechanical brake on the rear wheel. The electromagnetic brake is ac-
tivated by pressing the electromagnetic brake lever with the left thumb . The harder
you press, the greater the braking force will be. The mechanical brake is activated by
pressing the rear fender. If you need to make an emergency brake, use both brakes.
(g) (h)

13
EN
Horn
If you turn on the power, the scooter will emit a warning sound when you press on
the horn button.
Lights
Press the On/O light button when necessary. The display will show a symbol that
indicates that the lights are on (both the LED headlight and the rear stop light). Press
again when you no longer need the lights to turn them o.
If the lights are o, the rear stop light will only turn on when braking.
Displaying the mileage
When the display is powered, it shows 2 modes: ODO and TRIP. ODO displays the
total mileage, whereas TRIP displays the mileage of the current trip, from the last
reset. You can switch between the 2 modes by pressing the (S) button. When you
are in TRIP mode, you can clear the current trip mileage by pressing the (S) button
for 3 seconds.
Displaying and setting the scooter features
1. Headlight icon
2. Speed
3. Battery
4. Temperature
5. Displays the total mileage or cur-
rent trip distance
6. Trip total (ODO) or total mileage
from last trip (TRIP)

14
Menu for speed limit
To set up a speed limit, please follow the
steps detailed below:
• Turn o the scooter
• Press and hold the electromag-
netic brake lever with your left thumb.
Keep it pressed during the entire op-
eration
• Turn on the scooter. The dis-
play will show the L1 option.
• To set the desired speed lim-
it, press the light button successively to
navigate the L1-L2 -L3 -L4 options
• To set your desired option,
press the (S) button
• To end this operation, release
the electromagnetic brake and turn on
the scooter.
L1 = Limits the speed at 6 km/h
L2 = Limits the speed at 20 km/h
L3 = Limits the speed at 25 km/h
L4 = Removes all speed limits
*Certain speed limit options may not
be available if the scooter has a facto-
ry speed limit to comply with a country’s
legislation.
Setting the scooter’s functions
The scooter features 3 functions:
The Zero Start - P1 function - The purpose of this
function is to make the scooter safer to use. Once you
activate it, this function will only allow the scooter to be
accelerated after it has been previously pushed with
the foot and the wheel has been set into motion.
This will prevent the user from accidental acceleration.
The Zero Start function is not automatically set; it needs to be activated manually
from the central control unit.
The Cruise control - P2 function—This function allows the user to set and maintain a
constant speed for the scooter, without having to constantly press on the acceleration
lever. To activate the Cruise Control Function you must press the acceleration lever
and maintain a constant speed for 5 seconds. Then you can release the acceleration
lever and the scooter will continue to move at the set speed. You can easily deac-
tivate this function by pressing the acceleration lever or the electromagnetic brake
lever. The cruise control function is not automatically set. It needs to be set manually
from the central control unit. The P2 function is not available for the GT scooter.
The Sport - P3 function- (this function is only available on certain models) The sport
function eliminates the factory speed limitation, oering a higher speed and a higher
engine torque. The Sport function is not automatically set. It needs to be set manually
from the central control unit. The P3 function is not available for the GT scooter.

15
EN
WARNING!
To avoid dangerous situations, we recommend that you only use this function for
climbing ramps, or that you only use it on specially arranged tracks.
Setting the functions
To choose one of the 3 functions (P1, P2, P3), follow these instructions:
• Turn on the scooter
• Press the electromagnetic brake lever all the way and keep it pressed
during the entire operation.
• Press the power button. The display will show the P1 symbol. Press the On/
O light button to navigate the 3 functions P1—P2—P3.
• Each function has two options: On and O. To navigate between On and
O, press the Setting (S) button.
• To save your settings, release the electromagnetic brake lever.

16
8. RIDING OPERATION
GETTING READY
• Put on your protective gear
and choose a suitable place for
driving the scooter (see the SAFETY
INSTRUCTIONS chapter)
• Unfold the scooter and adjust
the handlebar to the suitable height,
according to your stature (see the
Folding, unfolding and adjusting the
handle-bar height chapter)
• Press the power button. Make
sure the scooter battery is suciently
charged to power the scooter for the
desired ride.
• Stand with one foot on the
scooter and the other one on the
ground.
• With your right thumb, gently
press the acceleration lever and the
scooter will immediately move forward
slowly. Now you can place the foot that
was on the ground on the scooter.
• When accelerating, keep in
mind that the harder you press the ac-
celeration lever, the faster the scooter
will go.
WARNING!
When you accelerate suddenly, you risk losing balance due to inertia. A progressive
acceleration and a moderate speed will help you maneuver the scooter more easily.

17
EN
To slow down, release the accelera-
tion lever. Press the electromagnetic
brake lever for normal braking situa-
tions. If you need to make an emer-
gency brake, if you have a high speed
or if you are riding downhill, use both
the electromagnetic brake and the
rear mechanical brake.
WARNING!
When braking rapidly, you risk serious injuries as you will lose traction and you might
fall. Try to maintain a moderate speed and be on the lookout for potential hazards
Braking instructions
Electromagnetic brake: Press the electromagnetic brake lever with the left thumb to
activate the electromagnetic brake. The harder you press, the stronger the braking
force will be. When you activate the brake, the rear stop light will turn on. If the lights
are already on, the rear stop light will double its luminous intensity when you push
the brake lever.
Rear mechanical brake:
Press the rear fender to activate the rear mechanical brake.
To turn the scooter, shift the body
weight and gently turn the handlebar
in the desired direction.
Speed limitations (5 speed limits - - L1, L2, L3, L4, L5)
To activate or deactivate a speed limit, see the Menu for speed limit section in the
OPERATION chapter.
The legislation of most countries poses a speed limitation. By using the speed limita-
tion option, once you set a limit, the scooter will not be able to exceed the set speed.

18
DO NOT carry heavy objects
on the scooter’s handlebar.
DO NOT ride the scooter with
only one foot.
DO NOT press the accelera-
tion lever when walking with the
scooter.
9. WARNINGS
Failure to follow the following instructions could cause serious injuries.
DO NOT ride the scooter in
the rain and/or don’t ride through any
body of water with a depth bigger than
4 cm.
DO NOT take your hands o
the handle-bar
Slow down when riding over
speedbumps, thresholds or other ter-
rain bumps.

19
EN
The scooter is meant for one rider only. DO NOT carry other adults, children
or pets on the scooter.
DO NOT rotate the handlebar
suddenly when riding the scooter at a
high speed
DO NOT ride on public roads,
on roads that are assimilated to public
roads, on lanes or on unsafe roads,
and do not violate legal regulations.
Do not attempt to ride the scooter up and down stairs with steps that are taller
than 3 cm and don’t jump over obstacles.
This manual suits for next models
4
Table of contents
Other e-TWOW Scooter manuals

e-TWOW
e-TWOW S2 GTS User manual

e-TWOW
e-TWOW Eco User manual

e-TWOW
e-TWOW S2 BOOSTER E User manual

e-TWOW
e-TWOW S2 BOOSTER User manual

e-TWOW
e-TWOW BOOSTER EKFV User manual

e-TWOW
e-TWOW E-SCOOTER User manual

e-TWOW
e-TWOW S2 ECO User manual

e-TWOW
e-TWOW BOOSTER PLUS User manual

e-TWOW
e-TWOW Uscooters Booster GT User manual

e-TWOW
e-TWOW s2 booster plus User manual