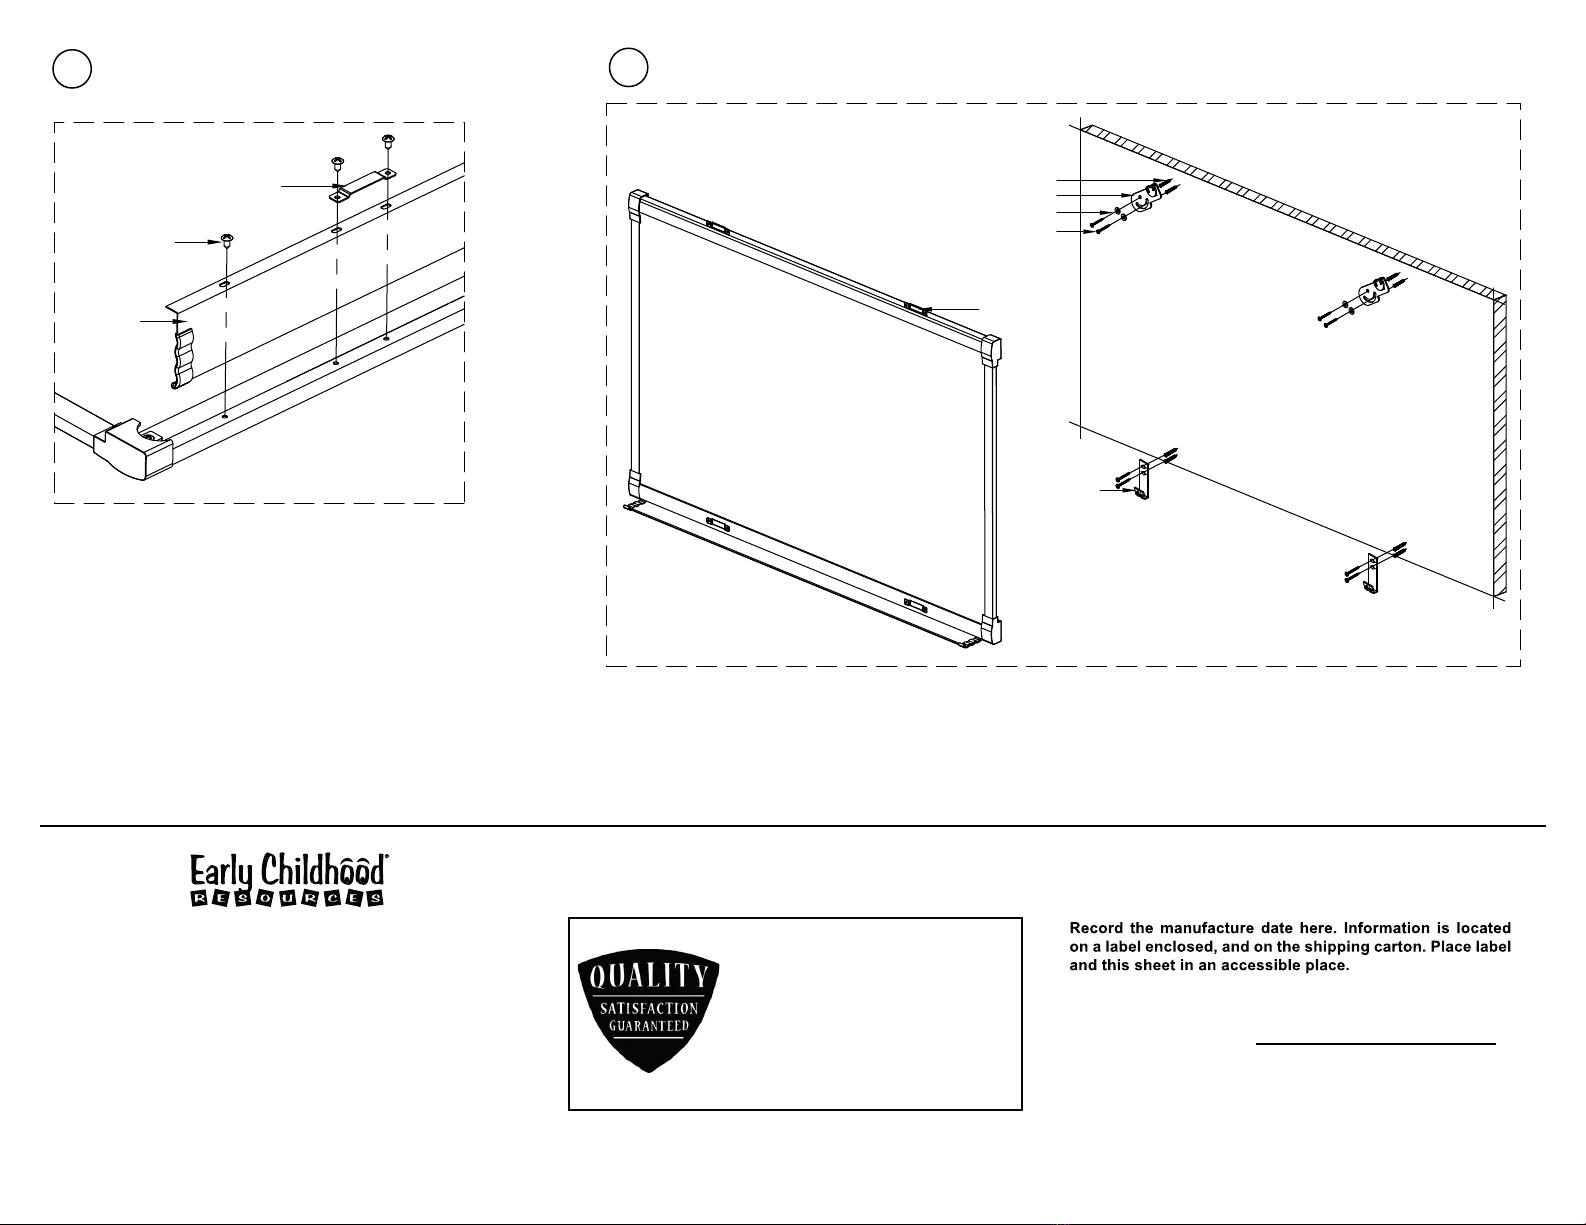
manuals.online logo
Brands
  1. Home
  2. •
  3. Brands
  4. •
  5. Early Childhood Resources
  6. •
  7. Whiteboard
  8. •
  9. Early Childhood Resources ELR-0822 User manual

Early Childhood Resources ELR-0822 User manual

This manual suits for next models

6

Popular Whiteboard manuals by other brands

Approx APPIB179 user guide

Approx

Approx APPIB179 user guide

SMART Board MX V3 Series manual

SMART

SMART Board MX V3 Series manual

Best-Rite Baby Folding Wheasel 784-T Assembly instructions

Best-Rite

Best-Rite Baby Folding Wheasel 784-T Assembly instructions

Copernicus RC105 Assembly guide

Copernicus

Copernicus RC105 Assembly guide

IKEA MALA 104.889.67 manual

IKEA

IKEA MALA 104.889.67 manual

IKEA MALA 504.565.92 instruction manual

IKEA

IKEA MALA 504.565.92 instruction manual

Steelcase 2003173001 user guide

Steelcase

Steelcase 2003173001 user guide

PLAYTIVE 346919 2001 Instructions for use

PLAYTIVE

PLAYTIVE 346919 2001 Instructions for use

Plus N-324 Service manual

Plus

Plus N-324 Service manual

neuland FlipWood Assembly instructions

neuland

neuland FlipWood Assembly instructions

SMART Board 8000 series manual

SMART

SMART Board 8000 series manual

NEC Mediaboard-102 Operation and installation manual

NEC

NEC Mediaboard-102 Operation and installation manual

Thomas Regout BalanceBox 650 installation manual

Thomas Regout

Thomas Regout BalanceBox 650 installation manual

promethean activboard 100 series installation guide

promethean

promethean activboard 100 series installation guide

Magiboards Chameleon Whiteboard instruction sheet

Magiboards

Magiboards Chameleon Whiteboard instruction sheet

AmazonBasics Dry Erase B07K68KR1H quick start guide

AmazonBasics

AmazonBasics Dry Erase B07K68KR1H quick start guide

Dahua LCH75 quick start guide

Dahua

Dahua LCH75 quick start guide

Vivo DESK-WB16D instruction manual

Vivo

Vivo DESK-WB16D instruction manual

manuals.online logo
manuals.online logoBrands
  • About & Mission
  • Contact us
  • Privacy Policy
  • Terms and Conditions

Copyright 2025 Manuals.Online. All Rights Reserved.

Figure 3
Figure 2
2
1
Figure 1
Hole 1
Hole 2
Washer
Top hanger
Bottom hanger
Anchor
Phillips screw
Board size
Model #
Allen wrench Small screws Pen tray Installed top
brackets
5PCS
2PCS
2PCS
2PCS
3PCS
3PCS
3PCS
4PCS
4PCS
4PCS
3PCS
2PCS
2PCS
2PCS
4PCS
4PCS
4PCS
3PCS
2PCS
2PCS
2PCS
8PCS
8PCS
8PCS
6PCS
4PCS
4PCS
4PCS
4PCS
4PCS
4PCS
3PCS
2PCS
2PCS
2PCS
4PCS
4PCS
4PCS
3PCS
2PCS
2PCS
2PCS
16PCS
16PCS
16PCS
12PCS
8PCS
8PCS
8PCS
16PCS
16PCS
16PCS
12PCS
8PCS
8PCS
8PCS
48"x144"
48"x120"
48"x96"
48"x72"
48"x48"
36"x48"
24"x36"
ELR-0830
ELR-0829
ELR-0828
ELR-0827
ELR-0825
ELR-0823
ELR-0822 1PC
1PC
1PC
1PC
1PC
1PC
1PC 1PC
1PC
1PC
1PC
1PC
1PC
1PC
Porcelain DE Board
Parts List : Before assembling, make sure there are no missing parts for the applicable model #.
Model # ELR-0822, 0823, 0825, 0827, 0828, 0829, 0830
Installed bottom
brackets
1-A With the help of 2 other people, position the board on the wall, approximately
4" above where you want to mount it. Place the bottom hangers upside down
on the pre-installed bottom brackets. Use a pencil to mark the position of the
holes in the bottom hangers.
1-B Remove board from the wall. Drill 1/4" diameter holes where marked and insert
an anchor into each hole. Align the holes in the bottom hangers with anchors
and secure with the Phillips screws.
3-A Remove the board from the wall and place the top hanger in the marked
position on the wall-use a pencil to mark the holes. See figure 3.
3-B Drill 1/4" diameter holes where marked and insert an anchor into each hole.
Align the holes in the top hangers with anchors and secure with washers
and Phillips screws.
2-A With the help of 2 people, place the pre-installed bottom brackets into the
bottom hooks on the wall. Push the board against the wall.
2-B Place the top hangers into the pre-installed top brackets as shown in Figure 2.
Use a pencil to mark the top and right side position of the top hangers - as
shown in Figure 2.
Attaching the bottom hangers
Attaching the top hangers - Part 1
3
Attaching the top hangers - Part 2
Mount Laurel,NJ 08054 USA
www.ecr4kids.com
!
WARNING:
- AdultAssembly Required.Two adults recommended.
- Contains small parts, sharp points and edges.
- Do not climb, lean or pull on unit or support.
- Never leave children unattended.
- Do not place unit near high heat or moisture.
-Adult Supervision Recommended.
Version: ELR-0822-0830_AI.F.2010.01.01
45
Figure 5
Bottom
hanger
Top brackets
Anchor
Top hanger
Washer
Phillips screw
HANGER
BOTTOM
A
Wall
A
BOTTOM
HANGER
Small
screws
Bottoom brackets
Pen
tray
We appreciate your purchase of the Porcelain DE Board.
Early Chidhoood Resources has made every effort to
supply a quality product that with proper use and care,
will bring you many years of trouble free use!
Care and Cleaning
Clean product with a damp cloth or sponge using warm water and
mild soap. Wipe dry.
Do not place near heat, moisture or vaporizer which may cause
product to warp and peel.
Check for loose or worn parts periodically and tighten or replace as
necessary.
Model Number: ELR-0822, 23, 25, 27, 28, 29, 30
Purchase Order #:
5-A Rotate the top hangers counter-clockwise so that they will not interfere with the placement of the board on the wall.
5-B Place the boards bottom brackets into the bottom hangers on the wall.
5-C Push the board against the wall and rotate the top hangers clockwise so that they lock into the top brackets.
4-A Attaching the pen tray to the board is optional. Turn the
board over - the pen tray attaches to the back of the board.
The installed bottom brackets must be removed temporarily
to attach the pen tray - refer to Figure 4. Retain the screws
for the bottom brackets so you can re-attach them.
4-B Align the holes in the pen tray with holes drilled on the back
of the board. Re-attach bottom brackets. Additional holes are
drilled into the pen tray and back of board - use the small
screws and tighten with an allen wrench (included).
“Early Childhood Resources® guarantees
the quality of all of our products. You can
trust the quality and safety of our furniture
and materials, along with the peace of
mind that our products are made to last. If
for any reason, you are not satisfied with
the quality and workmanship of our
products, we will replace the item or
refund the sale.”
Attaching the pen tray Mounting the board
Version: ELR-0822-0830_AI.F.2010.01.01