Panasonic TX-47P800HQ TX-47P800HZ User manual

© 2003 Matsushita Electric Industrial Co., Ltd. All
rights reserved. Unauthorized copying and
distribution is a violation of law.
TX-47P800HQ
TX-47P800HZ
GP1VP
Wide Projection Television
Specifications
Power Source AC 220 - 240 V, 50 / 60 Hz
Power Consumption Stand-by condition 0.5 W
Normal viewing 175 W
Dimensions (W × H × D) 1298 mm × 1207.5 mm × 567 mm
Mass (Weight) 62 kg (Net)
Remote control Transmitter EUR511267
R6 (AA) Battery × 2
Receiving System
Receiving Channels Regular TV
VHF BAND
2-12 (PAL/SECAM B, K1)
0-12 (PAL B AUST.)
1-9 (PAL B N.Z)
ORDER NO. ITD0308033C3

1 Safety Precautions 4
1.1. General Guide Lines 4
1.2. Leakage Current Cold Check 4
1.3. Leakage Current Hot Check (See Fig. 1) 4
1.4. X-Radiation 4
2 Chassis Board Layout 5
3 Disassembly for Service 6
3.1. Disassembly Flowchart 6
3.2. Cabinet Side (L, R) 7
3.3. Speaker Grille 7
3.4. Speaker Ass´y 7
3.5. Cabinet (Upper) 8
1-12 (PAL/SECAM D)
1-12 (NTSC M Japan)
2-13 (NTSC M U.S.A)
UHF BAND
21-69 (PAL G, H, I/SECAM G, K, K1)
28-69 (PAL AUST.)
13-57 (PAL D, K)
13-62 (NTSC M Japan)
14-69 (NTSC M U.S.A)
CATV
S1-S20 (OSCAR)
1-125 (U.S.A CATV)
C13-C49 (JAPAN)
S21-S41 (HYPER)
Z1-Z37 (CHINA)
5A, 9A (AUST.)
Receiving Stereo System NICAM I, NICAM B/G, NICAM D, A2 (German)
Tuning System Frequency synthesizer
A
uto Search Tuning
POSITION: 100 Position
DIRECT: 125 Position
Audio Output 40 W [20 W + 20 W] (10 % THD)
Speaker System Woofer (13 cm) × 2 + Squawker (12 cm × 6 cm) × 2 + Tweeter (5 cm) × 2
Headphones 3.5mmPlug×1
Aerial Impedance 75 9Unbalanced coaxial
Video / Audio / Component Terminals
AV 1, 2, 3, 4, S Video In Y: 1 V p-p, 75 9
C: 0.3 V p-p, 75 9
DVD (Y/ PB/P
R)
Video In 1 V p-p, 75 9
Audio In
A
pprox. 0.5 V 47 K9
Monitor Out Video Out 1 V p-p, 75 9
Audio Out
A
pprox. 0.5 V, 1 K9
AV1 IN (Rear): S Video, Video, Audio L/R terminals
AV2 IN (Rear): Video or Y/ PB/P
R, Audio L/R terminals
AV3 IN (Front): S Video, Video, Audio L/R terminals
AV4 IN (Rear): Video or Y/ PB/P
R, Audio L/R terminals
Applicable signal to AV2, AV4 Y/ PB/P
Rinput terminals: 480i (525i), 576i (625i), 480P (525P) and 576P (625P) and 1080i
(1125i)/50
Notes: Design and Specifications are subject to change without notice. Weight and Dimensions shown are approximate.
CONTENTS Page Page
2
TX-47P800HQ / TX-47P800HZ

3.6. Screen 8
3.7. Mirror 8
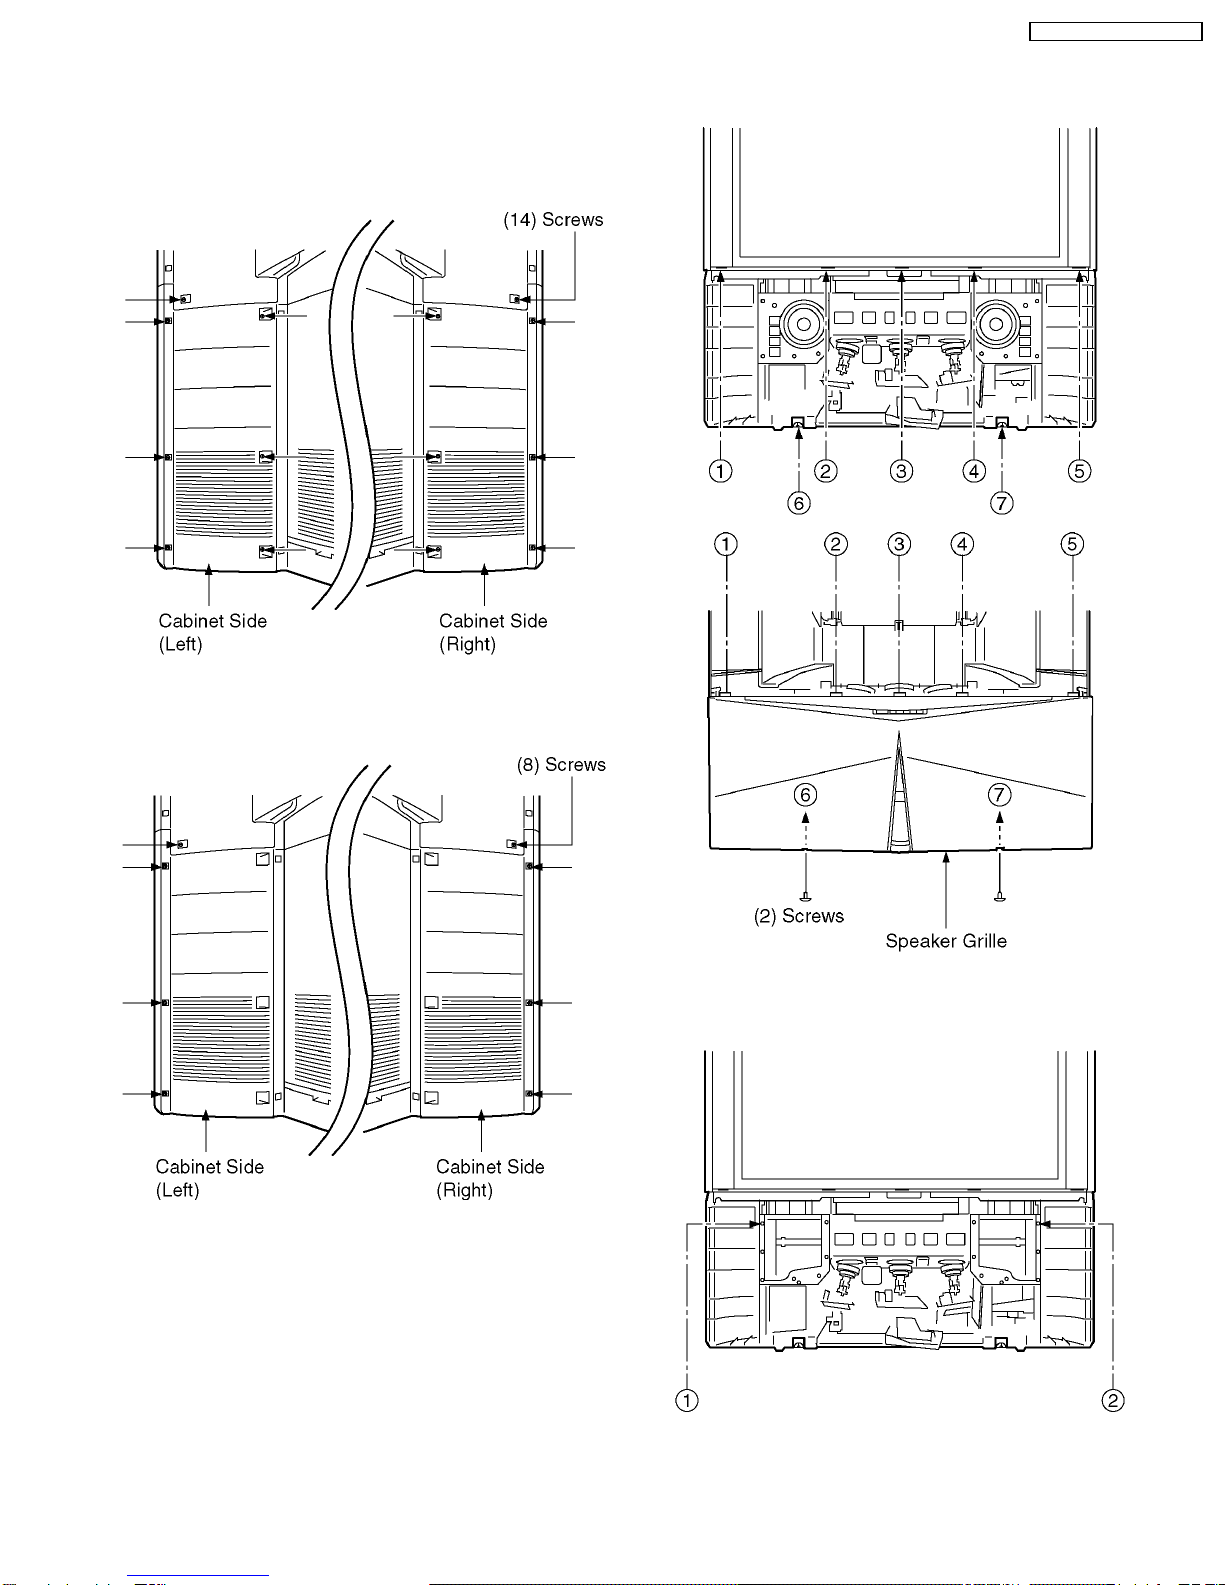
3.8. Rear Cover (Upper) 8
3.9. Rear Cover (Bottom) 9
3.10. Disassembly For CRT Removal 9
4 Service Hints 11
4.1. Service position for Main chassis 11
4.2. Service Position for DG-Board 11
4.3. Service Position for K-Board 11
4.4. Service Position for KA-Board 11
4.5. Service Position for G-Board 12
5SelfCheck 13
6 Service Mode Function 14
6.1. How to enter SERVICE 1 14
6.2. How to enter SERVICE 2 14
6.3. Option Descrition 16
7 CRT Set Up 19
7.1. Dynamic Focus Adjustment 19
7.2. Electrical Focus Adjustment 19
7.3. Optical Lens Focus Adjustment 19
7.4. Centering Magnet Adjustment 20
7.5. Alignment magnet Adjustment 21
8 Deflection Adjustment 22
8.1. PAL 100Hz mode (100i) 22
8.2. PAL 100Hz V Comp mode (100i) 23
8.3. PAL Progressive mode (50p) 24
8.4. NTSC Progressive mode (60p) 24
8.5. 525p Deflection Adjustment / Confirmation 25
8.6. 625p Deflection Adjustment / Confirmation 25
9 Adjustment Procedure 26
9.1. Cut off Adjustment 26
9.2. Sub Contrast / G-Limit Adjustment 27
9.3. Sub Picture Contrast Adjustment 27
9.4. NTSC Tint Adjustment 28
9.5. Sub Color Adjustment 28
9.6. Blue Focus / Gamma Adjustment 29
9.7. White Balance Adjustment 29
9.8. Sub Bright Adjustment 30
9.9. Blue Limit Adjustment 30
10 Convergence Adjustment 31
10.1. Convergence Adjustment Sheet 31
10.2. Convergence Adjustment Procedure 32
10.3. Coarse Convergence Adjustment mode 33
10.4. Fine Convergence Adjustment 39
11 Location of Lead Wiring 43
11.1. Location of Lead Wiring (1) 43
11.2. Location of Lead Wiring (2) 43
11.3. Location of Lead Wiring (3) 43
11.4. Location of Lead Wiring (4) 44
11.5. Location of Lead Wiring (5) 46
11.6. Location of Lead Wiring (6) 48
11.7. Location of Lead Wiring (7) 48
11.8. Location of Lead Wiring (8) 49
11.9. Location of Lead Wiring (9) 49
12 Conductor Views 51
12.1. A-Board 51
12.2. D-Board 53
12.3. DC-Board 56
12.4. DG-Board 57
12.5. H-Board 61
12.6. LG, LR and LB Board 63
12.7. P-Board 64
12.8. SG-Board 66
12.9. SR and SB Board 67
12.10. U-Board 68
12.11. G, K and KA-Board 70
13 Block Diagram 71
13.1. Audio Block Diagram 71
13.2. Video Block Diagram 72
13.3. Power Block Diagram 74
13.4. Control Block Diagram 77
14 Schematic Diagram 79
14.1. Schematic Diagram Notes 79
14.2. A-Board (1 of 5) Schematic Diagram 80
14.3. A-Board (2 of 5) Schematic Diagram 81
14.4. A-Board (3 of 5) Schematic Diagram 82
14.5. A-Board (4 of 5) Schematic Diagram 83
14.6. A-Board (5 of 5) Schematic Diagram 84
14.7. D-Board (1 of 2) Schematic Diagram 85
14.8. D-Board (2 of 2) Schematic Diagram 86
14.9. DC-Board Schematic Diagram 87
14.10. DG-Board (1 of 6) Schematic Diagram 88
14.11. DG-Board (2 of 6) Schematic Diagram 89
14.12. DG-Board (3 of 6) Schematic Diagram 90
14.13. DG-Board (4 of 6) Schematic Diagram 91
14.14. DG-Board (5 of 6) Schematic Diagram 92
14.15. DG-Board (6 of 6) Schematic Diagram 93
14.16. H-Board (1 of 2) Schematic Diagram 94
14.17. H-Board (2 of 2) Schematic Diagram 95
14.18. LG-Board Schematic Diagram 96
14.19. LB and LR-Board Schematic Diagram 97
14.20. P-Board Schematic Diagram 98
14.21. SG-Board Schematic Diagram 99
14.22. SB and SR-Board Schematic Diagram 100
14.23. U-Board (1 of 2) Schematic Diagram 101
14.24. U-Board (2 of 2) Schematic Diagram 102
14.25. G, K and KA Board Schematic Diagram 103
15 Parts Location 105
16 Packing Exploded View 107
17 Mechanical Replacement Parts List 109
18 Electrical Replacement Parts List 110
18.1. Replacement Parts List Notes 110
18.2. Electrical Replacement Parts List 111
3
TX-47P800HQ / TX-47P800HZ

1.1. General Guide Lines
1.It is advisable to insert an isolation transformer in the AC
supply before servicing a hot chassis.
2.When servicing, observe the original lead dress, especially
the lead dress in the high voltage circuits.
If a short circuit is found, replace all parts which have been
overheated or damaged by the short circuit.
3.After servicing, see to it that all the protective devices such
as insulation barriers, insulation papers, shields, and
isolation R-C combinations, are properly installed.
4.When the receiver is not to be used for a long period of
time, unplug the power cord from the AC outlet.
5.Potential, as high as 30.0kV, is present when this monitor is
in operation. Operation of the Projection Monitor without the
rear cover involves the danger of a shock hazard from the
power supply. Servicing should not be attempted by anyone
who is not thoroughly familiar with the precautions
necessary when working on high voltage equipment.
Always discharge the anode of the projection tube to the
Projection Monitor chassis before handling the tube.
6.After servicing make the following leakage current checks to
prevent the customer from being exposed to shock
hazards.
1.2. Leakage Current Cold Check
1.Unplug the AC cord and connect a jumper between the two
prongs on the plug.
2.Turn on the Projection Monitor´s power switch.
3.Measure the resistance value, with an ohmmeter, between
the jumpered AC plug and each exposed metallic cabinet
part on the projection monitor, such as screw heads,
connectors, control shafts, etc. When the exposed metallic
part has a return path to the chassis, the reading should be
between 4 M9and 20 M9.
When the exposed metal does not have a return path to the
chassis, the reading must be .
1.3. Leakage Current Hot Check
(See Fig. 1)
1.Plug the AC cord directly into the AC outlet. Do not use an
isolation transformer for this check.
2.Connect a 2k9, 10W resistor, in series with an exposed
metallic part on the projection monitor and an earth such as
a water pipe.
3.Use an AC voltmeter, with high impedance type, to
measure the potential across the resistor.
4.Check each exposed metallic part, and measure the
voltage at each point.
5.Reverse the AC plug in the AC outlet and repeat each of the
above measurements.
6.The potential at any point should not exceed 1.0V rms. In
case a measurement is outside of the limits specified, there
is a possibility of a shock hazard, and the projection monitor
should be repaired and rechecked before it is returned to
the customer.
Fig. 1
1.4. X-Radiation
Warning :
1.The potential sources of X-Radiation in projection
monitor are the High Voltage section and the projection
tube.
2.When using a projection tube test jig for service, ensure
that jig is capable of handling 30.0kV without causing X-
Radiation.
Note:
It is important use an accurate periodically calibrated high
voltage meter.
1.Set the brightness to minimum.
2.Set the service switch to the service position.
3.Measure the High Voltage. The meter reading should
indicate 30.0 ± 1.0 kV. If the meter indication is out of
tolerance, immediate service and correction is required to
prevent the possibility of premature component failure.
4.To prevent an X-Radiation possibility, it is essential to use
the specified projection tube.
1 Safety Precautions
4
TX-47P800HQ / TX-47P800HZ

2 Chassis Board Layout
Board-Name Function
A-Board Main Signal, Digital Converter
P-Board Line Filter
D-Board Deflection, High Voltage
LR-Board CRT Drive (R)
LG-Board CRT Drive (G)
LB-Board CRT Drive (B)
SR-Board VM Output (R)
SG-Board VM Output (G)
SB-Board VM Output (B)
H-Board Rear terminal
U-Board MPU
DG-Board Digital Core
DC-Board Convergence
G-Board Front Terninal
K-Board Power Switch
KA-Board Blue light
5
TX-47P800HQ / TX-47P800HZ

3 Disassembly for Service
This flowchart indicates disassembly items of the cabinet parts and circuit boards in order to find the items necessary for
servicing, when reassembling, perform the procedures in the reverse order.
3.1. Disassembly Flowchart
6
TX-47P800HQ / TX-47P800HZ

3.2. Cabinet Side (L, R)
1.Remove (14) screws.
3.3. Speaker Grille
1.Remove (8) screws.
2.Remove (2) screws.
3.4. Speaker Ass´y
1.Remove (10) screws.
Note:
Board ground wires may have to be disconnected to disassemble some boards. All ground wires must be reconnected using
jumper leads if necessary before power is applied to Receiver for service.
7
TX-47P800HQ / TX-47P800HZ

3.5. Cabinet (Upper)
1.Remove (12) Screws.
3.6. Screen
1.Remove (20) nails, and remove (2) Screen Holders (vertical
side) and (4) Screen Holders (horizontal side).
3.7. Mirror
1.Remove (3) screws.
3.8. Rear Cover (Upper)
1.Remove the Cabinet (Upper).
2.Remove (2) screws.
8
TX-47P800HQ / TX-47P800HZ

3.9. Rear Cover (Bottom)
1.Remove (16) screws.
2.Remove (1) screw.
3.10. Disassembly For CRT Removal
To facilitate CRT replacement, the complete CRT mounting
chassis does not need to be removed.
1.Remove the Screen Frame Ass´y, Decorative Panel and
the Bottom Rear Cover Ass´y. ( See Disassemble for
Service ).
2.Unplug the defective CRT Dag ( GND ), from the CRT
Board, LBGND for LB, LGGND for LG, LRGND for LR.
3.Remove lead wires ( DY, VM coil ) and anode lead wire
from holders as necessary.
4.Remove the CRT Board from the defective CRT neck.
5.Note position of yoke with centering tabs and remove from
defective CRT.
6.From the Top, remove (2) screws from the defective CRT.
9
TX-47P800HQ / TX-47P800HZ

7.Release CRT anode lead from CRT chassis wire clamp and
all other wires from holders.
8.Wire the anode lead wire.
9.Lift out CRT assembly with lens assembly and other CRT
neck assemblies.
10.Lay CRT face down on a soft cloth.
11.Remove CRT lens by removing (4) screws.
12.Install yoke and VM coil with other CRT neck assemblies on
CRT neck in the same order and position as removed from
the defective CRT.
13.Push yoke against bell of CRT and tighten the clamp just
snug enough so it will not easily shift.
14.Assemble CRT focus lens assembly to new CRT with (4)
screws. Make sure focus lens adjustment nut is in the same
location as on other CRT focus lens.
Note:
Please assemble with screws in the order shown in detail
and tighten with same torque.
10
TX-47P800HQ / TX-47P800HZ

4.1. Service position for Main
chassis
1.Remove the Rear Cover (Bottom) by removing (16) screws
and (1) screws around its perimeter.
2.Remove lead wires and bundles from holders as necessary.
3.Pull out main chassis and stand it.
4.2. Service Position for DG-Board
1.Remove the each circuit board from A or D-Board.
2.Connect extension cables between individual circuit board
and A or D-Board.
Note:
Extension cable kit is supplied as service fixtures and tools.
(Part No. TZSC0724)
4.3. Service Position for K-Board
1.Remove the Speaker Grille.
2.Remove the K-Board by (4) screws.
4.4. Service Position for KA-Board
1.Remove the Speaker Grille.
2.Remove the Terminal Door by (4) screws.
3.Remove the KA-Board by (1) screws.
4 Service Hints
11
TX-47P800HQ / TX-47P800HZ

4.5. Service Position for G-Board
1.Remove the Speaker Grille.
2.Remove the Terminal Door by (4) screws.
3.Remove the G-Board by (2) screws.
12
TX-47P800HQ / TX-47P800HZ

5SelfCheck
1.Self-Check is used to automatically check the bus lines and hexadecimal code of the TV set.
2.To get into the Self -Check mode press the down ( ) button on the customer controls at the front of the set, at the same
time pressing the HELP button on the remote control, and the screen will show :
If the CCU ports have been checked and found to be incorrect or not located then “--” will appear in place of “O.K.”.
13
TX-47P800HQ / TX-47P800HZ

6 Service Mode Function
MPU controls the functions switching for each IICs through IIC bus in this chassis. The following setting and adjustment can be
adjusted by remote control in Service Mode.
6.1. How to enter SERVICE 1
1.In sound menu, set BASS to MAX, and set TREBLE to MINIMUM.
2.Simultaneously press INDEX button on remote control and VOLUME DOWN button [ - ] on the TV set.
6.2. How to enter SERVICE 2
1.Set the channel to CH99.
2.Press HOLD button on remote control.
Note:
To exit to Service mode, press N or Power button on remote control.
14
TX-47P800HQ / TX-47P800HZ

15
TX-47P800HQ / TX-47P800HZ

6.3. Option Descrition
16
TX-47P800HQ / TX-47P800HZ

17
TX-47P800HQ / TX-47P800HZ

18
TX-47P800HQ / TX-47P800HZ

Caution:
Insure yoke plugs on the A-Board are reconnected before
turning the Receiver ON to prevent damage to the
horizontal output transistor and/or CRTs.
7.1. Dynamic Focus Adjustment
1.Focus adjustments should be performed after 1 hour of
aging.
2.Use oscilloscope with 100 : 1 probe.
3.Apply PAL monoscope pattern.
4.Set scan mode to 100Hz.
5.Set the picture menu to Dynamic.
6.Adjust the Red, Blue and Green focus VR on the focus
block for best focus of overall picture of each CRT. (Fig. 2)
Fig. 2
7.Connect the scope probe to TPD20, GND to TPD21. Scope
set at 20V/div & 5m sec./div.
8.Adjust V-PARA (Service mode1) so that waveform (A) is
260V ± 20V. (Fig. 3)
9.Adjust H-PARA (Service mode1) so that waveform (B) is
560V ± 40V. (Fig. 3)
Fig. 3
10.Set scan mode to PAL 100V Comp.
11.Set the picture menu to Dynamic.
12.Adjust V-PARA (Service model) so that waveform (A) is
180V ± 20V. (Fig. 3)
13.Adjust H-PARA (Service model) so that waveform (B) is
560V ± 20V. (Fig. 3)
14.Set scan mode to Progressive.
15.Repeat step 6-9.
16.Apply NTSC monoscope pattern.
17.Set scan mode to Progressive.
18.Repeat step 6-9.
19.Set scan mode to 100Hz.
20.Repeat step 6-9.
21.Apply monoscope pattern of PAL 1080i 50Hz.
22.Repeat step 6-9.
23.Proceed with Focus Adjustments.
7.2. Electrical Focus Adjustment
1.Receive a monoscope pattern.
2.Cover the Red and Blue CRT, projecting Green only.
The electrical focus controls are located on the front. Adjust
the Green Focus VR for best focus of overall picture. (Fig.
2)
3.Repeat for Red focus VR while projecting Red only.
4.Repeat for Blue. (Best focus at bottom left corner of screen)
7.3. Optical Lens Focus
Adjustment
Note:
This adjustment normally should not require resetting
unless the lens has been replaced or adjustment has
changed.
1.Optical focus adjustment is located on the top of each CRT
lens system. Loosen the adjustment knurls locking knob.
(Fig. 4)
Fig. 4 (Rear view)
2.Turn the Receiver ON apply and view a monoscope pattern.
3.Adjust each lens focus for best focus while viewing each
CRT.
4.Cover the Red and Blue CRT, projecting green only.Rotate
the Green lens for best focus around screen center area.
5.Do the same for the Red focus lens while projecting Red
only.
6.Repeat for Blue.
7 CRT Set Up
19
TX-47P800HQ / TX-47P800HZ

Procedure:
1.Cover the Red, Blue CRT lens, projecting Green only.
2.Adjust green centering magnet (DY) if the projected
green horizontal/vertical line does not line up with the
screen horizontal/vertical center line.
3.Cover the Green, Red CRT lens, projecting Blue only.
4.Repeat step 2. for blue.
5.Cover the Green, Blue CRT lens, projecting Red only.
6.Repeat step 2. for red.
7.Cover the Red, Blue CRT lens, projecting Green only.
8.Adjust green centering magnets until the center of the
monoscope pattern line up with the screen center line.
9.Cover the Green, Red CRT lens, projecting Blue only.
10.Adjust blue centering magnets to position the center of
the blue raster W2 away from the center of the green
raster.
11.Cover the Green, Blue CRT lens, projecting Red only.
12.Adjust red centering magnets to position the center of
the red raster W1 away from the center of the green
raster.
7.4. Centering Magnet Adjustment
1.Receive a monoscope pattern.
2.Set that Fine convergence data (Service mode1) is clear (no correction).
3.Set that V-Pos data (Service mode1) is [130].
4.Set that H-Pos data (Service mode1) is [438].
5.Set that H-Parallel data (Service mode1) is [8].
20
TX-47P800HQ / TX-47P800HZ
Table of contents
Other Panasonic Whiteboard manuals

Panasonic
Panasonic ElitePANABOARD UB-T880 User manual

Panasonic
Panasonic UB-T580 User manual

Panasonic
Panasonic UB-5338C User manual

Panasonic
Panasonic UB-5835 User manual

Panasonic
Panasonic UB-5838C User manual

Panasonic
Panasonic UB-T580 User manual

Panasonic
Panasonic KX-B520A User manual

Panasonic
Panasonic Panaboard KX-B420 User manual

Panasonic
Panasonic KX-B520A User manual

Panasonic
Panasonic Panaboard KX-B530U User manual