Eastic Tech W801 User manual

WiFi Intelligent Wireless Visible
Door Bell

1 Product introduction
WiFi Intelligent Wireless Visible Door Bell could link with wireless router or directly with the cable for
use, the handset includes mobile phone, tablets to connect with the bell, when visitors press the bell, handsets
could make video and voice calls with the bell, unlock, take photos and record videos. It has P2P cloud
service pushing function.
This product has functions of infrared night viewing &water and humidity proof.
Eight handsets could work with twenty bell sets simultaneously.
2 APP download &installation introduction
For IOS user, download "Ebell" in APP store
ForAndroid user, download "Wifi Smart Doorbell" in google play store
3 Port Definition
1

2

4.Installation diagram
Location choice for door machine: installation height of 1.5m, the
location should have few barrier with WiFi router
1. Use four screws to fix the rain-proof cover on the wall; 2. Use one screw
to fix the bell bottom; 3. The installation is finished.Bell matching
5.1.1 Join WLAN to link the doorbell (ignore this for cable use)
1.Press call button for over 5secs, operate by the voice instruction
2. The phone finds effective WiFi and hotspots, please select hotspot with
prefix GBELL-XXXXXX
3. Input default password 123456789 and click ‘connect’ submit,
3
8 Accessories
16
6.3 Take picture 7.automatic monitoring

Press take-picture button click the automatic monitoring
to take picture, check in on the bell (online) in the
the main interface picture; main interface, to record videos,
take picture, make calls without
unlcoking
15
5.1.2 Search doorbell
4. click ‘add doorbell’ in the main interface of the APP on phone or tablets;
5.fishish the adding by manual, 2D code scanning to add ID;
6. For LAN search, ensure the phone and the device in the same LAN, select
the target device. In general, the name is GBELL
4
5.1.3

Match the doorbell
the bell into the router (ignore this for cable use)
5
6.2 Unlock
Press unlock button to unlock
14
6.1 Talk-listen switch

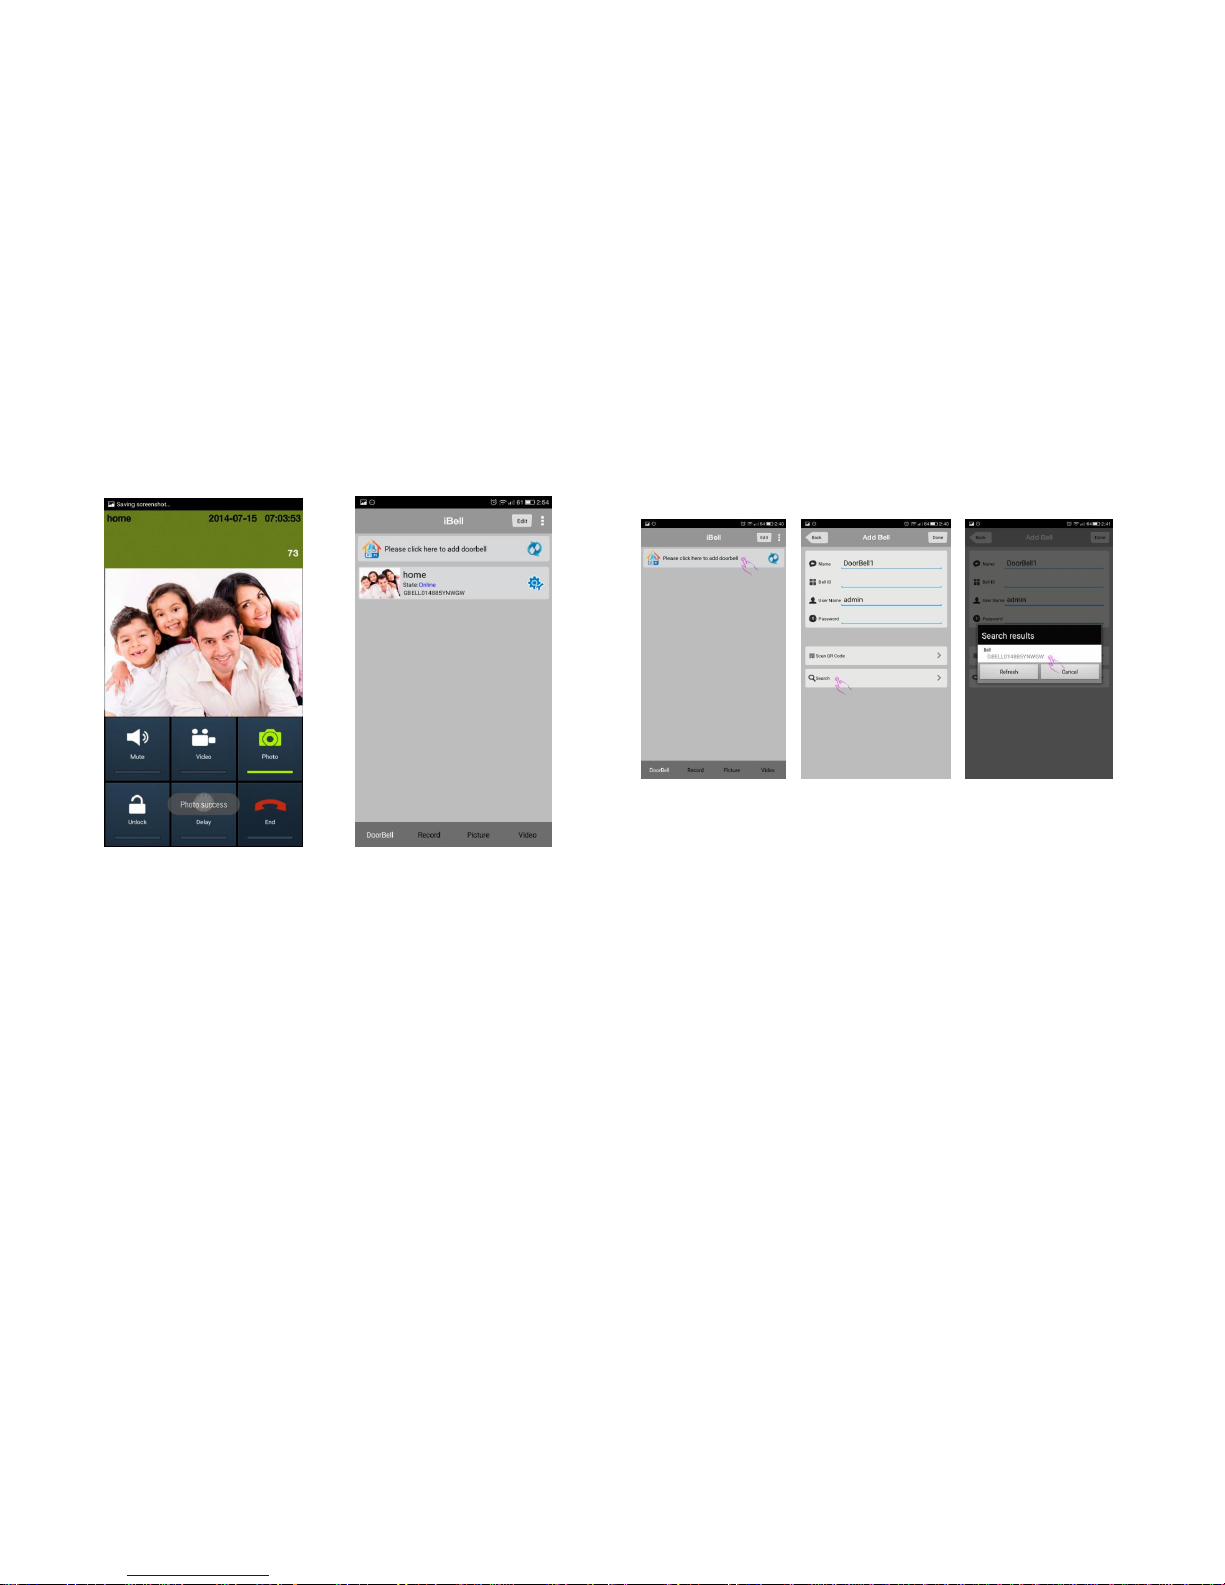
1. When visitors press the bell, answer and hang up
2. When any handset is answered, other handsets would automatically hang
up, video recording, picture taking and unlocking would be done within the
calling, press end to hang up;
3. Press video recording button to display the recorded video. Repress to
check in the main interface.
13
5.1.4 APP
7. now you can change name, ID, user name and password, click finish to
submit;
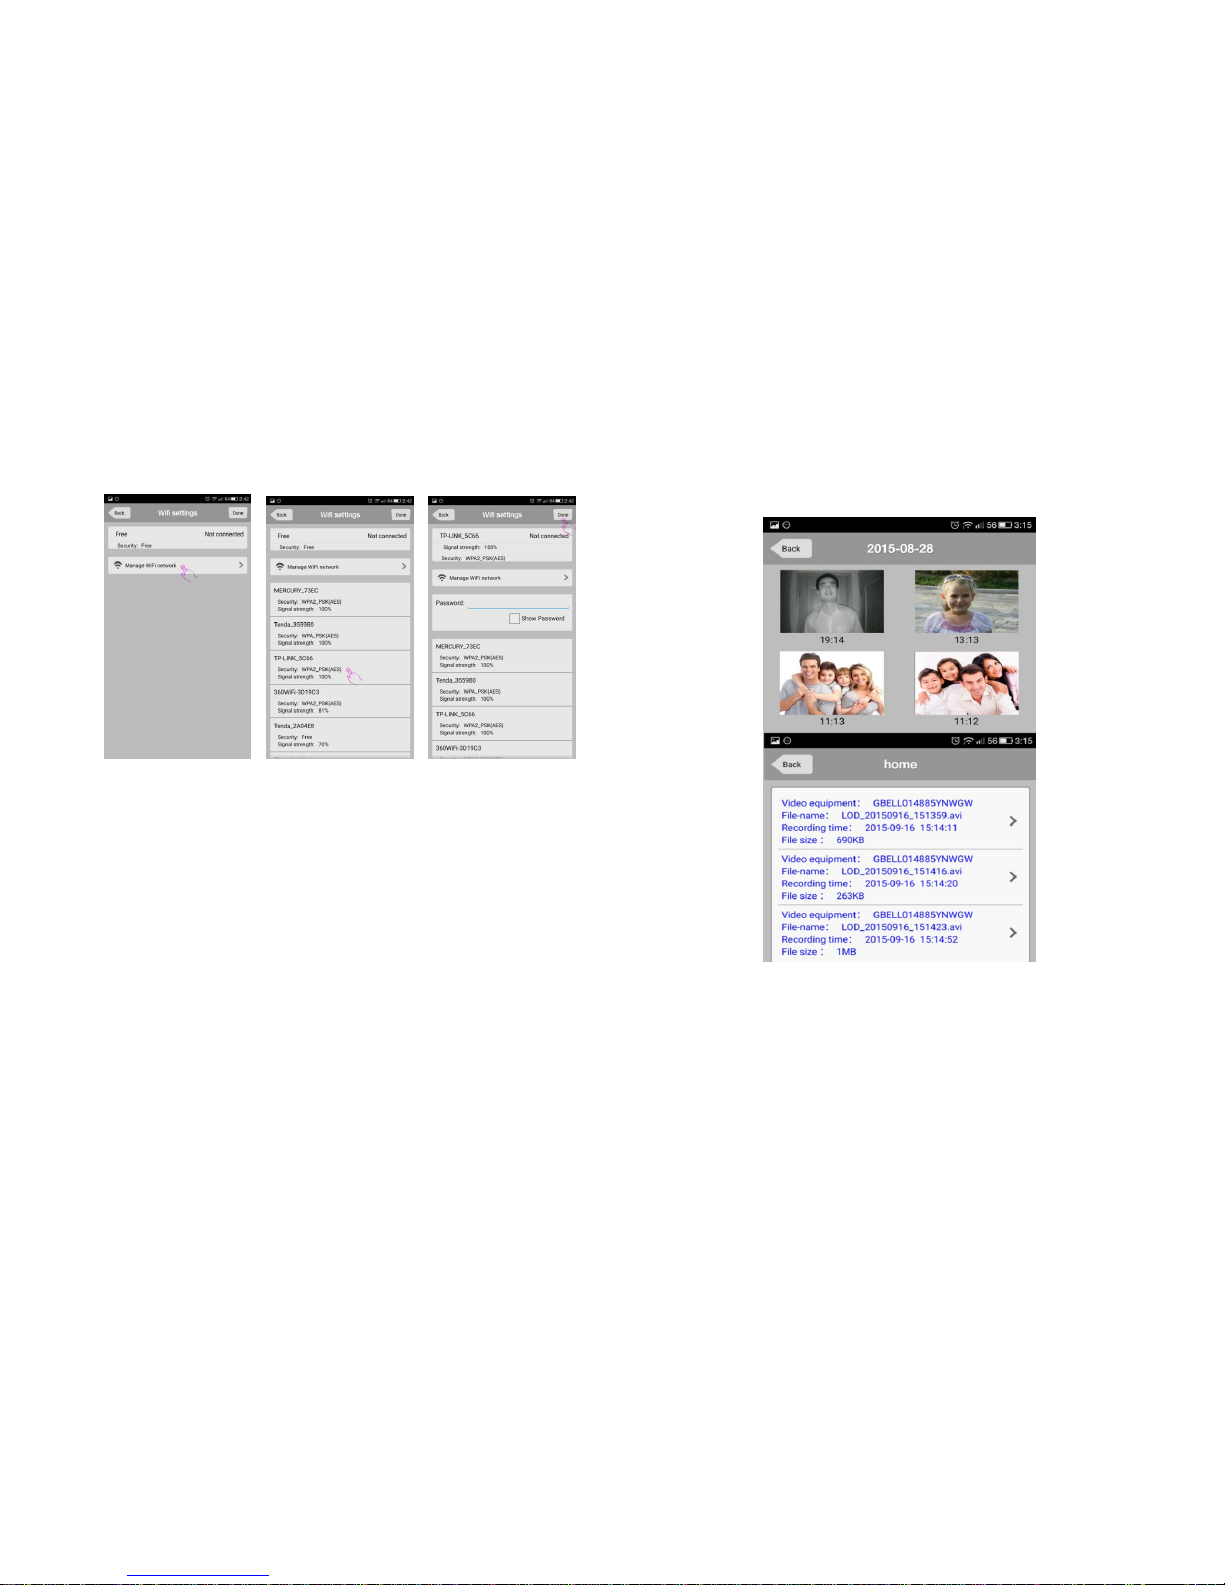
8. Now the bell is online, click to link for offline and click to set up WiFi;
9. Click WiFi setup, the bell will join the router network
6

10. In the bell setup interface, click wifi setup, and click manage wifi network
when it’s connected;
11. The device will list the found effective router, please select target router
(SSID);
12, input password, click ‘finish’ to submit, then the bell would restart, after
one min, the handset would find the bell online
7
5.7 check pictures &videos
check past visited pictures, video list could directly play visitors’ video,
long press to select and delet.
12
5.5 Ringtone set 5.6 check logs

Click to set up bell ringtone, Check past visitor calls, alarming,
alarming tone, software received calls and un-received calls,
version and log out. P2P cloud service push
11
5.2 Delete the doorbell , edit the doorbell
1. Navigate to the sub-interface to maintain the installed doorbell;
2. Select and single click ‘delete’ to batch-delete the selected device;
3. Directly edit the doorbell name, ID, login, username, password, finish and
click finish button
8
5.3 Doorbell setup

1.Click on the icon to make parameter setup
2.System setup interface
9
5.3.1 User management
1. Administrator could add new user, delete current user, common user
could only change their password, same user could not log on different
phones
2. Change user password;
3. Add new user.
10
NOTE: This equipment has been tested and found

to comply with the limits for a
Class B digital device, pursuant to part 15 of the
FCC Rules. These limits are
designed to provide reasonable protection
against harmful interference in a
residential installation. This equipment generates
uses and can radiate radio
frequency energy and, if not installed and used in
accordance with the instructions,
may cause harmful interference to radio
communications. However, there is no
guarantee that interference will not occur in a
particular installation. If this
equipment does cause harmful interference to
radio or television reception, which
can be determined by turning the equipment off
and on, the user is encouraged to
try to correct the interference by one or more of
the following measures:
- Reorient or relocate the receiving antenna.
- Increase the separation between the equipment
and receiver.
-Connect the equipment into an outlet on a circuit
different from that to which the
FCC Radio Frequency Exposure Statement: The device has been evaluated to meet general RF exposure requirements.
The device can be used in fixed/mobile exposure conditions. The min separation distance is 20cm.
receiver is connected.
-Consult the dealer or an experienced radio/TV
technician for help
Changes or modifications not expressly approved
by the party responsible for compliance
could void the user's authority to operate the
equipment.
This device complies with Part 15 of the FCC
Rules. Operation is subject to the following two
conditions:
(1) this device may not cause harmful
interference, and
(2) this device must accept any interference
received, including interference that may
cause undesired operation.
This device is acting as slave and operating in the
2.4 GHz (2412 ~2462 MHz) band.
Ad Hoc function is supported but not able to operate on non-US
frequencies
Popular Accessories manuals by other brands

Shadesign
Shadesign SHADEONE Twister-Sail Installation operation & maintenance

VWR International
VWR International 1917 Installation and operation

X10
X10 MS10A Set up and operating instructions

Panasonic
Panasonic KX-HNS103AZ installation guide

Grandview
Grandview CNV Series instruction manual

Balluff
Balluff BES05L2 user guide