ASTRO DEVICES Nexus DSC Pro User manual

Nexus DSC
Pro
Quick Setup Guide
7 8
4
1
0
2
5
9
6
3ESCOK
OFF ON
DSC
Nexus Pro

Nexus DSC Pro - Quick Setup Guide
Version 1.0
Firmware version 1.x.x
Last revised on February 9th, 2021
Printed in Australia
Copyright
Copyright © 2021 Astro Devices. All rights reserved.
No part of this manual may be reproduced or transmitted in any form for any purpose other than
the purchaser’s personal use, without the express written permission of Astro Devices.
Astro Devices reserves the right to make changes and improvements to its product without
providing a notice.
Precautions and Safety
Electricity
Nexus DSC Pro contains a rechargeable Lithium-ion battery. Lithium-ion
batteries can explode or cause a fire if they are used incorrectly or if they
are defective. Therefore, you are recommended to read the following
instructions very carefully:
NEVER leave Nexus DSC Pro where it is subjected to extremes in temperatures.
This includes low levels as well as high.
DO NOT leave Nexus DSC Pro where it is in direct sunlight or in an enclosed
space, such as a car, that can become extremely hot very rapidly.
Do not drop or subject the Nexus DSC Pro to impact.
Use only approved power adapter to charge your Nexus DSC Pro.
Do not handle power plug and adapter with wet hands. Electrical shock may
result. Immediately power off the product and unplug the DC adapter and/or
batteries if smoke or odours emit from the product. Immediately power off the
product and unplug the DC adapter if water or other liquids are present.
Product
Keep it away from harsh environments including humid, dusty, and smoky
areas.
Do not use excessive force on the connectors or attempt to disassemble the
device without prior consultation with Astro Devices.
Do not place heavy objects on the product. Damage to your products may
result from improper use.
Technical Support
Astro Devices
198 The Esplanade,
SYLVANIA, NSW 2224
AUSTRALIA
ABN 75 270 616 917
E-Mail: support@astrodevices.com
Website: http://www.astrodevices.com

3 Nexus DSC Pro Quick Setup Guide
Thank you
Thank you for purchasing Nexus DSC Pro
digital setting circles telescope computer. We
hope you enjoy it! This Guide will get you
started with your Nexus DSC Pro.
Introduction
Nexus DSC Pro is a digital setting circles
computer with optional WiFi interface for your
telescope. It works with most popular
telescopes – on equatorial or Alt-Azimuth
mounts.
Nexus DSC Pro is a very sophisticated device
for locating celestial object in the sky. Only two
rotary encoders are required to be fitted to your
telescope in order to be able to locate celestial
object with Nexus DSC Pro.
System Requirements
Nexus DSC Pro uses an optional WiFi
communication module and may be connected
to one of the following:
• iOS devices (iPhone, iPad, iPod touch)
running iOS 3.0+
• Android devices with WiFi support
• PCs with WiFi support (running
Windows XP or Windows 7/8/10).
• Apple computers with WiFi support
(running Mac OS X).
Please also refer to the system requirements
for your favourite planetarium software.
Package Content
The package contains:
• Nexus DSC Pro
• Quick setup guide and User manual
• DC 2.1mm to cigarette lighter power
cable
• USB to DC 2.1mm cable
• Optional power adapter
Unpacking
Nexus DSC Pro has a protective film covering
the front panel. Please peel it off to be able to
see the display clearly.
Controls
All controls are situated on front panel of Nexus
DSC Pro:
– power switch
– keypad
– display
– external power connector (DC 2.1mm)
– charging status LED
– USB connector
– Serial (RS232) port
– Encoders port
– Micro SD socket
Charge the battery
The battery may not be fully charged at first. It
is advised to fully charge the battery first.
Please use either the provided power adapter
or one of the recommended power adapters to
charge the battery.
7 8
4
1
0
2
5
9
6
3ESC OK
OFF ON
DSC
Nexus Pro
1 2 3
1
2
3
ENCODERSSERIAL
USB
microSD
5-16V DC
CHG
1 2 3 4 5 6
1
2
3
4
5
6

Nexus DSC Pro Quick Setup Guide 4
It is also possible to use the supplied USB to
DC 2.1mm cable to charge the battery from a
power adapter with a USB socket. The power
adapter must be capable of supplying at least
1.5A at 5V.
Connect the power adapter to Nexus DSC Pro
and plug the adapter into a power point.
It is recommended to keep Nexus DSC Pro
turned off during charging to reduce charging
time.
WARNING:
Do not connect Nexus DSC Pro to an
external power source that is not within
the specified voltage range. Nexus
DSC Pro has internal over-current
protection but it is safer to use it with
the power source specified.
The internal Lithium battery can only be
charged at a temperature range of 0 oC
to +30 oC (32 oF to 86 oF)
The charging status LED reports different
states:
Blinking
type
Description
Solid ON
The internal battery charging is in
progress
OFF
The internal battery has been fully
charged
Flashing
Flashing LED is indicating an error
(power source is not supplying sufficient
voltage and or current)
User interface
The main screen consists of a status bar,
horizontal menu with icons and a text
description of the currently selected menu item:
– Status bar
– Main menu
– Menu description
The status bar has the following elements:
– WiFi status
– GPS fix status
– Current time
– Battery charge level
and keys on the keypad move
between previous and next menu items, they
are also used to move between control fields
(edit value, list, check box, on-screen buttons)
in a dialogue screen. The key also acts as
a backspace when editing a value in edit fields.
The key activates the selected menu item.
The key goes back to the previous menu
level/screen.
and keys are used to select an item
from a list, to adjust value in numeric fields with
predefined steps (like ‘Time Zone’) or to change
a character in an edit field; they can also be
used to go to the previous/next menu level.
On-screen buttons have a flashing border when
selected – in that case pressing the key
generates a button press event.
Initial Setup
In order to be able to use Nexus DSC Pro for
locating celestial object it is necessary to set a
few parameters first:
- Time and date
- Mount Type
- Encoders’ resolution
Setting the time and date
Please select ‘Settings’ from the main menu:
1
2
3
1
2
3
1 2 3 4
1
2
3
4
OK
ESC
OK

5 Nexus DSC Pro Quick Setup Guide
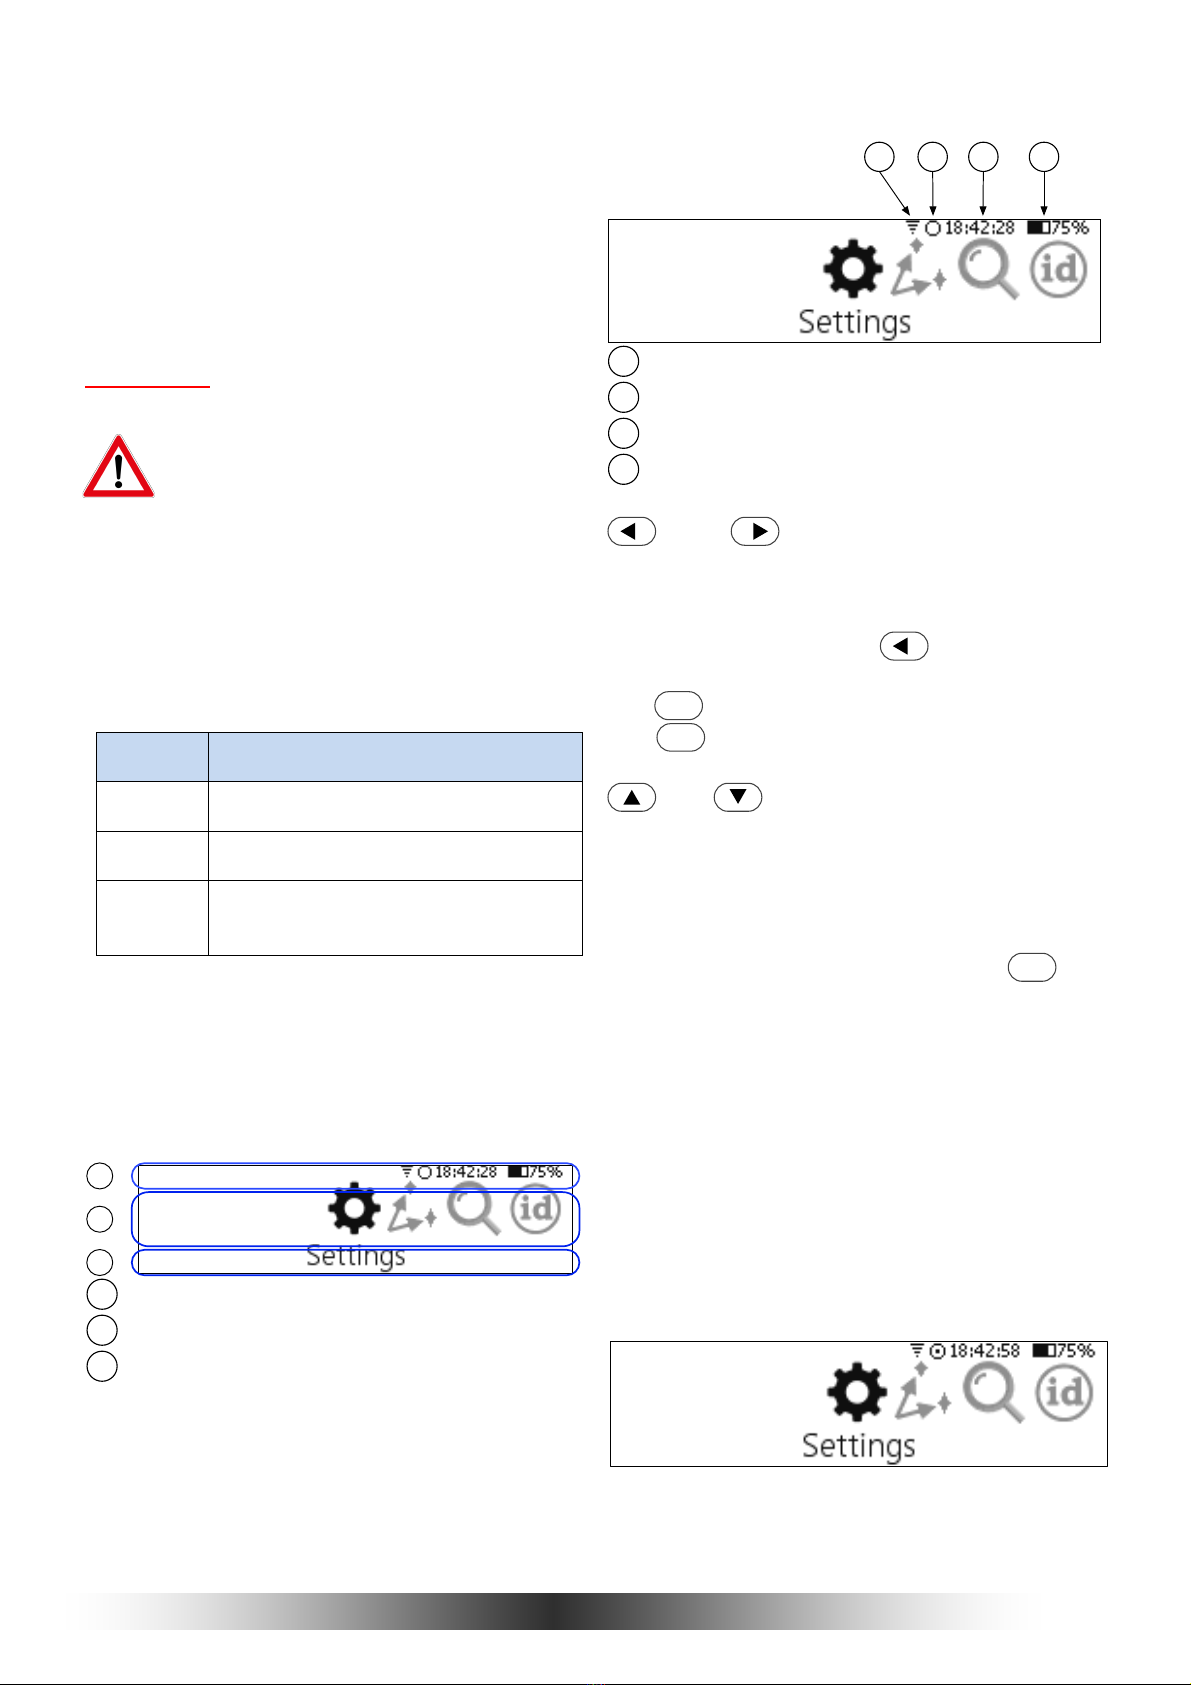
Then select Time and Date:
It will show the current time and date that can
be changed:
If all parameters are set correctly then pressing
the key can be used to avoid changing any
parameter.
If the time zone, time and date need to be
changed then and keys can be used
to select the parameter that needs to be
adjusted. and keys are used to
change the value.
Setting the time and date is only required if time
synchronisation with GPS is disabled. However
the time zone and date needs to be set for
Nexus DSC Pro to show the local time correctly.
The easiest way to set the time and date is
to set the date and time zone and then step
outside to allow the GPS receiver to get a
fix and thus synchronise time from GPS.
It usually takes 30 to 60 seconds for the
GPS receiver to get a fix on the location
(under open sky conditions). Nexus DSC
Pro will update the internal real time clock
with the time received by the GPS receiver
at this time. The GPS receiver will
automatically be switched into a power
saving mode after it acquired the location
to conserve the battery power.
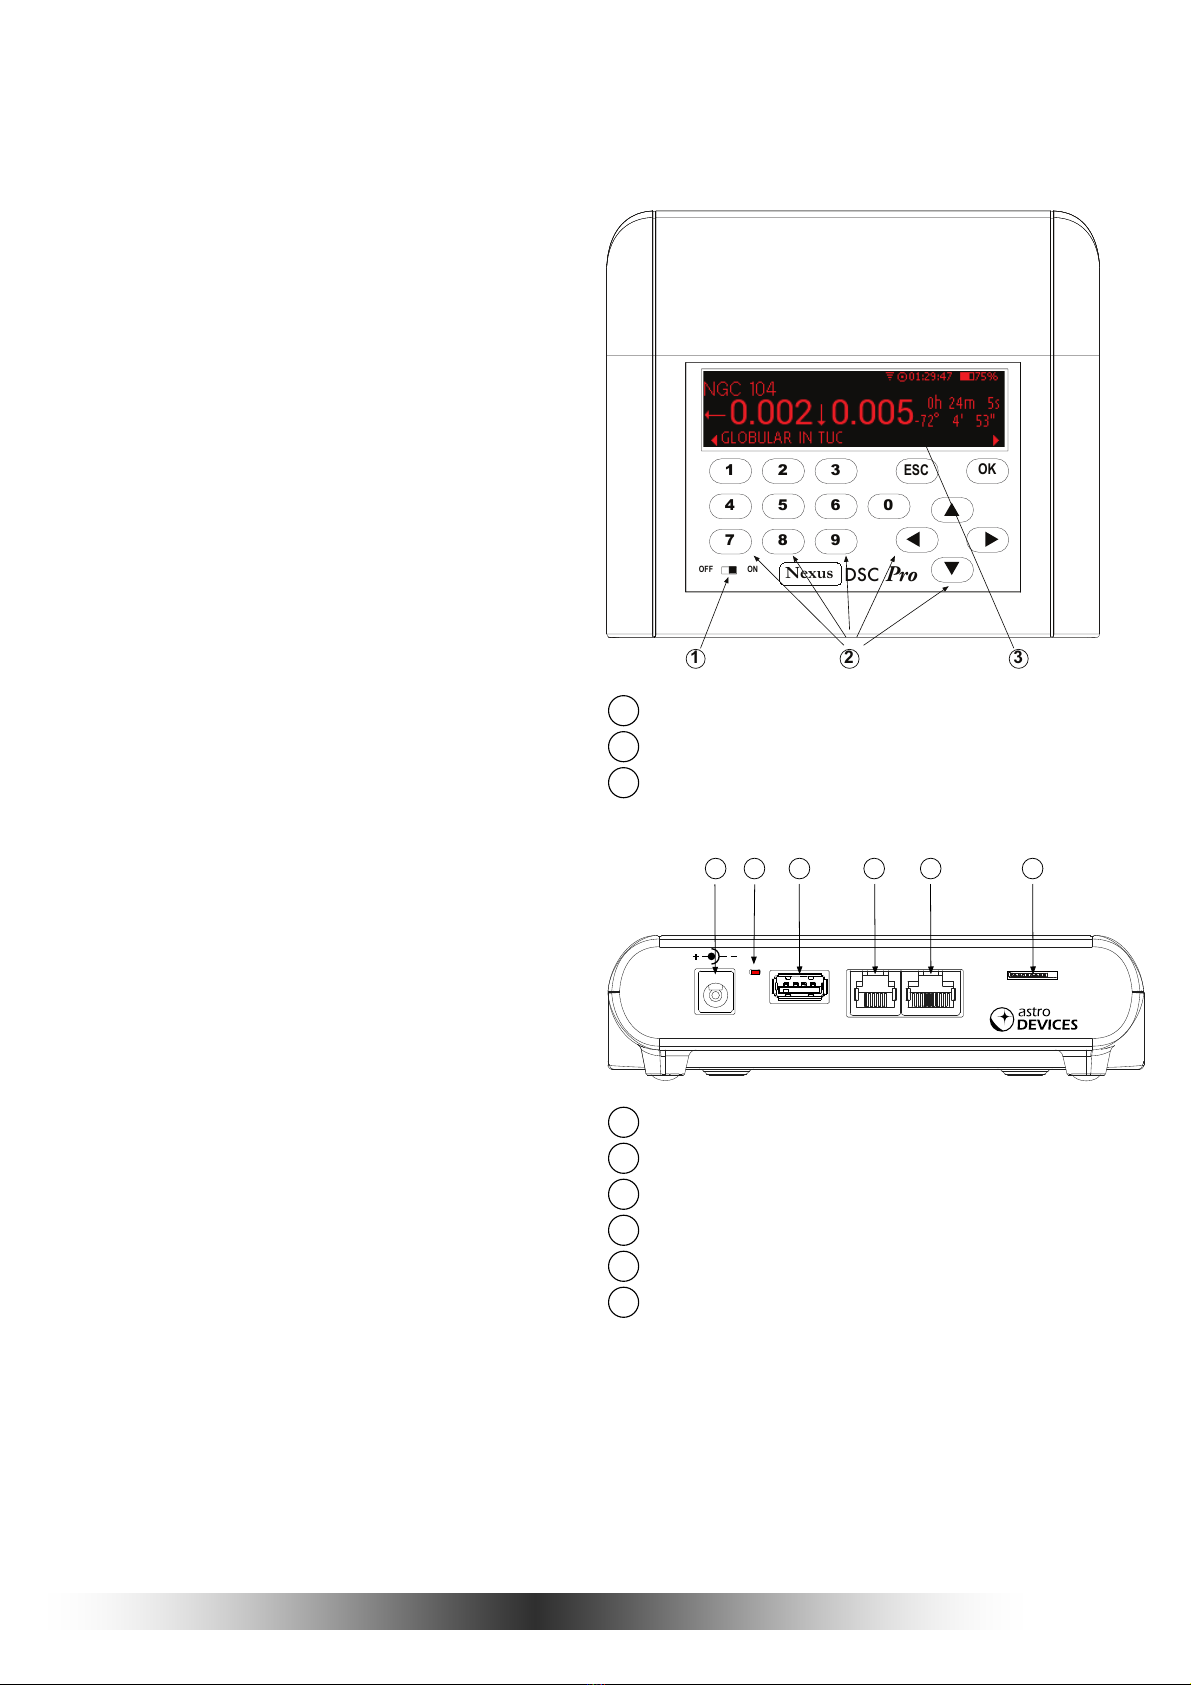
Connecting to your telescope
Please plug the encoder cable into ‘Encoders’
port on Nexus DSC Pro.
To make sure that encoders are functioning
correctly Nexus DSC Pro has a test mode.
Selecting ‘Test’ from the main menu activates
it:
Then selecting ‘Encoders’:
will show the current encoder steps and angles:
In order for Nexus DSC Pro to function correctly
it is required to adjust the encoder steps now to
make sure that:
• the RA/AZ current position in degrees is
increasing when rotating the telescope
clockwise around RA/AZ axis
• the Dec/Alt current position in degrees is
increasing when moving the telescope up in
declination/altitude
If either of those values is not increasing then
set the sign in front of the encoder steps for that
axis to a negative sign in the Telescope
Settings.
Telescope Settings
Nexus DSC Pro needs the mount type and
encoder steps to be set correctly before it can
be used to locate celestial object precisely.
The mount type and encoder steps are set in
the Telescope Settings that can be accessed by
selecting ‘Setting’ from the main menu:
then by selecting ‘Telescope’:
Then you need to select the telescope:
Nexus DSC Pro allows to have up to five
different telescope configurations. You can also
rename TELESCOPE 1 to your telescope
name. You just need to activate the Rename
ESC

Nexus DSC Pro Quick Setup Guide 6
button by using and then press the
key. A text cursor now appears under the name:
You will now be able to edit the name and
change it to your telescope name:
Now you need to set other parameters for your
telescope:
where the mount type can be selected by using
and keys. The encoder steps are set
to 10000 steps by default and should be set to
the number of steps corresponding to the
number of steps installed on your telescope.
Encoder steps can be set by using the numeric
keys on the keypad. Please change the sign in
front of the encoder steps to a negative sign if
required as described previously:
Two star alignment
Nexus DSC Pro needs to be aligned on two
stars before it can locate celestial objects.
The two star alignment can be performed using
two methods:
- Using Nexus DSC Pro itself
- Using SkySafari Plus/Pro
Two star alignment using Nexus DSC
Pro
The telescope does not need to be levelled
for Nexus DSC Pro to locate celestial
objects accurately.
The two star alignment is performed in three
steps.
Please go to the Align menu:
Then select Altitude Reference:
Adjust the altitude reference angle if required:
Now move the telescope into position
depending on the mount type (for 90 degrees
reference):
Telescopes on Alt-Azimuth mount should be
positioned vertically:
The same rule applies to telescopes installed
on equatorial platforms. Please note that the
telescope should be at 90 degrees to the
ground board, not the ground.
For equatorial mounts 0 degrees altitude
reference is more convenient.
Telescopes on an Equatorial Fork for a 0
degrees altitude reference then be positioned
as below:
OK

7 Nexus DSC Pro Quick Setup Guide
The telescope does not have to be
positioned exactly at the angle specified,
but it should be within ±10°. You can also set
the altitude reference to any angle between
-180°and +180° by selecting
Custom
from the list and by adjusting the angle:
Please note that the altitude reference angle is
individual for each telescope configuration –
this angle will be stored in the settings for the
currently selected telescope.
Nexus DSC Pro will automatically switch the
screen to the selection of first alignment object:
While Nexus DSC Pro can be aligned on any
object in its database it is best to use objects
form either Named Stars catalogue or Bright
Stars catalogue. You can press to go to
the CATALOGUE tab and selecting a different
catalogue then press the key to return to
the object selection.
It is time to select the first alignment object – by
pressing and to change to another
star:
Gacrux was selected as it is well above 30
degrees. Now the telescope should be pointed
at Gacrux using an eyepiece with a
reticle/crosshair or a very high magnification
eyepiece. Press the button once the
telescope is pointing at the star.
Nexus DSC Pro will now switch to the selection
of a second alignment object:
Please follow the procedure described above to
change the selection of the second alignment
object if necessary.
Press the button once the star is in the
centre of the eyepiece.
Now Nexus DSC Pro will show the alignment
status – Successful or Failed:
Now you can press either the button or the
key to go to the previous menu.
You can go back to align on first or to align
on second object at any time in case the
alignment error is too big.
Two star alignment using SkySafari
Plus/Pro
Please refer to the SkySafari Setup section in
this guide to start using Nexus DSC Pro with
SkySafari.
Perform the Altitude reference alignment first –
as described above.
Touch the Connect button on the telescope
control panel in SkySafari.
SkySafari will show where the telescope is
pointing but the position will most likely be
incorrect as the two star alignment has not yet
been performed.
In this example the altitude reference was 90º:
OK
OK
OK
ESC

Nexus DSC Pro Quick Setup Guide 8
Now select a star and point the telescope at the
selected star. Betelgeuse was selected in this
example. The telescope cursor will most likely
be quite far from the selected star unless the
telescope is levelled and pointing north when
the altitude reference was performed. The
telescope cursor does not have to be over the
selected star:
Once the star is precisely in the centre of the
field of view touch the Align button. A popup
window will appear to confirm the alignment:
Touch the Align button to confirm. Nexus DSC
Pro will produce a short beep if sounds are
enabled. The telescope cursor will now be
located precisely over the selected star:
Select another star and perform the same
procedure for the second star.
You can check if the alignment was successful
by going to Alignment Status.
Alignment object screen
Alignment object screen has four tabs:
CATALOGUE, OBJECT, INFO and HELP. You
can use and keys to switch between
the tabs. The OBJECT tab is selected by

9 Nexus DSC Pro Quick Setup Guide
default:
The INFO tab shows additional information
about the object:
where:
– Object’s information
– Currently selected object’s azimuth
– Currently selected object’s RA
– Telescope’s AZ/RA
– Telescope’s Altitude/Declination
– Currently selected object’s altitude
– Currently selected object’s declination
Pointing accuracy
Pointing accuracy depends on a number of
factors:
• Quality of the telescope mount
• Choice of alignment stars
• Accuracy in pointing on alignment objects
To achieve the best pointing accuracy with an
Altitude-Azimuth mount it is recommended that:
• The alignment stars chosen should always
be at 30 to 80 degrees in altitude and
separated by at least 70 degrees in
azimuth.
• Alignment stars should ideally have at
least a few degrees separation in altitude
• Polaris can be used as one of the
alignment stars
To achieve the best pointing accuracy on an
Equatorial mount it is recommended that:
• Polaris should never be used as one of the
alignment stars
• Alignment stars with a declination greater
than 80 degrees should be avoided
• The alignment stars chosen should always
be at 30 to 80 degrees in altitude and
separated by at least 70 degrees in RA.
Locating an object
Once the two star alignment is performed
Nexus DSC Pro can locate celestial object in
the sky.
The following steps describe a basic location of
celestial objects.
Go to the top menu and select Find:
Select From Catalogues:
Select a catalogue by using the and
keys and then press the :
The display will show the last selected object:
Suppose we would like to find NGC55. Just
press the key and the display will prompt
to continue typing the object number:
Now press the key again and then press
:
Nexus DSC Pro will now show where to move
the telescope to aim at NGC55:
1
5
2 3
6 74
1
2
3
4
5
6
7
OK
5
5
OK

Nexus DSC Pro Quick Setup Guide 10
It shows that the telescope needs to be moved
down by 27.2 degrees and counter clockwise
by 47.7 degrees. As you start moving the
telescope the numbers will start updating.
Continue to move until both numbers are close
to 0s:
If you look through the eyepiece then you will
see NGC55 there now.
To display additional information about the
object just press or key:
Pressing , or will take you
back to the previous screen.
Please refer to the Nexus DSC Pro User
Manual for advanced topic on objects’
selection.
Using Nexus DSC Pro with
SkySafari
If your Nexus DSC Pro has the optional WiFi
card then you can connect it to SkySafari
Plus/Pro running on iOS, Android or Mac OS
X. The following steps describe how to set
everything up on iPhone but the procedure is
very similar for Mac OS X and Android.
Nexus DSC Pro setup
Please go to the top menu on Nexus DSC Pro
and select Settings and then WiFi:
Make sure that WiFi Mode is set to Access
Point:
Press until the third page of setting
appears and make sure that Protocol is set to
LX200:
SkySafari Setup
Next please go to Settings->WiFi on your
iPhone: and join Nexus DSC Pro’s network:
The next steps is to set SkySafari’s settings.
Please start SkySafari on your iPhone and go
to Settings->Telescope->Setup:
ESC
OK

11 Nexus DSC Pro Quick Setup Guide
Nexus DSC Pro is emulating LX200 protocol
when used with a planetarium application.
Change the Scope Type to Meade LX200
Classic:
The next step is to set the WiFi network
parameters. Assuming default Nexus DSC
Pro’s settings were not changed:
- set Mount Type to Alt-Az GoTo
- IP Address should be set to 10.0.0.1
- Port Number should be set to 4060
- Readout Rate can be set to 10 per
second
Now the telescope control panel can be
activated by touching the Scope icon. Then
touch Connect.
If the telescope is still aimed at NGC55 then
SkySafari will show the telescope cursor on the
screen and NGC55 will be in the centre of the
screen:
Locating objects with SkySafari
Please go to the top menu on Nexus DSC Pro
and then select Find and then From
Planetarium:
To locate an object selected in SkySafari you
need to touch GoTo on the telescope control
panel – Nexus DSC Pro will now show where to
move the telescope to locate the object:
Please refer to Nexus DSC Pro User Manual for additional details on using your Nexus
DSC Pro

Printed in Australia
Other manuals for Nexus DSC Pro
1
Table of contents
Other ASTRO DEVICES Accessories manuals
Popular Accessories manuals by other brands

Thermo Scientific
Thermo Scientific iEMS Incubator user manual

Fresh 'N Rebel
Fresh 'N Rebel 2PB2000 manual

Tri-Tronics
Tri-Tronics Ultrasonic Clear Label Sensor manual

Swisher
Swisher PowerBlade PBY-5530 Assembly instructions

killerspin
killerspin Revolution SVR Wing Series Assembly instructions

Safeology
Safeology T Series operating instructions