eb brands Glow Copter XC9893 User manual

Glow Copter
Remote Control Helicopter
User Guide
XC9893 © 2012 EB Brands
XC9893IS01JCPRA
5 x 7 Ori
g
inal: 6/9/12
;
Revision & RA 7/10/12
SAVE THESE INSTRUCTIONS.
READ COMPLETE INSTRUCTIONS BEFORE USE.
XC9893IS01JCPRA.indd 1XC9893IS01JCPRA.indd 1 7/12/12 9:18 AM7/12/12 9:18 AM

Congratulations on your new EXRC purchase! EXRC pilots experience superior
remote control ight and excellence in the look and feel of our products
while commanding the skies. Now that you are a honorary EXRC pilot, we
recommend reading through this manual thoroughly before attempting
your rst ight. Inside this manual you will nd ight tips, safety precautions,
and care instructions to keep your EXRC helicopter in tip-top shape for
multiple ight missions. Please follow the instructions, enjoy your EXRC
helicopter to the fullest and command the skies.
HELICOPTER LAYOUT
CONTROLLER LAYOUT
Stabilizer Main Rotor Blade
Charging
Outlet ON/OFF
Switch
Connecting
Shaft
Secondary
Rotor Blade
2
LED
Light
Battery
Compartment
Battery
Compartment Cover
Screw
Band
Selector
Throttle
Joystick
Green
Charging
Indicator
On/O
Switch
Cover
and
Charging
Wire
Trim
Control
Knob
Direction
Joystick
Red Power Indicator
BOTTOM OF HELICOPTER
OFF ON
Charging
Outlet
C
B
A
XC9893IS01JCPRA.indd 2XC9893IS01JCPRA.indd 2 7/12/12 9:18 AM7/12/12 9:18 AM

ACTIVATING GLOW IN THE DARK FEATURE
Energize the Glow Copter’s glow in the dark body by using a bright light
source (e.g. next to the window on a sunny day or under a table lamp) for
10 minutes. Please be sure that the helicopter is turned off. Caution: Do not
leave the Glow Copter unattended under direct sunlight for a prolonged
period of time.
BATTERY INSTALLATION & CHARGING
Installing Batteries in the Remote Controller
1. Using a Phillips-head screwdriver, remove the screw from the battery
compartment cover.
2. Insert 6 AA batteries, making sure to follow the battery polarity
(+ and -) drawing on product.
3. Replace the battery compartment cover and secure with the screw.
4. Turn on the remote. If the batteries are properly installed, the Red LED light
will blink. If the Red
LED does not come on
when you turn the
remote on, remove
the batteries and
reinstall. Some brands of batteries have small size variations that can
impact the connection.
Charging the Helicopter
1. Make sure the controller is turned ON.
2. Pull the cover o the front center of the
controller, and take out the charging wire.
3. Make sure the helicopter power is OFF.
Insert the charging plug into the
charging outlet on the helicopter.
4. The Green LED on the remote will turn on
while charging and turn o when charging is
complete. When fully charged, remove plug
from the helicopter. REQUIRES
APPROXIMATELY 40-45 MINUTES CHARGE
FOR A 4 MINUTE FLIGHT.
OFF ON
Charging
Outlet
3
ON/OFF
Switch
BOTTOM OF HELICOPTER
XC9893IS01JCPRA.indd 3XC9893IS01JCPRA.indd 3 7/12/12 9:18 AM7/12/12 9:18 AM

4
FLYING YOUR HELICOPTER
GETTING STARTED
Band Selection
1. Select the frequency band on the controller. (A, B or C)
2. Move the chopper’s switch to the ON position.
The helicopter will light up, indicating it is on.
3. Carefully hold the chopper in one hand, be sure the blades are clear of any
obstacles. Move the throttle (left joy stick) on the remote control
completely down, then completely up, and then down again to “set” the
band. If done properly, the Red light on the remote will stop blinking and
the chopper will automatically sync. If Red light does not stop blinking, turn
the remote and chopper o, turn the remote back on and repeat the above
steps.
4. Place the chopper on the ground with the tail pointed toward you and the
nose facing away from you.
5. Make sure your surroundings are clear of obstacles before operating.
6. If you are ying multiple choppers in the same room set each one to a
dierent band (A, B, or C)
LEFT Joystick – Slowly press UP on the LEFT joystick to increase the speed of
the rotor blades and cause the helicopter to ascend into the air.
Slowly press DOWN on the LEFT joystick to cause the helicopter to descend.
RIGHT Joystick - Keep the helicopter at a steady height. Press the RIGHT
joystick to the LEFT to turn the helicopter counterclockwise. Press
the RIGHT joystick to the RIGHT to turn the helicopter clockwise. Adjust the
trim to avoid spins.
Moving Forward – Your helicopter has a built-in weight on the front of it that
causes it to move forward automatically. Forward motion is not controlled by
the remote control.
Interference
Some radio frequencies or other R/C units nearby can cause interference and
poor performance. Try to move away from the source of the interference.
Band
Selector C
B
A
XC9893IS01JCPRA.indd 4XC9893IS01JCPRA.indd 4 7/12/12 9:18 AM7/12/12 9:18 AM

5
TRIMMING HELICOPTER/DIRECTION CONTROL
Virtually no trimming is required for the Glow Copter. However, if the helicopter
rotates during ight, use the Rudder Trim Knob on the top right side to adjust.
1. When the helicopter is spinning clockwise, turn the Rudder Trim Knob
counterclockwise to adjust. (See Diagram A)
2. When the helicopter is spinning counterclockwise, turn the Rudder Trim
Knob clockwise to adjust. (See Diagram B)
3. For best control, adjust the trim with your right index nger while
controlling the turning with your right thumb and controlling the height
with your left thumb.
FLIGHT CONDITIONS
Always remember safety rst! All good pilots have to ensure ight conditions
are optimal before launch.
• This chopper was built for indoor terrain only with minimal wind conditions.
Heavy air-conditioning can be too strong for this chopper resulting in a
“Mayday” situation.
• It is also highly recommended to turn o all electric fans, air conditioning
units, or reading lamps that could impair ying.
• We recommend that the area/space for ight be at least 10 ft. x 15 ft. x 10 ft.
CONTROL TIPS
• It is best to start with both joysticks on the remote control in the middle
position. Do not immediately push into extreme positions. Instead start by
gently easing the joystick into the direction you would like to go.
• For your rst ight, EXRC recommends focusing on learning to control the
throttle joystick rst. Try to keep the helicopter at a constant 3-foot altitude
before attempting to learn directional control. After you have mastered the
throttle joystick, then start to practice turning with the directional joystick.
A
B
XC9893IS01JCPRA.indd 5XC9893IS01JCPRA.indd 5 7/12/12 9:18 AM7/12/12 9:18 AM

6
SAFETY TIPS
• Read through the entire instruction manual, before attempting to pilot your
helicopter.
• This product is intended for indoor use, and works best indoors. We do
not recommend using the product outdoors.
• Never attempt to y your helicopter in a cluttered space. This helicopter
was intended for obstacle free wide area spaces.
• Make sure all people and animals are 3-5 feet from the helicopter before
you start ying it.
• Always keep focus on your helicopter, and do not attempt to y/land/or
crash anywhere on or near any other people or animals.
• The rotating parts on the helicopter could lead to injury. Never put any
body part including the hands and face, close to the rotating parts. Only
operate this product standing, as it allows for quick movement away from
the helicopter if necessary.
• Never operate the helicopter using parts that are altered in shape or
damaged in any form.
• Make sure you use new or fully charged batteries in the controller.
• Do not try to crash or drop the helicopter, as it may cause damage.
TROUBLESHOOTING
For best results, do not use batteries with power strip indicators (such as
Duracell Ultra Power batteries and Duracell Ultra Advanced with a
Powercheck). Should you wish to continue to use these batteries, please be
sure that all power strips are facing forward when placed in the battery
compartment. In some cases, it may also help to remove, reinsert and push
the batteries forward ensuring proper contacts are being made. If batteries
have been installed correctly, the Red LED light on the remote control will
begin to blink once you turn the remote ON/OFF switch to the ON position.
Problem Cause Correction
Helicopter is not
responding to remote
Remote is not turning on
Reset band selection
on the remote.
Batteries are not making
contact with battery leads
in the remote.
Select a frequency Band. Press throttle all the way
up and all the way down to set.
Remove and reinstall the batteries being certain
they are installed in the right direction and
making proper contact with the battery leads.
XC9893IS01JCPRA.indd 6XC9893IS01JCPRA.indd 6 7/12/12 9:18 AM7/12/12 9:18 AM

TROUBLESHOOTING (continued)
Problem Cause Correction
CARE & HANDLING
• Do not submerge in water or other liquids.
• Do not disassemble the product for any reason.
• Do not expose to extreme temperatures.
• Do not drop, throw, smash or otherwise cause physical shock.
• Clean using only a slightly damp cloth.
• Do not use cleaners with chemical agents.
• Do not short-circuit the battery terminals.
CAUTION – Battery Safety Information
•Non-rechargeable batteries are not to be recharged
• Rechargeable batteries must be removed before recharging
• Rechargeable batteries should only be recharged under adult supervision
• Do not mix alkaline, standard (carbon-zinc), or rechargeable batteries
• Exhausted batteries are to be removed
• Do not mix old and new batteries
• Do not dispose of product in re; batteries may explode or leak
• If this product will not be used for an extended period, remove batteries from the
product
• The supply terminals are not to be short-circuited
• Batteries are to be inserted with correct polarity
• Clean the battery contacts and also those of the product prior to battery installation
• As always, dispose of batteries in an eco-friendly manner
• The pre-installed battery is non-replaceable
7
Loss of Control Interference of another
remote controlled device
Interference by other
conditions such as
lighting.
Avoid all other remote controlled devices running
on the same channel.
Change environment to better suited conditions.
Helicopter Spinning out
of control
Helicopter suddenly stops
and drops midight or
seems to have weak
performance
Propellers are not moving
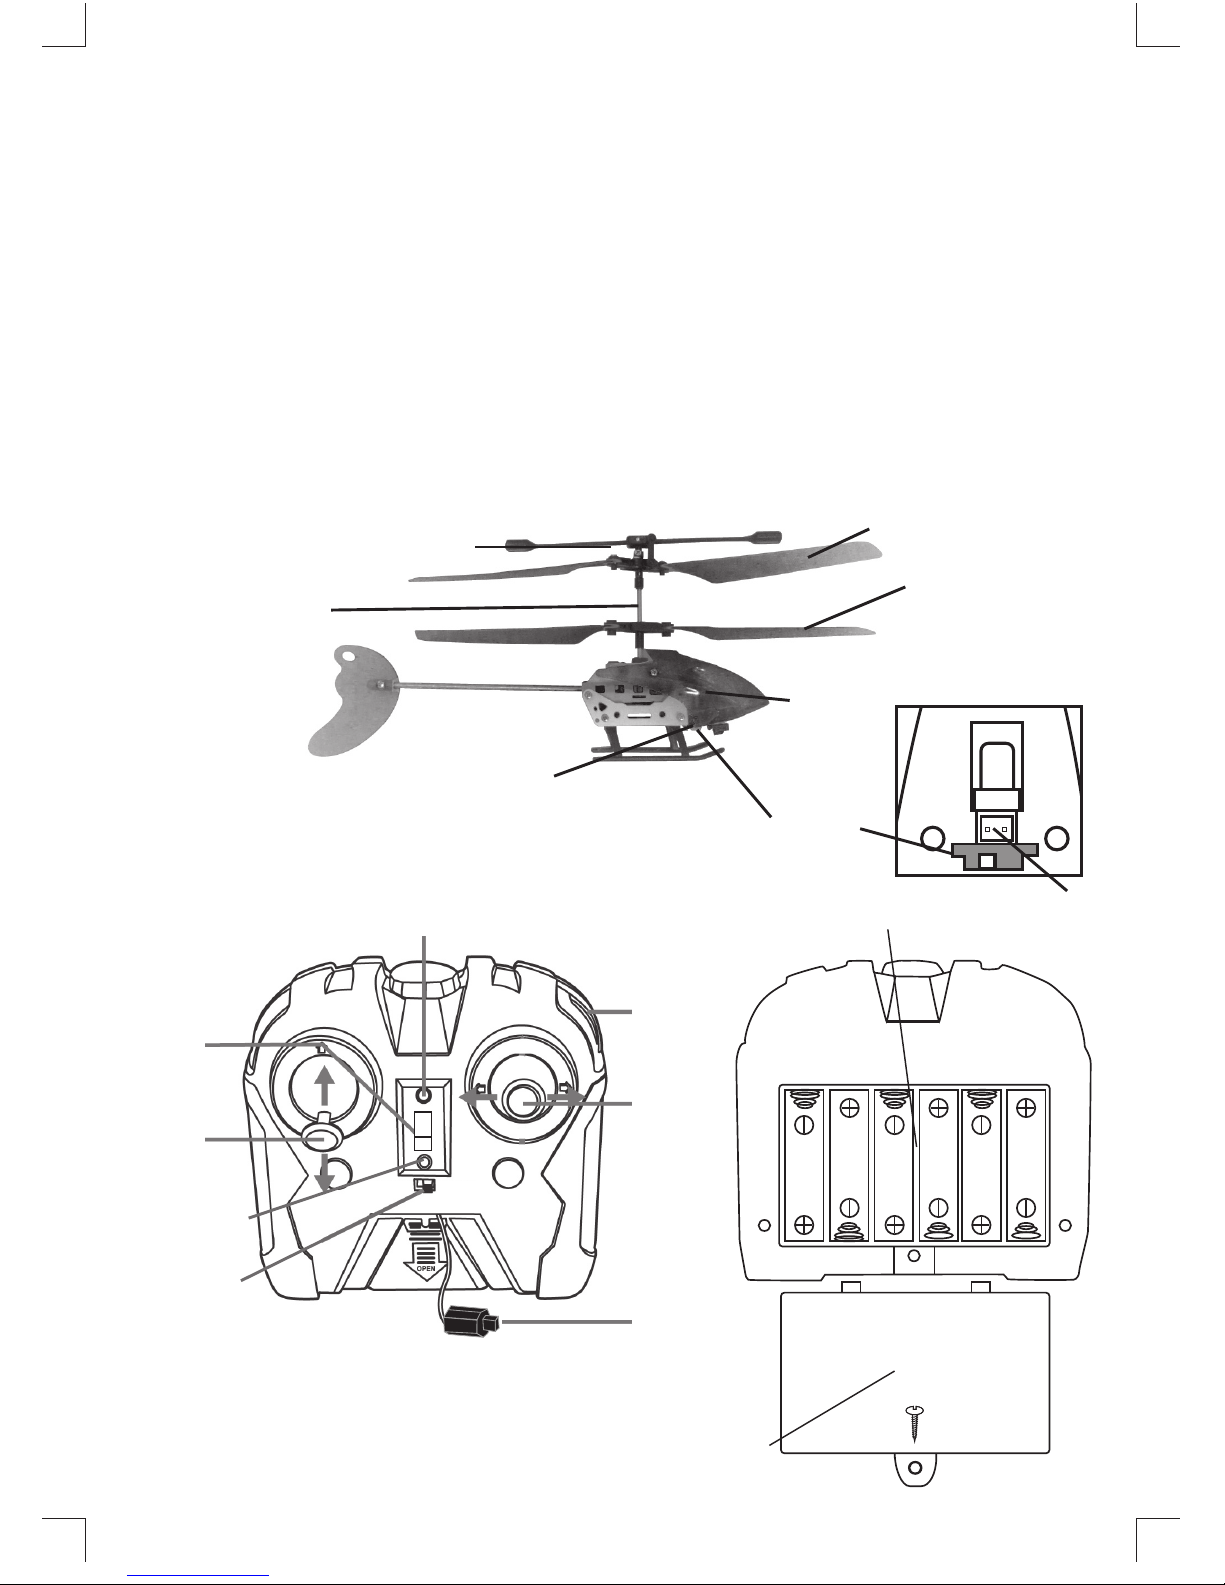
Incorrect trim
adjustment.
Weak battery power.
Helicopter is powered o.
Weak battery power.
Adjust the trim as shown above to nd the proper
adjustment.
Recharge the helicopter battery. If this does not
work, replace the batteries in the remote and
recharge o fresh batteries.
Set the ON/OFF Switch to the ON position.
Recharge the helicopter battery. If this does not
work, replace the batteries in the remote and
recharge o fresh batteries.
XC9893IS01JCPRA.indd 7XC9893IS01JCPRA.indd 7 7/12/12 9:18 AM7/12/12 9:18 AM

FCC Part 15 Compliance
Changes or modications not expressly approved by the party responsible for
compliance could void the user’s authority to operate
the product.
NOTE: This product has been tested and found to comply with the limits for a Class B
digital device, pursuant to Part 15 of the FCC Rules. These limits are designed to
provide reasonable protection against harmful interference in a residential
installation. This product generates uses and can radiate radio frequency energy and,
if not installed and used in accordance with the instructions, may cause harmful
interference to radio communications. However, there is no guarantee that
interference will not occur in a particular installation. If the product does cause
harmful interference to radio or television reception, which can be determined by
turning the equipment o and on, the user is encouraged to try to correct the
interference by one or more of the following measures:
- Reorient or relocate the receiving antenna.
- Increase the separation between the product and receiver.
- Connect the product into an outlet on a circuit dierent from that to which the
receiver is connected.
- Consult the dealer or an experienced radio/TV technician for help.
Product replacement policy only covers normal wear and tear when the product is used as
directed. Normal wear and tear does not include damage caused by crashes, collisions, or
any use other than as directed.
Distributed by EB Brands, Hazleton, PA 18202
www.goexrc.com
service@EBExcalibur.com
Distributed in the United Kingdom by:
EB Brands UK, Worcester WR4 9FA
© 2012 EB Brands
Actual product may differ slightly from photograph.
XC9893IS01JCPRA
XC9893IS01JCPRA.indd 8XC9893IS01JCPRA.indd 8 7/12/12 9:18 AM7/12/12 9:18 AM
Table of contents
Other eb brands Toy manuals
Popular Toy manuals by other brands

Model Engineering Company
Model Engineering Company PLine Moti PFWLJ owner's manual

Cabrinha
Cabrinha Switchblade 2 user manual

Small Foot
Small Foot 4776 Assembly instructions

Mega Bloks
Mega Bloks Nickelodeon Teenage Mutant Ninja Turtles Out of the Shadows Raph Street... manual

Model Airways
Model Airways SOPWITH CAMEL F.1 instruction manual

Hasbro
Hasbro Disney Princess E5054 quick start guide