ECG EWF 601000 BlackLine User manual

EWF 601000 BlackLine
EWS 601001 BlackLine
EWF 601002 BlackLine
EWF 701000 BlackLine
EWF 801200 BlackLine
Always read the safety&use instructions carefully before using your appliance for the rst time. The user´smanual must be always included. Bitte lesen Sie vor der Inbetriebnahme des Produktes diese Anleitung
und die darin enthaltenen Sicherheitshinweise aufmerksam durch. Die Bedienungsanleitung muss dem Gerät immer beigelegt sein. Před uvedením výrobku do provozu si důkladně pročtěte tento návod
abezpečnostní pokyny, které jsou vtomto návodu obsaženy. Návod musí být vždy přiložen kpřístroji. Uvijek pročitajte sigurnosne upute iupute za uporabu prije prvog korištenja vašeg uređaja. Upute moraju uvijek
biti priložene. Atermék használatba vétele előtt gyelmesen olvassa el ezt ahasználati útmutatót és az útmutatóban található biztonsági rendelkezéseket. Ahasználati útmutatót tartsa akészülék közelében. Przed
pierwszym użyciem urządzenia prosimy ouważne zapoznanie się zinstrukcjami dotyczącymi bezpieczeństwa iużytkowania. Instrukcja obsługi musi być zawsze dołączona. Pred uvedením výrobku do prevádzky si
dôkladne prečítajte tento návod abezpečnostné pokyny, ktoré sú vtomto návode obsiahnuté. Návod musí byť vždy priložený kprístroju.
Pred vklopom izdelka temeljito preberite ta navodila in varnostne napotke,
ki so navedeni vteh navodilih. Navodila morajo biti vedno priložena knapravi.
English
Deutsch
Čeština
Hrvatski
Bosanski
Magyar
Polski
Slovenčina
Slovenščina
WASHING MACHINE
INSTRUCTION MANUAL
MOSÓGÉP
HASZNÁLATI ÚTMUTATÓ
WASCHMASCHINE
BEDIENUNGSANLEITUNG
PRALKA
INSTRUKCJA OBSŁUGI
PRAČKA
NÁVOD KOBSLUZE
PRÁČKA
NÁVOD NA OBSLUHU
PERILICA RUBLJA
UPUTE ZA UPORABU
PRALNI STROJ
NAVODILA


English
English
3
WASHING MACHINE
SAFETY INSTRUCTIONS
Read carefully and save for future use!
Warning: The safety precautions and instructions in this manual do
not cover all possible conditions and situations that may occur. The
user must understand that common sense, caution and care are factors
that cannot be incorporated into any of the products. These factors
must therefore be provided by the user(s) using and operating this
appliance. We are not liable for damages caused during shipping, by
incorrect use, voltage uctuation or the modication or adjustment of
any part of the appliance.
Follow the instructions in this manual. Before using for the rst time,
read the entire written instructions carefully and keep them for future
reference.
To protect against a risk of re or electric shock, basic precautions shall
be taken while using electrical appliances, including the following:
1. Make sure that the voltage in your outlet corresponds to the voltage
indicated on the type plate of your appliance. To ensure your
safety, insert the plug of the power cord into a properly grounded
three-prong socket installed in accordance with the applicable
Czech Technical Standard in accordance with the manufacturer's
instructions and local safety regulations.
2. Do not operate the device if the cord is damaged. Entrust the
connection of the appliance to the power supply and the water
connection, any repairs or adjustments, including the replacement
of the power cable, to an authorized service center! Do not remove
the protective covers from the appliance; there is a risk of electric
shock!
3. Defective parts may only be replaced with original spare parts. Only
these parts are guaranteed by the manufacturer to fully meet safety
requirements.
4. There must always be access to a power socket so that the washing
machine can be disconnected from the mains at any time.

English
English
4
5. Improperly performed repairs can expose the user to signicant
hazards for which the manufacturer is not liable.
6. Repairs may only be carried out by a qualied person and a
designated service provider.
7. In the event of a fault or during cleaning and maintenance, the
washing machine is only electrically disconnected from the mains
when:
- the mains plug of the washing machine is pulled out of the socket,
or
- the circuit breaker of the house electrical installation is switched
o, or
- the screw-in fuse for the house electrical system is completely
unscrewed.
8. Do not plug and unplug the power cord from the outlet using wet
hands. You will avoid risk of electric shock.
9. Do not touch the appliance with wet hands or feet.
10.The power cord must remain accessible once the device is installed.
Do not shorten the cable or use a power strip or extension cord.The
power supply must not touch hot parts or lead over sharp edges
(risk of re due to overheating).
11.Do not turn the device on or o by plugging or unplugging the
power cord. Do not remove the power cord from the outlet by
yankingthecord.Unplugthepowercordfromtheoutletbygrasping
the plug. After use, always switch o with the rotary selector to the
OFF position, disconnect the appliance from the power supply and
close the water supply.
12.Do not place the machine on carpets or similar surface that could
block the ventilation openings in the base.
13.Do not insert any objects into the device or place any objects on
the device (e.g. vases, cups, etc.).
14.Do not place the drain hose of your machine in the sink, buckets or
basins.
15.Do not allow children to play with the appliance. Protect access to
the machine from children and animals. Children under the age

English
English
5
of 3 should be denied access unless they are under constant
supervision.
16.Keep away from children the small parts supplied in the bag with
documentation.
17.Do not expose the appliance to direct sunlight, do not use it outside,
and do not expose it to rain.
18.Do not keep ammable liquids close to the appliance.
19.Do not wash items that have been cleaned, washed, soaked or
stained with ammable or explosive substances (wax, oil, paint,
petrol, degreasers, chemical solvents, kerosene, etc.) in the washing
machine.Theuseofhighlyammableandexplosiveortoxicsolvents
is prohibited. Do not use gasoline, alcohol, etc. as detergent. There
might be a re or explosion. Carpet washing is prohibited.
20.Do not touch the washing machine with wet hands when in
operation. Never open the detergent drawer or the washing
machine door during washing and spinning.
21.Be careful when opening the door after using the steam function.
There is a risk of burns from the steam and high temperatures on
the surface of the drum and on the glass door. Take a step back and
wait for the steam to dissipate.
22.During discharge, do not touch the drain hose and the discharged
water. Water may reach high temperatures during the operation of
the washing machine. There is a risk of burns.
23.In case of malfunction rst unplug it from power and then close the
water tap. Do not try to repair the appliance by yourself, contact an
authorized service center.
24.Before using it for the rst time, do not forget to REMOVE THE
LOCKING SCREWS which are securing the washing machine drum
during transportation. Damage cause by starting the washing
machine with installed locking screws is not covered by the
warranty.
25.The appliance is intended exclusively for domestic use and for
washing only textile materials. In the event of commercial use or
use not in accordance with this manual, the warranty becomes void.

English
English
6
26.This washing machine is intended for indoor use only.
27.Do not install the appliance in wet or damp rooms, as well as in
rooms where appear explosive or corrosive gases.
28.This appliance is intended for use by children 8 years of age and
older and persons with reduced physical or mental abilities or lack of
experience and knowledge, provided they are under supervision or
given instructions concerning use of the appliance in a safe manner
and understand the potential hazards. Cleaning and maintenance
by the user must not be done by children unless they are older than
8 years old and under supervision. Children under the age of 8 must
keep away from the appliance and the power supply.
29.Any intervention in the appliance by a person other than an
authorized service provider results in loss of warranty.
30.The warranty does not cover damage caused by outside eects
(ood, chemicals, re, etc.).
31.The manufacturer is not liable for any damage caused by improper
grounding/use. DANGEROUS VOLTAGE, RISK OF INJURY!
RECOMMENDATION
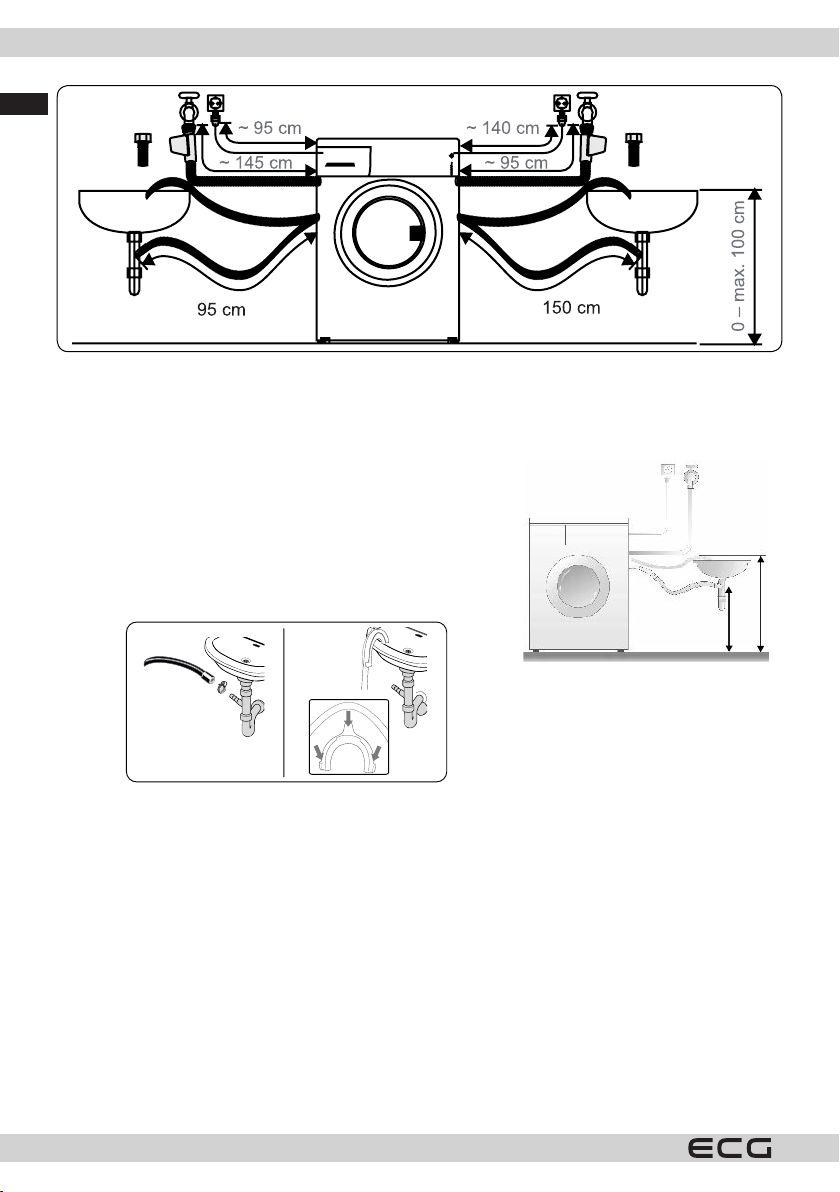
• Before using your new washing machine, ask for help with the installation and putting in operation a
qualied plumber or an authorized service center.
• Install the washing machine in a well ventilated area with adequate air circulation. Place the appliance so
that it can fully open the washing machine door. The washing machine is not intended as a built-in or for
integration into furniture sets.
• The ideal ambient temperature for the washing machine operation is 15°C to 25°C.
• Frozen hoses can rot and break. In areas where the temperature drops below freezing, the temperature
may jeopardize the safe operation of electronic circuits.
• We recommend that the rst washing cycle be undergone without laundry for„90° white cotton“ so that
you pour in the second compartment of the detergent drawer ½ measuring cup of detergent.
• Since long term contact with air can lead to deposition of detergent or fabric softener, pour the detergent
and fabric softener into the compartment until just before the intended wash.
• We recommend using the prewash program only for heavily soiled laundry.
• The amount of laundry loaded into the washing machine must not exceed the maximum permitted
amount. Otherwise, the washing machine will run in the safe mode.
• Use the washing machine only for laundry that is labelled by the manufacturer as suitable for machine
washing.
• When using fabric softener and similar products in your machine, follow the manufacturer's
recommendations for detergent/fabric softener.
• Make sure that there are no foreign objects in the pockets of the laundry pieces put in the washing
machine (nails, needles, coins, lighters, matches, clips, etc). These foreign objects could damage the
washing machine.
• Washing very dusty clothing damages your washing machine. Shake heavily dusty clothing before placing
it in the washing machine.

English
English
7
• Never open the detergent drawer while the machine is running.
• Never force open the door of the washing machine while it is running.
• Before opening the door, make sure that no water remains in the drum. Do not open the washing machine
door if you see water.
• At the end of the program, wait at least 2 minutes and then open the door.
• Sulphur in decolourants may cause corrosion. Therefore never use decolourants in the washing machine.
Never use substances containing solvents (e.g. benzine) in the washing machine.
• If you are not using the washing machine for longer time, unplug it, close the water supply and leave the
door open. The interior of your machine will stay dry and free of odours.
• After testing at the end of the manufacturing process in the machine might remain a small amount of
water, which does not constitute a risk of damage to your machine.
Danger of ooding
• Use a new set of hoses included with the appliance.
• Do not reuse the old hoses set.
• Always disconnect the appliance from the power supply and turn o the water supply after use.
• Do not place the drain hose of your machine in the sink, buckets or basins.
Danger of fall or injury
• Do not step or sit on the washing machine. The top plate could break and you could injure yourself.
• Do not lean on the door. Do not force it closed. If it is dicult to close the door, make sure that there are
not too many clothes in the washing machine or that they are well distributed.
• Arrange safely the hoses and power cable after installation. Trip and fall could cause injuries.
• Do not turn the washing machine upside down or on its side.
• Do not lift the washing machine by its protruding parts (detergent drawer, door). They could be damaged
and cause injury.
• Handling the washing machine requires cooperation of at least two people.
Children’s safety
• Children under the age of 3 should be denied access unless they are under constant supervision. Do not
leave children without supervision close to the washing machine. Children could lock themselves inside
the washing machine with fatal consequences.
• During the operation the glass door and the washing machine surfaces can be very hot. Protect small
children and animals from contact with these surfaces.
• Keep the packaging materials away from the children. There is a risk of suocation
• Swallowing detergents may cause poisoning and contact with skin or eyes may cause irritation. Keep
detergents away from the children.

English
English
8
DESCRIPTION
123
4
5
6
7
8
9
10
1. Display
2. Program selector
3. Top cover
4. Detergent drawer
5. Drum
6. Pump lter cover
7. Filling valve
8. Power cord
9. Drain hose
10. Shipping screws
INSTALLATION
Shipping screws removal
1. Before starting the washing machine, remove the
4 shipping screws and rubber washers from the
back of the washing machine. If the screws are not
removed, they can cause strong vibrations, noise
and malfunction of the washing machine and will
void the warranty.
2. Loosen the shipping screws by turning them
counterclockwise with a suitable wrench.
3. Remove the shipping screws by pulling them
straight out.
4. Insert the plastic plugs provided in the accessories
bag into the holes left after removing the screws.
Shipping screws should be stored for future use.
XX44
X4
1
3
2
4

English
English
9
Note: Remove shipping screws before rst use of the washing machine. Malfunctions caused by
operating the washing machine with the installed shipping screws are not covered by the
warranty.
Adjusting the leveling feet / adjusting the adjustable stops
1. Do not install the washing machine on a surface
(e.g. carpet) that would prevent ventilation from
below.
• To ensure quiet, vibration-free operation, install it
on a solid surface.
• You can level the washing machine with the
adjustable feet.
• Loosen the plastic lock nut.
2. If you want to increase the height of the washing
machine, turn the feet clockwise. If you want to
lower the height of the washing machine, turn the feet counterclockwise.
• Once the washing machine is levelled o, tighten the lock nuts by turning them clockwise.
3. Never put underneath the washing machine cardboard, wood or any other similar materials.
• When sweeping and washing the oor on which the washing machine is placed, take care not to disturb
the horizontal position of the washing machine.
Electrical wiring
• The washing machine requires power supply of 220-240 V, 50 Hz.
• The power cable of your washing machine is equipped with a grounded plug. This plug should always be
inserted into a 10 A grounded outlet.
• If you do not have a suitable outlet and a grounded fuse, consult a qualied electrician.
• We are not liable for damages resulting from connecting the appliance to an ungrounded outlet.
Note: Operating the washing machine at low voltage shortens the service life and reduces its eciency.
Water supply hose
1. Depending on the specications of the washing machine, your washing machine may be connected to a
cold water supply or to a cold and hot water supply. A hose with a white cap should be connected to the
cold water supply and a hose with a red cap to the hot water supply (if available).
• To prevent water leakage into the joints, 1 or 2 nuts are supplied in the hose package (depending on the
model of your washing machine). Attach these nuts to the end of the supply hose that connects to the
water supply.
2. Connect the new supply hoses to the ¾ ˝ threaded water tap.
• Connect the white end of the supply hose to the white supply valve on the back of the washing machine
and the red end of the hose to the red supply valve (if used).
• Tighten the joints manually. If in doubt, contact a qualied plumber.
• Water ow with a pressure of 0.1 - 1 MPa will allow your washing machine to work with optimal eciency
(pressure 0.1 MPa means that more than 8 liters of water per minute ow through a fully open tap).
3. Once all connections have been made, turn on the water supply and check for leaks carefully.
4. Make sure that new water supply hoses are not pinched, kinked, twisted, bent or crushed.
• If your washing machine is connected to a hot water supply, the hot water supply temperature should not
be higher than 70 ° C.
1

English
English
10
˜˜
Note: The washing machine must be connected to the water supply only using the new supplied supply hose.
Old hoses must not be reused.
Connecting water drain hose*
• Connect the drain hose to the stand or to the outlet elbow at the
sink using additional equipment.
• Never try to extend the drain hose.
• Do not put the hose for draining water from the washing machine
into a container, bucket or bathtub.
• Make sure that the drain hose is not bent, kinked, squashed or
extended.
• The drain hose must not be more than 100 cm from the ground.
* The hook for attaching to the sink is only included with selected models.
Min. 60 cm
Max. 100 cm

English
English
11
DETERGENT DRAWER
1. Liquid detergent compartment*
a) With additional container for liquid detergent*
b) With partition for part number II (without additional tray)*
2. Detergent dispenser
3. Fabric softener dispenser
4. Detergent dispenser for prewash
5. and 6.: Detergent measuring cup with scale*
Option A) with additional liquid detergent
dispenser*
Option B) with partition to part number II (without
additional dispenser)*
1
2
3
4
5
6
1
2
3
4
* The accessories for the detergent dispenser vary depending on the appliance model.

English
English
12
Sections
Detergent dispenser:
This section is for liquid or powder detergents or limescale removers.
Dispenser for fabric softener/starch:
This section is for emollients, fabric softeners or starch. Follow the instructions on the package. If fabric
softeners leave marks on the laundry after use, try diluting them or using a liquid fabric softener.
Detergent dispenser for prewash:
You should only use this dispenser if you have selected the prewash function. We recommend using the
prewash function only for very dirty laundry.
Program selector
• To select the desired program, turn the program selector clockwise
or counterclockwise until the mark on the program selector points to
the selected program.
• Make sure the program selector points exactly to the program you
want to select.
Display
1. Button to set water temperature
2. Speed setting button
3. Additional function button*
4. Start/Pause button
5. Display
The display will show the delayed start timer (if set), the set
temperature and spin speed during wringing and any other
selected functions.
When the selected program is completed, END appears on
the display. Display also shows whether the washing machine
has malfunctioned.
4
5123

English
English
13
USING THE WASHING MACHINE
Laundry preparation
1. Follow the instructions of the labels on the garment.
• Divide the laundry according to type (cotton, synthetics,
delicate, wool, etc.), washing temperature (cold, 30 °, 40
°, 60 °, 90 °) and degree of soiling (slightly soiled, soiled,
heavily soiled).
2. Never wash coloured and white laundry together.
• Dark fabrics may contain excess dye and should be
washed separately several times.
3. Make sure there are no metal objects on the laundry or in
the pockets; if so, remove them.
ATTENTION: The warranty does not cover malfunctions that
occur due to damage by foreign material.
4. Close zippers, all hooks and eyelets.
5. Remove the metal or plastic hooks of the curtains or put
them in a washing net or bag.
6. Turn fabrics such as pants, knits, T-shirts and sweatshirts
inside out.
7. Wash socks, handkerchiefs and other small items in a
protective net.
Clothing care symbols
Normal wash Maximum washing temperature is
90°C
Maximum washing temperature is
60°C
Maximum washing temperature is
30°C
Manual washing Washing prohibition
Can be bleached No bleach Maximum ironing temperature 110°C
Maximum ironing temperature 150°C Maximum ironing temperature 200°C Do not iron
Can be dry cleaned Dry cleaning prohibition Unfold at
1
3
5
7
2
4
6

English
English
14
Hang when wet Hang to dry Do not tumble dry
Can be cleaned with gasoline, alcohol,
and triuorotrichloroethane
Can be cleaned with benzene,
perchlorethylene
Can be cleaned with perchlorethylene,
R11, R113 and gasoline
Putting laundry in the washing machine
• Open the washing machine door.
• Spread the laundry evenly in the washing machine.
NOTE: Be careful not to exceed the maximum load of the drum, as this would lead to poor washing results and
wrinkling of the laundry. Information on the capacity of the washing machine can be found in the table
of washing programs.
The following table shows the approximate weight of common types of laundry:
TYPE OF LAUNDRY WEIGHT (g)
Towel 200
Bed linen 500
Bathrobe 1,200
Blanket 700
Pillow case 200
Underwear 100
Tablecloth 250
• Load each piece of laundry separately.
• Make sure that no objects are caught between the rubber seal and the door.
• Gently push on the door until it clicks.
• Make sure that the door is completely closed, otherwise the program will not start.
Adding detergent to the washing machine
The amount of detergent used in the washing machine depends on the following criteria:
• If the laundry is only slightly soiled, do not prewash it. Put a small amount of detergent (according to the
manufacturer's instructions) in compartment II of the detergent drawer.
• If the laundry is soiled too much, select the prewash program and place ¼ of the detergent to be used in
section I of the detergent drawer and the rest in section II.
• Use detergents designed for automatic washing machines in the washing machine. Follow the
manufacturer's instructions regarding the amount of detergent to be used.
• More detergent is needed in areas with hard water.
• The amount of detergent required increases with larger loads of laundry.
• Put softener into the middle section of the detergent drawer. Do not exceed the MAX mark.
• Thick softeners may cause blockage of the drawer and should be diluted.
• Liquid detergents can be used in all programs without prewash. In this case, use the additional liquid
detergent dispenser* or insert the divider* into the slots in section number II. Use the lines on the gauge
as a guide to ll the drawer to the desired level.
* The accessories for the detergent dispenser vary depending on the appliance model.

English
English
15
Washing machine operation
1. Connect the washing machine to the power supply.
2. Turn on the water supply.
• Open the washing machine door.
• Spread the laundry evenly in the washing machine.
• Gently push on the door until it clicks.
ATTENTION: BEFORE STARTING THE WASHING MACHINE FOR THE FIRST TIME (OR AFTER CLEANING THE PUMP
FILTER), POUR APPROX. 1 L OF CLEAN WATER INTO THE DRUM SO THAT THE PUMP IS SUBMERGED. IF THERE IS
NOT ENOUGH WATER IN THE DRUM, THE ERROR MESSAGE E02 WILL APPEAR ON THE DISPLAY.
Program selection
Use the program table to select the most suitable program for your laundry.
Half load detection system
Your washing machine has a half load detection function.
If you put less than half the maximum amount of laundry in the washing machine, it will automatically set
the half load function regardless of the selected program. This means that it takes less time to complete the
selected program and uses less water and energy.
Additional functions
You can select an additional function before starting the program.
• On the control panel, press the button below the additional function symbol.
• If the additional function symbol is on, it means that the function has been activated.
• If the additional function symbol ashes, it means that a function has not been selected.
Cause why the function was not activated:
• The additional function is not compatible with the selected program.
• The washing machine has gone too far in the program to be able to select an additional function.
• The additional function you selected is not compatible with another additional function you
selected previously.
Temperature selection (button 1)
Use the water temperature setting button to change
the automatically programmed water temperature.
After selecting a program, the maximum temperature
for that program is automatically set. To change the
temperature, keep pressing the water temperature
setting button until the desired temperature appears
on the display.
You can gradually reduce the water temperature
between the maximum water temperature of the
selected program and the cold wash (-) simply by
pressing the temperature setting button.
If you have skipped the water temperature you want to set, keep pressing the water temperature button until
the desired temperature is displayed again.

English
English
16
Selection of spin speed (button 2)
After selecting a program, the maximum spin speed is
automatically set.
To change the spin speed from maximum speed to no
spin (-), keep pressing the spin speed button until the
desired speed is displayed.
If you have skipped the desired spin speed, keep
pressing the spin speed setting button repeatedly until
the desired speed is displayed again.
Button 3 functions*
The additional functions of button 3 may vary
depending on the appliance model.
Delayed start timer*
• Press the Delay start button once.
• The display shows„1 h“.
• The delay start symbol lights up on the display.
• Press the Delay start button repeatedly until the
desired time appears on the display.
• If you have skipped the delayed start time you want to set, keep pressing the Delay start button until the
desired time is displayed again.
• You must press the Start / Pause button for the delayed start function to work.
• Press the "Start / Pause" button to activate the delayed start function.
• To cancel the delayed start function after you have set it, press the Delay Start button once. The delayed
start symbol on the display goes o.
• To add / remove laundry when the delayed start function is active, you must press the Start / Pause button.
After adding / removing laundry, you must press the Start / Pause button again to activate the delayed
start function.
Steam assistant*
Thanks to the application of steam, you can wash your clothes with less wrinkling after washing. The steam
penetrates and loosens clothes, eliminating wrinkles and leaving our clothes soft and gentle.
Anti-allergy function*
With this function, you can set additional soaking of the laundry. The washing machine performs all the hot
water soaking steps.
This setting is recommended for underwear worn on delicate skin, children's clothing and underwear.
Select this function by pressing the Anti-allergy function button when the symbol is displayed.
Easy Ironing*
When you use this function, the clothes will be less wrinkled at the end of the selected washing programme.
Select this function by pressing the Easy Iron button when the symbol is displayed.
Pre-wash*
This additional function allows you to pre-wash heavily soiled laundry before the main wash programme.When
using this function, you must pour the washing detergent into the front compartment in the front drawer.
Select this function by pressing the Prewash button when the symbol is displayed.
Extra Rinse*
With this additional function, you can set an additional rinse at the end of the selected programme.
Select this function by pressing the Extra Rinse button when the symbol is displayed.
Quick Wash*
By using this function, you can wash the laundry in less time and use less energy and water.

English
English
17
We recommend using this option only if you are washing less than half of the maximum dry load for the
selected programme Select this function by pressing the Quick Wash button when the symbol is displayed.
Note: If you put less than half the maximum amount of laundry in the washing machine, the washing machine
will automatically set the half load function, regardless of the selected program.This means that it takes
less time to complete the selected program and uses less water and energy. If your washing machine
detects half a load, the symbol will automatically appear on the display.
No Spin*
If you don't want to spin the clothes, you can use this additional function. When the symbol lights up, you
can activate the programme by pressing the No Spin button.
Cold Wash*
You can use this auxiliary function when you want to wash clothes in cold water (tap water). When the
symbol lights up, you can activate the programme by pressing the Cold Wash button on the display panel.
Start/Pause button (button 4)
To start the selected program, press the Start / Pause button.
When you switch the washing machine to standby mode, the Start / Pause light ashes on the display.
Child lock (buttons 2 and 3 simultaneously)
The Child Lock function allows you to lock the buttons
so that the selected wash cycle cannot be accidentally
changed.
To activate the child lock, press and hold buttons 4
and 5 simultaneously for at least 3 seconds. When the
child lock is activated, "CL" lights up on the display for
2 seconds.
If you press any button or change the selected
programme using the programme selector when the
child lock is active, the "CL" symbol will light up on the
display for 2 seconds.
If the washing machine is already washing, the child lock is active and you try to change the program by
turning the program selector to the CANCEL position and then to the required program, the washing machine
will continue to operate without change.
To deactivate the child lock, press and hold buttons 4 and 5 simultaneously for at least 3 seconds until the "CL"
symbol disappears from the display.
Cancelling program
The selected program can be canceled at any time:
1. Set the program selector to the "STOP" position.
2. The washing machine stops the wash cycle and the program is cancelled.
3. Drain the water from the washing machine by turning the PROGRAM selector to any other program.
4. Your washing machine will drain the water and cancel the program.
You can now select and start a new program.

English
English
18
End of programme
Your washing machine will stop by itself when the selected
program ends.
• END lights up on the display.
• You can open the washing machine door and remove
the laundry.
• Leave the washing machine door open to allow the
interior of the washing machine to dry.
• Turn the program selector to the OFF position.
• Unplug the washing machine from the power supply.
• Close the water supply.

English
English
19
PROGRAMS TABLE
EWS 601001
BLACKLINE
EWF 601000/
601002 BlackLine
Programme Washing
temperature °C
Detergent
drawer
Time/
min
Max.
load
Time/
min
Max.
load
Cotton *60-90-80-70-40 2 200 6 200 6 Heavily soiled, cotton and linen linen (Underwear, bed linen,
tablecloths, towels).
Eco 40-60 *40-60 2 180 6 193 6 Normally soiled cotton and linen textiles (underwear, bed linen,
tablecloths, towels).
Cotton with pre-wash *60-50-40-30 -“- -°C 1 and 2 156 6 164 6 Normally soiled cotton and linen textiles (underwear, bed linen,
tablecloths, towels).
Cotton 20 *20 -“- -°C 2 96 3 96 3 Less soiled cotton and linen textiles (Underwear, bed linen,
tablecloths, towels, bed linen, etc.).
Colour *40-30 -“- -°C 2 195 6 195 6 Less soiled cotton and linen textiles (underwear, bed linen,
tablecloths, towels, bed linen, etc.).
Wool *30 -“- -°C 2 39 2 39 2 For delicate (especially wool) fabrics marked with a "machine
washable" label.
Rinse *-“- -°C - 30 6 30 6 Additional soaking of any type of laundry after washing.
Antiallergic *60-50-40-30 -“- -°C 2 197 3 197 3 Children's underwear and clothing for allergy suerers.
Centrifuging/
discharging *“- -°C - 15 6 15 6 Additional wringing of any type of laundry after washing.
Manual washing *30 -“- -°C 2 90 2 90 2 Laundry for which hand washing or delicate laundry is
recommended.
Sports *40-30 -“- -°C 2 110 3 110 3 Very dirty or synthetic textiles (Nylon stockings, T-shirts, blouses,
synthetic blends, etc.).
Mix *40-30 -“- -°C 2 105 3 105 3 Solied cotton, synthetic, coloured and linen textiles can be washed
together.
Jeans/dark clothing *30 -“- -°C 2 96 3 96 3 Black and dark underwear made of cotton, blended bres or denim.
Wash inside out. Jeans often contain an excess of dye and can bleed
colour in the rst few washes.
Quick 60´ (**) *60-50-40-30 -“- -°C 2 60 3 60 3 Soiled, cotton, coloured and linen fabrics washed at 60 °C for 60
minutes.
15
Quick 15´ (***) *30 -“- -°C 2 15 2 15 2 Lightly soiled cotton, coloured and linen textiles can be washed
briey for 15 minutes.

English
English
20
PROGRAMS TABLE
EWF 701000
BLACKLINE
EWF 801200
BLACKLINE
Programme Washing
temperature °C
Detergent
drawer
Time/
min
Max.
load
Time/
min
Max.
load
Cotton *60-90-80-70-40 2 230 7 235 8 Heavily soiled, cotton and linen linen (Underwear, bed linen,
tablecloths, towels).
Eco 40-60 *40-60 2 208 7 218 8 Normally soiled cotton and linen textiles (underwear, bed linen,
tablecloths, towels).
Cotton with pre-wash *60-50-40-30 -“- -°C 1 and 2 164 7 164 8 Normally soiled cotton and linen textiles (underwear, bed linen,
tablecloths, towels).
Cotton 20 *20 -“- -°C 2 96 3.5 96 4 Less soiled cotton and linen textiles (Underwear, bed linen,
tablecloths, towels, bed linen, etc.).
Colour *40-30 -“- -°C 2 225 7 230 8 Less soiled cotton and linen textiles (underwear, bed linen,
tablecloths, towels, bed linen, etc.).
Wool *30 -“- -°C 2 39 2.5 43 2.5 For delicate (especially wool) fabrics marked with a "machine
washable" label.
Rinse *-“- -°C - 30 7 30 8 Additional soaking of any type of laundry after washing.
Antiallergic *60-50-40-30 -“- -°C 2 197 3.5 197 4 Children's underwear and clothing for allergy suerers.
Centrifuging/
discharging *“- -°C - 15 7 17 8 Additional wringing of any type of laundry after washing.
Manual washing *30 -“- -°C 2 90 2.5 90 2.5 Laundry for which hand washing or delicate laundry is
recommended.
Sports *40-30 -“- -°C 2 110 3.5 110 3.5 Very dirty or synthetic textiles (Nylon stockings, T-shirts, blouses,
synthetic blends, etc.).
Mix *40-30 -“- -°C 2 105 3.5 105 3.5 Solied cotton, synthetic, coloured and linen textiles can be washed
together.
Jeans/dark clothing *30 -“- -°C 2 96 3.5 96 3.5 Black and dark underwear made of cotton, blended bres or denim.
Wash inside out. Jeans often contain an excess of dye and can bleed
colour in the rst few washes.
Quick 60´ (**) *60-50-40-30 -“- -°C 2 60 3 60 4 Soiled, cotton, coloured and linen fabrics washed at 60 °C for 60
minutes.
15
Quick 15´ (***) *30 -“- -°C 2 15 2 15 2 Lightly soiled cotton, coloured and linen textiles can be washed
briey for 15 minutes.
This manual suits for next models
4
Table of contents
Languages:
Other ECG Washer manuals

ECG
ECG EWFS 1063 DE User manual

ECG
ECG EWF 1062 DA+++ User manual

ECG
ECG BlackLine EWF 801201 Steam User manual

ECG
ECG EWT 70120 User manual

ECG
ECG EWF 1062 DA++ User manual

ECG
ECG EWF 1053 MD User manual

ECG
ECG EWS 1063 DQD User manual

ECG
ECG EWS 1063 DQA+++ User manual

ECG
ECG EWF 1280 IDA+++ User manual

ECG
ECG EWS 60103 User manual
Popular Washer manuals by other brands

montpellier
montpellier MW6101W Installation and operating instructions

Zanussi
Zanussi ZWM 160 Instruction booklet

Bosch
Bosch WAV28M60TH User manual and installation instructions

Beko
Beko WTV 8744 X0A user manual

General Technomatic
General Technomatic ONX-969 user manual

Bosch
Bosch WAN28160BY User manual and assembly instructions