ECG EWFS 1063 DE User manual

EWFS 1063 DE
English
Deutsch
Čeština
Slovenčina
Always read the safety & use instructions carefully before using your appliance for the rst time. The user’smanual must be always included. Bitte lesen Sie vor der Inbetriebnahme des Produktes diese Anleitung und
die darin enthaltenen Sicherheitshinweise aufmerksam durch. Die Bedienungsanleitung muss dem Gerät immer beigelegt sein. Před uvedením výrobku do provozu si důkladně pročtěte tento návod abezpečnostní
pokyny, které jsou vtomto návodu obsaženy. Návod musí být vždy přiložen kpřístroji. Pred uvedením výrobku do prevádzky si dôkladne prečítajte tento návod abezpečnostné pokyny, ktoré sú vtomto návode
obsiahnuté. Návod musí byť vždy priložený kprístroju
.
WASHING MACHINE
INSTRUCTION MANUAL
WASCHMASCHINE
BEDIENUNGSANLEITUNG
PRAČKA
NÁVOD KOBSLUZE
PRÁČKA
NÁVOD NA OBSLUHU


English
English
3
WASHING MACHINE
SAFETY INSTRUCTIONS
Read carefully and save for future use!
Warning: The safety measures and instructions, contained in this
manual, do not include all conditions and situations possible. The user
must understand that common sense, caution and care are factors that
cannot be integrated into any product. These factors must therefore
be provided by the user(s) using and operating this appliance. We
are not liable for damages caused during shipping, by incorrect use,
voltage uctuation or the modication or adjustment of any part of
the appliance.
Follow the instructions in this manual. Before using for the rst time,
read the entire written instructions carefully and keep them for future
reference.
To protect against the risk of re or electric shock, basic precautions
mustbetakenwhileusingelectrical appliances,includingthefollowing:
1. Make sure that the voltage in your outlet corresponds to the voltage
indicated on the type plate of your appliance. To ensure your
safety, insert the plug of the power cord into a properly grounded
three-prong socket installed in accordance with the applicable
Czech Technical Standard in accordance with the manufacturer's
instructions and local safety regulations.
2. Do not operate the device if the cord is damaged. Entrust the
power and water connection, any repairs or adjustments, including
the replacement of the power cord, to an authorized (in the case of
the Czech Republic) / professional (in other cases) service! Do not
remove the protective covers from the appliance; there is a risk of
electric shock!
3. Do not plug and unplug the power cord from the outlet using wet
hands. You will avoid risk of electric shock.
4. Do not touch the appliance with wet hands or feet.
5. The power cord must remain accessible once the device is installed.
Do not shorten the cable or use a power strip or extension cord.

English
English
4
Do not allow the cord to touch hot surfaces or place the cord over
sharp edges.
6. Do not turn the device on or o by plugging or unplugging the
power cord. Do not remove the power cord from the outlet by
yanking the cord. Unplug the power cord from the outlet by
grasping the plug. After use, always turn the rotary selector to the
o position, disconnect the appliance from the power supply and
turn o the water supply.
7. Do not place the machine on carpets or similar surface that could
block the ventilation openings in the base.
8. Do not insert any objects into the device or place any objects on
the device (e.g. vases, cups, etc.).
9. Do not place the drain hose of your machine in the sink, buckets or
basins.
10.Do not allow children to play with the appliance. Protect access to
the machine from children and animals. Children under the age
of 3 should be denied access unless they are under constant
supervision.
11.Keep away from children the small parts supplied in the bag with
documentation.
12.Do not expose the appliance to direct sunlight, do not use it outside,
and do not expose it to rain.
13.Do not keep ammable liquids close to the appliance.
14.Do not wash items that have been cleaned, washed, soaked or
stained with ammable or explosive substances (wax, oil, paint,
petrol, degreasers, chemical solvents, kerosene, etc.) in the washing
machine.Theuseofhighlyammableandexplosiveortoxicsolvents
is prohibited. Do not use gasoline, alcohol, etc. as detergent. There
might be a re or explosion. Carpet washing is prohibited.
15.Do not touch the washing machine with wet hands when in
operation. Never open the detergent drawer or the washing
machine door during washing and spinning.

English
English
5
16.During discharge, do not touch the drain hose and the discharged
water. Water may reach high temperatures during the operation of
the washing machine.
17.In case of malfunction rst unplug it from power and then close the
water tap. Do not try to repair the appliance by yourself, contact an
authorized service center.
18.Before using it for the rst time, do not forget to REMOVE THE
LOCKING SCREWS which are securing the washing machine drum
during transportation. Damage cause by starting the washing
machine with installed locking screws is not covered by the
warranty.
19.The appliance is intended exclusively for domestic use and for
washing only textile materials. In the event of commercial use or
use not in accordance with this manual, the warranty becomes void.
20.This washing machine is intended for indoor use only.
21.Do not install the appliance in wet or damp rooms, as well as in
rooms where appear explosive or corrosive gases.
22.This appliance is intended for use by children 8 years of age and
older and persons with reduced physical or mental abilities or lack of
experience and knowledge, provided they are under supervision or
given instructions concerning use of the appliance in a safe manner
and understand the potential hazards. Cleaning and maintenance
by the user must not be done by children unless they are older than
8 years old and under supervision. Children under the age of 8 must
keep away from the appliance and the power supply.
23.Any intervention in the appliance by a person other than an
authorized service provider results in loss of warranty.
24.The warranty does not cover damage caused by outside eects
(ood, chemicals, re, etc.).
25.The manufacturer is not liable for any damage caused by improper
grounding/use. DANGEROUS VOLTAGE, RISK OF INJURY!
RECOMMENDATION
• Before using your new washing machine, ask for help with the installation and putting in operation a
qualied plumber or an authorized service center.

English
English
6
• Install the washing machine in a well ventilated area with adequate air circulation. Place the appliance so
that it can fully open the washing machine door.
• The washing machine is not intended as a built-in or for integration into furniture sets.
• The ideal ambient temperature for the washing machine operation is 15°C to 25°C.
• Frozen hoses can rot and break. In areas where the temperature drops below freezing, the temperature
may jeopardize the safe operation of electronic circuits.
• We recommend that the rst washing cycle be undergone without laundry for„90° white cotton“ so that
you pour in the second compartment of the detergent drawer ½ measuring cup of detergent.
• Since long term contact with air can lead to deposition of detergent or fabric softener, pour the detergent
and fabric softener into the compartment until just before the intended wash.
• We recommend to use the prewash program only for a heavily soiled laundry.
• The amount of laundry loaded into the washing machine must not exceed the maximum permitted
amount. Otherwise, the washing machine will run in the safe mode.
• Use the washing machine only for laundry that is labelled by the manufacturer as suitable for machine
washing.
• When using fabric softener and similar products in your machine, follow the manufacturer's
recommendations for detergent/fabric softener.
• Make sure that there are no foreign objects in the pockets of the laundry pieces put in the washing
machine (nails, needles, coins, lighters, matches, clips, etc). These foreign objects could damage the
washing machine.
• Washing very dusty clothing damages your washing machine. Shake heavily dusty clothing before placing
it in the washing machine.
• Never open the detergent drawer while the machine is running.
• Never force open the door of the washing machine while it is running.
• Before opening the door, make sure that no water remains in the drum. Do not open the washing machine
door if you see water.
• At the end of the program, wait at least 2 minutes and then open the door.
• Sulphur in decolourants may cause corrosion. Therefore never use decolourants in the washing machine.
Never use substances containing solvents (e.g. benzine) in the washing machine.
• If you are not using the washing machine for longer time, unplug it, close the water supply and leave the
door open. The interior of your machine will stay dry and free of odours.
• After testing at the end of the manufacturing process in the machine might remain a small amount of
water, which does not constitute a risk of damage to your machine.
Danger of ooding
• Use a new set of hoses included with the appliance.
• Do not reuse the old hoses set.
• Always disconnect the appliance from the power supply and turn o the water supply after use.
• Do not place the drain hose of your washing machine in a sink or bucket or washbasin.
Danger of fall or injury
• Do not step or sit on the washing machine. The top plate could break and you could injure yourself.
• Do not lean on the door. Do not force it closed. If it is dicult to close the door, make sure that there are
not too many clothes in the washing machine or that they are well distributed.
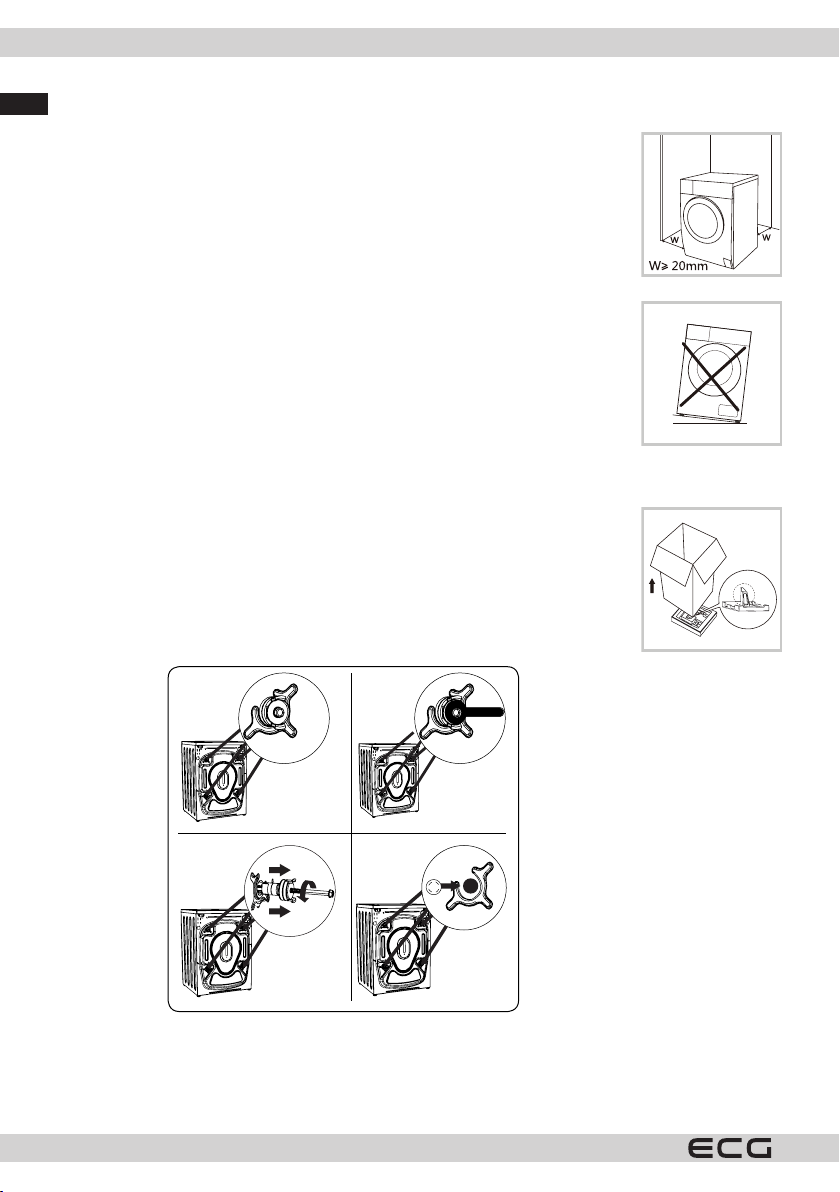
• Arrange safely the hoses and power cable after installation. Trip and fall could cause injuries.
• Do not turn the washing machine upside down or on its side.
• Do not lift the washing machine by its protruding parts (detergent drawer, door). They could be damaged
and cause injury.
• Handling the washing machine requires cooperation of at least two people.

English
English
7
Children’s safety
• Children under the age of 3 should be denied access unless they are under constant supervision. Do not
leave children without supervision close to the washing machine. Children could lock themselves inside
the washing machine with fatal consequences.
• During the operation the glass door and the washing machine surfaces can be very hot. Protect small
children and animals from contact with these surfaces.
• Keep the packaging materials away from the children. There is a risk of suocation
• Swallowing detergents may cause poisoning and contact with skin or eyes may cause irritation. Keep
detergents away from the children.
DESCRIPTION
Top cover
Control panel
Supply feed
Drum
Service lter
Water supply hose
Detergent dispenser
Door
Drain hose
The picture is only informative The actual functions and features depend on the specic model.
Included in package
Shipping hole
plug
Cold water supply
hose

English
English
8
INSTALLATION
Place of installation
Before installing the appliance, you must choose a location according to the following
requirements:
1. Firm, dry and even surface.
2. Protected from direct sunlight.
3. Suciently ventilated.
4. Ambient temperature higher than 0 °C.
5. Far from heat sources such as stoves and boilers.
Unpacking the washing machine
1. Remove the cardboard packaging and foam inserts.
2. Lift the machine and remove the base of the packaging. Make sure the small foam
triangle has been removed with the packaging. If not, place the appliance on its
side and remove a piece of foam from the bottom by hand.
3. Remove the tape securing the power cord and hoses.
4. Remove the water supply hose from the drum.
Shipping screws removal
1. Before starting the washing machine, remove the 4 shipping bolts and rubber pads
from the back of the washing machine. If the screws will not be removed they could
cause strong vibrations, noise and incorrect functioning of the washing machine
and void the warranty.
2. Loosen the shipping screws by turning them counterclockwise with a suitable
wrench.
3. Remove the shipping screws by pulling them straight out.
4. Insert the plastic plugs provided in the accessory bag into the holes left after
removing the shipping screws. Shipping screws should be stored for future use.
XX44
X4
1
3
2
4
Note: Remove shipping screws before rst use of the washing machine. Malfunctions caused by operating the
washing machine with the shipping bolts tted are not covered by the warranty.

English
English
9
Levelling the washing machine
1. Make sure that the feet t tightly against the cabinet. If not, turn them to their original position and tighten
the nuts.
2. Loosen the lock nut and turn the foot until it touches the oor.
3. Adjust the feet and secure them with a wrench; make sure the machine is stable.
Lift Lower
Nut
Leg
• The lock nuts on all four legs must be tightened to the bottom.
Connecting the water supply hose
• Follow the instructions in this chapter to protect against water leakage!
• Do not bend, crush, modify or disassemble the supply hose.
Note: The washing machine must be connected to the water supply only using the new supplied supply hose.
Old hoses must not be reused.
The ideal water supply pressure is between 0.05 MPa and 1 MPa.
Connect the supply hose as indicated; There are two ways to connect the supply hose.
1. Connection between ordinary tap and supply hose.
clamping nut
Loosen the clamping
nut and the four bolts
Tighten the
clamping nut
Squeeze the sliding
sleeve, insert the
supply hose into the
connection base
Connection completed
sliding sleeve
2. Connection between screw tap and supply hose.
Threaded tap and supply hose Special tap for washing machine
sliding sleeve
Connect the other end of the supply hose to the inlet valve on the back of the appliance and tighten the hose
clockwise.

English
English
10
water supply valve water supply hose
Once all connections have been made, turn on the water supply and check for leaks carefully. If in doubt,
contact a qualied plumber.
Drain hose
• Do not bend or pull the drain hose
• Position the drain hose correctly, otherwise water may leak.
The end of the drain hose can be placed in two ways:
1. Put it in the bathtub 2. Connect it to the drain valve.
Before placing the drain hose in the bathtub, make sure that the water drains quickly.
• Take necessary measures to prevent slippage of the hose.
• Recoil of an incorrectly placed hose could cause its slippage. Make sure that the plug cannot close the
drain hole of the bathtub.
• If the hose is too long, do not push it back into the washing machine. This will cause excessive noise.
Electrical wiring
• The washing machine requires power supply of 220-240 V, 50 Hz.
• The power cable of your washing machine is equipped with a grounded plug. This plug should always be
inserted into a 10 A grounded outlet.
• If you do not have a suitable outlet and a grounded fuse, consult a qualied electrician.
• We are not liable for damage resulting from connecting the appliance to an ungrounded outlet.
Note: Operating the washing machine at low voltage shortens the service life and reduces the eciency.
QUICK START
• Before using the appliance for the rst time, make sure that it is installed correctly.
• Before the rst wash, it is necessary to run one cycle without laundry.

English
English
11
Before starting washing
Connect it Open the tap Load laundry Close the door Add detergents
Main
wash
Prewash
Fabric softening
• The detergent should be added to "drawer I" for prewash.
Washing
Turn on Select a program Select a special function
or use default
Start
• If you select default functions, skip step 3.
• The table of function keys is for guidance only. The actual functions and features depend on the specic
model.
When washing ends
Beeping sounds and the display shows ”End“.
BEFORE EACH WASHING
• The ambient temperature around the washing machine
should be in the range (15-25) ° C.When used below 0 ° C,
the supply valve and drain system may be damaged. If the
product gets into frost below 0 ° C, it must be transferred
to a heated place before use and after thawing it must be
ascertained whether the supply and discharge pipes are
damaged or frozen.
• When washing one piece of clothing, the drum can easily
become unbalanced and cause an error message due to
a large imbalance. Therefore, it is recommended to wash
several pieces of clothing at the same time to facilitate
wringing.
• Do not wash clothes stained with kerosene, gasoline,
alcohol or other ammable substances.
Laundry preparation
1. Follow the instructions of the labels on the garment.
1
3
5
7
2
4
6

English
English
12
• Divide the laundry according to type (cotton, synthetics, delicate, wool, etc.), washing temperature (cold,
30 °, 40 °, 60 °, 90 °) and degree of soiling (slightly soiled, soiled, heavily soiled).
2. Never wash colored and white laundry together.
• Dark fabrics may contain excess dye and should be washed separately several times.
3. Make sure there are no metal objects on the laundry or in the pockets; if so, remove them.
ATTENTION: The warranty does not cover malfunctions caused by damage by foreign objects.
4. Fasten zippers, all hooks and eyelets.
5. Remove the metal or plastic hooks of the curtains or put them in a washing net or bag.
6. Turn fabrics such as pants, knits, T-shirts and sweatshirts inside out.
7. Wash socks, handkerchiefs and other small items in a protective net.
Clothing care symbols
Normal wash Maximum washing temperature is
90°C
Maximum washing temperature is
60°C
Maximum washing temperature is
30°C
Manual washing Washing prohibition
Can be bleached No bleach Maximum ironing temperature 110°C
Maximum ironing temperature 150°C Maximum ironing temperature 200°C Do not iron
Can be dry cleaned Dry cleaning prohibition Unfold at
Hang when wet Hang to dry Do not tumble dry
Can be cleaned with gasoline, alcohol,
and triuorotrichloroethane
Can be cleaned with benzene,
perchlorethylene
Can be cleaned with perchlorethylene,
R11, R113 and gasoline
Putting laundry in the washing machine
• Open the washing machine door.
• Spread the laundry evenly in the washing machine.

English
English
13
NOTE: Be careful not to exceed the maximum load of the drum, as this would lead to poor washing results and
wrinkling of the laundry. Information on the capacity of the washing machine can be found in the table
of washing programs.
The following table shows the approximate weight of common types of laundry:
TYPE OF LAUNDRY WEIGHT (g)
Towel 200
Bed linen 500
Bathrobe 1200
Blanket 700
Pillow case 200
Underwear 100
Tablecloth 250
• Load each piece of laundry separately.
• Check that no objects are caught between the rubber seal and the door.
• Gently push on the door until it clicks.
• Make sure that the door is completely closed, otherwise the program will not start.
DETERGENT DISPENSER
Prewash detergent
Washing detergent
Fabric softener
• The detergent should be added to "drawer I" after selecting the
prewash.

English
English
14
Programme
Cotton
Synthetics
Mix
Jeans
Spin Only
Rinse & Spin
ECO 40-60
20 °C
Programme
Bulky/Bed
linen
Baby Care
Wool
Sports Wear
Rapid 45’
(Rapid 45 min.)
Quick 15’
(Quick 15 min.)
Intensive
Obligatory Means optional
• In the case of an agglomerated or viscous detergent or additive, it is recommended to use a little dilution
water before pouring it into the detergent drawer to prevent blocking and overow of the dispenser inlet
when lling with water.
• By choosing the right type of detergent according to the washing temperature, you will achieve the best
washing performance with lower water and energy consumption.
CONTROL PANEL AND DISPLAY
1 234
5
1. Program selector
• To select the desired program, turn the program
selector clockwise or counterclockwise until
the mark on the program selector points to the
selected program.
• Make sure the program selector points exactly to
the program you want to select.
• Turn o the appliance by turning the selector to
position.
2. Start/Pause button

English
English
15
Press the button to start or pause the washing
cycle.
3. Function buttons
Here you can select additional functions that light
up after selection.
4. Programmes
See the program table below.
5. Display
This display shows the settings, the estimated
remaining time and the appliance status
messages see the description below. The display
is lit during the cycle
6. Drum cleaning
Function for cleaning the washing machine drum
and drain hose.
Display description
A B
D E
C
A. Display
B. Child lock symbol
C. Prewash symbol
D. Door lock symbol
E. Extra rinse
Function buttons
Delayed start
Setting the program delay:
1. Select a program;
2. Press the Delay button to select the time (the delay time can be in the range 0–24 h);
3. Press [Start/Pause] to start the delay countdown
Program selection Time settings Start
Cancel program delay:
Press the [Delay] button to set the delay to 0H. You must do it before the program starts. If the program has
already started, you can only turn it o and choose another one.
• If the power supply is interrupted during washing, the selected program is stored in memory and the
washing continues when the power supply is restored.
Special function button
Use this button to set the Extra Rinse or Prewash functions.
The selected function is indicated by the corresponding icon lighting up on the display.
Extra rinse
After the selection, another rinsing will take place.

English
English
16
Prewash
The prewash function adds another wash cycle before the main wash; suitable for heavily soiled laundry.When
selecting a prewash, place the detergent in the drawer (I).
Temperature selection
Press to select the washing temperature (Cold, 20 °C, 30 °C, 40 °C, 60 °C, 90 °C)
Selection of spinning speed/ switching o the sound signal
Press the button to select the spin speed.
1000: 0-400-600-800-1000
Programme Default speed (rpm) Programme Default speed (rpm)
1000 1000
Cotton 800 Bedding 1000
Synthetics 800 Children’s 1000
Mix 1000 Wool 600
Jeans 1000 Sports 800
Only spinning 800 Quick 45 min. 800
Rinse and spin 1000 Quick 15 min. 800
ECO 40-60 - Intensive 800
20 °C 1000
Note: You cannot change temperature and spinning speed in the ECO 40-60°C program.
Turning o the sound signal
• Press the button Speed for 3 s, sound signal is muted.
• To turn on the sound signal again, press the button again for 3 seconds. The setting is saved until the next
reset.
Warning: When you use the Mute function, the sound signal will not be reactivated.
Child lock
Prevents operation of the appliance by children.
Press together the temperature selection button and the special function button. A beep sounds.
• If the child lock is activated and the program starts, the child lock indicator lights up and the display
alternates between CL and the remaining time after 0.5 s. After pressing the other buttons, the child lock
indicator will ash for 3 s. At the end of the program, CL and END alternate for 10 s by 0.5 s, then the child
lock indicators ash for 3 s.
• To cancel the child lock, press and hold the two buttons, as well as power, turn o and end the program.
• The Child Lock locks all buttons except the On /O and Child Lock buttons.
• Cancel the Child lock before you select a program and start washing.
Self-cleaning
After 25 wash cycles, the Drum Cleaning indicator lights up to indicate that the washing machine drum needs
to be cleaned.
Self-cleaning function
High water levels, high temperature and high spin speed allow this function to disinfect the inside of the
washing machine and kill germs. Make sure that the drum of the washing machine is empty before cleaning.

English
English
17
Open the detergent drawer and pour bleach into the main wash compartment. Do not add a detergent or soap
to avoid excessive foaming. Close the detergent drawer Make sure that the washing machine is connected to
the power supply and the water inlet is open.
1. Press the Self-clean button.
2. Press the Start/Pause button. When the door is locked the self-cleaning program starts. A beep sounds
when program is nished. Once the program ends, dry the interior of the washing machine.
Resetting counter
1. Press and hold the Self-clean button for at least 3 seconds. The counter resets.
2. The counter also resets after starting the Self-cleaning function.
WASHING PROGRAMS
Programme
Cotton Durable fabrics, heat-resistant fabrics made of cotton or linen.
Intensive The washing time is extended to enhance the washing eect.
Synthetics For synthetic fabrics, e.g. shirts, coats, blends.
When washing knitted fabrics, the amount of detergent should be reduced; the ber is
looser and bubbles easily form.
Mix Program for cotton and synthetics blend.
Jeans Program designed for jeans.
ECO 40-60 A program specially designed for washing blankets.
The initial temperature of 40 °C and the speed cannot be changed; suitable for washing
clothes at a temperature of about 40-60 ° C.
20 °C The default temperature is 20 °C, cold water is used.
Spin Additional spinning with optional speed.
Rinse and spin Additional rinsing and spinning.
Bedding A program specically designed for washing bulky bed linen.
Children’s Gentle washing program for gentle but consistent care of children's clothing
Wool For woolen fabrics or rich wool fabrics intended for hand washing and also for washing
machines. Particularly gentle washing program, which prevents shrinkage, longer
program pauses (the fabric rests in the washing liquid).
Sports Washing sports laundry and clothes.
Quick 45 min. This program is suitable for washing not too soiled laundry; it saves more energy and
washing.
Quick 15 min. Extra short program, suitable for lightly soiled laundry or a small amount of laundry.

English
English
18
Programme Load (kg) Temperature (°C) Default time
Cotton 6.0 40 2:40
Intensive 6.0 40 3:48
Synthetics 3.0 40 2:20
Mix 6.0 40 1:20
Jeans 6.0 60 1:45
ECO 40-60 6.0 - 3:16
20°C 3.0 20 1:01
Spin 6.0 - 0:12
Rinse and spin 6.0 - 0:20
Bedding 3.0 40 1:48
Children’s 6.0 60 1:43
Wool 2.0 40 1:07
Sports 3.0 20 0:45
Quick 45 min. 2.0 40 0:45
Quick 15 min. 2.0 Cold 0:15
• Directive (EU) č.1061/2010:
Energy eciency according to EU standards is: A+
Test program: Intensive 60/40 °C; rpm: highest
Others in default setting
Half load according to the size of the appliance
3 kg.
• Directive (EU) 2019/2023:
Energy eciency according to EU standards is: E
Test program: ECO 40-60. Others in default setting
Half load according to the appliance size 3 kg
Quarter load according to the size of the appliance 2 kg.
This table is for user information only. Actual parameters may dier from those shown.
CLEANING AND MAINTENANCE
• Before performing maintenance, disconnect the power supply and close the tap.
• Do not use alcohol, solvents or chemicals to clean the washing machine.
Cleaning the box
Proper maintenance of the appliance will extend its life. If necessary, the surface can
be cleaned with diluted non-abrasive neutral detergents. If water overows, wipe it
o immediately with a damp cloth. No sharp objects are allowed.
• The use of formic acid and its diluted solutions or equivalent substances, such as
alcohol, solvents or chemical products, etc., is prohibited.
Drum cleaning
Rust left inside the drum by metal objects must be removed immediately with
chlorine-free detergents.
Under no circumstances use a wire brush for cleaning.

English
English
19
Cleaning door seal and glass
After each wash, wipe the glass and seal to remove lint and stains. Accumulation of lint and dirt can cause a
leak.
After each wash, remove coins, buttons and other objects from the seal.
Cleaning the inlet lter
• If there is not enough water in the washing machine, clean the inlet lter.
Cleaning the lter at the tap
1. Close the tap
2. Disconnect the supply hose from the tap.
3. Clean the lter.
4. Reconnect the supply hose.
Cleaning the ler in the washing machine
1. Unscrew the inlet pipe from the back of the washing
machine.
2. Pull out the lter with longer pliers, clean and reinstall.
3. Clean the lter using a soft brush.
4. Reconnect the hose.
Cleaning the detergent dispensers
1. Press the area indicated by the arrow on the softener
drawer cover inside the dispenser.
2. Remove the dispenser, pull the cover upwards and
wash all the corners with water.
3. Replace the fabric softener cover and slide the dispenser back to its original position.
Pull out the dispenser while
pressing A
Rinse the dispenser with water Clean the corners with an old
toothbrush
Replace the dispenser
Cleaning the drain pump lter
• Be careful when working with hot water!
• Allow the detergent solution to cool.
• To prevent electric shock, unplug the power cord before cleaning.
• The drain hose lter catches larger residues and small items from the wash.
• Cleaning the lter regularly will ensure normal operation of the washing machine.

English
English
20
Open the bottom cover Rotate the emergency drain
hose by 90° and pull it out, then
remove its cover
After the water has
drained, insert the
drain hose
Open the lter by
turning it to the right
Collect the sticking
material
Close the bottom cover
Warning:
• Make sure that the valve cap and emergency drain hose are properly installed, the cap plates should be
inserted aligned with the holes, otherwise water may leak out.
• Some appliances do not have an emergency drain hose, so step 2 and step 3 can be skipped. Rotate the
bottom cover directly to allow water to ow into the tank.
• When the appliance is in use and depending on the selected program, there may be hot water in the
pump. Never remove the pump cover during a wash cycle, always wait until the appliance has completed
the cycle and it is empty. When replacing the cover, make sure that it is securely tightened again.
TROUBLESHOOTING
Description Cause Solution
The washing machine
does not turn on
The door is not closed Try again after closing the door. Check that
the laundry is not stuck there.
The door does not
open
The protective circuits of the washing
machine are working
Disconnect the power supply, restart the
washing machine
Water leakage Inlet valve connection
and the supply hose or drain hose is
not tight
Check and tighten the supply hose. Clean
the drain hose
There are detergent
residues in the
dispenser
The detergent is damp or lumpy Clean and wipe the dispenser
The lights or display
do not light up
The power supply to the
electronics board or wire harness is
disconnected
Check that the power is not disconnected
and that the power plug is connected
properly
Table of contents
Languages:
Other ECG Washer manuals

ECG
ECG EWS 1063 DQA+++ User manual

ECG
ECG EWF 1280 IDA+++ User manual

ECG
ECG EWS 1063 DQD User manual

ECG
ECG EWF 1062 DA++ User manual

ECG
ECG EWF 1053 MD User manual

ECG
ECG EWT 70120 User manual

ECG
ECG EWF 1062 DA+++ User manual

ECG
ECG EWS 60103 User manual

ECG
ECG BlackLine EWF 801201 Steam User manual

ECG
ECG EWF 601000 BlackLine User manual