Echelon CORE LOUNGE ULTRA User manual

INSTRUCTIONS
Read instructions carefully and thoroughly before first use
Google Play and the Google Play logo are trademarks of Google Inc.
Apple and the Apple logo are trademarks of Apple Inc., registered in the U.S. and other countries.
App Store is a service mark of Apple Inc., registered in the U.S. and other countries.
FIT
lead by certified instructors
FITNESS APP FOR SMARTPHONES AND TABLETS
LIVE / ON-DEMAND CLASSES
SCENIC RIDES
“THE EXTRA MILE”
to warm-up and cool-down
STAY TOGETHER
recorded in beautiful locations by connecting with family & friends
2
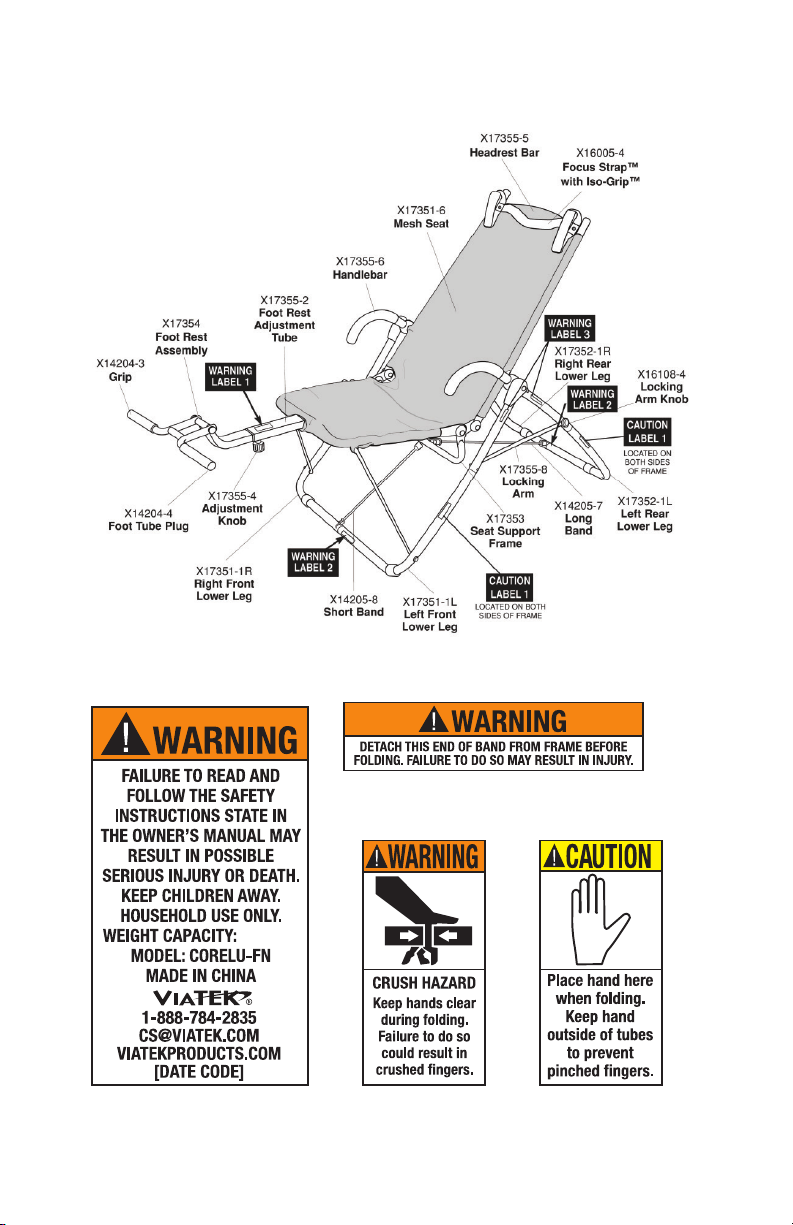
UNIT DIAGRAM
WARNING LABEL 1 WARNING LABEL 2
WARNING LABEL 3 CAUTION LABEL 1
250 LBS

3
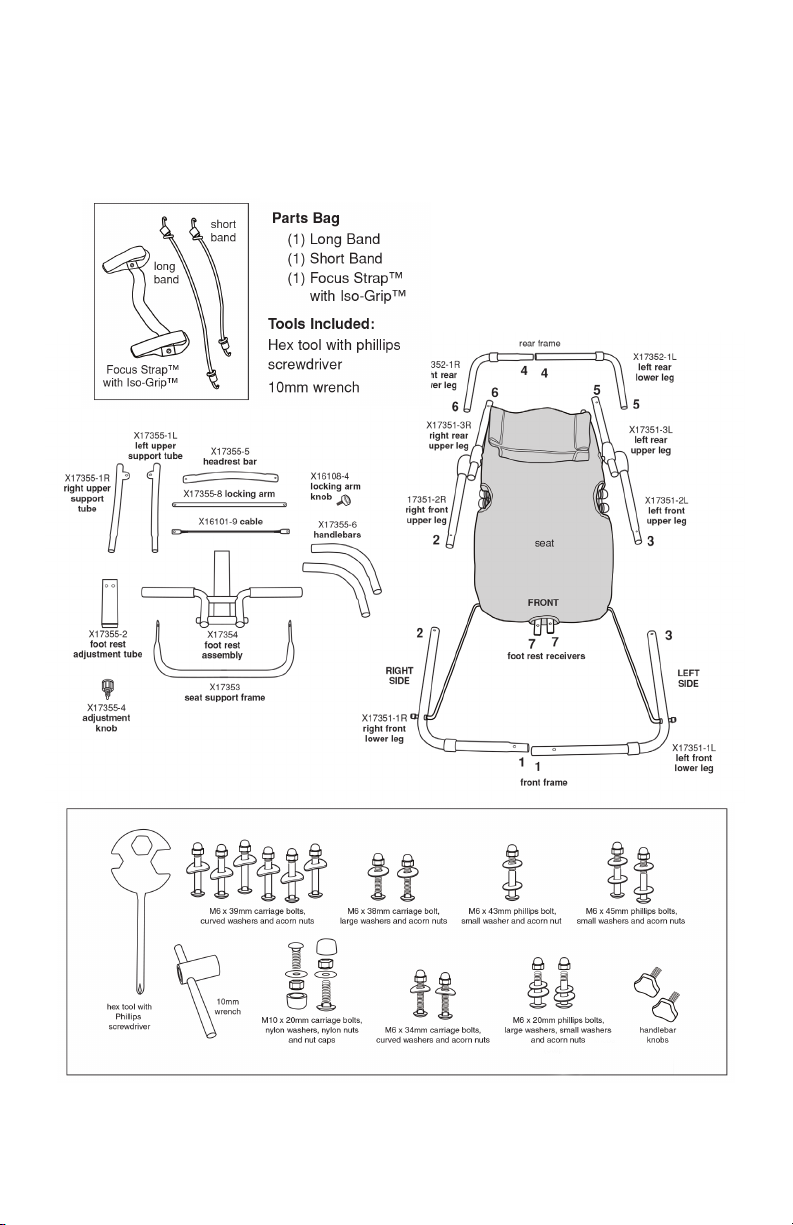
EXPLODED VIEW
PARTS LIST
4
PARTS DIAGRAM
NOTE: Some parts may be pre-lubricated. To protect your flooring or
anything the parts may contact, lay down a newspaper or cloth.
For an instructional video to aid in assembly,
visit CORELOUNGEULTRA.COM

5
ASSEMBLY
Remove all parts from packing and lay out pieces as illustrated in
PARTS DIAGRAM.
1. Slide Front Leg pieces (1) together. Secure with an M6x39mm Carriage
Bolt, Curved Washer, and Acorn Nut (see fig. 1a). Tighten nut with
wrench provided. NOTE: Bolts should enter from bottom of frame
tubes so nut is on top.
2. Pull up gently on Foot Rest Receivers (7) to allow for parts 2 and 3 to
meet. Slide together and secure with an M6x39mm Carriage Bolt, Curved
Washer, and Acorn Nut (fig. 1a) on both 2 and 3 (fig. 1).
3. As shown in fig. 1b, slide Foot Rest Adjustment Tube onto Foot Rest
Receiver (7). Slide two M6x38mm Carriage Bolts through the two holes
from top of Foot Rest Adjustment Tube. Add washers and secure with
Acorn Nuts.
4. Partially screw the Adjustment Knob into underside of Foot Rest
Adjustment Tube at front of unit (fig. 1c). Pull down Adjustment Knob
and slide Foot Rest Assembly into the Foot Rest Adjustment Tube. Let
Adjustment Knob retract, making sure it is secure in one of the holes on
Foot Rest Assembly. Secure Adjustment Knob by turning clockwise
until tight.
FIG. 1
6
ASSEMBLY
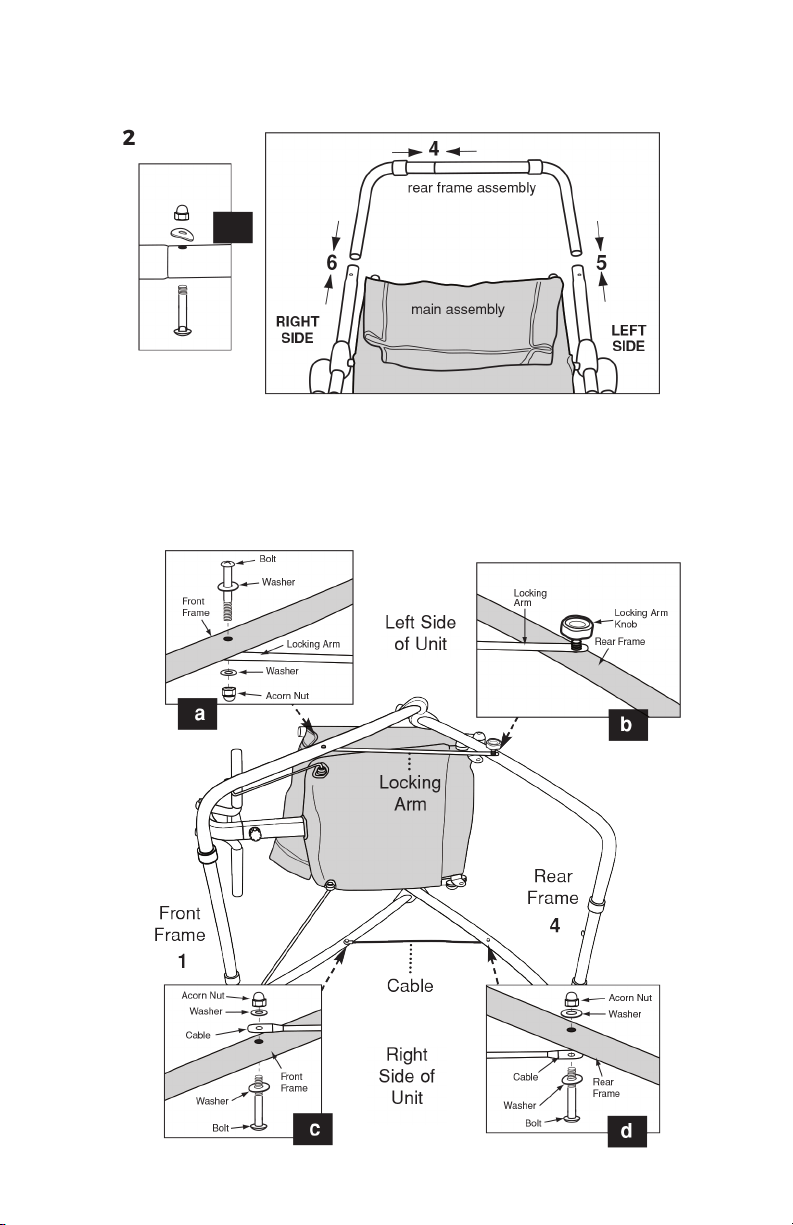
5. As shown in fig. 2, slide Rear Leg pieces (4) together. Secure with an
M6x39mm Carriage Bolt, Curved Washer, and Acorn Nut. Bolts should enter
from bottom of frame tubes with washer and nut on top (fig. 3a). Tighten
Nut with wrench provided.
6. Slide Rear Frame Assembly onto Main Frame Assembly, matching up parts
5 and 6 (fig. 2). Secure with M6x39mm Carriage Bolts, Curved Washers, and
Acorn Nuts in the same configuration as step 5 (fig 2a).
FIG. 2
FIG. 3
a

7
ASSEMBLY
FIG. 4
7. Lift left side up so right side remains on floor and rotate Rear Frame
Assembly around until unit is oriented as shown in Fig. 3.
8. Starting on the right side of the unit, position one end of Cable on
Inside of Right Front Frame (1) and align bolt holes. Lift unit slightly and
insert an M6x 45mm Phillips Bolt and Washer from bottom of Right
Front Frame (fig. 3c). Secure with Washer and Acorn Nut. Tighten Bolt
with Wrench and Screwdriver provided.
9. Position other end of cable to outside of Right Rear Frame (4) and align
holes. Insert Phillips Bolt and Washer from bottom Right Rear Frame
(fig. 3d). NOTE: Cable will be on inside of Right Front Frame and on
outside of Right Rear Frame. Secure with Washer and Acorn Nut (or a
Nut and Nut Cap). Tighten Bolt with Wrench and Screwdriver provided.
10. Position Locking Arm under Left Front Frame and align bolt holes.
Insert M6x43mm Phillips Bolt and Washer from the outside of frame
(fig. 3a). Secure with Washer and Acorn Nut. Tighten Bolt with Wrench
and Screwdriver provided.
11. Rotate loose end of Locking Arm to top side of Left Rear Frame. Align
holes and insert Locking Arm Knob through frame and tighten (fig. 3b).
NOTE: If you have difficulty tightening bolts while unit is lying down,
stand unit upright.
12. While unit is still on its side, place Seat Support Frame between
Brackets sticking out at fold of Seat (fig. 4). NOTE: You may have to
slightly flex brackets to insert support frame.
13. Place a Nylon Washer between Seat Support Frame and Bracket
(fig. 4a).
14. Slide a M10x20mm bolt through Seat Support Frame, Nylon Washer,
and Bracket (fig. 4a). Secure with a Nylon Nut. Tighten and add a nut
cap. NOTE: Seat Support Frame must rotate back and forth easily.
15. Repeat steps 12-13 on other side (fig. 4b).
16. Locate the two holes (a & b) on tube of Seat Support Frame (fig. 5). Hook
one end of Long Band (a) to lower hole of Seat Support Frame. Hook
a
b

8
ASSEMBLY
other end of Long Band to hole on Rear Frame (a).
Make sure hooks are inserted completely (fig. 5c).
NOTE: Chair will pivot easily at this point. Make sure
you hold Frame firmly in place as you attach bands.
17. As shown in fig. 5, hook Short Band (b) into upper
hole (b) on Seat Support Frame and hook other end
into hole on Front Frame (b).
18. Stand unit upright.
19. As shown in fig. 6, working from back of unit, slide Left Upper Support
Tube (8) through fabric pocket on left into its corresponding hole on
Main Frame Assembly.
20. Secure in place using M6x34mm Carriage Bolt, Curved Washer, and
Acorn Nut
(fig. 6a).
21. Repeat step 19-20 on
right side to attach
Right Upper Support
Tube (9).
FIG. 5
FIG. 6
c
a
9
ASSEMBLY
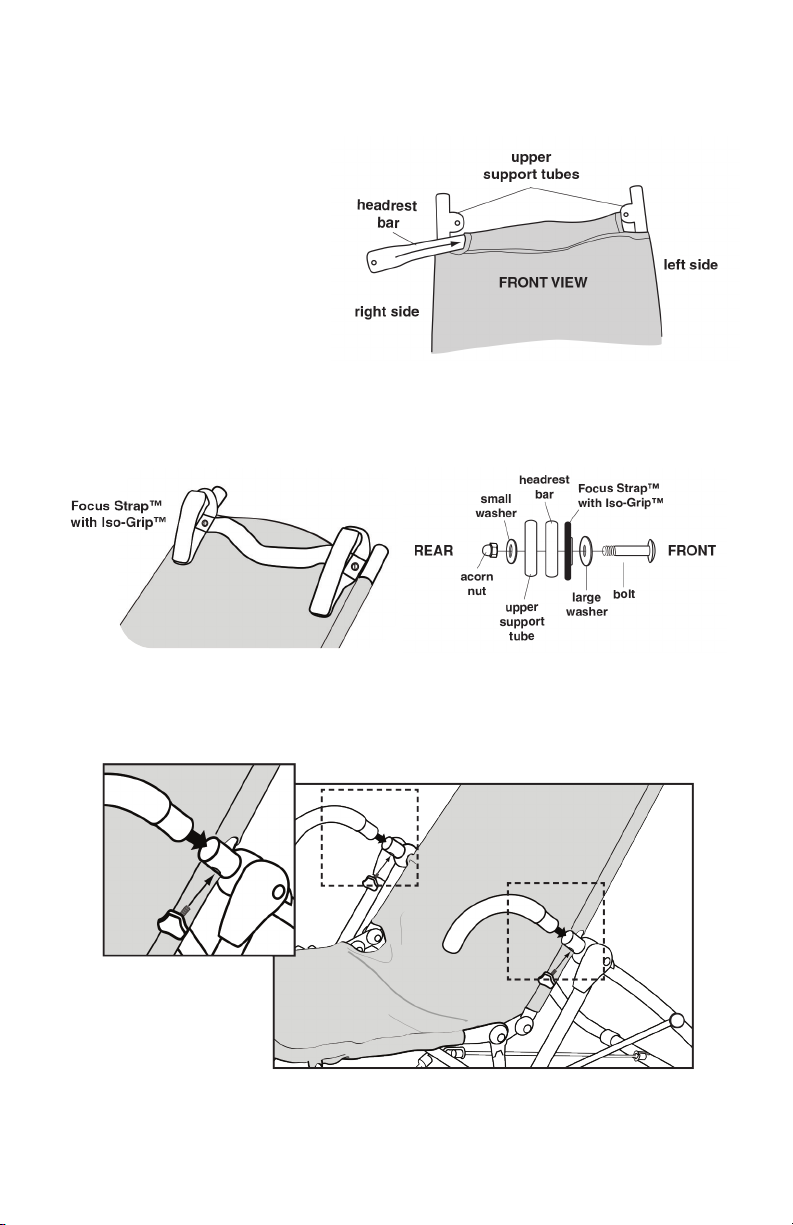
22. As shown is fig. 7a,
working from front of
unit, slide Headrest Bar
through fabric pocket at
top of back rest making
sure Headrest Bar is in
front of Upper Support
Tubes and the bend is
pointed up.
23. As you secure Headrest
Bar to Upper Support
Tubes, you are also attaching Focus Strap™ with Iso-Grip™ (see fig. 7b).
24. Place a Large Washer onto M6x20mm Phillips Bolt from the front. Put
bolts through Focus Strap™ with Iso-Grip™ holes, the Headrest Bar and
Back Support Tubes (fig 7c). Secure Washers and Acorn Nuts.
FIG. 7a
FIG. 7b FIG. 7c
FIG. 8
Check all bolts and nuts to be sure they are tight
before using unit.
25. As shown in fig. 8, slide each Handlebar into holes on either side of
top of Main Frame Assembly with Handlebar curves facing down. Align
holes and guide a Handlebar knob through holes on left side and
secure. Repeat on right side.
10
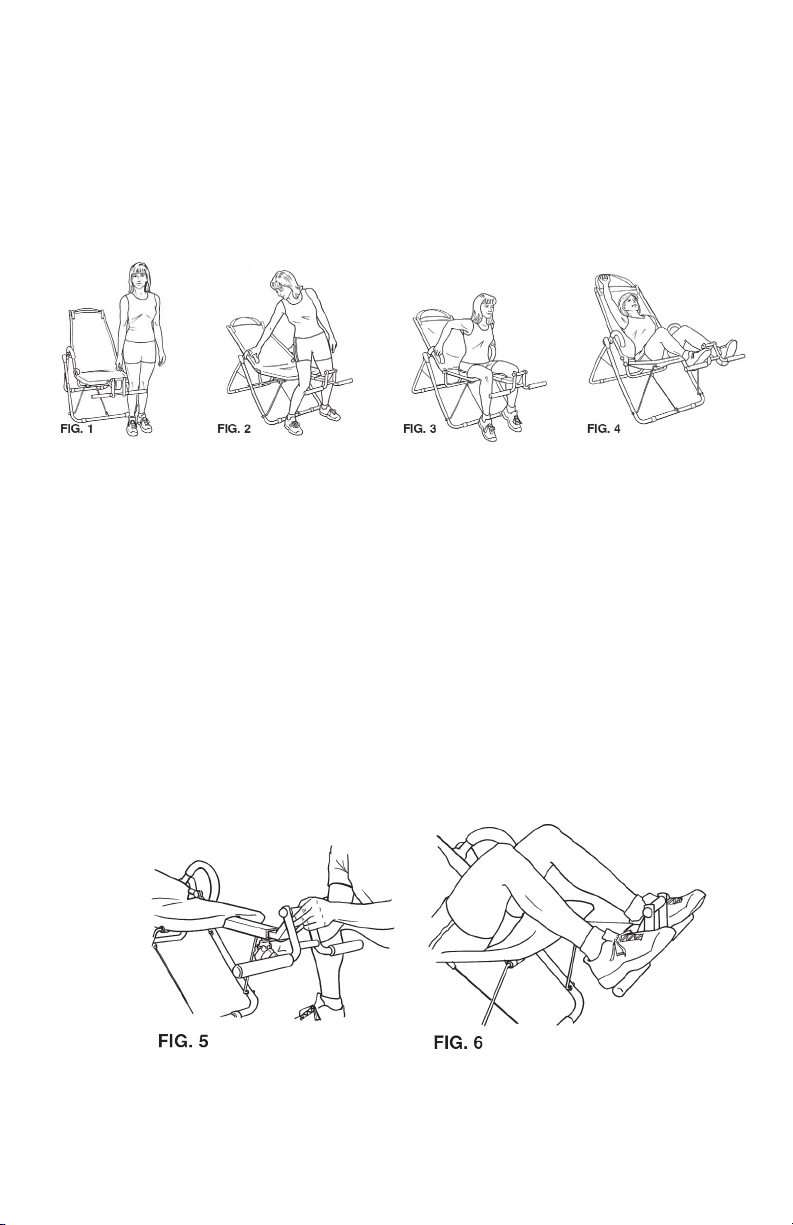
GETTING ON
GETTING OFF
ADJUSTING FOOT REST
1. Stand next to the unit near foot rest (fig. 1).
2. Place one hand lightly on handlebar and carefully step over footrest
cross bar connecting seat and foot rest (fig. 2).
3. Facing the foot rest, slowly sit down on seat (fig. 3).
4. When your hips feel centered, lean back into a comfortable reclining
position. Lift feet, one at a time, and place on foot rests. Reach overhead
and grasp the Iso-Grip™ handles or Focus Strap™ with a light grip (fig. 4).
1. Release hands from Iso-Grip™ handles or Focus Strap™ and lean forward
until you are upright.
2. Lower feet, one foot at a time, until flat on floor.
3. Stand up slowly using handlebars on sides of unit, and carefully step
back over bar to one side of unit.
1. Grasp knob on the underside of foot rest crossbar. Pull pin out and slide
foot rest closer or further away from crossbar (fig. 5).
2. Replace pin into one of holes in crossbar. Make sure pin is secure before
placing feet on bar.
3. Foot rest should be adjusted where knees are bent at a right angle,
about 90 degrees, when feet are resting on bar (fig. 6).
11
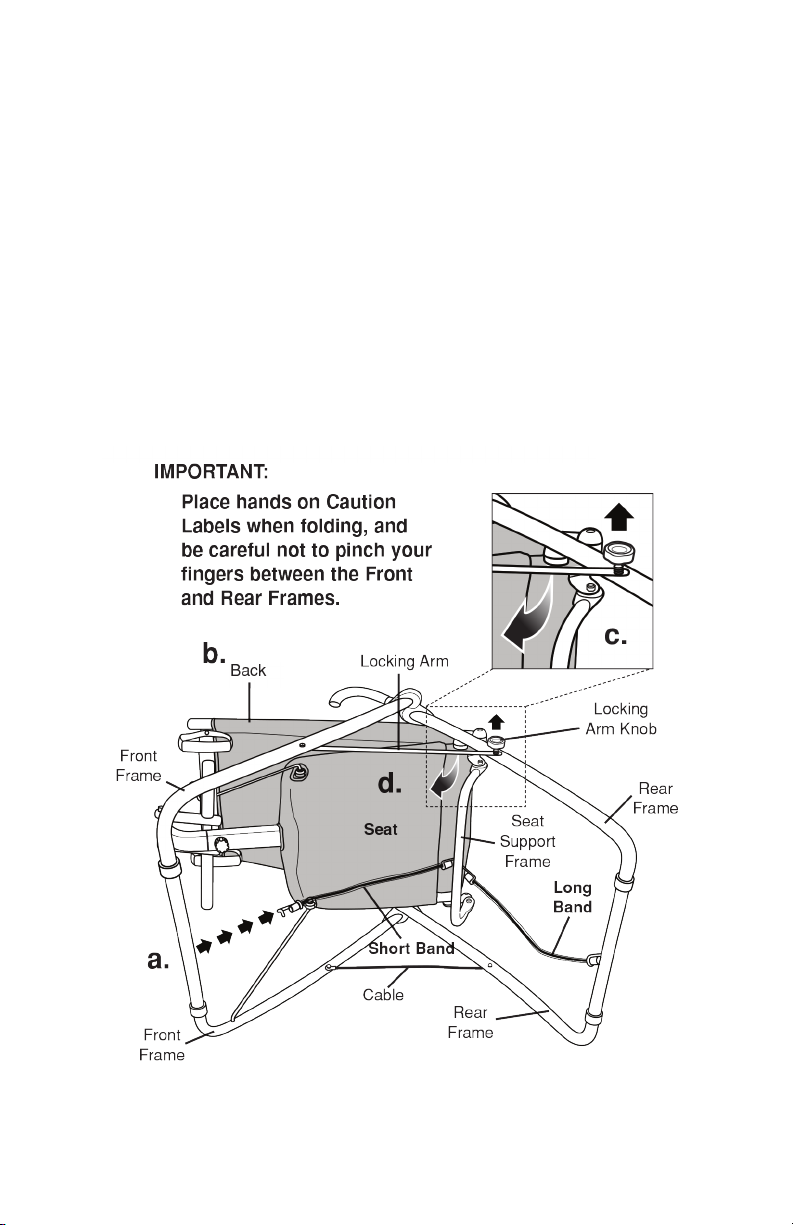
FOLDING UNIT
1. Lay unit on right side as shown in Fig. 1 below.
2. Unhook Short Band from Front Frame and Long Band from Rear Frame.
Leave both Bands connected to Seat Support Frame for storage (fig. 1a).
3. Push the Back toward the Seat until it aligns with Front Frame (fig. 1b).
4. Remove Locking Arm Knob from Rear Frame (fig. 1c).
5. Rotate Locking Arm toward Front Frame and re-install Locking Arm
Knob for storage.
6. Grasp Front Frame with one hand and Rear Frame with other hand and
slowly pull together.
7. For unit to store flat, you must fold Handlebars in. Loosen Handlebar
Knobs and turn Handlebars inward toward unit and tighten Knobs to
keep in place.
NOTE: Before using unit, be sure Handlebars are back in correct position
and Knobs are tightened.
FIG. 1
Always review these instructions prior to folding unit.

12
CARE
EXERCISES
STORAGE
• Keep equipment clean by wiping sweat, dust, or other residue off seat,
foot rest, and handlebars with a soft, clean cloth after each use.
• Before each use, check bands, fabric, and stitching for signs of fraying. If
you notice any wear, stop using immediately. Call Customer Service to
order replacement parts.
• To protect equipment from stains and dirt, you may spray fabric with any
type of protective fabric spray.
• Before each use, check frame and pivot assembly to be sure it is properly
working. Check all nuts and bolts to be sure they are tight. If unit is not
in proper working order, stop using immediately.
• Follow folding instructions outlined in FOLDING UNIT section.
• Store unit in a dry place away from children and high traffic areas.
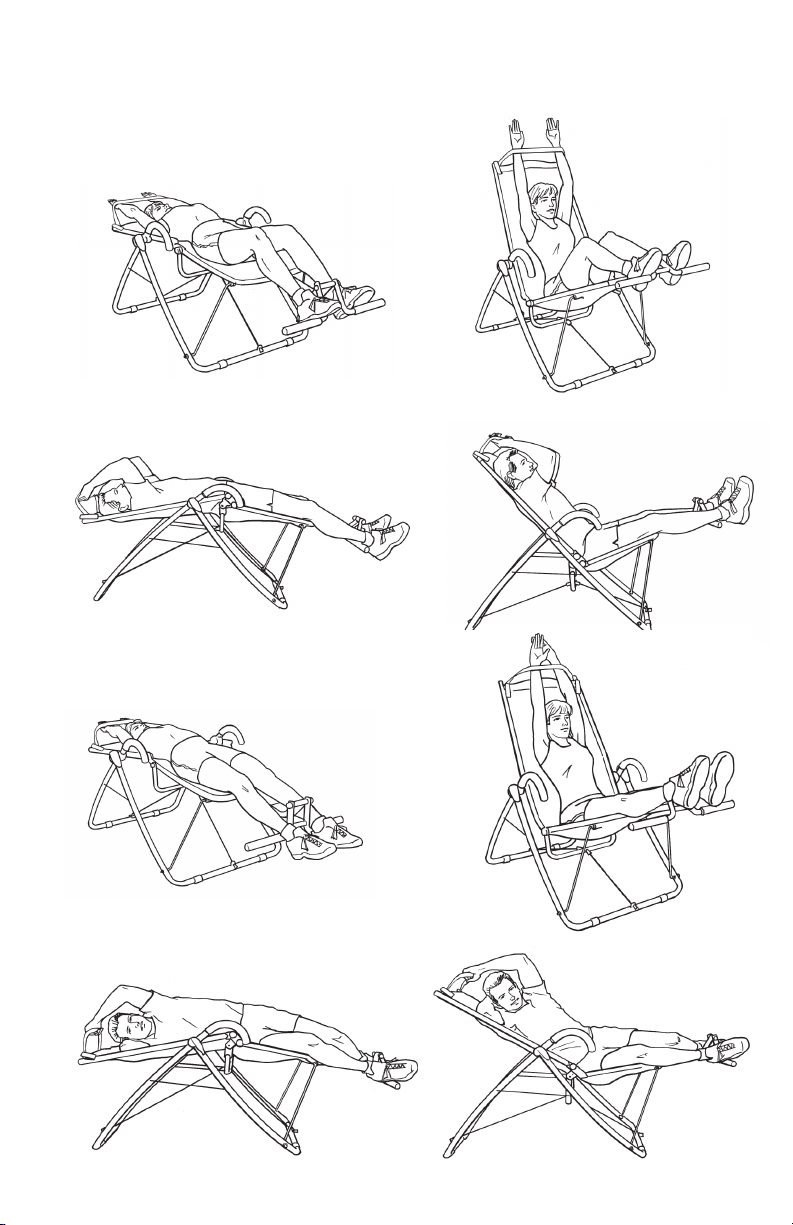
BASIC JACKKNIFE
OBLIQUE JACKKNIFE
TORSO & HIP FLEXOR STRETCH
STEP 1
STEP 1
STEP 2
STEP 2
13
EXERCISES
EXTENDED ARM JACKKNIFE
EXTENDED LEG JACKKNIFE
ADVANCED JACKKNIFE
LATERAL JACKKNIFE
STEP 1
STEP 1
STEP 1
STEP 1
STEP 2
STEP 2
STEP 2
STEP 2

14
IMPORTANT SAFETY INSTRUCTIONS
When using exercise equipment, basic precautions should
always be followed, including the following:
Read all instructions before using the CORE LOUNGE ULTRA.
BEFORE starting any fitness or strength program, consult
with your physician or health official. This will ensure that you
engage in the proper strength or fitness program for your age
and physical condition.
Before using the Core Lounge Ultra, answer these questions:
· Have you been sick recently?
· Have you had prolonged dizziness recently?
· Have you been out of breath for no reason recently?
· Have you had chest pain recently?
· Do you currently have any injuries preventing you
from exercise?
· Are you pregnant?
· Do you have any conditions or reasons you should
NOT exercise?
· Are you over 35 years old and physically inactive?
· Have you been told by a doctor that you should NOT exercise?
IF YOU ANSWER “YES” TO ANY OF THE ABOVE QUESTIONS, YOU
SHOULD SEEK FURTHER ADVICE FROM YOUR DOCTOR PRIOR
TO USING THE CORE LOUNGE ULTRA.
Read the user manual fully and follow all instructions. This
ensures your safety.
WARNINGS
• ALWAYS use the Core Lounge Ultra on solid, level ground and in a well
lit and ventilated area.
• ALWAYS check that the unit is secure before use.
• NEVER allow children to play on or around the unit. This helps protect
them from injury from moving parts.
• ALWAYS check the unit before use.
• NEVER use the unit if it is not properly/completely assembled or is
damaged in any way.
• NEVER exceed the weight limit for this unit. The weight limit for this
unit is 250 pounds. Do not use the Core Lounge Ultra if your body
weight is in excess of 250 pounds.
• NEVER use Core Lounge Ultra when sick or fatigued.
• ALWAYS wear proper attire and footwear that fully covers your feet.
Long hair should be tied back or tucked away. Ensure that shoelaces
are tucked into your shoes.

15
• ALWAYS warm up/stretch before starting exercise.
• ALWAYS be cautious when getting on and off the Core Lounge Ultra.
• ALWAYS keep hands away from moving parts.
• NEVER overexert yourself or work to exhaustion. If you feel faint,
dizzy, short of breath, or if you have chest or other pains, STOP
IMMEDIATELY! Consult your physician before using the Core Lounge
Ultra again.
• NEVER use accessory attachments that have not been recommended
by the manufacturer. Using such attachments may cause injury or
damage to the unit and will affect the warranty of the unit.
• ALWAYS ensure that the Core Lounge Ultra is wiped down after each
use to keep it sanitary.
• Use this equipment ONLY for intended use.
• Product is NOT intended for children. Use adult supervision.
• Ensure you have a minimum of three feet of clearance behind and in
front of unit. Keep children, pets, furniture, and other objects out of
the way when using equipment.
If any problems arise affecting the performance of the Core Lounge
Ultra, contact the manufacturer immediately. Always ensure that parts
which undergo wear are checked regularly.
THIS SAFETY INFORMATION AND USER MANUAL DOES NOT REPLACE
THE NEED TO BE ALERT AND TO USE COMMON SENSE WHEN USING
THE CORE LOUNGE ULTRA!
THE CORE LOUNGE ULTRA IS INTENDED FOR CONSUMER
USE ONLY.
SAVE THESE INSTRUCTIONS
SPECS
PRODUCT WEIGHT: APPROX. 33 LBS
LENGTH: 39.5"
WIDTH: 30"
HEIGHT: 44.5"
WEIGHT CAPACITY: 250 LBS

Customer Service / Le service a la clientele / Servicio al Consumidor
MADE IN
CHINA
Read Instructions
Before Operating PATENT
PENDING
DO NOT DISPOSE OF BATTERIES IN FIRE. ALWAYS DISPOSE OF BATTERIES PER LOCAL & FEDERAL GUIDELINES.
© 2019 VIATEK CONSUMER PRODUCTS GROUP, INC. All specications are subject to change without notice. All rights reserved.
Viatek Consumer Products Group, Inc. 6011 Century Oaks Dr. Chattanooga, TN 37416
Rev:
Viatek®warrants this product to be free of manufacturing defects. Should any such defect develop or become evident within one year from
the date of purchase, Viatek®will replace the entire product or, at its option, repair or replace the defective part(s) without charge.
Contact Viatek®customer service at 888.784.2835 or at [email protected] to determine whether it is necessary to return the unit. To return,
securely pack the entire unit. Be sure carton clearly identies sender by name and address. Attach a letter or card describing defect and
original sales receipt. Mail prepaid to Viatek Consumer Products Group, Inc. 6011 Century Oaks Dr. Chattanooga, TN 37416.
This warranty is void if damage or malfunction is due to abuse or failure to operate product in accordance with instructions and on
recommended electrical current. This warranty gives you specic legal rights and you may also have other rights which vary from state to
state. If you have any questions, or would like to learn more about Viatek®, please contact us at 888.784.2835 or at [email protected].
Register your product online at viatekproducts.com/register-your-product-warranty/
Model:
VIATEKPRODUCTS.COM
For questions, assistance, or replacement parts, do not return to your retailer. Contact Viatek®customer service below.
For refunds on items not purchased from Viatek®directly, please contact your retailer.
VIATEK®1-YEAR LIMITED WARRANTY
CORELU-FN
041019
QUESTIONS?
CONTACT CUSTOMER SERVICE
1-888-784-2835
This manual suits for next models
1
Table of contents
Popular Outdoor Furnishing manuals by other brands


Palmako
Palmako PAV-3333 installation manual

Outsunny
Outsunny 84B-670 Assembly & instruction manual

Erommy
Erommy HWG-045WT instruction manual

Cuscini
Cuscini ABRI Step by step assembly instructions

Sunjoy
Sunjoy Villa Dining Table L-DN605SAL-T2 Assembly instructions

Lemeks
Lemeks Palmako PA120-5959-1 Assembly, installation and maintenance manual


