Eci Telecom Coral GKT User manual

ommunications Preliminary 2nd Draft
ontinuous
ystems
S
Coral
GKT
User’sGuide
GraphicKeyTelephone
for the

The information contained in this document is proprietary and is subject to all relevant copyright, patent and other laws
protecting intellectual property, as well as any specific agreement protecting ECI TELECOM LTD.’s rights in the aforesaid
information. Neither this document nor the information contained herein may be published, reproduced or disclosed to third
parties, in whole or in part, without the express, prior, written permission ofECI TELECOM LTD. In addition, any use of this
document or the information contained herein for any purposes other than those for which it was disclosed is strictly forbidden.
ECI TELECOM LTD. reserves the right, without prior notice or liability, to make changes in equipment design or
specifications.
Information supplied by ECI TELECOM LTD. is believed to be accurate and reliable. However, no responsibility is assumed
by ECI TELECOM LTD. for the use thereof nor for the rights of third parties which may be effected in any way by the use
thereof.
Any representation(s) in this document concerning performance of ECI TELECOM LTD.’s product(s) are for informational
purposes only and are not warranties of future performance, either express or implied.ECI TELECOM LTD.’s standard
limited warranty, stated in its sales contract or order confirmation form, is the only warranty offered by ECI TELECOM LTD.
in relation thereto.
This document may contain flaws, omissions or typesetting errors; no warranty is granted nor liability assumed in relation
thereto unless specifically undertaken in ECI TELECOM LTD.’s sales contract or order confirmation. Information contained
herein is periodically updated and changes will be incorporated into subsequent editions. If you have encountered an error,
please notify ECI TELECOM LTD. All specifications are subject to change without prior notice.
© Copyright by ECI TELECOM LTD., 2000. All rights reserved worldwide.
All trademarks contained herein are the property of their respective holders.

7DEOHRI&RQWHQWV*.78VHUV*XLGH
L
Table of Contents Preliminary 2nd Draft
Introduction...........................................................................................................................................................1
Conventions................................................................................................................................................2
GKT Overview......................................................................................................................................................3
GKT Overview Definitions........................................................................................................................3
GKT Side and Rear Views.........................................................................................................................5
Using the Graphic Display....................................................................................................................................6
Graphic DisplayIcon Definitions..............................................................................................................7
Adjustingthe Angle of the Graphic Display..............................................................................................8
Using the Hard keys..............................................................................................................................................9
Hard keys; What TheyDo........................................................................................................................10
Operating the GKT.............................................................................................................................................15
Usingthe SystemDefined Fixed Keys.....................................................................................................16
Usingthe Programmable (DSS) Keys......................................................................................................17
To Programa Key.....................................................................................................................17
MakingCalls............................................................................................................................................17
When You Hear Ringbackfor Internal Calls............................................................................18
When You Hear Ringbackfor External Calls...........................................................................19
When You Hear a BusyTone...................................................................................................21
When You Hear a BusyTone for External Calls......................................................................22
AnsweringCalls.......................................................................................................................................23
Duringan Internal Call.............................................................................................................................25
Duringan External Call............................................................................................................................27
Usingthe Speakerphone or Headset.........................................................................................................29
Usingthe Volume Buttons.......................................................................................................................31
RingAdjustment......................................................................................................................................32
Usingthe Calculator.................................................................................................................................33
Usingthe Calendar...................................................................................................................................34
UsingHelp...............................................................................................................................................35
Context-Sensitive HELP...........................................................................................................35
HELP Table of Contents...........................................................................................................36

7DEOHRI&RQWHQWV *.78VHUV*XLGH
LL
Using the Directory..................................................................................................................................37
Adding Contacts to the Directory.............................................................................................38
Updating Directory Contacts ....................................................................................................41
Deleting Directory Contacts .....................................................................................................42
Copying Directory Contacts .....................................................................................................43
Using the Favorites List ...........................................................................................................................44
Adding a Contact to the Favorites List.....................................................................................45
Moving a Favorites List Contact...............................................................................................47
Exchanging Favorites List Contact Positions ........................................................................... 49
Deleting a Favorites List Contact .............................................................................................50
Using the Private Directory......................................................................................................................51
To View the Private Directory:................................................................................................. 51
Adding New Contacts Directly to the Private Directory:.........................................................52
Moving Existing Names from the General Directory to PRIVATE.........................................52
Using the GKT Telephony Features.........................................................................................................53
Using HELP in FEATURES.....................................................................................................54
Using SEARCH in FEATURES...............................................................................................55
Maintenance via Toolkit Functions...................................................................................................................56
Operating Mode........................................................................................................................................57
Tel. Features.............................................................................................................................................57
DIR 58
Timeouts61
Diagnostic Tools ......................................................................................................................................62
Utilizing the PC Connection...............................................................................................................................63
Equipment Supplied.................................................................................................................................63
Appendix of Telephony Features
Appendix A - Telephony Features .........................................................................................................A-1
Appendix B - Attendant Features...........................................................................................................B-1
INTERCEPTED CALLS........................................................................................................B-3
Appendix C - Glossary........................................................................................................................... C-1
Appendix D -Tones................................................................................................................................D-1
,QWURGXFWLRQ *.78VHUV*XLGH
The Graphic Key Telephone (GKT) meets all your telephony and office needs. The benefits you receive from
working with the GKT will become an invaluable part of your work environment. While the technology employed in
the GKT is state of the art, using the telephone is simple and straightforward. Immediately you will appreciate the
large Graphic Display and easy to reach Softkeys. Depending on the state of the telephone, the Graphic Display
automatically changes to provide you with the appropriate options. In addition, on-line help is available at any time.
Simply press the Help button to get step-by-step instructions.
The GKT functions include a user created Directory loaded at the GKT and a Private password protected Directory.
The Directory can be configured so that important or Frequently Dialed Numbers always reside on the display when
accessing the directory. Other GKT functions include Coral telephony features easily activated by using the softkeys
at the side of the display, a calculator, a calendar and the on-line Help function.
The GKT works as a stand-alone unit or can utilize the GKT software package installed on your PC. The software
package enables you to backup your Directory as well as download new/updated Directories or GKT software
versions.
Beyond streamlining the functionality of your GKT telephone, any option can be quickly located by using the
function aides such as SEARCH, GO TO, and the scroll keys.
This User’s Guide provides an overview of the GKT and instructions on how to accomplish several tasks. Additional
instructions on other feature rich options are located in the On-line Help or in the Appendices located at the end of
this guide. The GKT is a top-of-the-line telephone from the Coral family of telephones.
Enjoy your new GKT telephone!

*.72YHUYLHZ *.78VHUV*XLGH
Conventions
q
GKT Hard key names appear in a shaded distinctive box, for example MENU
q
Softkey names appear in a clear distinctive box, for example >$GG(QWU\@
q
Text in italics refers the reader to another section of the guide or to other Coral Manuals. It is also used for notes,
for example See Adding New Contacts.
q
Text in Arial Bold, such as SPKR, indicates system defined fixed keys or DSS user programmable keys (see
figure on page 3).
q
Messages that pop-up on the GKT display screen are printed in the Courier font, for example Deleted.
q
The instruction “Select” indicates that the user should use Navigator keys: up/down, right/left scroll keys and /or
Page Up/Down Hard Keys to find and select an item from the display.
q
The instruction “Enter” indicates that the user should press the ENTER button (above navigational arrows or on
the GKT keyboard) to accept action.
q
The instruction “Choose” indicates that the user should combine the “Select” and “Enter” actions to choose an
option. Pressing an option’s nearby softkey also chooses the option.

*.72YHUYLHZ *.78VHUV*XLGH
GKT OVERVIEW
Graphic Display
Angle Adjuster
Graphic Display
Message
Waiting Lamp
Soft Keys
System Defined
(fixed) Keys
Hard Keys
Microphone
Scroll Keys
Programmable
Keys (DSS Keys) Keyboard
Cover
Alphanumeric
Keyboard
Loudspeaker
Handset
Dial Pad
Volume Buttons
Soft Keys
GKT Front View
GKT Overview Definitions
The following table defines all controls, buttons and keys found on the GKT.
*.72YHUYLHZ *.78VHUV*XLGH
CONTROL BUTTONS AND
KEYS ACTION
Alphanumeric Keyboard Used to input alphanumeric information into the Graphic Display.
Dial Pad Digit buttons used for dialing phone numbers or extension numbers.
Graphic Display Displays the system lines, orientation line and available function options
according to GKT status. See Using the Graphic Display on page 6.
Graphic Display Angle
Adjuster Activates a release mechanism to adjust the angle of the Graphic Display.
Hard Keys Status-independent access to GKT functions and options.
Handset Works as typical phone handset.
Loudspeaker Output sound device used in hands free operation, paging, ringing and
background music.
Microphone Input sound device used in hands free operation.
Message Waiting Lamp Lamp lights indicating that a message is waiting.
This lamp also lights when the GKT is ringing.
Programmable Keys (DSS) Four user programmable keys with LED Indicators. Used to activate
telephony features or speed dial telephone numbers according to the user’s
needs. LED lights when key or feature is activated.
System Defined Fixed Keys Four system-wide programmed keys: Speaker, Loop, Transfer and Hold.
Scroll Keys (Up/Down,
Right/Left Arrows) Moves from one option to another on the Graphic Display. Used for
selecting without choosing or activating the option.
Softkeys Keys used to activate dynamic features located on the Graphic Display.
Volume Buttons Adjusts the speakerphone, handset, loudspeaker, background music and
ringer volume.

*.72YHUYLHZ *.78VHUV*XLGH
GKT Side and Rear Views
#2 #1
REC
Connection for
Second Handset or
Tape Recorder
Connection to
Handset or Hands-
free Headset
LV
eft iew
D-BUS
RV
i
g
ht iew
Connection to
Optional DPEM
Unit
(GKT 4321)
DC
LINE
RS232
ECI TELECOM
RJ-11 Telephone
line to Coral PBX
RV
ear iew
RJ-45 Jack to PC
RS-232 Power Supply
(24 to 48 VDC)
GKT Sides and Rear View
8VLQJWKH*UDSKLF'LVSOD\ *.78VHUV*XLGH
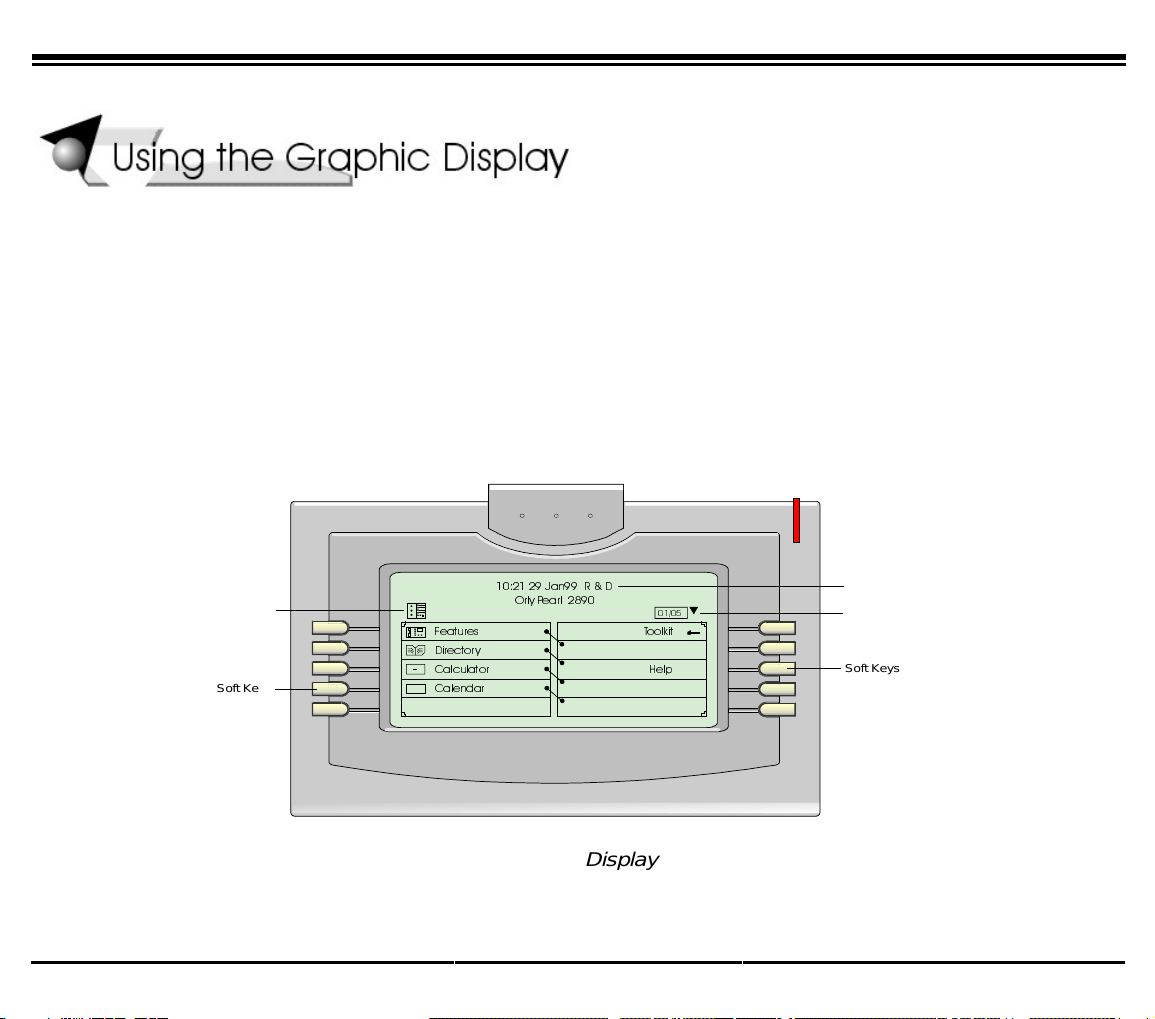
USING THE GRAPHIC DISPLAY
The GKT Graphic Display provides an easy to use control interface. On this display, several different classes of
function information and controls are found. During normal operation, the current function assumes control over the
entire area of the Graphic Display and all of the Softkeys. Meanwhile, the System Lines which usually include the
time, date, and station name and number, automatically change to relay pertinent information about telephony states
and operations.
Several icons also appear in the Graphic Display. See the following section Graphic Display Icons for Icon
definitions. Five Softkeys located on each side of the display act as triggers for any currently displayed GKT
functions or options. All of the information in the Graphic Display continually changes to reflect options related to
the current state of the GKT. In this manner, no matter which state the telephone is in (i.e. Idle, or Ringing) the
relevant option is always next to and enabled by one of the Softkeys.
7RRONLW
+HOS
Soft Keys
Soft Keys
Function Icons Orientation Line
System Lines
)HDWXUHV
'LUHFWRU\
&DOFXODWRU
&DOHQGDU
-DQ5'
2UO\3HDUO
1:2
[?]
+
=
Graphic Display
8VLQJWKH*UDSKLF'LVSOD\ *.78VHUV*XLGH
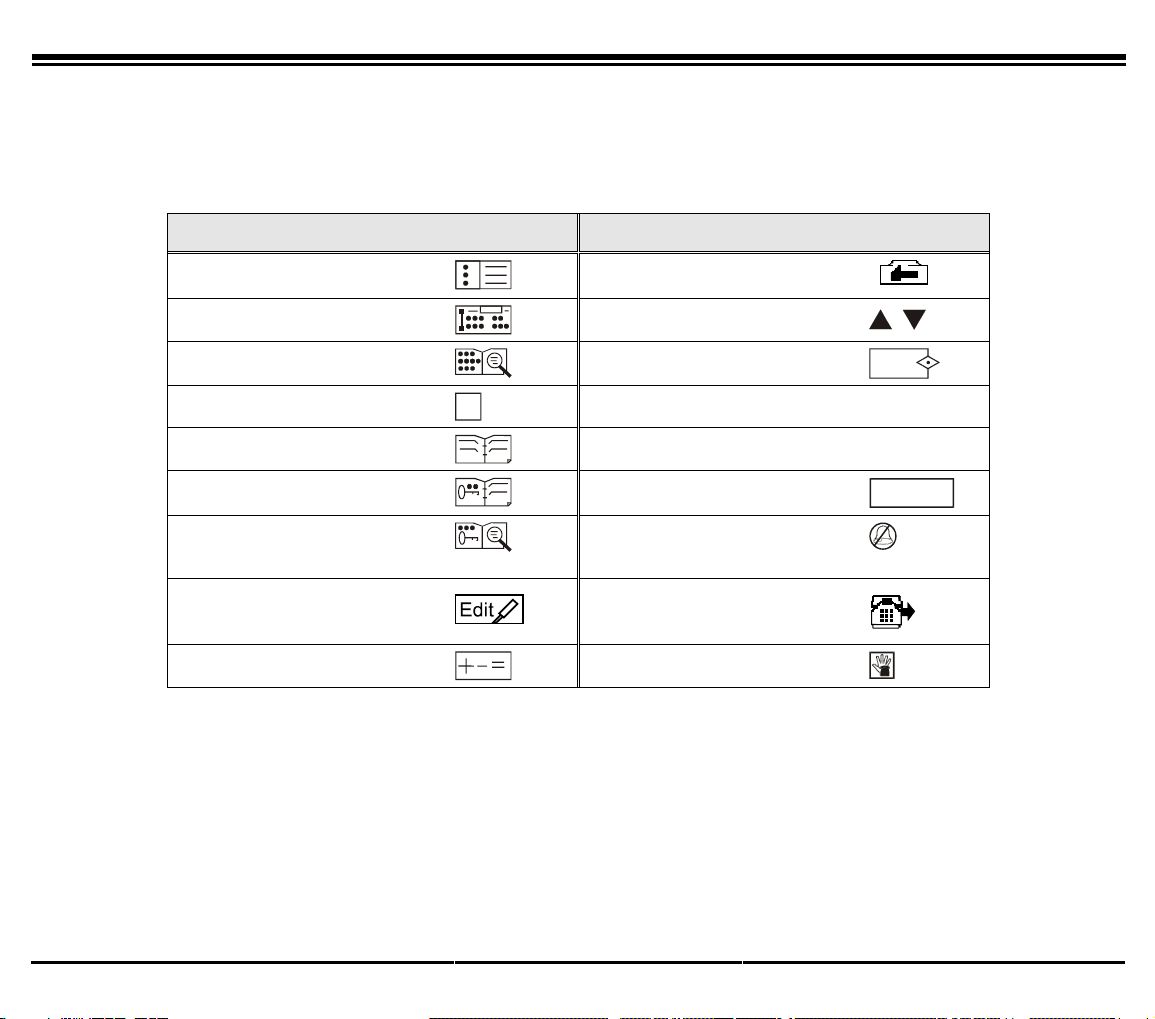
Graphic Display Icon Definitions
Graphic Display Icons provide visual cues that signify the state of the telephone. Several icons can appear in the
Orientation Line at once and can change depending on the function being used. The following table shows which
icons can appear and the function or option they represent.
FUNCTION OR OPTION ICON FUNCTION OR OPTION ICON
Menu Tool Kit
Features Scrolling Indicators
Directory/Details Search Results
Srch
Help Indicator
?
Shift Indicator >6+,)7@
Directory/Brief CAPS Lock Indicator >&$36@
Private Directory/Brief Page Number
53/99
Private
Directory/Details Do Not Disturb*
Edit Call Forward All*
Calculator Hold*
*When any one of these icons appears in the Graphic Display, the ringer is disabled and the GKT
cannot receive calls. When DND is activated, incoming calls receive a reorder tone.
8VLQJWKH*UDSKLF'LVSOD\ *.78VHUV*XLGH
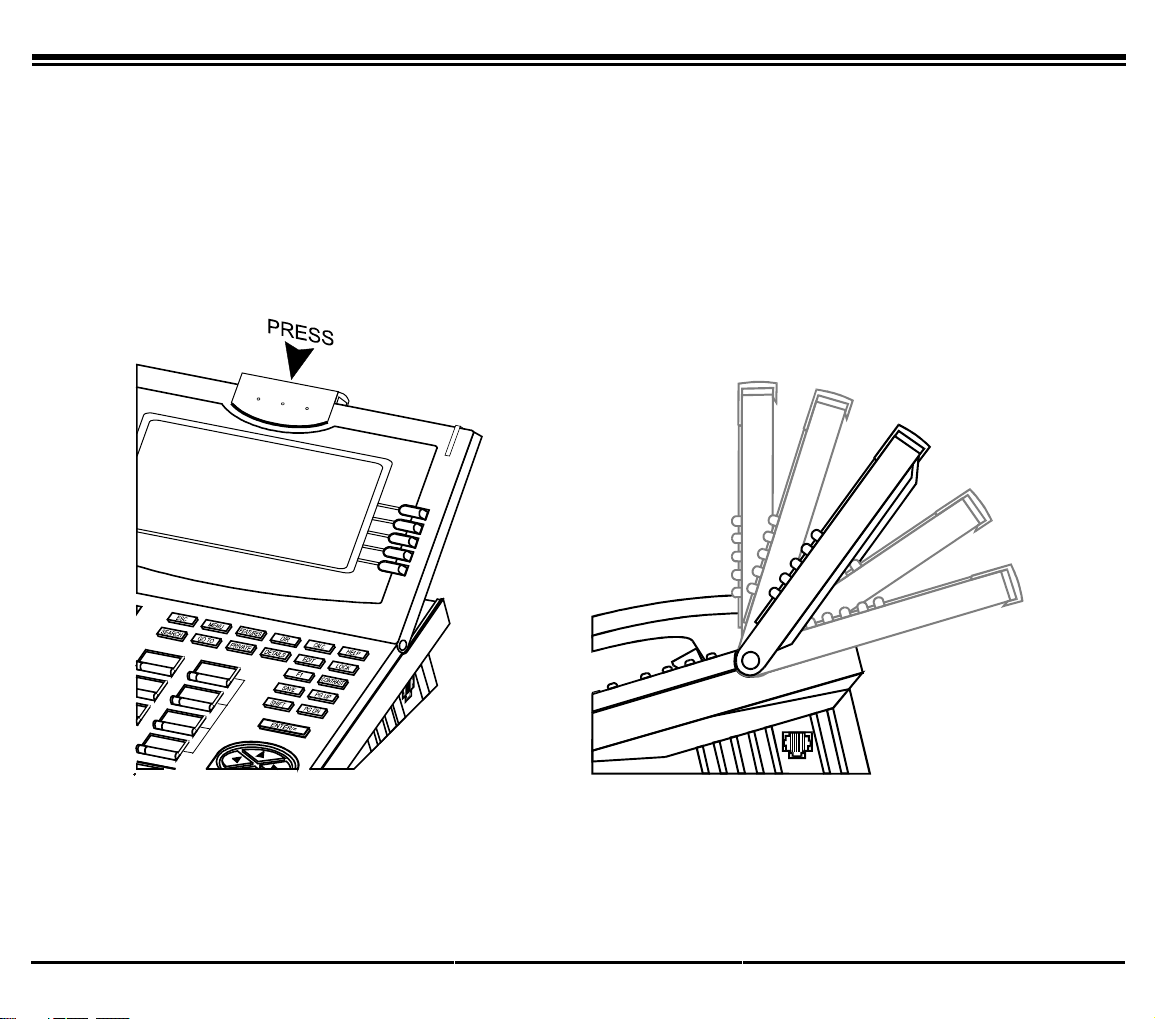
Adjusting the Angle of the Graphic Display
The angle of the GKT Graphic Display can be adjusted to suit various seating positions.
7RDGMXVWWKHDQJOHRIWKH*.7*UDSKLF'LVSOD\
1. Press on the Graphic Display Angle Adjuster Release.
2. With the Release held down move the Graphic Display to the desired position.
3. Let go of the Release.
D-BUS
Graphic Display Angle Adjuster Release Graphic Display Axis of Motion
8VLQJWKH+DUGNH\V *.78VHUV*XLGH
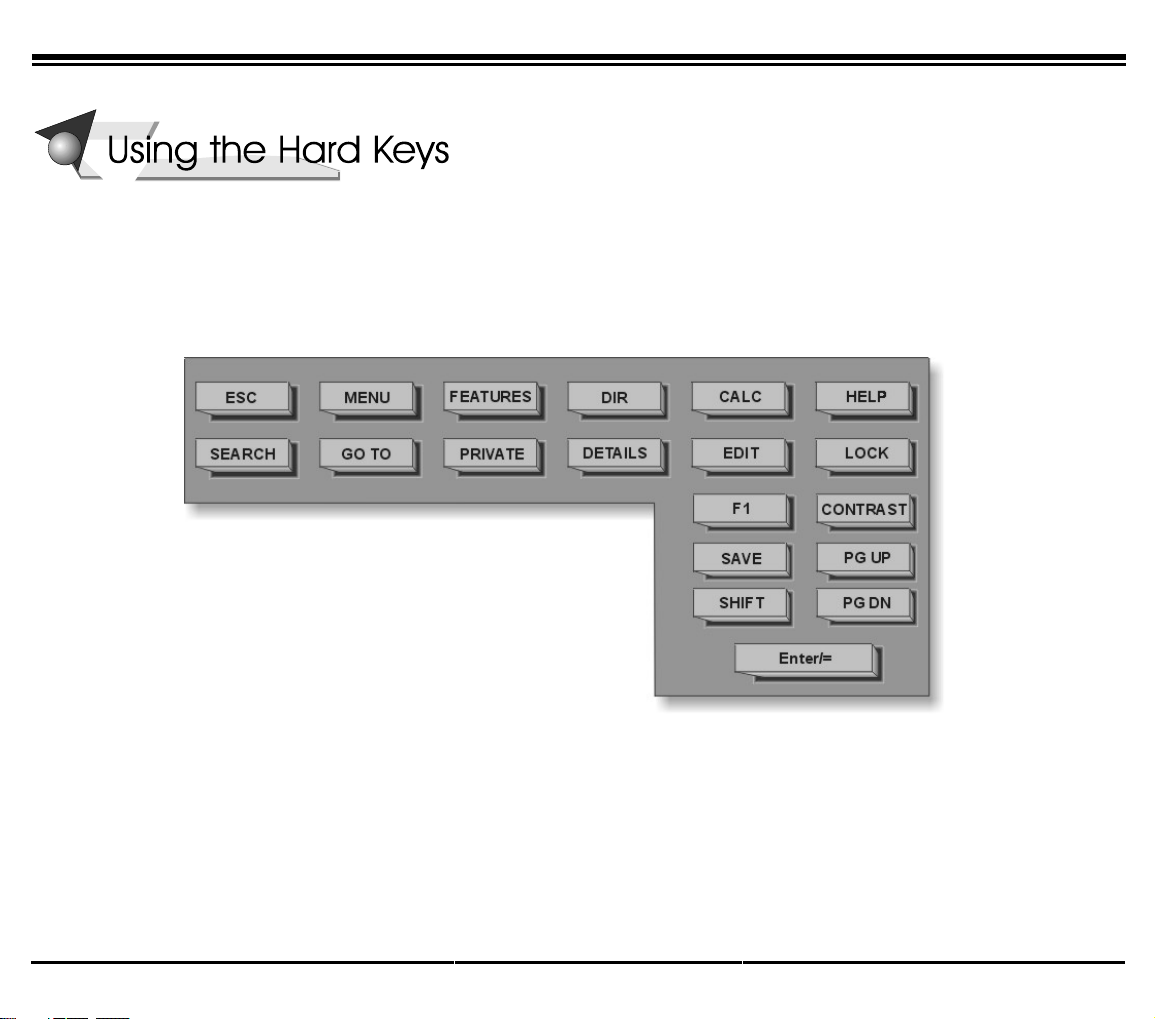
USING THE HARD KEYS
Use the Hard keys to administer GKT basic operations. The Hard keys, like the Softkeys, allow you to choose between the
various functions and options. However, unlike the Softkeys, the Hard keys are not dependent on the state of the telephone.
Any function or option can be enabled at any time utilizing the Hard keys. The hard keys include Function Hard keys:
MENU, FEATURES, DIR, CALC, F1 (Calendar) and HELP. All the other Hard keys operate as aids to the Function Hard
keys. The aids are used to configure and edit the options found in the Function Hard keys.
GKT Hard Keys Layout
8VLQJWKH+DUGNH\V *.78VHUV*XLGH
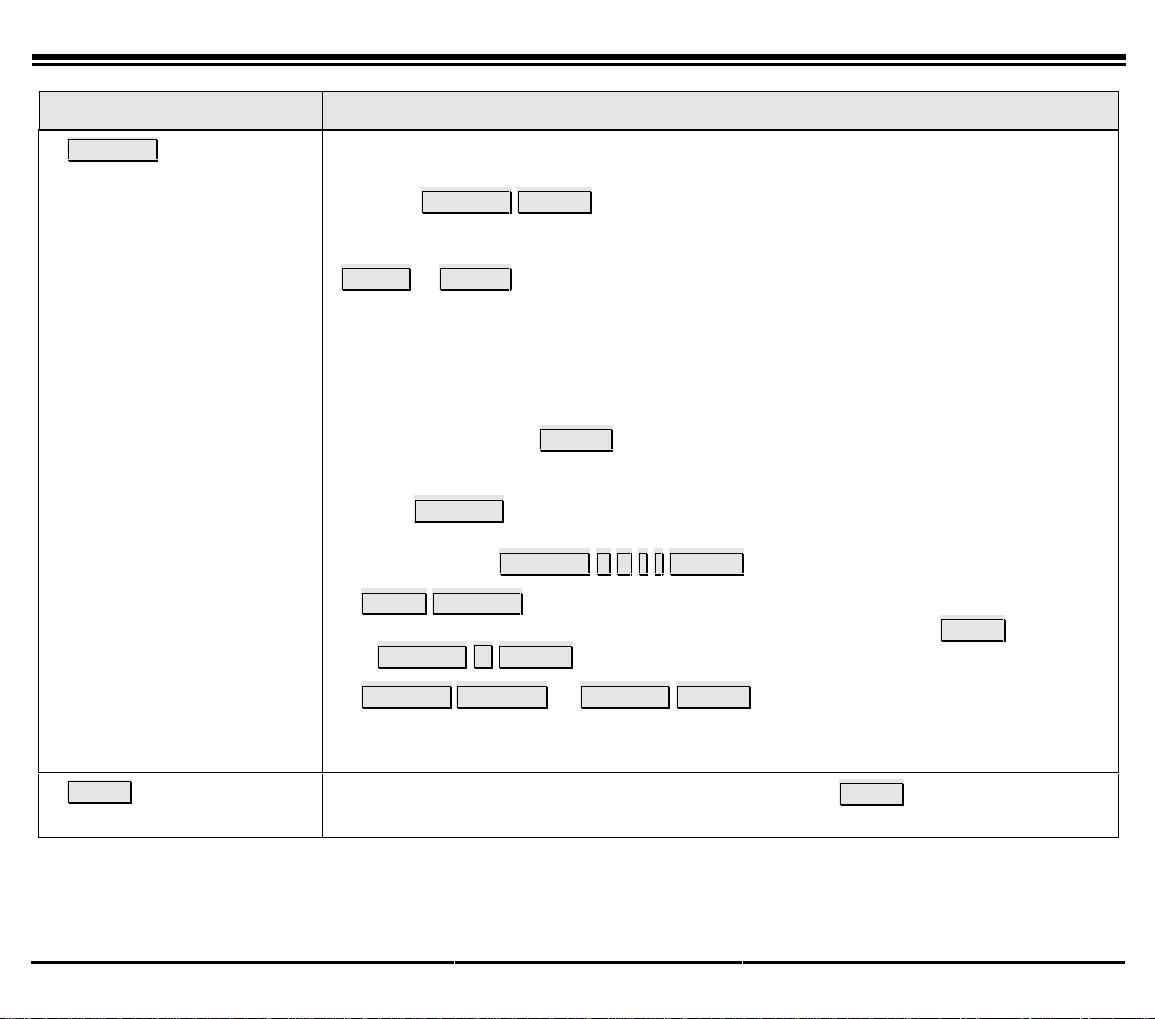
Hard keys; What They Do
A table containing all the GKT Hard keys and the actions they provoke is provided below.
HARD KEY ACTION
ESC •Retreats to the previous menu of the current function.
•Aborts a SEARCH or EDIT session. Aborts a GO TO query.
•Retreats from Directory (DIR) Details mode to Directory Brief mode.
•Exits from the Private Directory to the general Directory.
•Clears calculator display.
•Exits Help screen if context-sensitive Help was invoked.
MENU Function Provides access to all the GKT functions.
FEATURES Function Provides a list of Coral telephony features related to the current telephone state.
See Using the GKT Telephony Features on page 53 for more details.
DIR Function Provides a telephone directory complete with personal and business contacts. Speed
dial by pressing the Softkey located next to the contact name.
See Using the Directory on page 37 for more details.
CALC Function Displays the Calculator function.
See Using the Calculator on page 33 for more details.
HELP Function Accesses on-line help from any point while operating the GKT.
See Using Help on page 35 for more details.
8VLQJWKH+DUGNH\V *.78VHUV*XLGH
HARD KEY ACTION
SEARCH Opens a search window on top of the active function (FEATURES, DIRECTORY,
Calendar, …) display. Enter character string from the alphanumeric keyboard.
Pressing SEARCH ENTER (i.e., searching the null string) performs a search for
that string with the results appearing in alphabetical order. If the search results are
large enough to require more space than one screen can offer, use the Scroll Keys or
PG-UP & PG-DN keys to see the entire query. If the search operation does not find
any matching strings, the message - Item Not Found- is temporarily displayed
and the Graphic Display is restored to the point prior to where the search was
initiated.
The simplest way to conduct a search is to simply enter characters on the GKT
keyboard. The search window will automatically appear with the character string
already entered. Press ENTER to activate.
The other ways to conduct a search include:
•Press SEARCH and enter a character string. This looks for the character string at
the beginning of the words, even within word phrases,
e.g., Pressing SEARCH callENTER can find >'LYHUW&DOO@ and >&DOO:DLWLQJ@.
•SHIFTSEARCH - looks for the character string anywhere in the function being
searched (i.e., also in the middle of the “words”). E.g., pressing SHIFT
SEARCH QENTER can find >3DJH4XHXH@, as well as >:DNHXS5HTXHVW@.
•SEARCHSEARCH or SEARCH ENTER – Returns an alphabetical listing of
all the items in the current function.
GOTO Use to skip to another page in the same function. Press GOTO and enter the page
number you want to skip to.

8VLQJWKH+DUGNH\V *.78VHUV*XLGH
HARD KEY ACTION
PRIVATE Displays the Private Directory records. The system prompts the user for a password
(if defined) to enter the directory. This is a toggle switch, therefore press PRIVATE
again to return to the Favorites List or general Directory.
NOTE! Define your PRIVATE Password in MENU>7RRONLW@>'LU@>6HW3ULYDWH3DVVZRUG@
Also, during an edit session, press PRIVATE to enter (or remove) the contact
information into the PRIVATE directory. Notice that on the orientation line the icon
changes. See Using the Private Directory on page 51 for more information.
DETAILS Changes the Directory function from the Brief mode to the Details mode where all
the details for the selected contact are displayed. Details are available for both DIR
and PRIVATE modes. Press ESC to return DIR. It is also possible to speed dial
from Details Mode. See also Using the Directory on page 37.
EDIT Edits the Directory file by adding, removing or updating entries. Also allows
accessing and manipulating the Favorites List. See Using the Directory on page 37
for more details.
LOCK This is a toggle switch that locks/unlocks the GKT so that it cannot initiate calls.
You can still receive calls. The user is prompted for a passcode to use this feature.
To change the Phone Lock passcode, press FEATURES. Search for Passcode. Enter
the old passcode (if defined – otherwise enter new passcode) from the dial pad.
Enter and re-enter new passcode until confirmed.
NOTE! This passcode (also used to operate other telephony features such as
EXECUTIVE PRIVILEGE and COS SWITCHOVER) is different from the Private
Directory password.
In Lock mode the Softkeys and Function Keys are not operational. A user trying to
operate the GKT will see the -PHONE LOCKED- message.
CAUTION! If you forget the passcode, you will not be able to unlock the GKT.
See your system administrator.
8VLQJWKH+DUGNH\V *.78VHUV*XLGH
HARD KEY ACTION
F1 Calendar View the current month/day/year. You can also view any other date between
January 1900 to December 2100 by scrolling. See Using the Calendar on page 34
for more details.
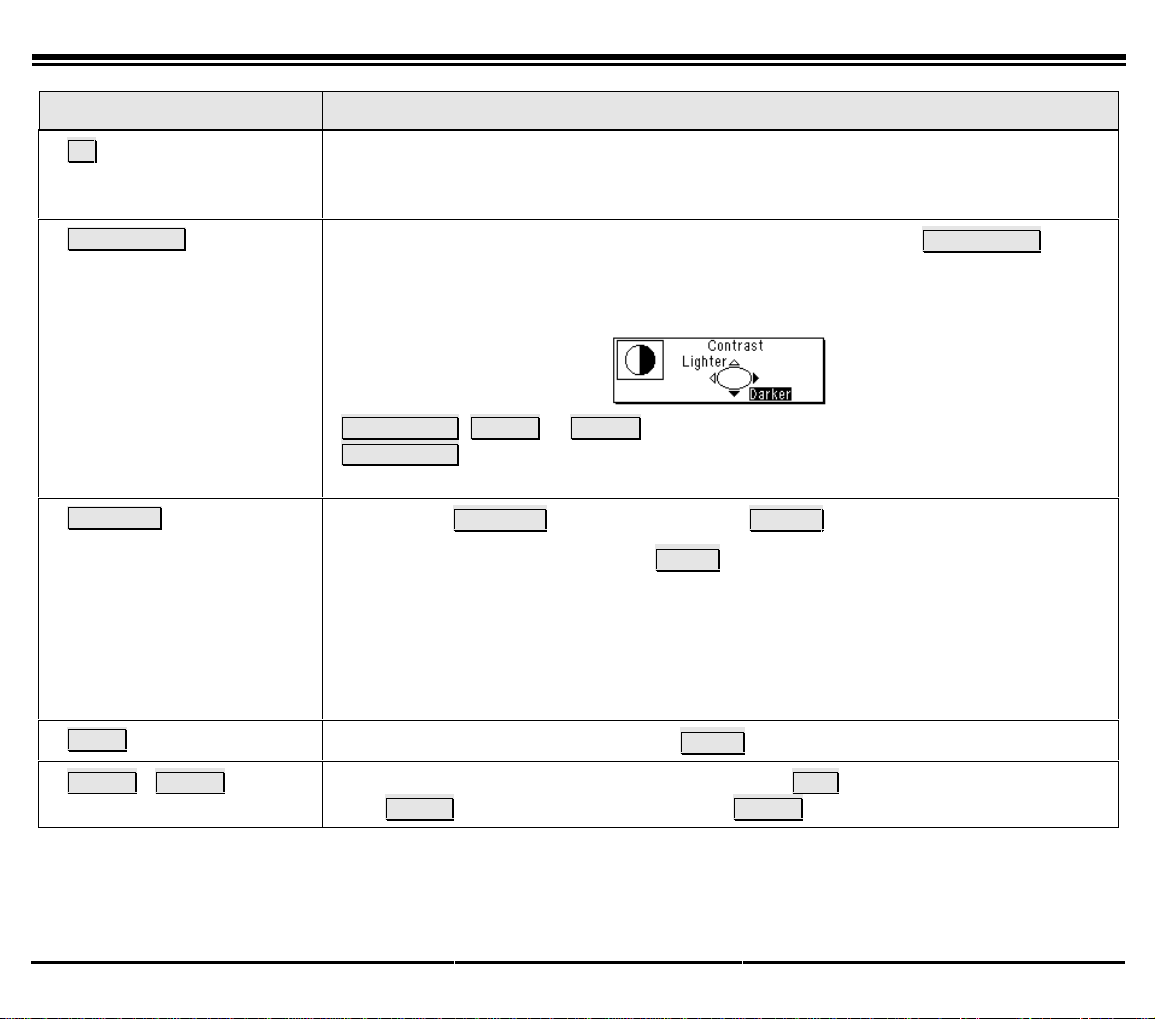
CONTRAST Change the contrast of the GKT display by continuously pressing CONTRAST. The
contrast can be changed cyclically from lighter to darker by using the Contrast
button. The contrast can vary from a value of 1 (lightest) to a value of 15 (darkest).
The default value for the contrast is 7.
CONTRAST, PG UP or PG DN changes the contrast in steps of five (5).
CONTRAST, scroll up or scroll left lightens the contrast in steps of 1. Scroll down
or scroll right to darken the contrast in steps of 1.
ENTER/= NOTE! The ENTER/= key is the same as the ENTER key on the keyboard.
•Use in an EDIT or Toolkit (from MENU) session to move to the next selection.
•Use in the calculator function as an equal “=” sign.
•Use to deploy the Search or GOTO option after entering a character string.
•Use to activate a telephony feature after selecting it with the scroll keys (same as
using the softkey).
SAVE Use to save changes in EDIT mode or MENU>7RRONLW@changes.
PG UP / PG DN Use to scroll pages when the page x of y indicator: 4/11 icon appears on orientation
line. PG UP to scroll backward one screen. PG DN to scroll forward one screen.
8VLQJWKH+DUGNH\V *.78VHUV*XLGH
HARD KEY ACTION
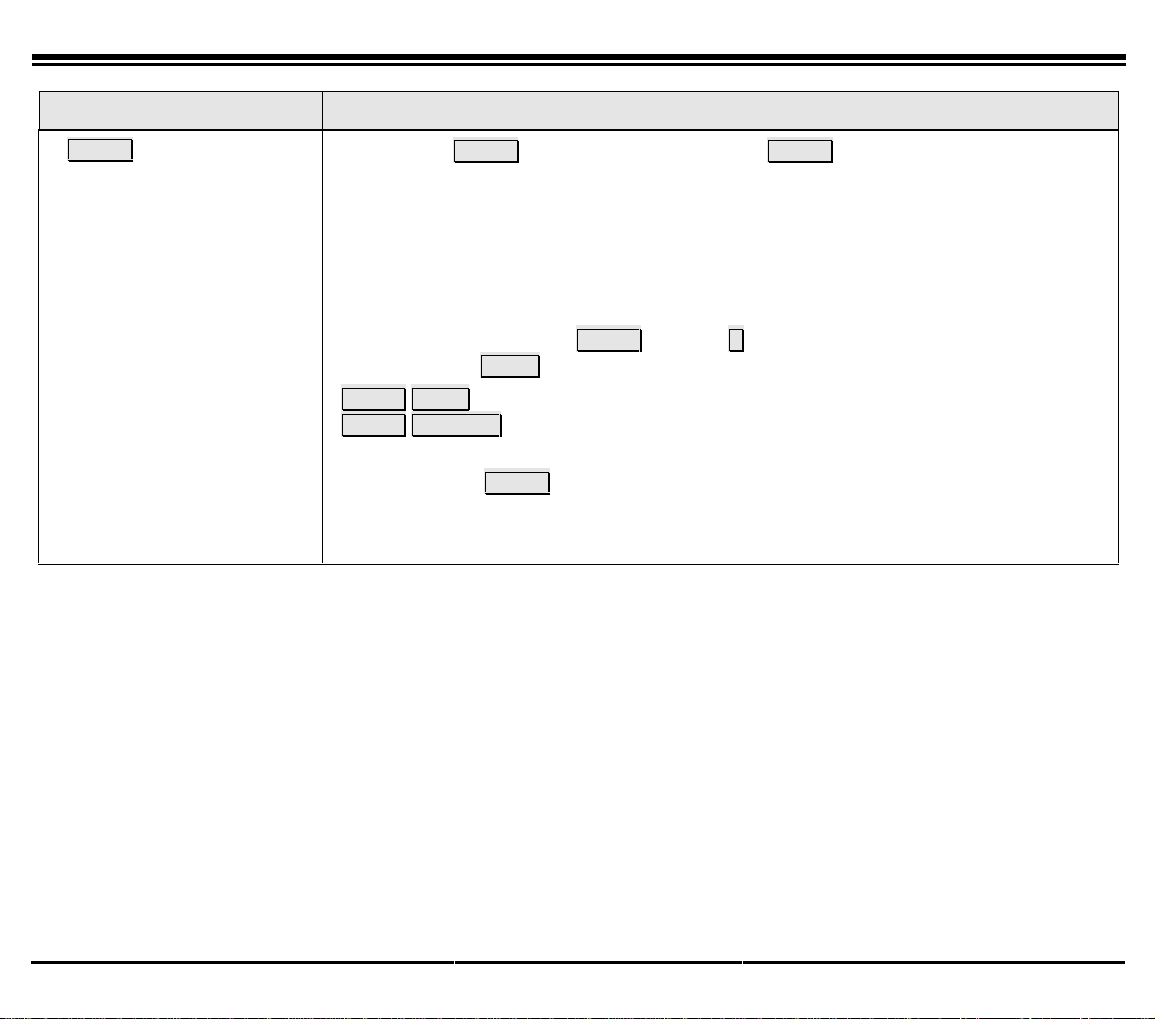
SHIFT NOTE! The SHIFT hard key is the same as the SHIFT key on the keyboard.
Use the Shift key in combination with other keys for enhanced GKT functions such
as with HELP or SEARCH.
SHIFT is always pressed before the next key and not simultaneously with any other
key, allowing simple one-finger operation of the GKT.
Examples:
To print a capital Q, press SHIFT and then q, subsequent letters return to
lowercase. Use CAPS for all uppercase letters.
SHIFTHELP – Displays the Help Table of Contents.
SHIFTSEARCH – Finds character strings in the middle of the words.
Note! Press the SHIFT key, release it, and then the next key. The GKT ignores two
keys pressed simultaneously.

2SHUDWLQJWKH*.7 *.78VHUV*XLGH
OPERATING THE GKT
Operating the GKT is as simple as pressing a button. The GKT options appear in the Graphic Display and
automatically change to reflect the current state of the telephone. Operate the GKT using a combination of Soft and
Hard keys.
Ten Softkeys, 5 located on each side of the Graphic Display, allow you to enable the relevant options as they appear.
The Softkey options change every time the GKT status changes.
The GKT Hard keys are located directly below the display. These are fixed GKT options that can be enabled at any
time, regardless of the GKT status. The Hard keys include Function keys such as: MENU, FEATURES, DIR
CALC, HELP and F1 (Calendar) and Function Aides: such as SEARCH, GOTO, EDIT, PG UP, PG DN. Use
the aides to configure and edit the Function options. See Using the Hard Keys (beginning on page 9) for more details
about the function aides.
Any GKT function can also be accessed by pressing MENU and then choosing the GKT Function by using one of
the Softkeys.
Use ESCto bring the GKT, one screen at a time, to the top level of the current Function. For example, when you are
changing a contact entry in Directory, continuously press ESCto return to the main screen for the Directory.
Pressing ESC however, does not switch between functions. To switch between functions, either use the Function
Hard key or use MENU.
Table of contents


