Aastra CM-16 User manual

CM16.book Page i Friday, June 18, 2004 3:22 PM

Model CM-16 User Guide
i
Table of Contents
SAFETY INFORMATION ...............................................................................................2
Handset and Base Station ..............................................................................................2
Batteries.................................................................................................................................2
INSTALLATION ..............................................................................................................4
Base Station .................................................................................................................... 4, 5
Charging Cradle .................................................................................................................5
Battery Charging ...............................................................................................................6
Belt Clip..................................................................................................................................6
Using a Headset with your Telephone........................................................................6
Battery Status Icons ....................................................................................................6
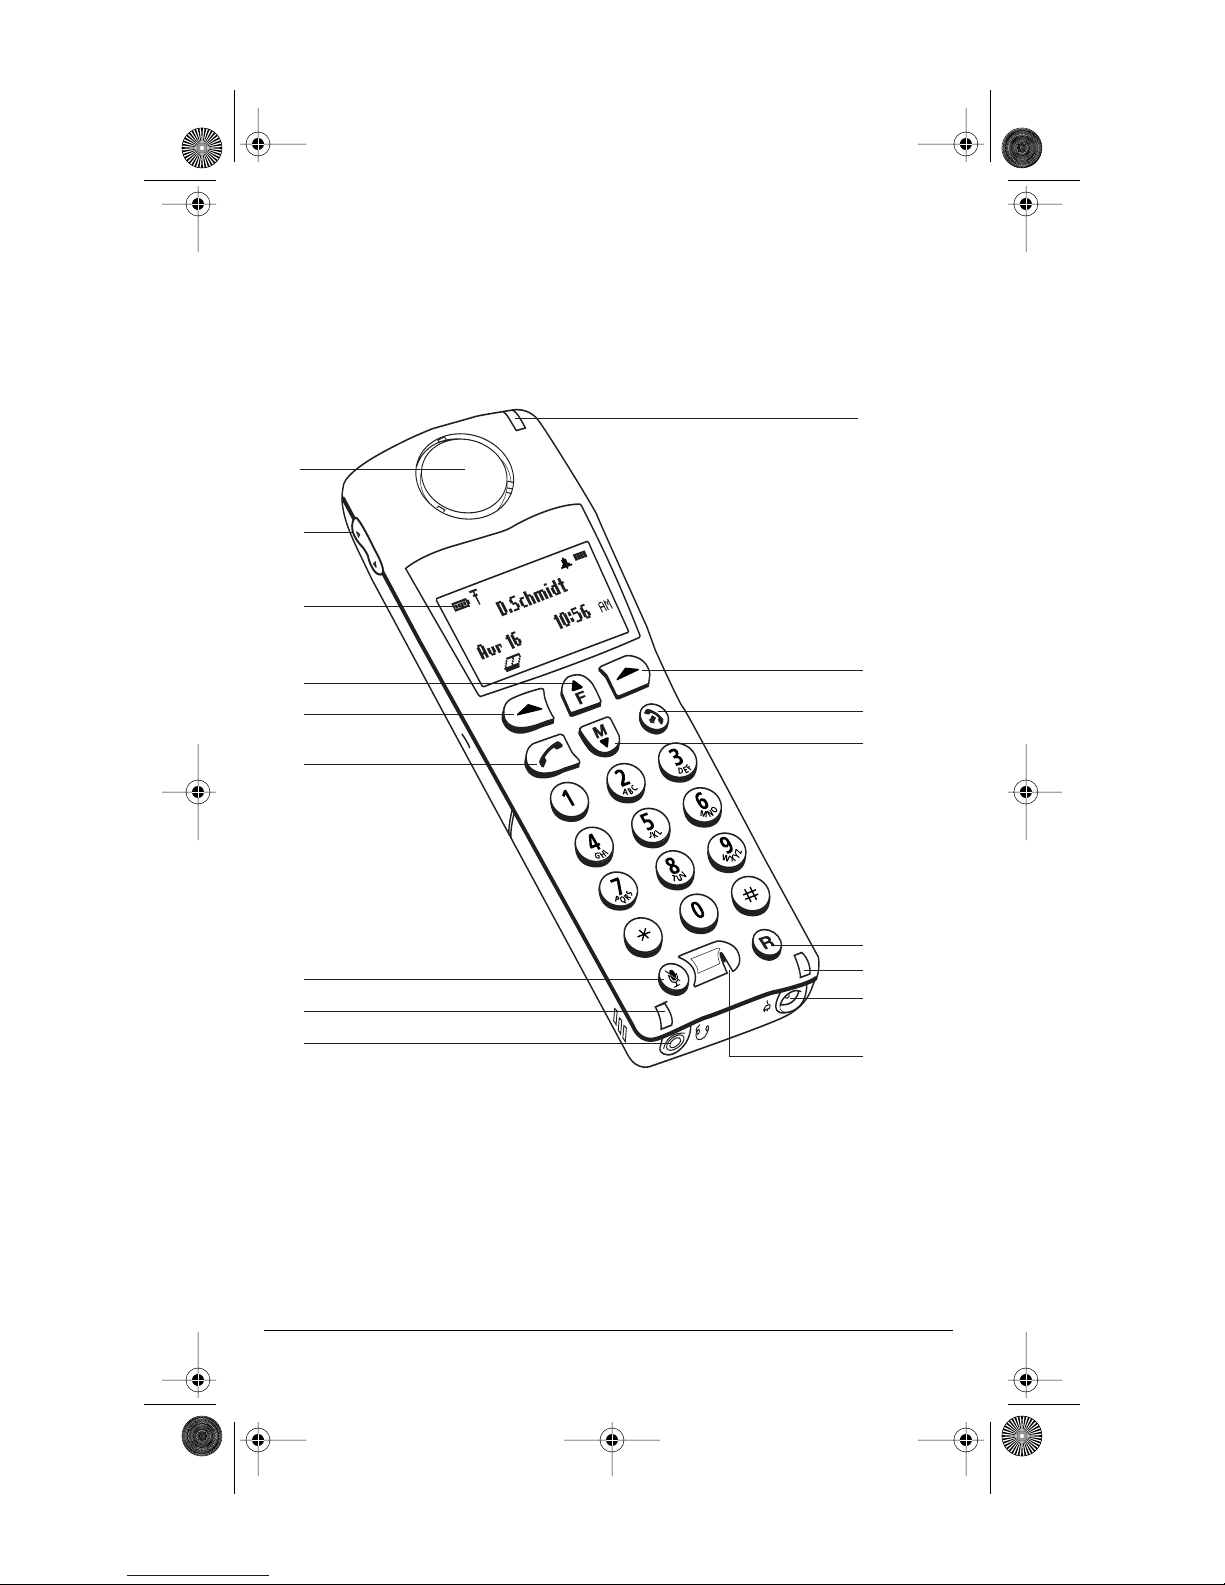
CM-16 HANDSET KEY FUNCTIONS .......................................................................7, 8
Screen Display .............................................................................................................9
Screen Icons .................................................................................................................9
Screen Prompts .........................................................................................................10
Making and Answering Calls ..................................................................................11
Redial .......................................................................................................................... 11
Hold function .............................................................................................................12
Mute Key .....................................................................................................................12
Ringer/Alerter tones .................................................................................................12
Volume Control ..........................................................................................................12
To adjust the receiver volume .................................................................................... 13
To adjust the ringer volume ........................................................................................ 13
Status Light ................................................................................................................13
Feature Key List ........................................................................................................ 13
OPTIONS .....................................................................................................................14
Language ....................................................................................................................14
Key Label .....................................................................................................................15
To edit key label text ..................................................................................................... 15
To delete a single key label ......................................................................................... 15
To delete all feature label text ................................................................................... 15
Ring Tone ...................................................................................................................16
Custom Name ............................................................................................................16
Call Timer ................................................................................................................... 16
Vibrate .........................................................................................................................17
Handset Pairing .........................................................................................................17
Key Lock ......................................................................................................................17
Backlight .....................................................................................................................18
Silent Alert.................................................................................................................. 18
Directory .....................................................................................................................19
Adding a name and number to the Directory ..................................................... 19
Entering Letters and Characters ............................................................................... 19
Finding entries in the Directory ................................................................................ 20
Dialing from the Directory .......................................................................................... 20
Changing entries in the Directory ............................................................................ 20
Deleting an entry in the Directory ........................................................................... 21
Limited Warranty .......................................................................................................22
CM16.book Page i Friday, June 18, 2004 3:22 PM

Model CM-16 User Guide
2
SAFETY INFORMATION
Prior to installing and using the telephone, please read the following
important safety information.
HANDSET AND BASE STATION
Do not:
•
Rely only on this telephone as your only means of communication in
the event of an emergency. As this handset uses radio signals, a connection
to the telephone network cannot be guaranteed in all circumstances.
•
Use this handset near medical equipment such as pacemakers.
•
Place the handset in areas subject to explosive hazards, flammable
liquids or gases.
•
Set up and use the handset close to devices that emit electromagnetic
fields (i.e. electric motors, household appliances, fluorescent lamps,
computers, radios, televisions,VCR’s, DVD’s etc.) Operation of the handset
could be adversely affected if exposed to such fields and, at minimum,
subject to interference and poorer quality voice communication.
•
Locate the handset and base station near water, moisture, damp
areas, heat sources, direct sunlight, areas with excessive dust, vibration
or temperature extremes.
•
Clean the handset using any chemical or commercial cleaner. Use only an
anti-static or soft moistened cloth to clean the handset. Disconnect the
charger stand prior to cleaning.
BATTERIES
Please observe the following guidelines when dealing with the batteries:
•
Never tamper with or dismantle the battery pack
•
Avoid touching the battery contacts
•
If necessary, clean the contacts with a damp cloth
•
Protect the battery contacts from contact with any metal objects
•
Never immerse batteries in water or throw them into a fire
When setting up the phone:
•
Use only the rechargeable batteries supplied with this product
•
Follow the battery installation instructions included with this guide
Note:
That it takes two to three charging cycles for the batteries to reach
their fully charged state.
•
Charge the batteries using only the charger stand supplied with
this product
CM16.book Page 2 Friday, June 18, 2004 3:22 PM

3
Model CM-16 User Guide
In operation:
•
It is normal for the batteries to become warm when charging.
•
Discharge the batteries from time to time to prolong their service life.
To do this, do not place the phone back into the charger stand until the
batteries are completely or almost completely discharged. The battery
icon on the display will indicate when the batteries are low and an alert
tone is sounded every three minutes.
•
Only use batteries and charging units approved by the manufacturer.
•
If you do not intend to use the phone for an extended period, the batteries
should be removed from the handset.
•
Store batteries at room temperature. Above average temperatures tend
to reduce the service life of batteries.
•
Do not throw away or incinerate used batteries. Take them to an
appropriate collection point for recycling or send them back to your
supplier or distributor.
The batteries included with the CM-16 are designed to provide up to four
hours talk time and eighty hours standby time. Actual battery performance
can be affected by a wide variety of environmental and user factors.
REGULATORY INFORMATION
This class B device complies with Part 15 of the FCC rules and ICES-003
Class B Canadian EMI requirements. Operation is subject to the following two
conditions: (1) This device may not cause harmful interference and (2) This
device must accept interference received, including interference that may cause
undesired operation.
CM16.book Page 3 Friday, June 18, 2004 3:22 PM

Model CM-16 User Guide
4
INSTALLATION
The CM-16 consists of a base station,wireless handset and a charging base stand.
The following diagram provides an overview of the installation of the product
using the power supply provided.
Your System Administrator should be aware of the Meridian settings required to
make this telephone operational within your business environment.
Base Station
The base station can be placed on a flat surface or be wall mounted.
For optimum range performance, wall mounting is recommended.
Location of the base station can have significant impact on performance.
It is recommended that the base station be located:
•
Away from metal objects such as filing cabinets, metal blinds or other
metal support structures
•
Away from other electronic devices such as CRT’s, desktop computers and
other cordless products
•
As high as possible with the antennas pointing up in a vertical position.
CM-16 Handset
Charging Cradle
Meridian
®
1
Base Station
CM16.book Page 4 Friday, June 18, 2004 3:22 PM

5
Model CM-16 User Guide
Base Station (continued)
To wall mount the base station:
•
Locate the wall mounting strip located on the back side of the base station
•
Slide the strip out from the base station (Fig A)
•
Turn the strip around and secure firmly to the wall using the screws
supplied (Fig B)
•
Plug the line cord into the jack on the unit
•
Slide the base station over the strip until it clicks into place (Fig C)
Charging Cradle
The charging cradle is designed to be placed on a desk or any similar flat
surface in the vicinity of the base station. To set up the charging cradle:
1. Plug the appropriate power adapter plug into the bottom of the
charging cradle.
2. Plug the other end of the power adapter into an AC outlet. It is
recommended that the adapter should not be plugged in to an electrical
power bar and should be the only item plugged in to the AC outlet.
Figure A Figure B Figure C
CM16.book Page 5 Friday, June 18, 2004 3:22 PM

Model CM-16 User Guide
6
Battery Charging
The handset is powered by a nickel metal hydride battery pack. To install and
charge the battery
:
To confirm that the battery is charging, check the battery icon symbol on the
handset display to see if the lines inside the icon are flashing left to right.
Note: The battery must be charged for a minimum of six hours prior to initial usage
of the phone.
Belt Clip
To install the belt clip, snap one arm of the clip into the slot on the side of
the handset and then slide the other arm into the slot on the other side of the
handset until it snaps into place.
Using a Headset with your Telephone
The CM-16 accepts headsets through the jack on the bottom of the
handset. Contact your telephone equipment retailer or distributor
to purchase a compatible headset. Customers should read and observe
all safety recommendations contained in headset operating guides
when using any headset.
BATTERY STATUS ICONS
The display provides “at a glance” information on the handset battery
Note:
The handset is designed to recharge the batteries automatically, when required
and placed on the charger stand. The battery icon will not flash and the handset
does not charge every time it is placed on the stand. If a defective battery is replaced,
then the battery Icon is not identified until the new battery is charged for
at least 2 minutes.
1. Slide the cover off of the battery compartment.
2. Place the battery pack in the compartment with the connector wires
pointing towards the bottom of the handset.
3. Connect the battery terminal wire to the charging pins located
in the compartment
4. Slide the cover of the battery compartment back onto the handset
5. Place the handset, face up, in the charging cradle.The handset should
easily slide into the charging cradle. If it does not, check the battery
compartment cover to ensure it is in the proper position.
The bars indicate the battery charge level — 4 for full,
needs recharging when only 1 bar appears.
The bars will flash when the battery is being
recharged on the charger stand
.
CM16.book Page 6 Friday, June 18, 2004 3:22 PM

7
Model CM-16 User Guide
C
M-16 HANDSET KEY FUNCTIONS
1
2
3
4
5
6
7
14
8
9
5
10
11
12
14
13
15
CM16.book Page 7 Friday, June 18, 2004 3:22 PM

Model CM-16 User Guide
8
CM-16 HANDSET KEY FUNCTIONS
Function # Function Description
1 Receiver
2 Volume key
•
During Ringing: Adjusts ringer volume
•
During a call: Adjusts receiver volume
•
During text mode (not in a call):
Moves cursor right/left
3 Display
4 Features FF
FF
Key List
•
Access key to the M1 Feature key list
•
Scrolls up when in the various lists
•
Add a space during editing
5 Softkeys
•
Activates feature or option shown on
the display above the keys
6 Call key OO
OO
•
Used to obtain dial tone
•
Also used as a Hold key
7 Mute
XX
XX
key
•
When used, prevents the caller from hearing you
8 Headset jack
9 Status Light
10 Release II
II
key
•
To end calls and go on hook
•
Exits Menu and the various lists.
11 Menu MM
MM
key
•
Access key to the different Options
•
Scrolls down when in the various lists.
•
Used as Backspace during editing
12 Redial rr
rr
key
•
Displays the last 10 numbers dialed
13 Charging jack
14 Charging contacts
15 Microphone
CM16.book Page 8 Friday, June 18, 2004 3:22 PM

9
Model CM-16 User Guide
SCREEN DISPLAY
The screen display on the CM-16 provides five lines, 15 characters per
line of display area. Pressing any key will light up the display if the Backlight
option is On.
The display provides a variety of information, using text or icons, pertaining
to set status, including battery strength, reception range and selected
settings. Caller information, option menus, instructions, time and date and
general information about calls in progress may also appear.
In addition, at the bottom of the screen display, softkey functions will appear.
These functions or options change based on activity and can be activated
by pressing the appropriate key just below the display. For M1 functions, the
screen can display functions that are activated by pressing the softkey.
See the
“Features List”
section of this guide for more information.
Note:
Whenever the display indicates UU
UUss
ssee
ee
sr
tt
ttoo
oo vv
vvii
iiee
eeww
ww
use the EE
EE
key to scroll
up and the
LL
LL
key to scroll down.
SCREEN ICONS
Battery Strength
4 bars for battery full and the bars
flash when charging
Reception Range
Indicates that the handset is within range of the Base
Station and that the Base Station is powered.
Call in progress
Indicates that you are off hook
PP
PP Message Waiting
Indicates a message waiting
Vibrate
Vibrate activated
* This symbol indicates that vibrate is active.
The difference between vibrate and silent alert is
that the phone will also ring in vibrate mode,
but will not in silent alert mode.
Directory
Directory, which can store up to 50 names and
numbers in alphabetical order. Note that the
Directory Softkey can be overwritten by a feature
key during a call. The directory softkey can always
be accessed from within the options list.
CM16.book Page 9 Friday, June 18, 2004 3:22 PM

Model CM-16 User Guide
10
SCREEN PROMPTS
Ringer Volume
This Icon appears when the phone is not in use
to indicate the ringer volume level. As the ringer
volume level is increased, from off to high, the
box will go from empty to fully black.
This icon does not appear when silent alert
is activated.
The bell icon and the vibrate icon can be present at
the same time. This means both the vibrate and audio
alerters are active. If the vibrate icon is shown,
that means the phone is in silent alert mode. If just
the bell is displayed, then the phone is in normal
alert mode with only the audible alert active.
Receiver Volume
This Icon is available only when the phone is
Off hook.
Displays the receiver audio volume from
low to high with the box gradually filling up
as the volume level is increased.
Display Message Description
MM
MMii
iicc
ccrr
rroo
oopp
pphh
hhoo
oonn
nnee
ee mm
mmuu
uutt
ttee
ee Indicates when the Mute button has
been Activated
OO
OOuu
uutt
tt oo
ooff
ff rr
rraa
aann
nngg
ggee
ee Appears briefly when pressing a key if out of
range of the base station
CC
CChh
hhee
eecc
cckk
kk LL
LLii
iinn
nnee
ee CC
CCoo
oorr
rrdd
dd Will appear if the line cord is not properly
connected to the base station.
CM16.book Page 10 Friday, June 18, 2004 3:22 PM

11
Model CM-16 User Guide
MAKING AND ANSWERING CALLS
To make a call:
Press the OO
OO key to obtain dial tone and use the Keypad to dial the number
OR
Predial the number first using the Keypad. The number, as entered,will appear
on the display. If the number is correct, press the OO
OO key to dial the number.
If number is incorrect use the LL
LL key or press down on the volume key to erase
digits from right to left.
If you need to add a pause to a number (for example, between a telephone
number and an access code) press the PP
PPaa
aauu
uuss
ssee
eeKK
KKee
eeyy
yy softkey to insert a 2 second
pause into the number.
Calls can also be made directly from the Directory. See the “Directory”
portion of this guide for further information.
To end a call:
Press II
II key
OR
Return the handset to the charging cradle.
To answer a call:
Press the OO
OO key to answer an incoming call or lift the handset out of the
charging cradle.
REDIAL
To redial the last 10 numbers:
When on hook
•Press rr
rr key, and use the EE
EE and the LL
LL keys to scroll up and down through
the list of the last ten numbers dialed
•Press the OO
OO key to dial the selected number or press the Line softkey to
select an outgoing line and the Select softkey and the selected number will
automatically be redialed
When off hook
•Press rr
rr key and the last number dialed will automatically be redialed.
In addition to redialing the last 10 numbers, the CM-16 allows
redialed numbers to be deleted from the redial list or saved to the
Directory, while on hook.
To add a redialed number to the directory:
•Press rr
rr key, and use the EE
EE and the LL
LL keys to scroll up and down through
the list of the last ten numbers dialed.
CM16.book Page 11 Friday, June 18, 2004 3:22 PM

Model CM-16 User Guide
12
•Once the selected number appears on the display, press the OO
OOpp
pptt
ttii
iioo
oonn
nnss
ss
softkey — the display shows SS
SSaa
aavv
vvee
ee 4DD
DDii
iirr
rree
eecc
cctt
ttoo
oorr
rryy
yy aa
aann
nndd
dd
s
==
==
ee
eexx
xxtt
tt
•Press the SS
SSee
eell
llee
eecc
cctt
tt softkey. If there is no name associated with the
number, the display will prompt, to enter a name to save the entry.
Use the instructions in the section AA
AAdd
dddd
ddii
iinn
nngg
gg aa
aa
aa
aamm
mmee
ee aa
aann
nndd
dd
uu
uumm
mmbb
bbee
eerr
rr tt
ttoo
oo tt
tthh
hhee
ee
DD
DDii
iirr
rree
eecc
cctt
ttoo
oorr
rryy
yy to save the entry in the Directory. If there is a name associated
with the number it will automatically save it to the directory and briefly
indicate ii
iitt
ttee
eemm
mm ss
ssaa
aavv
vvee
eedd
dd.
To delete an entry in the Redial list:
•Press rr
rr key, and use the EE
EE and the LL
LL keys to scroll up and down through
the list of the last ten numbers dialed
•Once the selected number appears on the display, press the OO
OOpp
pptt
ttii
iioo
oonn
nnss
ss softkey
and the LL
LL key once — the display shows DD
DDee
eell
llee
eett
ttee
ee aa
aann
nndd
dd
s
==
==
ee
eexx
xxtt
tt
•Press the SS
SSee
eell
llee
eecc
cctt
tt softkey. The display will show DD
DDee
eell
llee
eett
ttee
ee aa
aagg
ggaa
aaii
iinn
nn tt
ttoo
oo
ee
eerr
rraa
aass
ssee
ee tt
tthh
hhii
iiss
ss ii
iitt
ttee
eemm
mm.
•Press the DD
DDee
eell
llee
eett
ttee
ee softkey to erase the entry. Display shows II
IItt
ttee
eemm
mm ee
eerr
rraa
aass
ssee
eedd
dd.
You can return to the main display any time by pressing the II
II key.
HOLD FUNCTION
To place a call on hold, press the OO
OO key. To take a call off hold, press the
OO
OO key again.
MUTE KEY
Use the mute key when you want to be able to hear a caller but have
them not hear you. Press the XX
XX key to mute the handset. Press the XX
XX key again
to disengage mute.
ALERTER TONES
The CM-16 uses tones to provide information as follows:
VOLUME CONTROL
The volume key, located on the side of the handset, controls both the receiver
and ringer volume.
Low Battery one tone every three minutes
Out of Range whenever handset loses connection to base station
Check
Line Cord
Whenever you try to establish a link with the base
station and the DC power is not plugged in and/or
the line cord is not plugged into the base.
CM16.book Page 12 Friday, June 18, 2004 3:22 PM

13
Model CM-16 User Guide
Note: The volume key can also be used to adjust the right/left cursor to add spaces or
to erase characters on the display when editing or creating names, key labels etc.
To adjust the receiver volume:
•While on a call, press the top of the key to increase the receiver volume and
press the bottom of the key to decrease the volume. The receiver volume
icon on display will indicate the current volume level. In absence of a PBX,
the receiver volume returns to the default setting after each call. However,
the PBX directive can direct the handset default to the volume.
To adjust the ringer volume:
•When the handset is not being used for a call, press the top of the key
to increase the ringer volume and press the bottom of the key to decrease
the ringer volume. The handset ringer will sound on each adjustment to
reflect the new setting and the ringer volume icon on display will also show
the current level chosen.
STATUS LIGHT
The green LED light on the handset indicates the following conditions:
FEATURES LIST
There are 14 Meridian features available through the CM-16. The features list
can be accessed through the Feature FF
FF key of the CM-16. When scrolling
through the features list, a darker scroll bar highlights the feature that can be
selected. If the Meridian features are labeled instead of pre-programmed
and identified on handset, the features list on the CM-16 menu display will
be identified by item numbers from 00 to 14 with no text (example <<
<<00
0099
99>>
>>)
oo
oott
ttee
ee
tt
tthh
hhaa
aatt
tt MM
MMee
eerr
rrii
iidd
ddii
iiaa
aann
nn KK
KKee
eeyy
yy 00
0077
77 aa
aann
nndd
dd 11
1155
55 ff
ffee
eeaa
aatt
ttuu
uurr
rree
eess
ss aa
aarr
rree
ee nn
nnoo
oott
tt aa
aavv
vvaa
aaii
iill
llaa
aabb
bbll
llee
ee oo
oonn
nn tt
tthh
hhee
ee CC
CCMM
MM--
--11
1166
66..
..
Also, the first kk
kkee
eeyy
yy ((
((00
0000
00))
)) in the list will always be the primary DN.
• Each feature can be labeled manually through the Edit option. See the
“Key Label“ option in this guide for detailed labeling instructions.
•The 4indicates that the feature is activated or flashing during
the program state.
•To activate one of the features press the SS
SSee
eell
llee
eecc
cctt
tt Softkey.
•To cancel an activated M1 feature key, press the CC
CCaa
aann
nncc
ccee
eell
ll Softkey or
II
II key to end the call.
See your system administrator and your M2600/M2616 user guide for further
information on Meridian features available.
Incoming call flashes rapidly Call on hold solid green
Handset muted flashes rapidly Features activated
(only while on hook) /
message waiting
solid green
CM16.book Page 13 Friday, June 18, 2004 3:22 PM

Model CM-16 User Guide
14
OPTIONS
To access the options list:
Note: The Menu and Options display revert to the regular idle mode display
if no action/activity is initiated within 20 seconds.
Press II
II key to quit at any time and to return to the main idle display screen.
Language
The CM-16 offers a choice of English, French and Spanish display languages.
The default language setting is English. The language display in use is always
identified with a check mark.
To change the display language, follow the display menu prompts using
the two softkeys as required to change, cancel or select a language option.
The display will always show ——
——cc
ccoo
oonn
nnff
ffii
iirr
rrmm
mmee
eedd
dd——
—— when the selection is changed.
Pressing the CC
CCaa
aann
nncc
ccee
eell
ll softkey will return you to the previous display.
Pressing the II
II key will return you to the main idle display screen.
1. Press the MM
MM key when the phone is not in use — the display will
indicate UU
UUss
ssee
ee
sr
tt
ttoo
oo vv
vvii
iiee
eeww
ww. Use the EE
EE and LL
LL keys for scrolling.
2. There are ten options that can be accessed by either scrolling to
the option or by using the keypad to dial the option number as per
the table below.
Option # Options list
1Language
2Key label
3Ring tone
4Custom name
5Timer Off
6Vibrate Off
7Hset pairing
8Key lock Off
9Backlight Off
10 Silent Alert Off
CM16.book Page 14 Friday, June 18, 2004 3:22 PM

15
Model CM-16 User Guide
Key label
The Key label option gives access to the display text associated with the 14
Meridian features that can be programmed with to CM-16 handset.
Text to identify a specific feature can be added, modified or deleted or all
feature key text can be deleted at once. Labels can have up to 14 characters.
To edit key label text
Press the CC
CChh
hhaa
aann
nngg
ggee
ee softkey from the key label display
•At the Edit display screen, press SS
SSee
eell
llee
eecc
cctt
tt softkey — this will display the
key label 00
0000
00
•Use the scroll keys to find the feature key desired
•Press the EE
EEdd
ddii
iitt
tt softkey
•Use the keypad to type out a new label or use the scroll keys EE
EE and LL
LL to
move the cursor to the desired display position or to erase text. (See
EE
EEnn
nntt
ttee
eerr
rrii
iinn
nngg
gg LL
LLee
eett
tttt
ttee
eerr
rrss
ss aa
aann
nndd
dd CC
CChh
hhaa
aarr
rraa
aacc
cctt
ttee
eerr
rrss
ss in the Directory portion of this guide for
additional details regarding adding a name using the keypad)
•The CC
CChh
hhCC
CCaa
aass
ssee
ee softkey changes the screen text between Upper and Lower case
•The SS
SSaa
aavv
vvee
ee softkey saves changes made
Use the II
II key at any time to exit the option menu.
Note: In editing mode, the Volume Bar can be used in place of the ( EE
EE and LL
LL ) keys
to control the screen cursor
•Press the Lower end volume bar for Backspace/Erase
•Press the Higher end volume bar to add a Space
To delete a single key label
•At the Edit display screen: Press the CC
CChh
hhaa
aann
nngg
ggee
ee softkey from the
key label display
•Press SS
SSee
eell
llee
eecc
cctt
tt softkey — this will display the key label 00
0000
00
•Use the scroll keys to find the feature key desired
•Press DD
DDee
eell
llee
eett
ttee
ee to delete the text associated with the feature
To delete all feature label text
•Press the CC
CChh
hhaa
aann
nngg
ggee
ee softkey from the key label display
•Press the LL
LL key to move to the DD
DDee
eell
llee
eett
ttee
ee AA
AAll
llll
ll option display
•Press SS
SSee
eell
llee
eecc
cctt
tt softkey — display indicates PP
PPrr
rree
eess
ssss
ss dd
ddee
eell
llee
eett
ttee
ee tt
ttoo
oo cc
ccoo
oonn
nnff
ffii
iirr
rrmm
mm
•Press DD
DDee
eell
llee
eett
ttee
ee softkey to delete all labels
CM16.book Page 15 Friday, June 18, 2004 3:22 PM

Model CM-16 User Guide
16
Ring Tone
The CM-16 offers the choice of four different ring tones.
To change the ring tone, follow the display menu prompts using the two
softkeys as required to change, cancel or select a ring tone. Each of the four
ring tones can be heard prior to selection. The display will always show
——
——cc
ccoo
oonn
nnff
ffii
iirr
rrmm
mmee
eedd
dd——
—— to indicate when a selection has been made.
Pressing the CC
CCaa
aann
nncc
ccee
eell
ll softkey returns you to the options list.
Pressing the II
II key returns you to the main idle display screen.
Custom Name
This option allows a name or extension number etc. to be added/edited and
displayed in idle mode. In a multi-handset environment, this is an ideal option
to personalize each handset to its user or extension number.
From the Custom name option display, press the CC
CChh
hhaa
aann
nngg
ggee
ee softkey and then
the EE
EEdd
ddii
iitt
tt softkey. If an existing custom name already appears on the display,
the DD
DDee
eell
llee
eett
ttee
ee softkey is also shown and can be used to delete a custom name.
•Use the keypad to type out a new label or use the scroll keys EE
EE and LL
LL
to move the cursor to the desired display position or to erase text.
(See entering names in the“Directory” for additional details.)
•The CC
CChh
hhCC
CCaa
aass
ssee
ee softkey changes the screen text between upper and lower case
•The SS
SSaa
aavv
vvee
ee softkey saves changes made
Pressing the II
II key returns you to the main idle display screen.
Note: In editing mode, the Volume Bar can be used in place of the ( EE
EE and LL
LL ) keys to
control the screen cursor
•Press the Lower end volume bar for Backspace/Erase
•Press the Higher end volume bar to add a Space
Call Timer
The duration of calls can be displayed by using this option. By default, the
Call Timer option is always Off.
To turn the timer on, press the CC
CChh
hhaa
aann
nngg
ggee
ee softkey and the display will indicate
TT
TTii
iimm
mmee
eerr
rr OO
OOnn
nn and ––
––cc
ccoo
oonn
nnff
ffii
iirr
rrmm
mmee
eedd
dd--
-- and will quickly return to the previous menu display.
Pressing the II
II key will return you to the main idle display screen.
CM16.book Page 16 Friday, June 18, 2004 3:22 PM

17
Model CM-16 User Guide
Vibrate
The Vibrate option allows the CM-16 handset to signal an incoming call by
vibrating as well as ringing. By default, this option is always Off.
To enable this feature, press the CC
CChh
hhaa
aann
nngg
ggee
ee softkey and the display will
indicate VV
VVii
iibb
bbrr
rraa
aatt
ttee
ee OO
OOnn
nn and--
--cc
ccoo
oonn
nnff
ffii
iirr
rrmm
mmee
eedd
dd--
-- and will quickly return to the previous
menu display.
Once the Vibrate is On, the is shown beside the ringer icon on the top
right line of the display.
Pressing the II
II key will return you to the main idle display screen.
Handset Pairing
The Handset Pairing option provides flexibility by allowing any CM-16 handset
to work with any CM-16 base station. Each handset is factory programmed to
work only with the base station shipped with the product.
When using this option, be sure to keep the handset at least a few feet away
from the base station. The handset does not need to be placed right in front of
the base station when pairing and may not, in fact, be able to pair if too close
to the base station.
To program the handset to work with another CM-16 base station in this
option, press the CC
CChh
hhaa
aann
nngg
ggee
ee softkey and the display will indicate AA
AAtt
tttt
ttee
eemm
mmpp
pptt
ttii
iinn
nngg
gg
pp
ppaa
aaii
iirr
rrii
iinn
nngg
gg. If successful, the display will indicate PP
PPaa
aaii
iirr
rrii
iinn
nngg
gg ss
ssuu
uucc
cccc
ccee
eess
ssss
ssff
ffuu
uull
ll. If the pairing
does not occur, the display will indicate PP
PPaa
aaii
iirr
rrii
iinn
nngg
gg ff
ffaa
aaii
iill
llee
eedd
dd TT
TTrr
rryy
yy aa
aagg
ggaa
aaii
iinn
nn.
Pressing the II
II key will return you to the main idle display screen.
Key Lock
The key lock option enables the user to lock the keypad keys. This prevents
accidental activation of the phone while carrying it, putting in a pocket etc.
To lock the keys from the key lock option page:
•Press CC
CChh
hhaa
aann
nngg
ggee
ee softkey to turn Key lock ON or Off. The screen will display
KK
KKee
eeyy
yy ll
lloo
oocc
cckk
kk OO
OOnn
nn or KK
KKee
eeyy
yy ll
lloo
oocc
cckk
kk OO
OOff
ffff
ff --
--cc
ccoo
oonn
nnff
ffii
iirr
rrmm
mmee
eedd
dd--
--
Pressing the II
II key will return you to the main idle display screen.
Note: You can active the Key Lock Off or On by pressing only the M key and then the
* asterisk key.
CM16.book Page 17 Friday, June 18, 2004 3:22 PM

Model CM-16 User Guide
18
Backlight
The Backlight option enables the user to have the display diffuser lighted
or not when a keypad key is pressed. Press CC
CChh
hhaa
aann
nngg
ggee
ee softkey to turn Backlight
ON or Off.
Once the Backlight option is chosen, the screen will display BB
BBaa
aacc
cckk
kkll
llii
iigg
gghh
hhtt
tt OO
OOnn
nn
or BB
BBaa
aacc
cckk
kkll
llii
iigg
gghh
hhtt
tt OO
OOff
ffff
ff --
--cc
ccoo
oonn
nnff
ffii
iirr
rrmm
mmee
eedd
dd--
--
Silent Alert
The Silent Alert option will activate an internal hardware vibrator
instead of a regular ringer during an incoming call. By default, the Silent Alert
is automatically set to Off.
To activate Silent Alert from the option display:
•Press CC
CChh
hhaa
aann
nngg
ggee
ee softkey to turn alert On or Off. The display will show
––
––cc
ccoo
oonn
nnff
ffii
iirr
rrmm
mmee
eedd
dd--
-- and the handset will vibrate if the alert has been turned on
Once the Alert is On, the is shown on the Top line of the display.
Note: You can active or deactivate the Silent alert by pressing only the LL
LL key and
then the # key.
Note: The Ringer Icon does not appear on the display when the Silent alert is On.
CM16.book Page 18 Friday, June 18, 2004 3:22 PM

19
Model CM-16 User Guide
DIRECTORY
The directory can store up to 50 names and numbers, which are displayed
in alphabetical order. If no name is entered, the entries are sorted by number,
at the beginning of the directory.
Adding a name and number to the Directory
Pressing the II
II key will return you to the main idle display screen. If this key is
pressed before the item is saved, it will not be saved.
Note: Names and numbers can also be copied into the Directory from the Redial list.
See the Redial section for additional details.
Entering Letters and Characters
You can enter characters using the telephone’s dial pad. To enter a letter,
press the key with that letter on it. If the letter is the second one on that key,
press the key twice. For example, to enter the letter“r”, press the 7 key three
times. The cursor will then advance to the next space.
To change the case of a letter, press the CC
CChh
hhCC
CCaa
aass
ssee
ee softkey and then enter the
letter. By default, the first letter of a word or name will be capitalized and the
letters following will be lower case.
Special characters are entered by pressing the 1 key. Characters will appear
in this order: , - ‘ & . ()1
1. Press Directory softkey
2. Press AA
AAdd
dddd
dd softkey. Display prompts EE
EEnn
nntt
ttee
eerr
rr nn
nnuu
uumm
mmbb
bbee
eerr
rr
3. Enter the number using the keypad. You can enter up to 24 digits.
Hyphens will be automatically added. If you need to enter a pause
(between your voice mail number and password, for example) press
the PP
PPaa
aauu
uuss
ssee
eeKK
KKee
eeyy
yy softkey and the pause icon will appear. To erase a digit,
use the LL
LL key or press the bottom of the volume bar.
4. Press the SS
SSaa
aavv
vvee
ee softkey. The display will prompt EE
EEnn
nntt
ttee
eerr
rr nn
nnaa
aamm
mmee
ee. If no name
is to be used for this directory entry, press the SS
SSaa
aavv
vvee
ee softkey again,
the display will show II
IItt
ttee
eemm
mm ss
ssaa
aavv
vvee
eedd
dd
5. Enter a name using the letters on the dial pad. The name can have up
to 15 characters,including spaces. See the section EE
EEnn
nntt
ttee
eerr
rrii
iinn
nngg
gg LL
LLee
eett
tttt
ttee
eerr
rrss
ss aa
aann
nndd
dd
CC
CChh
hhaa
aarr
rraa
aacc
cctt
ttee
eerr
rrss
ss for more details regarding entering text on display.
To erase a letter or to add a space use the EE
EE and LL
LL keys or the volume
bar to move the screen cursor position.
6. Press the SS
SSaa
aavv
vvee
ee softkey. The display will show II
IItt
ttee
eemm
mm ss
ssaa
aavv
vvee
eedd
dd.
CM16.book Page 19 Friday, June 18, 2004 3:22 PM
Other manuals for CM-16
5
Table of contents
Other Aastra Telephone manuals

Aastra
Aastra 480 Guide User manual

Aastra
Aastra M9316CW User manual

Aastra
Aastra M760E User manual

Aastra
Aastra 9110 User manual

Aastra
Aastra 6867i User manual

Aastra
Aastra 480E User manual

Aastra
Aastra 6751i RP User manual

Aastra
Aastra 9110 User manual

Aastra
Aastra 9417CW User manual

Aastra
Aastra 6771 User manual

Aastra
Aastra SIP-DECT Instruction Manual

Aastra
Aastra DBC 225 Manual

Aastra
Aastra CM-16 User manual

Aastra
Aastra dialog 4224 Operator User manual

Aastra
Aastra 600d User manual

Aastra
Aastra 470 User manual

Aastra
Aastra 5380 User manual

Aastra
Aastra 6721ip User manual

Aastra
Aastra Dialog 4220 Lite User manual

Aastra
Aastra 8009 User manual