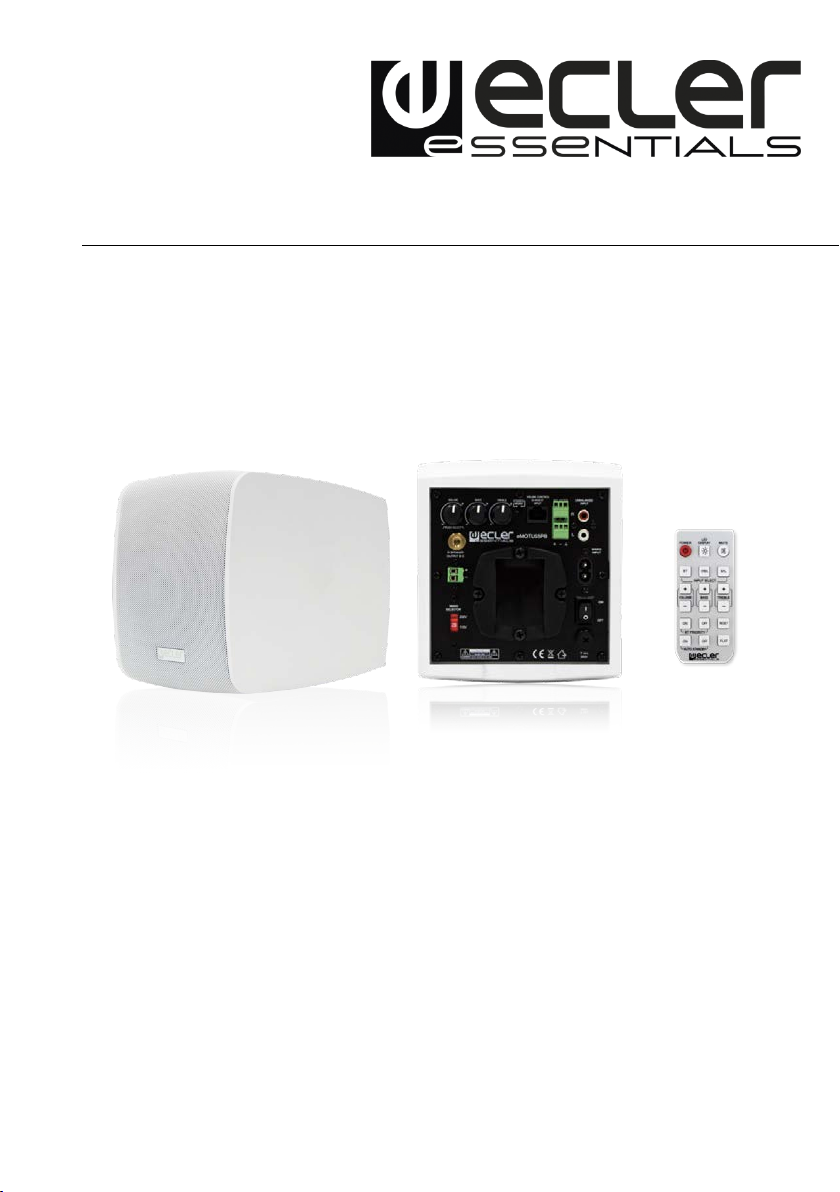
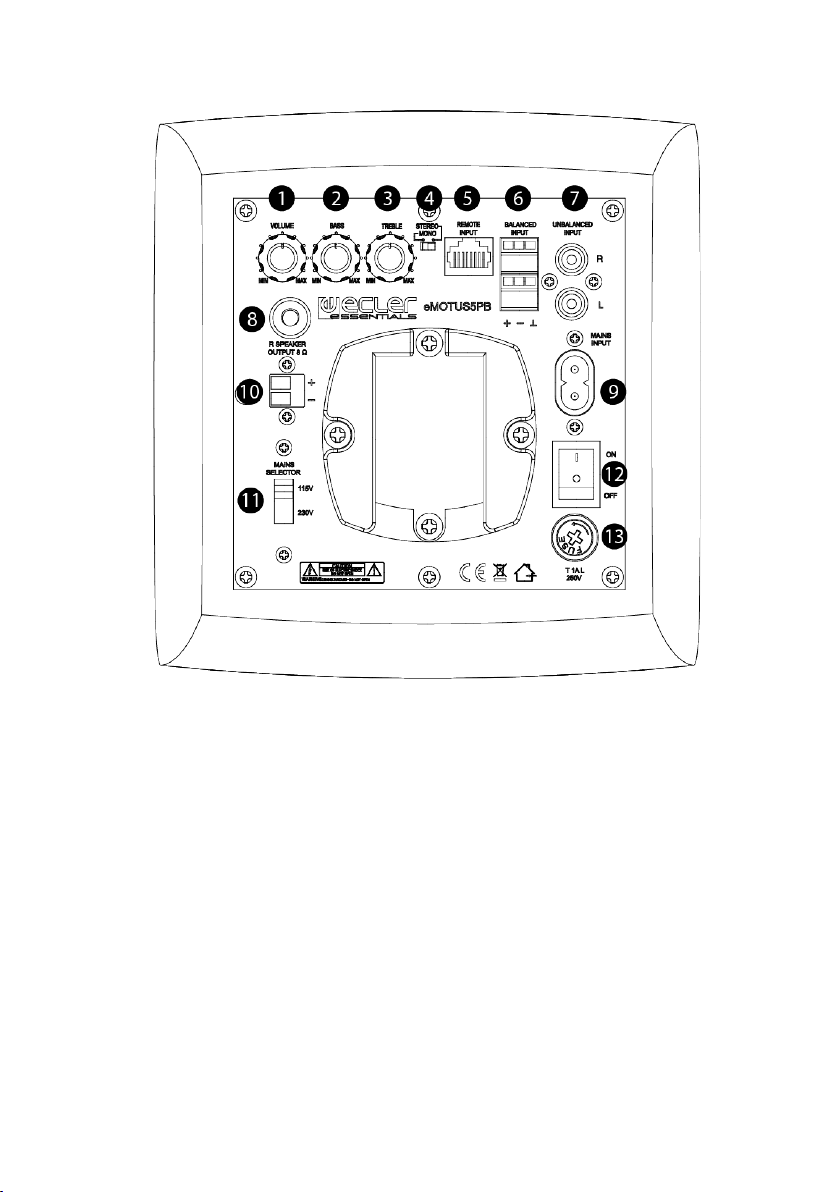
Ecler essentials eMOTUS5P User manual

eMOTUS5P/eMOTUS5PB
SURFACE MOUNT CABINETS
Powered Loudspeakers - Stereo kit
USER MANUAL

2
INDEX
Important note 3
Precautions 3
Introduction 4
Key Features 4
Positioning and fitting 5
Start up 7
Remote control 8
Rear panel 10
Technical specifications 11
Packing content 12

3
IMPORTANT NOTE
Congratulations. You now own the result of a well-designed, carefully produced
manufacture. We thank you for your trust by having chosen our set of powered
eMOTUS5P/eMOTUS5PB acoustic cabinets.
To achieve its maximum working order and performance, it is VERY IMPORTANT,
before connecting, to read this manual carefully. To guarantee optimum working
order, we recommend that maintenance be carried out by our authorized Technical
Services.
PRECAUTIONS
•Read these instructions
•Keep these instructions
•Heed all warnings
•Follow all instructions
•Do not use this apparatus near water
•Clean only with dry cloth
•Install in accordance with the manufacturer’s instructions
•Do not install near any heat sources such as radiators or heat registers
•Only use attachments/accessories specified by the manufacturer
•Refer all servicing to qualified personnel
Warning: an inappropriate usage of the device could cause
injury, death or damage the apparatus.

4
INTRODUCTION
The eMOTUS5P / eMOTUS5PB is a kit of loudspeakers including an active and a
passive acoustic box. The eMOTUS5PB includes a wireless BT receiver, remote control
and remote control volume port (0-10 VDC). A compact, professional stereo kit, easy
to handle and at a very attractive price. Its fantastic performance and unique design
ensure that it can easily be integrated into a wide range of multimedia applications:
lecture halls, meeting rooms, outlets, etc. Available in black and white.
KEY FEATURES
• Stereo 2-way loudspeaker stereo kit – powered loudspeaker + passive
loudspeaker
• Full range: 5” woofer and 1” tweeter
• Integrated amplifier 2 x 25 WRMS (MASTER unit)
• Volume control and tone control (bass & treble) in the MASTER unit
• Euroblock balance stereo input on the MASTER UNIT
• Non-balanced RCA input on the MASTER UNIT
• Wireless BT stereo input (only on the eMOTUS5PB)
• Mono/Stereo switch
• Link between the MASTER and the SLAVE unit via Euroblock connectors.
• Integrated power supply source (MASTER unit)
• Selectable power voltage 115 V/230 V (MASTER unit)
• Auto standby function (automatic standby mode / energy saving without the
need to turn the system on or off each day)
• Integrated Anti-Clip System
• LED activity display
• Reinforced ABS construction
• BT wireless connection, remote control port (0-10 VDC – RJ45 connector) and
remote control (eMOTUS5PB)
• Available in black and white

5
POSITIONING AND FITTING
In the packing of the eMOTUS systems, you will find all you need to complete
installation of the two units.
The following should be observed as general rules:
•Always install on solid, firm surfaces.
•For good sound reproduction, there should be no hindrance between the
units and the audience.
•Adjust the levels of sound pressure to reproduction requirements. Despite its
small size, the eMOTUS5P / eMOTUS5PB has a performance far higher than
that of domestic loudspeakers.
Procedure for installing on a surface:
1. Make three 6 mm screw holes in the wall, aligned with the position of the
holes in the bracket.
2. Insert three 6 mm wall plugs into the holes.
3. Fasten the safety line on the rear of the bracket.
4. Fit the bracket in place, after threading the line and loudspeaker wire through
the square hole in the bracket. Secure the bracket to the wall.

6
5. Connect the power supply cables, signal input and link between the two units
to the connectors on the rear part of the housing. Ensure correct polarity in
the Euroblock terminals.
6. Place the acoustic box in its final position, sliding it vertically downwards so
that the rear side of the rail slots into the bracket rail.
7. Secure the safety wire on the rear part of the acoustic box to ensure that it
does not accidentally fall and cause any material and/or personal damage.
8. Orientate the box to achieve the required position on the vertical and
horizontal axes. Tighten up the Allen screws on the bracket to fasten this
position on both axes.

7
START UP
eMOTUS5P
To start up the system, turn on the MASTER (L) unit with the switch on the rear
panel and adjust the volume and equalizer to the required settings.
You may select the audio source (balanced or non-balanced input) by pressing the
rotating volume encoder.
eMOTUS5PB
To start up the system, turn on the MASTER (L) unit with the switch on the rear
panel and adjust the volume and equalizer to the required settings. Pressing the
rotating volume encoder, the unit will be muted.
You can select the audio source (balanced, non-balanced input or wireless
connection) by pressing the relevant button on the remote control: BAL, UNBAL or
BT.
Wireless connection
Press the BT key to select the wireless connection mode. For pairing the BT, the
eMOTUS5BT is displayed on other devices as the eMOTUS5 (password:”0000”). Once
paired with the emitting device, the eMOTUS5PB will act as a receiver/reproducer of
the audio emitted by the former.
N.B. To safeguard the system from any possible power surges in the electrical
supply, there is a network fuse in the MASTER unit, located in a screw mount fuse
holder in the rear panel. In the event of this blowing, disconnect the device, remove
it from the wall bracket, unscrew the fuse holder, take out the fuse and replace it
with another with identical characteristics. If the new fuse blows straight away,
consult our Technical Department.

8
REMOTE CONTROL
Remote control (only applies to the eMOTUS5BT model)
º
1. Turn on: on/off. The green LED display lights up when the unit is on. When off,
no LED is displayed.
2. LED display: turn on/off the LEDs while the unit is operating. When restarting
the unit, this function returns to its default value: LEDs on.
3. MUTE. The red LED blinks on and off when the unit is muted.
4. BT: wireless connection. The blue LED light turns on when there is a BT
connection by pressing the BT key.
5. UNBAL: select the stereo unbalanced RCA input as the audio input source.
6. BAL: select the stereo balanced Euroblock input as the audio input source.
7. Volume: increase/decrease the volume in 1 step (range available in 0-36 steps).
This only operates when the unit is on.
8. Bass & Treble: increases/decreases by 1 dB (range available of -7 to +7dB) in
bass/treble.
9. BT priority: if priority is activated, whenever it detects a wireless connection
available, this will take priority over the other audio inputs and will
automatically switch over to this.

9
10. Auto Standby: keep pressed (for 2 secs.) to activate/deactivate the auto
standby function. If this is activated, after 2`30” with no audio in the inputs and
if the remote controlled is not used, the unit will switch to standby mode.
11. Reset: keep pressed (for 2 secs.) to reset the system to its default values: BT
priority ON, volume = 30 bass; treble = 0.
12. Flat: keep pressed (for 2 secs.) to reset the system to its default equalizer
values: bass = 0; treble = 0.
Remote port (only applies to the eMOTUS5BT model)
REMOTE port: the RJ-45 REMOTE type connector makes it possible to connect from
a type WPmVOL wall control panel (control 0-10 VDC) for adjusting the general
output volume. The connection is made by a standard CAT5 cable between the
WPmVOL wall panel and the REMOTE connector on the MASTER unit.
As there is an eMOTUS5PB kit along with a type WPm control and other types of
control (rotating control on the rear panel, remote control or control via remote
port), at all times, the latest adjustments made using one or another method will
prevail. For instance, if the volume is adjusted using a WPmVOL wall panel
connected to the REMOTE port, and then said parameters are altered using the
control on the rear panel, the latest adjustment will prevail. In this case, when the
position of the wall panel is altered again, the eMOTUS5PB kit will retake the values
that this indicates, and so on.
N.B. the green LED light will keep on whenever the unit is on. It will blink on and off
when there is activity in the remote controls (remote control or 0-10VDC port).

10
REAR PANEL
1. Output volume control
2. Bass control
3. Treble control
4. Stereo-mono switch
5. Remote input RJ-45. Only applies to the eMOTUS5BT model
6. Balanced audio input - Euroblock connectors
7. Non-balanced audio input – RCA connectors
8. Attachment point for the safety cable
9. Socket base
10. Amplified output right channel R
11. Mains selector (115V / 230V)
12. Start up switch
13. Fuse holder

11
TECHNICAL SPECIFICATIONS
eMOTUS5PB / eMOTUS5P
Power
2 x 25W RMS
Impedance
8 Ω
Frequency response (±10dB)
85Hz – 20kHz
THD + Noise @ 1kHz Full PWR
≤0.5%
Inputs sensitivity nom/impedance
525mV/22k Ω
CMRR - Line Bal
≥80dB
Tone control response
±14dB
Mains voltage
115 / 230VAC (selectable)
Power consumption (pink noise, 1/8
power @ 8ohm)
≤10.5W
Power consumption (pink noise, 1/3
power @ 8ohm)
≤23W
Power consumption Standby
≤3W
Construction
Aluminium grill, ABS cabinet
Dimensions (WxDxH)
173x185x180mm - Not including brackets; 173x248x180mm -
Including brackets
Weight eMOTUS5PB
4.8 kg – Not including accessories; 5.3 kg – Including accessories
Weight eMOTUS5P
4.2 kg – Not including accessories; 4.5 kg – Including accessories
BT module (eMOTUS5PB)
Bluetooth® 4.0 Compliant
Class II Range up to 10 Meters
Supported Bluetooth® Profiles: A2DP v1.2, AVRCP v1.4, HFP v1.6,
HSP v1.2
aptX, SBC, MP3 and AAC decoder support
Remote Control (eMOTUS5PB)
fosc
455 kHz
Carrier frequency
38 kHz NEC format
Battery
Lithium Cell CR2025 3V

12
PACKING CONTENT
•eMOTUS5P / eMOTUS5PB loudspeaker kit (one active unit + one passive unit)
•Two articulated brackets for wall mounting
•5mm Allen key
•Metal safety lines against any possible flaking off, with corresponding screws
and lock washers.
•Two Euroblock connectors with three terminals for balanced stereo input
•Connectors / ACTIVE unit link cable – PASSIVE unit
•8 adhesive legs for positioning the loudspeakers on a desktop
•Power cable for the MASTER unit
•The eMOTUS5PB kit also includes a remote control (battery included)
•Quick start Guide
•Warranty card

13
All product characteristics are subject to variation due to production tolerances. NEEC AUDIO BARCELONA S.L. reserves the right to make changes or improvements in the
design or manufacturing that may affect these product specifications.
Motors, 166‐168 08038 Barcelona ‐ Spain ‐ (+34) 932238403 information@ecler.es www.ecler.com
This manual suits for next models
3
Other Ecler essentials Speakers manuals

Ecler essentials
Ecler essentials eAMBIT106 User manual

Ecler essentials
Ecler essentials IG108 User manual

Ecler essentials
Ecler essentials eCMP8 User manual

Ecler essentials
Ecler essentials eAMBIT103 User manual

Ecler essentials
Ecler essentials eHORN10 User manual

Ecler essentials
Ecler essentials eMSP50Ti User manual

Ecler essentials
Ecler essentials ePRS10Ti User manual

Ecler essentials
Ecler essentials eMOTUS5OD User manual

Ecler essentials
Ecler essentials eIC5154 User manual

Ecler essentials
Ecler essentials eUC106 User manual