Bergstrom H796 User manual

Wireless TV Speaker
H796 v02: 11/04/22
Please read and retain these instructions for future reference
The Enterprise
Department
UK Head Office, 11 Bridge Street, Bishop’s Stortford, CM23 2JU
Tel: 0844 4824400*, Fax: 01279 756595
www.coopersofstortford.co.uk
EU address: D.S.B. LD, 160 Bd. de Fourmies, 59100 Roubaix, France
Tel: (+44) 1279 701269
*UK Calls cost around 7 pence per minute plus your telephone company’s network access.
Please check with your telephone supplier.
Dimensions
(H) 14.5 x (W) 21 x (D) 10
•THIS WIRELESS SPEAKER ALLOWS YOU TO BRING THE TV SOUND CLOSER TO YOU
•THE GREAT SOUND QUALITY AND AMPLICFICATION WILL MAKE DIALOGUE CLEARER AND EASIER
TO HEAR
•BLUETOOTH CONNECTION
•REMOTE/CELL PHONE STORAGE COMPARTMENT
•BIG DISPLAY BUTTONS AND EASY-TURN VOLUME CONTROL FOR EASIER USE
•ALSO INCLUDES FM RADIO
•ARTIFICIAL LEATHER HANDLE
•BUILT IN RECHARGEABLE BATTERY WITH MAINS ADAPTOR
Technical details
Unit: DC 5V –Class III
Docking: DC 5.5V –2.5A Class III
Powered by external power supply
(Input: 100-240V, 50/60 Hz, 0.5A
Output: 5.5V –2500mA

Wireless TV Speaker H796 Instructions for Use
Please read and retain these instructions for future reference v002: 11/04/22
The Enterprise
Department
UK Head Office, 11 Bridge Street, Bishop’s Stortford, CM23 2JU
Tel: 0844 4824400*, Fax: 01279 756595
www.coopersofstortford.co.uk
EU address: D.S.B. LD, 160 Bd. de Fourmies, 59100 Roubaix, France
Tel: (+44) 1279 701269
*UK Calls cost around 7 pence per minute plus your telephone company’s network access.
Please check with your telephone supplier.
IMPORTANT SAFETY INSTRUCTIONS:
1. Read the instructions. All user guidelines must be read before starting the device.
2. Keep the instructions for future use.
3. Attention, use and security guidelines must be respected.
4. The device must not be used near water or be put in contact with moisture.
5. Make sure has no liquid is spilled on device and device openings.
6. Move device carefully, avoid shocks.
7. Do not block the device outputs.
8. Do not place the device near a heat source (e.g. radiator). Do not expose it to the sun.
9. Plug in the device as indicate on this information form.
10. This device has a connection with overload protection (security device) decision-making. This can only be
repaired by a qualified technician.
11. For cleaning the device, please follow the recommendations of the manual.
12. The AC/DC adaptor should be unplugged if not in use.
13. Device can only be repaired by a qualified technician when:
a. the AC/DC adaptor is damaged,
b. objects have fallen into the apparatus or a liquid has been spilled into device,
c. device was exposed to rain,
d. device does not work correctly without noticeable exterior damage apparent,
e. device is broken.
14. The apparatus shall not be exposed to dripping or splashing and no objects filled with liquids, such as
vases, shall be placed on top of the speaker.
15. To completely disconnect the power input, the AC/DC adaptor shall be disconnected from the mains.
16. The AC/DC adaptor of apparatus should not be obstructed OR should be easily accessed during intended
use.
17. Battery shall not be exposed to excessive heat such as sunshine, fire or the like.
18. Excessive sound pressure form earphones and headphones can cause hearing loss.
Wireless TV Speaker H796 Instructions for Use
Please read and retain these instructions for future reference v002: 11/04/22
The Enterprise
Department
UK Head Office, 11 Bridge Street, Bishop’s Stortford, CM23 2JU
Tel: 0844 4824400*, Fax: 01279 756595
www.coopersofstortford.co.uk
EU address: D.S.B. LD, 160 Bd. de Fourmies, 59100 Roubaix, France
Tel: (+44) 1279 701269
*UK Calls cost around 7 pence per minute plus your telephone company’s network access.
Please check with your telephone supplier.
19. Leave a minimum gap (150-180mm) around the apparatus for sufficient ventilations;
20. The ventilation should not be impeded by covering the ventilation opening with items such as newspaper,
table-cloths, curtain etc;
21. No naked flame sources such as lit candles should be placed on top of the speaker.
22. Caution marking and nameplate are located on the rear panel of product.
Caution:
- In an environment with electrostatic discharge present, this device may malfunction and require user
to reset.
- ELECTRIC SHOCK HARZARD is possible if the unit is opened; Never open and dissemble the unit to avoid
ELECTRIC SHOCK.
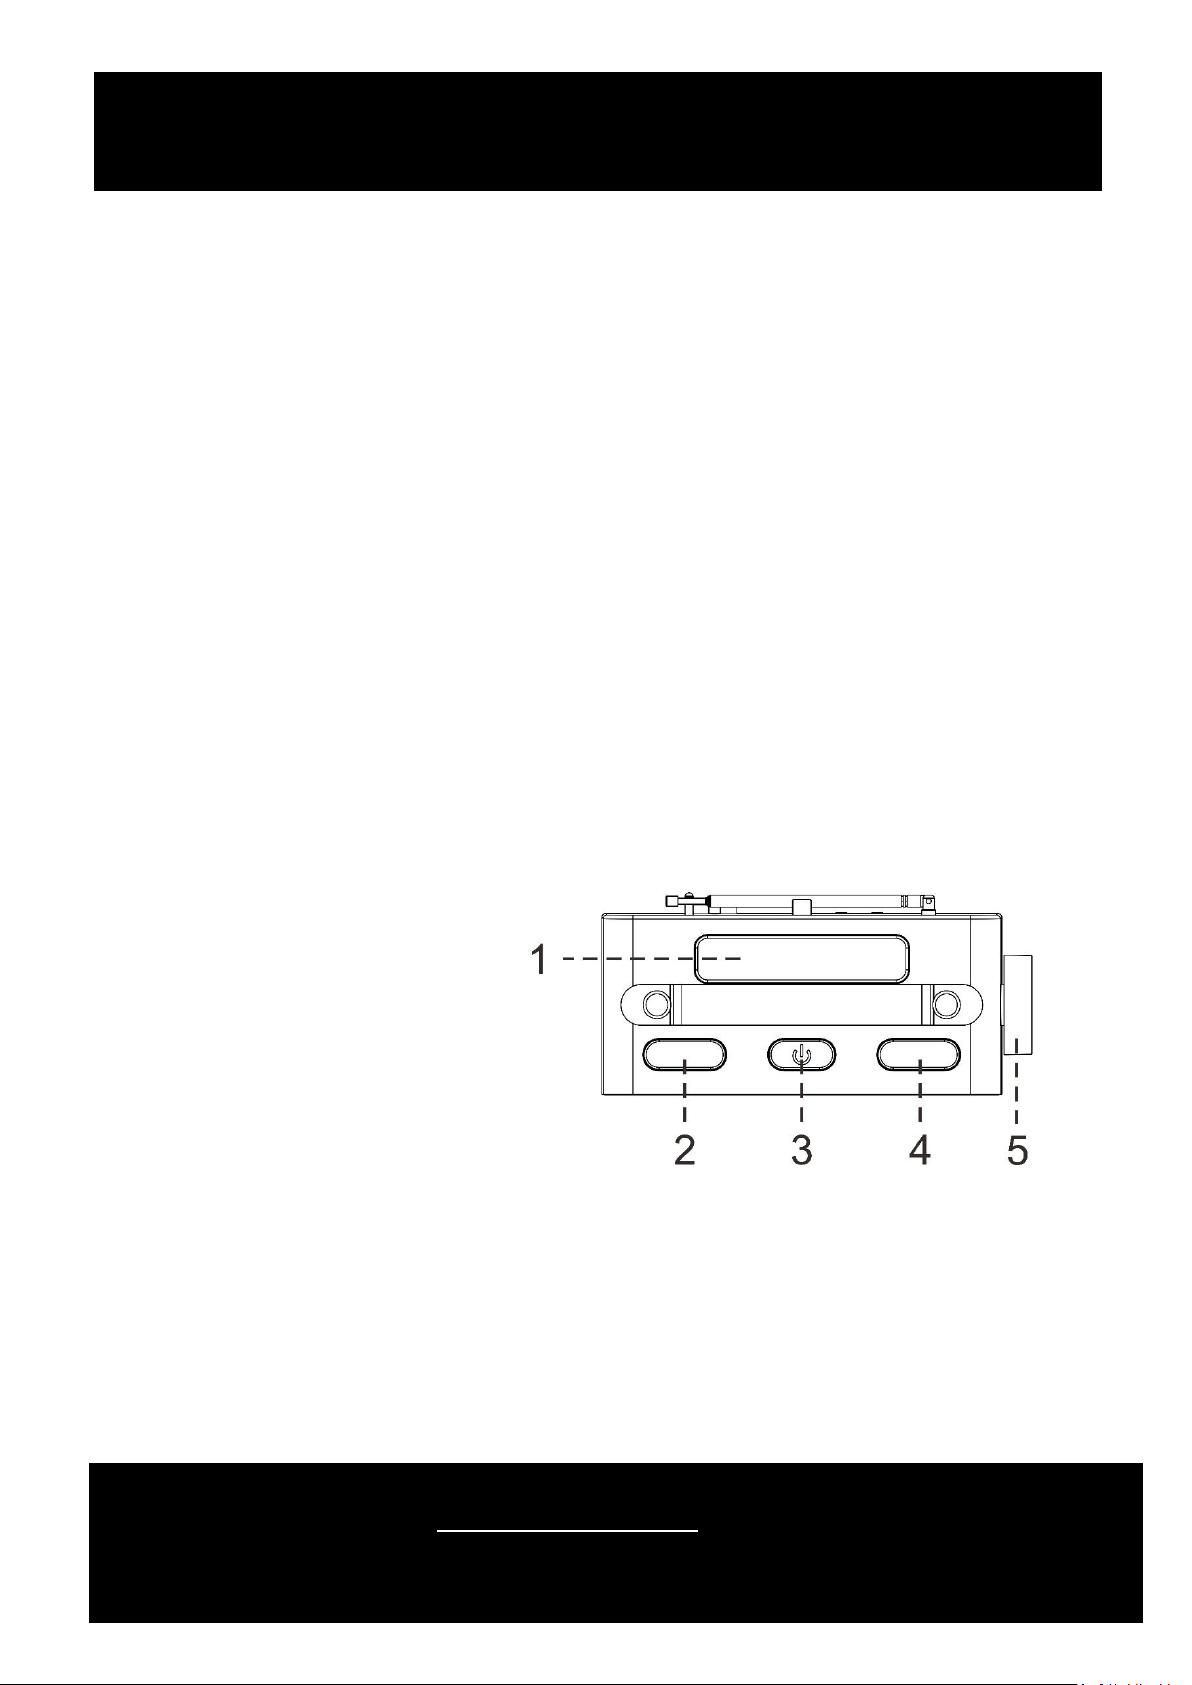
LOCATION OF CONTROLS
1) TV Remote/Mobile Holder
2) Mode button
3) On/Off button
4) Clock button
5) Volume knob
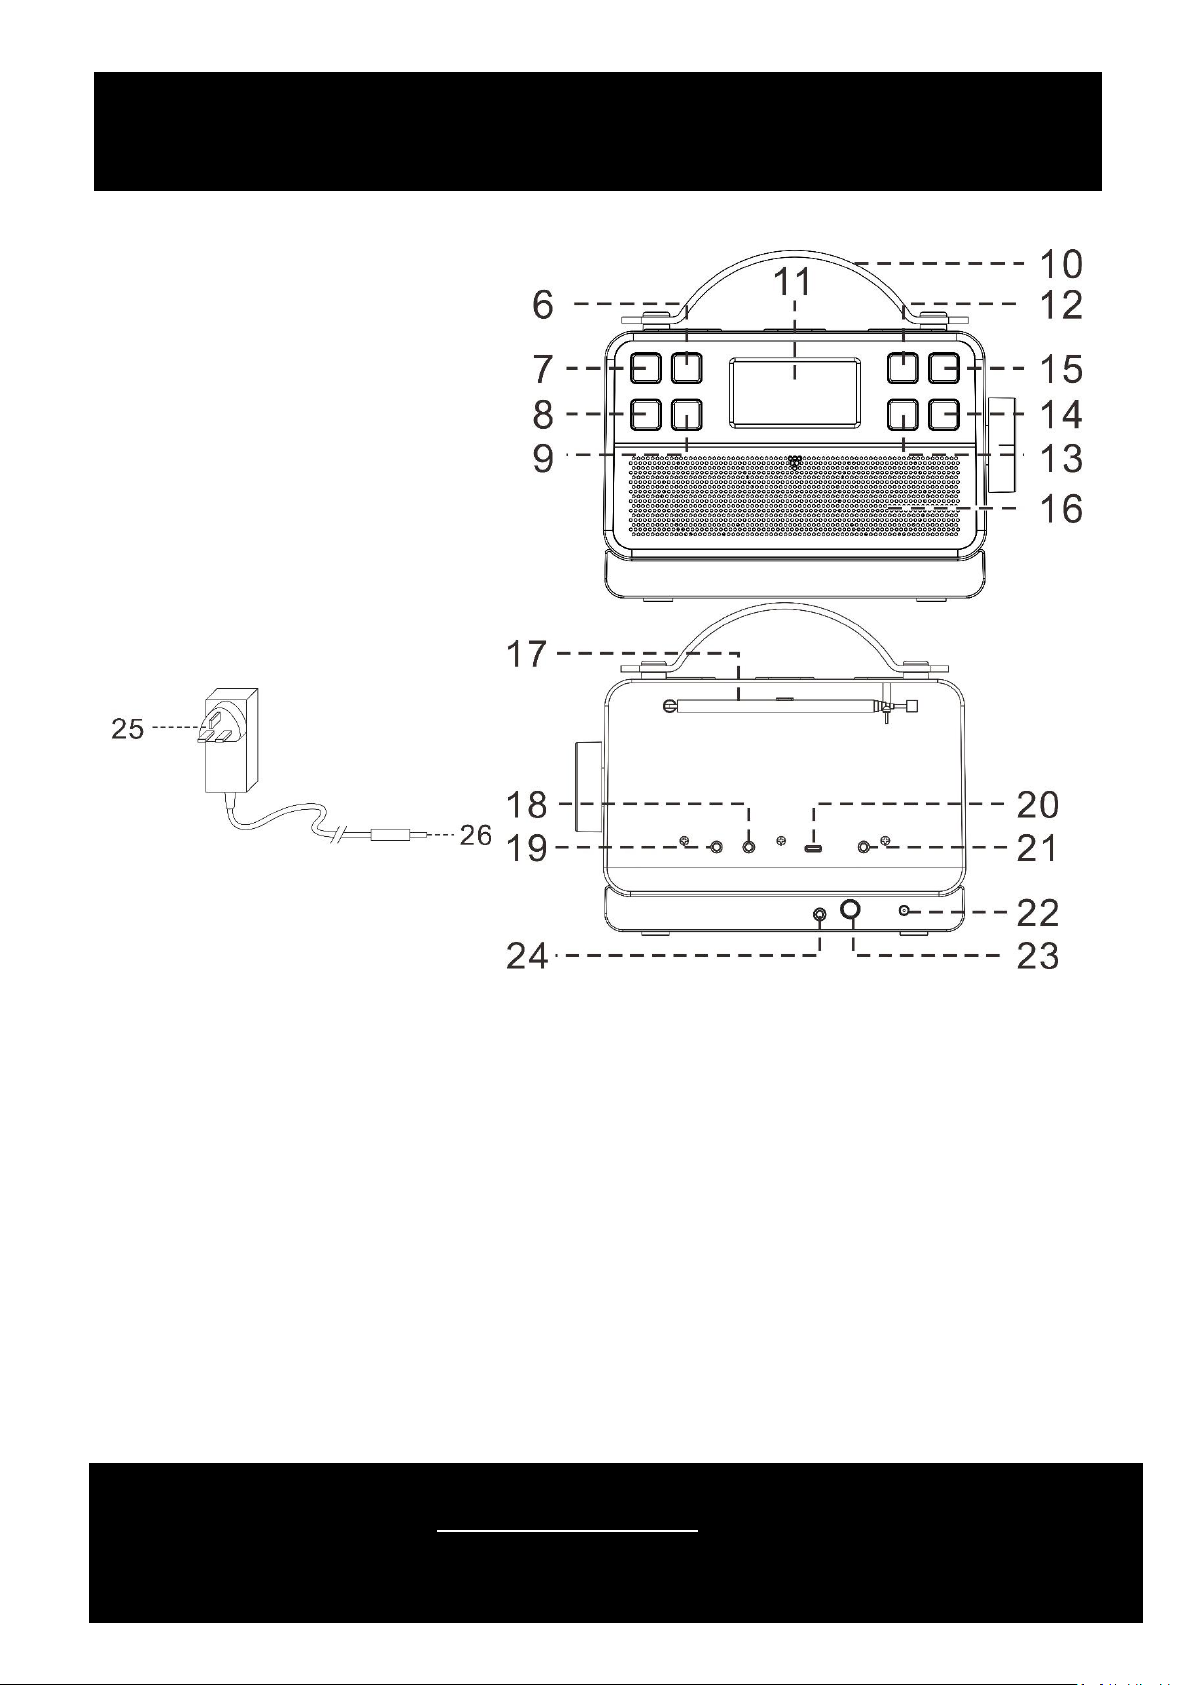
6) Tune up button
7) Play button
8) Preset button
9) Tune down button
10) Handle
11) LCD display
12) Preset station no. 1 button
13) Preset station no. 2 button
Wireless TV Speaker H796 Instructions for Use
Please read and retain these instructions for future reference v002: 11/04/22
The Enterprise
Department
UK Head Office, 11 Bridge Street, Bishop’s Stortford, CM23 2JU
Tel: 0844 4824400*, Fax: 01279 756595
www.coopersofstortford.co.uk
EU address: D.S.B. LD, 160 Bd. de Fourmies, 59100 Roubaix, France
Tel: (+44) 1279 701269
*UK Calls cost around 7 pence per minute plus your telephone company’s network access.
Please check with your telephone supplier.
14) Preset station no. 3 button
15) Preset station no. 4 button
16) Speaker
17) FM antenna
18) 3.5mm Aux in jack
19) 3.5mm headphone jack
20) Type C socket for charging
21) Line out socket
22) DC jack of the charger docking station
23) Pairing button for Bluetooth transmit
24) 3.5mm Aux in jack
25) AC/DC adaptor
26) DC plug
Wireless TV Speaker H796 Instructions for Use
Please read and retain these instructions for future reference v002: 11/04/22
The Enterprise
Department
UK Head Office, 11 Bridge Street, Bishop’s Stortford, CM23 2JU
Tel: 0844 4824400*, Fax: 01279 756595
www.coopersofstortford.co.uk
EU address: D.S.B. LD, 160 Bd. de Fourmies, 59100 Roubaix, France
Tel: (+44) 1279 701269
*UK Calls cost around 7 pence per minute plus your telephone company’s network access.
Please check with your telephone supplier.
Caution:
Use of controls or procedures other than those specified herein may result in hazardous radiation exposure.
This unit should not be adjusted or repaired by anyone except qualified technicians.
Important:
Since the sensitive circuitry may cause interference to a radio tuner nearby, switch this unit off while
operating other radio devices.
Due to the complexity of the MCU control, please un-plug the main power supply of the unit if the unit stops
during operation! This is not a malfunction of the system!
Precautions for use
Installation
•Unpack all parts and remove protective material.
•Do not connect the unit to the mains before checking the main voltage and before all other connections
have been made.
•Do not cover any vents and make sure that there is a space of several centimetres around the unit for
ventilation.
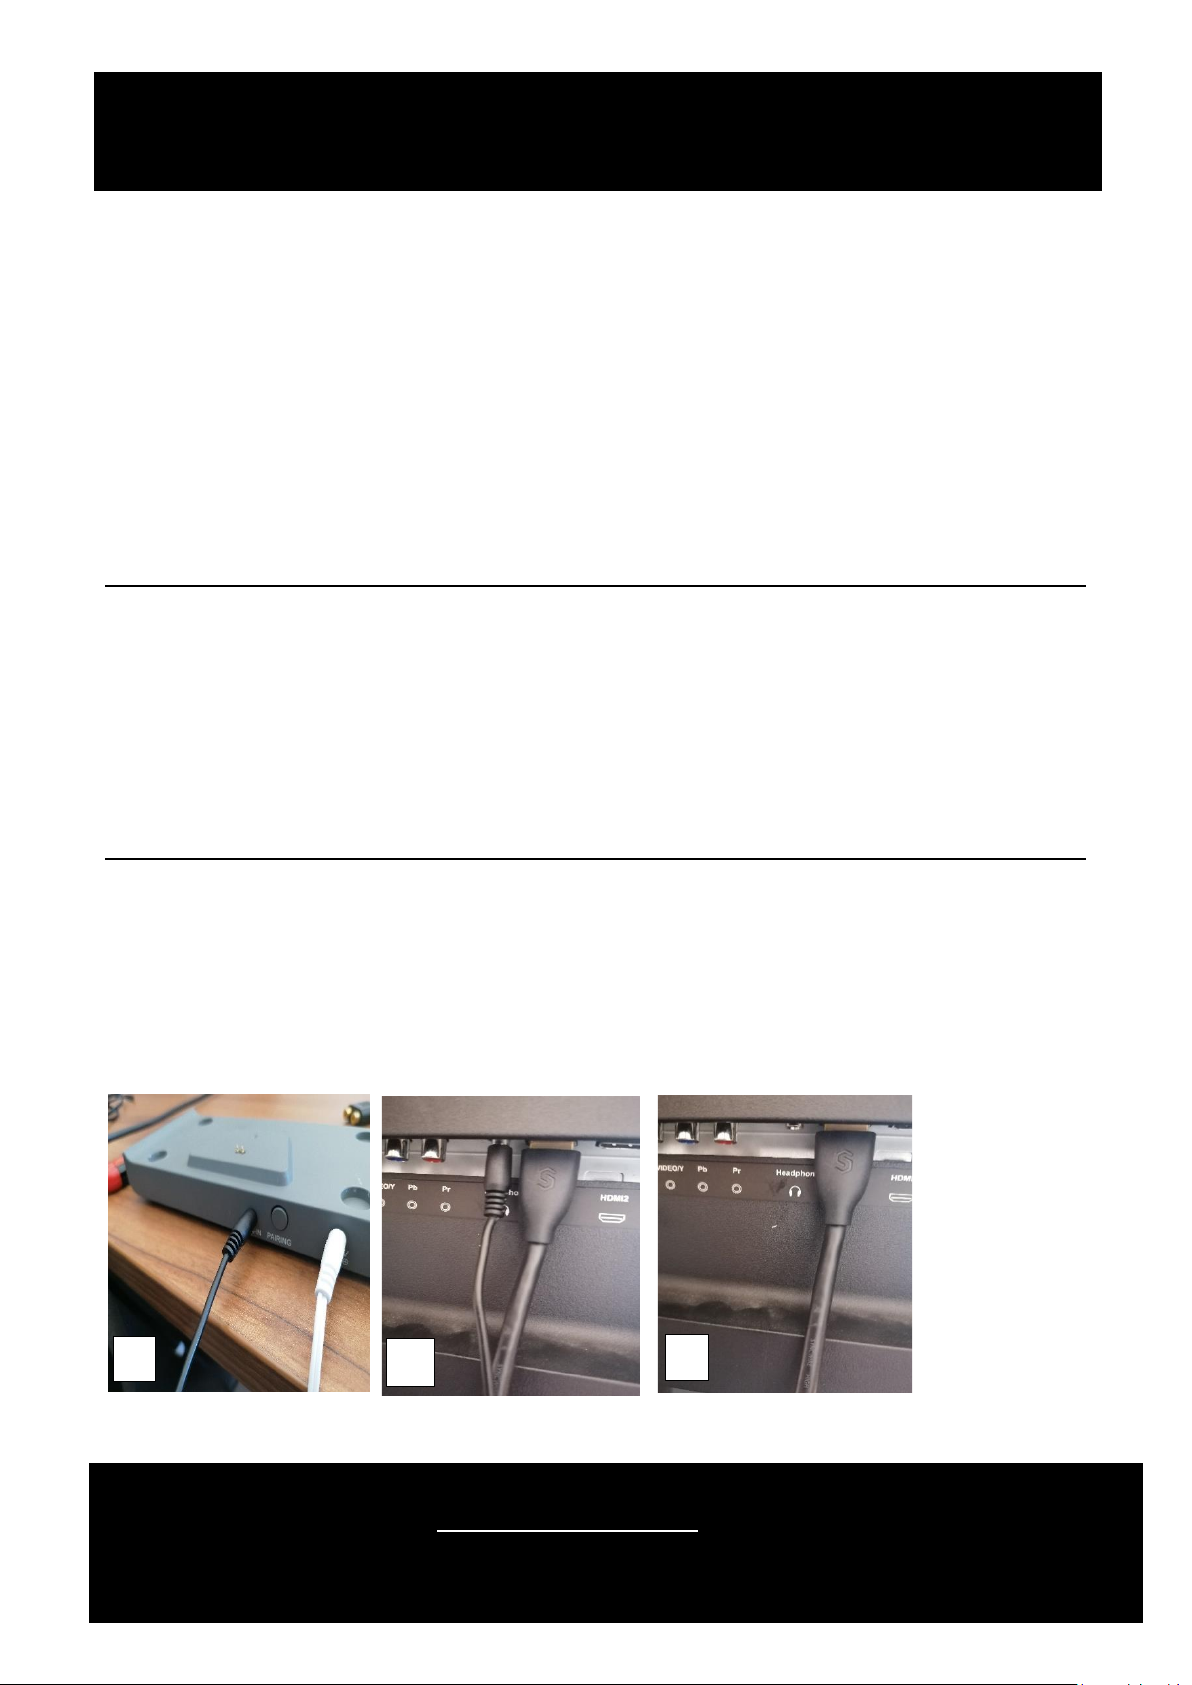
Setting Speaker Bluetooth connection to TV:
When pairing the speaker with TV;
1. Place the speaker about 1ft away from the docking station.
2. Connect a 3-5mm jack plug cable to TV headphone or audio output socket and then to the speaker
base.
Photo 1 shows the docking station and 2 and 3 shows the other end of the cable going in headphone
connector.
3.
1
2
3
Wireless TV Speaker H796 Instructions for Use
Please read and retain these instructions for future reference v002: 11/04/22
The Enterprise
Department
UK Head Office, 11 Bridge Street, Bishop’s Stortford, CM23 2JU
Tel: 0844 4824400*, Fax: 01279 756595
www.coopersofstortford.co.uk
EU address: D.S.B. LD, 160 Bd. de Fourmies, 59100 Roubaix, France
Tel: (+44) 1279 701269
*UK Calls cost around 7 pence per minute plus your telephone company’s network access.
Please check with your telephone supplier.
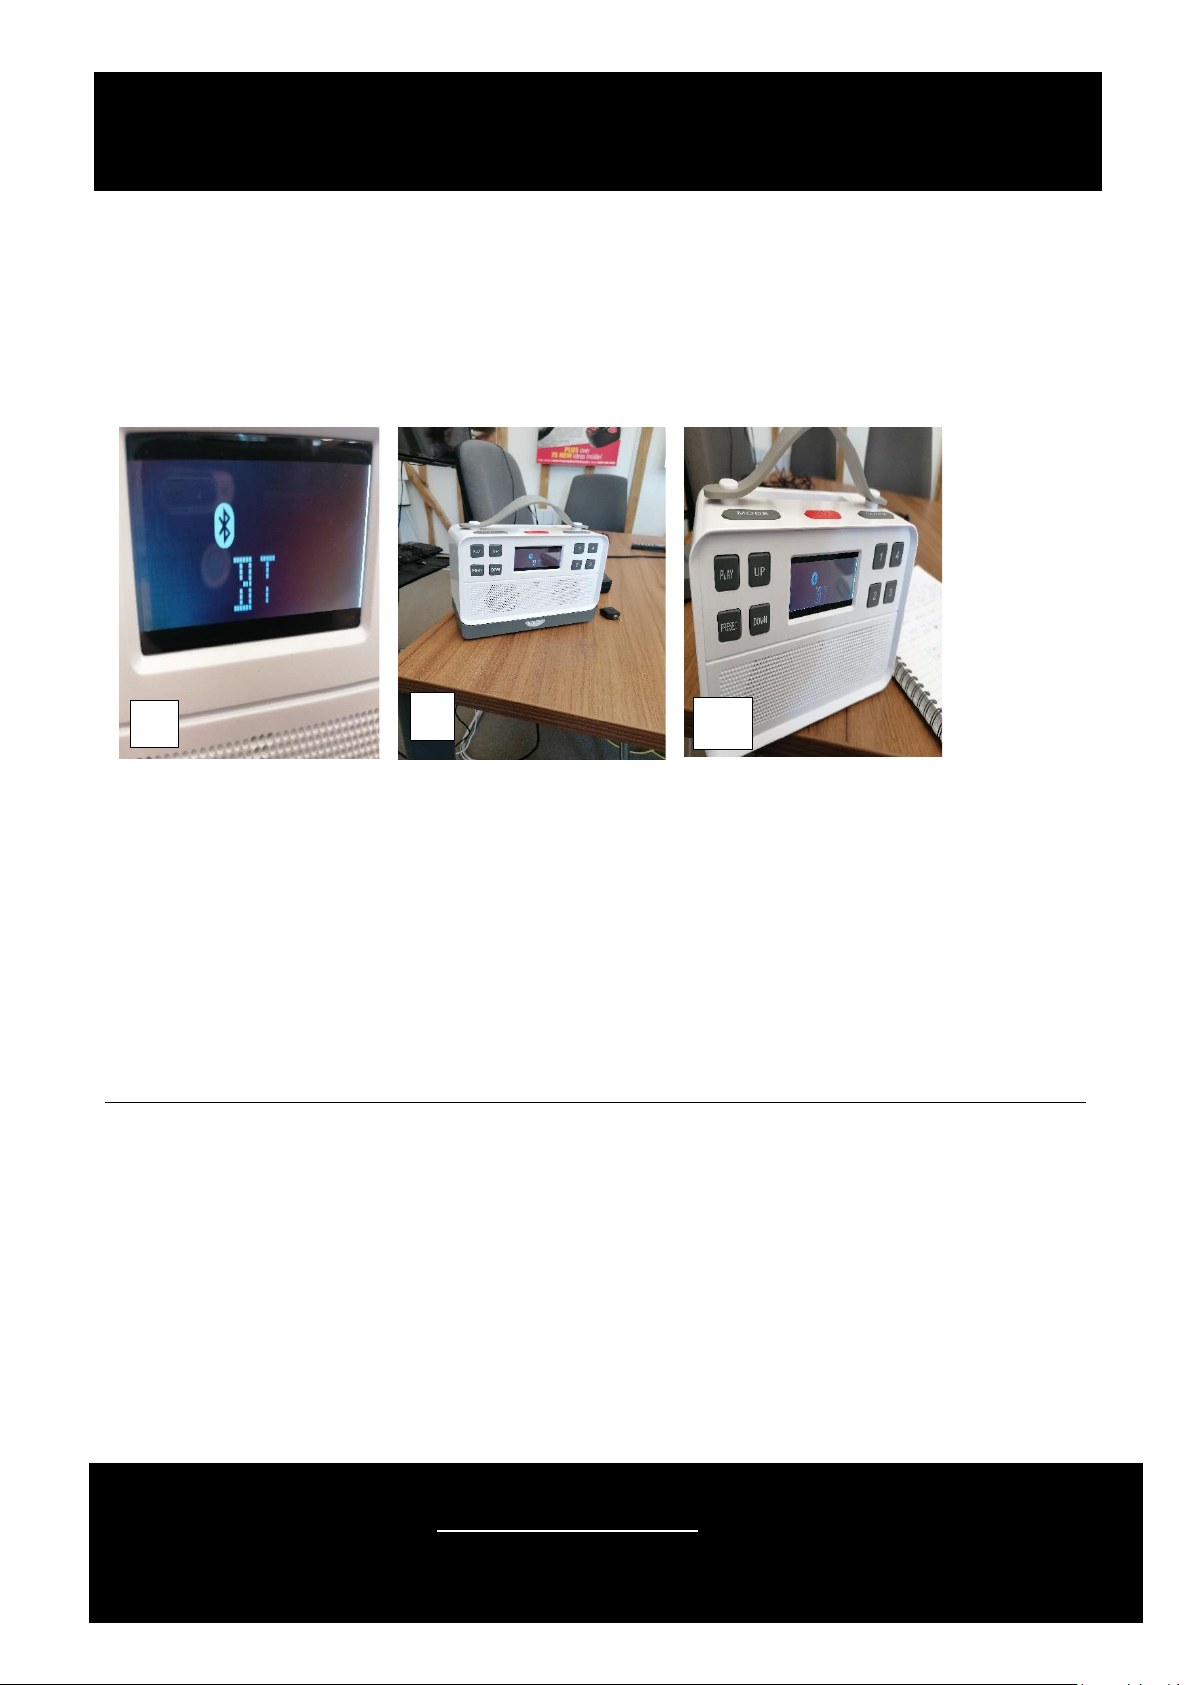
4. Switch TV and Speaker ON.
5. Press the mode button and keep pressing until you get Bluetooth on the screen which will say BT
after approx. 10sec (photograph 4). On the screen the BT symbol will be flashing, next lift the
wireless of the docking station and move away about a foot from the docking station and press the
pairing at the back of the docking station shown in photo 1 and press pairing until flashing stops with
a beep. Now you are connected.
6. Test for sound output.
7. If No sound, repeat steps 1 –5 if necessary moving the speaker gently away from the docking station
until Bluetooth light flashes.
Remarks:
1. To save the battery life of the built-in rechargeable battery, the unit will turn off after power off if
disconnected with the charger station. Press the On/Off button (3) of the main unit to switch on the unit
in this condition.
2. It is recommended to connect the unit to the charger station for home use.
Setting the Time & Date
Follow the below steps to set the time and date manually.
1. Set the unit in standby mode
2. Press and hold the Clock button (4) for 3-4 seconds and display will show “24HR”.
3. Press UP (6) button to select 24 hour display or 12 hour display. Press Clock button (2) to confirm.
4. The display will show the Time and the hour digits will be flashing. Press UP (6) or Down (9) button to
select the hour and press Clock button (4) to confirm.
5. The minute digits will be flashing. Press UP (6) or Down (9) button to select the minute and press Clock
button (4) to confirm.
6. Time will be shown on the LCD display.
4
5
6

Wireless TV Speaker H796 Instructions for Use
Please read and retain these instructions for future reference v002: 11/04/22
The Enterprise
Department
UK Head Office, 11 Bridge Street, Bishop’s Stortford, CM23 2JU
Tel: 0844 4824400*, Fax: 01279 756595
www.coopersofstortford.co.uk
EU address: D.S.B. LD, 160 Bd. de Fourmies, 59100 Roubaix, France
Tel: (+44) 1279 701269
*UK Calls cost around 7 pence per minute plus your telephone company’s network access.
Please check with your telephone supplier.
➢The preset time will be reset completely if the speaker is disconnected from the mains power supply.
It is recommended to switch the system into standby mode for convenient use.
Listening to radio
FM Operation
Manual tuning
1. Turn on the unit by pressing On/Off button (3), then press the Mode button (2) to select Tuner mode.
2. Press the Tune Up (6) or Tune down (9) button to tune your desired station.
3. Adjust volume up/down button (5) for the desired volume level.
Auto tuning
1. Press the Play button (7) once and the unit will start to scan in up direction until a radio station is
received.
2. Or press and hold the Tune down (9) button for 5-6 seconds to tune automatically in down direction
until a radio station received.
3. Adjust volume up/down button (5) for the desired volume level.
Hints for reception:-
Extend the telescopic antenna (17) for the best reception.
Preset memory stations
You can store 20 FM stations in the memory.
1. Turn to the desired radio station by manual or auto tuning method described above.
2. Press and hold the Preset button (8) for 3-4 seconds, the display will show “MEM” with a flashing digit
representing the Preset Store number.
3. Then press Up or Down (6, 9) button to select the desired Preset Store number.
4. Press Preset button (8) once to store the location (1-20).
Remarks:
1. The preset station will be overwritten when a new radio station is being stored.
2. For present station number 1, 2, 3, 4, they can be stored directly by pressing and hold the button (12) or
(13) or (14) or (15) on the main unit after turned to the desired radio station.
Recall preset memory :

Wireless TV Speaker H796 Instructions for Use
Please read and retain these instructions for future reference v002: 11/04/22
The Enterprise
Department
UK Head Office, 11 Bridge Street, Bishop’s Stortford, CM23 2JU
Tel: 0844 4824400*, Fax: 01279 756595
www.coopersofstortford.co.uk
EU address: D.S.B. LD, 160 Bd. de Fourmies, 59100 Roubaix, France
Tel: (+44) 1279 701269
*UK Calls cost around 7 pence per minute plus your telephone company’s network access.
Please check with your telephone supplier.
1. Press the Preset button (8) once recall the preset station directly. Press the Preset button (8) continuously
to select the desired stored preset station.
2. For preset station nr. 1 button (12) / nr. 2 (13) / nr. 3 (14) / nr. 4 (15) on the main unit directly to recall
these four preset stations.
3. Display will show the preset station frequency and preset store number (1, 2, 3… etc).
➢The preset stations will be reset completely if the speaker is disconnected from the the mains power
supply. It is recommended to switch the system into standby mode for convenient use.
Bluetooth connecting and playback
1. Turn on the unit by pressing On/Off button (3), then press the Mode button (2) to select BT (Bluetooth)
mode.
2. “BT” will be shown on the LCD display and the Bluetooth icon will flash. It means the Bluetooth is in
searching mode.
3. Switch on the Bluetooth feature of your Bluetooth device (such as mobile phone) and select
“BergstromTV Spk” Bluetooth equipment to connect.
4. Once connected successfully, the Bluetooth icon will become static.
5. Start playback from your Bluetooth device and enjoy the music.
6. Adjust the Volume Up/Down button (5) to desired volume level.
7. You can press the Play button (7) of the unit to pause or resume the music playback.
8. To disconnect the Bluetooth connection, press and hold the Play button (7) disconnect the Bluetooth
feature of your Bluetooth device. The Bluetooth icon will flash again for pairing of a new device or switch
off the unit. Repeat step 3-5 above to connect for another Bluetooth device.
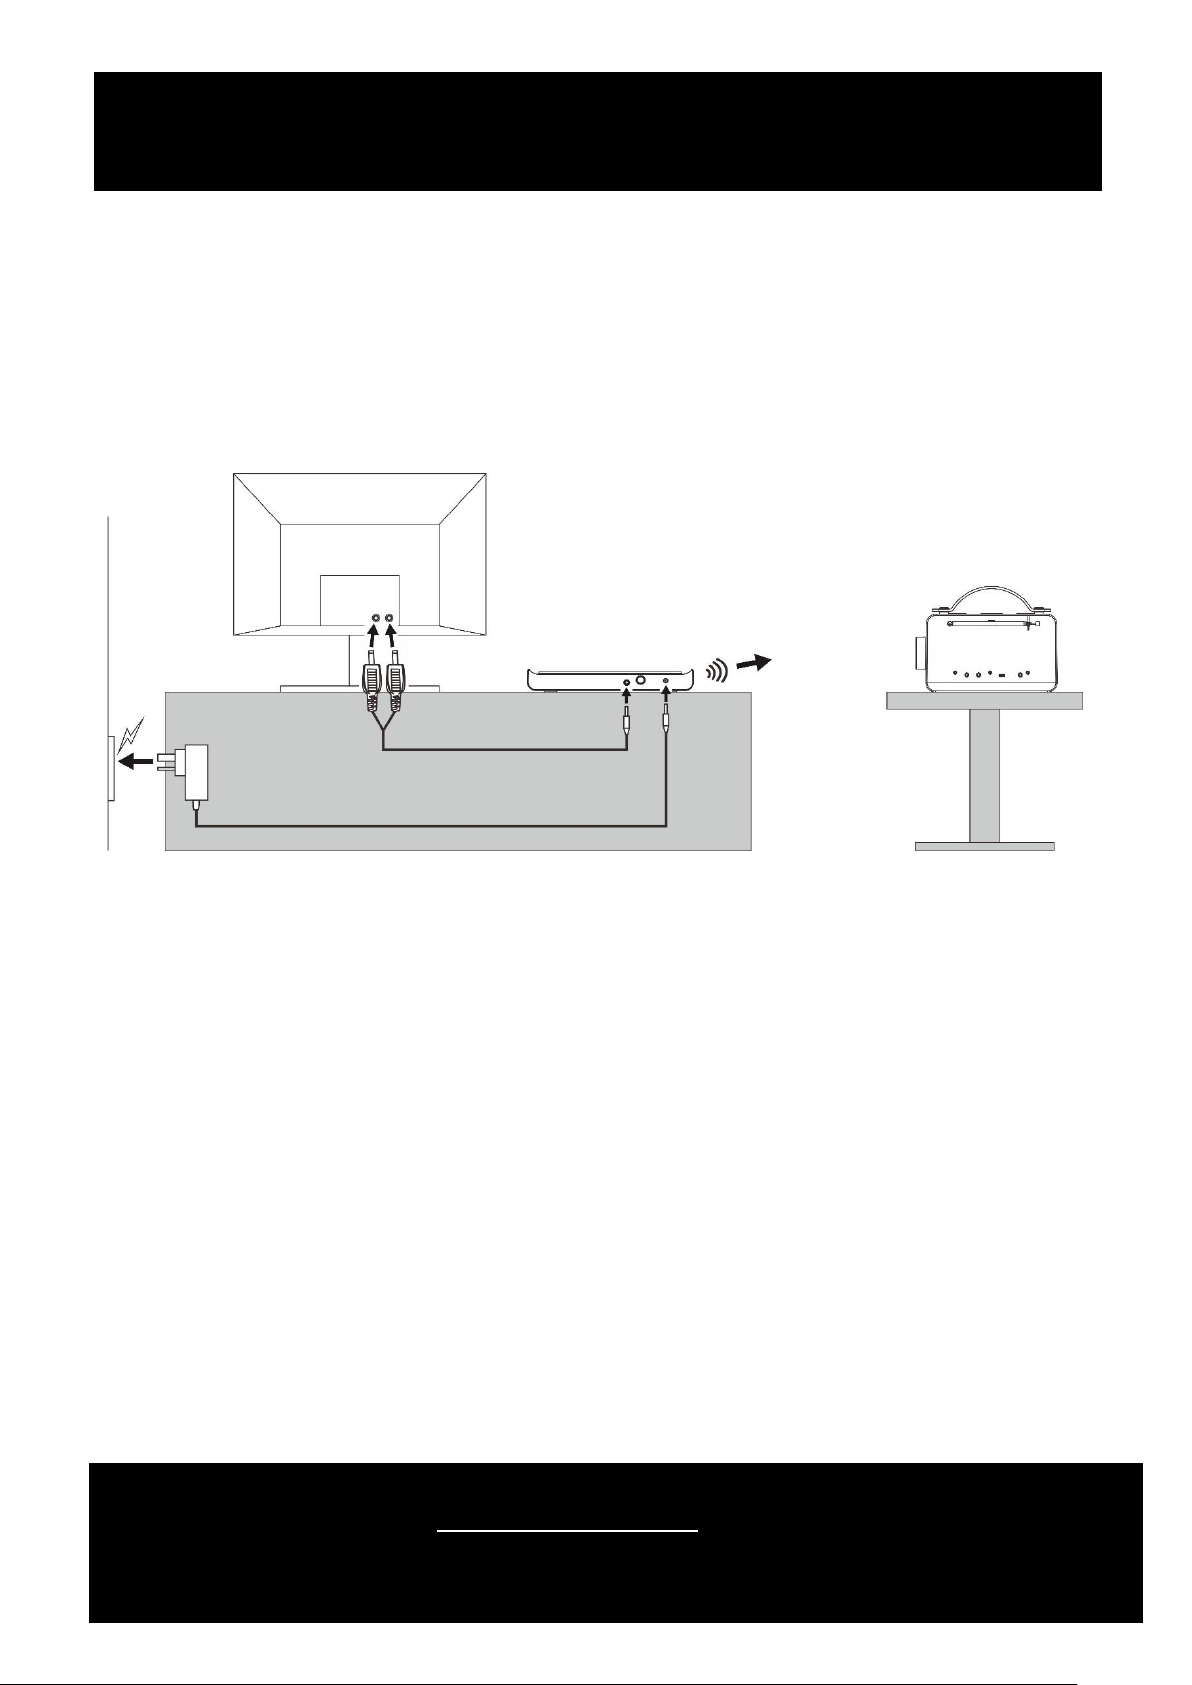
Bluetooth Transmission
⚫To Connect with TV and act as a TV speaker
The charger docking station is equipped with Bluetooth transmitter which can connect with the main unit
wirelessly.
By connecting the TV with the charger docking station via a RCA-to-3.5mm cable and the Bluetooth wireless
connection between the charger docking station and the main unit, this main unit can deliver the sound
signal of your TV system in order to act as a TV speaker.
1. Connect the power to the charger docking station following the instruction step 1-2 of “Connection”.
2. To connect the TV with the charger docking station via a RCA-to-3.5mm cable: Plug the RCA jacks to the
TV and the 3.5mm jack to the Aux-in jack (24) of the charger docking station.
3. Press the Pairing button (23) on the charger docking station.
4. Turn on the unit by pressing On/Off button (3), then press the Mode button (2) to select BT (Bluetooth)
mode.
5. Wait for the connection between the main unit to the charger docking station.
6. Once they are connected, the Bluetooth icon on the LCD display (11) will be static.
Wireless TV Speaker H796 Instructions for Use
Please read and retain these instructions for future reference v002: 11/04/22
The Enterprise
Department
UK Head Office, 11 Bridge Street, Bishop’s Stortford, CM23 2JU
Tel: 0844 4824400*, Fax: 01279 756595
www.coopersofstortford.co.uk
EU address: D.S.B. LD, 160 Bd. de Fourmies, 59100 Roubaix, France
Tel: (+44) 1279 701269
*UK Calls cost around 7 pence per minute plus your telephone company’s network access.
Please check with your telephone supplier.
7. After Bluetooth is connected, the main unit will start delivering the sound signal of your TV system via
the speakers of the main unit. You can place the main unit from the docking station at a convenient
place. The maximum range of Bluetooth between the charger docking station and the main unit is
approx. 10 meters. The maximum communication range will vary depending on obstacles (person, metal,
wall, etc) or electromagnetic environment.
Please refer to the below diagram for the connection and setting idea:
⚫To Connect with another Bluetooth speaker
You can also connect the charger docking station with another Bluetooth speaker wirelessly.
1. Follow the above instruction of “To Connect with TV and act as a TV speaker”, but in step 4, instead of
turning on the main unit, turn on the Bluetooth speaker that you wish to connect with.
2. If necessary, select the pairing name “BergstromSpDock” of the charger docking station for connection.
Remarks:
1. The charger docking station must be powered in order to perform the above.
2. In Step 5, if the Bluetooth connection between the charger docking station and the main unit is not
successful, press the Pairing button (23) again.
3. The maximum Bluetooth communication range will vary depending on obstacles (person, metal, wall,
etc) or electromagnetic environment.

Wireless TV Speaker H796 Instructions for Use
Please read and retain these instructions for future reference v002: 11/04/22
The Enterprise
Department
UK Head Office, 11 Bridge Street, Bishop’s Stortford, CM23 2JU
Tel: 0844 4824400*, Fax: 01279 756595
www.coopersofstortford.co.uk
EU address: D.S.B. LD, 160 Bd. de Fourmies, 59100 Roubaix, France
Tel: (+44) 1279 701269
*UK Calls cost around 7 pence per minute plus your telephone company’s network access.
Please check with your telephone supplier.
Aux-in connection
Connect the unit to other devices by connecting the Aux in jack (18) with a 3.5mm cable (not provided) and
the other end to the external device such as Discman/MP3 player to perform the music playback or encoding
function etc.
1) Select the AUX mode by pressing the Mode button (2)
2) Adjust the Volume knob (5) to desired volume level.
3) Start to play your external device.
Using Headphones
Inserting the plug of your headphones into the Headphone jack (19) will enable you to listen in private.
READ THIS IMPORTANT INFORMATION BEFORE USING YOUR HEADPHONES
1) Avoid extended play at very high volume as it may impair your hearing.
2) If you experience ringing in your ears, reduce the volume or shut off your unit.
3) Keep the volume at a reasonable level to allow you to hear outside sounds.
Built-in Rechargeable Battery
The main unit is equipped with a Lithium built-in rechargeable battery. You can charge the unit by placing it
on the charger docking station OR charging via type C socket (20) (please make sure the output of USB adaptor
at 5V 1A, USB adaptor not included).
The built-in rechargeable battery can be replaced (if necessary) by unscrew the screws at the bottom of the
unit. But it is recommended to consult with the service provider for the replacement.
NOTE: Due to ERP stage two requirements and to protect the environment, the unit will switch to standby
mode automatically if no music is playing after 15 minutes.
PLUG WIRING (UK & IRELAND)
This appliance is supplied with a mains adaptor/charger with BS1363 plug pins.
DO NOT use If the socket outlets in your home or office are not suitable for this product’s mains adaptor/
charger plug pins. Attempts to insert the mains adaptor/charger into the wrong socket is likely to cause
electric hazard or damage.
DO NOT use with any other mains transformer/charger than the one that is supplied with this product.
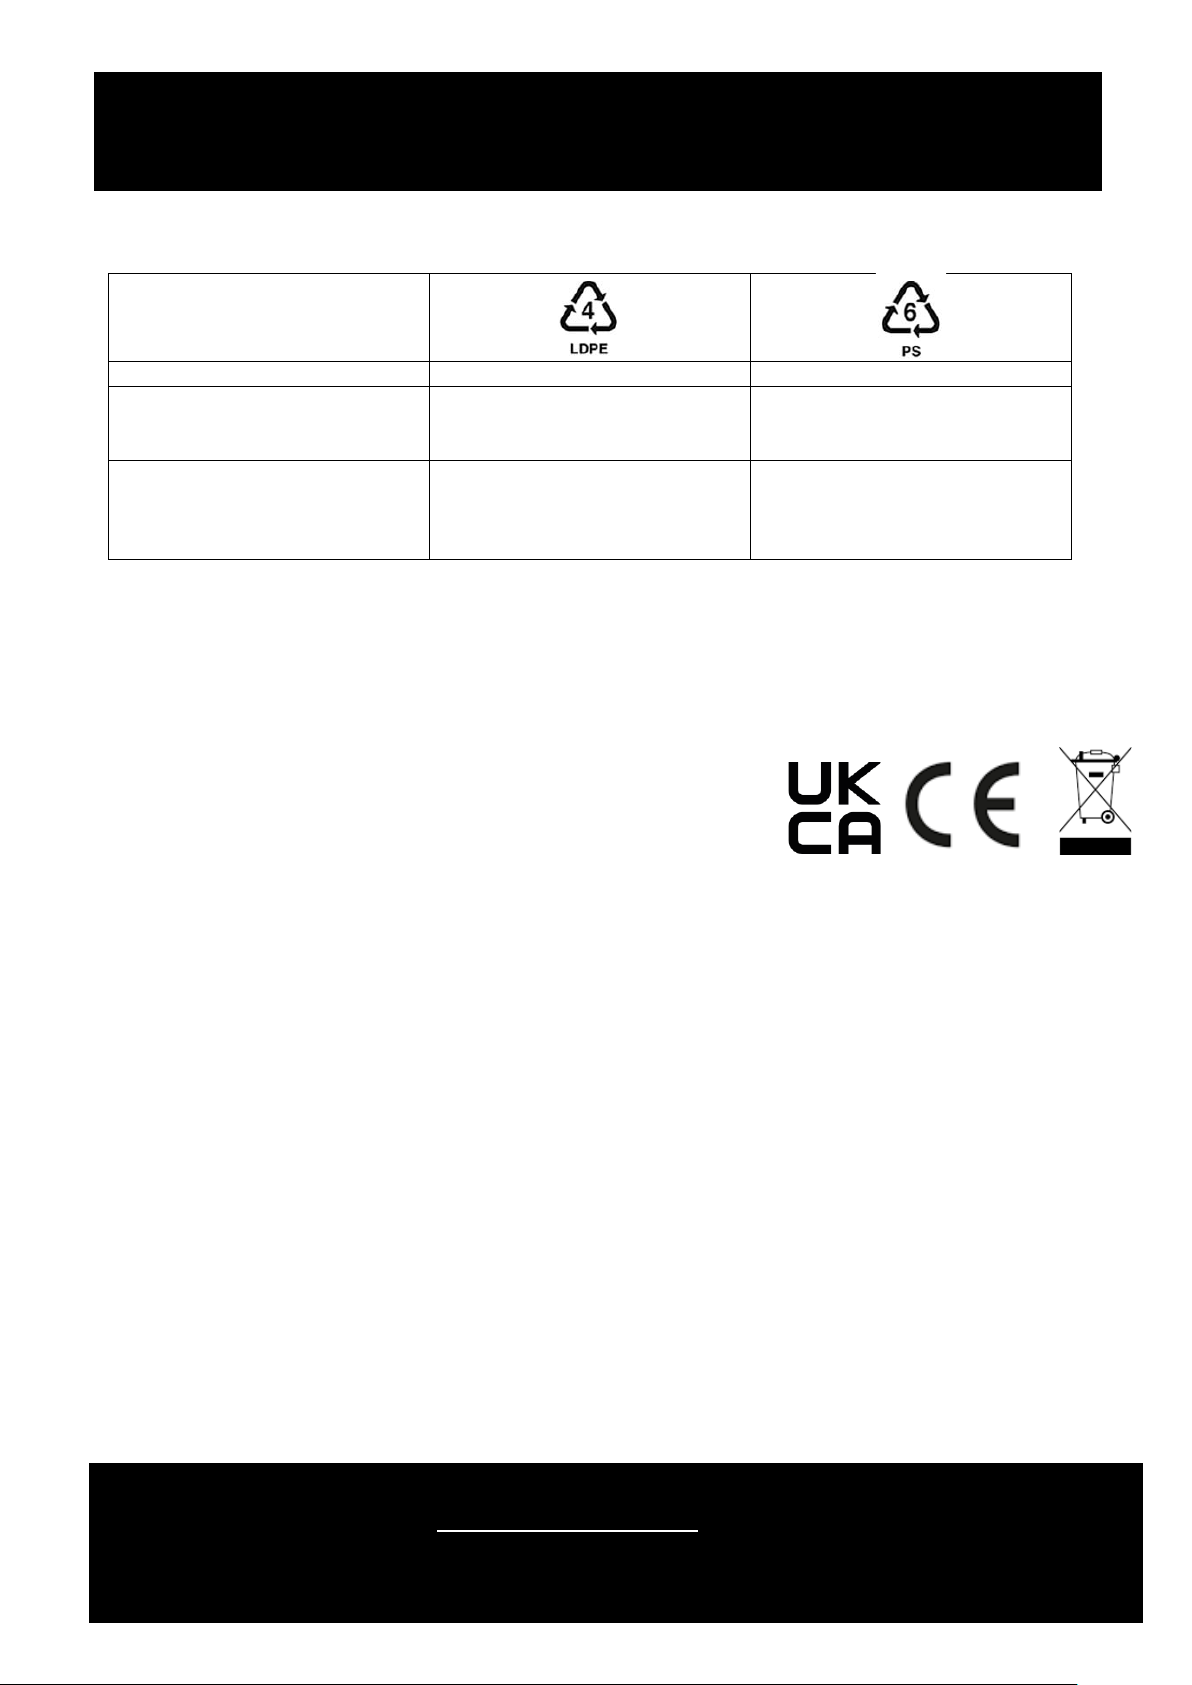
DISPOSAL
•Coopers of Stortford use recyclable or recycled packaging where possible.
•Please dispose of all packaging, paper, cartons, packaging in accordance with your local
recycling regulations.
•Plastics, polybags –Contains the following recyclable plastic.
Wireless TV Speaker H796 Instructions for Use
Please read and retain these instructions for future reference v002: 11/04/22
The Enterprise
Department
UK Head Office, 11 Bridge Street, Bishop’s Stortford, CM23 2JU
Tel: 0844 4824400*, Fax: 01279 756595
www.coopersofstortford.co.uk
EU address: D.S.B. LD, 160 Bd. de Fourmies, 59100 Roubaix, France
Tel: (+44) 1279 701269
*UK Calls cost around 7 pence per minute plus your telephone company’s network access.
Please check with your telephone supplier.
Code & Symbol
Type of Plastic
Low Density Polyethylene
Polystyrene
Commonly used for
Shopping bags, bread bags, squeezy
bottles, stretch/pallet wrap, bubble
wrap, multi-pack can holders
Insulation boxes, water cups,
protective packaging inserts, take
away containers
Notes
Usually recyclable supermarket
deposit points. Check other plastic
films as any non-polythene film e.g.
cling film, crisp packets film lids
Not commonly recycled but waste
management
centres will recycle it.
•At the end of the product’s lifespan please check with your local council authorised household waste
recycling centre for disposal.
Table of contents


