Ecler essentials ePLAYER1 User manual

ePLAYER1
AUDIO PLAYER
Local and Streaming Audio Player
USER MANUAL

2
CONTENTS
1. IMPORTANT WARNING .......................................................................................... 3
2. IMPORTANT SAFETY INSTRUCTIONS ....................................................................... 4
3. IMPORTANT NOTE.................................................................................................. 5
4. INTRODUCTION...................................................................................................... 5
5. INSTALLATION AND CONNECTIONS ........................................................................ 6
5.1. Location, set up and ventilation ...............................................................................6
5.2. AC connection and powering on ..............................................................................6
5.3. Audio output connections ........................................................................................7
5.4. Ethernet port for configuration and Internet connection ........................................7
5.5. Wi-Fi interface for configuration and Internet connection ......................................7
5.6. GPI remote control ports..........................................................................................8
6. FRONT PANEL......................................................................................................... 9
7. STARTUP.............................................................................................................. 10
7.1. Main menu .............................................................................................................10
7.2. Local media playback .............................................................................................12
7.2.1. Playing files stored on USB storage devices .........................................................12
7.2.2. Playing files stored on SD/SDHC memory cards.................................................13
7.3. Audio streaming playback......................................................................................13
7.3.1. Audio streaming playback via AirPlay ....................................................................14
7.3.2. Audio streaming playback via DLNA .......................................................................15
7.3.3. Listening to an Internet radio station .....................................................................16
7.3.4. Audio streaming playback over the Internet........................................................17
7.4. Configuration Menu ...............................................................................................18
7.5. Lock Menu ..............................................................................................................19
8. PART NAMES........................................................................................................ 20
9. HARDWARE FEATURES ......................................................................................... 20
10. BLOCK DIAGRAM.................................................................................................. 21
11. TECHNICAL SPECIFICATIONS ................................................................................. 22

3
1. IMPORTANT WARNING
The lightning flash with arrowhead symbol within an equilateral
triangle is intended to alert the user to the presence of uninsulated
“dangerous voltage” within the product’s enclosure that may be of
sufficient magnitude to constitute a risk of electric shock to persons.
The exclamation point within an equilateral triangle is intended to
alert the user to the presence of important operating and maintenance
(servicing) instructions in the literature accompanying the appliance.
WARNING (if applicable): terminals marked with the " " symbol may be of
sufficient magnitude to constitute a risk of electric shock. The external cables
connected to the terminals require installation by qualified personnel or the use of
pre-assembled cables.
WARNING:to prevent fire or shock hazard, do not expose this equipment to rain or
moisture.
WARNING:apparatus with Class I construction shall be connected to a mains socket
outlet with a protective earthing connection.

4
2. IMPORTANT SAFETY INSTRUCTIONS
1. Read these instructions.
2. Keep these instructions.
3. Heed all warnings.
4. Follow all instructions.
5. Do not use this apparatus near water.
6. Clean only with dry cloth.
7. Do not block any ventilation openings. Install in accordance with the
manufacturer’s instructions.
8. Do not install near any heat sources such as radiators, stoves or other
apparatus that produce heat, including amplifiers.
9. Do not defeat the safety purpose of the polarized or grounding-type plug. A
polarized plug has two blades with one wider than the other. A grounding
type plug has two blades and a third grounding prong. The wide blade or the
third prong are provided for your safety. If the provided plug does not fit into
your outlet, consult an electrician for replacement of the obsolete outlet.
10. Protect the power cord from being walked on or pinched particularly at
plugs, convenience receptacles, and the point where they exit from the
apparatus.
11. Only use attachments/accessories specified by the manufacturer.
12. Unplug this apparatus during lightning storms or when unused for long
periods of time.
13. Refer all servicing to qualified service personnel. Servicing is required when
the apparatus has been damaged in any way, such as power supply cord or
plug is damaged, liquid has been spilled or objects have fallen into the
apparatus, the apparatus has been exposed to rain or moisture, does not
operate normally, or has been dropped.
14. Mains disconnection: turning off the POWER switch stops all the device
functions and indicators from operating, but complete disconnection is
achieved by disconnecting the mains power cable from its connector. For this
reason, it shall remain readily operable.
15. The unit is connected to a protective earthing plug via the power cord.
16. Part of the product labelling is located at the base of the product.
17. This apparatus should not be exposed to dripping or splashing and no objects
filled with liquids, such as vases, should be placed on the apparatus.
WARNING:this product must not be disposed of as unsorted household
waste under any circumstances. Go to the nearest electrical and electronic
waste recycling facility.
NEEC AUDIO BARCELONA, S.L declines any responsibility for damages caused to
people, animals or objects due to failure to comply with the above warnings.

5
3. IMPORTANT NOTE
Thank you for choosing our ePLAYER1 multimedia player. It is VERY IMPORTANT to
carefully read this manual and to fully understand its contents before any
connection in order to maximize your use and get the best performance from this
equipment.
To ensure optimal operation of this device, we strongly recommend that its
maintenance be carried out by our authorised Technical Services.
The ePLAYER1 comes with a 3-year warranty.
4. INTRODUCTION
The ePLAYER1 is a compact stereo audio player able to play music content from
local storage devices (USB/SD), Internet streaming services (online radios, etc.) and
digital media exchange (DLNA, AirPlay) with the following main features:
Main features:
1 unbalanced stereo audio output, RCA connector and mini-jack (with
stereo/mono selection).
Compatible with mp3, ogg, AAC, WAV, AIFF and FLAC audio formats.
One USB port and one SD card slot for access to local media content.
Ethernet interface with RJ45 connector for communication with web setup
application as well as Internet streaming reception.
Wi-Fi interface (client or master mode) for communication with web
application configuration as well as Internet streaming reception.
Fully configurable through web application (point-to-point or through the
same LAN)
2 GPI (General Purpose Inputs) ports, to trigger the 2 available events.
Silence detection event.
Internal clock with up to 240h autonomy (without AC adapter) and automatic
synchronization with NTP services.
Front panel controls and indicators:
oLCD display.
oDigital encoder to navigate in the menus and set the parameters.
o6 backlit keys with pre-assigned function: ENTER, ESC, STOP,
PLAY/PAUSE, NEXT and PREV.

6
Modular firmware: the ePLAYER1 has a firmware with modular services that
allow each user to personalize its operation and adapt it to the size of his
project or to his business model. The firmware includes, among other
functions and services:
oCalendar event triggering
oSynchronization of cloud content (Cloud Disk Sync): compatible with
Google Drive service
oExecution of scripts (user-written instruction files in lua language -
www.lua.org).
oLocal file encryption (USB/SD)
oActivity Log
Note: ePLAYER1 programming is done through the web application embedded in
the unit. Refer to the ePLAYER1 web application manual for more information.
5. INSTALLATION AND CONNECTIONS
5.1. Location, set up and ventilation
The ePLAYER1 has been specially designed to be used both as a desktop player and
a 19" rackmount unit, occupying half a rack space (with 1UHRMKIT, optional
mounting kit for standard rack cabinets).
In professional installations, it should preferably be placed in the same rack as the
audio sources.
Since its power consumption is very low, forced ventilation is not necessary.
However, avoid exposing the device to extreme temperature and the environment in
which it is placed should be as dry and clean (no dust) as possible.
5.2. AC connection and powering on
The ePLAYER1 is powered by alternating current (AC) through its external power
supply: 100-240 VAC, 50-60 Hz. This external power supply has several
interchangeable connectors: American, European, British and Chinese.
The operating environment should be dry and be totally free of dust. Do not expose
the unit to dripping or splashing. Do not place incandescent objects like candles on
top of it.

7
If the unit requires any intervention and/or connection/disconnection, it must be
powered off first. There are no user-serviceable parts within the unit. To avoid
buzzing, do not allow the power cable to intertwine with audio shielded cables.
5.3. Audio output connections
The ePLAYER1 has 1 unbalanced stereo output on its rear panel.
The signal output connectors are 2 x RCA and 1 x stereo mini-jack.
5.4. Ethernet port for configuration and Internet connection
An RJ45 connector allows the unit to be connected to an Ethernet network or even
directly (point-to-point) to a computer.
This connection provides access to Internet contents, and to the configuration of the
unit using a web browser on the computer, which points to the IP address of the
ePLAYER1, showing the web application embedded in the unit. Refer to the
ePLAYER1 web application manual for more information.
5.5. Wi-Fi interface for configuration and Internet connection
A Wi-Fi interface allows the unit to be connected to a Wi-Fi network or even directly
(point-to-point) to a computer by Wi-Fi.
This connection provides access to Internet contents, and to the configuration of the
unit using a web browser on the computer, which points to the IP address of the
ePLAYER1, showing the web application embedded in the unit. Refer to the
ePLAYER1 web application manual for more information.

8
5.6. GPI remote control ports
The ePLAYER1 has 2 GPI control inputs on its rear panel. These inputs can be
connected to an external physical device (e.g. a contact closure) and associated with
an ePLAYER1 function:
Load and play previously configured audio content
Preset recall
Audio playback with priority over the music program
Transport bar control (PLAY/PAUSE, STOP, etc.)
Internal triggering, to interact with other player services (scripts for example)
GPI connectors use 3-position screw terminal blocks (Euroblocks). The wiring is as
follows:
GPI terminal > −1, 2 terminals
Ground > terminal
Connecting cables can be up to 500 meters long with a minimum section of 0,5 mm2.
Figure 1: Connection example of GPI 2

9
6. FRONT PANEL
The ePLAYER1 front panel provides the following elements:
SD/SDHC slot: for local audio content playback. Up to 2TB. FAT16/32 format.
USB 2.0 port: for local audio content playback. Up to 2TB. FAT16/32 and
NTFS format.
SP LED: signal presence indicator.
NET LED: network (Internet) data reception indicator.
LCD display: displays menus, player information, etc.
CONTROL & SELECT digital encoder: allows menu navigation, parameter
selection, etc.
ESC key: allows you to exit the menu (return to the main screen). It also
provides access to the lock menu.
MENU key: provides access to the main menu and device configuration.
PREV () key: skips to the previous song in the player playlist. Within the
main or configuration menu, allows you to navigate through the different
(previous) settings.
STOP key (): stops the current playback.
PLAY/PAUSE () key: starts/pauses playback of the loaded item.
NEXT key (): skips to the next song in the player playlist. Within the main or
configuration menu, allows you to navigate through the different (next)
settings.

10
7. STARTUP
The ePLAYER1 has been designed to be used as a local media player, without prior
configuration. However, Ecler recommends configuring ePLAYER1 with your web
application to enjoy its full functionality. Please refer to the ePLAYER1 web
application manual to know all the functionality it offers.
Plug the power cord into the back of the device to turn it on. A message will be
displayed on the screen indicating that ePLAYER1 is starting.
Note: please check the firmware version of your device. It should be updated to the
latest version to ensure that all features described in this manual are available. Visit
www.ecler.com to download it.
7.1. Main menu
The ePLAYER1 main menu allows you to make playback adjustments, such as
selecting the audio source, loading presets, etc.
The main menu is accessed by pressing the MENU key. Navigation through the
various menu items is performed using the NEXT () and PREV () keys, to
respectively move to the next or previous one. Once you have chosen the item to be
set, rotating the CONTROL & SELECT encoder allows you to select the different
parameters. The selected parameter will start flashing until its selection is
confirmed by pressing the CONTROL & SELECT encoder. If you change items (with
the NEXT () and PREV () keys) or exit the menu by pressing ESC without
confirming, the changes will not be applied, except for the volume whose changes
are executed in real time.
To exit the main menu, press the ESC key.
The main menu consists of the following items:
SOURCE: audio source. To select USB media (USB), SD/SDHC card (MMC),
DLNA device (DLNA), AirPlay device (AIRPLAY) or any of the items previously
configured as the source of a preset. Refer to the ePLAYER1 web application
manual to learn how to create audio sources. If the selected device is not
found, cannot be read or if there is no connection available (DLNA/AirPlay),
the display indicates that the device is not available (UNAVAILABLE).
PRESET: preset (configuration memory) recall. Allows you to select from 20
user presets. Refer to the ePLAYER1 web application manual for information
on how to configure presets.

11
VOLUME: volume control. Allows real-time adjustment of the player volume.
0dB corresponds to the maximum value of the player. Press the CONTROL &
SELECT encoder to mute the player output (MUTE). Press it again to deactivate
MUTE.
REPEAT: track repeat modes within a playlist.
oPLAY ALL: plays the playlist only once.
oPLAY ONE: plays the track only once.
oREPEAT ALL: when the playlist ends, the same list starts playing
again.
oREPEAT ONE: when the track ends, the same track starts playing
again.
PLAY MODE: playback mode.
oSEQUENTIAL: sequential playback (same alphanumeric order as the
storage device).
oRANDOM: random playback.
FADE: transition mode between audio tracks inside the playlist.
oOFF: transition without fades. Once a track ends, the next track in the
playlist starts playing.
oXFADE: crossfade. the transition between tracks progressively
reduces the volume level of the ending track as the next track volume
level gradually increases, merging both tracks for a short time until
the starting track reaches its nominal volume level.
oFADE: the ending track fades out. After this, the next track fades in
until it reaches its nominal volume level. There's no crossfade
between tracks.
BOOT MODE: reset mode. Allows you to adjust the startup parameters of the
player.
oKEEP STATUS: at start-up, the last settings made just before shutdown
are retained: player status (PLAY/STOP), volume, repeat mode, fade,
play mode and playlist.
oLOAD PRESET1: at start-up, preset 1 is always loaded. The settings of
this preset can be configured using the web application of the device.

12
7.2. Local media playback
7.2.1. Playing files stored on USB storage devices
Insert USB media containing audio files in the USB port. Then press the MENU key to
access the main menu. In the SOURCE submenu, select the USB source using the
CONTROL & SELECT digital encoder to navigate through the different parameters
and press the encoder to confirm (SELECT). The selected parameter will flash until
your selection is confirmed. Press in the transport bar to start playing content.
If no media is found or the media cannot be read, the display will show the message:
USB UNAVAILABLE (flashing). If this occurs, please check that the media is properly
inserted and that it meets the specifications. If there are no files with one of the
accepted audio formats, the message "NOT FOUND" will be displayed. If this
happens, please check that the files meet the specifications.
A
r
t
i
s
t
-
s
o
n
g
.
m
p
3
0
2
:
5
6
U
S
B
Figure 2: ePLAYER1 playing a file from USB media
The CONTROL & SELECT digital encoder allows you to access additional information
about the playback track and the playlist. Press it once to access playback track
information, displaying: track name, audio format (mp3, wav, etc.), bitrate (kbps),
track duration (mm:ss), and sample rate (kHz).
A
r
t
i
s
t
-
s
o
n
g
m
p
3
3
2
0
0
3
:
0
5
4
4
.
1
Figure 3: playback track information

13
Press the CONTROL & SELECT encoder a second time to access playlist information.
The display shows the position of the playing track and the total number of tracks in
the playlist.
I
N
D
E
X
|
T
O
T
A
L
0
0
1
7
|
0
0
6
4
Figure 4: playlist information
7.2.2. Playing files stored on SD/SDHC memory cards
Insert a SD/SDHC card containing audio files in the slot. Then press the MENU key to
access the main menu. In the SOURCE submenu, select the MMC source using the
CONTROL & SELECT digital encoder to navigate through the different parameters
and press the encoder to confirm (SELECT). The selected parameter will flash until
your selection is confirmed. Press in the transport bar to start playing content.
If no media is found or the media cannot be read, the display will show the message:
MMC UNAVAILABLE (flashing). If this occurs, please check that the media is
properly inserted and that it meets the specifications.
A
r
t
i
s
t
-
s
o
n
g
.
m
p
3
0
2
:
5
6
M
M
C
Figure 5: ePLAYER1 playing a file from SD/SDHC card
7.3. Audio streaming playback
The ePLAYER1 allows audio streaming playback, from its Ethernet or Wi-Fi
interface.
It supports DLNA and AirPlay, so you can play files sent from your smartphone,
tablet or PC via a wireless connection. It also plays Internet streaming services such
as online radios or files from a server. A stable Internet connection is required.
14
7.3.1. Audio streaming playback via AirPlay
Point-to-point audio content can be sent via AirPlay by connecting your device to
the ePLAYER1 Wi-Fi interface or via a home Wi-Fi network. AirPlay also works with
a wired Ethernet connection. Refer to the web application manual for information
on the different ways to connect to a LAN.
First, make sure that your device and ePLAYER1 are on the same local network or
are point-to-point connected. Then press the MENU key to access the main menu. In
the SOURCE submenu, select the AIRPLAY source using the CONTROL & SELECT
digital encoder to navigate through the different parameters and press the encoder
to confirm (SELECT). The selected parameter will flash until your selection is
confirmed. The AIRPLAY MODE message flashes on the display. The ePLAYER1 is
now ready to receive AirPlay streams.
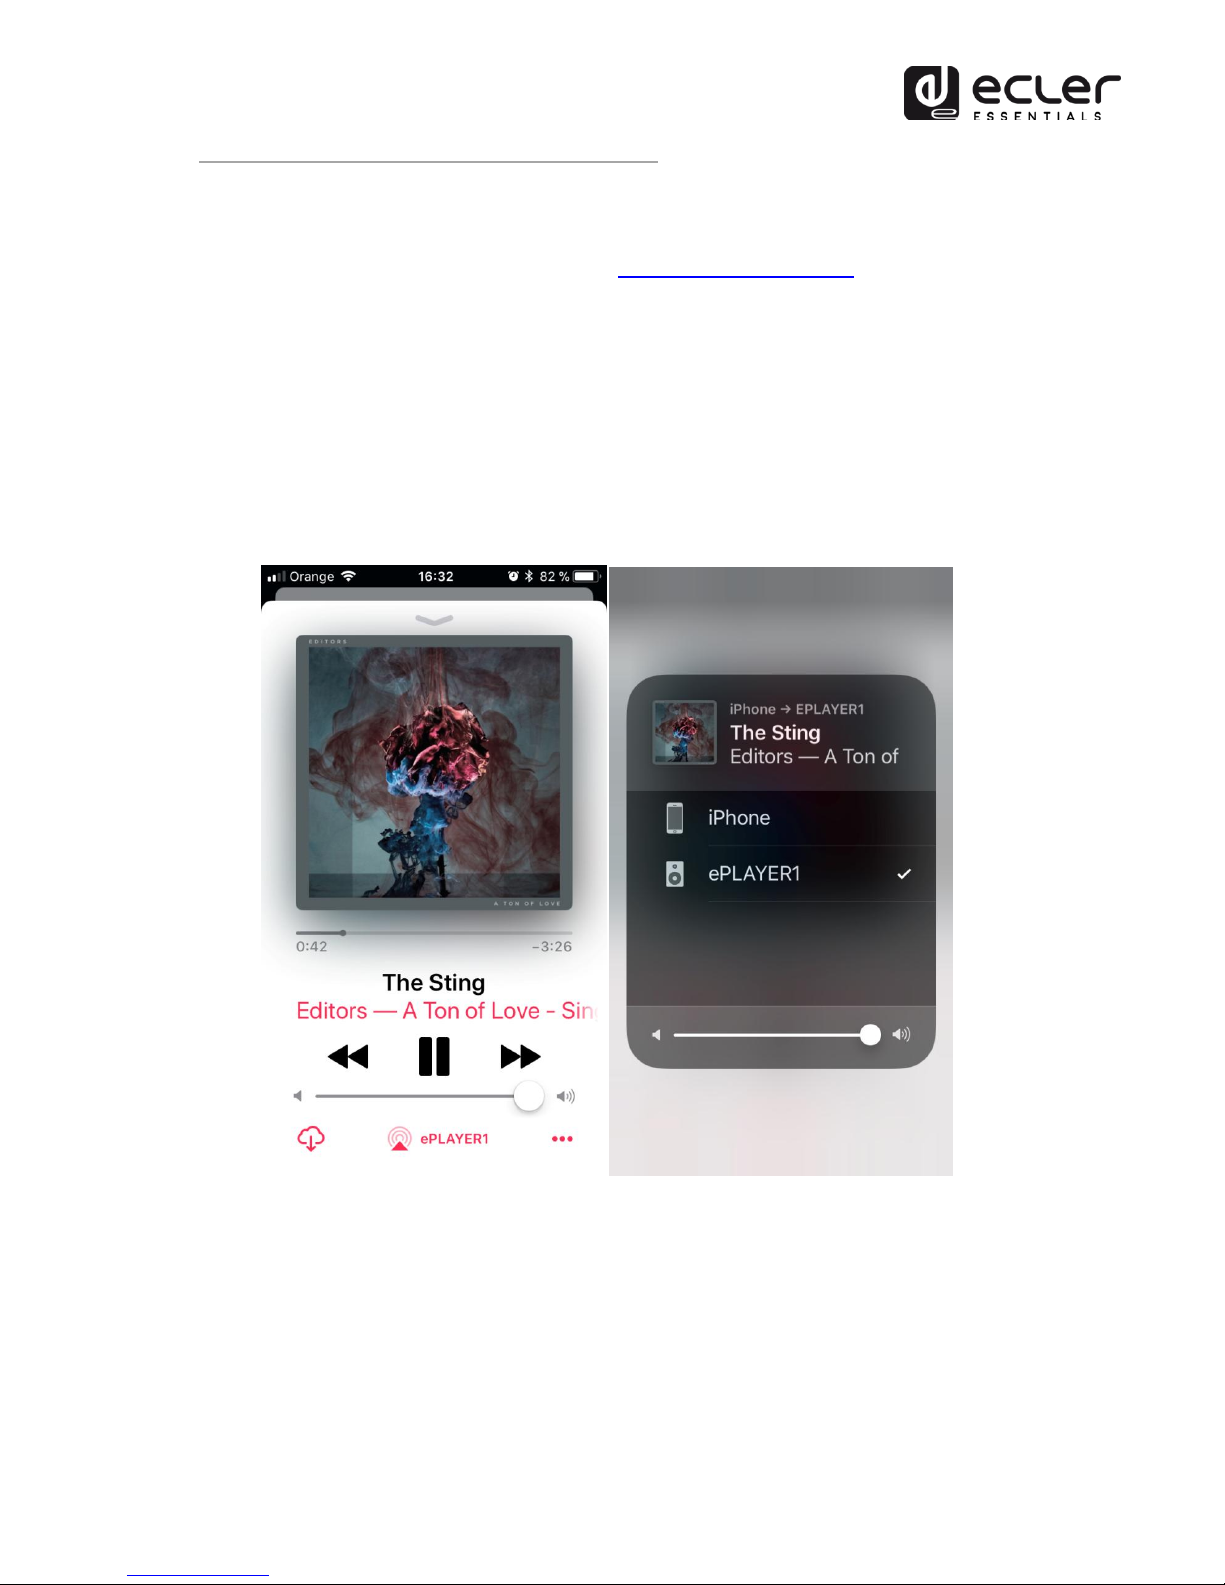
Figure 6: AirPlay streaming from iOS© device
15
7.3.2. Audio streaming playback via DLNA
Point-to-point audio content can be sent via DLNA, connecting your device to the
ePLAYER1 Wi-Fi interface or via a home Wi-Fi network. DLNA is not available via
wired Ethernet connection. Refer to the web application manual for information
on the different ways to connect to a LAN.
First, make sure that your device and ePLAYER1 are on the same local network.
Then press the MENU key to access the main menu. In the SOURCE submenu, select
the DLNA source using the CONTROL & SELECT digital encoder to navigate through
the different parameters and press the encoder to confirm (SELECT). The selected
parameter will flash until your selection is confirmed. The DLNA MODE message
flashes on the display. The ePLAYER1 is now ready to receive DLNA streams.
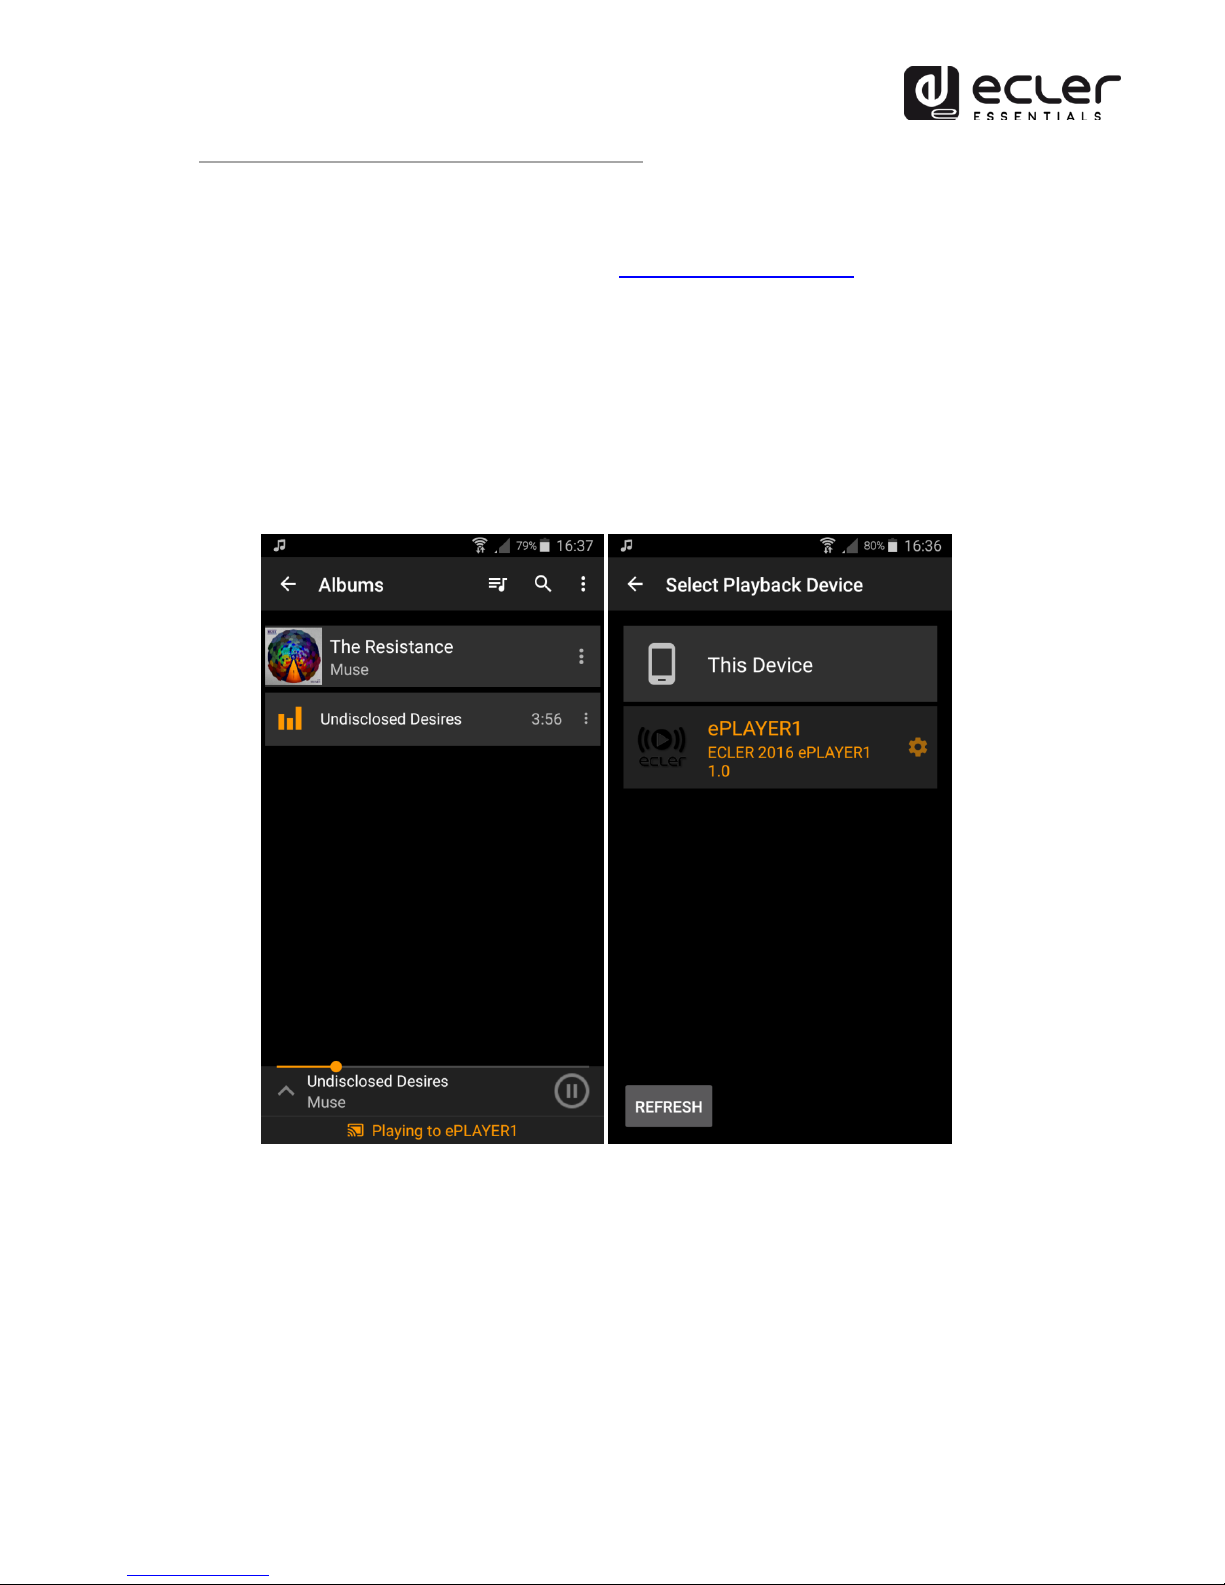
Figure 7: Android© device connected to an ePLAYER1 for streaming via DLNA

16
7.3.3. Listening to an Internet radio station
Connect your ePLAYER1 to the Internet. You can use the Ethernet port or the Wi-Fi
interface. Refer to the web application manual for information about connecting to
the Internet.
From firmware version v3.01r00, ePLAYER1 includes an Internet radio service that
allows you to discover, listen and store in a very simple way different audio content
such as music, news, sports, podcasts and Internet radios, among more than
120,000 radio stations worldwide.
NOTE: in version v3.01r00, this service is only accessible from the front panel of the
player.
Press the MENU key to access the main menu. In the SOURCE submenu, select the
INTERNET RADIO source using the CONTROL & SELECT digital encoder to navigate
through the different parameters and press the encoder to confirm (SELECT).
NOTE: INTERNET RADIO is at the top of the list, so turn the encoder counter-
clockwise.
Turn the rotary encoder to navigate through the different menus, press the encoder
to select a menu, and press the ESC key to return to the previous menu.
>
L
o
c
a
l
R
a
d
i
o
M
u
s
i
c
Figure 8: Internet radio service navigation menu
If you have already selected an Internet radio, press the MENU button again to recall
the last selection. Press the MENU key again to return to the beginning.
Press and hold the rotary encoder on an Internet radio for 2 seconds to preset this
radio station. Turn the encoder to navigate between the different presets available
and press it to store the radio station.
S
A
V
E
R
A
D
I
O
T
O
>
>
0
1
-
P
R
E
S
E
T
0
1
Figure 9: saving a preset
If the preset is empty, you must confirm by pressing the encoder. If you do not want
to store in the selected preset, you can return to the previous menu and select
another preset by pressing the ESC key.

17
If you want to overwrite a preset, you must confirm by pressing the encoder. If you
do not want to store in the selected preset, you can return to the previous menu and
select another preset by pressing the ESC key.
You can store an Internet radio in a preset without listening it.
Once an Internet radio has been stored in a preset, it is available in the SOURCE
submenu as an audio source, at the position corresponding to the preset number.
7.3.4. Audio streaming playback over the Internet
Connect your ePLAYER1 to the Internet. You can use the Ethernet port or the Wi-Fi
interface. Refer to the web application manual for information about connecting to
the Internet.
Press the MENU key to access the main menu. In the SOURCE submenu, select your
playlist as the source, whether it is a preset Internet radio or a previously created
playlist pointing to streaming content (see the web application manual to learn how
to set up a playlist), by turning the CONTROL & SELECT digital encoder to navigate
through the different parameters and pressing the encoder to confirm (SELECT).
The selected parameter will flash until your selection is confirmed. Press in the
transport bar to start playing content.
If playlist playback does not start, please check your Internet connection and/or the
network settings of your device.
r
a
d
i
o
-
o
n
l
i
n
e
.
m
p
3
0
0
:
3
8
N
E
T
Figure 10: ePLAYER1 playing an Internet stream

18
7.4. Configuration Menu
The configuration menu allows you to set network parameters, date and time, the
audio output mode (mono/stereo) and view relevant device information.
The configuration menu is accessed by holding down the MENU key for a few
seconds. Menu navigation and parameter setting are the same as in the main menu
(see chapter 7.2).
The configuration menu consists of the following items:
CHANNELS: to set the output to stereo or mono.
WIFI: to configure the Wi-Fi interface.
oOFF: disables the Wi-Fi interface.
oON: enables the Wi-Fi interface. Press the CONTROL & SELECT
encoder to display the IP address assigned to the device. In MASTER
mode this IP will be 192.168.189.1 (refer to the web application
manual for details).
oRESTORE DEFAULTS: resets the default Wi-Fi configuration
parameters.
ETHERNET: to set the Ethernet interface to DHCP or static (dynamic or static
addressing). Turn the CONTROL & SELECT encoder to select one of the two
options:
oDHCP: press the CONTROL & SELECT encoder to display the IP
address assigned to the device (DHCP).
oSTATIC: if you have selected static addressing, you can edit the
network parameters from the front panel by pressing the CONTROL &
SELECT encoder to access the IP submenu. If you want to change the
IP address, turn the encoder. To select the next parameter (byte),
press the NEXT key.
oEach time you press the encoder, you can navigate through the
different network parameters: IP, MASK, GATEWAY, DNS1, DNS2 and
APPLY+REBOOT. The latter option is available only if you have made
changes to any of the network parameters.
oTo confirm changes to network parameters, select YES in the
APPLY+REBOOT submenu. The device will restart with the new
network settings.
DATE: displays date in YEAR/MONTH/DAY format
TIME: displays time in HH:MM format
GALLERY: under construction.
VERSION: displays the current firmware version of the device.

19
7.5. Lock Menu
To access the lock menu, press and hold the ESC key for approximately 10 seconds.
In the LOCK MODE menu, the following options appear (same navigation as in all
other menus):
UNLOCK ALL: unlocks all front panel keys.
UNLOCK USER: locks access to the device configuration menu (administrator
functions) but allows you to use all other features. A submenu appears in
which you must enter the password that protects access to the device's
configuration functions. Turn the CONTROL & SELECT digital encoder to select
the desired digit. Press the NEXT key to advance to the next digit. To confirm
the password, press the CONTROL & SELECT digital encoder.
The next time you try to access the lock menu, you will be prompted for the
password to unlock the administrator functions. After a while without
pressing any key, and as a precaution, the configuration menu will be locked
again. It will be necessary to return to the lock menu and select UNLOCK ALL
to prevent the unit from locking the configuration menu after a few seconds of
user inactivity.
LOCK ALL: locks all front panel keys. To unlock them, proceed in the same way
as to unlock the configuration menu (UNLOCK ALL).

20
8. PART NAMES
1. LCD display
2. Digital encoder CONTROL & SELECT
3. SP LED (signal presence indicator)
4. NET LED (network traffic indicator)
5. ESC key
6. MENU key
7. PREV key
8. STOP key
9. PLAY/PAUSE key
10. NEXT key
11. SD/SDHC Slot
12. USB port
13. PSU cable security clamp
14. External power supply connector
15. Stereo output (2 x RCA)
16. Stereo output (mini-jack)
17. Wi-Fi antenna
18. RJ45 connector
19. GPI port
20. Wi-Fi indicator light
9. HARDWARE FEATURES
Table of contents
Popular Turntable manuals by other brands

JVC
JVC QL-Y55F Instruction book

Pro-Ject Audio Systems
Pro-Ject Audio Systems Remote Box S2 Instructions for use

NAD
NAD 533 Instructions for use

Kenwood
Kenwood KD-291R instruction manual

REKKORD AUDIO
REKKORD AUDIO M 600 operating manual

Pro-Ject Audio Systems
Pro-Ject Audio Systems Speed Box MK II Instructions for use


