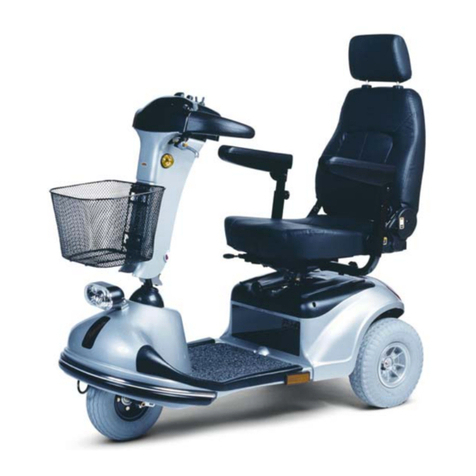
Eclipse P327 User manual

*Product may not be exactly as shown P327
Instruction Manual

1
Table of Contents
Introduction ....................................................................................................................................................... 2
EMI Warning.....................................................................................................................................................3
Safety Guidelines.............................................................................................................................................5
Preparation for Use..........................................................................................................................................6
Features............................................................................................................................................................. 7
Free Wheel Mode........................................................................................................................................... 11
Disassembly.................................................................................................... Error! Bookmark not defined.
Batteries and Battery Charging....................................................................................................................14
Controller Operation......................................................................................................................................16
Controller Flash Codes .................................................................................................................................20
Dynamic Controller Operation...................................................................................................................... 21
Inspection and Maintenance........................................................................................................................22
Warranty..........................................................................................................................................................24
Specifications P326A.....................................................................................................................................25
Options............................................................................................................................................................. 26

2
Introduction
Congratulations on the purchase of your Eclipse Powerchair. Please carefully read this owner’s
manual before attempting to use your Powerchair. After reading the manual if you still have any
questions or concerns please feel free to contact your local authorized dealer.
Before reading the rest of the manual please register your product online at
www.eclipsemedical.com.
You must keep your receipt as proof of purchase for the warranty to be valid: you will need
to present the receipt when you service or repair your product under warranty.
Please fill in the information below for your records.
Model: __________________________
Serial # __________________________
Date Purchased: __________________________
Dealer Name: __________________________
Dealer Telephone #: __________________________

3
EMI Warning
This vehicle has an immunity level of 30 v/m which should protect it from Electromagnetic
Interference (EMI) from radio wave sources. The rapid development of electronics, especially in the
area of communications, has saturated our environment with electromagnetic (radio) waves that are
emitted by television, radio and communication signals. These EMI waves are invisible and their
strength increases as one approaches the source. All electrical conductors act as antennas to the
EMI signals and, to varying degrees, all power wheelchairs and power scooters are susceptible to
electromagnetic interference (EMI). This interference could result in abnormal, unintentional
movement and/or erratic control of the vehicle. The United Statement is incorporated to the user's
manual for all electric power wheelchairs:
Powered wheelchairs and electric power scooters (in this text, both will be referred to as powered
wheelchairs) may be susceptible to electromagnetic interference (EMI), which is interfering
electromagnetic energy emitted from sources such as radio stations, TV stations, amateur radio
(HAM) transmitters, two-way radios and cellular phones. The interference (from radio wave sources)
can cause the powered wheelchair to release its brakes, move by itself or move in unintended
directions. It can also permanently damage the powered wheelchair's control system. The intensity
of the EMI energy can be measured in volts per meter (V/m). Each powered wheelchair can resist
EMI up to a certain intensity. This is called the "immunity level." The higher the immunity level, the
greater the protection. At this time, current technology is capable of providing at least 30 V/m of
immunity level which would provide useful protection against common sources of radiated EMI.
Following the warnings listed below should reduce the chance of unintended brake release or
powered wheelchair movement that could result in serious injury:
1) Do not turn on hand-held personal communication devices such as citizens band (CB) radios
and cellular phones while the powered wheelchair is turned on.
2) Be aware of nearby transmitters such as radio or TV stations and try to avoid coming close to
them.
3) If unintended movement or brake release occurs, turn the powered wheelchair off as soon as
it is safe.
4) Be aware that adding accessories or components, or modifying the powered wheelchair, may
make it more susceptible to interference from radio wave sources. (Note: there is no easy way
to evaluate their effect on the overall immunity of the powered wheelchair).
5) Report all incidents of unintended movement or brake release to the powered wheelchair
manufacturer, and note whether there is a radio wave source nearby.

4
TURN OFF YOUR POWER WHEELCHAIR AS SOON AS POSSIBLE WHEN EXPERIENCING
ANY OF THE FOLLOWING:
1. Unintentional motions.
2. Unintended of uncontrollable direction.
3. Unexpected brake release.
The FDA has written to the manufacturers of power wheelchairs, asking them to test their new
products to be sure they provide a reasonable degree of immunity against EMI. The letter says that
powered wheelchairs should have an immunity level of at least 30 Vim, which provide a reasonable
degree of protection against the more common sources of EMI. The higher the level, the greater the
protection.

5
Safety Guidelines
Your Powerchair is a powerful electric device. Please read the following notes carefully to ensure
safety at all times. Always make certain your Powerchair is in full working order before use.
1. Do not exceed any incline over 6 / 10%
2. Do not reverse while driving up any incline or hill.
3. Do not use the joystick in an erratic manner when proceeding uphill or downhill.
4. Do not turn off your Powerchair using the ON/OFF button when in motion. This will set the
brakes immediately and could cause damage to the controls of the Powerchair and to you.
5. Do not ride over deep, soft terrain such as loose dirt/gravel, tall grass etc.
6. Do not mount any curb height over 4 cm (1.5 inches).
7. Do not attempt to cross over a gap on the sidewalk or road that is greater than 7.5 cm (3
inches).
8. Do not carry passengers.
9. Do not mount or dismount your Powerchair unless brakes are engaged and the controls are
off.
10. Do not get on or off of the Powerchair on a hill.
11. Do not operate your Powerchair on public roads.
12. Do not remain seated on your Powerchair when in a vehicle. Transfer to a seat within the
vehicle.
13. Do not adjust seat height while sitting on your Powerchair!
14. Always come to a full stop before making any sharp change of direction.
15. Always reduce to a slow speed when approaching and proceeding down gradients. Moving
your joystick slowly towards the central position will reduce your speed.
16. Always approach curbs and gradients at slow speeds.
17. Do not drive over soft, uneven or unprotected surfaces such as grass, loose gravel or sand.
18. Always keep your feet on the footplate when in motion.
19. Always use your safety belt.

6
20. Always keep your tires at the correct air pressure.
21. Always make certain that your batteries are fully charged before setting out on your journey.
22. Do not drink and drive. Consult your Physician to determine if your medications impair your
ability to control the Powerchair.
23. Do not turn on or use hand-held personal communications devices such as radios or cellular
phones.
24. PLEASE GIVE CONSIDERATION TO PEDISTRIANS WHEN OPERATING YOUR ECLIPSE
POWERCHAIR.
Preparation for Use
Your Powerchair has many features designed to provide you with maximum comfort, and will be
ready for immediate use upon assembly and delivery by your dealer. Adjustments may then be
made to the following parts:
1. Footplate may be lengthened outward from the main frame to four different positions.
2. Footplate may be angled from 0to 60.
3. Armrests may be set at a variety of angles and/or lengths.
4. Arms may be increased in height.
5. Joystick control may be fitted for either right or left hand use.
6. Seat height can be raised or lowered.
7. Backrest angle may be adjusted.
8. Make sure batteries are connected and charged at least 6-8 hours before first use.

7
Features
WARNING: All adjustments must not be made while user is seated on Powerchair.
All other adjustments should be carried out while seated in your Powerchair.
Footrest Angle Adjustment
1. Flip-up the footplate for easy access to bolt.
2. With an Allen wrench, simple turn the bolt clockwise to
increase the angle or counter-clockwise to decrease the
angle.
A. Hold hexagonal bolt with wrench and loosen the
nut.
B. Choose the correct angle and tighten the bolt.
Armrest Angle Adjustment
1. Flip up the armrest for easy access to the set screw.
2. Turn the set screw counter-clockwise to raise the armrest and clockwise
to lower the front of the armrest.
Headrest Height Adjustment
Depress then release the clamp on the left of the backrest while pulling
headrest up or pushing down until you reach the desired comfort position. (one
of three).
Seat Back Adjustment
Your powerchair has a fully adjustable seat for your comfort. To manually recline your seat, simply
pull up on the lever located on the lower left side of the seat and you will be able to adjust it to fit
your desired convenience.

8
Seat Removal
1. Disconnect the controller connector from the joystick.
2. Turn the backrest angle adjustment lever up and tilt the backrest forward.
3. At the rear of the seat release the lock holding the seat and carefully lift the rear part of the
seat and remove the seat vertically.
4. To install the seat, insert the from seat hook into the cross bar. Carefully lower the seat
down towards rear and lock into position. Before operating make sure the seat is fully
locked into position.

9
Seat Height Adjustment
1. Take off the seat.
2. Remove the retaining clips.
3. Pull the trapeze bar out as far as the required height until the correct hole appears in the
seat tubes.
4. Insert the pins back into the correct height hole on all four tubes.
5. Reinstall the seat.

10
Joystick Controller
Conversion
You can move the joy stock controller so the operator can use it with either their left or right hand.
Beneath the armrests there is a hand knob (same know to adjust the armrests). Remove the hand
knob completely and slide off the armrests. You can now exchange the joystick control from one side
to the other.
Position
Loosen the set screwwith an allen key and adjust the joystick
correct position and then tighten.
Extension or Retraction
Push the joystick controller outward and backward to store it at the side of the Powerchair Arm. This
allows easier access to tables, desks, etc.

11
Free Wheel Mode
The powerchair has a manual freewheel model lever on each motor. Manual freewheel levers enable
you to disengage the drive motors from the gearboxes and maneuver the chair manually.
WARNING: DO NOT USE THE POWERCHAIR WHILE THE DRIVE MOTORS ARE
DISENGAGED! DO NOT DISENGAGE THE DRIVE MOTORS WHEN THE POWERCHAIR IS ON
AN INCLINE, AS THE UNITCOULD ROLLON ITS OWN, CAUSING INJURY!
To engage or disengage the drive motors:
1. Locate the lever on the top of each motor.
2. Push the two levers downward to engage the drive motors. (A)
3. Pull the two levers upward to disengage the drive motors. (B)
WARNING: IT IS IMPORTANT TO REMEMBER THAT WHEN YOUR POWERCHAIR IS
IN FREEWHEEL MODE, THE BRAKING SYSTEM IS DISENGAGED.
Motor Engaged Motor Disengaged
A B

12
Disassembly
DISASSEMBLY INSTRUCTIONS WARNING:
CAUTION IS ADVISED WHEN DISASSAMBLING AND LIFTING ITEMS. YOU MUST
ENSURE THAT THE PERSON UNDERTAKING THIS PROCEDURE IS PHYSICALLY
CAPABLE OF LIFTING THE WEIGHT INVOLVED.
Seat Removal
1. Disconnect the controller connector from the joystick.
2. Turn the backrest angle adjustment lever up and tilt the backrest forward.
3. At the rear of the seat release the lock holding the seat and carefully lift the rear part of the
seat and remove the seat vertically.

13
4. To install the seat, insert the from seat hook into the cross bar. Carefully lower the seat
down towards rear and lock into position. Before operating make sure the seat is fully
locked into position.
Battery Removal
1. Unscrew the four plastic lock pins then remove top shroud.
2. Disconnect the battery cables.
3. Remove velcro battery straps.
4. Carefully lift out each battery.
TO RE-ASSEMBLE YOUR POWERCHAIR SIMPLY REVERSE THE ABOVE DESCRIBED
PROCEDURES.

14
Batteries and Battery Charging
Your powerchair uses two long-lasting, 12 volt batteries. These deep-cycle batteries are sealed and
maintenance free. Since they are sealed, there is no need to check the electrolyte fluid level. Deep-
cycle batteries are designed to handle deep discharges. Though they are similar in appearance to
automotive batteries, they are not interchangeable. Automotive batteries are not designed to handle
long, deep discharges, and are also unsafe for use in your powerchair.
Because your Powerchair batteries are sealed, they are most likely to be accepted for transport on
all aircrafts. Please consult your carrier prior to departure, as they will need advance warning that
you wish them to carry batteries.
PLEASE NOTE: Each carrier reserves the right to carry what may be termed “HAZARDOUS
CARGO” Eclipse Medical Inc. cannot be responsible for their final decision.
WARNING! Battery posts, terminals and related accessories contain lead and lead
compounds. Wash hands after handling.
Battery Charging
Your Powerchair has a lot of power, so keeping it working to its maximum potential means that its
two batteries must be maintained with full power. An active user will need to charge the batteries
after using approx. 30% of the battery capacity. An inactive user (once a week to every other day),
the recharge point would be 50%. Nightly recharging, after use, will help you give the batteries a
longer life and will ensure your Powerchair is always ready to go when you are. The batteries are
located under the seat in the center of the chair. The duration of the batteries can be affected by
temperature, terrain and weight of the user. On the joystick controller there is a battery gauge, which
indicates how much charge is remaining in the batteries.
Battery Charger
The battery charger supplied is special to your Powerchair, and may not be suitable for any other
power mobility products. Use only the charger supplied with your Powerchair; other makes of
chargers may permanently damage your Powerchair batteries, and would void the warranty.
Charging the Batteries
Your Powerchair batteries will need to be recharged when the battery state indicator located on the
joy stick controller is reading in the RED bar area. NOTE: The batteries will have a longer life if you
do not use up all of the battery’s power, and recharge as soon as the battery gauge reaches the red
bars. The bars represent time to recharge.

15
Battery Break-In
To break in your new powerchair batteries for maximum efficiency:
1. Fully recharge any new battery prior to initial+ use. This will bring the battery up to about 90%
of its peak performance level.
2. Drive your powerchair for a small amount of time while you become accustomed to the
controls.
3. Fully charge the batteries again for 8-12 hours and then operate the powerchair again. The
batteries should now perform at over 90% of their potential.
4. After four or five charging cycles, the batteries will top off at 100% charge and last for an
extended period.
Charging Your Batteries
1. Connect the charger port cable to the controller charging port on the front of the controller.
2. Plug in the charger into an electrical wall outlet.
3. Controller battery gauge will illuminate.
4. Minimum charging time varies depending on battery condition and discharge level. It is
recommended to charge the batteries overnight.
5. Once batteries are fully charged unplug the battery charger from outlet and then from the
controller. Do not leave the charger connected to the controller when the input power is
disconnected. It is dangerous and will jeopardize the power charging to the batteries.
The battery charger has an auto shut off when the batteries are completely charged.
A Guide to Safe and Lasting Batteries
1. For longest life your batteries should be recharged after use, preferably overnight.
2. If your Powerchair is not used for a period of time, a refreshing charge should be given every
month. Never leave your batteries in a discharged condition. This is particularly important to
sealed batteries.
3. If your Powerchair has been stored away for some time, recharge your batteries before re-
using it.
4. Every six months, check the connections on the batteries, making sure they are tight and
clean. Batteries carry no warranty

16
Controller Operation
Controller Diagram
Turning Controller ON / OFF
Turn the Power ON
Press the On/Off button.
All battery gauge indicators will light briefly.
Either the current battery charge or lock mode will then be indicated.
Battery Gauge
On / Off
Speedometer
Increase Speed
Service Indicator LED
Shark Bus Socket
Horn
Decrease Speed
Attendant Control LED
Joystick

17
Turn the Power OFF
Press the On/Off button.
All LED’s will turn off.
Using the Horn
Press the Horn button.
The horn will sound for as long as the button is pressed.
Battery Gauge
The battery gauge is used to indicate power on and provides an
estimate of remaining battery capacity.
Any green LEDs lit indicate well charged batteries.
If only amber and red LEDs are lit, the batteries are moderately
charged. Recharge before using your powerchair.
If only red LEDs are lit, the batteries are running out of charge.
Recharge as soon as possible.
The Joystick
The powerchair starts to drive the direction of the joystick
movement.
The amount of joystick movement determines the speed of the
powerchair. If the joystick is moved further from the centre, the
powerchair will drive faster.
Adjusting Driving Speed
You can adjust the maximum speed of the chair to your preference
or environment. The currently selected top speed is shown on the
Speedometer.

18
Press and release the “SLOWER” button to
decrease the max speed of the chair by 20%.
Press and hold the “SLOWER” button to
decrease the max speed of the chair in fine
steps*.
Press and release the “FASTER” button to
increase the max speed of the chair by 20%.
Press and hold the “FASTER” button to increase
the max speed of the chair in fine steps*.
*If adjusting the speed in fine steps does not work, simultaneously hold down the ‘slower’ and
‘faster’ buttons for 2 seconds to activate fine speed control. The SHARK will beep when the mode
has been changed.
Using fine steps can be particularly useful for matching the chair speed to the walking speed of an
accompanying pedestrian.
The Speed Button Sensitivity parameter sets how quick the maximum speed increments or
decrements when a speed button is held down.
The Speedometer
The speedometer is used to gauge the relative speed of
the chair in comparison to the max speed possible. The
right MOST LED indicates current max speed, which can
be adjusted using the Increase (Decrease) Speed button.
Using the Joystick, as the speed of the chair increases,
the LED’s will fill in until MAX speed (as displayed) is
reached.
Maximum
If the bottom, left most GREEN LED is flashing the
joystick is in SPEED LIMIT mode, which limits the drive
speed to a pre-programmed value.
The Battery Gauge Indications
Display
Description
Meaning
Notes
All LED’s OFF
Power is OFF

19
All LED’s ON steady
Power is ON
Less LED’s imply a
reduced battery
charge
Left RED LED is
flashing
Battery charge is
almost empty
Batteries should be
recharged NOW.
LED’s flash Right to
Left
Controller is being
LOCKED
To UNLOCK, Press
HORN button 2X
within 10 SEC.
Flash Code 2 Fault
Battery too full
Slow down if you are
driving down a slope.
Flash Code 2 Fault
Battery completely
empty
Recharge
immediately.
Battery damage will
occur if you keep
driving.
Drive Inhibit
LED’s turn on one by
one, left to right
Chair will not drive
E.g. Charger connect
to controller
Table of contents
Other Eclipse Mobility Aid manuals
Popular Mobility Aid manuals by other brands

Pride
Pride Quantum 6000Z 3S owner's manual

Liberty Hardware
Liberty Hardware CP2970 -02 Series quick start guide

NRS Healthcare
NRS Healthcare Walking Frame Series User instructions

Mopedia
Mopedia RP701A instruction manual

KMINA
KMINA K10051 quick start guide

Sizewise
Sizewise Shuttle A series Quick reference guide

Michael Graves
Michael Graves Quick Fold Cane user manual

Kid-Man
Kid-Man 04-7410 user manual

EZee Life
EZee Life CH3010 quick start guide

Drive DeVilbiss Healthcare
Drive DeVilbiss Healthcare WA024 user manual

Essential Medical Supply
Essential Medical Supply Endurance W1301 instructions

Invacare
Invacare Cascata user manual