ECO-WORTHY 5A User manual
User Manual
AUTOMATIC BATTERY CHARGER
FOR LEAD ACID BATTERIES (STANDARD, GEL AND AGM)
&LIFEPO4 BATTERIES
If you are experiencing technical problems and cannot find a solution in this manual,
please contact ECO-WORTHY for further assistance.
SUPPORT
Tel:E-mail:customer.service@eco-worthy.com Web:www.eco-worthy.com
+44 20 7570 0328(EU)
1-866-939-8222(US)

1. WARNING-RISK OF EXPLOSIVE GASES
2.To reduce risk of a battery explosion, follow these instructions and those marked
on the battery.
3.NEVER smoke or allow an open spark or flame in the vicinity of the battery or
engine.
4.CAUTION - To reduce the risk of injury us the charger for charging a rechargeable
lead-acid battery only It is not intended to supply power to a low-voltage electrical
system or to charge dry-cell batteries. May cause cause them to burst and cause
injury to persons and damage to property.
5.Do not expose the charger to moisture,rain or snow.for indoor use only. 6.Use of
an attachment not recommended or sold by the battery charger manufacturer may
result in a risk of fire, electric shock, or injury to persons.
7.To reduce risk of damage to electric plug and cord, pull by plug rather than cord
when disconnecting the charger.
8.Make sure cord is located so that it cannot be stepped on, tripped over, or other-
wise subjected to damage or stress.
9.Study all the battery manufacturers specific precautions such as removing or not
removing cell caps while charging and recommended rates of charge.
10.Do not use the battery charger unless the battery voltage matches the output
voltage rating of the charger.
11.Do not operate the charger in a closed-in area or restrict ventilation in any way.
a.Working in the vicinity of a lead -acid battery can be dangerous. Batteries gener-
ate explosive gases during normal batter operation.
b.For this reason it is of the utmost importance that prior to each use of your
charger, you read and follow the instructions provided exactly.
c.The appliance is not intended for use by young children or infirm persons without
supervision Young Children should be supervised to ensure that they do not play
with the appliance.
- 1 -
WARNINGS

12.An extension cord should not be used unless absolutely necessary. Use of
improper extension cord could result in a risk of fire and electric shock. If extension
cord must be used, make sure.
a.That pins on the plug of extension cord are the same number, size and shape
as those of plug on charger;
b.That extension cord is properly wired and is in good electrical condition;
13.Do not operate the charger with damaged cord or plug. If the supply cord cannot
be replaced and the cord is damaged, the appliance should be scrapped.
14.Do not operate the charger if it has received a sharp blow, been dropped, or
otherwise damaged in any way Take it to a qualified repair station or EP dealer.
15.Do not disassemble the charger. Take it to a qualified repair station dealer when
service or repair is required. Incorrect reassembly may result in a risk of electric
shock or fire.
16.To reduce risk of electric shock, unplug the charger from an outlet before attempt-
ing any maintenance or cleaning.
a. Someone should be within range of your voice or close enough to come to your
aid when you work near lead-acid battery
b.Have plenty of fresh water and soap nearby in case battery acid contacts skin,
clothing, or eyes
c. Wear complete eye protection and clothing protection. Avoid touching eyes while
working near battery
d. If battery acid contacts skin or clothing, wash immediately with soap and water. If
acid enters an eye, immediately flood eye with running cold water for 10+ minutes
and get medical attention at once.
e. NEVER smoke or allow a spark or flame in vicinity of battery or engine
f. Do not drop metal tools on battery as it might cause a spark or short-circuit
damage equipment or Lead to an explosion
h.Remove all metal items (jewelry) when working with a lead-acid battery, as they
can produce a short-circuit current strong enough to weld metal, possibly causing a
severe burn
- 2 -
PERSONAL PRECAUTIONS

- 3 -
h. It is not intended to supply power to a Low-voltage electrical system or to charge
dry-cell batteries. Charging dry-cell batteries may cause them to burst and cause
injury to persons and/or damage to property
I. NEVER charge a frozen battery
a. If necessary to remove battery from vehicle for charging, always remove ground-
ed terminals from battery first. Make sure all accessories in the vehicle are off in
order to prevent an arc.
b. Ensure area around battery is ventilated during charging. Explosive gas/micro
particles can be blown away by using a piece of cardboard or non-metallic fans
c. Clean battery terminals. Be careful to keep corrosion from coming in contact with
eyes
d. If battery is not sealed, add distilled water in each cell until battery acid reaches
Level specified by battery manufacturer. This helps purge excessive gas from cells.
Do not overfill. For a sealed battery or a battery without cell caps, carefully follow
manufacturers recharging instructions
e. Study all battery manufacturers' specifications such as removal of cell caps during
charging and recommended rates of charge
f. Determine voltage of battery by referring to vehicle owner's manual and make sure
it matches output rating of the battery charger
PREPARING TO CHARGE
a. Place the charger as faraway from battery as the DC cables permit
b. Never place the charger directly above or below the battery being charged. Gases
or fluids from the battery will corrode and damage the charger.
c. Never allow battery acid to drip on the charger when reading gravity or filling
battery
d. Do not operate charger in a closed-in area with poor ventilation
e. Do not set a battery on top of charger
LOCATE CHARGER

- 4 -
CONNECTION PRECAUTIONS
Connect and disconnect DC output clips only after removing AC cord from the
electric outlet. Never allow clips to touch each other.
1) Follow these steps when battery is installed in vehicle as a spark near battery may
cause a battery explosion.
a.
b.
c.
d.
e.
f.
g.
i.
j.
Properly place AC and DC cords to reduce risk of damage by hood, door or any
moving engine parts
Stay clear of fan blades, belts, pulleys, and other parts that can cause injury to
persons
Check polarity of battery posts. A positive (+) battery post may have a larger
diameter than a negative (-) post
Determine which battery post is grounded to the chassis. If negative post is
grounded to the chassis (as in most vehicles), see item (e) if positive post is
grounded to the chassis, see item (f)
Fora negative-grounded vehicle, connect the positive (red) clip from the
battery
charger to the positive (+) post of battery first. Connect the negative (black) clip
from the battery charger to the vehicle chassis of the engine block remote from
the battery and fuel line. Do not connect the clip to carburetor, fuel lines, or
sheet-metal body, instead connect to a heavy gauge metal part of the frame or
engine block;
For a positive-grounded vehicle, connect the negative (black) clip from the
battery charger to negative battery post first, then connect the positive (red)
clip from the battery charger to the vehicle chassis or engine block remote from
the battery and fuel line.
If using permanently mounted eyelet Lead SAE connector, simply connect to
charger output lead. h. Connect charger AC supply cord to an electric outlet
When disconnecting the charger, disconnect AC cord, remove clip from vehicle
chassis, and then remove clip from battery terminal
See operating instructions for length of charge information

- 5 -
2) Follow these steps when battery is outside the vehicle. A spark near the battery
may cause an explosion reduce risk of a spark near battery.
a.
b.
c.
d.
e.
f.
Check polarity of battery posts. A positive (+) battery post may have a larger
diameter than a negative (-) post
Attach at least a 1.8m Long 2.5mm' insulated battery out-put cable charger to
the negative (-) battery post
Connect the positive (red) clip from the battery charger to the positive (+)
battery post
Position yourself and the free end of cable as faraway from battery as possible,
then connect negative ( black) clip from the battery charger to free end of cable
Do not face battery when making final connection
Connect charger AC supply cord to an electric outlet
3) When disconnecting the charger, always do so in reverse sequence of connecting
procedure and break first connection while standing as far away from battery as
practical.
a. A marine (boat) battery must be removed and charged on shore, to charge it
on the boat requires equipment specially designed for marine use.

AUTOMATIC MONITORING- Your new battery charger is completely automatic and
can be left on whenever input power is made available to the charger. The charger
output depends on the condition of the battery it is charging. When the battery is fully
charged, the “Good” will indicate and battery indicator will show “100%” , then the
charger will switch itself To a storage charge mode and will automatically monitor
and maintain the battery at full charge
CABLE CONNECTIONS- Your new battery charger is equipped with two output
Leads, a red positive Lead, and a black negative clip Lead and a permanent mount
eyelet Lead with a 2 pin SAE connector. Always connect or disconnect the output
Leads before plugging into AC power For all battery types: Connect the red positive
(+ lead to the positive terminal of the battery. Connect the black negative(-)lead to
the negative terminal of the battery
NOTE: If the charger is left connected to a lead acid battery for long periods of time,
check water levels periodically as directed by the battery manufacturer to ensure
electrolyte is maintained at proper level
ATTENTION: THE BATTERY CHARGER HAS A SPARK FREE AND REVERSE
POLARITY PROTECTION . AS A GOOD PRACTICE, NEVER ALLOW THE TWO
CLIPS TOUCH EACH OTHER
The battery charger will not produce voltage (turn on) until it recognizes at least two
volts from the battery. The battery charger clips must be clipped to a battery in the
correct polarity to initiate output voltage and begin charging when in Lead Acid(Pb)
charge mode When in Lead Acid(Pb) charge mode if the charger is hooked up in
reverse polarity, the red "Reverse Polarity" light will flash indicating that the connec-
tion has been made in reverse of the polarity of the battery and a charge has not
been initiated. The clips must be re-connected in the proper polarity to start the
charger, Red to positive(+to +) and Black to Negative( -to-)
OPERATING INSTRUCTIONS:
- 6 -
NOTE: DO NOT TURN YOUR BATTERY CHARGER ON AND OFF REPEATED-
LY (Plug and Unplug) WITHIN A SHORT PERIOD. IF THIS HAPPENS,
UNPLUG BATTERY CHARGER FROM AC POWER, WAIT FOR ONE MINUTE
AND THEN CONNECT THE CHARGER AGAIN TO RESTART CHARGING
CYCLE

ESTIMATED TIME TO CHARGE
(BATTERYCAPACITY)+(CHARGER CURRENT)= HOURS or
(AMP HOURS)+(AMPS)= EST. HOURS TO CHARGE
Some large capacity batteries may take up to 24 hours or even days to fully charge
Note: it is recommended that only one battery be charged at a time
Suppose you have a 60Amp-Hour Battery. Now Let's say you have a 10 Amps Char-
ger that will deliver 10 Amps for as long as it takes to get the battery voltage up to its
recharged Level. So, how long will it take to actually charge the battery? You can
make a calculated guess by just dividing two numbers
Example: (60AMP HOURS) DIVIDED BY (10AMPS)=6 HOURS
A 72 hour Safety Timer will commence anytime the charger is on. This feature is
designed to protect marginal batteries from over charging. If the battery voltage
reaches the proper level within 72 hours, the charger will automatically switch to float
mode. If your battery is marginal or defective, the Battery Charger will stop all the
happens, the bad battery indicator will be indicated. If this is the case, please contact
your local battery deal and have the battery tested
HOUR SAFETY FEATURE:
If your battery is totally discharged(below 2.0 volts) the BATTERY CHARGER circuit-
ry will not start due to its internal safety circuit. The internal safety circuit of the
battery charger must sense more than 2.0 volts in the battery before it will allow the
charging circuit to turn on. Otherwise, the charger is inoperable. In this case, the bad
battery indicator light will flash, which means charging has not been initiated to
initiate charge on a battery that is below 2.0 volts, you must fool the battery charger
circuitry by momentarily jumping the discharged battery to a known charged
battery(above 2.0 volts) This will trick the charger in to initializing the charging
sequence
Note: Unless the battery was rapidly discharged (lights left on overnight) most
12 volt lead acid batteries that are at a state of charge that is less than 9 volts
are likely to be worn out or defective
FULLY DISCHARGEDBATTERIES - LEAD ACID (Pb) CHARGING MODE:
- 7 -

AC power is connected with the wall socket properly Press MODE key for battery
charge mode selection before you connect the charger to the battery terminals
SELECTION FOR OPERATING MODE
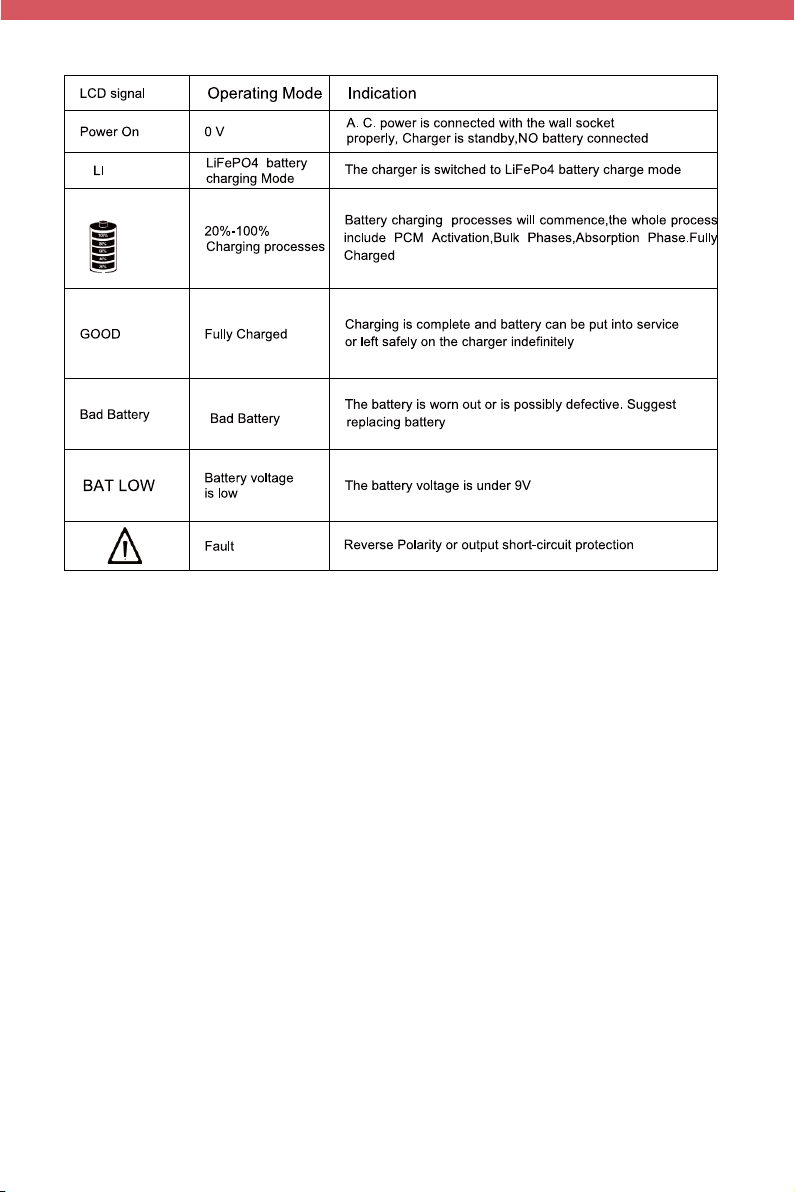
LCD SIGNAL INSTRUCTION:
- 8 -
LCD Signal
STD
AGM
LI
DC
Operating Mode
Lead Acid charging
AGM Battery Charging
LiFePO4 charging
DC Adapter
Low temperature charging
Description
12V lead-acid battery charge mode
(Standard,GEL,SLA,VRLA)
12V AGM battery charge mode
14.4V LiFePO4 battery charge mode
12V DC Adapter
Low temperature charging mode for 12V
lead acid batteries( Standard&AGM)

5.LOW TEMPERATURE CHARGINGMODE
When the ambient temperature is below -10
degrees, Press “MODE”Key, The LCD signal
will show“ ”this mode can be set for battery
charging to facilitate the rapid recovery of the
battery capacity. NOTED:ONLY FOR 12V
LEAD ACID BATTERIS(Standard,AGM)
HOW TO USE:
1.STANDARD MODE
A.C Power is connected with the wall socket
properly,Press "MODE"key,The LCD signal
will show "STD",the charger is switched to
standard battery mode(GEL,VRLA,SLA),cor-
rectly connect the charger output leads
(Red"+",Black"-")to battery positive and
negative
2.AGM MODE
A.C Power is connected with the wall socket
properly,Press "MODE"key,The LCD signal
will show "AGM",the charger is switched to
AGM battery mode(AGM),correctly connect
the charger output leads (Red"+",Black"-")to
battery positive and negative
- 9 -
3.LI MODE
A.C Power is connected with the wall socket
properly,Press "MODE"key,The LCD signal
will show "LI",the charger is switched to
LiFePO4 battery mode(LiFePO4),correctly
connect the charger output leads
(Red"+",Black"-")to battery positive and
negative
4.DC ADAPTER MODE
A.C Power is connected with the wall socket
properly,Press "MODE"key and hold for 3-5
seconds ,The LCD signal will show "DC",the
charger is switched to DC Adapter with 12V
10Amp (MAX output 120 Watt)
6.BATTERY TESTER MODE
The charger can be used for testing your
battery healthy.Correctly connect your battery
positive and negative with the charger leads,
no need to connect AC power.
The LCD display will indicate battery indicator
20-100%,”BAT LOW” will be indicated while
the battery voltage is LOW,easily to know
your battery status.

Note:
1) Please be sure not to touch clips together and make sure to connect the red
positive (+) lead to the positive terminal of the battery and the black negative(-)lead
to the negative terminal of the battery
1)(Pd) lead acid battery charging mode
2) Lithium Iron Phosphate (LiFePO4) Battery Charging Mode:
- 10 -
LCD Signal INDICATION:
2) DC Adapter Mode
AC power is connected with the wall socket properly,Press”MODE”Key for 3-5
seconds,The device will enter DC adapter mode.the LCD signal will show “DC”,it can
supply 120-Watt output (12V-DC & 10-Amp)
3) Battery tester Mode
The charger can be used for testing your battery healthy.Correctly connect your
battery positive and negative with the charger leads, no need to connect AC power.
The LCD display will indicate battery indicator 20-100%,”BAT LOW” will be indicated
while the battery voltage is LOW,easily to know your battery status.
- 11 -

A.Disconnect the charger from the AC
outlet Check connections to battery
and ensure they are good
B.Check to ensure that there is power
at the AC outlet by plugging in a table
lamp or power meter
A.Battery is not connected
B. The battery may be damaged or
below 2 volts, charge process will not
begin. In this case the"Bad Battery"
Light will be on
Battery voltage is under 9V
The battery is worn out or is possibly
defective Suggest replacing battery
with a battery.
A.The battery is worn out or is possibly
defective Suggest testing and/or
replacing battery with battery
B.The battery may have an excessive
current draw caused by a potential
short circuit. Disconnect battery from
charger. Suggest testing and/or replac-
ing battery
C.The charged battery is larger than
the charger marked capacity (shown in
manual) Please recharge with larger
capacity charger
- 12 -
TROUBLE MESSAGE LIGHTS CHECKLIST
NO LCD signal
LCD Signal is ON,No charging current
The charger is charging but the 20-100%
signal does not come on
BAT LOW signal is ON
BAD BAT signal is ON

LiFePO4 Charging Mode( Lithium Battery Charge Mode)
PCM Activation: Once the charger has been properly connected to the battery it will
deliver a constant pulse frequency to activate the PCM before it enters into the
charge program
1. Soft Start Phase
Soft start is applied when the charger has detected a battery at a very Low initial
state of charge. Voltage and current are delivered at a specified rate to help the
battery to recover prior to bulk charge
2. Bulk Charge Phase
With the battery now having been activated and gone through the Soft Start phase
as needed the bulk charge phase gives the battery constant current, taking the
battery up to 80% of its full
3. Absorption Phase
In the absorption phase the battery is given constant voltage while current is reduced
based on actions taken from ongoing battery monitoring until the battery is 100%
charged
4. Full Charge
Charging is complete and the battery can be returned to service or left safely on the
charger indefinitely
4 Stage Charge, Conditioning Process Map
- 13 -

Charge and maintenance capacity ranges are suggested only as a guide for battery
charger selection and application based on varied customer charging and mainte-
nance requirements, Please be sure to follow
safety and use information in user guide for correct product application and use
Technical Specifications:
Charger selection and use
Model
Input:
Output:
Max. Voltage:
Min.starting voltage
Overcharge Protection
Reverse Polarity Protection
Short Circuit Protection
Spark Proof
Operating temperature
Waterproof
Recommender Battery
110Vac@60Hz 220Vac@50Hz
2V( the charger can`t charge battery under 2V)
YES
YES
YES
YES
-10~50 degree
IP64
5A 10A
12V 6A Pb Battery Charger
14.4V 4.5A LiFePO4 charger
12V 6A DC Adapter
14.5V Lead-Acid(Pb)Batter Charging
14.9V AGM Battery Charging
14.4V LiFePO4 Battery Charging
12~200Ah Lead-Acid battery
9-108Ah LiFePO4 battery
12~300Ah Lead-Acid battery
9-108Ah LiFePO4 battery
14.5V Lead-Acid(Pb)Batter Charging
14.9V AGM Battery Charging
14.4V LiFePO4 Battery Charging
12V 10A Pb Battery Charger
14.4V 9A LiFePO4 charger
12V 10A DC Adapter
- 14 -

Tel:E-mail:customer.service@eco-worthy.com Web:www.eco-worthy.com
+44 20 7570 0328(EU)
1-866-939-8222(US)
AUTOMATISCHES
BATTERIELADEGERÄT
Benutzerhandbuch
FÜR BLEI-SÄURE-BATTERIEN (STANDARD, GEL UND AGM)
&LIFEPO4-BATTERIEN

1. WARNUNG-GEFAHR EXPLOSIVER GASE:
a.Das Arbeiten in der Nähe einer Blei-Säure-Batterie kann gefährlich sein. Batterien
erzeugen während des normalen Batteriebetriebs explosive Gase.
b.Aus diesem Grund ist es äußerst wichtig, dass Sie vor jeder Verwendung Ihres
Ladegeräts die bereitgestellten Anweisungen genau lesen und befolgen.
c.Das Gerät ist nicht für den unbeaufsichtigten Gebrauch durch kleine Kinder oder
gebrechliche Personen bestimmt. Kleine Kinder sollten beaufsichtigt werden, um
sicherzustellen, dass sie nicht mit dem Gerät spielen.
2.Um das Risiko einer Batterieexplosion zu verringern, befolgen Sie diese Anweis-
ungen und die auf der Batterie angegebenen.
3. NIEMALS rauchen oder offene Funken oder Flammen in der Nähe der Batterie
oder des Motors lassen.
4. VORSICHT - Um die Verletzungsgefahr zu verringern, verwenden Sie das Lade-
gerät nur zum Laden eines Blei-Säure-Batterien. Es ist nicht zur Stromversorgung
eines Niederspannungs-Bordnetzes oder zum Laden von Trockenbatterien bestim-
mt. Sie können platzen und Personen- und Sachschäden verursachen.
5. Setzen Sie das Ladegerät nicht Feuchtigkeit, Regen oder Schnee aus. Nur für
den Innenbereich.
6. Die Verwendung eines Zubehörs, das nicht vom Hersteller des Batterieladegeräts
empfohlen oder verkauft wird, kann zu Brand-, Stromschlag- oder Verletzungsgefahr
führen.
7. Um das Risiko einer Beschädigung des Steckers und des Kabels zu verringern,
ziehen Sie beim Trennen des Ladegeräts am Stecker und nicht am Kabel.
8. Stellen Sie sicher, dass das Kabel so verlegt ist, dass nicht darauf getreten,
darüber gestolpert oder anderweitig beschädigt oder belastet werden kann.
9. Studieren Sie alle spezifischen Vorsichtsmaßnahmen des Batterieherstellers, wie
das Entfernen oder Nicht-Entfernen von Zellenkappen während des Ladens und die
empfohlenen Laderaten.
10. Verwenden Sie das Batterieladegerät nicht, es sei denn, die Batteriespannung
entspricht der Nennausgangsspannung des Ladegeräts.
11. Betreiben Sie das Ladegerät nicht in geschlossenen Räumen und schränken Sie
die Belüftung in keiner Weise ein.
- 1 -
WARNUNGEN

12. Ein Verlängerungskabel sollte nur verwendet werden, wenn es unbedingt
erforderlich ist. Die Verwendung eines falschen Verlängerungskabels kann zu
Feuer- und Stromschlaggefahr führen. Wenn ein Verlängerungskabel verwendet
werden muss, stellen Sie Folgendes sicher:
a.Dass die Pins am Stecker des Verlängerungskabels die gleiche Anzahl, Größe
und Form haben wie die des Steckers am Ladegerät;
b.Dass Verlängerungskabel richtig verdrahtet ist und sich in einem guten
elektrischen Zustand befindet;
13. Betreiben Sie das Ladegerät nicht mit beschädigtem Kabel oder Stecker. Wenn
das Netzkabel nicht ersetzt werden kann und das Kabel beschädigt ist, sollte das
Gerät verschrottet werden.
14. Betreiben Sie das Ladegerät nicht, wenn es einem heftigen Schlag ausgesetzt
wurde, heruntergefallen oder anderweitig beschädigt wurde. Bringen Sie es zu einer
qualifizierten Reparaturwerkstatt oder einem EP-Händler.
15. Zerlegen Sie das Ladegerät nicht. Bringen Sie es zu einem qualifizierten Händler
einer Reparaturwerkstatt, wenn eine Wartung oder Reparatur erforderlich ist. Ein
falscher Zusammenbau kann zu Stromschlag- oder Brandgefahr führen.
16. Um das Risiko eines Stromschlags zu verringern, ziehen Sie das Ladegerät aus
der Steckdose, bevor Sie Wartungs- oder Reinigungsarbeiten durchführen.
A. Jemand sollte sich in Reichweite Ihrer Stimme oder nahe genug befinden, um
Ihnen zu helfen, wenn Sie in der Nähe von Blei-Säure-Batterien arbeiten
b.Halten Sie viel frisches Wasser und Seife in der Nähe bereit, falls Batteriesäure mit
Haut, Kleidung oder Augen in Kontakt kommt
C. Vollständigen Augenschutz und Schutzkleidung tragen. Vermeiden Sie es, die
Augen zu berühren, während Sie in der Nähe der Batterie arbeiten
D. Wenn Batteriesäure mit Haut oder Kleidung in Kontakt kommt, sofort mit Wasser
und Seife waschen. Wenn Säure in ein Auge gelangt, spülen Sie das Auge sofort mit
fließendem kaltem Wasser für mehr als 10 Minuten und suchen Sie sofort einen Arzt
auf.
E. NIEMALS rauchen oder Funken oder Flammen in die Nähe der Batterie oder des
Motors bringen
F. Lassen Sie keine Metallwerkzeuge auf die Batterie fallen, da dies Funkenbildung
oder Kurzschlüsse verursachen kann, die Geräte beschädigen oder zu einer Explo-
sion führen können
- 2 -
PERSÖNLICHE VORSICHTSMASSNAHMEN

- 3 -
G. Entfernen Sie alle Metallgegenstände (Schmuck), wenn Sie mit einer
Blei-Säure-Batterie arbeiten, da diese einen Kurzschlussstrom erzeugen können,
der stark genug ist, um Metall zu schweißen, was möglicherweise zu schweren
Verbrennungen führen kann.
H. Es ist nicht dazu bestimmt, ein Niederspannungs-Bordnetz mit Strom zu versor-
gen oder Trockenbatterien aufzuladen. Das Aufladen von Trockenbatterien kann
zum Bersten und zu Personen- und/oder Sachschäden führen
I. Laden Sie NIEMALS eine gefrorene Batterie
A. Wenn die Batterie zum Laden aus dem Fahrzeug entfernt werden muss,
entfernen Sie immer zuerst die geerdeten Pole von der Batterie. Stellen Sie sicher,
dass alle Zubehörteile im Fahrzeug ausgeschaltet sind, um einen Lichtbogen zu
vermeiden.
B. Stellen Sie sicher, dass der Bereich um die Batterie während des Ladevorgangs
belüftet ist. Explosives Gas/Mikropartikel können mit einem Stück Karton oder
nichtmetallischen Ventilatoren weggeblasen werden.
C. Batteriepole reinigen. Achten Sie darauf, dass keine Korrosion mit den Augen in
Kontakt kommt
D. Wenn die Batterie nicht versiegelt ist, geben Sie destilliertes Wasser in jede Zelle,
bis die Batteriesäure das vom Batteriehersteller angegebene Niveau erreicht. Dies
hilft, überschüssiges Gas aus den Zellen zu entfernen. Nicht überfüllen. Befolgen
Sie bei einer versiegelten Batterie oder einer Batterie ohne Zellkappen sorgfältig die
Ladeanweisungen des Herstellers
E. Informieren Sie sich über die Spezifikationen aller Batteriehersteller, wie z. B. das
Entfernen der Zellenkappen während des Ladevorgangs und die empfohlenen
Laderaten
F. Bestimmen Sie die Batteriespannung anhand der Bedienungsanleitung des
Fahrzeugs und stellen Sie sicher, dass sie mit der Ausgangsleistung des Batteriela-
degeräts übereinstimmt
VORBEREITEN ZUM AUFLADEN
A. Platzieren Sie das Ladegerät so weit von der Batterie entfernt, wie es die DC-Ka-
bel zulassen.
B. Platzieren Sie das Ladegerät niemals direkt über oder unter dem zu ladender
Batterie. Gase oder Flüssigkeiten aus der Batterie korrodieren und beschädigen das
Ladegerät.
LADEGERÄT lokalisieren
This manual suits for next models
1
Table of contents
Languages:
Other ECO-WORTHY Batteries Charger manuals


