Eco2All COMFORT DUO RF User manual

COMFORT DUO RF
1
COMFORT DOU RF-RV Wireless Thermostat
Installation Guide
COMFORT DOU RF is a surface-mounted
transmitter unit and COMFORT DOU RF-RV, a
receiver unit, it is designed to control the
heating and cooling systems efficiently with
precise control.
1) Features:
Easy operation and settings with touch key function
displayed on LCD.
TPI Function.
Temperature Differential adjustable.
Easy Installation: Separate Base plate to aid
installation.
Daily Program period can be changed subject to
personal activities or commercial applications.
Informative Display.
Both Set & Room Temperature Displayed.
Anti-freeze protection in standby mode.
Lock or unlock keys to prevent unauthorized
changes.
Temperature reading calibration(offset).
Daily programming status indicator.
Battery low indicator.
Vacation setting to program a setback temperature
to save energy.
Comfort Override mode maintains the room
temperature on the desired setpoint during a set
period of time from 1~9 hours.
Manual override.
User settings can be retained when the thermostat
is power off.
2)Technical data:
Temperature control range : 5 ~ 35°C
Comfort setpoint adjustment range: 5 ~ 35°C
Temperature adjustment scale : 0.5°C
Temperature offset calibration range: ±3,5°C
Temperature reading calibration increments: 0.5°C
Antifreeze protection: 5.0°C (Standby mode Only)
Switching differential (Hysteresis) : 0.5°C /1 °C /1.5 °C
/2°C Default 0.5°C
Temperature sensor : 10K Ohm NTC
Temperature accuracy: ±0.5°C (@21°C)
Temperature display resolution: 0.1°C
Sampling resolution: 1 minute interval
Material : Non flammable plastics
Storage temperature : -10°C ~ 60°C
Dimensions: 120W x 112 H x 27 D mm
3) Installation
Please force the upper edge of the cover to open
it and insert batteries (AA Alkaline Batteries x 2).
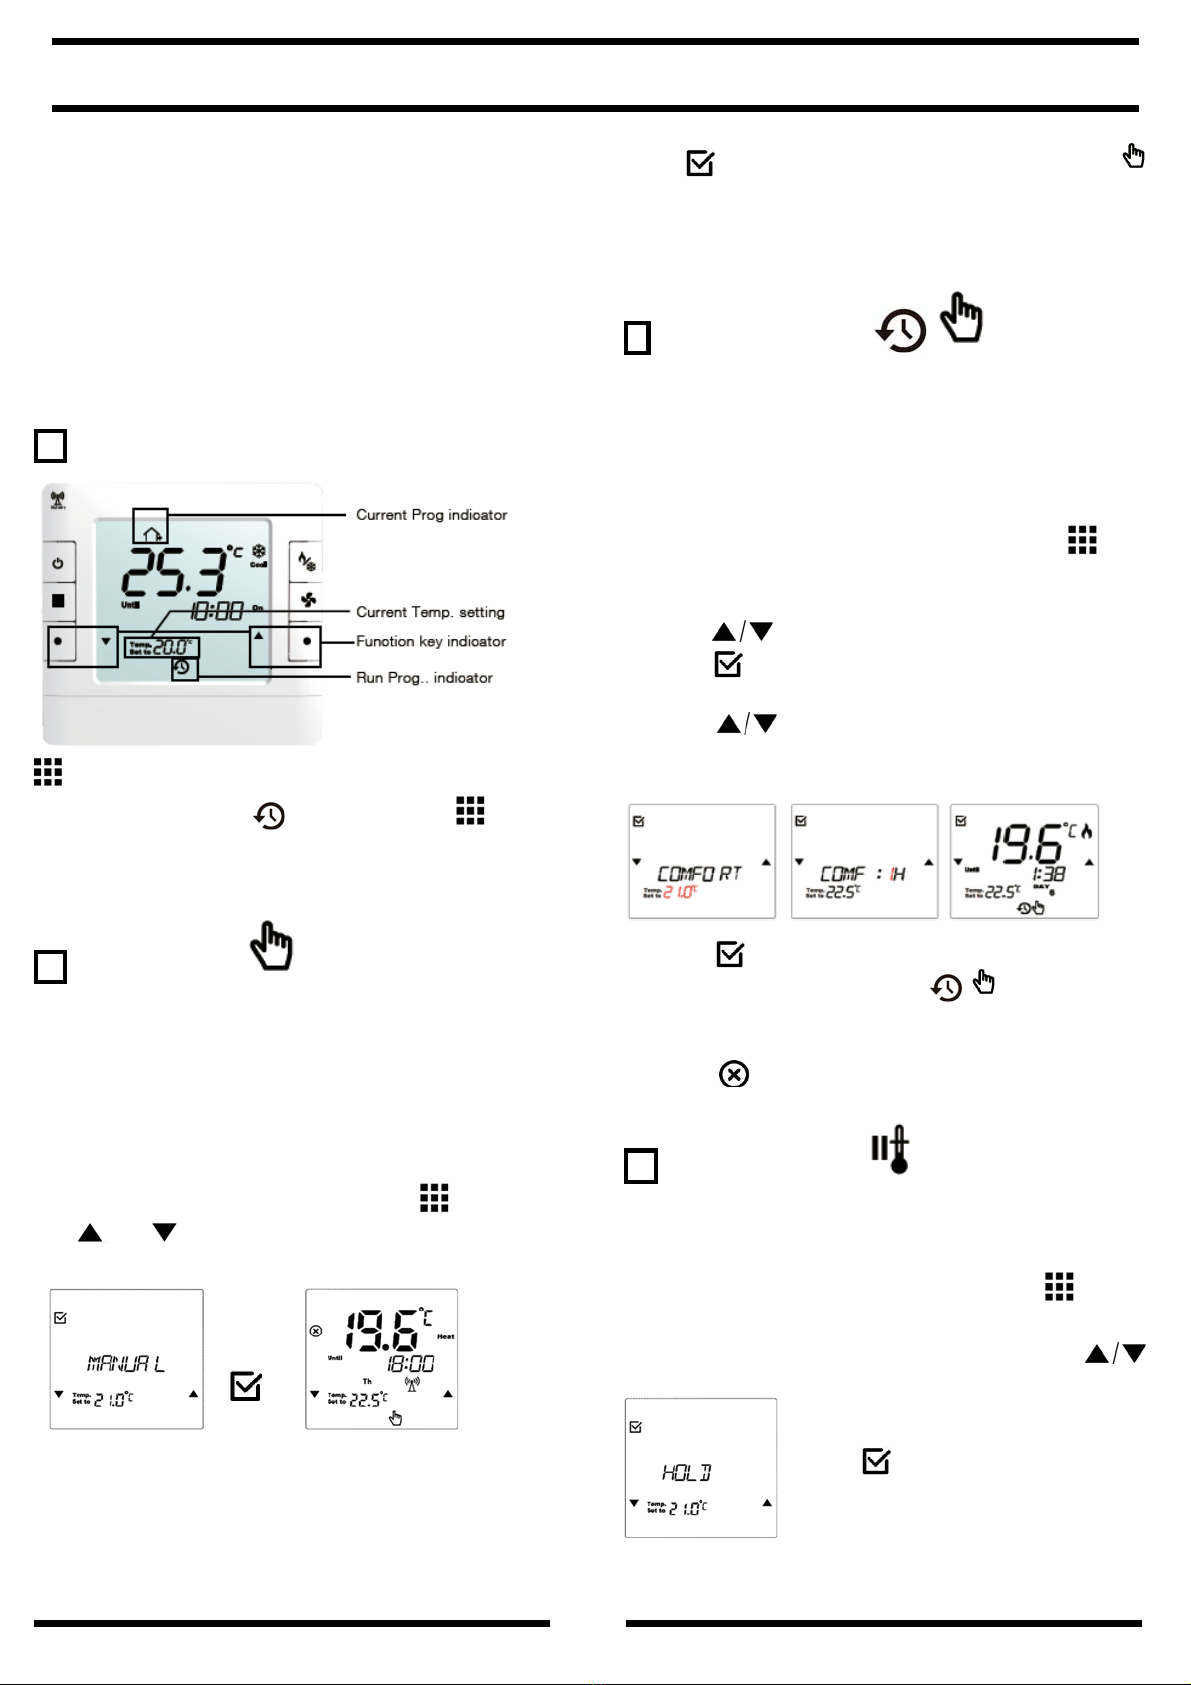
4) Design and function
(1) :Switch on/off (2) :Run Prog. Select.
(3) (6):Function key
(4) :Heat / Cool / Auto mode select.
(5) : Fan mode select.
: Confirm
: Cancel
: NEXT ITEM, jump to next function setting

COMFORT DUO RF
2
: Next Item, jump to next item setting
: PROG COPY, to run ”PROG COPY” function
: Exit the setting mode and return to Run PROG
mode
4-1. Keypad Operation Description:
Function Select
a. In Run PROG mode :Press key to select
the desired mode, MANUAL override ,
COMFORT hour , temperature HOLD ,
or HOLIDAY .
b. In Run PROG mode : Press for 5
seconds to enter general settings ; LCD shows
symbol.
c. In Standby mode (tap key), press key for
5 seconds to adjust day program period:
6 period/day, 4 period/day or 2 period/day.
PROG.: 6 period / per day
Program Time Cool Heat
Wake (P1) 6:00 25ºC 21 ºC
Leave (P2) 8:00 29ºC 14 ºC
Occupied (P3) 12:00 25ºC 21 ºC
Unoccupied (P4) 14:00 29ºC 14 ºC
Return (P5) 18:00 25ºC 21 ºC
Sleep (P6) 22:00 27ºC 16 ºC
PROG.: 4 period / per day
Program Time Cool Heat
Wake (P1) 6:00 25ºC 21 ºC
Leave (P2) 8:00 29ºC 14 ºC
Return (P5) 18:00 25ºC 21 ºC
Sleep (P6) 22:00 27ºC 16 ºC
PROG.: 2 period / per day
Program Time Cool Heat
Wake (P1) 6:00 25ºC 21 ºC
Sleep (P2) 22:00 29ºC 16 ºC
4-2. LCD Display Descriptions
: Key lock / : Frost Protection
: Heating on
: Battery Low / : Standby Mode
: Run Prog Wake / : Run Prog Leave
: Run Prog Occupied
: Run Prog Unoccupied
: Run Prog Return / : Run Prog Sleep
: Setting Mode
DAY:
MoTuWeThFrSaSu
:MON TUE WED THU FRI
SAT SUN
5) Programming instructions
Contents 1---Resetting the thermostat
2---Set Date
3---Set TIME
4---Adjusting The Programs
5---Operating mode
6---Temperature reading calibration
7---LCD Brightness
8---RF home code setting
9---RF home code setting
10-Test RF signal strength of location
11-Factory default setting
1 Resetting the thermostat
It is necessary to press the RESET button prior to
initial programming.
To activate the setting mode:
Press for 5 seconds, LCD shows symbol.
In setting mode, you can press key
to select the settings for DATE, TIME, PROG,
DIFF(Differential), T CAL, CONT, HOME, ROOM.

COMFORT DUO RF
3
Enter the item you want to configure by pressing
(Confirm).
Exit the setting mode and return to Run PROG mode
by pressing .
2 Set DATE
Press the key to select the
settings for DATE.
Press the key to enter the “Date”
setting.
Setting sequence is
Year>Month>Day.
Press the key to select the “Year”.
Press to “Month” setting.
Press the key to select the “Month”.
Press to “Day” setting.
Press the key to select the “Day”.
Press to return to "DATE"; the settings will be
automatically saved.
3 Set TIME
Press the key to select the settings for TIME.
Press the key to set “TIME”.
Setting sequence is HOUR>MINUTE.
Press the key to select the “HOUR”.
Press to “Minute” setting.
Press the key to select the “MINUTE”.
Press to return to "TIME"; the settings will be
automatically saved.
4 Adjusting The Programs
Press the key to select the settings for PROG.
Press the key to start programming.
Press to enter the program setting for day of the
week. “SET PROG”.
Press to enter “PROG COPY” function.
Press to return to Run PROG mode.
4-1. Set PROG
A. Press to enter the program setting. (You will see
“Mo”, and P1 temperature reading is flashing).
Each day of the week can be
individually programmed.
B. Press the key to set desired temperature for
P1 program period.
C. Press the key to enter setting the “time
schedule” for Mo P1 program period (You will see
"Start Time" flashing).
D. After time schedule of the 1st program period is set,
P1 complets.
Press the key to set the P2 temperature and set
time schedule for 2nd program –period (flashing
temperature reading appears on LCD again).
E. Press the keys to complete
settings of Temperature & Time schedule for each
program-period (P1-P6) of the day.
F. Press to select the rest weekdays
programming.
G. When the entire programming DAY 7 completes (or
press key), the display returns to Run PROG
mode.
H. Press to select ”DIFF” setting or press to
return to Run PROG mode.

COMFORT DUO RF
4
4-2. PROG copy
Press the key to select the settings for PROG.
Press the key to start programming.
Press
Prog Copy function:
Before copying the program, please select any day of
the week and complete entire temperature set points
for each program period of the day. (Read
Programming procedure described in the step 4-1.Set
PROG).
Press to enter “PROG COPY” function. ‘-From'
MoTuWeThFrSaSu
lit on the LCD (Choosing the
reference-day “from”).
Take the selected day as reference-day for “Copy”
function, and follow the instructions below:
A. Press to select the reference-day.
B. Press after reference-day is selected, ‘To' will
lit on LCD.
C. Press to select the day of the week for the
programs to be copied to.
Press as confirmation.
D. Repeat the steps by pressing and to
select more days to copy the programs to or press
to delete the previously selected day of the
week (flashing).
E. Press after desired days for “copy” are
completed. The display returns to start PROG
setting mode.
5 Set Differential
Press the key to select the settings for Operating
mode.
Press to change between TPI and ANALOGE
operationg mode and press to select the desired one.
5-1 Analoge operating mode
Once selected the Analoge operating mode, press
key to change value.0.5/1/1.5/2, the default
value is 0.5).
Press to save the changed value.
5-2 TPI operting mode
CPH: Cicles per hour
Once selected the TPI operating mode, press
key to change CHP value: 3/6/9/12, (the default value is
6).
Press to save the changed value and change to P-
BAND parameter.
Through this parameter the number of modulation cycles
per hour is selected. In other words, if CPH=6 the
thermostat will do 6 modulation cycles, so each cycle will
last for 10 minutes.
P-BAND: Modulation range
Press again key to change P-BAND value: 1,5
ºC – 3 ºC (the default value is 1,5 ºC).
Press to save the changed value.
This parameter selects the temperature range in which
the modulation is activated. For example, if P-BAND=2
the modulating will be activated between the Set
Temperature ±1 ºC.
COMFORT DUO RF
5
6 Temperature Reading calibration
Temperature Offset is a feature that lets you adjust the
room temperature reading +/- 3.5°C. This helps if your
thermostat is in a slightly warm or cold spot. To update
the room temperature reading using Temperature
Offset:
Press to save the changed value. Press
key to "CONT" setting; or press to return to
Run PROG mode.
7 LCD Brightness
This function can adjust the
brightness of your device. Press
to enter “LCD Brightness” setting.
Press the buttons to select
your preference (1~10).
Press to save the setting and
press key to enter “RF-home
code” setting” setting.
8
RF Home code settings
This function can adjust the Home
code of your device. Press to
enter “RF-Home code” setting.
In order to pair with COMFORT DOU
RF-RV, please keep the home code
at 0.
Press key to save the setting and press key
to enter “RF-Room code” setting.
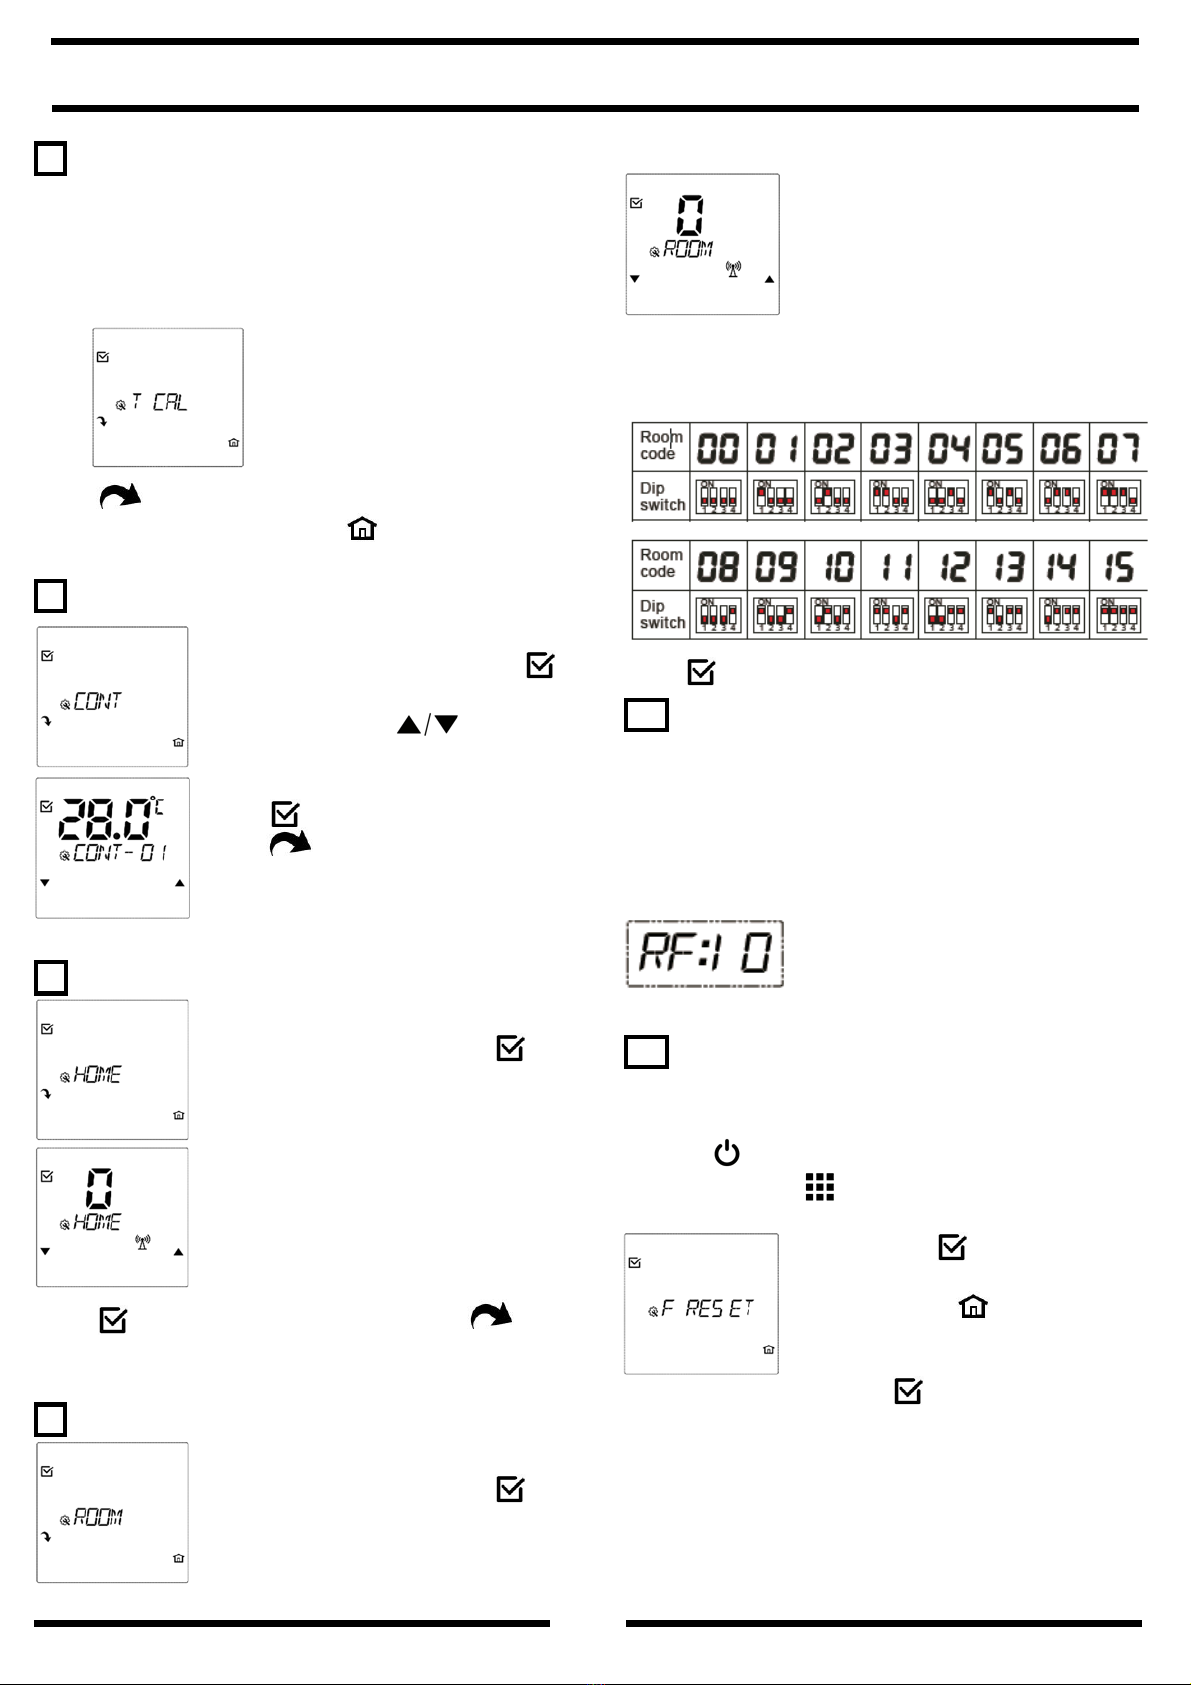
9 RF Room code settings
This function can adjust the Room
code of your device. Press to
enter “RF-Room code” setting.
In order to pair with RV-receiver,
please set a code from 0~15.
Attention! After setting the room code, please
remember to set the dip switch on RV-receiver. For dip
switch setting, please refer the form below:
Press key to save the setting.
10 Test RF signal strength of location
1. To test your devices’ location are good or not.
2.. When the ventilation is off, press the fan button
twice so that the intensity of the signal appears on
the screen.
3. RF strength range: 0 ~ 15.
NOTE: Above 8 is better. *It displays only 3 secs.
4. Return to the ventilation mode as it was.
11 Factory default settings
This function will clear all custom settings and the unit
will be restored to factory default settings.
A. Press key to enter standby (System Off) mode.
B. Press and hold first then press (6) function key
to enter "F RESET" as the fig. below:
Press the key to restore factory
default settings.
Press the key to cancel the
factory reset function and return to
standby mode.
Attention!! If you press key, all the custom
programs and option settings (except DATE and TIME
settings) will be cleared.
COMFORT DUO RF
6
6) OPERATION
Contents
1.---RUN PROG 7.---Key lock
2.---Manual override 8.---Battery low indicator
3.---Comfort hour override 9.---Change day program
4.---Temperature hold 10.--System mode
5.---Vacation mode 11.--Fan mode
6.---Standby off
1 RUN PROG Normal display Descriptions
Key Operate descriptions:
In Run PROG mode , you can press key to
select the desired mode, MANUAL override,
COMFORT hour, temperature HOLD, or HOLIDAY,
according to the indication on LCD.
2 Manual override
Temporary Override is available enabling you to
temporarily change the temperature without
altering
the thermostat's program. The thermostat will use
the new temperature setting during the duration of
this program period. Override function will be
terminated when the next program period starts to run
the programmed temperature setpoints.
Activate MANUAL Override by pressing key. Press
the or key to manually adjust the desired
temperature setting.
Press
Press to activate the temporary override mode,
appears on the display. The time indicates when the
MANUAL override will expire. Press key to cancel the
MANUAL override mode and return to Run PROG
mode.
3 COMFORT override
COMFORT override allows you to change the
temperature for a specific number of hours (from one
to nine) without altering the thermostat's program. The
thermostat will use the new temperature setting for the
specified amount of time, then the thermostat will
return to run the programmed temperature setpoints.
Activate COMFORT Override by pressing key
twice.
1. Simply adjust the set temperature (Temp. Set to) by
using key.
2. Press key to confirm the adjusted temperature
and go to the setting of COMFORT Hours.
3. Press key to select the COMFORT Hours.
LCD indicates “COMF:1H”, “1” will be flashing as
for adjustment.
4. Press to confirm the settings and activate the
COMFORT override mode,
appear on the
display. The time indicates when the COMFORT
override mode will expire.
5. Press key to cancel the COMFORT override
mode and return to Run PROG mode.
4 Temperature Hold
Temperature HOLD allows you to maintain a constant
temperature and disable temperature program
periods.
Activate temperature HOLD by pressing key 3
times.
Simply adjust the set temperature by using the
key.
Press to activate temperature
HOLD mode.

COMFORT DUO RF
7
Press key to cancel temperature
HOLD mode and return to Run
PROG mode.
5 HOLIDAY
HOLIDAY hold allows you to setup the desired
temperature while you are away from home or on
vacation to reduce the energy consumption. Activate
HOLIDAY hold by pressing key 4 times.
Use the key to select the
desired temperature. The
temperature setting range is from
0°C to 10°C.
Press key to confirm the
temperature setting.
Use the key to
increase/decrease the number of
HOLIDAY days. LCD shows the
number of the days under Holiday
hold mode and the date indicates
when the HOLIDAY hold mode will
expire.
Press to confirm the HOLIDAY hold settings and
activate Holiday hold mode.
Press to cancel the HOLIDAY hold mode and
return to Run PROG mode.
If the temperature setting is under
5°C. the frost protection will be
triggered and the icon appears
on LCD.
6 Standby Function
This thermostat offers a Standby
function that allows you to turn off
your heating system when not
required, while the thermostat keeps
monitoring the room temperature
and calls for heating, should there be
a risk of frost damage.
1. Activate Standby function by pressing key,
power icon and frost protection icon will
appear on LCD.
2. Press the key to deactivate the Standby function
and return to Run PROG mode. Power icon
and frost protection icon will disappear from LCD.
7 Key Lock function
This function allows you to lock the operation keys on
this thermostat.
1.Lock the Operation keys
Press and hold both & keys simultaneously for
about 5 seconds until the key lock icon appears on
the LCD.
2.Release Key Lock function
Press and hold & keys simultaneously again for
about 5 seconds until the key lock icon disappears
from the LCD.
8 Battery Low indication
When the battery voltage becomes too low for reliable
operation, battery low icon will appear on LCD
,and the batteries must be replaced as soon as
possible.
9 Change program period settings:
1. Press key to enter "Standby"
mode.
2.Press and hold key for about
5 seconds until appears on LCD.
3. Factory default is 6 periods per day
4. Press to change the program period as desired.
5. Press to save the change
and return to Standby mode.
6. Press to retrun to Run
Prog mode.

COMFORT DUO RF
8
10 System Mode
1. Press " " to change system mode.
2. The system will enter the HEAT ->>COOL ->>>
AUTO-mode by pressing " " alternately.
3. The HEAT mode means system enter heating
setting mode, the LCD will show HEAT.
4. The COOL mode means system enter cooling
setting mode, the LCD will show COOL.
5. AUTO mode means system enter auto setting
mode, the LCD will show AUTO.
11 Fan Mode
1. Press " " to change fan mode.
2. The system will enter the AUTO (“AUTO”)->>
ON (“ ON”) ->>> OFF ( )mode by pressing " "
alternately.
7) Dimensions (unit:mm)
COMFORT DOU RF-RV
Feature
Wireless operation range is up to 30 meters
Working frequency: 868 MHz
Installation
COMFORT DOU RF-RV
Open both ends of blue
cover by “+” screw driver
and make the electrical
connections according to
the following scheme
N: Neutral (230 V~). C:
Cooling.
L:
Phase (230 V~). F: Fans (fancoils).
H: Heating. COM: Common.
Operating Instruction
RF code (ID) setting
1.Check RF code to match with the transmitter’s RF
code. Initial code setting is 0000 (All pins are
downward).
2.RF LED indicator (on the right next to reset):
A. The LED will keep lighting until RF is connected.
B. When the receives the signal, the LED will flash
for three times.
C. The LED will light up when it stops receiving the
signal.
Transmitter and receiver pairing:
1. Set Home code and Room code of the transmitter.
2. Please also set the dip switch of receiver.
(The Home code of RF Receiver need to set as “00”.
For the Room code setting, please refer to the below
diagram.)
House code=
Dimensions (unit:mm)
*CDOC001954*
CDOC001954 03/20
This manual suits for next models
1
Table of contents


