Econoco SteamButler ST500 User manual
Die Line for new SteamButler
Bleed Line for Artwork
Model: ST500
Your Steamer provides clean,
professional results every time!
• Water container holds 3.5 liters,
enough for hours of continuous use.
• No need to empty water from steamer
after each use.
• Eliminates ironing by removing
wrinkles on the hanger.
• Automatic shut-off safety feature.
• Power indicator light.
• Easy-Roll casters make unit portable.
• Stores upright in a small space.
• Hose hangs on its own hook.
• Steamer handle includes snap-on brush.
Commercial Garment Steamer

Safety Reminders
• BEFORE PLUGGING IN your steamer, be sure the electrical information on the label on the bottom of the base
agrees with your power supply. This is a high wattage appliance. To avoid a circuit overload, DO NOT operate
another high wattage appliance on the same circuit at the same time.
• READ ALL INSTRUCTIONS before using your steamer.
• USE THE STEAMER ONLY for its intended use.
• TO PROTECT against the risk of electric shock, DO NOT immerse the appliance in water.
• ALWAYS turn the switch to the OFF position before plugging in or unplugging the unit.
• NEVER yank the cord from the outlet. ALWAYS grasp the plug and pull it out to disconnect.
• DO NOT allow the cord to touch hot surfaces.
• DO NOT leave the steamer unattended while it is operational.
• ALWAYS allow the appliance to cool completely for at least thirty minutes before storing.
• DO NOT operate the steamer without properly filling the reservoir.
• ALWAYS check the water level upon initial operation.
• ONLY hang the steamer hose end on the supplied hanger rod.
• DO NOT lay the hose on the ground or wind it unnecessarily.
• MOVE the appliance by grasping the hose and the hose hanging rod. Do not force the casters. If they stick for
some reason, turn the appliance OFF, then empty the reservoir and inspect the casters.
• The appliance has a very hot surface. DO NOT allow unsupervised children to use it.
• ALWAYS disconnect the appliance from the outlet BEFORE filling with or removing water. Be careful to AVOID
spilling excess water into the reservoir when removing or placing the reservoir bottle into the reservoir.
• DIFFERENT water sources contain different levels of mineral content. If the steamer begins to cut on and off
during normal use, the thermostat is indicating that the unit may have sediment inside which needs to be
cleaned out.
• ALWAYS allow the unit to cool completely before inspecting or cleaning the interior.
• ALWAYS disconnect the appliance when not in use.
• DO NOT use the appliance if it has been dropped or damaged. DO NOT disassemble the appliance. Incorrect
reassembly can cause a risk of electric shock. Send it to an authorized service center for repair.
• DO NOT operate another high wattage appliance on the same circuit.
• If an EXTENSION CORD is necessary, use a 20 Ampere Cord for 110V/ 120V appliances. Cords rated for less
amperage may overheat.
• This appliance MUST BE grounded. DO NOT alter the plug or attempt to defeat this feature.
• Be careful. Burns can occur from touching HOT METAL PARTS, HOT WATER, OR STEAM.
SAVE THESE INSTRUCTIONS!
Steamer Assembly
STEP 3 - BEFORE FILLING THE
WATER BOTTLE
Check to make sure the bottle sits
into the reservoir securely and fits
properly before proceeding.
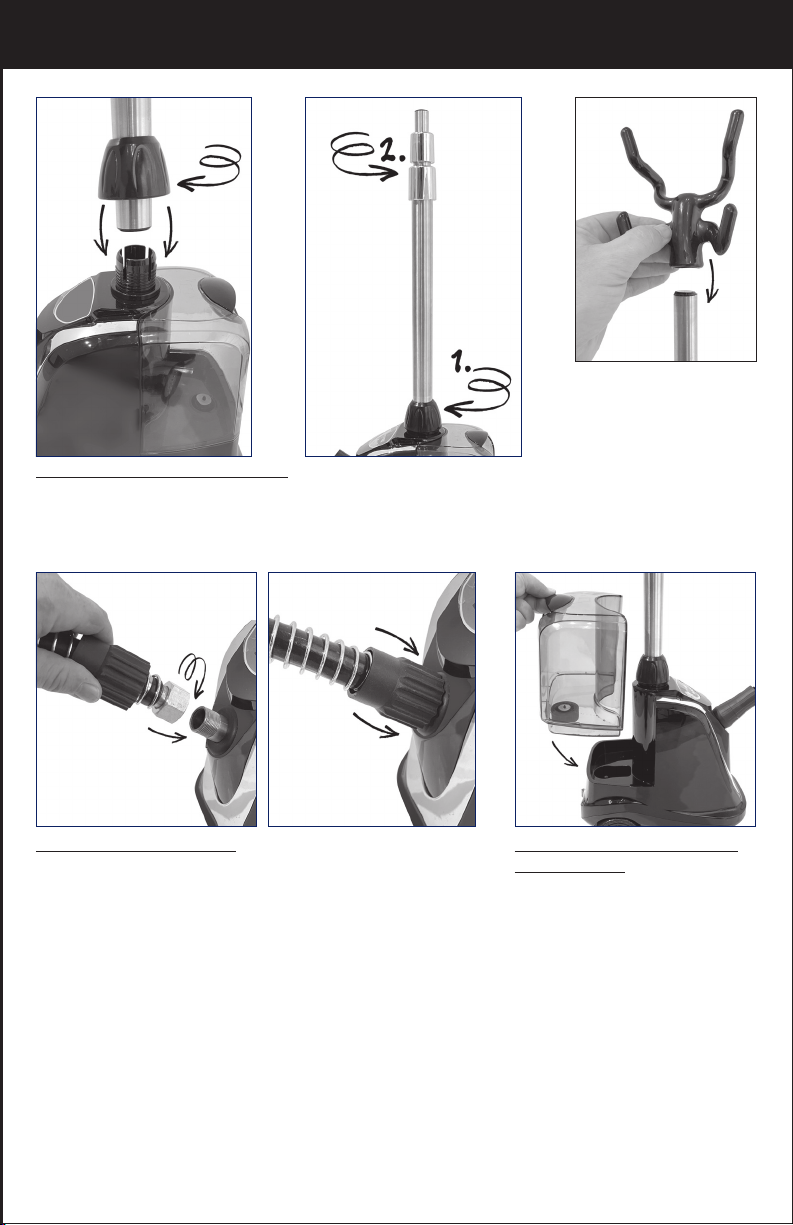
STEP 1 - ATTACH THE VERTICAL ROD
• Insert the rod assembly into the threaded base adapter on top of the steamer base and hand tighten knob.
• Loosen the telescoping rod assembly knobs and raise upright fully and hand tighten knobs to secure position.
• Slide black handle holder on top of the vertical upright.
STEP 2 - ATTACH THE HOSE
Take the end with the threaded brass screw and place onto the
threaded pipe sticking out of the top of the machine. Tighten by
hand then slide black plastic screw cover over brass nut to aide in
further tightening.Don’t over tighten.

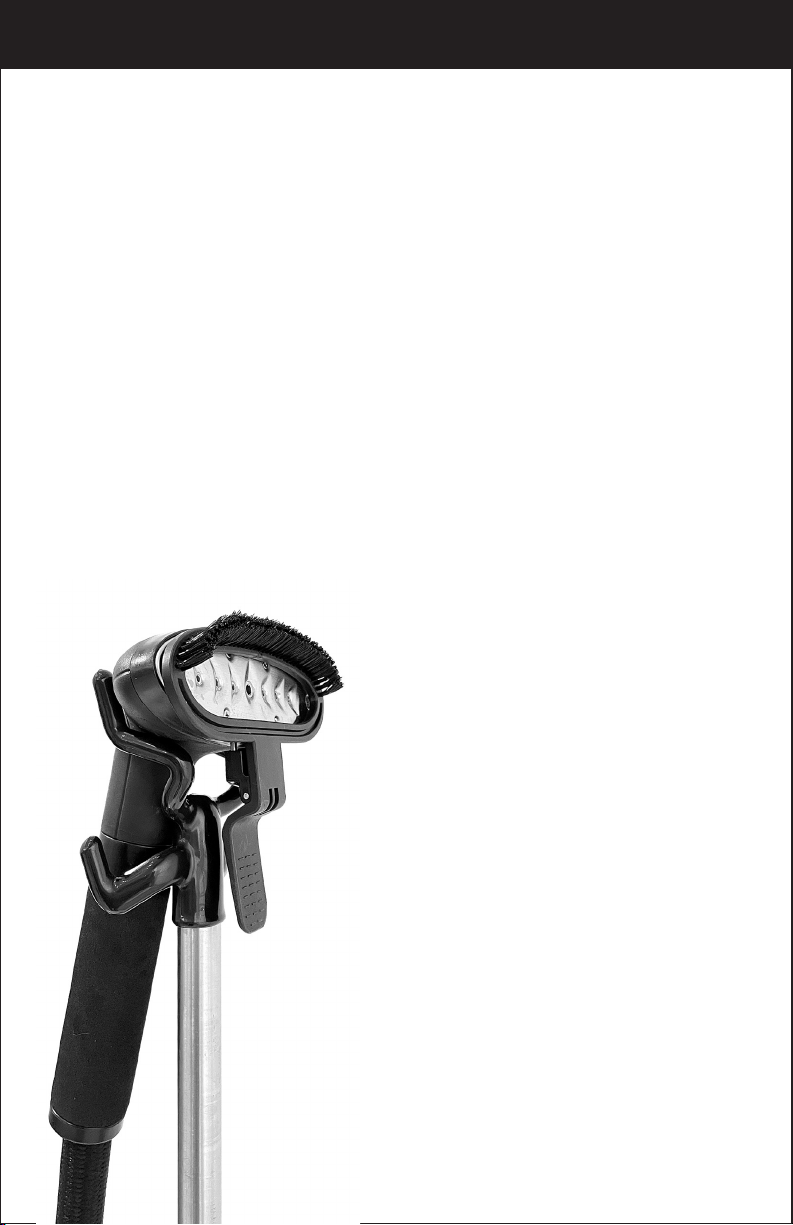
STEP 4 - USING THE STEAMER
1. Grasp the handle of the steamer hose once the steam is released.
2. Hold the handle with the nozzle facing upward and begin at the bottom of a
garment, allowing the escaping steam to rise inside and outside, removing
the wrinkles as it rises.
3. After a few seconds, remove the nozzle from the garment. Smooth the
garment with your free hand and check to see if more steam is needed.
Steamer Operation
STEP 1 - PREPARATION FOR USE
1. Set the appliance on the floor and remove the water bottle.
2. Check for sediment or build-up inside the water reservoir.
3. Follow the steps for cleaning and emptying the appliance if water was
accidentally left in the water bottle during storage of the unit.
4. Place the steamer hose with the nozzle end up on the hanger rod.
Make sure the hose is free of kinks.
5. Make sure that the unit rolls freely.
STEP 2 - FILLING THE WATER BOTTLE
1. Before plugging in the appliance, fill the water bottle.
2. Always make sure the appliance is unplugged before filling the bottle.
3. Fill the water bottle with ordinary, cool tap water.
4. Close the cap tight until it points to the ring as shown on right top.
5. Replace the water bottle straight into the reservoir.
STEP 3 - TURNING ON THE POWER
1. Always check to make sure the ON/OFF switch is OFF.
2. Plug the steamer into an electric outlet.
3. Turn the ON/OFF switch to the ON position.
4. The power indicator light shines when the unit is switched on.
IMPORTANT NOTE:
For heavier fabrics, you may need to use repeated applications. Avoid heating a single area with steam for a
prolonged period. Check the garment periodically to see that the process is succeeding.
With practice, you will gain speed and efficiency. You will also learn which of your clothes require more
steam pressing than others.
PREPARE GARMENT BEFORE STEAMING
• It will make pressing easier if there are few creases in the apparel.
• To avoid excess creasing, shake each item out before placing them
in a drier or hanging them out to dry in the open air.
• For towels, handkerchiefs, and napkins, drape them over a rod or
steam press them in place over towel racks!

Steamer Cleaning & Storage
IMPORTANT NOTE FOR DAILY USE:
If you wish to leave your steamer ready for use on a daily basis, simply leave the
water bottle filled and in place. While you do not have to empty the water bottle
each day, you should periodically empty the old water out of the steamer and
remove any sediment has accumulated. Empty it once a month, depending on use
and water mineral content in your area.
STEP 5 - CLEANING AND STORING THE UNIT
• Turn the ON/OFF switch to the OFF position. The indicator light will
go out. As the appliance cools down, disconnect the plug from the
outlet.
• Drain the water bottle by removing it and emptying its contents in
a sink. Rinse the water bottle lightly, shake out excess moisture,
and set it aside to dry.
• Wait for the steamer to cool completely for at least thirty minutes
before draining.
• Disconnet the steamer hose from base and set aside.
• Disconnect the rod entirely from the base.
• Lift the base over a sink and empty the water
remaining the reservoir. Wash the interior of the
reservoir by flushing it with some fresh
water. This will dislodge any sediment that has
accumulated. Drain this water from the reservoir.
• Reattach the steamer hose and the hanger rod or
store separately.
• Once the appliance has been drained and set
aside to dry, you are ready to store it.
Operating Notes
WHILE OPERATING STEAMER...
IF THE STEAMER HOSE GURGLES DURING USE...
• This is a normal result of condensation collecting inside the hose. Simply lift the control
handle upward until the hose is extended to its full height.
• The gurgling will disappear when the excess moisture inside the hose has had a chance to
drain back into the base.
IF THE STEAMER STOPS PRODUCING STEAM, THEN STARTS AGAIN...
• You may wish to examine the inside of the reservoir. The most common reason for this
effect is the accumulation of sediment from mineral laden water
• Clean the offending sediment from inside the unit, first following the steps for cooling and
cleaning the unit as presented on a previous page.
IF THE “STEAMER INDICATOR READY
LIGHT” DOES NOT TURN ON AND THE
UNIT DOES NOT PRODUCE STEAM...
• There may be an electrical problem with
the appliance. Disconnect the power supply
immediately, cool and drain the unit as
previously described. DO NOT use the unit until it
has been examined by a qualified repair
technician,

Trouble Shooting
Below is a chart detailing the most common problems, their causes, and their solutions.
Before shipping any appliance to a service center, please check to make sure that the
solution is not listed here.
PROBLEM CAUSE SOLUTION
Steamer
DOES NOT
get hot.
Steamer is not plugged
into an outlet.
Automatic shut-off has
engaged. The water bottle is
empty and the reservoir has
drained
Plug the appliance in.
Push the ON/OFF switch to the
OFF position. Fill the water bottle
and replace inside the reservoir.
Once the appliance is refilled,
turn the power ON.
No steam. Water level is too low.
Push the ON/OFF switch to the
OFF position. Refill the water
bottle and replace inside the
reservoir. Once the appliance is
filled, turn the power ON.
Water drips from
the nozzle.
Condensation has formed
inside the steamer hose
Hold the hose upright and allow
excess moisture to drain back
into the base of the unit.

© 2022 Econoco Corporation • www.econoco.com
Table of contents


