ECOVACS ATMOBOT ANDY KJ500G-LX11-01 User manual

INSTRUCTION MANUAL / 사용 설명서

2
EN
Live Smart. Enjoy Life.
Should you encounter situations that have not been properly addressed in this Instruction Manual, please contact our
Customer Service Center where a technician can address your specic problem or question.
For more information, please visit the ECOVACS ROBOTICS ofcial website: www.ecovacs.com
The company reserves the right to make technological and/or design changes to this product for continuous
improvement.
Thank you for choosing ATMOBOT!
Instruction Manual..............................................................................................................2
EN
사용 설명서 ���������������������������������������������������������������������������������������������������������������������������������������������������������29
KO

3EN
CONTENTS
1. Important Safety Instructions ..........................................................................................................................................4
2. Package Contents .............................................................................................................................................................6
3. Using ATMOBOT..............................................................................................................................................................10
4. Maintenance ....................................................................................................................................................................19
5. Troubleshooting...............................................................................................................................................................24
6. Product Specications....................................................................................................................................................28

4
EN
1. Important Safety Instructions
When using an electrical appliance, basic precautions should always
be followed, including the following:
READ ALL INSTRUCTIONS BEFORE USING
THIS APPLIANCE
SAVE THESE INSTRUCTIONS
1. This Appliance is not intended for use by persons (including
children) with reduced physical, sensory or mental capabilities, or
lack of experience and knowledge, unless they have been given
supervision or instruction concerning use of the Appliance by a
person responsible for their safety.
2. Children should be supervised to ensure that they do not play
with the Appliance.
3. Clear the area to be puried. Remove power cords and small
objects from the oor that could entangle the Appliance. Tuck
rug fringe under the rug base, and lift items such as curtains and
tablecloths off the oor.
4. If there is a drop off in the purifying area due to a step or stairs,
you should operate the Appliance to ensure that it can detect the
step without falling over the edge. It may become necessary to
place a physical barrier at the edge to keep the robot from falling.
Make sure the physical barrier is not a trip hazard.
5. Only use as described in this manual. Only use attachments
recommended or sold by the manufacturer.
6. Please make sure your power supply voltage matches the power
voltage marked on the Charging Dock and AC Adapter.
7. For INDOOR household use ONLY. Do not use the Appliance in
outdoor, commercial or industrial environments.
8. Use only the original rechargeable battery, AC Adapter
and Charging Dock provided with the Appliance from the
manufacturer. Non-rechargeable batteries are prohibited. For
battery information, please refer to Specications section.
9. Do not use without lters in place.
10. Do not operate the Appliance in an area where there are lit
candles or fragile objects.
11. Do not use in extremely hot or cold environments (below -5˚C/23˚F
or above 40˚C/104˚F).
12. Do not use Appliance on wet surfaces or surfaces with standing
water. Do not use Appliance in areas where they may be present.
13. Do not touch the plug or the Appliance with wet hands.
14. Take care not to damage the power cord. Do not pull on or carry
the Appliance AC Adapter or Charging Dock by the power cord,
use the power cord as a handle, close a door on the power cord,
or pull power cord around sharp edges or corners.
15. Do not run Appliance over the power cord. Keep power cord
away from hot surfaces.
16. If the supply cord is damaged, it must be replaced by a special
cord or assembly available from the manufacturer or its service
agent.
17. Do not place the power cord under carpets, furniture, product,
etc. Keep the power cord away from crowded areas.
18. Do not use the Charging Dock or AC Adapter if it is damaged.
19. Do not use with a damaged power cord or receptacle. Do not use
the Appliance, AC Adapter or Charging Dock if it is not working
properly, has been dropped, damaged, left outdoors, or come in
contact with water. It must be repaired by the manufacturer or its
service agent in order to avoid a hazard.
20. Turn OFF the power switch before cleaning or maintaining the
Appliance.
21. The plug must be removed from the receptacle before cleaning or
maintaining the Charging Dock and AC Adapter.
5EN
22. Remove the Appliance from the Charging Dock and AC Adapter,
and turn OFF the power switch to the Appliance before removing
the battery for disposal of the Appliance.
23. The battery must be removed and discarded according to local
laws and regulations before disposal of the Appliance.
24. When not using the Charging Dock or AC Adapter for a long
period of time, please unplug it.
25. The Appliance must be used in accordance with the directions
in this Instruction Manual. ECOVACS ROBOTICS cannot be
held liable or responsible for any damages or injuries caused by
improper use.
26. The robot contains batteries that are only replaceable by skilled
persons. To replace the robot’s battery, please contact Customer
Service.
27. If the robot will not be used for a long time, fully charge the robot
and power OFF for storage, and unplug the Charging Dock and
AC Adapter.
To satisfy RF exposure requirements, a separation distance of 20 cm
or more should be maintained between this device and persons during
device operation.
To ensure compliance, operations at closer than this distance is not
recommended. The antenna used for this transmitter must not be co-
located in conjunction with any other antenna or transmitter.
Output power of the Wi-Fi module is less than 100mW.
Direct current
Alternating current
6
EN
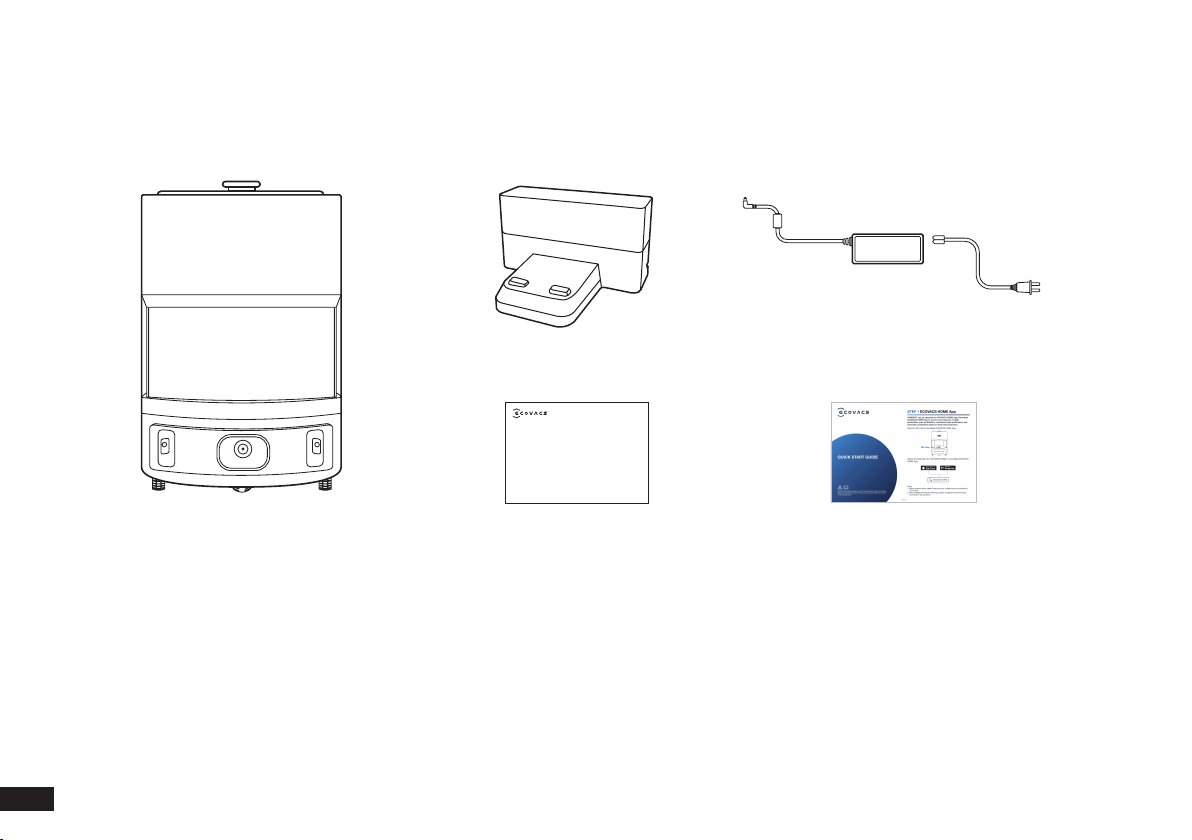
2. Package Contents/2.1 Package Contents
ATMOBOT
Power Adapter + Power Cord
Quick Start Guide
Charging Dock
Instruction Manual
Note: Figures and illustrations are for reference only and may differ from actual product appearance.
INSTRUCTION MANUAL
7EN
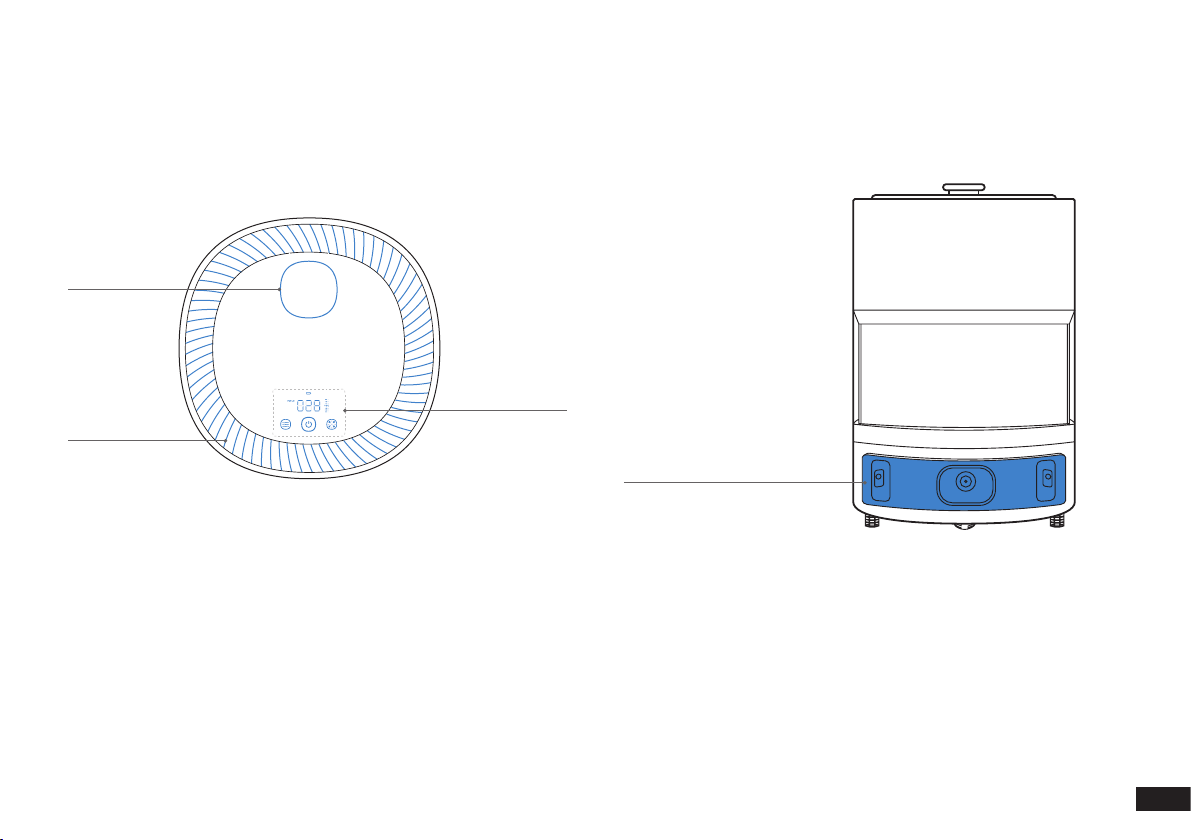
2. Package Contents/2.2 Product Diagram
Top Front
Line Laser Anti-collision
Sensor & Bumper
Air Outlet
D-ToF Distance
Sensor
Control Panel
(Power ON)
8
EN
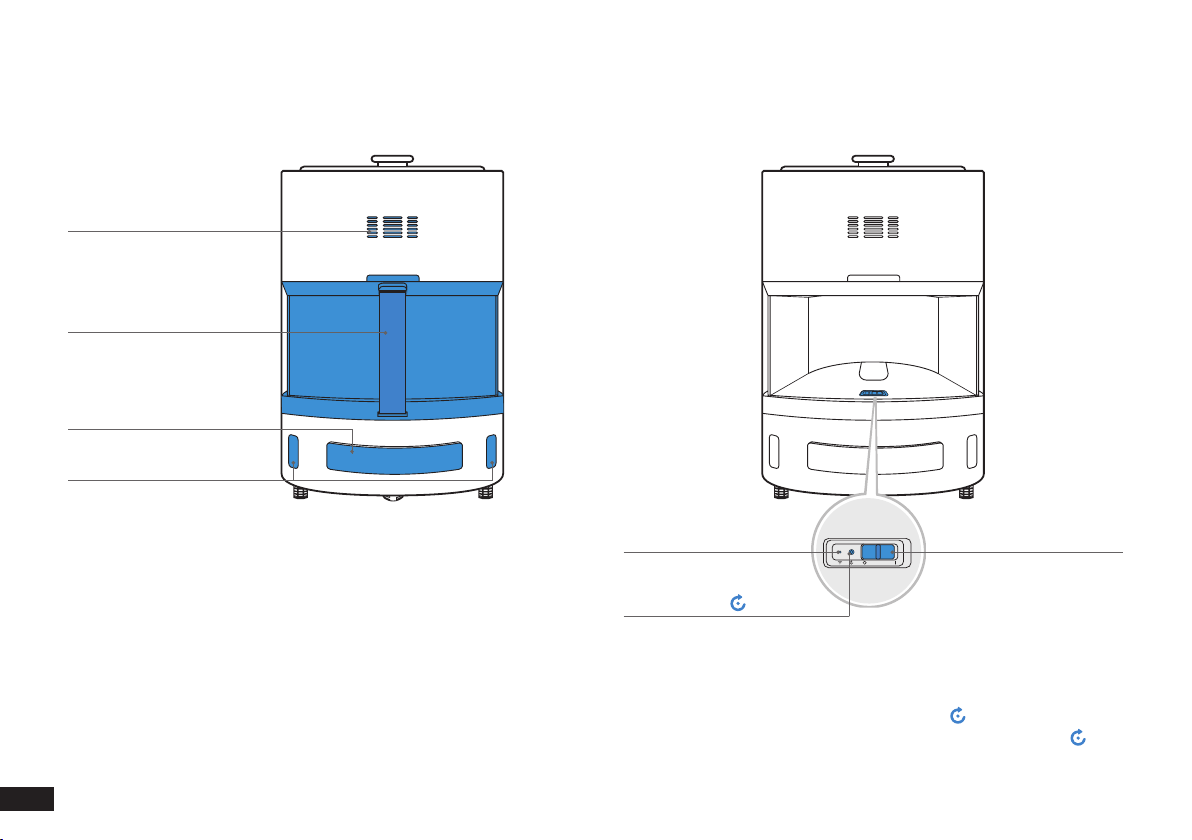
Back
Particulate Matter & VOC
Sensor
Filter
Charging Dock Signal Sensor
Infrared Anti-collision
Bumper
Back (Filter Uninstalled)
RESET Button
For network setup: Press the RESET Button .
To restore the factory setting: Press and hold RESET Button for 5
seconds.
Wi-Fi Indicator Power Switch
(“I”=ON; “ ○”=OFF)

9EN
Bottom Charging Dock
Universal Wheels
Charging Contacts Anti-drop Sensors
Upgrade Port
(For customer
service only)
Anti-drop Sensors
Driving Wheels
Battery Cover
Infrared Signal
Emitter
Charging Dock Pins
Power Adapter Port
Power Adapter
Power Cord
10
EN
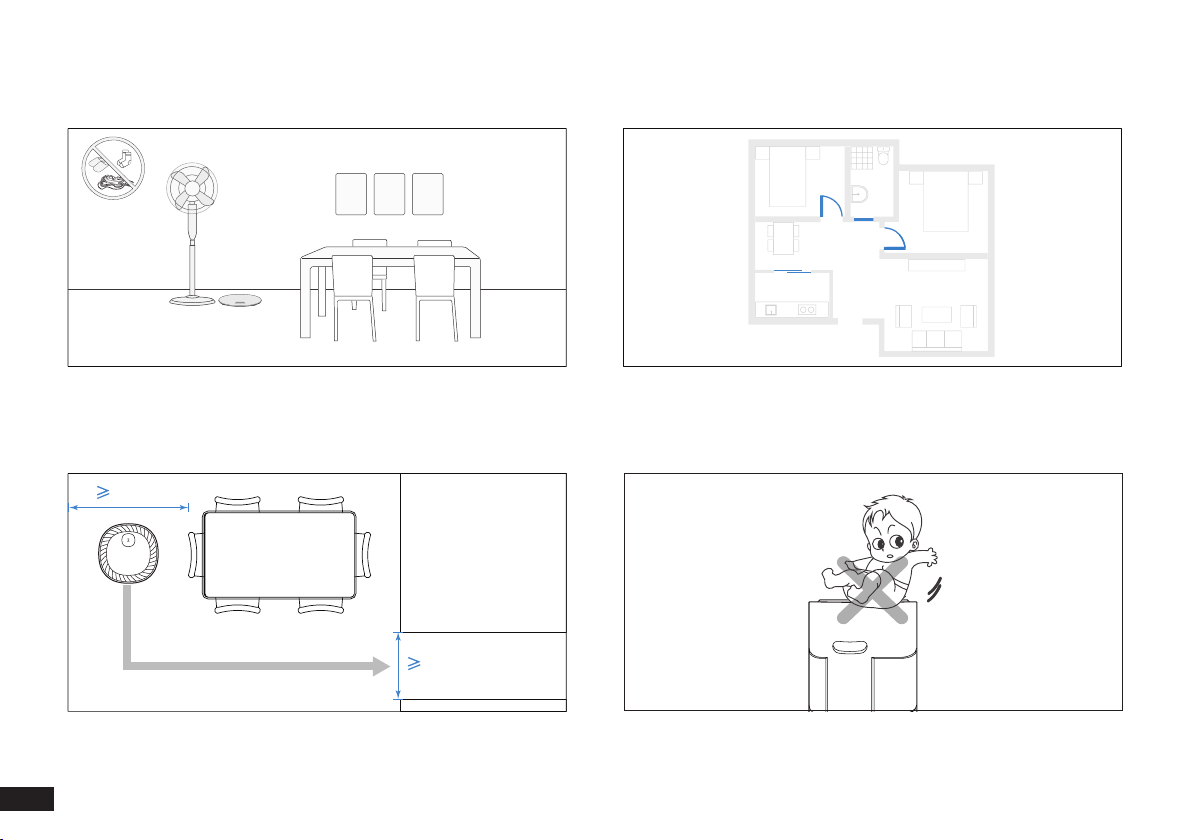
3. Using ATMOBOT/3.1 Notes Before Use
Before each use, tidy up the area by putting furniture in their proper
place and remove loose items such as power cords and toys.
ATMOBOT can pass a space of no less than 65 centimeters in width.
Please avoid blocking ATMOBOT during mobile purication.
Open the room doors to allow ATMOBOT to explore the home
environment during the rst mobile purication. It is recommended to
close the doors of the bathroom and the kitchen to prevent ATMOBOT
from slipping or falling in places with standing water.
Do not place items on top of ATMOBOT or use ATMOBOT as a seat.
65cm
65cm
11 EN
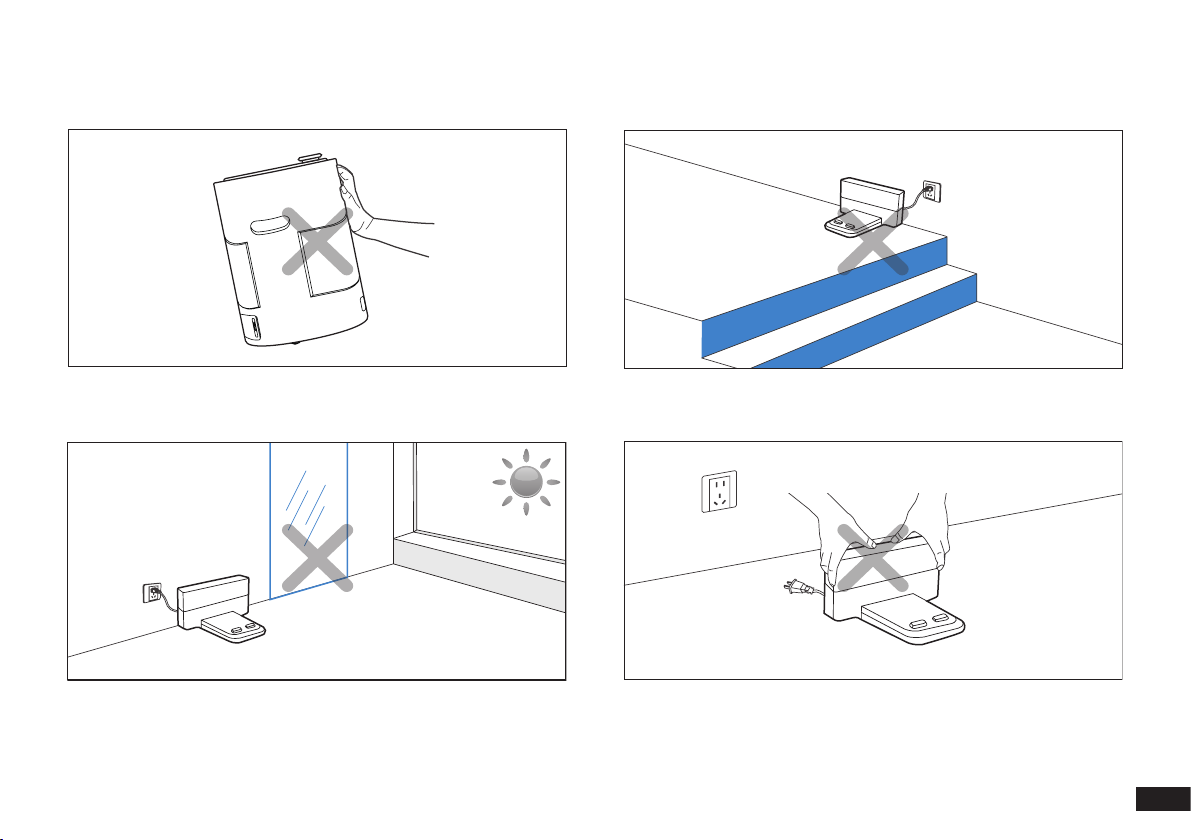
Do not push or tip ATMOBOT. Do not place the Charging Dock near stairs or a drop off to prevent
ATMOBOT from falling over the edge.
Do not place the Charging Dock in direct sunlight or near reective
objects such as mirrors. The strong light and reflection may keep
ATMOBOT from nding its way back to the Charging Dock.
Avoid moving the Charging Dock. If the Charging Dock is moved,
ATMOBOT may fail to locate itself and may lose the map.

12
EN
3. Using ATMOBOT/3.2 Quick Start
Remove Protective Materials
ATMOBOT
Charging Dock Filter
1
2
13 EN
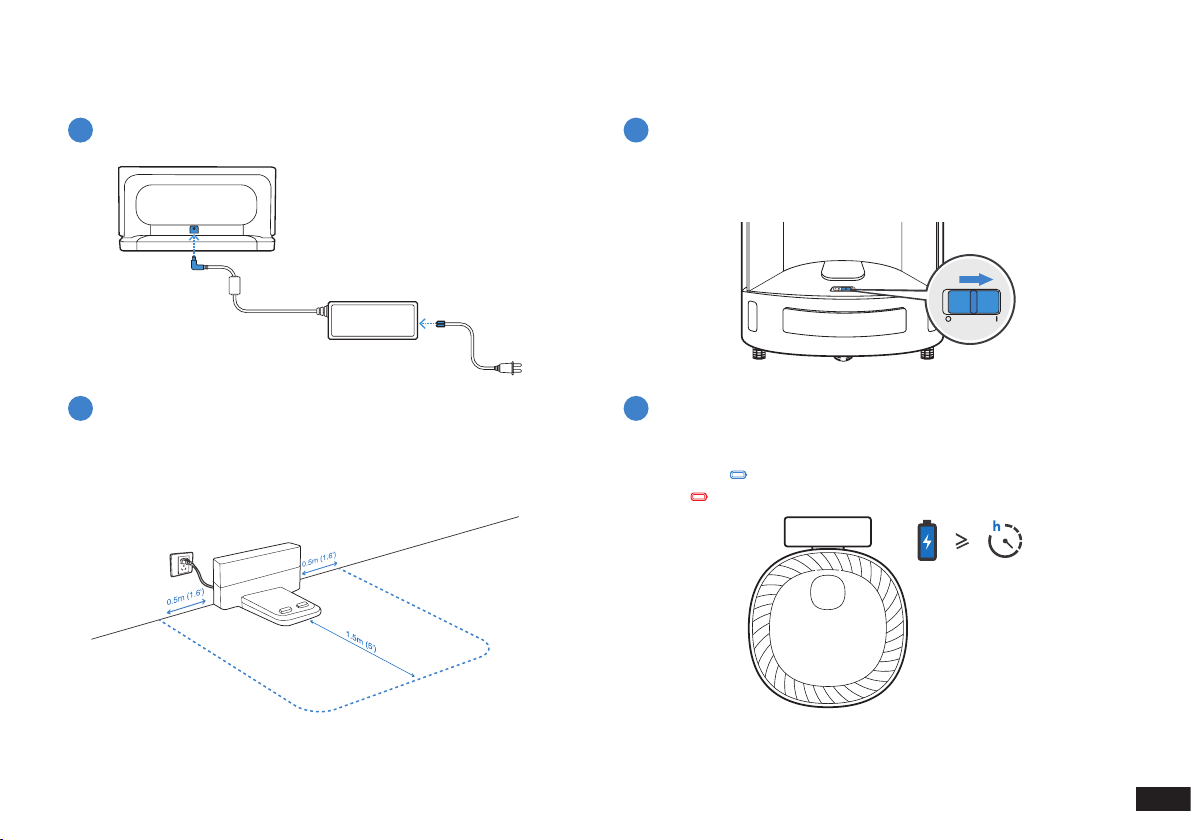
Charge ATMOBOT
Assemble the Power Adapter and Charging Dock Power ON
Place Charging Dock Charge ATMOBOT
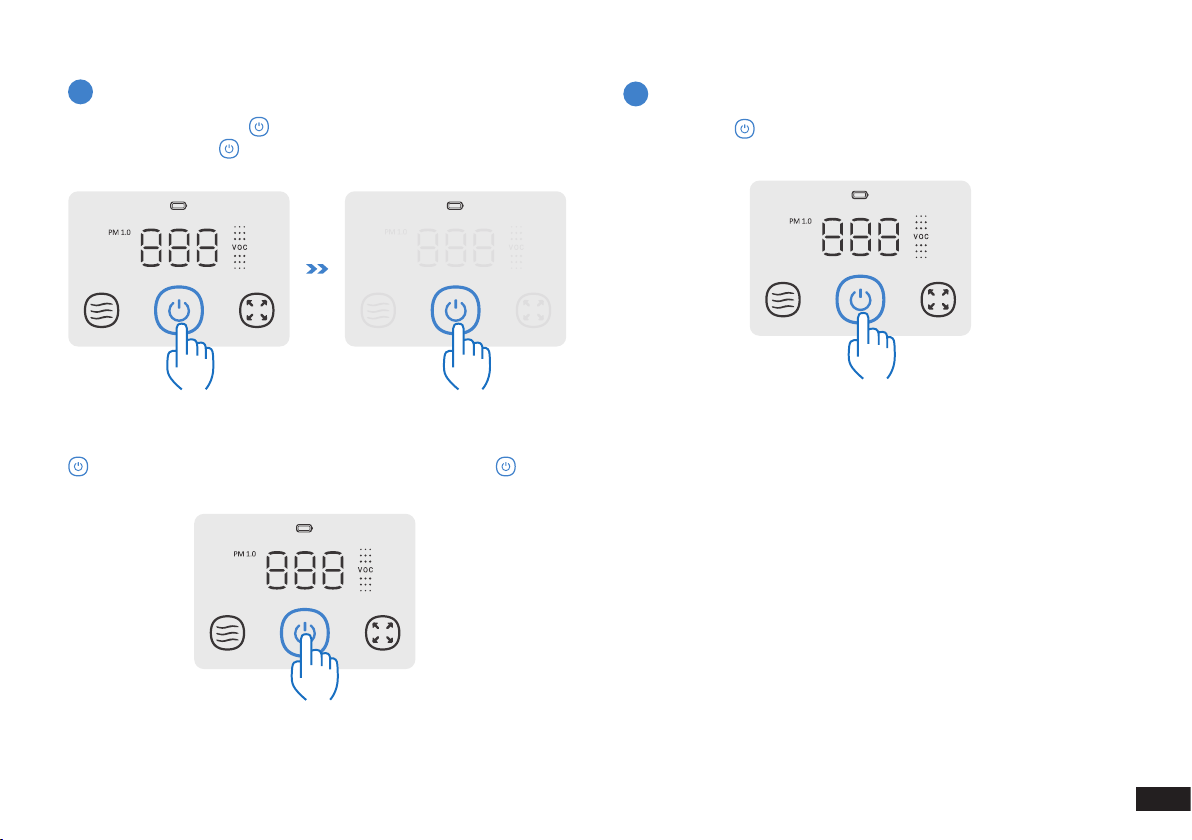
Uninstall the lter, and move the Power Switch to “I”. “I”= ON; “O”=
OFF. ATMOBOT is powered ON when the control panel is illuminated.
Note:
* Before charging ATMOBOT, pleas power the robot ON.
* Charge ATMOBOT for a minimum of 4 hours before the rst use.
Install the lter, and place ATMOBOT on the Charging Dock. Ensure
the charging contacts on ATMOBOT and the Charging Dock Pins
make contact. glows solid WHITE when ATMOBOT is fully
charged. appears when the battery is low.
Place the Charging Dock on a level oor surface against a wall with the
base perpendicular to the ground. Keep the immediate area 1.5m / 5’ in
front of and on both sides clear of objects and reective surfaces.
1 3
2 4
AUTO
4

14
EN
3. Using ATMOBOT/3.3 ECOVACS HOME App
Scan the QR code to download ECOVACS HOME App.
QR code
ATMOBOT can be operated via ECOVACS HOME App. Download ECOVACS HOME App to access more features: mobile purication, area
purication, customized area purication, and automatic purication based on data interconnection.
Search the App Store for "ECOVACS HOME" to download ECOVACS
HOME App.
Note:
1. Before network setup, please make sure your mobile phone is connected to home Wi-Fi.
2. After installing ECOVACS HOME App, please complete the network setup according to App guidance.
ECOVACS HOME
OR

15 EN
3. Using ATMOBOT/3.4 Use ATMOBOT
Control Panel
1
Indicator Status
BLUE 0-15 Excellent
GREEN 16-35 Good
ORANGE 36-75 Lightly Polluted
RED ≥76 Heavily Polluted
Flashing BLUE VOC sensor starting
BLUE Excellent
GREEN Good
ORANGE Lightly polluted
RED Heavily polluted
Flashing WHITE Charging
Glowing WHITE Fully charged
RED Low battery
Indicator Status
Quiet
Normal
High
Smart airow
Glowing WHITE Standby/ Purifying
Malfunction Alert
Mobile Purication
Spot Purication
Battery Indicator
Airow Button
Standby Button
Particulate Matter & VOC
Indicator
Purication Mode
Button
16
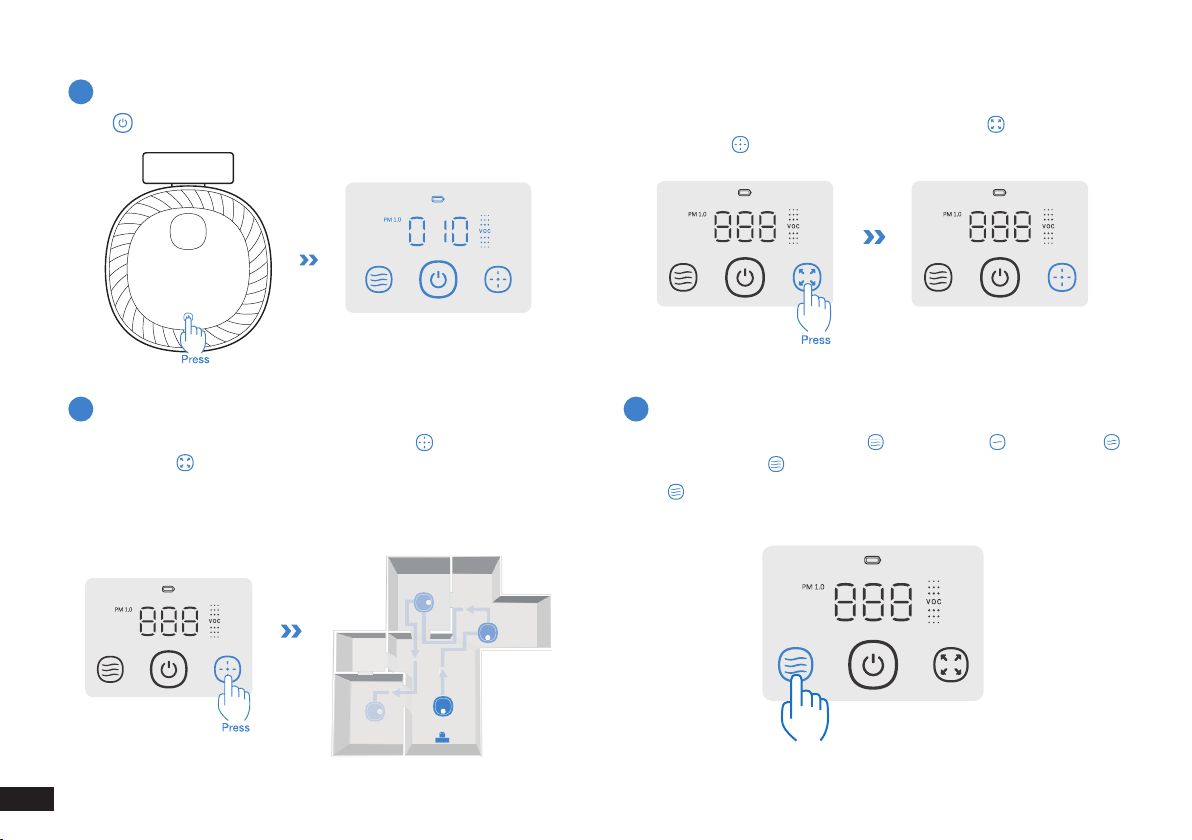
EN
Press to start spot purication.
①When ATMOBOT is in spot purication, press . The indicator
switches to and ATMOBOT will leave the Charging Dock and go
to each room to purify.
* Make sure ATMOBOT stays connected to the Charging Dock and
keeps charging before the rst mobile purication.
②When ATMOBOT is in mobile purication, press . The indicator
switches to and ATMOBOT will start spot purication.
Starting Purication
Switching Mode
2
3
ATMOBOT has four airow levels: Smart airow, quiet airow,
normal airow, and high airow.
Press on the control panel to switch among these airows.
Switching Airow
4
Press
17 EN
Spot Purication: Press to end purication while ATMOBOT is
spot purifying. Press again to wake up the robot to start purifying.
Press Long Press 3 seconds
Press
Press
Mobile Purication: When ATMOBOT is in mobile purication, press
to pause purication; when purication is paused, press to
resume mobile purication.
Press and hold for 3 seconds, and ATMOBOT will automatically
return to the Charging Dock to charge.
Pausing/Ending Purication Return to Charging Dock
56
* ATMOBOT will automatically return to the Charging Dock to charge
when mobile purication is completed or the battery is low.
* During mobile purication, if ATMOBOT is paused for more than 60
minutes, the current mobile purication cycle will be canceled.

18
EN
1
2
Note:
1. When ATMOBOT is not working, keep the Charging Dock plugged in and keep ATMOBOT powered ON and on the Charging Dock to make sure
it has a full battery to work at any time.
2. If you will not be using ATMOBOT for a long time, charge it fully and then turn off the power switch before placing it in storage. Be sure to
recharge ATMOBOT every three months to prevent the battery from over-discharging.
3. If the battery over-discharges or remains unused for a long time, ATMOBOT might become unchangeable. Please contact Customer Service for
assistance.
Uninstall the lter and move the Power Switch to “O”. “I”= ON; “O”= OFF.
3. Using ATMOBOT/3.5 Power OFF for Storage

19 EN
4. Maintenance/4.1 Filter
Note:
1. Turn off the robot’s power switch and unplug the power cord of the Charging Dock before maintenance.
2. It is recommended to maintain and replace the lter regularly to avoid pollution and noise.
Uninstall the lter, and turn off the power switch. Place the lter in sunlight for 2–3 hours.
Clean the lter with a vacuum cleaner. Turn on the robot’s power switch, and install the lter.
1 3
2 4
Care and Maintenance
1
22-3h
20
EN
4. Maintenance/4.2 Air Outlet
Note:
The air lter life varies across different environments.
Replace the lter if it is expired or develops an odor.
Visit https://www.ecovacs.com/global for more information to
purchase the lter.
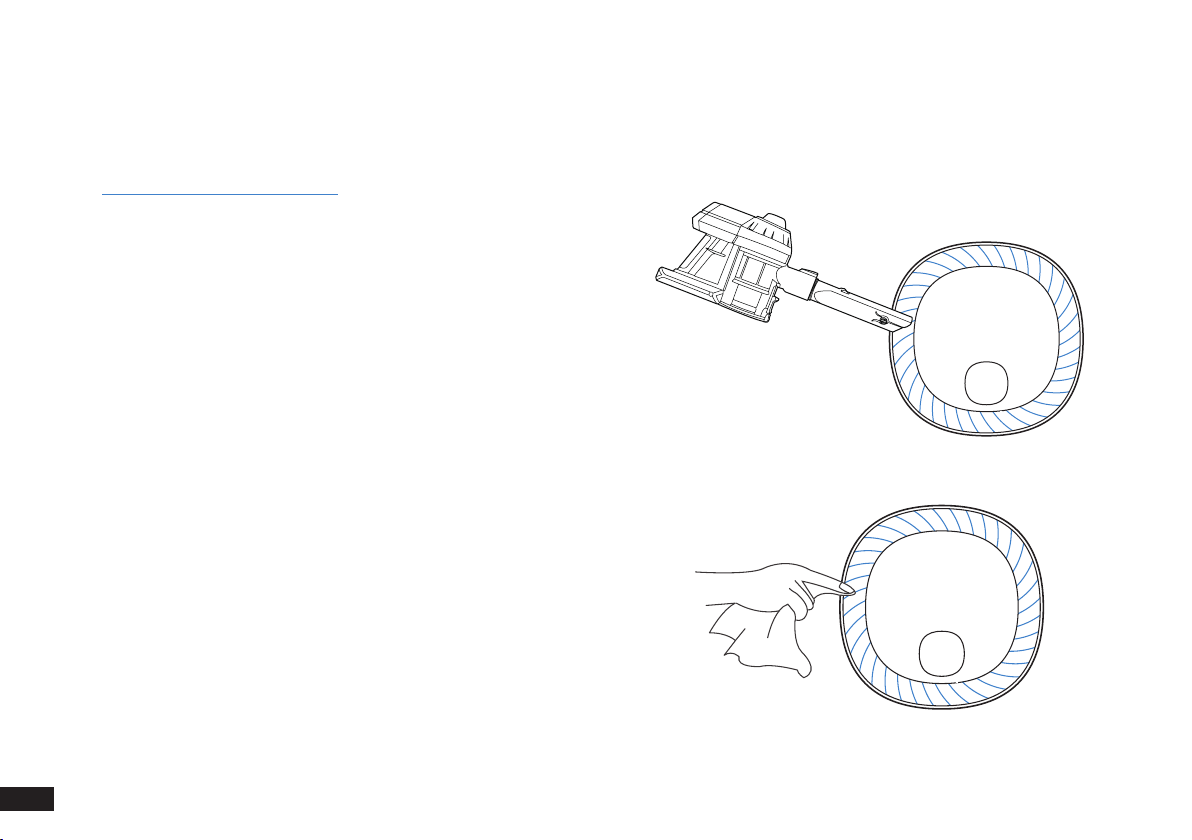
Regularly clean the Air Outlet with a vacuum cleaner. This will ensure
the air outlet by ATMOBOT is clean.
Replacing the Air Filter
Table of contents
Other ECOVACS Air Cleaner manuals


