EcoVolter Type 2-3x16A/11kW User manual
Tragbares EV Level 2
Smart-Ladegerät
Benutzerhandbuch
EcoVolter
Portable EV Level 2
Smart Charger
User Manual

2
Table of contents
Inhaltstabelle
EN
DE
3. Welcome
3. Contents of the Package
4. Main Parts of the Charger
5. Functionality
5. Before You Start
7. Charging Your EV
12. Troubleshooting
12. Using the iXmanager Mobile Application
14. Product Warranty
15. Technical Specifications
15. Product Disposal
16. Herzlich willkommen
16. Paketinhalt
17. Hauptbestandteile des Ladegeräts
18. Funktionen
18. Vor dem Verwendungsbeginn
20. Aufladen Ihres EV-Gerätes
25. Fehlerbehebung
25. Verwendung der mobilen iXmanager-App
27. Produktgarantie
28. Technische Spezifizierungen
28. Produktentsorgung

Wi-Fi connectivity, mobile
application
Booster mode
Charging history with internal
real time clock
Charging schedule mode
Multi-user access sharing
3
Portable EV Level 2 Smart Charger / User Manual
ENGLISH
Thank you for buying the EcoVolter portable EV charger. This user manual contains important
information about the product. Please read this user manual before you start using your EcoVolter
portable charger.
Please follow the instructions in this document carefully. Failure to observe the instructions in this user
manual may result in fire, electric shock, serious injury, or death, and will void the product‘swarranty.
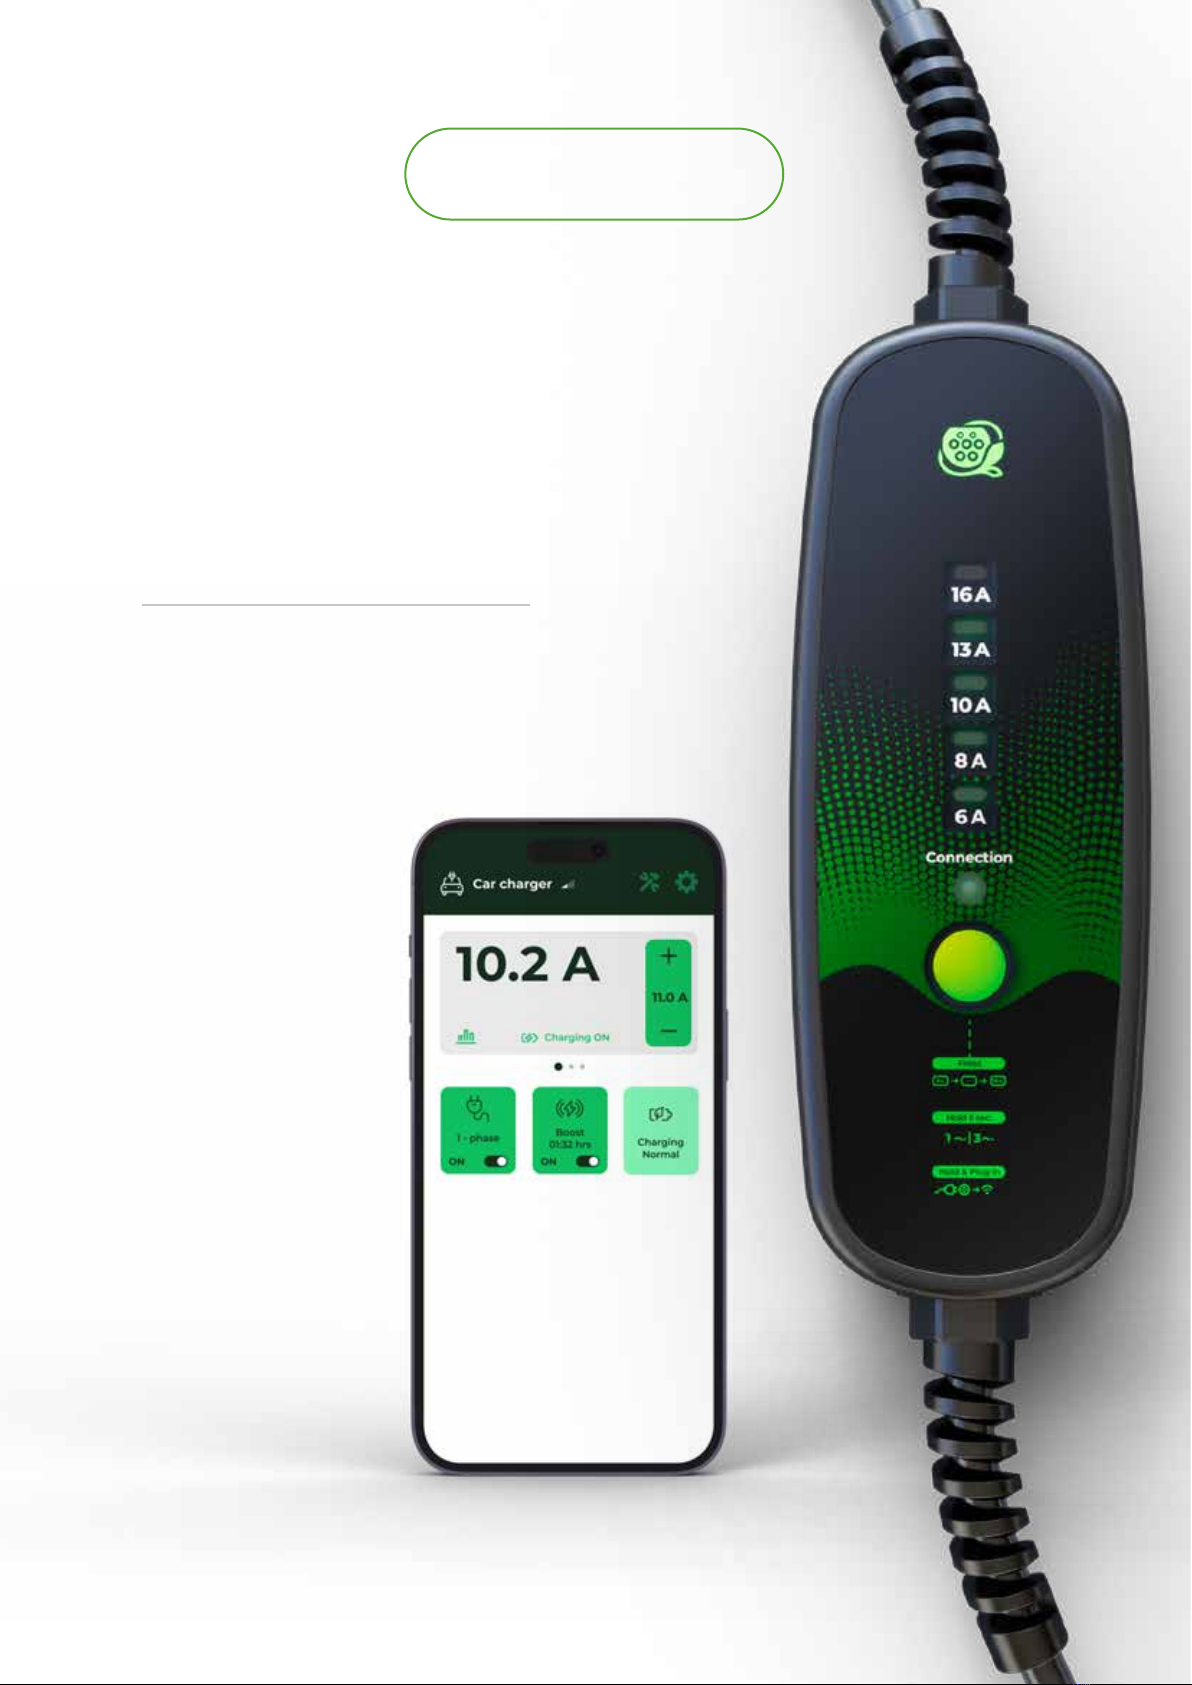
Product Features
EcoVolter is aconnected charger. It enables arange of advanced functionalities.
Please check the package content carefully before you take any further steps.
Portable Charger User Manual
Automatic grid type detection
RCD DC 6 mA, AC/DC 30 mA
with self-test
Advanced safety and protection
functions
Energy metering
API support
Symbols Legend
This symbol indicates the product meets the requirements of relevant product directives of the
European Economic Area.
This symbol indicates the product meets the requirements of the EU directive on the
restriction of the use of certain hazardous substances.
Welcome
Contents of the Package
+ +
+
+
+ +
+ +
+ +
1
2

4Portable EV Level 2 Smart Charger / User Manual
ENGLISH
Important Notice
This charger is intended only for charging electric vehicles that support the IEC 62196-1 and
IEC 61851-1 standards with aType 2 and Type 1 connector. Do not use this product for any other
purposes than charging compatible electric vehicles.
Do not use the charger if it shows signs of damage or if the LED indicates an error.
- Familiarize yourself with the charger’scontrol panel and its functions before use.
- Use the charger only with plug adaptors specifically designed for this product.
- Do not use the charger with apower outlet that does not comply with valid regulations and standards.
- Always make sure the charger is connected to aproperly grounded power outlet with amatching
current rating.
- Never attempt to disassemble, modify or repair the product or its parts. In the event of aproduct
malfunction, do not use the product and contact the seller.
- Never disconnect the charger from the power outlet or from the EV during charging. This could cause
injury or defects.
- Always make sure the portable charger’scables are untangled and not covered by any objects that
may obstruct normal airflow and cooling during charging.
- Do not use any extension cords with the charger.
- Always make sure the charger housing is not covered by any objects that may obstruct normal airflow
and cooling during charging.
- Do not expose the charger or its parts to harsh external conditions such as excessive dirt, heavy rain, or
snow.
- Keep the charger and all its parts clean and dry. Use adry or slightly damp cloth to clean its surface if
needed.
- Keep the charger’shousing away from direct sunlight or aheat source when charging. This may cause
overheating and malfunctions.
- Never touch the connector terminals with your hands or any objects or tools.
- Do not allow children or unauthorized individual to handle the charger or its accessories. Improper
handling of the charger can result in electric shock, fire, serious injury, or death.
- The manufacturer or reseller of the product does not accept any liability for damage caused by
improper use of the product.
The charger features apower metering function. The energy metering data is indicative and should
not be used for energy billing purposes.
Main Parts of the Charger
Main control unit
Type 2 vehicle connector
with 6 m cable
Power plug (CEE 5P/16A)
with 0.4 m cable
3
!
!
!
!
!
!
!
!
!
!
!
!
!
!
!
!
!
5
Portable EV Level 2 Smart Charger / User Manual
ENGLISH
Functionality
The EcoVolter is designed to be used to charge electric vehicles from low voltage 240V and 400V power
grids. It combines aportable Mode 3 charging station with aMode 2 charging cable.
The charger automatically detects the type of power grid and adjusts its charging and protective
functions accordingly. After the charger plug is connected to amatching power outlet, it performs
anumber of self-tests and upon their completion is prepared to start the charging process.
The user can set the charging current from 6 Ato 16 Aor the maximum current permitted by the plug.
The user can also switch between asingle-phase and three-phase charging mode while the charger is
connected to athree-phase power grid from the charger’scontrol panel.
Additional functionalities are accessible from the mobile application.
The vehicle charging connector remains locked while charging and when it has been interrupted.
To unlock the connector, charging needs to be halted from the car mobile application or its control panel.
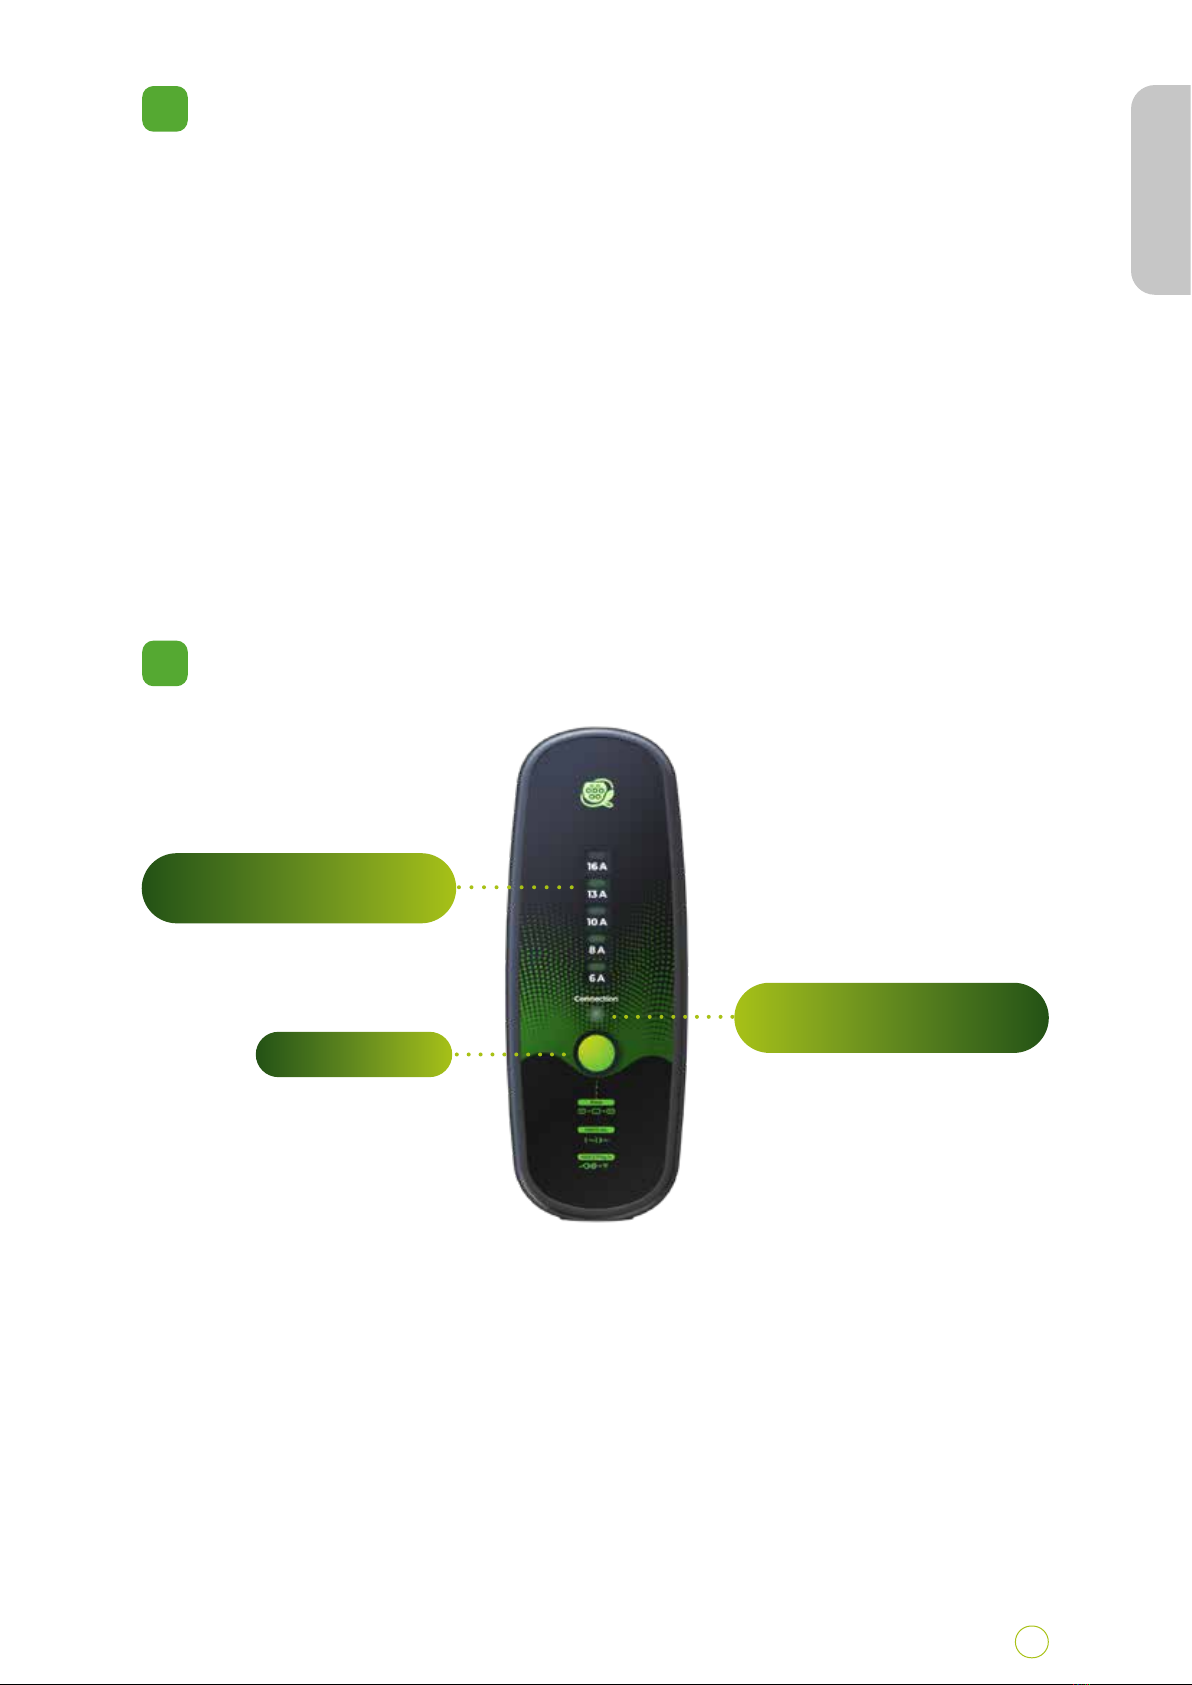
Before You Start
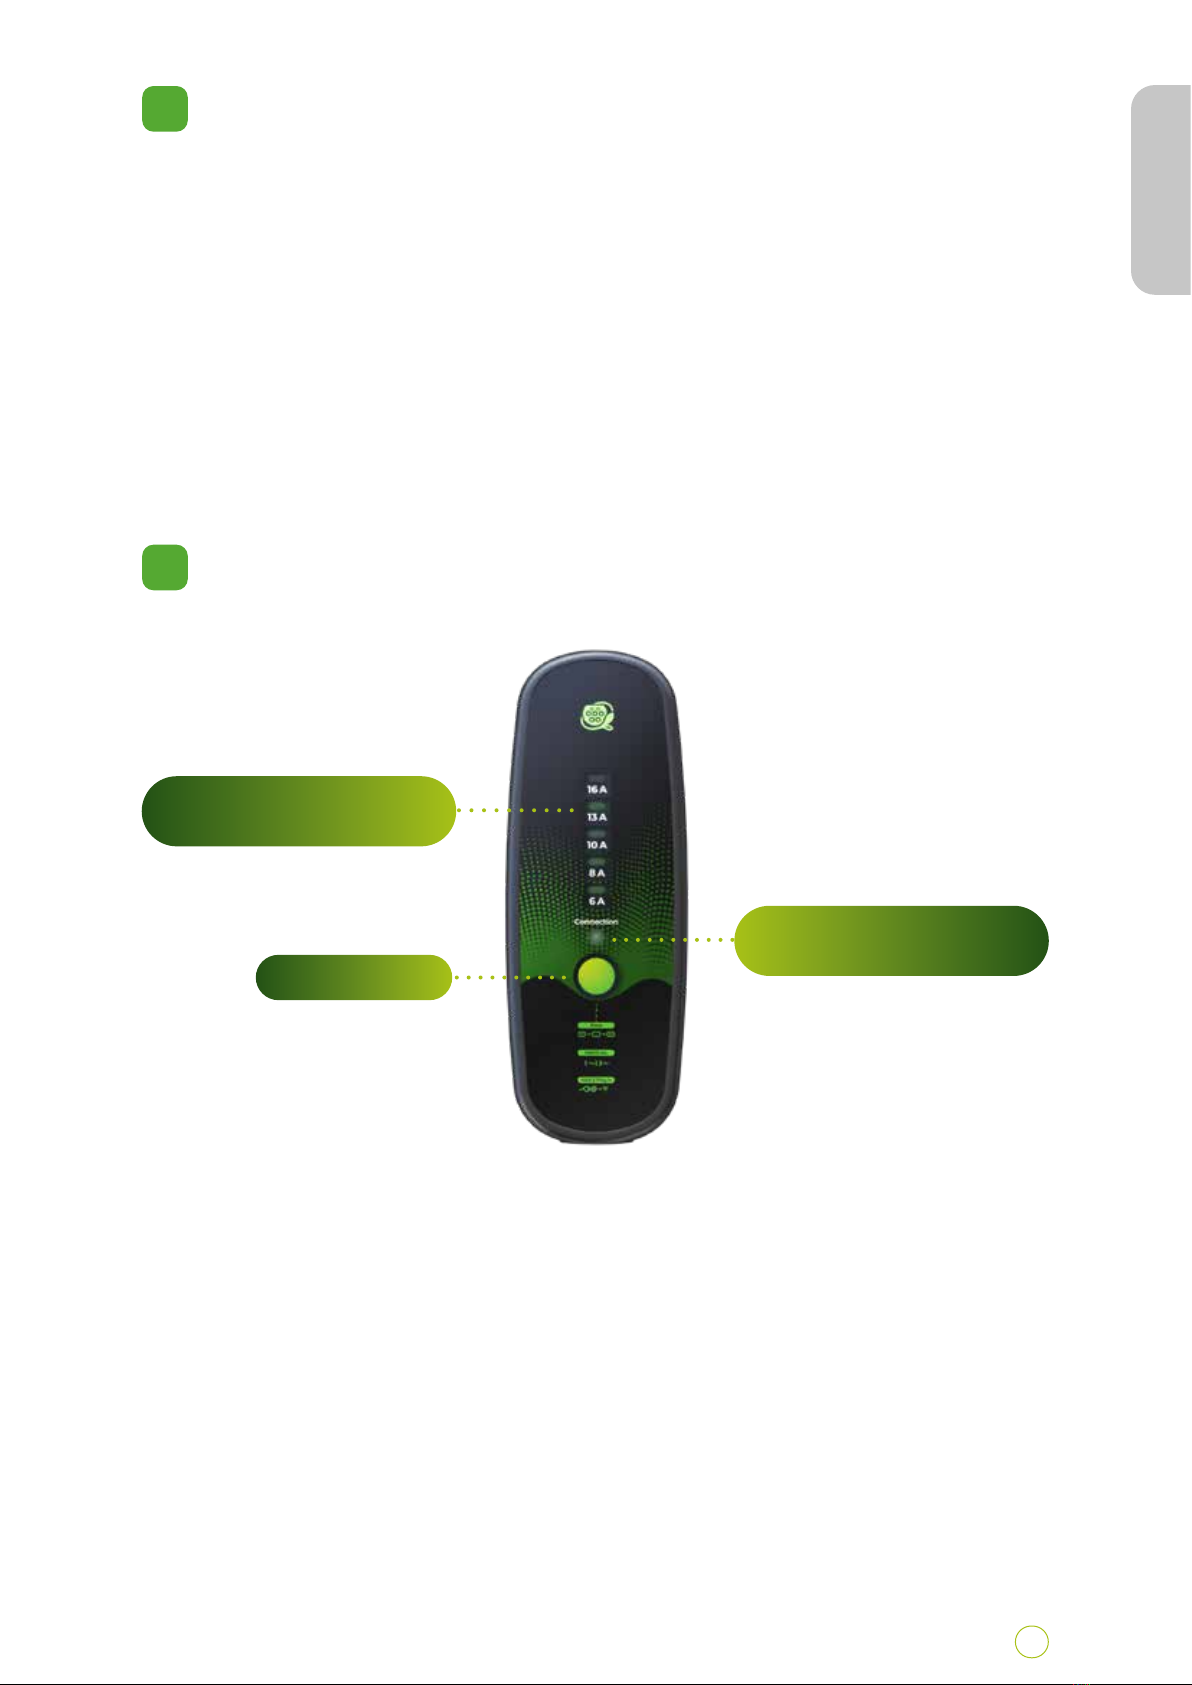
Control Panel
Charging indicator LED bar
(charging status, errors)
Connection status LED
(status Wi-Fi connection)
Control button
Important - Using the Charger in an IT Grid System
Default European TN Grid System
Power grids include protective earthing (PE conductor). In the factory settings, the EchoCharge is set to
the TN grid mode. The TN grid system is used in the vast majority of European countries. In the TN grid
mode, the charger checks the proper connection of the protective earthing (PE) conductor and displays
the “Ground Fault” error if it detects a malfunction.
You can ignore the rest of this chapter if you are not planning to use the charger in Norway.
4
5
6Portable EV Level 2 Smart Charger / User Manual
ENGLISH
The Special Norwegian IT Grid System
The protective earthing check does not work in the isolated IT grid system, which is used in Norway.
In this case the charger must be manually switched into the IT grid mode, and the protective earthing
check must be disabled in the IT grid system for the charger to operate correctly.
Switching the Charger between TN Grid and IT Grid (Norway) Mode
If you plug the charger into the IT grid power socket while it is switched to the standard TN gride mode.
The “Ground Fault” error will appear. Now you can switch the charger to the IT grid mode.
Switching the Charger back into the Default TN Grid Mode
The charger will remain in the IT grid mode until you plug into a TN grid with a protective earthing
(PE conductor). If you plug the charger into a correctly working TN grid it will automatically switch into
TN grid system mode.
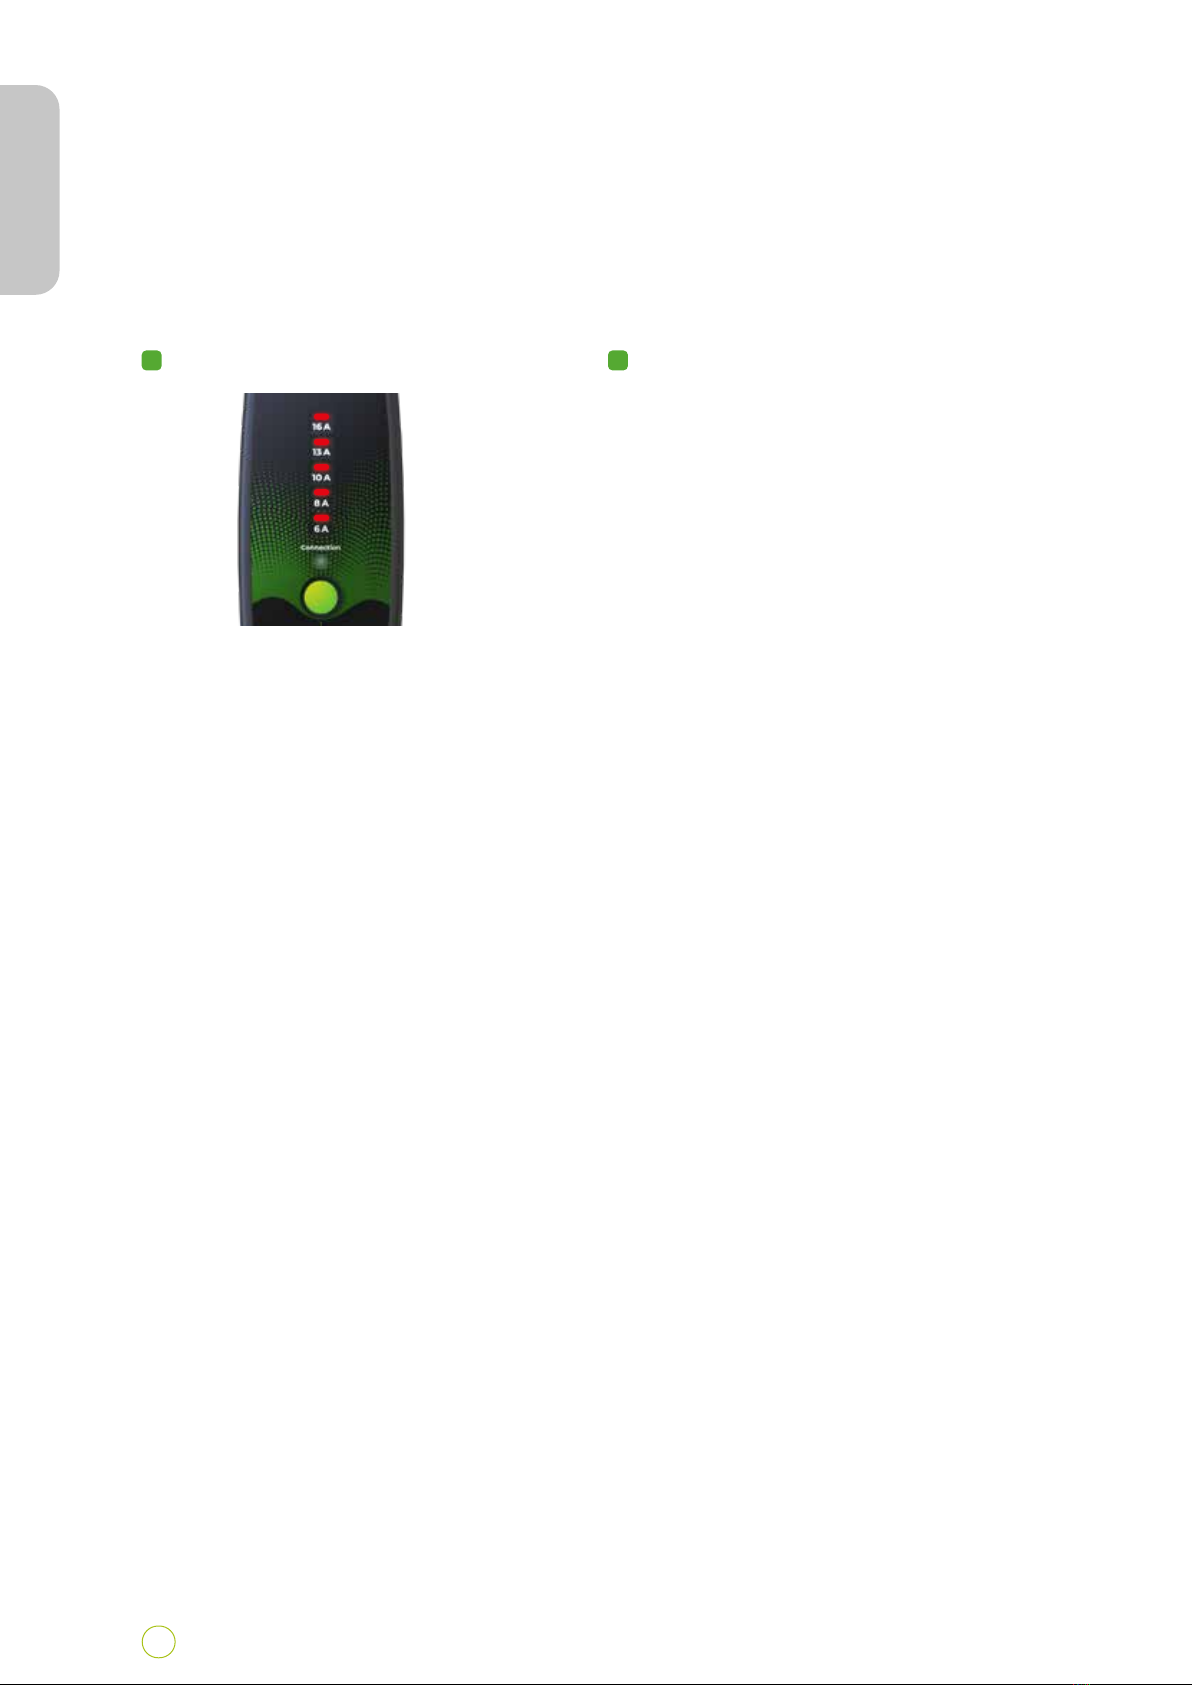
The “Ground Fault” error will appear:
1 2
Press and hold the control button
for 3 seconds. This will switch the
charger into the IT grid mode.
The charger will restart and perform
the initial self-test.
Updating Your EcoVolter’sFirmware
We continuously develop the EcoVolter portable charger. We recommend you update the
product’sfirmware before you start using it. To do so, simply connect the charger to aWi-Fi network.
The firmware will update automatically.
The color of the connection status LED is magenta during the firmware update.
Please allow for up to aminute for the update to complete.

7
Portable EV Level 2 Smart Charger / User Manual
ENGLISH
Important Note for EVs with Two-Phase Charging
Some electric vehicles use two-phase charging only when used in the three-phase power grid. To make
sure the energy metering function works correctly please select the two-phase charging mode in your
mobile application if you are using the charge for this kind vehicle.
Charging Your EV
Before Charging
1) Park your vehicle within reach of asuitable power outlet. Lay out the cables and place the charger’s
housing in asuitable location away from direct sunlight, sources of heat and excessive pollution.
2) If needed, use an adaptor compatible with the power outlet.
Begin Charging
To begin charging:
1) Check the charger before each use. This will prevent the possibility of electric shock, injury, or
damage.
2) If the charger shows no signs of damage, plug the charger into the power outlet. Wait 5 seconds until
all self-tests have been completed.
3) Select the required charging current if needed.
4) Connect the vehicle connector to your EV.
5) Within moments, the charger will initiate the charging process, and colour of the charging current
LED will go from green to blue.
6) You can change the current on the charger in the mobile application.
7) Once your electric car is fully charged, the vehicle connector remains locked in the vehicle until you
unlock it in the car mobile app or manually in the car.
Connecting to Wi-Fi
To connect your EcoVolter charger to the Internet, please follow the
following steps:
1) Make sure the charger is disconnected from the power outlet.
2) Connect the charger plug to the power outlet.
3) Within 5 seconds of plugging the charger into the power outlet, press
and hold the button on the control unit for 1 second.
4) The charger is now transmitting its own Wi-Fi network under the
name (Charger-xxxxxx).
5) Go to the Wi-Fi settings on your mobile phone and click on the
charger’sWi-Fi (Charger-xxxxxx).
Enter your charger‘s Wi-Fi password. You will find the password on
acard you recevied with your charger.
6) Apop-up window will appear on your mobile phone. Select the „Wi-Fi
configuration“ window in the pop-up window.
7) If apop-up window does not appear automatically enter this IP
address in your web browser: 172.217.28.1.
9) Now your EcoVolter is successfully connected to the Wi-Fi network
and will be accessible through the iXmanager mobile application. (Please see the Using the Mobile
Application chapter)
You can configure up to ten different Wi-Fi networks.
6
5
6
7
1
1
2
2
3
4
1
2
3
4
5
6
7
8
9
10

Function Description Action
Change target charging
current
Set the target charging
current between 6 Aand 16
A(or the maximum current
permitted by the power cable
fixture).
Press the control button to
increase the target charging
current. The LED bar will
indicate the current set.
Switch between single and
three-phase charging
Switch between single-phase
and three-phase charging
mode (this option is only
available in athree-phase
TN-C/TN-Spower grid.)
Before connecting the vehicle
connector press and hold the
control button for 5 seconds.
The LED will 1x once for the
single-phase settings and 3x
times for three phase settings.
Go to Wi-Fi setting mode Select and configure Wi-Fi
networks for the charger
Internet connection
Within 5 seconds after
plugging the into the power
outlet (before the initialization
sequence has completed),
press the control button on
the control unit briefly.
The follow the instructions
in the “Connecting to Wi-Fi”
chapter.
8Portable EV Level 2 Smart Charger / User Manual
ENGLISH
If the charger is connected to asingle-phase grid (e.g. using an adaptor), the charging mode
is automatically set to the single-phase charging.
Operating the Charger from the Control Panel
You can control charging before and during the charging process from the charger’scontrol panel.
The following functions are accessible on the control panel:
Note: Never attempt to remove the vehicle connector during charging!
Note: Please observe the maximum rating of your electrical system. Select acharging current below the
maximum power rating of the local electrical system. This will reduce the risk of an incidental interruption
of the main circuit breaker. If several electric vehicles are charging at the same time please make sure the
total charging current of all vehicles does not exceed the maximum power rating of the electrical system.

Set target
charging current
The charging indicator LED bar shows
the charging current set.
Single-phase
/ three-phase
charging
Single-phase: LED does briefly dark 1x
every 5 seconds
Three-phase: LED goes briefly dark 3x
every 5 seconds
Wi-Fi connection
status
Waiting for Wi-Fi connection - continual
white color
Connected to Wi-Fi - continual blue color
Wi-Fi
configuration
mode
Wi-Fi configuration - pulsing white
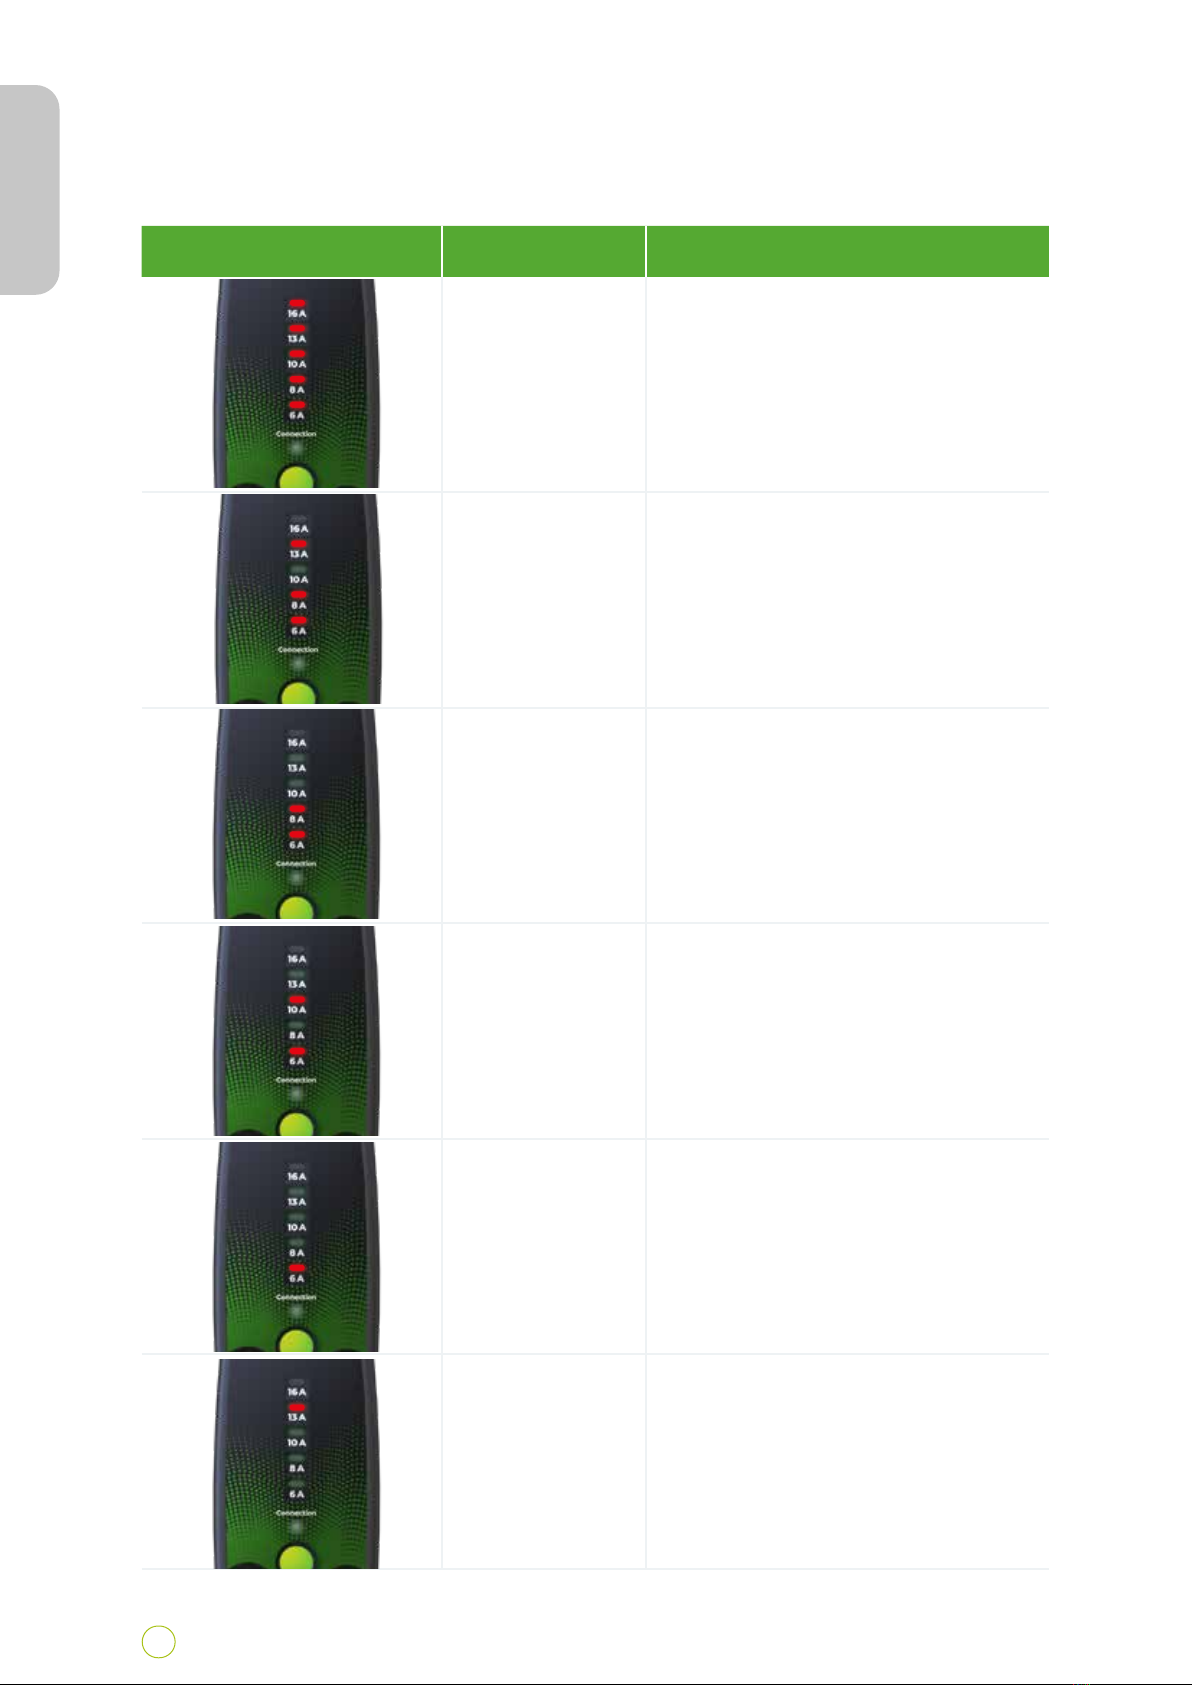
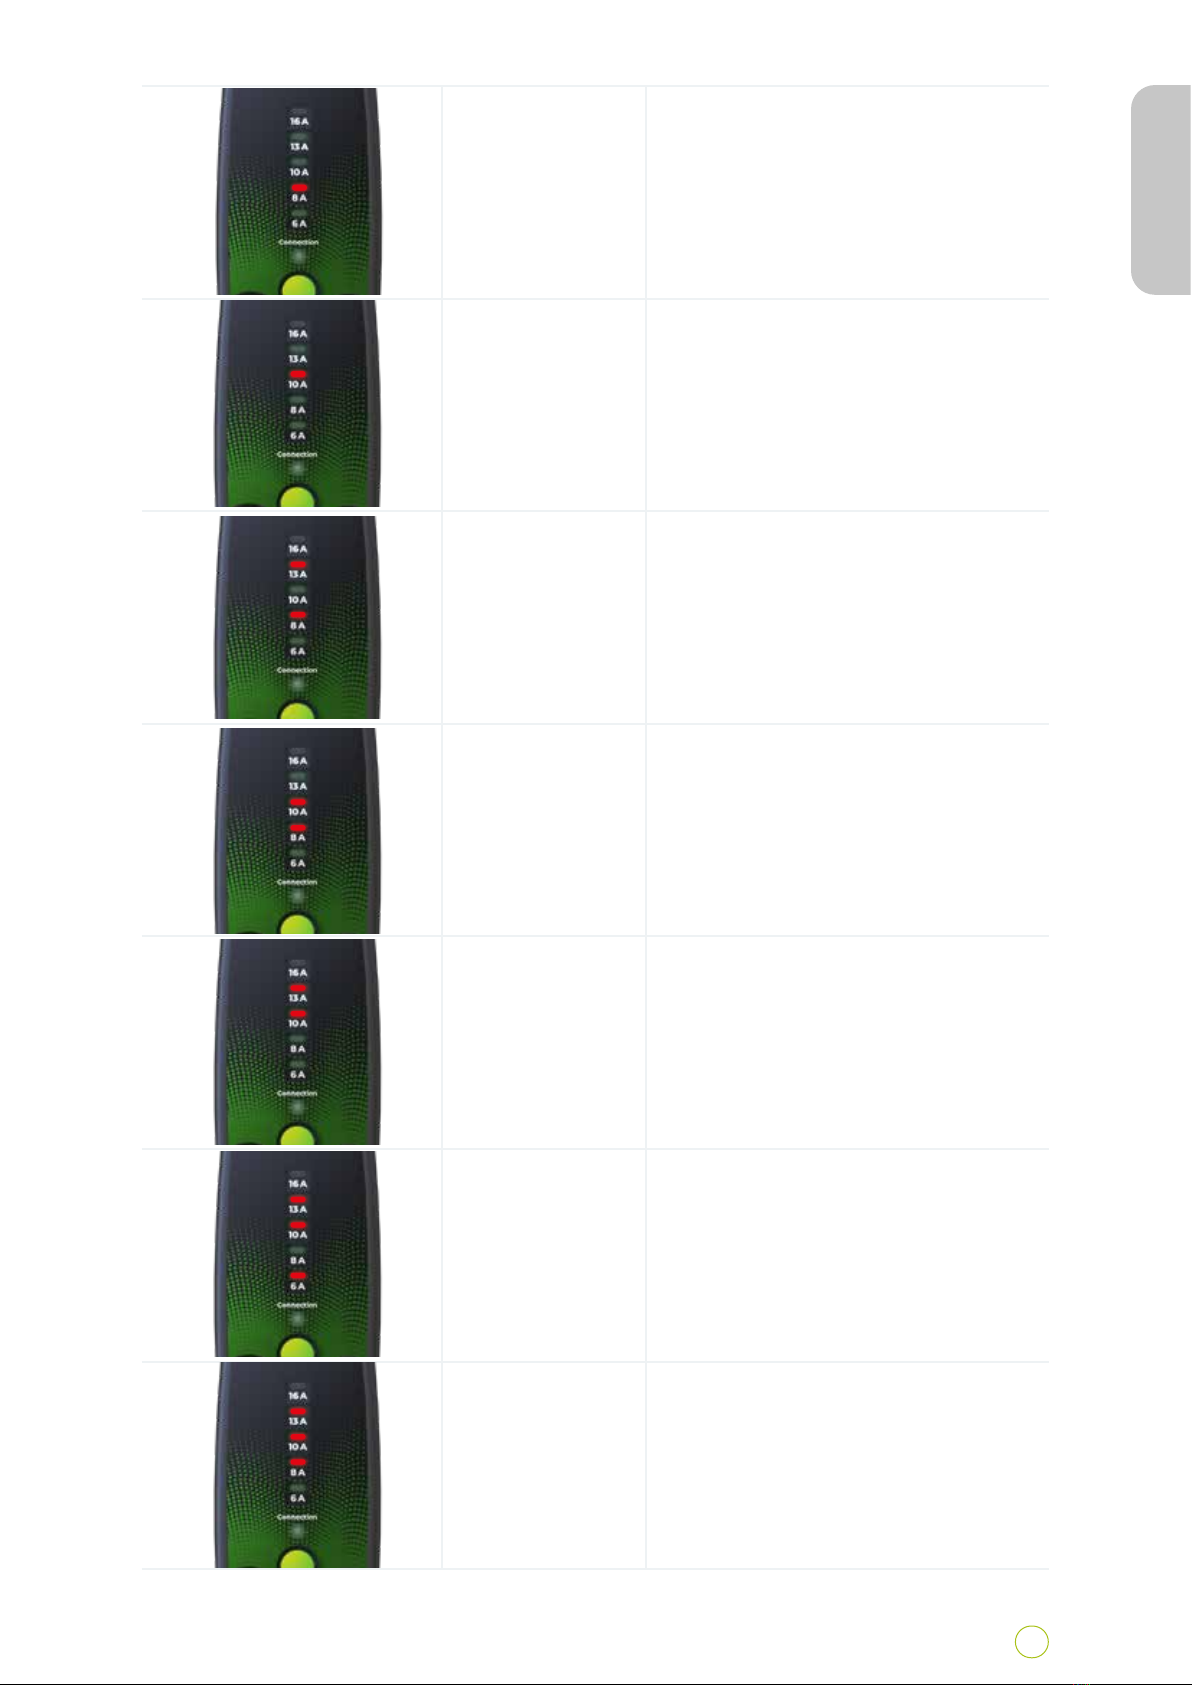
LEDs Description Note
Initial self-test Self-test progres is indicated by LED
lights gradually lighting up from 6 Ato
16 A.
During this time, anumber of tests are
performed by the charger to ensure safe
charging.
The LED bar color indicates the charger
grid mode
White: TN grid mode
Magenta: IT grid mode
9
Portable EV Level 2 Smart Charger / User Manual
ENGLISH
LED Indicators on the Control Panel
During charging, the control panel LEDs show the following states:
Network type
recognition failed
The initial recognition of the power grid
type has failed.
Disconnect the charger from the power
outlet.
If the problem persists, please have the
power outlet checked by a qualified
professional.
N-lead test failed No or a faulty N-lead connection.
Disconnect the charger from the power
outlet.
If the problem persists, please have the
power outlet checked by a qualified
professional.
RCD self-test
failed
RCD initialization or test failed.
Disconnect the charger from the power
outlet.
If the problem persists, please have the
power outlet checked by a qualified
professional.
Diode check
failed
On-board vehicle charging system or
vehicle connection error.
Disconnect the charger from the vehicle.
If the problem persists, have your vehicle
checked.
Control pilot self-
test failed
The vehicle communication signal test
has failed.
Disconnect the charger from the vehicle.
If the problem persists, have the vehicle
connection checked.
LEDs Error Note
Ground fault No or a faulty PE-lead connection.
Disconnect the charger from the power
outlet. If you are using the charger in the
IT grid type please follow instructions
in chapter 6 - Important - Using the
Charger in an IT Grid System. Oherwise
please have the power outlet checked by
a qualified professional.
Control Panel Error Indication
If the charger detects an error, it is indicated by the charging indication LED bar.
10 Portable EV Level 2 Smart Charger / User Manual
ENGLISH
Current leakage
detected
AC or DC current leakage detected.
Disconnect the charger from the vehicle.
If the problem persists, have your vehicle
checked.If the problem persists, have
your vehicle checked.
Relay break
contact error
Output voltage detected while the relay
coil is off.
Disconnect the charger from the from
the power outlet.
If the problem persists, return the
product to the distributor.
Relay make
contact error
No output voltage detected while the
relay coil is on.
Disconnect the charger from the vehicle.
If the problem persists, return the
product to the distributor.
High temperature
error
The main control unit temperature has
exceeded the maximum limit.
Let the main control unit cool.
Place the main control unit out of reach
of sources of excessive heat.
Overvoltage error The supply voltage has exceeded the
maximum limit.
The error will disappear automatically
once correct supply voltage has been
resumed for at least 30 seconds.
Undervoltage
error
The supply voltage has dropped below
the minimum limit.
The error will disappear automatically
once correct supply voltage has been
resumed for at least 30 seconds.
Vehicle connector
overheating error
The main control unit temperature has
exceeded the maximum limit.
Let the vehicle connector cool or
reconnect the vehicle connector.
The error will disappear automatically
once the temperature has dropped
below the limit.
11
Portable EV Level 2 Smart Charger / User Manual
ENGLISH
12 Portable EV Level 2 Smart Charger / User Manual
ENGLISH
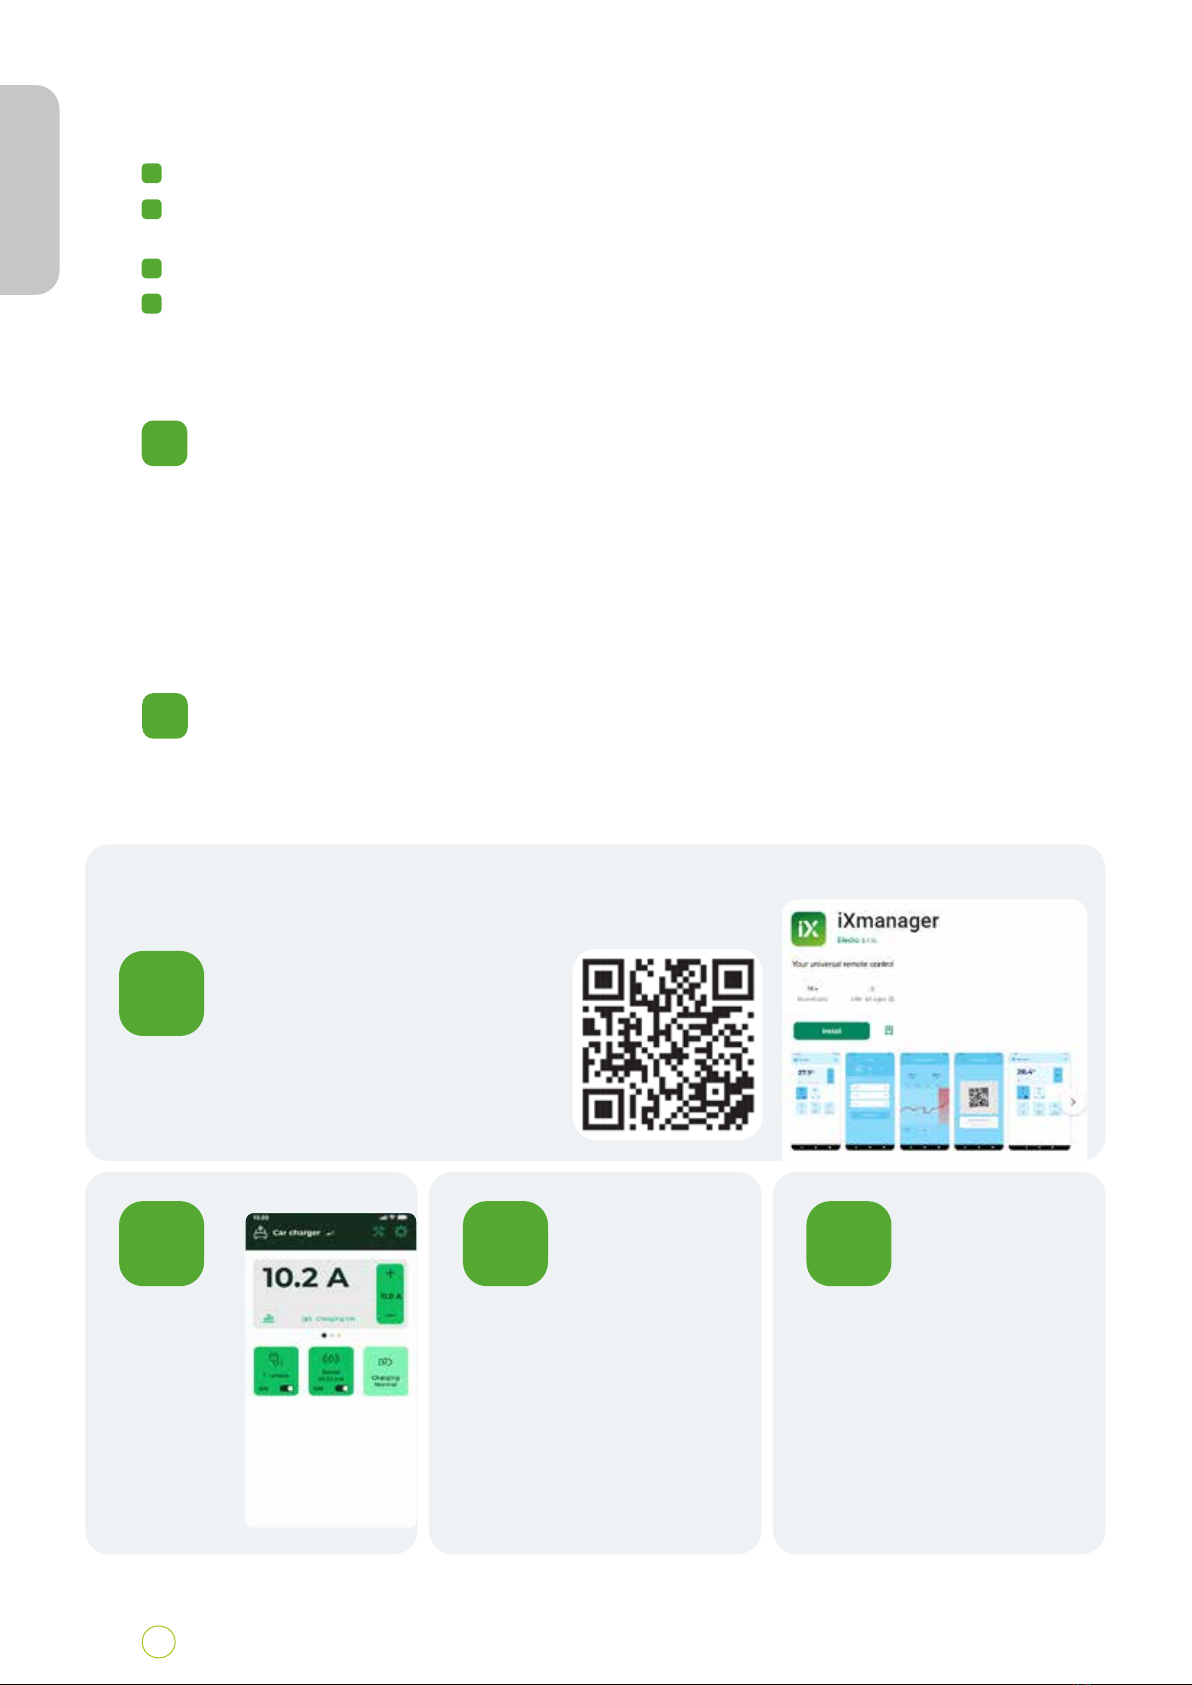
Using the iXmanager Mobile Application
You can control the EcoVolter charger when it is connected to the Wi-Fi via the iXmanager mobile
application.
Scan the following QR code with
your phone or search for the
iXmanager application in Google
Play or the Apple Store.
You can use your email and
password or log in with your
Google, Apple, or Facebook
account.
You can assign your charger
in the application by scanning
the barcode on the back of the
control unit.
You will be asked to give
aname to your charger.
Install the
iXmanager
application.
Create auser account Assign your charger in the
application
Installing and Setting up the iXmanager
Mobile Application
1.
2. 3. 4.
8
Troubleshooting
If the charging process terminates unexpectedly, please check the vehicle’son-board system for
possible overheating. In case of overheating, disconnect the vehicle connector and allow it to cool.
If the problem occurs repeatedly, check the power outlet connection, the vehicle connection, or contact
the seller.
If there is aproblem with the charger indicated by the control panel, disconnect it and take the
necessary corrective measures.
7
Ending Charging
To complete charging your EV:
1) The charging process will stop automatically once your car is fully charged.
2) If you wish to interrupt the charging process before the car is fully charged please stop charging in the
vehicle application or in the charger mobile application.
3) Once the charging process has been stopped you can safely disconnect the vehicle connector from the EV.
4) As the last step, unplug the mains plug from the power outlet.
Note: Termination of the charging from the mobile application may not work correctly with all models of
electric vehicles. Some vehicles may show an error when the charging is terminated by the charger.
1
2
3
4

It you are the charger administrator and you
want to grant access to the charger to someone
else, tap this settings icon.
Tap the charger
settlings icon.
Tap the sharing
settings icon.
The user will receive an email invitation.
You can ant time later remove the user‘saccess.
You can also transfer the administrator
role to another user by selecting „Transfer
administrator role“.
Charger Administrator
The user who first assigns the charger to the application becomes the charger administrator. The
administrator can set access to the charger for other users.
Inviting other users
If as an administrator you want to allow someone else to control the charger, you can give them access.
However, these new users cannot further give access to anyone else. Only the administrator has that.
Select „Invite
another user“.
13
Portable EV Level 2 Smart Charger / User Manual
ENGLISH

Boost mode The charge temporarily increases the charging current to the set
boost charging current for a set period of time.
1-phase mode Allows to force the charger to the single phase charging mode
before starting charging.
Remaining boost time Indicated time remaining till the end of the boost mode.
Maximum charging current Maximum current permitted in the normal mode and in the
boost mode.
Boost charging current Changing current used in the boost mode.
Boost time Total duration of the boost mode in minutes
Vehicle charging mode Set this parameter to „2-phase“ if your vehicle allows one or two
phase charging only.
14 Portable EV Level 2 Smart Charger / User Manual
ENGLISH
Using the iXfield Web Application
The iXfield web application enables advanced settings of the charger. To access the application please
enter www.ixfield.com in your web browser. Use the same login credentials you used for the iXmanager
mobile application.
Charger Controls
Charger Settings
Product Warranty
The warranty period is two years form the date of purchasing the product. During this time, the product
is guaranteed to be free of errors and malfunctions. Defective products are either repaired or replaced
by the manufacturer.
Please present any proof of purchase when submitting awarranty claim.
The warranty does not cover any defects caused by improper use contrary to the instructions in this user
manual, by tampering with the product, or by visible external damage to the product.
9

Model number Type 2 - 3x16A / 11kW
Manufacturer EVCH420RE1001VC20
Product type Mode 2 charging device, in-cable control and protection devices
(IC-CPD)
Housing material Flame retardant polyacrylate, black
Housing dimensions 245 x 91 x 47 mm (main unit)
Net weight 2800 g
Dimension incl. packaging 420 x 395 x 120 mm
Gross weight incl. packaging 3300 g
Nominal voltage 240 / 400 VAC
Nominal current 16 A
Nominal power 11 kW
Self power consumption 5 W
Residual current protection RCD DC 6 mA, AC 30 mA, with initial self-test
Vehicle connection Type 2 (IEC 62196-2), cable length 6.5m, 10m depending on
product version
Mains connection CEE 5p / 16A (IEC 60309)
Operating temperature -25 to +45 °C
Charging current may be reduced at temperatures over +45 °C
Storage temperature -30 to +60 °C
IP protection degree IP 67 (housing), IP44 (main power plug and vehicle connector)
Applicable standards SAE J1772, IEC 62752, IEC 62196, 61851-Mode2, 62196-1 and IEC
61851-1, EMC, RoHS, ETSI EN 300 328 V2.1.1
Data connectivity Wi-Fi 802.11b
15
Portable EV Level 2 Smart Charger / User Manual
ENGLISH
Technical Specifications
Product Disposal
This product cannot be disposed of as normal household waste. When disposing of this product, please
follow the European environmental standard 2012/19/EU that defines the correct disposal of electronic waste.
Separate the packaging and electrical parts by type of material prior to disposal. Dispose of the paper
packaging separately in apaper recycling receptacle.
Dispose of the other parts of the product at an authorized waste disposal and recycling facility. Please take
note of the applicable regulations.
10
11

Wi-Fi-Konnektivität, mobile App
Booster-Modus
Ladehistory mit interner
Echtzeituhr
Ladeplanmodus
Gemeinsame Verwendung des
Mehrbenutzerzugriffs
16 Tragbares EV Level 2 Smart-Ladegerät / Benutzerhandbuch
DEUTSCH
Vielen Dank dafür, dass Sie sich für unser tragbares EcoVolter- Ladegerät entschieden haben. In diesem
Benutzerhandbuch sind wichtige Informationen über das Produkt aufgelistet. Bitte lesen Sie diese
Bedienungsanleitung, bevor Sie Ihr tragbares EcoVolter-Ladegerät verwenden.
Halten Sie bitte an die in diesem Dokument aufgeführten Anweisungen sorgfältig ein. Eine
Nichteinhaltung der in dieser Bedienungsanleitung aufgeführten Anweisungen kann Feuer, einen
elektrischen Stromschlag, schwere Verletzungen oder Tod nach sich ziehen und bringt das Erlöschen
unserer Produktgarantie herbei.
Produktmerkmale
Beim EcoVolter handelt es sich um ein ans Stromnetz angeschlossenes Ladegerät. Es ermöglicht etliche
erweiterte Funktionen.
Bitte überprüfen Sie den Paketinhalt sorgfältig, bevor Sie weitere Schritte unternehmen.
Tragbares Ladegerät Benutzerhan
Automatische Netztyperkennung
RCD DC 6 mA, AC/DC 30 mA
mit Selbsttest
Erweiterte Sicherheits- und
Schutzfunktionen
API-Support
Stromverbrauchsm essung
Symbolerklärung
Dieses Symbol gibt an, dass das Produkt den Anforderungen seitens entsprechender
Produktrichtlinien des Europäischen Wirtschaftsraums entspricht.
Dieses Symbol gibt an, dass das Produkt den Anforderungen der EU-Richtlinie
Herzlich willkommen
Paketinhalt
+ +
++
+
+
+
+
+
+
1
2

17 Tragbares EV Level 2 Smart-Ladegerät / Benutzerhandbuch
DEUTSCH
Wichtiger Hinweis
Dieses Ladegerät ist ausschließlich zum Aufladen von den Normen IEC 62196-1 und IEC 61851-1 entsprechenden
Elektrofahrzeugen bestimmt, wobei mit einem Netzstecker vom Typ 2 und Typ 1 aufgeladen wird. Verwenden Sie
dieses Produkt für keinerlei andere Zwecke als zum Aufladen kompatibler Elektrofahrzeuge.
Verwenden Sie das Ladegerät nicht, sofern es beschädigt aussieht, oder wenn die LED einen Fehler anzeigt.
Machen Sie sich vor dem Gebrauch mit dem Bedienpanel des Ladegeräts sowie dessen Funktionen vertraut.
Verwenden Sie das Ladegerät lediglich in Verbindung mit Steckeradaptern, die speziell für dieses Produkt
entwickelt wurden.
Ladegerät im Falle einer Steckdose, welche den geltenden Vorschriften und Normen nicht entspricht, nicht
verwenden
Gewährleisten Sie stets, dass das Ladegerät an eine ordnungsgemäß geerdete Steckdose mitsamt passender
Stromstärke angeschlossen ist.
Unternehmen Sie niemals Versuche, das Produkt oder dessen Bestandteile zu zerlegen, Modifizierungen oder
Reparaturen vorzunehmen. Verwenden Sie das Produkt nicht, sofern es Fehlfunktionen aufweist, sondern wenden
Sie sich an den Verkäufer.
Trennen Sie das Ladegerät während des Ladevorgangs niemals vom Stromnetz, d.h. Nehmen Sie es nicht aus der
Steckdose oder aus dem Elektrofahrzeug. Dies könnte Verletzungen oder Defekte nach sich ziehen.
Sorgen Sie stets dafür, dass die Kabel des tragbaren Ladegeräts entwirrt und auch nicht von Gegenständen
bedeckt sind, welche den üblichen Luftstrom bzw. die Kühlung während des Ladevorgangs blockieren könnten.
Verwenden Sie in Verbindung mit dem Ladegerät keine Verlängerungskabel.
Sorgen Sie stets dafür, dass das Gehäuse des Ladegeräts von keinerlei Gegenständen abgedeckt wird, welche den
üblichen Luftstrom bzw. die Kühlung während des Ladevorgangs behindern könnten.
Setzen Sie weder das Ladegerät noch dessen Teile rauen äußeren Bedingungen wie übermäßigem Schmutz,
starkem Regen oder Schnee aus.
Bewahren Sie das Ladegerät sowie alle seine Teile in sauberem und trockenem Zustand. Verwenden Sie im
Bedarfsfall ein trockenes bzw. ein teilweise angefeuchtetes Tuch, um die Oberfläche zu reinigen.
Setzen Sie das Gehäuse des Ladegeräts während des Ladevorgangs keiner direkten Sonneneinstrahlung oder einer
Wärmequelle aus. Dies kann Überhitzungen oder Fehlfunktionen nach sich ziehen.
Berühren Sie die Klemmen niemals mit Ihren Händen oder jedweden Gegenständen bzw. Werkzeugen.
Kindern sowie weiteren unbefugten Personen ist der Umgang mit dem Ladegerät oder seinem Zubehör untersagt.
Ein unsachgemäßer Umgang mit dem Ladegerät kann einen elektrischen Stromschlag, Brand, schwere oder gar
tödliche Verletzungen nach sich ziehen.
Weder der Hersteller noch der Wiederverkäufer des Produkts übernehmen jedwede Haftung für Schäden, welche
in Folge einer unsachgemäßen Verwendung des Produkts entstehen.
Das Ladegerät verfügt über eine Leistungsmessfunktion. Bei diesen Energiemesswerten handelt es sich jedoch
um Richtwerte, die nicht für Energieabrechnungszwecke verwendet den sollten.
Hauptteile des Ladegerätes
Zentrales Steuergerät
Fahrzeugstecker Typ 2
mit 6m langem Kabel
Netzstecker (CEE 5P/16A) mit
einem 0,4m langem Kabel
3
!
!
!
!
!
!
!
!
!
!
!
!
!
!
!
!
!
18
Tragbares EV Level 2 Smart-Ladegerät / Benutzerhandbuch
DEUTSCH
Funktionen
Der EcoVolter ist zum Aufladen von Elektrofahrzeugen mittels eines 240-V- bzw.
400-V-Niederspannungsnetzes konzipiert. Das Ladegerät beinhaltet sowohl eine tragbare Mode-3-
Ladestation und ein Mode-2-Ladekabel.
Das Ladegerät erkennt automatisch die Stromnetzart und passt seine Lade- und Schutzfunktionen
dementsprechend an. Nachdem der Netzstecker an die ihm entsprechende Steckdose angeschlossen
ist, werden etliche Selbsttests durchgeführt, wobei das Gerät nach deren Abschluss bereit ist, den
Ladevorgang zu starten.
Userseits kann der Ladestrom von 6 A bis 16 A oder den maximal vom steckerseitig zugelassenen Strom
eingestellt werden.
User können ebenfalls zwischen einem einphasigen sowie einem dreiphasigen Lademodus schalten,
während das Ladegerät über das Ladegerätbedienfeld an ein dreiphasiges Stromnetz angeschlossen ist.
Mittels der mobilen App stehen weitere Features zur Verfügung.
Der Fahrzeugaufladestecker bleibt während des Ladevorgangs sowie nach einer Unterbrechung
verriegelt.
Um den Netzstecker zu entriegeln, muss der Ladevorgang über die mobile Fahrzeugapp oder das
Bedienfeld angehalten werden.
Vor dem Verwendungsbeginn
Schalttafel
Ladeanzeige LED-Balken
(Ladestatus, Fehler)
Verbindungsstatus-LED
(Status Wi-Fi-Verbindung)
Steuertaste
Wichtig - Verwendung des Ladegeräts in einem IT-Grid-System
Europäisches TN-Grid-Standardsystem
Bestandteil der Stromnetze ist eine Schutzerdung (PE-Leiter). Werkseits ist der EchoCharge auf den TN-
Netzmodus eingestellt. Das TN-Netzsystem verwendet man in den allermeisten europäischen Ländern.
Das Ladegerät überprüft im TN-Netzmodus, ob der Anschluss des Schutzleiters (PE) ordnungsgemäß
ist und signalisiert im Falle einer Fehlfunktion den Fehler „Ground Fault“ (Erdungsfehler) an.
Den Rest dieses Kapitels können Sie ignorieren, wenn Sie nicht beabsichtigen, das Ladegerät in
Norwegen zu verwenden.
4
5

19 Tragbares EV Level 2 Smart-Ladegerät / Benutzerhandbuch
DEUTSCH
Das spezielle norwegische IT-Grid-System
Im Falle von Arbeiten im isolierten IT-Netzsystem, das es in Norwegen gibt, funktioniert die
Schutzerdungsprüfung nicht. Daher muss das Ladegerät hier manuell in den IT-Netzmodus
geschaltet und die Schutzerdungsprüfung im IT-Netzsystem deaktiviert werden, damit das Ladegerät
ordnungsgemäß funktioniert.
Wechsel am Ladegerät zwischen dem Modus TN Grid und IT Grid (Norwegen)
Sofern Sie das Ladegerät an eine IT-Netzsteckdose anschließen, während es auf den Standard-TN-
Netzmodus eingestellt ist. In einem solchen Falle erscheint der Fehler „Grund Fault“ (Erdungsfehler). Sie
können nun mit dem Ladegerät in den IT-Netzmodus wechseln.
Zurücksetzen des Ladegeräts in den Standard-TN-Netz-Modus
Das Ladegerät bleibt im IT-Netzmodus, bis Sie es an ein TN-Netz mitsamt einer Schutzerdung (PE-
Leiter) angeschlossen ist. Sofern das Ladegerät an ein ordnungsgemäß funktionierendes TN-Netz
angeschlossen wird, wechselt es automatisch in den TN-Netzsystemmodus.
Es wird der „Grund Fault“ (Erdungsfehler)
angezeigt:
1 2
Halten Sie die Steuerungstaste 3 Sekunden
lang gedrückt. Somit wird das mit dem
Ladegerät in den IT-Netzmodus wechseln.
Das Ladegerät startet neu und führt den
anfänglichen Selbsttest durch.
Aktualisieren der Firmware Ihres EcoVolter-Gerätes
Wir arbeiten ein einer kontinuierlichen Weiterentwicklung des tragbaren EcoVolter-Ladegerätes.
Wir empfehlen es Ihnen, die Produkt-Firmware zu aktualisieren, bevor Sie es verwenden.
Um dies durchzuführen, schließen Sie das Ladegerät schlichtweg an ein Wi-Fi-Netz an. Die
Firmwareaktualisierung erfolgt automatisch.
Die Verbindungsstatus-LED-Leuchte leuchtet während des Firmware-Updates magentafarbig. Bitte
warten Sie bis zu einer Minute, bis die Aktualisierung abgeschlossen sein wird.

20
Tragbares EV Level 2 Smart-Ladegerät / Benutzerhandbuch
DEUTSCH
Wichtiger Hinweis für Elektrofahrzeuge mit Zweiphasen-Aufladesystem
Einige Elektrofahrzeuge bedienen sich des zweiphasigen Aufladens lediglich, sofern sie im dreiphasigen
Stromnetz verwendet werden. Damit sichergestellt wird, dass die Energiemessfunktion korrekt
funktioniert, wählen Sie bitte in Ihrer Handyapp den zweiphasigen Lademodus an, sofern Sie das
Aufladen für ein solches Fahrzeug verwenden.
Aufladen Ihres Elektrofahrzeugs
Vor dem Aufladen
Parken Sie Ihr Fahrzeug in Reichweite einer geeigneten Steckdose. Verlegen Sie die Kabel und
platzieren Sie das Gehäuse des Ladegeräts an einem geeigneten Ort, wo es weder direkter
Sonneneinstrahlung, Wärmequellen oder einer übermäßigen Verschmutzungsquelle ausgesetzt ist.
Benutzen Sie im Bedarfsfall einen mit der Steckdose kompatiblen Adapter.
Starten des Ladevorgangs
So starten Sie den Ladevorgang:
Das Ladegerät ist vor jedem Gebrauch zu überprüfen. Hierdurch wird beugen wir eventuellen
Stromschlägen, Verletzungen oder Schäden vor.
Sofern das Ladegerät keine Beschädigungsanzeichen aufweist, stecken Sie den Netzstecker in eine
Steckdose hinein. Warten Sie 5 Sekunden, bis alle Selbsttests abgeschlossen sein werden.
Wählen Sie im Bedarfsfalle den erforderlichen Ladestrom aus.
Verbinden Sie den Fahrzeugstecker mit Ihrem Elektrofahrzeug.
Binnen weniger Augenblicke leitet das Ladegerät den Ladevorgang ein und die Farbe der
Ladestrom-LED wechselt von grün auf blau.
In der Handyapp können den am Ladegerät befindlichen Strom ändern.
Sobald Ihr Elektroauto vollends aufgeladen sein wird, bleibt der Fahrzeugstecker im Fahrzeug
verriegelt, bis Sie ihn in der Car Mobile App oder manuell im Fahrzeug selbst wieder entriegeln.
Verbinden mit einem WLAN Netz
Damit Sie Ihr EcoVolter-Ladegerät ans Internet anschließen, gehen Sie bitte
wie folgt vor:
Vergewissern Sie sich, dass das Ladegerät von der Steckdose getrennt ist.
Verbinden Sie den Ladegerätstecker mit der Steckdose.
Halten Sie binnen 5 Sekunden nach dem Einstecken des Ladegeräts in
die Steckdose die Taste auf dem Steuergerät 1 Sekunde lang gedrückt.
Das Ladegerät überträgt sodann sein eigenes WLAN-Netzwerk unter
dem Namen (Charger-xxxxxx).
Gehen Sie zu den WLAN-Einstellungen Ihres Handys und klicken Sie auf
das WLAN des Ladegeräts (Charger-xxxxxx).
Geben Sie das WLAN-Passwort Ihres Ladegeräts ein. Das Passwort
finden Sie auf der Karte, welche Sie gemeinsam mit Ihrem Ladegerät
erhalten haben.
Auf Ihrem Handy erscheint ein Pop-up-Fenster. Wählen Sie im Pop-up-
Fenster die Auswahlmöglichkeit „WLAN-Konfiguration“ aus.
Sollte das ein Pop-up-Fenster nicht automatisch erscheinen, geben Sie
die nachstehend aufgeführte IP-Adresse in Ihren Webbrowser ein: 172.217.28.1.
Nun ist Ihr EcoVolter erfolgreich mit dem WLAN-Netz verbunden und wird mittels der Handyapp
iXmanager verfügbar sein. (Bitte lesen Sie das Kapitel Verwendung der Handyapp)
Sie können bis zu zehn verschiedene WLAN-Netze konfigurieren.
6
5
6
7
1
1
2
2
3
4
1
2
3
4
5
6
7
8
9
10
This manual suits for next models
1
Table of contents
Languages:
Popular Automobile Batteries Charger manuals by other brands

Redarc
Redarc BCDC1225 instruction manual

CRAIG & DERRICOTT
CRAIG & DERRICOTT SMART ION CHARGE EV03221000 Installation & maintenance

Chicago Electric
Chicago Electric 96157 Operation instructions

Motorola
Motorola MT146 owner's manual

Telwin
Telwin Touring 11 instruction manual

Stanley
Stanley TGC11 instruction manual


