Vynco E1V2 Operation instructions

E1V2 EV Charger
User Operating Manual
WWW.VYNCO.CO.NZ


3
WWW.VYNCO.CO.NZ
CONTENTS PAGE
Dimensions 4
Carton Contents 4
Operating Instructions 5
Charging Safety Precautions 7
Maintenance 8
Troubleshooting 9
Technical Specications 10
Servicing, Replacement Parts and Warranty 11
TABLE OF CONTENTS

WWW.VYNCO.CO.NZ
4
211 mm 122 mm
LED Status Indicator
Type 2 Socket
345 mm
Emergency
Stop Button
DIMENSIONS
Front View Side View
The following parts should be inside the carton:
• E1V2 charger
• Black metal mounting plate
• Installation manual
• User operating manual
• Installation screws
If any of the parts are missing or damaged, contact your supplier or Vynco for assistance
before installing the charger.
CARTON CONTENTS

5
WWW.VYNCO.CO.NZ
OPERATING INSTRUCTIONS
To start charging your electric vehicle
1. Check the charger is powered. The LED should be blue.
2. Plug the charging lead into your electric vehicle.
Always plug in charging lead into the vehicle rst.
3. Plug the charging lead into the charger.
4. Check the LED display.
Check if the charger has turned green and is ashing. Check that the status display on
the vehicle shows charging.
Follow the vehicle manufacturer’s instructions to start the vehicle charging. Some vehicles
require the doors to be locked or a charging button to be pressed before the charging will
start. For most electric vehicles the charging will start automatically after 20 seconds.
LED STATE CHARGER STATUS
BLUE Power Available
GREEN FLASHING Charging (Normal Operation)
RED FLASHING Fault or Stop Button pressed in

WWW.VYNCO.CO.NZ
6
To stop charging your electric vehicle
1. Check that the charger is still charging or has nished charging.
If LED is ashing green – vehicle is still charging. The charging can be stopped if required.
If LED is blue – vehicle has nished charging and the battery should be at 100%.
2. Remove the charging lead from the vehicle.
Follow the vehicle manufacturer’s instructions to remove the charging lead.
Some vehicles require the doors to be unlocked or a charging button to be pressed before
the lead can be unlocked and removed.
3. Remove the charging lead from the charger.
If the plug cannot be easily removed from the charger push the plug in rmly and then try to
remove the plug again. If the plug will still not come out – push in the red stop button on the
side and then try to remove the plug again.
4. Check that the LED status on the charger has turned blue.
The charger is now ready to charge another vehicle. The plug must be removed from the
charger each time before you charge a vehicle. This resets the safety protocols built in
to the charger. If the LED status is Red – check that the Red Stop Button is out. Twist to
release if pushed in.
OPERATING INSTRUCTIONS
PRESS

7
WWW.VYNCO.CO.NZ
CHARGING SAFETY PRECAUTIONS
Familiarise yourself with these instructions and the charging instructions for the
electric vehicle before using this charger.
• Be careful that the charging leads are not left anywhere where they can get damaged,
driven over or create a trip hazard.
• Leave the charging lead in the vehicle or coiled up around the charger when charging is
completed.
• Always remove the charging lead from the vehicle rst then the charger.
• Do not modify or alter the charger or charging lead in any way.
• Do not use with any extension or adaptor lead.
• Do not join two or more charging leads together.
• Do not use if the charger or charging lead shows signs of damage.
• Only use this charger to charge electric vehicles.
• Do not use to charge or power any other device.
• Do not open up the charger without isolating the power. Caution: Electric shock danger.

WWW.VYNCO.CO.NZ
8
MAINTENANCE
The E1V2 electric vehicle charger has been designed to operate under normal working
conditions and usually does not require any special maintenance during its lifetime.
Vynco recommends the following checks to ensure the long term operation of the
charger and safety of the users.
INTERVAL MAINTENANCE ACTION
At every charge
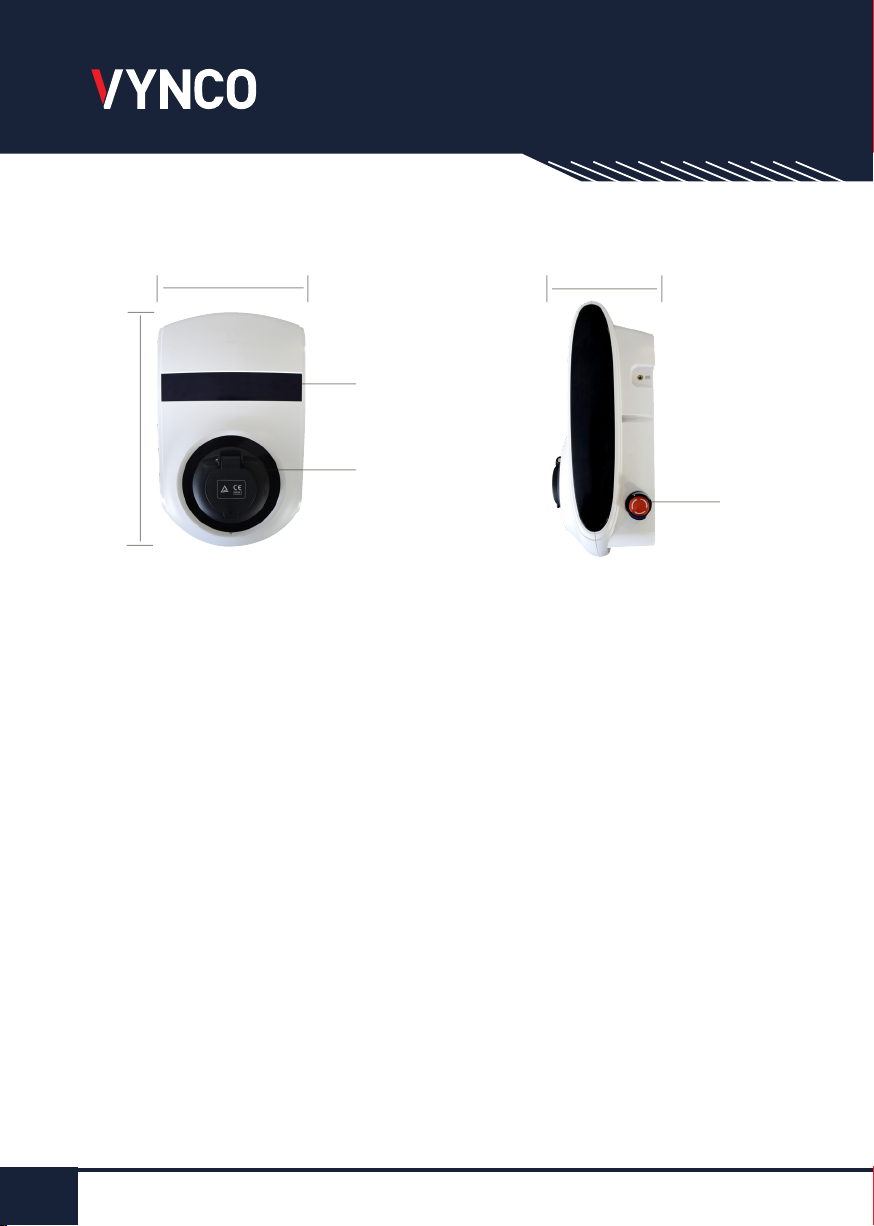
Visual check that the housing is not
damaged, cracked or broken.
If the housing is damaged,
contact your installer for a
safety check before using.
Check that the blue LED light is on.
Check that the power is on to
the charger
- Isolator is turned on.
- Check that the MCB and
RCCB at the switchboard are
both on (levers up).
Every 6 months
Clean the charger with a damp cloth
(not wet) to remove any dirt, grime
and cob-webs.
Do not use cleaning agents or
solvents to clean the
charger as these may
damage the plastic housing.
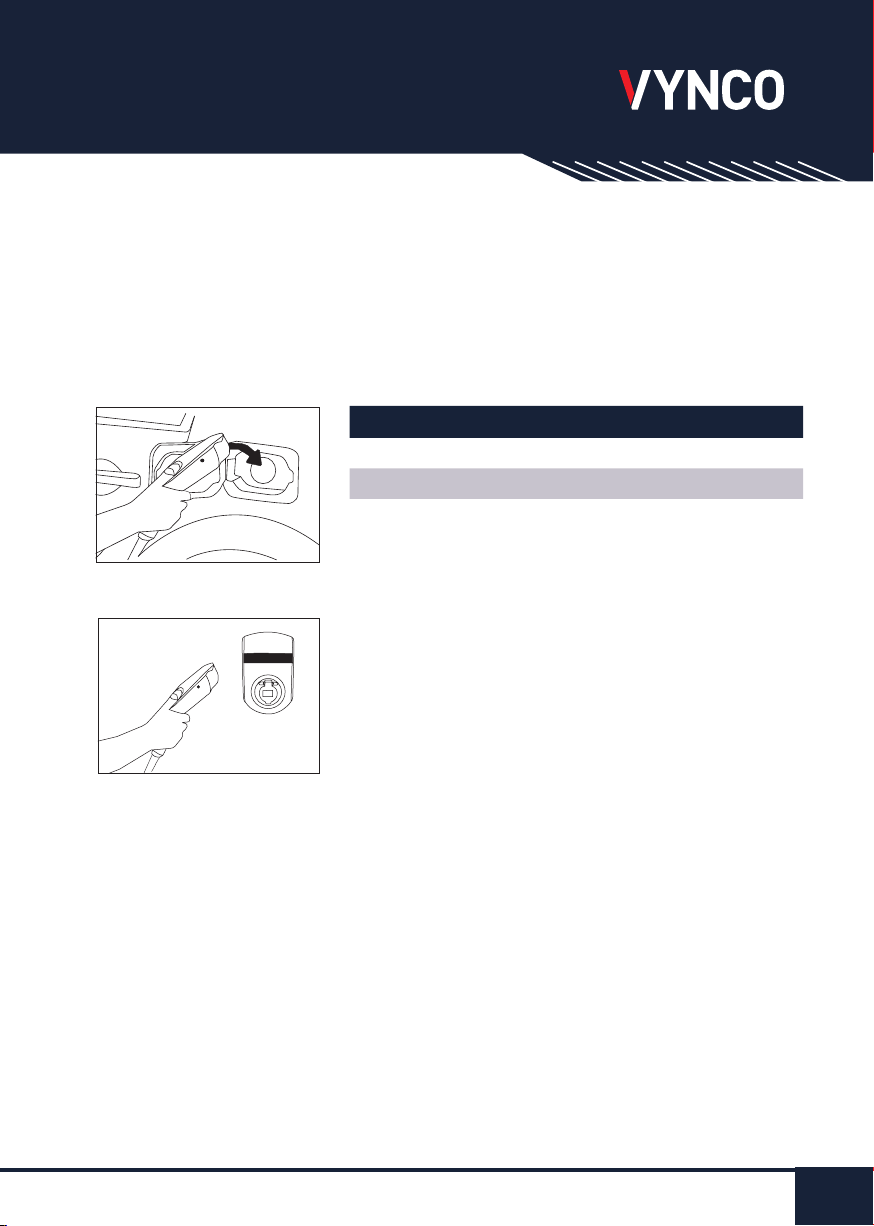
Press the red stop button on the side
and check that the RED Light comes
on and ashes. Twist to release the
Stop Button after testing.
Do not use the charger if the
red light does not come on.
Contact your installer for a
safety check.
Yearly
Press the test button on the RCCB at
the switchboard.
The RCCB should trip and
disconnect the power to the
Charger.
DO-NOT use the charger if the
RCCB does not trip. Contact
your installer for a safety
check.
Commercial installations may require
that the charger is tested and tagged
every 12 months.
See the Worksafe NZ EV
Charging Safety Guidelines
for details or contact your
Installer.

9
WWW.VYNCO.CO.NZ
TROUBLESHOOTING
ERROR CAUSE SOLUTION
No LED lights on display No power available Check if the MCB and RCCB at
the switchboard is ON or Isolator
is turned ON.
Flashing Red Display
Emergency Stop button
pushed in
Twist stop button to release.
Faulty charging cable Use another cable to check
charger.
Earth fault in car or lead Contact your installer.
Flashing Green Display Vehicle Charging
Normal operation during
charging – no action required.
Blue Display Power available
Vehicle not charging
Power not on Check LED display is on and turn
power on if required.
Plug tted incorrectly Ensure plug is pushed in to
Charger.
Connector tted incorrectly Ensure connector is pushed in to
the vehicle inlet.
Vehicle not detecting plug Always plug into vehicle rst then
charger.
Vehicle charging system not
turned on
Check vehicle manual for
charging instructions – lock
vehicle doors or push charging
button on vehicle.
Fault in charging cable Try another cable, check cable
and plugs for damage.
Charging cable cannot
be removed from
charger or vehicle
Interlocks in vehicle and
charger engaged
Turn vehicle charging button off
or unlock vehicle if required.
Always unplug vehicle rst then
charger.
Charging takes a while
to start
Charger checking the safety
systems before charging. This
check can take 20 secs
Normal operation.
Charging will start after 20 secs
when safety checks are complete.
Charging won’t start
after a previous use
Charger not detecting the lead
and vehicle
Unplug the lead from the charger
and plug in again to reset.
Always plug in vehicle rst then
charger.

WWW.VYNCO.CO.NZ
10
TECHNICAL SPECIFICATIONS - E1V2
Electrical
Ratings
Rated Input Voltage 230V a.c. +- 10% - Single Phase
Frequency 50Hz
Maximum Power 7.4kW
Rated Current 32A maximum (permanent connection)
Standby Power <6W
Electrical
Protection
RCCB Protection None supplied – Type B RCCB
required to be tted at the
switchboard
RCCB - minimum 32A – 2 Pole.
Additional Internal Protection Under/Over Voltage, Short Circuit,
Under/Over Temperature,
Phase Protection
Equipment Protection Class Class 1
Environmental
Ratings
Suitable For Use Indoors or Outdoors.
Restricted access location
Protection Rating IP54
Working Temperature Range -30°C to +55°C
Working Humidity 5% to 95% without condensation
Maximum Elevation <2000 Metres
Average Mean Time Before Failure
(MTBF)
100,000 operations
Overall Dimensions 211mm x 345mm x 122mm
(L x W x D)
Installation Surface, wall or post mount
(post not provided)
Weight < 4.0kgs
Operational Ratings
Activation method Plug in and charging starts
automatically after 20 seconds
Emergency Disconnection Emergency Stop Button
LED Status Indication Blue – Power Available.
Green Flashing – Charging.
Red Flashing – Fault.
Charging Method Mode 3
Compliance Electrical Standards complying to IEC 61851-1:2017,
IEC 61851-23 (Mode 3)
Supplier Declaration of Conformity (SDoC) Available from - www.vynco.co.nz
Instructions Installation and Operating
instructions.
Available from - www.vynco.co.nz
Installation and Operating Instructions available from www.vynco.co.nz

11
WWW.VYNCO.CO.NZ
Warranty:
This product is covered by the standard 3 year Vynco Warranty - proof of purchase is required.
Please contact Vynco for details of returns procedure.
Servicing:
The E1V2 Electric Vehicle Charger does not contain any user serviceable parts. If your charger
stops working or has broken parts contact your installer or Vynco for assistance.
Replacement Parts:
Only Vynco supplied replacement parts can be used to repair this electric vehicle charger.
Contact your installer or Vynco for assistance.
SERVICING, REPLACEMENT PARTS & WARRANTY
All contents and diagrams contained in this manual are copyrighted and are not to be reproduced
in any form without written permission of Vynco Industries Ltd.

Christchurch Ofce
388-396 Tuam Street, Phillipstown, Christchurch 8011
PO Box 9022, Tower Junction, Christchurch 8149
P (+64) 3 379 9283 F (+64) 3 379 6838
Auckland Ofce
9 Levene Place, Mt Wellington, Auckland 1061
PO Box 12 249, Penrose, Auckland 1642
P (+64) 9 525 6051 F (+64) 9 525 5799
INSV0039 V1
Other manuals for E1V2
1
Table of contents
Popular Automobile Batteries Charger manuals by other brands

POD Point
POD Point Solo 3 install guide

Spelsberg
Spelsberg Wallbox Pure product manual

ULTIMATE SPEED
ULTIMATE SPEED ULG 3.8 B1 operating instructions

ULTIMATE SPEED
ULTIMATE SPEED ULGD 10 A1 Translation of the original instructions

DieHard
DieHard 200.7123 owner's manual

DEFA
DEFA Power 715000 installation manual