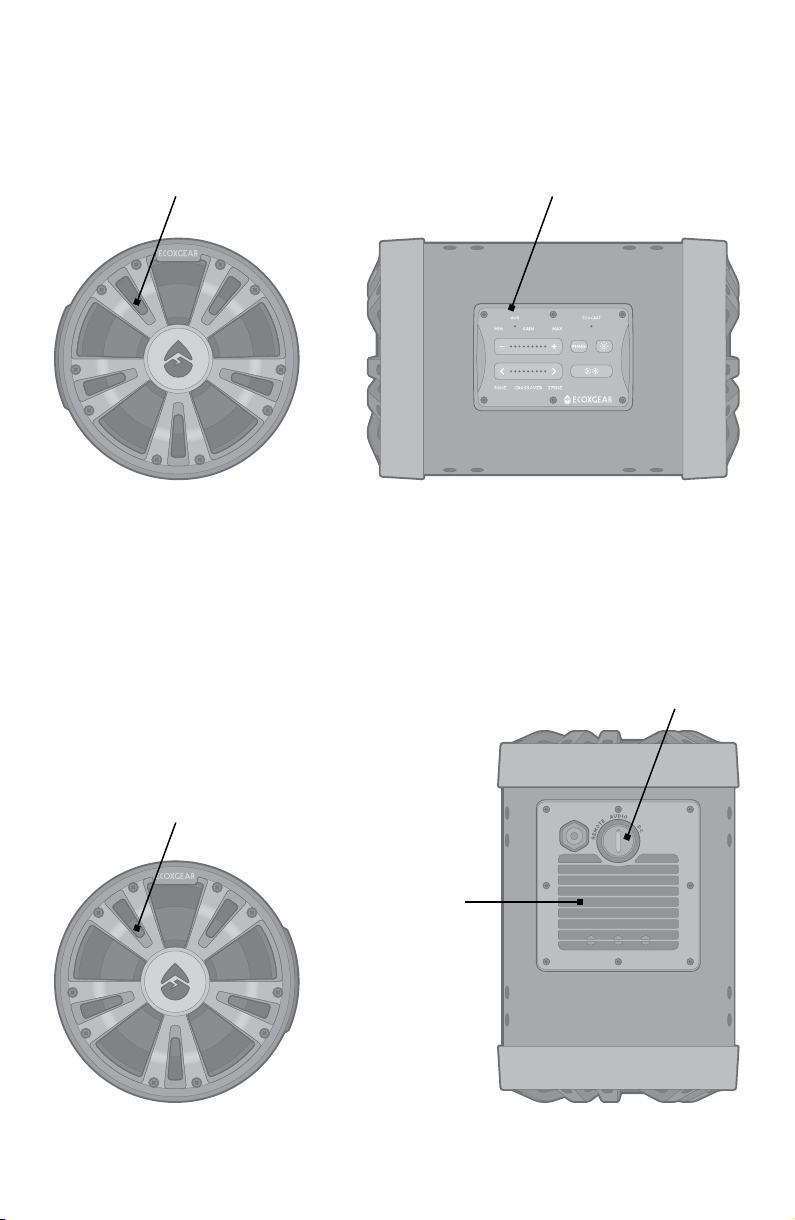
EcoxGear Extreme Sub ES08 User manual

1
Extreme Sub ES08
Models: GDI-EXESW800...20
POWERSPORTS + GOLF CARS + MARINE
SUBWOOFER
User Guide

2
Extreme Sub Layout
BACK
RIGHT SIDE
LEFT SIDE
FRONT
Control Panel
Auto-Turn-On Switch
Backlit Subwoofer (Passive)
Backlit Subwoofer
Heat Sink

3
In/Out Connections
Do NOT use these connections if they are wet.
Aux-In / Sub-In Jack: If you do not want to connect the Extreme
Sub wirelessly via EcoCast or want to connect it to a non-ECOXGEAR
amplifier or speaker, you can connect the subwoofer using this input
and the supplied 3.5mm Audio Cable. Connect it to any brand of stereo,
amplifier, or soundbar’s wired subwoofer-out or line-out.
Remote Gain Level Control Jack: This input can be connected to the
supplied Remote Gain Level Controller, which allows for easy adjustment
of the Extreme Sub’s overall output.
Remote Turn-On Jack: This input can be used to turn on or turn off the
Extreme Sub by another device. When the Auto-Turn-On Switch is turned
to “Remote,” a 12VDC signal will turn on the Extreme Sub. A (Dark Blue)
Remote Turn-On Cable has been provided for your convenience.
12V Power-In Connector: This connector is used to connect to an external
12VDC power supply, with a minimum of a 30A current rating, via the
supplied 6.6ft Power Cable (EC5, female).
Aux-In / Sub-In
Jack (Black)
Remote Gain Level Control
Jack (Green)
Remote Turn-On
Jack (Dark Blue)
12VDC Power-In
Connector (EC5, Male)

4
Connecting to 12VDC
Power Supply
The Extreme Sub does not have an internal battery. It must be connected
to an external 12VDC power supply to function. Before you connect the
Extreme Sub to a battery or a voltage regulator on a golf cart, a boat, a
quad bike, a UTV, or another vehicle, you need to confirm the following:
1. Your vehicle battery or battery pack’s terminal voltage is 12VDC.
2. Your vehicle battery or battery pack can supply a 30A current rating to
the Extreme Sub.
If both an Extreme Sub and an ECOXGEAR SoundExtreme soundbar are
connected to the same battery or battery pack, it requires a 40A current
rating supply. So, before connecting to the vehicle’s power supply, please
check your vehicle’s electrical specifications, or consult with the vehicle’s
manufacturer or distributor.
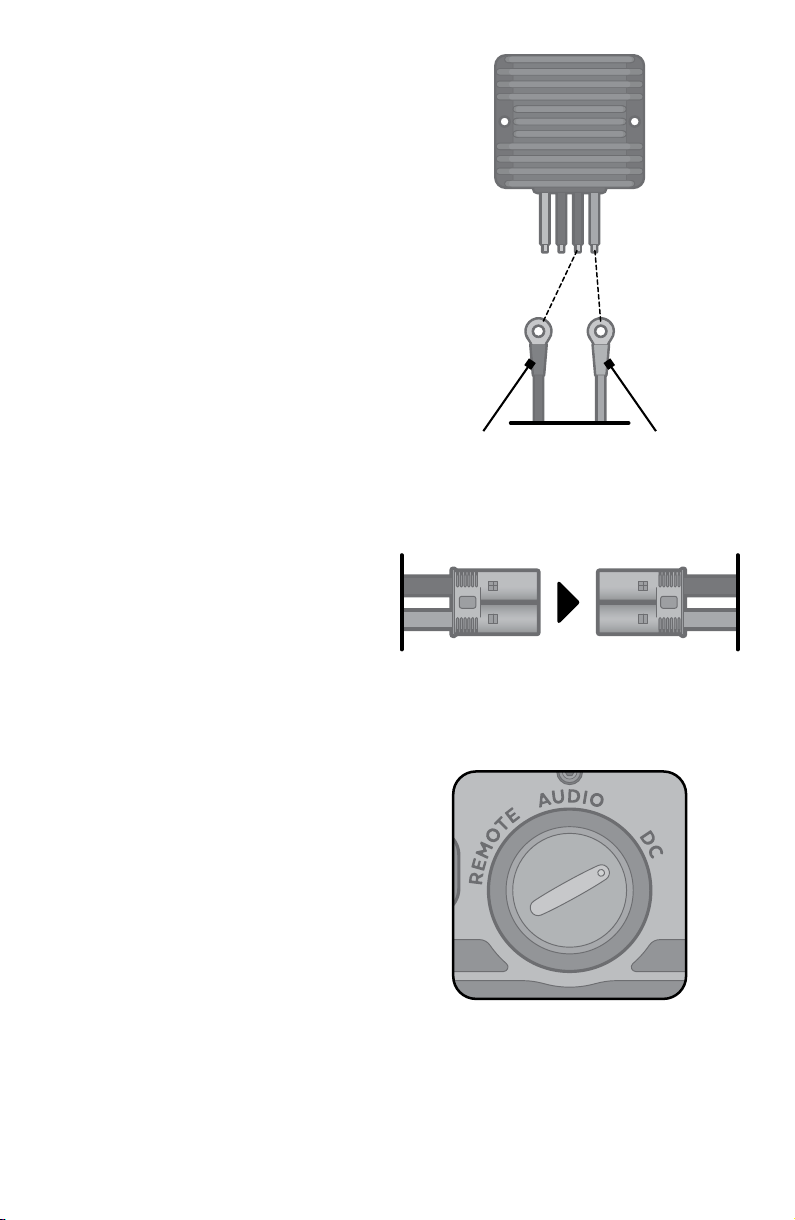
If the battery terminal voltage is not 12V, it requires a DC-DC converter with
output 12V and 30A or 40A rating, as explained above.
Connecting the Extreme Sub to a non-12VDC power source will lead to a
malfunction or damage to the subwoofer.
On electric vehicles, a DC-DC converter is required to avoid damage to the
unit and the vehicle.
The accessory power output on the SoundExtreme soundbar (sold
separately) does not have enough current capacity to supply the Extreme
Sub. Do NOT connect the Extreme Sub Power-In Connector to the
SoundExtreme accessory power output.
WARNING: In certain power modes, the
Extreme Sub will still draw power when it
is off. To avoid battery drain, connect the
supplied Remote Turn-On Cable (Dark Blue)
to a power on/off switch or disconnect the
subwoofer from the power source when
storing for long periods of time.
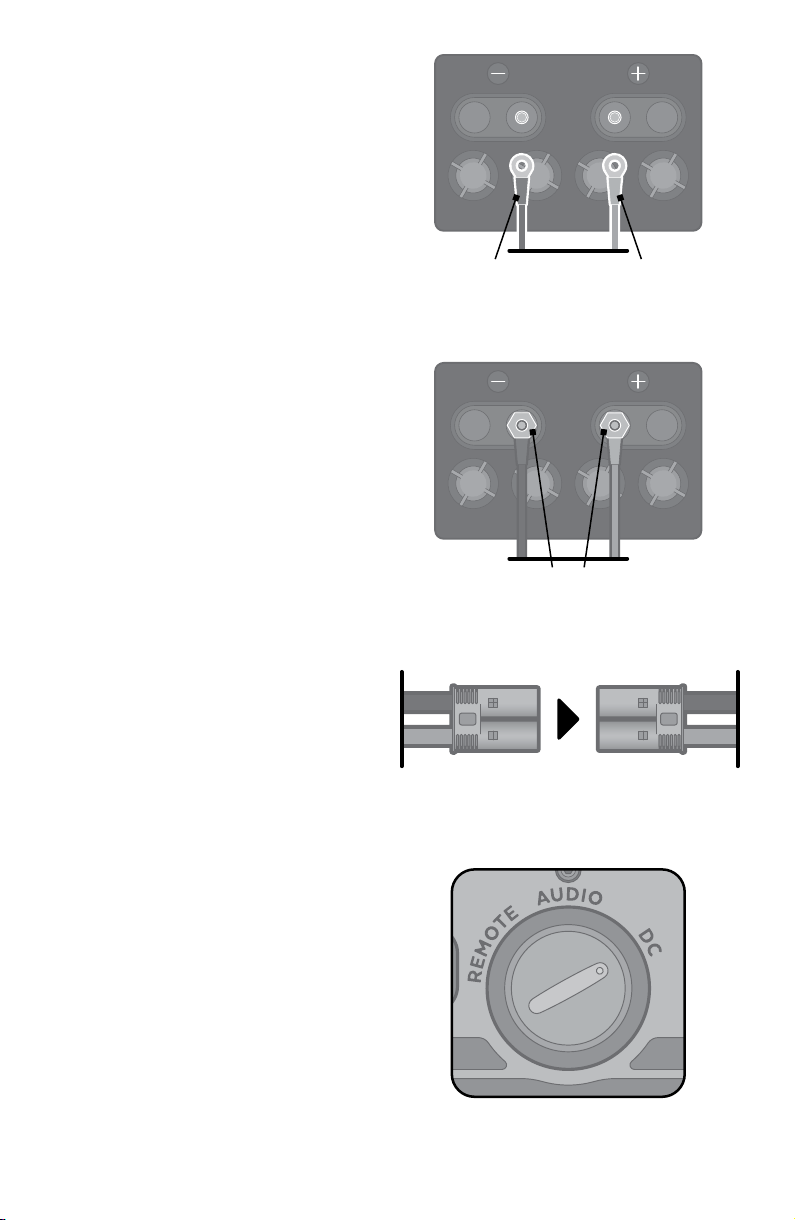
Installation: Gas Vehicle
1. Loosen the nuts on the battery terminals. Loosen Nuts

5
Black Cable Red Cable
Tighten Nuts
Turn Auto-Turn-On
Switch to DC
Use Caution: Do NOT attempt
to loosen nuts if battery is wet.
Contact may cause electric shock
and injury if wet.
2. Connect the BLACK wire to the
BLACK, negative terminal.
3. Connect the RED wire to the
RED, positive terminal. Unit
will not work correctly and may
be damaged if wires are not
correctly attached.
4. Tighten the nuts on the battery
terminals until the connectors
are held firmly in place.
5. Connect the (EC5) female
connector on the 6.6ft Power
Cable to the (EC5) male 12VDC
Power-In Connector.
Use Caution: Do NOT connect
to 12V Battery if the 6.6ft Power
Cable or the (EC5) Power-In
Connector are wet. Contact may
cause electric shock and injury if
wet.
6. Turn the Auto-Turn-On Switch
toward, “DC” in order to turn
on the subwoofer.
Tip: Use zip ties to gather
any excess wires, and secure
them so that they are not
dangling, loosely.
EC5, MaleEC5, Female

6
Black Cable Red Cable
Turn Auto-Turn-On
Switch to DC
EC5, MaleEC5, Female
Installation: Electric Vehicle
1. Switch your vehicle to
TOW mode.
2. Wire the BLACK wire on the
Extreme Sub power cable to
the GROUND on output of the
DC-DC Converter.
3. Wire the RED wire on the
Extreme Sub to the POSITIVE
(+) post on the output of the
DC-DC converter. Unit will
not work correctly and may
be damaged if wires are not
correctly attached.
5. Connect the (EC5) female
connector on the 6.6ft Power
Cable to the (EC5) male 12VDC
Power-In Connector.
Use Caution: Do NOT connect
to DC-DC converter if the
6.6ft Power Cable or the (EC5)
Power-In Connector are wet.
Contact may cause electric
shock and injury if wet.
4. Turn the Auto-Turn-On
Switch toward, “DC” in order
to turn on the subwoofer.
Tip: Use zip ties to gather
any excess wires, and secure
them so that they are not
dangling, loosely.

7
Controls
1. LED Indicators: Each of the 2 LEDs correspond to different functions:
AUX, Phase, and EcoCast Receiving.
2. Phase Button: Press this button to toggle the Extreme Sub sound
output from in phase to out of phase. If the AUX LED flashes Green
3 times, the sound output is in phase. If the AUX LED flashes Red 3
times, the sound output is out of phase.
3. EcoCast Button: When turned on, the Extreme Sub enters EcoCast
Receiving Mode. If it is not paired with a SoundExtreme, press this
button to put the Extreme Sub into Pairing Mode.
4. Party Lights Button: Press to cycle through the following 12 Party
Light Modes: Red, Orange, Yellow, Green, Cyan, Blue, Purple, White,
Music Sync, FADE7, JUMP7, Color Fade. Press and hold to turn off the
Party Lights.
5. Gain Control Buttons: Press to increase or decrease the gain level of
the Extreme Sub. The Gain Controls allow you to change the relative
value of the Extreme Sub compared to the SoundExtreme.
6. Crossover Control Buttons: Press to decrease or increase the frequency
range of the Extreme Sub. Reducing the Crossover Frequency will result
in the Extreme Sub performing solely as a low frequency subwoofer.
7. Auto-Turn-On Switch: Turn the switch to select one of three modes:
Remote, Audio, and DC.
CONTROL
PANEL
AUTO-TURN-
ON SWITCH
2 3
4
5
6
1
7

8
Operations
Auto-Turn-On Switch
Turn the Auto-Turn-On Switch to select one
of three modes: Remote, Audio, and DC.
Remote: When the switch is turned to this
position, the (Dark Blue) Remote Turn-On
Cable must be connected to the vehicle
ignition switch or the vehicle’s 12VDC power
supply. When the vehicle’s ignition is on or
the Remote Turn-On Cable has a 12VDC
signal, the Extreme Sub will turn on.
Audio: When the switch is turned to this position, the Aux-In / Sub-In
Jack must have an Aux-In audio input connection from a soundbar, an
amplifier, or stereo receivers. The Extreme Sub will turn on only when there
is an audio signal input.
DC: When the switch is turned to this position, the Extreme Sub will turn
on whenever there is a 12VDC power supply.
LED Indicators
There are two LED Indicators at the top of the Control Panel. The left LED
Indicator corresponds to AUX and Phase, and the right LED Indicator
corresponds to EcoCast Receiving.
1. AUX
Solid Blue: When an Aux-In cable is plugged in
Phase - Sound Output
When the Phase Button has been pressed, the AUX LED flashes 3
times to indicate if the Extreme Sub sound output is in or out of phase.
Flashing Green: Sound output is in phase
Flashing Red: Sound output is out of phase
2. ECOCAST
Flashing Green: EcoCast Receiving Mode - Pairing
Solid Green: EcoCast Receiving Mode - Paired

9
Phase Button
Press PHASE briefly to toggle the Extreme Sub sound output from in
phase to out of phase. If the AUX LED flashes Green 3 times, the sound
output is in phase. If the AUX LED flashes Red 3 times, the sound output
is out of phase.
Note: Pairing multiple subwoofers, depending on their location to one
another, can result in the subwoofers sounding out of phase with each
other and a reduction in their overall, perceived volume output. Toggle
the PHASE button to determine which setting provides the optimal
bass performance.
Adjust Gain
Press briefly to reduce the gain. Press briefly to increase the gain.
The LEDs between the Gain Control Buttons indicate the gain level. When
increased, the LEDs will light up, towards the right. When decreased, the
LEDs will turn off, towards the left.
Notes:
· When you adjust the volume level on your connected ECOXGEAR
SoundExtreme soundbar, the volume level will adjust automatically
on the Extreme Sub. The gain controls allow you to change the relative
value of the subwoofer compared to the soundbar.
· The Gain Control Buttons control the sensitivity of the amplifier built
into the subwoofer. You will want to optimize the gain level of the
subwoofer depending on the type of music you enjoy as well as the
location of the Extreme Sub.
Adjust Crossover
Press briefly to reduce the frequency range that the amplifier sends to
the subwoofer. Press briefly to increase the frequency range.
The LEDs between the Crossover Control Buttons indicate the frequency
level. When increased, the LEDs will light up, towards the right. When
decreased, the LEDs will turn off, towards the left.

10
Notes:
· When the crossover frequency is set to 275Hz, you receive the full
range of the Extreme Sub’s capability. This allows it to play low woofer
frequencies, not just subwoofer frequencies, to produce a more full
sound profile when paired with ECOXGEAR SoundExtreme soundbars.
· When the crossover frequency is reduced down to 50Hz, the Extreme
sub will perform solely as a low-frequency subwoofer.
Party Lights
Press briefly to cycle through 12 Party Light Modes: Red, Orange,
Yellow, Green, Cyan, Blue, Purple, White, Music Sync, FADE7, JUMP7,
Color Fade.
PRESS AND HOLD to turn off the Party Lights.
EcoCast – Broadcast Your Music
to Multiple Speakers and Extreme Subs
The ECOXGEAR SoundExtreme speaker is designed to be paired with
one or more SoundExtreme speakers and Extreme Subs. You can build
a broadcast system by initiating EcoCast Transmitting Mode in one
SoundExtreme speaker and broadcasting your music to one or more
Extreme Subs and SoundExtreme speakers in EcoCast Receiving Mode.
Note: The Extreme Sub is always in EcoCast Receiving Mode.

11
1. Follow the Pairing a Bluetooth Device instructions in your
SoundExtreme user guide to connect one SoundExtreme (Speaker A)
to your Bluetooth device. After your device is connected to Speaker A,
you can select a song to play.
2. Press on Speaker A to initiate EcoCast Transmitting Mode. The
Mode LED Indicator (the third LED Indicator from the left) will flash
Red, and the speaker will announce, “EcoCast transmitting.”
3. Power on your Extreme Sub (Sub B). It will already be in EcoCast
Receiving Mode. The subwoofer will announce, “EcoCast receiving.”
4. Once the connection between the speakers is successful, Sub B will
announce, “Connection Successful,” and start playing music from your
Bluetooth device.
EcoCast: Additional Receiving Speakers and/or Subwoofers
1. Power on the additional SoundExtreme speaker(s) (Speaker C and
Sub D). Press on Speaker C to cycle through to and initiate
EcoCast Receiving Mode. The Mode LED Indicator will flash Green,
and the speaker(s) will announce, “EcoCast receiving.”
A C
B
D
AB
EcoCast: SoundExtreme to Extreme Sub

12
2. On Speaker A (the speaker with the Mode LED Indicator shining solid
Red), PRESS AND HOLD for 6 seconds. The Mode LED Indicator
will flash Red.
3. Once the connection between the speakers is successful, Speaker C
(and Sub D) will announce, “Connection Successful,” and start playing
music from your Bluetooth device.
Notes:
· If all the speakers are turned off, then turned on, the speaker(s) and
sub(s) in EcoCast Receiving Mode (Speakers and Subs B, C, and D)
will automatically re-connect to the speaker in Transmitting Mode
(Speaker A). If they are not automatically re-connected, please follow
the above steps. To clear pairing records on an Extreme Sub, PRESS
AND HOLD for 6 seconds.
· You can also pair the SoundExtreme with any other ECOXGEAR
speaker bearing the EcoCast symbol .
· The EcoCast functionality is only available while using Bluetooth as
your Audio Source at a maximum range of 30 feet between speakers.
· While connecting the SoundExtreme speakers, make sure that the
speakers are within a few feet of each other.
· If you do not want to connect the subwoofer wirelessly or want
to connect it to a non-ECOXGEAR amplifier or speaker, you can
connect the subwoofer via its Aux-In / Sub-In Jack, using the
supplied 3.5mm Audio Cable.
Aux-In Audio Connection
To use an Aux-In audio source, connect the audio output from the source
unit to the Extreme Sub’s Aux-In / Sub-In Jack with the supplied 3.5
Audio Cable.
Once the 3.5mm Audio Cable is plugged in, the Aux-In LED Indicator will
shine solid Blue.

13
Remote Gain Level Controller
1. Mount the Remote Gain
Level Controller in an
accessible location. Keep
the cable away from
the vehicle’s electrical
wiring to avoid possible
interferences from the
vehicle’s electrical system.
2. Connect the Remote
Gain Level Controller to
the (Green) Remote Gain
Level Control Jack on the
Extreme Sub. The LED on
the Remote Gain Level
Controller will shine solid
Red if the Extreme Sub is
turned on.
3. Turn the knob to adjust
the gain level.
Important: Maintaining Waterproofness
If the caps on the Aux-In,
Remote Gain Level Control,
and Remote Turn-On jacks
are not properly closed, the
unit is NOT waterproof.
To close the Aux-In, Remote
Gain Level Control Connector,
and Remote Turn-On jacks
properly, push firmly to be
sure the cap snaps securely
into place. ClosedOpen

14
Mounting Your Subwoofer
Use Caution:
· The Extreme Sub weighs 17 lbs.
Please use caution when lifting
or handling.
· The Extreme Sub vibrates when
playing heavy bass music at
maximum gain. It is important
to fasten the subwoofer securely
to a flat surface on the vehicle.
Whether mounting the subwoofer
horizontally or vertically, the
supplied Washers and Lock
Washers MUST be used.
· There is a Heat Sink on the back of the
Extreme Sub. For optimal performance,
install the subwoofer so that the Heat
Sink is not in direct sunlight.
Horizontal Mount
1. To mount the subwoofer in
a horizontal orientation, first
attach the Horizontal Mounting
Plate, using eight 29/32” Screws,
Lock Washers, and Washers.
Tighten securely.
2. Ensure that the subwoofer fits
in the desired location and
mark where the mounts will be
attached to your vehicle.
3. Drill holes at the desired
mounting points on your vehicle,
large enough for the provided
Hex Bolts to fit.
x8
x8
x8

15
Optional: Place the Mount Standoffs under both ends of the Mounting
Plate. Use these optional Standoffs when there is not enough clearance
between the Mounting Plate and the vehicle’s mounting surface.
4. Attach the Mounting Plate to your vehicle with the provided ¼-20 Hex
Bolts, Washers, Lock Washers, and Nuts. Tighten securely.
Vertical Mounts
1. To mount the subwoofer in
a vertical orientation, first
attach both Vertical Mounting
Plates to either side of the
subwoofer, using four 29/32”
Screws, Lock Washers, and
Washers on either side.
Tighten securely.
2. Ensure that the subwoofer fits
in the desired location and
mark where the mounts will be
attached to your vehicle.
3. Drill holes at the desired mounting
points on your vehicle, large enough
for the provided Hex Bolts to fit.
4. Attach the Mounting Plates to
your vehicle with the provided
¼-20 Hex Bolts, Washers,
Lock Washers, and Nuts.
Tighten securely.
Note: When the Control Panel
is facing you, the Extreme Sub’s
active subwoofer is on the left
side. Depending on your vehicle,
the active or passive subwoofer
may sound better facing down.
Please listen to the Extreme
Sub oriented both ways before
finalizing the installation.
x4 x4
x8
x8

16
Troubleshooting
No audio and LED indicator are off
Check if there is voltage at Power-In connector or if there is an ignition
signal when the Auto-Turn-On Switch is set to Remote, or if there is an
audio signal input when the Auto-Turn-On Switch is set to Audio.
Poor audio quality
Check if the Gain Level is set properly. Check wires for shorts or grounds.
Check the source signal. Check if the 3.5mm Audio Cable or the Remote
Gain Level Controller cable is close to the vehicle’s electrical wiring.
LED Party Lights for show and off-road use only
Check with local ordinance before using LED lights. Do NOT drive on
public roads with LED lights on. LED lights are not DOT compliant.
Please do NOT attempt to fix your Extreme Sub
Please contact our Customer Support at support@gracedigital.com or
call us at 800.903.9524.
Specifications
Unit Dimensions
9.1 in / 232 mm
8.9 in / 228 mm
13.9 in / 352 mm

17
Unit Weight
16.87 lbs (7.65 kg)
Horizontal Mount Weight
1.5 lbs (0.68 kg)
Vertical Mounts Weight
1.28 lbs (0.64 lbs x2)
0.58 kg (0.29 kg x2)
Bluetooth Compliance
Bluetooth V 5.0
Bluetooth Frequency Band
2.402~2.480GHz ISM Spectrum
Modulation
GFSK, π/4-DQPSK, 8DPSK
Crossover Range
50Hz - 275Hz
Subwoofer
8'' (203.2 mm) subwoofer
Passive Subwoofer
8’’ (203.2 mm) subwoofer
Audio Output Power
500W (peak)
Power Supply
Input Voltage: 12VDC, 30A
(requires connection to external
DC battery for power)
EcoCast
Using Qualcomm® Broadcast
Audio technology
EcoCast Range
30 ft / 9.1 m between Casting
speaker and Receiving speakers
Blade Fuse
30A, 32V
Storage Temperature
-40°F to 122°F / -40°C to 50°C
Operating Temperature
23°F to 95°F / -5°C to 35°C
Waterproof / Dust Rating
IP66
Unit + Horizontal Mount Dimensions
Unit + Vertical Mount Dimensions
Unit + Horizontal Mount +
Mount Standoffs Dimensions
16.1 in / 410 mm
9.7 in / 246 mm
16.1 in / 410 mm
11.7 in / 296 mm
12 in / 306 mm
14.6 in / 371 mm

18
FCC STATEMENT:
This device complies with Part 15 of the FCC Rules. Operation is subject to the following two conditions:
1.) This device may not cause harmful interference, and
2.) This device must accept any interference received, including interference that may cause undesired operation.
WARNING: Changes or modifications not expressly approved by the party responsible for compliance could void the user’s
authority to operate the equipment.
NOTE: To maintain compliance with FCC's RF Exposure guidelines, this equipment should be installed and operated with
minimum distance between 20cm the radiator to your body: Use only the supplied antenna. FCC ID: 2AAUI-GDIEXESW801.
This equipment has been tested and found to comply with the limits for a Class B digital device, pursuant to Part 15 of the
FCC Rules. These limits are designed to provide reasonable protection against harmful interference in a residential installation.
This equipment generates, uses, and can radiate radio frequency energy and, if not installed and used in accordance with the
instructions, may cause harmful interference to radio communications. However, there is no guarantee that interference will
not occur in a particular installation. If this equipment does cause harmful interference to radio or television reception, which
can be determined by turning the equipment off and on, the user is encouraged to try to correct the interference by one or
more of the following measures: reorient or relocate the receiving antenna, increase the separation between the equipment
and receiver, connect the equipment into an outlet on a circuit different from that to which the receiver is connected, consult
the dealer or an experienced radio/TV technician for help.
RF WARNING STATEMENT:
The device has been evaluated to meet general RF exposure requirement. The device can be used in portable exposure
condition without restriction.
IC STATEMENT:
This device complies with Industry Canada licence-exempt RSS standard(s). Operation is subject to the following two conditions:
1.) This device may not cause interference, and
2.) This device must accept any interference, including interference that may cause undesired operation of the device.
PRODUCT USE AND PROTECTION:
Read and follow all instructions. Use only as intended.
The ECOXGEAR subwoofer is intended to be used indoors or outdoors and in land or water environments. The subwoofer has
been tested to IP66 waterproofing standards, which means the subwoofer can be exposed to dust and water, but should not
be submerged underwater. The subwoofer is NOT intended for constant underwater use.
Always make sure the cap(s) / cover(s) are clean, free from sand or debris, and correctly fitted. The subwoofer will only meet
IP66 ratings if all rubber seals, gasket(s) and cover(s) / cap(s) are in place. If you notice a muffling of audio after submersion,
gently shake the unit to clear excess water. If your subwoofer is exposed to salt water, clean it thoroughly after use with fresh
water.
To prevent fire or shock, do NOT attempt to power this unit if it is wet or you suspect water has entered the unit. In this
situation, please return the unit to Grace Digital for a free assessment. If we have found that the unit has carried water, we will
repair or replace the unit free of charge.
SAFETY ADVISORY & WARNING:
Read and follow all instructions. Use only as intended.
CAUTION: Do NOT open to repair. A qualified technician must carry out repair work.
ATTENTION: Do NOT connect to a 12VDC power supply while the unit is wet. Make sure all connections are dry
BEFORE connecting to a power source. Failure to do so may result in electrical damage to the unit
and may void the warranty.
WARNING: Cancer and Reproductive Harm - www.P65Warnings.ca.gov
WARNING: Danger of explosion if battery is incorrectly replaced.
ATTENTION: Do NOT dispose of in a landfill. Contact Grace Digital at www.gracesupport.com or a certified recycling
agent to dispose of the unit.
SAFETY:
This product has a limited life span of use and should be replaced when it shows obvious signs of wear.
Do not modify or remove any original component parts of the subwoofer. Doing so could cause damage to the unit, allowing
water to ingress. A unit with water ingress should not be charged due to potential risk of fire or shock.
Please exercise care and good judgment when using your ECOXGEAR subwoofer. Audio levels should be appropriate to your
environment, comply with all local regulations, and always ensure that you can hear and be aware of any potential hazards
around you.
You should always
1.) Use the ECOXGEAR subwoofer in accordance with any music or noise rules and regulations.
2.) Properly seal the ECOXGEAR prior and after each use when in humid or water environments to avoid water damage to the
internal components. Salt water / air is particularly corrosive. Always make sure that the gaskets are sealed when in a salt
water environment and that the unit is properly rinsed off after use.

19
3.) Properly clean the ECOXGEAR and ensure the gaskets have no sand, dirt, or water on them prior to storage.
4.) Store your unit with all caps properly sealed to avoid long term internal moisture damage inside your unit.
5.) Return the ECOXGEAR to Grace Digital if you suspect water ingress into the unit or if the unit has experienced a severe
impact that may have affected the integrity of the unit to take on water.
You should never
1.) Never power your ECOXGEAR if you suspect water has entered the device. Powering a device with water inside could be
potentially hazardous and cause fire or a spark.
2.) Never use your ECOXGEAR if you have dropped it or thrown it against a hard surface which may have destroyed the
integrity of the subwoofer, housing, or gaskets. In the event of a severe impact to your unit, please return the unit to Grace
Digital to review for potential damage.
3.) Never open the auxiliary doors in a water environment. This could cause water to ingress into the unit which could
potentially be hazardous and cause a fire or a spark.
4.) Never connect a device to the auxiliary input jacks when in a water environment. The auxiliary jacks should only be used in
a dry environment.
5.)Never attempt to fix, repair your ECOXGEAR unit. Please send it back to Grace Digital for any assessments and repairs.
CARE, MAINTENANCE & PRECAUTIONS:
1.) The unit is waterproof only when the caps and door are properly closed.
2.) Close the caps and door properly before use. If the unit is placed in a water environment without the caps or door properly
closed, water may enter into the unit and void your warranty.
3.) Dry unit completely before opening the caps. Do NOT open the caps if wet or in a wet environment.
4.) Do NOT apply excessive force to any surfaces of the unit when wet or in a wet environment.
5.) Do NOT use or store the unit in places with high temperature.
6.) AVOID prolonged exposure to ultraviolet radiation (UV sunlight) and strong magnetic fields.
7.) Periodically check the rubber seal on the caps and door for premature wear.
8.) Periodically clean the rubber with a soft moist cloth and ensure no objects such as dirt, hair, sand are on the rubber seal
ring. Do NOT use any oily solvent or chemicals for cleaning.
9.) Rinse off the unit with tap water after use in salt water.
10.) Power the unit by attaching the 12VDC Power-In Connector (EC5, male) to the 6.6ft Power Cable (EC5, female) intended
for use with the unit. The unit must be connected to a 12VDC, 30A rating power source. If the battery terminal voltage is
not 12V, you will need a DC–DC converter with output 12V. Connecting the unit to a non-12VDC power source will lead to a
malfunction or damage to the unit.
LIMITED MANUFACTURER’S WARRANTY:
Extreme Sub is covered by a 1-year limited warranty that covers defects in workmanship and / or materials for a period of
1 year from original purchase date. This warranty does not apply to any products which have been abused, neglected, modified
or used for a purpose other than the one for which they were manufactured. Please refer to the above care and maintenance
instructions for suggested care details. The warranty is valid only for the original owner who purchases the unit from an
authorized dealer. Transfers do not qualify for warranty protection. Grace Digital reserves the right to replace any out-of-stock
or discontinued product with a comparable product. Discontinued products may not be available for warranty replacement.
Any contents are NOT covered by the limited manufacturer’s warranty. Warranty terms may be revised without notification at
the discretion of the manufacturer. Please visit www.ecoxgear.com for additional product & warranty information.
Extreme Sub ES08 by ECOXGEAR, a division of Grace Digital Inc., San Diego, California.
Designed in California. Made in China.
Patents pending.

20
What’s in the Box
Extreme Sub
Subwoofer
(8pcs) ¼-20 stainless steal Hex
Bolts – 3.5˝ long
(8pcs) ¼-20 stainless steal Hex
Bolts – 3˝ long
Extreme Sub
User Guide
Remote Gain
Level Controller
6.6ft Power Cable - EC5, Female
6.6ft Remote Turn-On
Cable - Dark Blue
(8pcs) 10-24 x 29/32” Stainless
Steel Button Head Screws
(8pcs) Lock
Washers – small
(8pcs) Washers
– small
(8pcs) ¼-20
Nuts
(8pcs) ¼ Lock
Washers
(8pcs) ¼ Washers
Horizontal Mounting Plate
6.6ft 3.5mm
Audio Cable
(2pcs) Vertical
Mounting Plates
(2pcs) Horizontal
Mount Standoffs
Extreme Sub ES08
Models: GDI-EXESW800...20
POWERSPORTS + GOLF CARS + MARINE
SUBWOOFER
User Guide
This manual suits for next models
1
Table of contents